在本文中,您将会了解到关于在Django中进行测试:TestCase类中的setUpClass,setUpTestData和setUp有什么区别?的新资讯,并给出一些关于android.test.An
在本文中,您将会了解到关于在Django中进行测试:TestCase类中的setUpClass,setUpTestData和setUp有什么区别?的新资讯,并给出一些关于android.test.AndroidTestCase中的方法setUp没有被模拟、Angular单元测试框架karma-jasmine里类似ABAP unit框架的setup和class_setup方法、Data Guard Physical Standby Setup in Oracle Database 11g Release 2、ez_setup.py(setuptools安装工具easy_install)的实用技巧。
本文目录一览:- 在Django中进行测试:TestCase类中的setUpClass,setUpTestData和setUp有什么区别?
- android.test.AndroidTestCase中的方法setUp没有被模拟
- Angular单元测试框架karma-jasmine里类似ABAP unit框架的setup和class_setup方法
- Data Guard Physical Standby Setup in Oracle Database 11g Release 2
- ez_setup.py(setuptools安装工具easy_install)

在Django中进行测试:TestCase类中的setUpClass,setUpTestData和setUp有什么区别?
之间有什么区别setUpClass,setUpTestData并且setUp在TestCase上课吗?
更具体地说,每种情况都有哪些用例?
到目前为止我所了解的:
setUpClass
- 在测试类中的所有测试之前,此方法运行一次
setUpTestData
- 如果数据库具有事务支持,则此方法运行一次。否则,它将在每次测试之前运行。
设定
- 此方法在测试类中的每个测试之前运行。
从我上面提到的理解来看,setUpTestData似乎位于setUpClass和setUp之间。为什么我们需要一个用于setuUpTestData的类级别方法,而通过其中之一setUpClass或setUp两者结合可以达到相同的效果?
答案1
小编典典编辑:Alasdair的评论后更新/更正
setUpClass
setUpClass用于执行类范围的初始化/配置(例如,创建连接,加载Web驱动程序)。setUpClass例如,使用打开数据库连接/会话时,可以使用tearDownClass它们来关闭它们。setUpClass在运行任何测试之前,都会为TestCase调用一次。tearDownClass在所有测试运行之后,类似地被调用。
文档说明:
SimpleTestCase及其子类(例如TestCase等)依靠setUpClass()和tearDownClass()来执行某些类范围的初始化(例如,覆盖设置)。如果您需要重写这些方法,请不要忘记调用超级实现:
setUpTestData
setUpTestData用于根据TestCase创建初始测试数据。此方法由TestCase.setUpClass()(src)调用setUpTestData如文档所述,一次被调用用于TestCase 。如果数据库不支持事务,setUpTestData将在每次测试运行之前调用(感谢@Alasdair纠正我)
设定
setUp将在每次测试运行之前被调用,并应用于为每次测试运行准备测试数据集。
使用setUpTestData可以提高测试性能,请注意,在测试中对该数据的更改将在不同的测试运行之间持续存在。如果需要重新加载,可以通过setUp方法完成。如果用于运行测试的数据库不支持事务,则性能提升setUpTestData将被否定(在每次测试运行之前将被称为)

android.test.AndroidTestCase中的方法setUp没有被模拟
我按照 http://tools.android.com/tech-docs/unit-testing-support上的说明进行操作.那里的描述明确提到了’Method … not mocked’错误,并建议将以下内容放入build.gradle:
android {
  // ...
  testOptions {
    unitTests.returnDefaultValues = true
  }
}
这可以在从命令行启动时运行测试
gradlew test --continue
但是当我使用rightclick从Android Studio运行测试类时 – >跑.这样,我又得到了同样的错误:
java.lang.RuntimeException: Method setUp in android.test.AndroidTestCase not mocked. See https://sites.google.com/a/android.com/tools/tech-docs/unit-testing-support for details.
    at android.test.AndroidTestCase.setUp(AndroidTestCase.java)
    at org.junit.internal.runners.JUnit38ClassRunner.run(JUnit38ClassRunner.java:86)
    at org.junit.runner.JUnitCore.run(JUnitCore.java:137)
    at com.intellij.junit4.JUnit4IdeaTestRunner.startRunnerWithArgs(JUnit4IdeaTestRunner.java:74)
    at com.intellij.rt.execution.junit.JUnitStarter.prepareStreamsAndStart(JUnitStarter.java:211)
    at com.intellij.rt.execution.junit.JUnitStarter.main(JUnitStarter.java:67)
    at sun.reflect.NativeMethodAccessorImpl.invoke0(Native Method)
    at sun.reflect.NativeMethodAccessorImpl.invoke(NativeMethodAccessorImpl.java:57)
    at com.intellij.rt.execution.application.AppMain.main(AppMain.java:134)
关于如何解决这个问题的任何想法?
编辑:测试类的内容并不重要,因为测试的setUp失败,我尝试了最简单的类:
public class ContactFormToolTest extends AndroidTestCase {

    public void testSOmething(){
        assertEquals(false,true);
    }
}
也尝试重写setUp,没有任何区别.
解决方法
AndroidTestCase用于使用真正的Android SDK运行测试.
因此,您的问题是您正在尝试运行依赖于Android SDK的AndroidTestCase,但您的测试运行器正在启动单元测试环境,该环境使用假的Android SDK而不是真实的SDK.
你需要选择一种方法.如果你想要一个纯单元测试,那么你可能应该使用JUnit 4测试类而不是AndroidTestCase.更多说明:
https://developer.android.com/training/testing/unit-testing/local-unit-tests.html#build

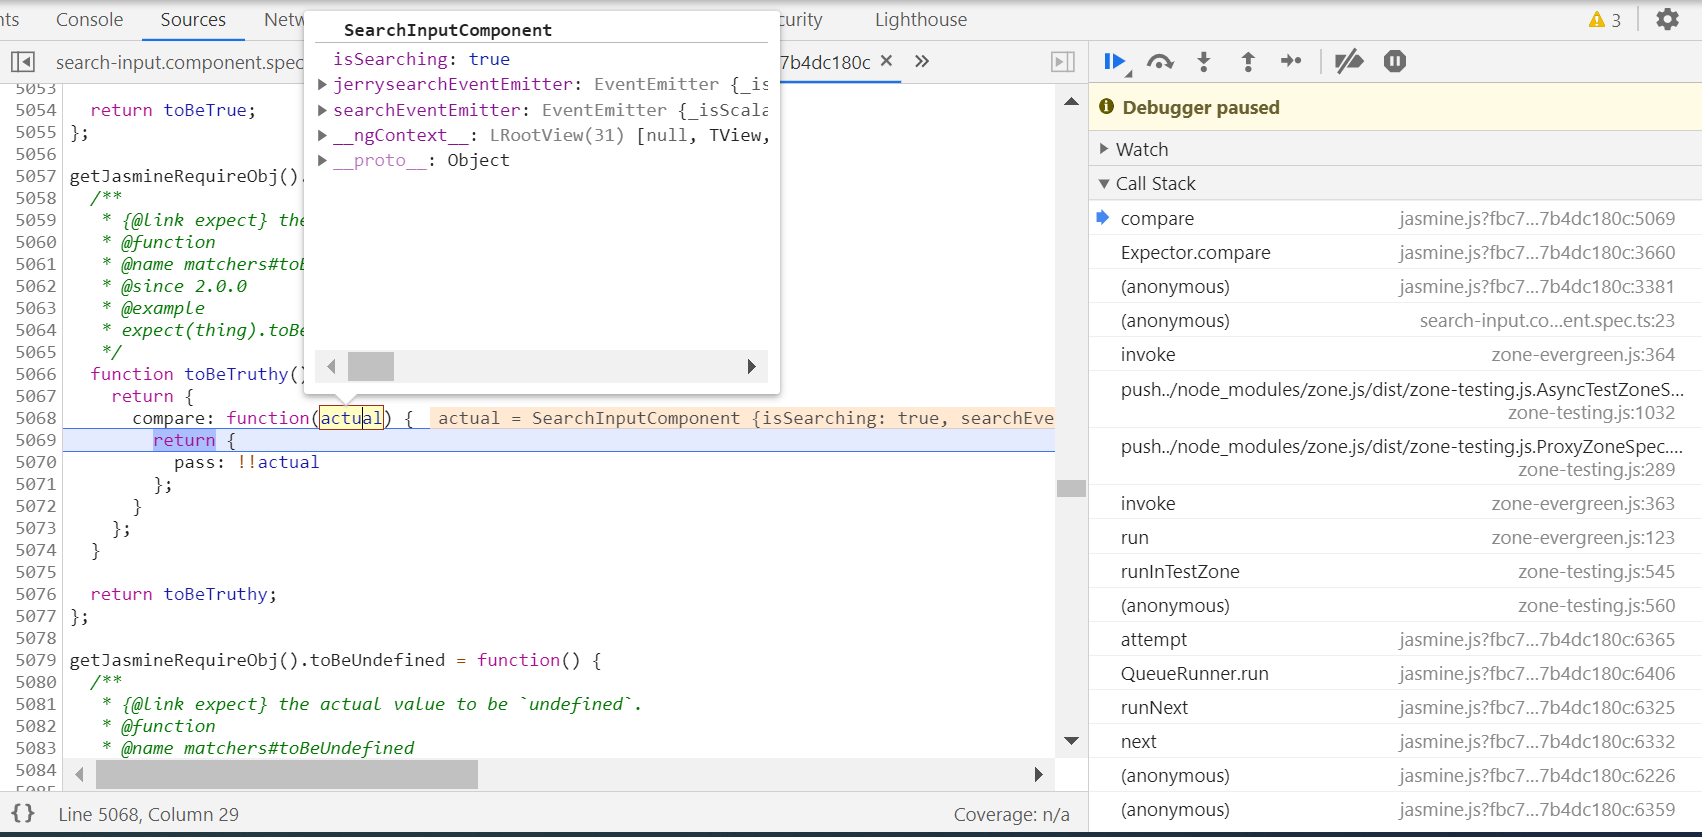
Angular单元测试框架karma-jasmine里类似ABAP unit框架的setup和class_setup方法
类似ABAP unit框架的setup和class_setup方法:
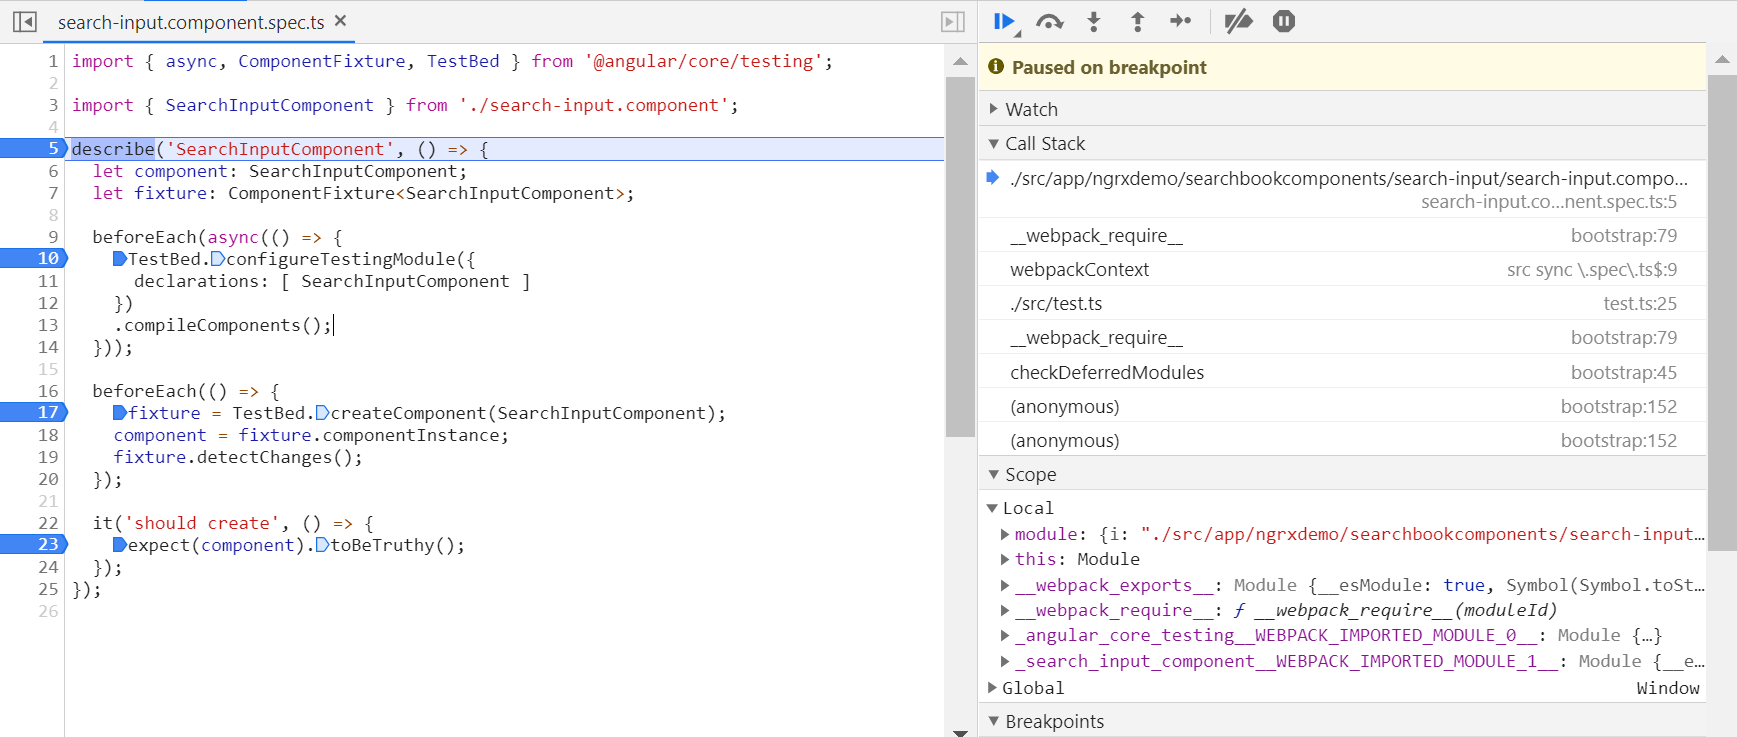
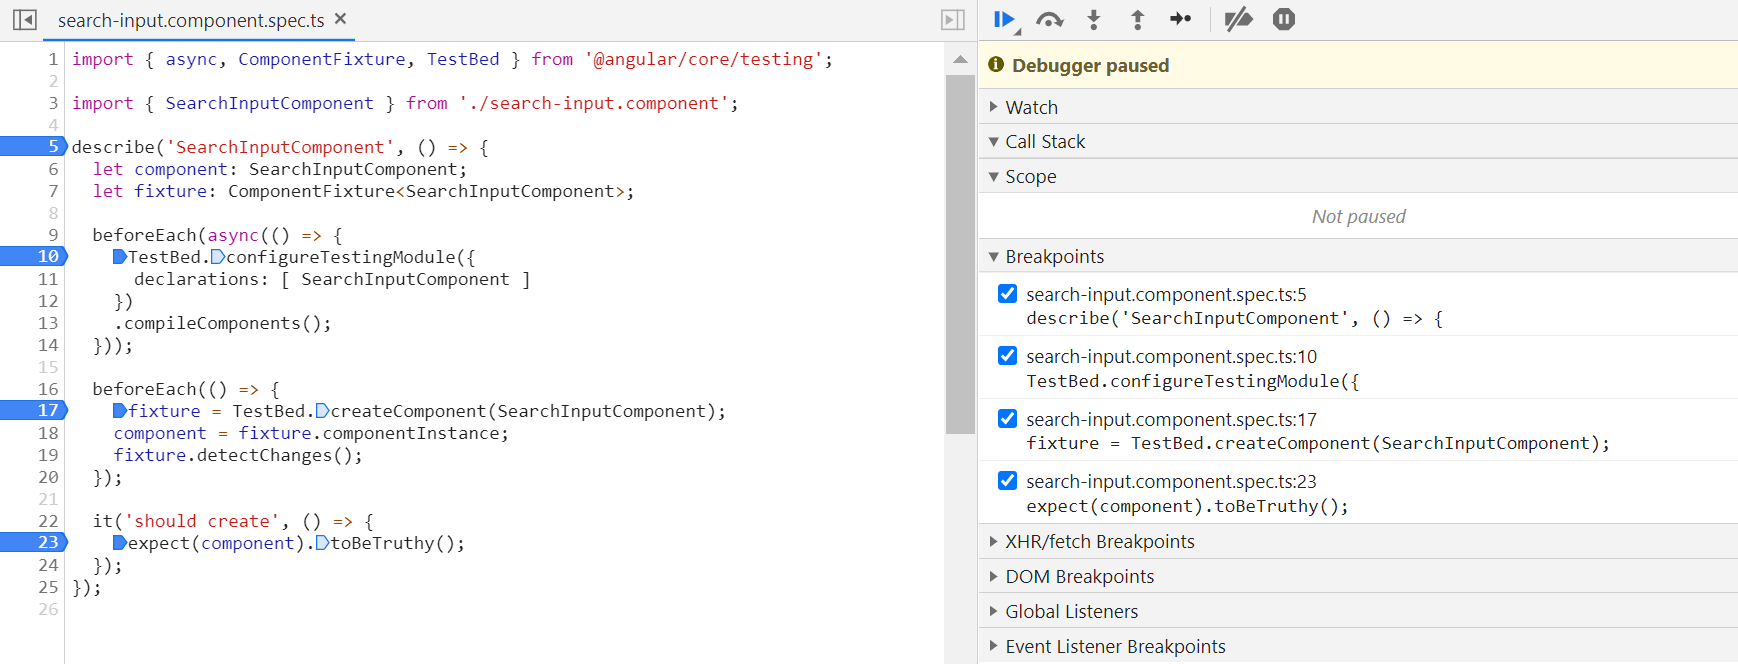
使用TestBed的工厂方法创建Component:
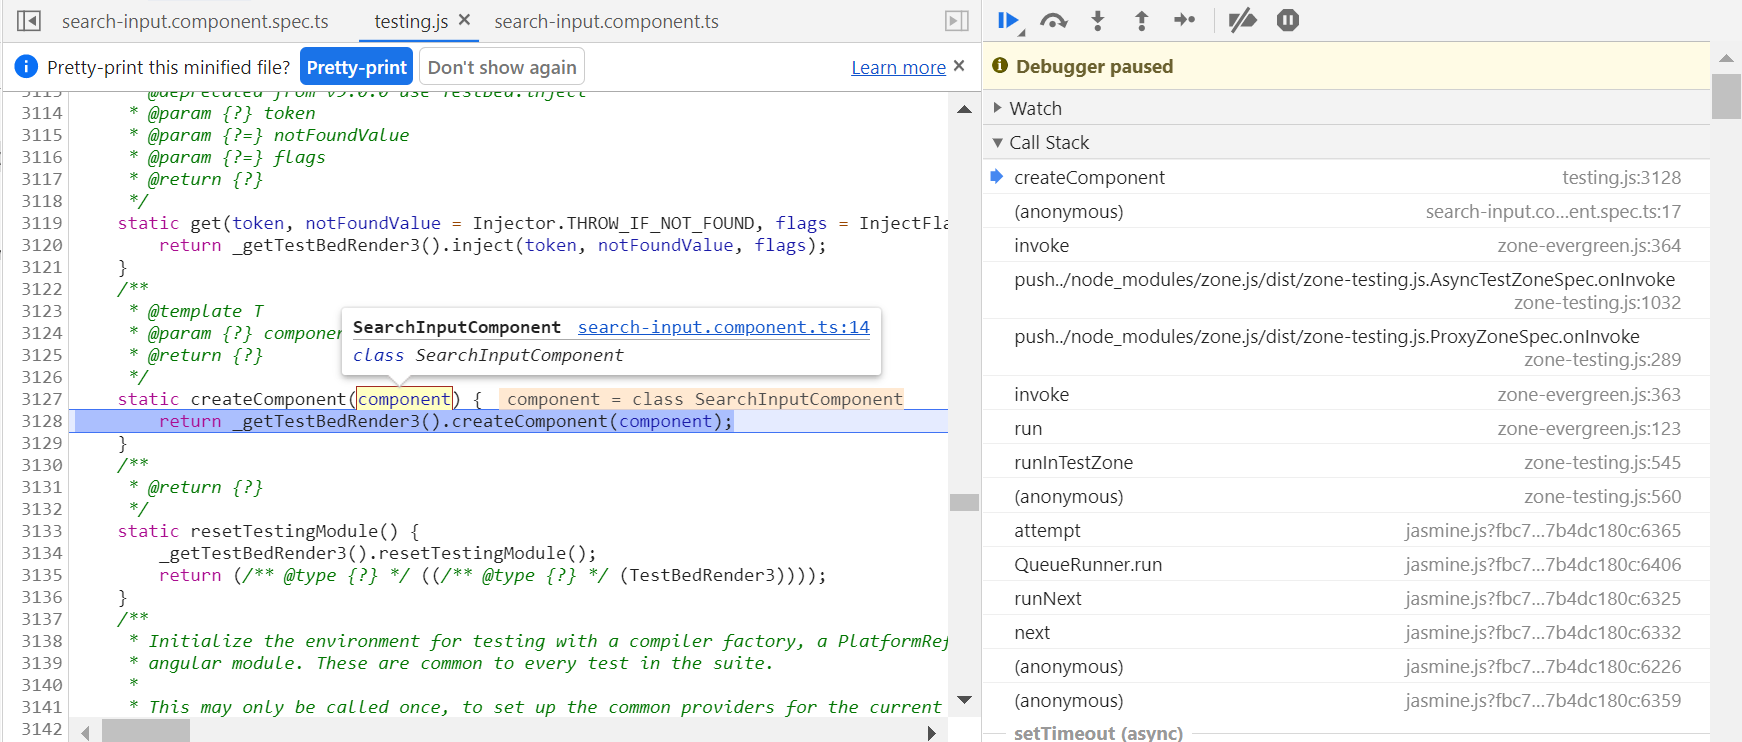
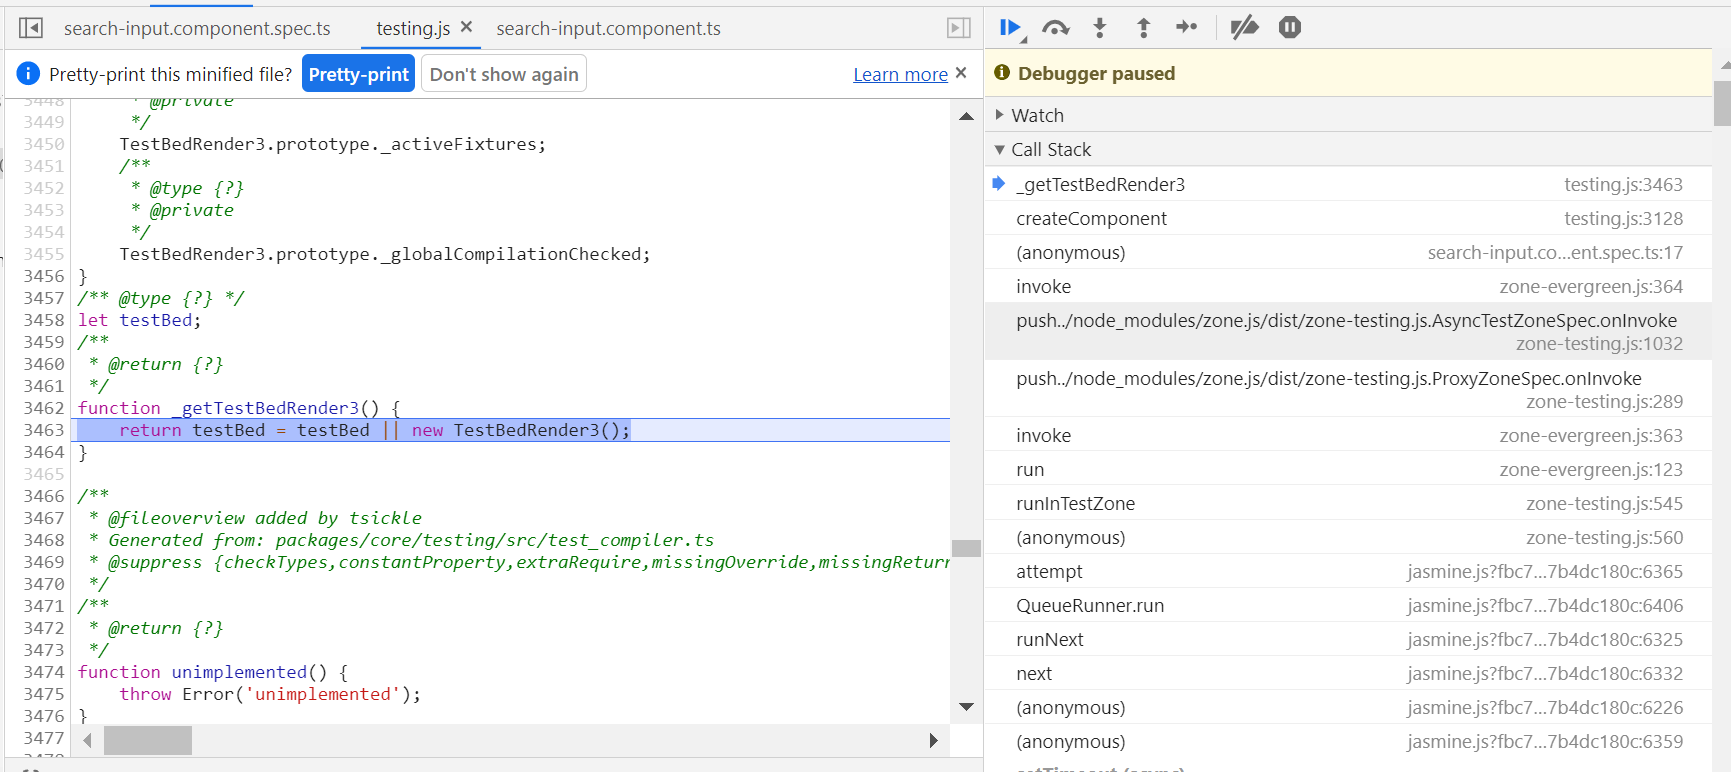
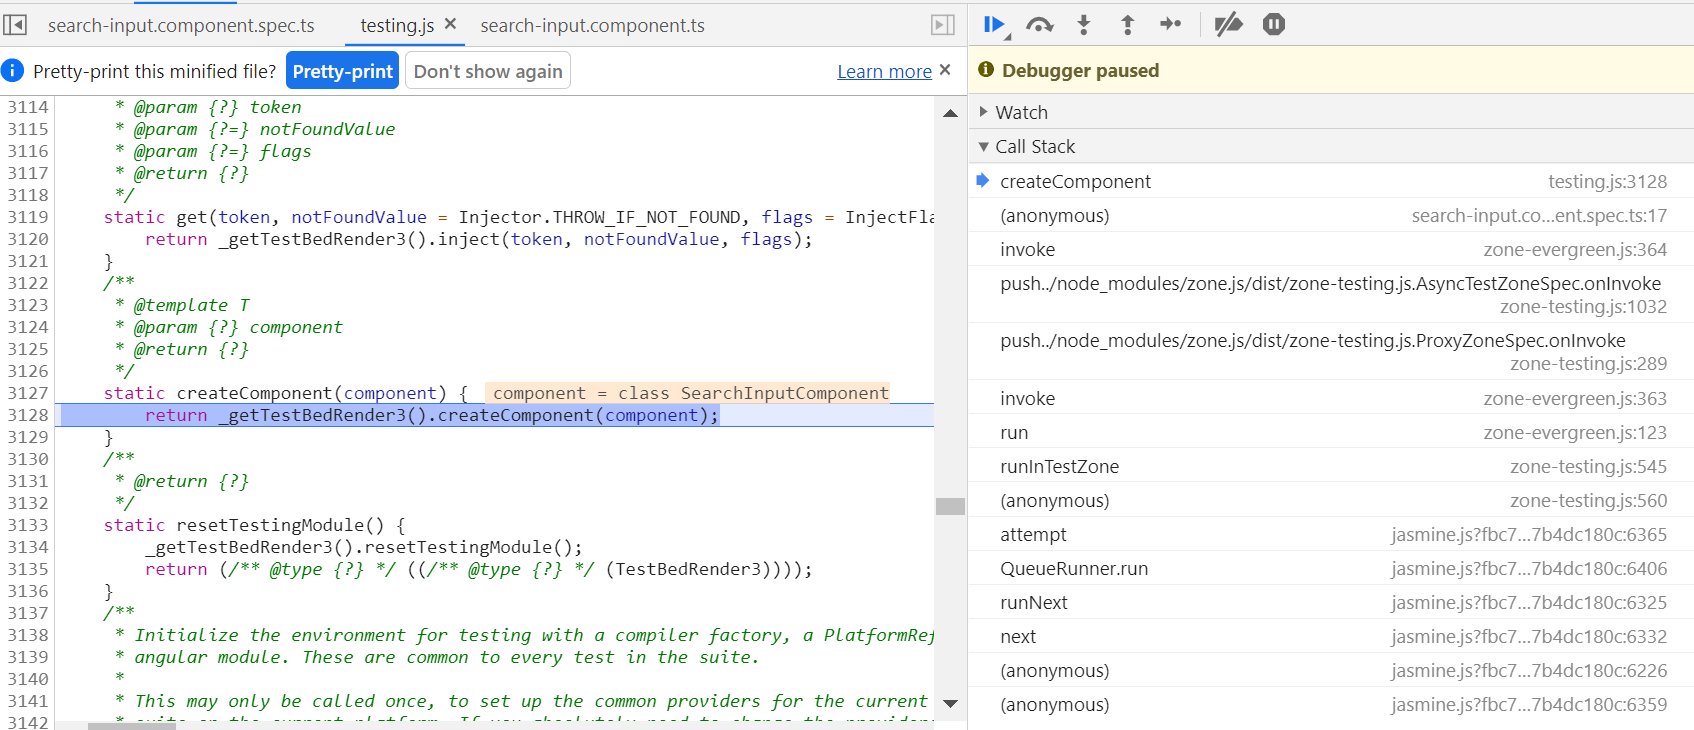
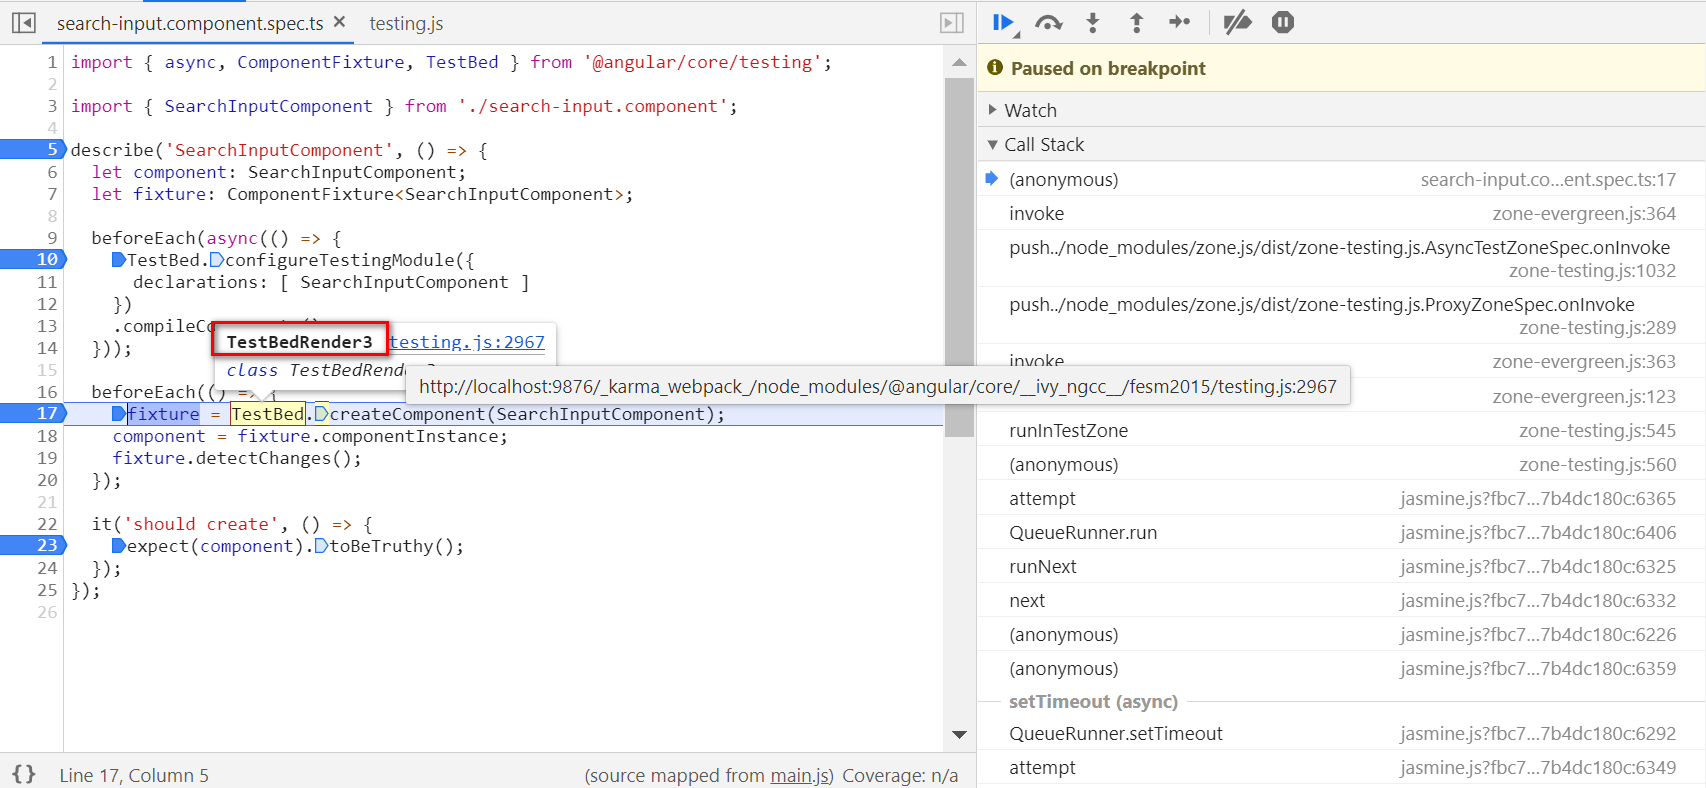
最后使用工厂方法新建Component实例:
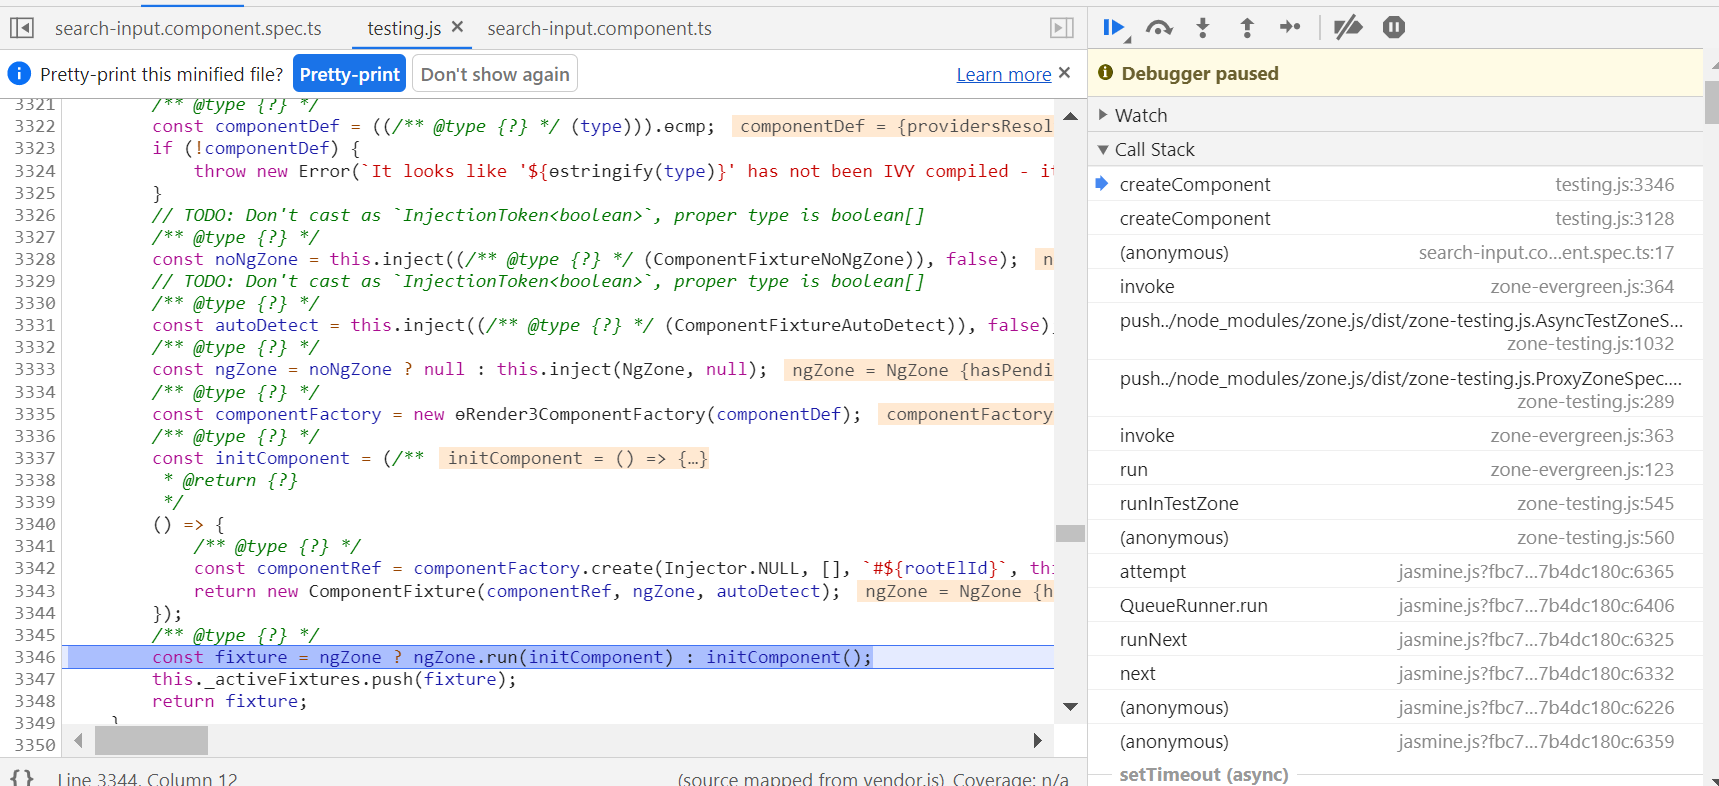
创建好的Component实例如下:
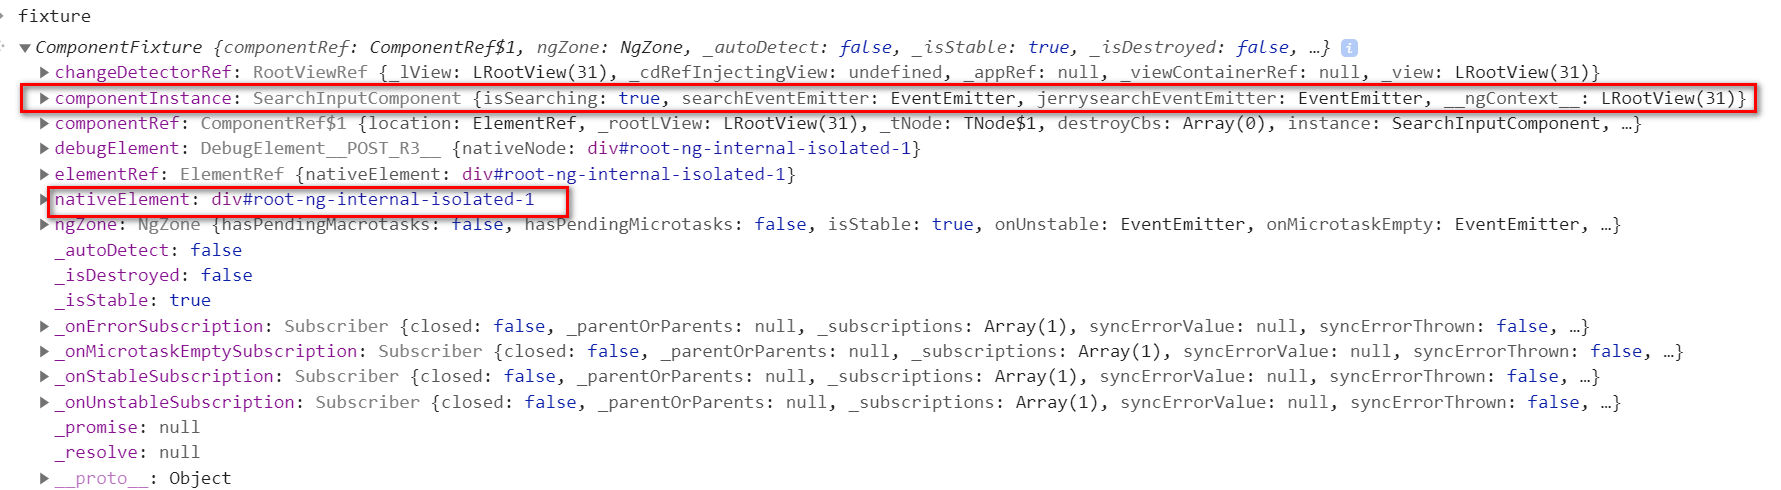
toBeTruthy的实现:
要获取更多Jerry的原创文章,请关注公众号"汪子熙":

本文同步分享在 博客“汪子熙”(CSDN)。
如有侵权,请联系 support@oschina.cn 删除。
本文参与“OSC源创计划”,欢迎正在阅读的你也加入,一起分享。

Data Guard Physical Standby Setup in Oracle Database 11g Release 2
Home » Articles » 11g » Here
Data Guard Physical Standby Setup in Oracle Database 11g Release 2
Data Guard is the name for Oracle''s standby database solution, used for disaster recovery and high availability. This article contains an updated version of the 9i physical standby setup method posted here.
You should probably be using the Data Guard Broker to configure and manage your standby database, as described here.
- Assumptions
- Primary Server Setup
- Logging
- Initialization Parameters
- Service Setup
- Backup Primary Database
- Create Standby Controlfile and PFILE
- Standby Server Setup (Manual)
- Copy Files
- Start Listener
- Restore Backup
- Create Redo Logs
- Standby Server Setup (DUPLICATE)
- Copy Files
- Start Listener
- Create Standby Redo Logs on Primary Server
- Create Standby using DUPLICATE
- Start Apply Process
- Test Log Transport
- Protection Mode
- Database Switchover
- Failover
- Flashback Database
- Read-Only Standby and Active Data Guard
- Snapshot Standby
Related articles.
- Data Guard Physical Standby Setup Using the Data Guard Broker in Oracle Database 11g Release 2
- Data Guard Physical Standby Setup Using the Data Guard Broker in Oracle Database 12c Release 1
- Data Guard (9i)
- Data Guard (11gR2) Setup using Oracle Grid Control
Assumptions
- You have two servers (physical or VMs) with an operating system and Oracle installed on them. In this case I''ve used Oracle Linux 5.6 and Oracle Database 11.2.0.2.
- The primary server has a running instance.
- The standby server has a software only installation.
Primary Server Setup
Logging
Check that the primary database is in archivelog mode.
SELECT log_mode FROM v$database;

LOG_MODE
------------
NOARCHIVELOG

SQL>
If it is noarchivelog mode, switch is to archivelog mode.
SHUTDOWN IMMEDIATE;
STARTUP MOUNT;
ALTER DATABASE ARCHIVELOG;
ALTER DATABASE OPEN;
Enabled forced logging by issuing the following command.
ALTER DATABASE FORCE LOGGING;
Initialization Parameters
Check the setting for the DB_NAME and DB_UNIQUE_NAME parameters. In this case they are both set to "DB11G" on the primary database.
SQL> show parameter db_name

NAME				     TYPE	 VALUE
------------------------------------ ----------- ------------------------------
db_name 			     string	 DB11G

SQL> show parameter db_unique_name

NAME				     TYPE	 VALUE
------------------------------------ ----------- ------------------------------
db_unique_name			     string	 DB11G

SQL>
The DB_NAME of the standby database will be the same as that of the primary, but it must have a different DB_UNIQUE_NAME value. The DB_UNIQUE_NAME values of the primary and standby database should be used in the DG_CONFIG setting of the LOG_ARCHIVE_CONFIG parameter. For this example, the standby database will have the value "DB11G_STBY".
ALTER SYSTEM SET LOG_ARCHIVE_CONFIG=''DG_CONFIG=(DB11G,DB11G_STBY)'';
Set suitable remote archive log destinations. In this case I''m using the fast recovery area for the local location, but you could specify an location explicitly if you prefer. Notice the SERVICE and the DB_UNIQUE_NAME for the remote location reference the standby location.
ALTER SYSTEM SET LOG_ARCHIVE_DEST_2=''SERVICE=db11g_stby NOAFFIRM ASYNC VALID_FOR=(ONLINE_LOGFILES,PRIMARY_ROLE) DB_UNIQUE_NAME=DB11G_STBY'';
ALTER SYSTEM SET LOG_ARCHIVE_DEST_STATE_2=ENABLE;
The LOG_ARCHIVE_FORMAT and LOG_ARCHIVE_MAX_PROCESSES parameters must be set to appropriate values and the REMOTE_LOGIN_PASSWORDFILE must be set to exclusive.
ALTER SYSTEM SET LOG_ARCHIVE_FORMAT=''%t_%s_%r.arc'' SCOPE=SPFILE;
ALTER SYSTEM SET LOG_ARCHIVE_MAX_PROCESSES=30;
ALTER SYSTEM SET REMOTE_LOGIN_PASSWORDFILE=EXCLUSIVE SCOPE=SPFILE;
In addition to the previous setting, it is recommended to make sure the primary is ready to switch roles to become a standby. For that to work properly we need to set the following parameters. Adjust the *_CONVERT parameters to account for your filename and path differences between the servers.
ALTER SYSTEM SET FAL_SERVER=DB11G_STBY;
--ALTER SYSTEM SET DB_FILE_NAME_CONVERT=''DB11G_STBY'',''DB11G'' SCOPE=SPFILE;
--ALTER SYSTEM SET LOG_FILE_NAME_CONVERT=''DB11G_STBY'',''DB11G''  SCOPE=SPFILE;
ALTER SYSTEM SET STANDBY_FILE_MANAGEMENT=AUTO;
Remember, some of the parameters are not modifiable, so the database will need to be restarted before they take effect.
Service Setup
Entries for the primary and standby databases are needed in the "$ORACLE_HOME/network/admin/tnsnames.ora" files on both servers. You can create these using the Network Configuration Utility (netca) or manually. The following entries were used during this setup.
DB11G =
  (DESCRIPTION =
    (ADDRESS_LIST =
      (ADDRESS = (PROTOCOL = TCP)(HOST = ol5-112-dga1)(PORT = 1521))
    )
    (CONNECT_DATA =
      (SERVICE_NAME = DB11G.WORLD)
    )
  )

DB11G_STBY =
  (DESCRIPTION =
    (ADDRESS_LIST =
      (ADDRESS = (PROTOCOL = TCP)(HOST = ol5-112-dga2)(PORT = 1521))
    )
    (CONNECT_DATA =
      (SERVICE_NAME = DB11G.WORLD)
    )
  )
Backup Primary Database
If you are planning to use an active duplicate to create the standby database, then this step is unnecessary. For a backup-based duplicate, or a manual restore, take a backup of the primary database.
$ rman target=/

RMAN> BACKUP DATABASE PLUS ARCHIVELOG;
Create Standby Controlfile and PFILE
Create a controlfile for the standby database by issuing the following command on the primary database.
ALTER DATABASE CREATE STANDBY CONTROLFILE AS ''/tmp/db11g_stby.ctl'';
Create a parameter file for the standby database.
CREATE PFILE=''/tmp/initDB11G_stby.ora'' FROM SPFILE;
Amend the PFILE making the entries relevant for the standby database. I''m making a replica of the original server, so in my case I only had to amend the following parameters.
*.db_unique_name=''DB11G_STBY''
*.fal_server=''DB11G''
*.log_archive_dest_2=''SERVICE=db11g ASYNC VALID_FOR=(ONLINE_LOGFILES,PRIMARY_ROLE) DB_UNIQUE_NAME=DB11G''
Standby Server Setup (Manual)
Copy Files
Create the necessary directories on the standby server.
$ mkdir -p /u01/app/oracle/oradata/DB11G
$ mkdir -p /u01/app/oracle/fast_recovery_area/DB11G
$ mkdir -p /u01/app/oracle/admin/DB11G/adump
Copy the files from the primary to the standby server.
$ # Standby controlfile to all locations.
$ scp oracle@ol5-112-dga1:/tmp/db11g_stby.ctl /u01/app/oracle/oradata/DB11G/control01.ctl
$ cp /u01/app/oracle/oradata/DB11G/control01.ctl /u01/app/oracle/fast_recovery_area/DB11G/control02.ctl

$ # Archivelogs and backups
$ scp -r oracle@ol5-112-dga1:/u01/app/oracle/fast_recovery_area/DB11G/archivelog /u01/app/oracle/fast_recovery_area/DB11G
$ scp -r oracle@ol5-112-dga1:/u01/app/oracle/fast_recovery_area/DB11G/backupset /u01/app/oracle/fast_recovery_area/DB11G

$ # Parameter file.
$ scp oracle@ol5-112-dga1:/tmp/initDB11G_stby.ora /tmp/initDB11G_stby.ora

$ # Remote login password file.
$ scp oracle@ol5-112-dga1:$ORACLE_HOME/dbs/orapwDB11G $ORACLE_HOME/dbs
Notice, the backups were copied across to the standby server as part of the FRA copy. If your backups are not held within the FRA, you must make sure you copy them to the standby server and make them available from the same path as used on the primary server.
Start Listener
Make sure the listener is started on the standby server.
$ lsnrctl start
Restore Backup
Create the SPFILE form the amended PFILE.
$ export ORACLE_SID=DB11G
$ sqlplus / as sysdba

SQL> CREATE SPFILE FROM PFILE=''/tmp/initDB11G_stby.ora'';
Restore the backup files.
$ export ORACLE_SID=DB11G
$ rman target=/

RMAN> STARTUP MOUNT;
RMAN> RESTORE DATABASE;
Create Redo Logs
Create online redo logs for the standby. It''s a good idea to match the configuration of the primary server.
ALTER SYSTEM SET STANDBY_FILE_MANAGEMENT=MANUAL;
ALTER DATABASE ADD LOGFILE (''/u01/app/oracle/oradata/DB11G/online_redo01.log'') SIZE 50M;
ALTER DATABASE ADD LOGFILE (''/u01/app/oracle/oradata/DB11G/online_redo02.log'') SIZE 50M;
ALTER DATABASE ADD LOGFILE (''/u01/app/oracle/oradata/DB11G/online_redo03.log'') SIZE 50M;
ALTER SYSTEM SET STANDBY_FILE_MANAGEMENT=AUTO;
In addition to the online redo logs, you should create standby redo logs on both the standby and the primary database (in case of switchovers). The standby redo logs should be at least as big as the largest online redo log and there should be one extra group per thread compared the online redo logs. In my case, the following standby redo logs must be created on both servers.
ALTER DATABASE ADD STANDBY LOGFILE (''/u01/app/oracle/oradata/DB11G/standby_redo01.log'') SIZE 50M;
ALTER DATABASE ADD STANDBY LOGFILE (''/u01/app/oracle/oradata/DB11G/standby_redo02.log'') SIZE 50M;
ALTER DATABASE ADD STANDBY LOGFILE (''/u01/app/oracle/oradata/DB11G/standby_redo03.log'') SIZE 50M;
ALTER DATABASE ADD STANDBY LOGFILE (''/u01/app/oracle/oradata/DB11G/standby_redo04.log'') SIZE 50M;
Once this is complete, we can start the apply process.
Standby Server Setup (DUPLICATE)
Copy Files
Create the necessary directories on the standby server.
$ mkdir -p /u01/app/oracle/oradata/DB11G
$ mkdir -p /u01/app/oracle/fast_recovery_area/DB11G
$ mkdir -p /u01/app/oracle/admin/DB11G/adump
Copy the files from the primary to the standby server.
$ # Standby controlfile to all locations.
$ scp oracle@ol5-112-dga1:/tmp/db11g_stby.ctl /u01/app/oracle/oradata/DB11G/control01.ctl
$ cp /u01/app/oracle/oradata/DB11G/control01.ctl /u01/app/oracle/fast_recovery_area/DB11G/control02.ctl

$ # Parameter file.
$ scp oracle@ol5-112-dga1:/tmp/initDB11G_stby.ora /tmp/initDB11G_stby.ora

$ # Remote login password file.
$ scp oracle@ol5-112-dga1:$ORACLE_HOME/dbs/orapwDB11G $ORACLE_HOME/dbs
Start Listener
When using active duplicate, the standby server requires static listener configuration in a "listener.ora" file. In this case I used the following configuration.
SID_LIST_LISTENER =
  (SID_LIST =
    (SID_DESC =
      (GLOBAL_DBNAME = DB11G.WORLD)
      (ORACLE_HOME = /u01/app/oracle/product/11.2.0/db_1)
      (SID_NAME = DB11G)
    )
  )

LISTENER =
  (DESCRIPTION_LIST =
    (DESCRIPTION =
      (ADDRESS = (PROTOCOL = TCP)(HOST = ol5-112-dga2.localdomain)(PORT = 1521))
    )
    (DESCRIPTION =
      (ADDRESS = (PROTOCOL = IPC)(KEY = EXTPROC1521))
    )
  )

ADR_BASE_LISTENER = /u01/app/oracle
Make sure the listener is started on the standby server.
$ lsnrctl start
Create Standby Redo Logs on Primary Server
The DUPLICATE command automatically creates the standby redo logs on the standby. To make sure the primary database is configured for switchover, we must create the standby redo logs on the primary server.
ALTER DATABASE ADD STANDBY LOGFILE (''/u01/app/oracle/oradata/DB11G/standby_redo01.log'') SIZE 50M;
ALTER DATABASE ADD STANDBY LOGFILE (''/u01/app/oracle/oradata/DB11G/standby_redo02.log'') SIZE 50M;
ALTER DATABASE ADD STANDBY LOGFILE (''/u01/app/oracle/oradata/DB11G/standby_redo03.log'') SIZE 50M;
ALTER DATABASE ADD STANDBY LOGFILE (''/u01/app/oracle/oradata/DB11G/standby_redo04.log'') SIZE 50M;
Create Standby Using DUPLICATE
Start the auxillary instance on the standby server by starting it using the temporary "init.ora" file.
$ export ORACLE_SID=DB11G
$ sqlplus / as sysdba

SQL> STARTUP NOMOUNT PFILE=''/tmp/initDB11G_stby.ora'';
Connect to RMAN, specifying a full connect string for both the TARGET and AUXILLARY instances. DO not attempt to use OS authentication.
$ rman TARGET sys/password@DB11G AUXILIARY sys/password@DB11G_STBY
Now issue the following DUPLICATE command.
DUPLICATE TARGET DATABASE
  FOR STANDBY
  FROM ACTIVE DATABASE
  DORECOVER
  SPFILE
    SET db_unique_name=''DB11G_STBY'' COMMENT ''Is standby''
    SET LOG_ARCHIVE_DEST_2=''SERVICE=db11g ASYNC VALID_FOR=(ONLINE_LOGFILES,PRIMARY_ROLE) DB_UNIQUE_NAME=DB11G''
    SET FAL_SERVER=''DB11G'' COMMENT ''Is primary''
  NOFILENAMECHECK;
A brief explanation of the individual clauses is shown below.
FOR STANDBY: This tells theDUPLICATEcommand is to be used for a standby, so it will not force a DBID change.FROM ACTIVE DATABASE: TheDUPLICATEwill be created directly from the source datafile, without an additional backup step.DORECOVER: TheDUPLICATEwill include the recovery step, bringing the standby up to the current point in time.SPFILE: Allows us to reset values in the spfile when it is copied from the source server.NOFILENAMECHECK: Destination file locations are not checked.
Once the command is complete, we can start the apply process.
Start Apply Process
Start the apply process on standby server.
# Foreground redo apply. Session never returns until cancel.
ALTER DATABASE RECOVER MANAGED STANDBY DATABASE;

# Background redo apply. Control is returned to the session once the apply process is started.
ALTER DATABASE RECOVER MANAGED STANDBY DATABASE DISCONNECT FROM SESSION;
If you need to cancel the apply process, issue the following command.
ALTER DATABASE RECOVER MANAGED STANDBY DATABASE CANCEL;
If you prefer, you can set a delay between the arrival of the archived redo log and it being applied on the standby server using the following commands.
ALTER DATABASE RECOVER MANAGED STANDBY DATABASE CANCEL;
ALTER DATABASE RECOVER MANAGED STANDBY DATABASE DELAY 30 DISCONNECT FROM SESSION;

ALTER DATABASE RECOVER MANAGED STANDBY DATABASE CANCEL;
ALTER DATABASE RECOVER MANAGED STANDBY DATABASE NODELAY DISCONNECT FROM SESSION;
Provided you have configured standby redo logs, you can start real-time apply using the following command.
ALTER DATABASE RECOVER MANAGED STANDBY DATABASE USING CURRENT LOGFILE;
Test Log Transport
On the primary server, check the latest archived redo log and force a log switch.
ALTER SESSION SET nls_date_format=''DD-MON-YYYY HH24:MI:SS'';

SELECT sequence#, first_time, next_time
FROM   v$archived_log
ORDER BY sequence#;

ALTER SYSTEM SWITCH LOGFILE;
Check the new archived redo log has arrived at the standby server and been applied.
ALTER SESSION SET nls_date_format=''DD-MON-YYYY HH24:MI:SS'';

SELECT sequence#, first_time, next_time, applied
FROM   v$archived_log
ORDER BY sequence#;
Protection Mode
There are three protection modes for the primary database:
- Maximum Availability: Transactions on the primary do not commit until redo information has been written to the online redo log and the standby redo logs of at least one standby location. If no standby location is available, it acts in the same manner as maximum performance mode until a standby becomes available again.
- Maximum Performance: Transactions on the primary commit as soon as redo information has been written to the online redo log. Transfer of redo information to the standby server is asynchronous, so it does not impact on performance of the primary.
- Maximum Protection: Transactions on the primary do not commit until redo information has been written to the online redo log and the standby redo logs of at least one standby location. If not suitable standby location is available, the primary database shuts down.
By default, for a newly created standby database, the primary database is in maximum performance mode.
SELECT protection_mode FROM v$database;

PROTECTION_MODE
--------------------
MAXIMUM PERFORMANCE

SQL>
The mode can be switched using the following commands. Note the alterations in the redo transport attributes.
-- Maximum Availability.
ALTER SYSTEM SET LOG_ARCHIVE_DEST_2=''SERVICE=db11g_stby AFFIRM SYNC VALID_FOR=(ONLINE_LOGFILES,PRIMARY_ROLE) DB_UNIQUE_NAME=DB11G_STBY'';
ALTER DATABASE SET STANDBY DATABASE TO MAXIMIZE AVAILABILITY;

-- Maximum Performance.
ALTER SYSTEM SET LOG_ARCHIVE_DEST_2=''SERVICE=db11g_stby NOAFFIRM ASYNC VALID_FOR=(ONLINE_LOGFILES,PRIMARY_ROLE) DB_UNIQUE_NAME=DB11G_STBY'';
ALTER DATABASE SET STANDBY DATABASE TO MAXIMIZE PERFORMANCE;

-- Maximum Protection.
ALTER SYSTEM SET LOG_ARCHIVE_DEST_2=''SERVICE=db11g_stby AFFIRM SYNC VALID_FOR=(ONLINE_LOGFILES,PRIMARY_ROLE) DB_UNIQUE_NAME=DB11G_STBY'';
SHUTDOWN IMMEDIATE;
STARTUP MOUNT;
ALTER DATABASE SET STANDBY DATABASE TO MAXIMIZE PROTECTION;
ALTER DATABASE OPEN;
Database Switchover
A database can be in one of two mutually exclusive modes (primary or standby). These roles can be altered at runtime without loss of data or resetting of redo logs. This process is known as a Switchover and can be performed using the following statements.
-- Convert primary database to standby
CONNECT / AS SYSDBA
ALTER DATABASE COMMIT TO SWITCHOVER TO STANDBY;

-- Shutdown primary database
SHUTDOWN IMMEDIATE;

-- Mount old primary database as standby database
STARTUP NOMOUNT;
ALTER DATABASE MOUNT STANDBY DATABASE;
ALTER DATABASE RECOVER MANAGED STANDBY DATABASE DISCONNECT FROM SESSION;
On the original standby database issue the following commands.
-- Convert standby database to primary
CONNECT / AS SYSDBA
ALTER DATABASE COMMIT TO SWITCHOVER TO PRIMARY;

-- Shutdown standby database
SHUTDOWN IMMEDIATE;

-- Open old standby database as primary
STARTUP;
Once this is complete, test the log transport as before. If everything is working fine, switch the primary database back to the original server by doing another switchover. This is known as a switchback.
Failover
If the primary database is not available the standby database can be activated as a primary database using the following statements.
ALTER DATABASE RECOVER MANAGED STANDBY DATABASE FINISH;
ALTER DATABASE ACTIVATE STANDBY DATABASE;
Since the standby database is now the primary database it should be backed up immediately.
The original primary database can now be configured as a standby. If Flashback Database was enabled on the primary database, then this can be done relatively easily (shown here). If not, the whole setup process must be followed, but this time using the original primary server as the standby.
Flashback Database
It was already mentioned in the previous section, but it is worth drawing your attention to Flashback Database once more. Although a switchover/switchback is safe for both the primary and standby database, a failover renders the original primary database useless for converting to a standby database. If flashback database is not enabled, the original primary must be scrapped and recreated as a standby database.
An alternative is to enable flashback database on the primary (and the standby if desired) so in the event of a failover, the primary can be flashed back to the time before the failover and quickly converted to a standby database. That process is shown here.
Read-Only Standby and Active Data Guard
Once a standby database is configured, it can be opened in read-only mode to allow query access. This is often used to offload reporting to the standby server, thereby freeing up resources on the primary server. When open in read-only mode, archive log shipping continues, but managed recovery is stopped, so the standby database becomes increasingly out of date until managed recovery is resumed.
To switch the standby database into read-only mode, do the following.
SHUTDOWN IMMEDIATE;
STARTUP MOUNT;
ALTER DATABASE OPEN READ ONLY;
To resume managed recovery, do the following.
SHUTDOWN IMMEDIATE;
STARTUP MOUNT;
ALTER DATABASE RECOVER MANAGED STANDBY DATABASE DISCONNECT FROM SESSION;
In 11g, Oracle introduced the Active Data Guard feature. This allows the standby database to be open in read-only mode, but still apply redo information. This means a standby can be available for querying, yet still be up to date. There are licensing implications for this feature, but the following commands show how active data guard can be enabled.
SHUTDOWN IMMEDIATE;
STARTUP MOUNT;
ALTER DATABASE OPEN READ ONLY;
ALTER DATABASE RECOVER MANAGED STANDBY DATABASE DISCONNECT FROM SESSION;
Since managed recovery continues with active data guard, there is no need to switch back to managed recovery from read-only mode in this case.
Snapshot Standby
Introduced in 11g, snapshot standby allows the standby database to be opened in read-write mode. When switched back into standby mode, all changes made whilst in read-write mode are lost. This is achieved using flashback database, but the standby database does not need to have flashback database explicitly enabled to take advantage of this feature, thought it works just the same if it is.
If you are using RAC, turn off all but one of the RAC instances. Make sure the instance is in MOUNT mode.
SHUTDOWN IMMEDIATE;
STARTUP MOUNT;
Make sure managed recovery is disabled.
ALTER DATABASE RECOVER MANAGED STANDBY DATABASE CANCEL;
Convert the standby to a snapshot standby. The following example queries the V$DATABASE view to show that flashback database is not enabled prior to the conversion operation.
SELECT flashback_on FROM v$database;

FLASHBACK_ON
------------------
NO

ALTER DATABASE CONVERT TO SNAPSHOT STANDBY;
ALTER DATABASE OPEN;
SELECT flashback_on FROM v$database;

FLASHBACK_ON
------------------
RESTORE POINT ONLY

SQL>
You can now do treat the standby like any read-write database.
To convert it back to the physical standby, losing all the changes made since the conversion to snapshot standby, issue the following commands.
SHUTDOWN IMMEDIATE;
STARTUP MOUNT;
ALTER DATABASE CONVERT TO PHYSICAL STANDBY;
SHUTDOWN IMMEDIATE;
STARTUP NOMOUNT;
ALTER DATABASE MOUNT STANDBY DATABASE;
ALTER DATABASE RECOVER MANAGED STANDBY DATABASE DISCONNECT;
SELECT flashback_on FROM v$database;

FLASHBACK_ON
------------------
NO

SQL>
The standby is once again in managed recovery and archivelog shipping is resumed. Notice that flashback database is still not enabled.
For more information see:
- Creating a Physical Standby Database
- Converting a Failed Primary Into a Standby Database Using Flashback Database
- Data Guard Physical Standby Setup Using the Data Guard Broker in Oracle Database 11g Release 2
- Data Guard Physical Standby Setup Using the Data Guard Broker in Oracle Database 12c Release 1
- Data Guard (9i)
- Data Guard (11gR2) Setup using Oracle Grid Control
- Step by Step Guide on Creating Physical Standby Using RMAN DUPLICATE...FROM ACTIVE DATABASE [ID 1075908.1]
")
ez_setup.py(setuptools安装工具easy_install)
wget http://peak.telecommunity.com/dist/ez_setup.py
python ez_setup.py
安装完成后就可以用easy_install安装python的库了,比如:
easy_install pip
今天关于在Django中进行测试:TestCase类中的setUpClass,setUpTestData和setUp有什么区别?的讲解已经结束,谢谢您的阅读,如果想了解更多关于android.test.AndroidTestCase中的方法setUp没有被模拟、Angular单元测试框架karma-jasmine里类似ABAP unit框架的setup和class_setup方法、Data Guard Physical Standby Setup in Oracle Database 11g Release 2、ez_setup.py(setuptools安装工具easy_install)的相关知识,请在本站搜索。
本文标签:


