关于android:整理drawable和shapdrawable的问题就给大家分享到这里,感谢你花时间阅读本站内容,更多关于Android-newBitmapDrawabledeprecated创建
关于android:整理drawable和shapdrawable的问题就给大家分享到这里,感谢你花时间阅读本站内容,更多关于Android - new BitmapDrawable deprecated 创建一个空白的 drawable、Android can''t convert StateListDrawable to BitmapDrawable、Android drawable:未知资源类型@ drawable-nodpi、Android ShapeDrawable 之 OvalShape、RectShape、PaintDrawable、ArcShape等相关知识的信息别忘了在本站进行查找喔。
本文目录一览:- android:整理drawable(shapdrawable)(二)(安卓应用整理)
- Android - new BitmapDrawable deprecated 创建一个空白的 drawable
- Android can''t convert StateListDrawable to BitmapDrawable
- Android drawable:未知资源类型@ drawable-nodpi
- Android ShapeDrawable 之 OvalShape、RectShape、PaintDrawable、ArcShape
(二)(安卓应用整理)")
android:整理drawable(shapdrawable)(二)(安卓应用整理)
前言
bitmapdrawable 与nithpathdrawable 完结,接下来是shapedrawable。
shapedrawable是使用频率最高的drawable 可见其重要性。
shapedrawable
shapedrawable 有 rectangle、oval、line、ring
分别对应 矩形、椭圆、横线、圆环。
矩形
先看一段:
<?xml version="1.0" encoding="utf-8"?>
<shape xmlns:android="http://schemas.android.com/apk/res/android"
    android:shape="rectangle"
    >
    <corners android:radius="20dp">
    </corners>
    <gradient
        android:angle="0"
        android:startColor="#008577"
        android:centerColor="#FFF200"
        android:endColor="#D81B60"
        >
    </gradient>
    <size
        android:height="100dp"
        android:width="100dp">
    </size>
</shape>
效果:

总结起来就4个字,华丽庸俗。
那就来介绍一下其中的作用:
android:shape:形状
corners android:radius="20dp" 边角20dp。
gradient:渐变
size:大小,有宽高两个属性。
那么重点就是:gradient,其他的都很简单易懂。
gradient 属性:
angle 表示渐变的角度,这个角度只能是45的倍数。

如果把角度比作是旋转,不如把角度比作灯光照射,如上图。
android:startColor="#008577" // 开始渐变的颜色
android:centerColor="#FFF200" // 中间渐变的颜色
android:endColor="#D81B60" // 结束渐变的颜色
在这上面还有一个重要的属性:centerX:
如图比较下:centerX:0.1

centerX:0.2

centerX:0.3

相信已经明白了这个属性的意思了。
渐变分为:线性渐变,径向渐变,以及扫描线渐变
上面就是线性的了。
看下径向的:
<gradient
    android:startColor="#008577"
    android:centerColor="#FFF200"
    android:endColor="#D81B60"
    android:gradienTradius="45dp"
    android:type="radial"
    >
</gradient>
其他不变替换gradient部分:

黄色的太阳,感觉有点科技感了。
关键部分,既然是径向变,其实就是gradienTradius要设置,毕竟要有半径的吧,设置gradienTradius="60dp"看下。

上图可看,其实就是中心点到黄色的圆环位置,设置100看下,这里为什么设置100呢?
<size
        android:height="100dp"
        android:width="100dp">
</size>
如图:

在加上另外两个有用的属性:
<gradient
    android:startColor="#008577"
    android:centerColor="#FFF200"
    android:endColor="#D81B60"
    android:gradienTradius="45dp"
    android:type="radial"
    android:centerX="0.1"
    android:centerY="0.5"
    >
</gradient>
效果:

如此可见,真的就非常明了了。
接下来就是sweep:这东西就诡异了。。。
<gradient
    android:startColor="#008577"
    android:centerColor="#FFF200"
    android:endColor="#D81B60"
    android:type="sweep"
    >
</gradient>
非常好,非常beautiful。
这里可以看到中心点在中间,那么可以遐想一下,是否可以改变其位置。

solid
关于solid 没什么好介绍的,solid就是设置color的,和gradient 是冲突的,android:color就可以设置其整体颜色。
stroke
我翻译过来是轻抚,其实就是border的意思。
加上:
<stroke
    android:width="2dp"
    android:color="@color/colorPrimary"
    >
效果:

加上2dp的绿色的框。
其他两个属性:dashWidth,dashGap
<stroke
    android:width="2dp"
    android:color="@color/colorPrimary"
    android:dashWidth="2dp"
    android:dashGap="2dp"
    >
这两个觉得了边框设置为虚线:

椭圆
设置一下type="oval",如下:

因为宽高都是相等的,所以是圆。
里面的属性一致,不多介绍。
横线
type 设置为type="line",如下:

就真的是条线了。
圆环
设置type="ring",然后修改code:
<?xml version="1.0" encoding="utf-8"?>
<shape xmlns:android="http://schemas.android.com/apk/res/android"
    android:shape="ring"
    android:useLevel="false"
    >
    <gradient
        android:centerColor="#ff0000"
        android:endColor="#0ff676"
        android:startColor="#B23AEE"
        android:useLevel="false" />
    <size
        android:height="100dp"
        android:width="100dp"
        ></size>
</shape>
如下:

| 值| 描述|
|-|-|
|android:innerRadius|圆的内半径,优先级高于android:innerRadiusRatio|
|android:innerRadiusRatio|圆的半径与drawable的比例,默认值为3,也就是宽度的1/3。如果是n的话,就是宽度/n|
|android:thickness| 圆环的厚度,外径-内径|
|android:thicknessRatio| 圆环的厚度的比例,默认值为9,占用1/9。如果是n的话,就是宽度/n|
现在可以看出上图圆环厚度,大概是1/3,因为分成9份,占用3份。
<?xml version="1.0" encoding="utf-8"?>
<shape xmlns:android="http://schemas.android.com/apk/res/android"
    android:shape="ring"
    android:innerRadiusRatio="3"
    android:thicknessRatio="9"
    android:useLevel="false"
    >
    <gradient
        android:centerColor="#ff0000"
        android:endColor="#0ff676"
        android:startColor="#B23AEE"
        android:useLevel="false" />
    <size
        android:height="100dp"
        android:width="100dp"
        />
</shape>
这样设置和刚才的效果一样,接下来就是自己的设计与审美了。
总结
shapeDrawable 分为rectangle,oval,line,ring。
总结如上述。。。。

Android - new BitmapDrawable deprecated 创建一个空白的 drawable
创建一个空白的 drawable
myPopupWindow.setBackgroundDrawable(new ColorDrawable(android.graphics.Color.TRANSPARENT));
I''ve used a PopupWindow. With this PopupWindow I set the BackgroundDrawable to an empty BitmapDrawable.
When I use the following code it gives a deprecated warning:
myPopupWindow.setBackgroundDrawable(new BitmapDrawable());So I changed it to:
myPopupWindow.setBackgroundDrawable(new BitmapDrawable( getApplicationContext().getResources(), Bitmap.createBitmap(0, 0, Bitmap.Config.ARGB_8888) ));This gave me an error that a Bitmap must have a width and height bigger than 0.
Right now I use:
myPopupWindow.setBackgroundDrawable(new BitmapDrawable( getApplicationContext().getResources(), Bitmap.createBitmap(1, 1, Bitmap.Config.ARGB_8888) ));And it works. But it just seems a bit wrong to use a 1x1 pixel Bitmap instead of a completely empty one like I want to. Is there another way to actually use an empty BitmapDrawable, instead of one that is 1 by 1 pixels?
|
2
down vote
accepted
|
Ok, instead of OR I just use a background-color that I want to set to the PopupWindow. So for example, one of my PopupWindows just had a few Images without margins in between them, so I just used a Transparent background for it: And for another one I wanted to use a white background anyway, so I''ve used: |
|
|

Android can''t convert StateListDrawable to BitmapDrawable
Bitmap icon = BitmapFactory.decodeResource(getResources(), R.drawable.xxxx)
如果 xxxx 是 selector 的话,会返回 null。
先是改成
Bitmap mSlideBitmap = ((BitmapDrawable) getResources().getDrawable(R.drawable.xxx)).getBitmap();
catch 提示
can''t convert StateListDrawable to BitmapDrawable,最后把 xxx 替换成一般的 drawable 之后,异常消失,最后改回 decodeResource 也可以获取成功了。

Android drawable:未知资源类型@ drawable-nodpi
我在res里面创建了一个新的Android资源目录drawable-nodpi并将我的png图像放在里面,但当我尝试用下面的代码引用它时,它会返回一个错误
未知资源类型@ drawable-nodpi.
我究竟做错了什么?我将它放入@drawable时效果很好,但图像太大而无法上传到纹理中.我使用的是Android Studio 2.1.2
android:src=”@drawable-nodpi/java”
解决方法:
你不使用@ drawable-nodpi / java.它应该是@ drawable / java. Android将自动选择具有设备配置的源.

Android ShapeDrawable 之 OvalShape、RectShape、PaintDrawable、ArcShape
Android ShapeDrawable 之 OvalShape、RectShape、PaintDrawable、ArcShape
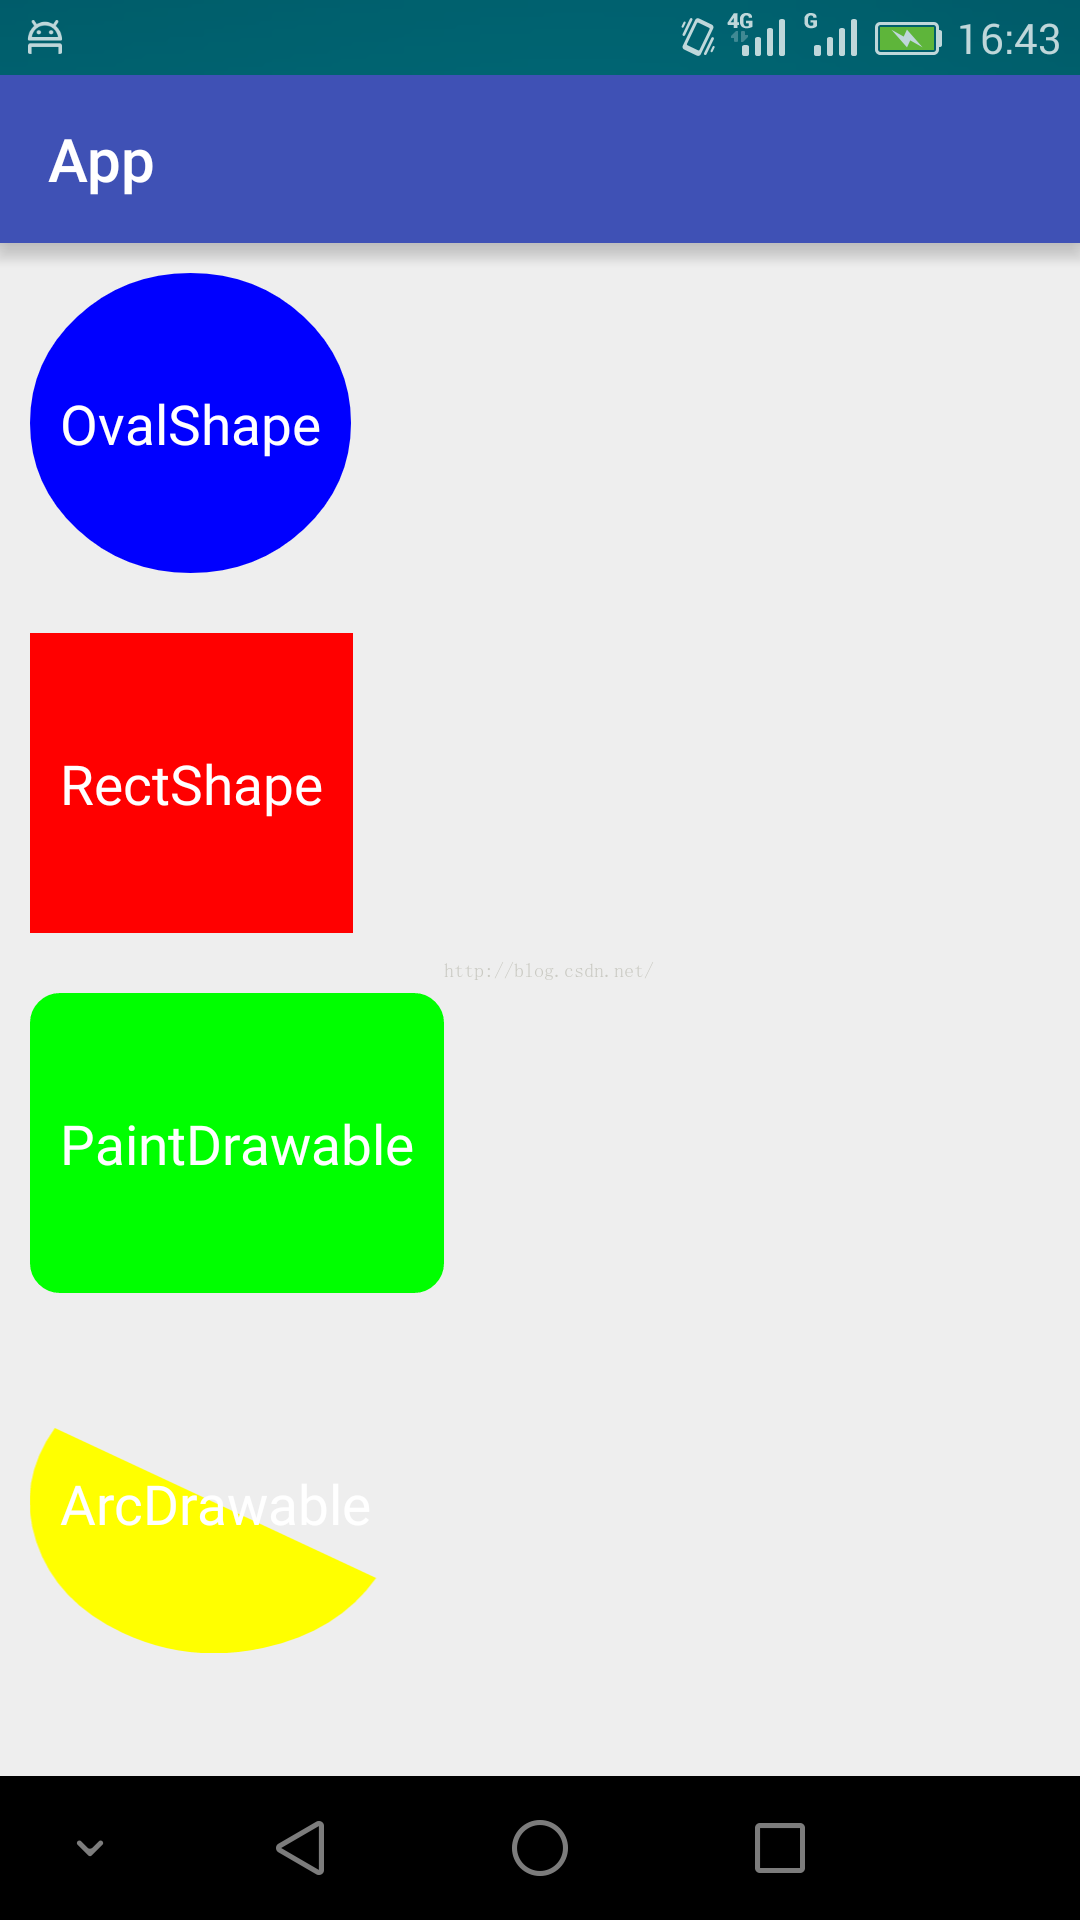
Android 图形图像基础之 OvalShape、RectShape、PaintDrawable、ArcShape。写一个例子说明。
准备一个布局,布局里面竖直方向排列若干 TextView:
<?xml version="1.0" encoding="utf-8"?>
<LinearLayout xmlns:android="http://schemas.android.com/apk/res/android"
    android:layout_width="match_parent"
    android:layout_height="match_parent"
    android:orientation="vertical">

    <TextView
        android:id="@+id/textView1"
        android:layout_width="wrap_content"
        android:layout_height="100dp"
        android:layout_margin="10dp"
        android:gravity="center"
        android:padding="10dp"
        android:text="OvalShape"
        android:textColor="@android:color/white" />

    <TextView
        android:id="@+id/textView2"
        android:layout_width="wrap_content"
        android:layout_height="100dp"
        android:layout_margin="10dp"
        android:gravity="center"
        android:padding="10dp"
        android:text="RectShape"
        android:textColor="@android:color/white" />

    <TextView
        android:id="@+id/textView3"
        android:layout_width="wrap_content"
        android:layout_height="100dp"
        android:layout_margin="10dp"
        android:gravity="center"
        android:padding="10dp"
        android:text="PaintDrawable"
        android:textColor="@android:color/white" />

    <TextView
        android:id="@+id/textView4"
        android:layout_width="wrap_content"
        android:layout_height="100dp"
        android:layout_margin="10dp"
        android:gravity="center"
        android:padding="10dp"
        android:text="ArcDrawable"
        android:textColor="@android:color/white" />

</LinearLayout>
上层 Java 代码把 OvalShape、RectShape、PaintDrawable、ArcShape 分别作为背景 Drawable:
package zhangphil.app;

import android.graphics.Color;
import android.graphics.Paint;
import android.graphics.drawable.PaintDrawable;
import android.graphics.drawable.ShapeDrawable;
import android.graphics.drawable.shapes.ArcShape;
import android.graphics.drawable.shapes.OvalShape;
import android.graphics.drawable.shapes.RectShape;
import android.support.v7.app.AppCompatActivity;
import android.os.Bundle;

public class MainActivity extends AppCompatActivity {

    @Override
    protected void onCreate(Bundle savedInstanceState) {
        super.onCreate(savedInstanceState);
        setContentView(R.layout.activity_main);

        //椭圆形形状
        OvalShape ovalShape = new OvalShape();
        ShapeDrawable drawable1 = new ShapeDrawable(ovalShape);
        drawable1.getPaint().setColor(Color.BLUE);
        drawable1.getPaint().setStyle(Paint.Style.FILL);
        findViewById(R.id.textView1).setBackgroundDrawable(drawable1);

        //矩形形状
        RectShape rectShape = new RectShape();
        ShapeDrawable drawable2 = new ShapeDrawable(rectShape);
        drawable2.getPaint().setColor(Color.RED);
        drawable2.getPaint().setStyle(Paint.Style.FILL);
        findViewById(R.id.textView2).setBackgroundDrawable(drawable2);

        //一个继承自ShapeDrawable更为通用、可以直接使用的形状
        PaintDrawable drawable3 = new PaintDrawable(Color.GREEN);
        drawable3.setCornerRadius(30);
        findViewById(R.id.textView3).setBackgroundDrawable(drawable3);

        //扇形、扇面形状
        //顺时针,开始角度30, 扫描的弧度跨度180
        ArcShape arcShape = new ArcShape(30, 180);
        ShapeDrawable drawable4 = new ShapeDrawable(arcShape);
        drawable4.getPaint().setColor(Color.YELLOW);
        drawable4.getPaint().setStyle(Paint.Style.FILL);
        findViewById(R.id.textView4).setBackgroundDrawable(drawable4);
    }
}
运行结果:
关于android:整理drawable和shapdrawable的问题就给大家分享到这里,感谢你花时间阅读本站内容,更多关于Android - new BitmapDrawable deprecated 创建一个空白的 drawable、Android can''t convert StateListDrawable to BitmapDrawable、Android drawable:未知资源类型@ drawable-nodpi、Android ShapeDrawable 之 OvalShape、RectShape、PaintDrawable、ArcShape等相关知识的信息别忘了在本站进行查找喔。
本文标签:


