在本文中,我们将为您详细介绍IdentifyingandresolvingsecuritycodevulnerabilitiesusingSnykinAWSCI/CDPipeline的相关知识,此外,
在本文中,我们将为您详细介绍Identifying and resolving security code vulnerabilities using Snyk in AWS CI/CD Pipeline的相关知识,此外,我们还会提供一些关于<
- Identifying and resolving security code vulnerabilities using Snyk in AWS CI/CD Pipeline
- <
> 评论打分预测 - AI-Quantifying uncertainty: Inference using full joint distribution, independence, Bayes'' rule.
- Analysing SWF files for vulnerabilities
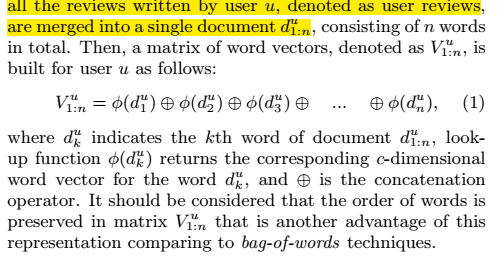
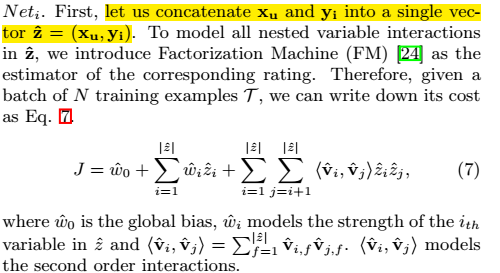
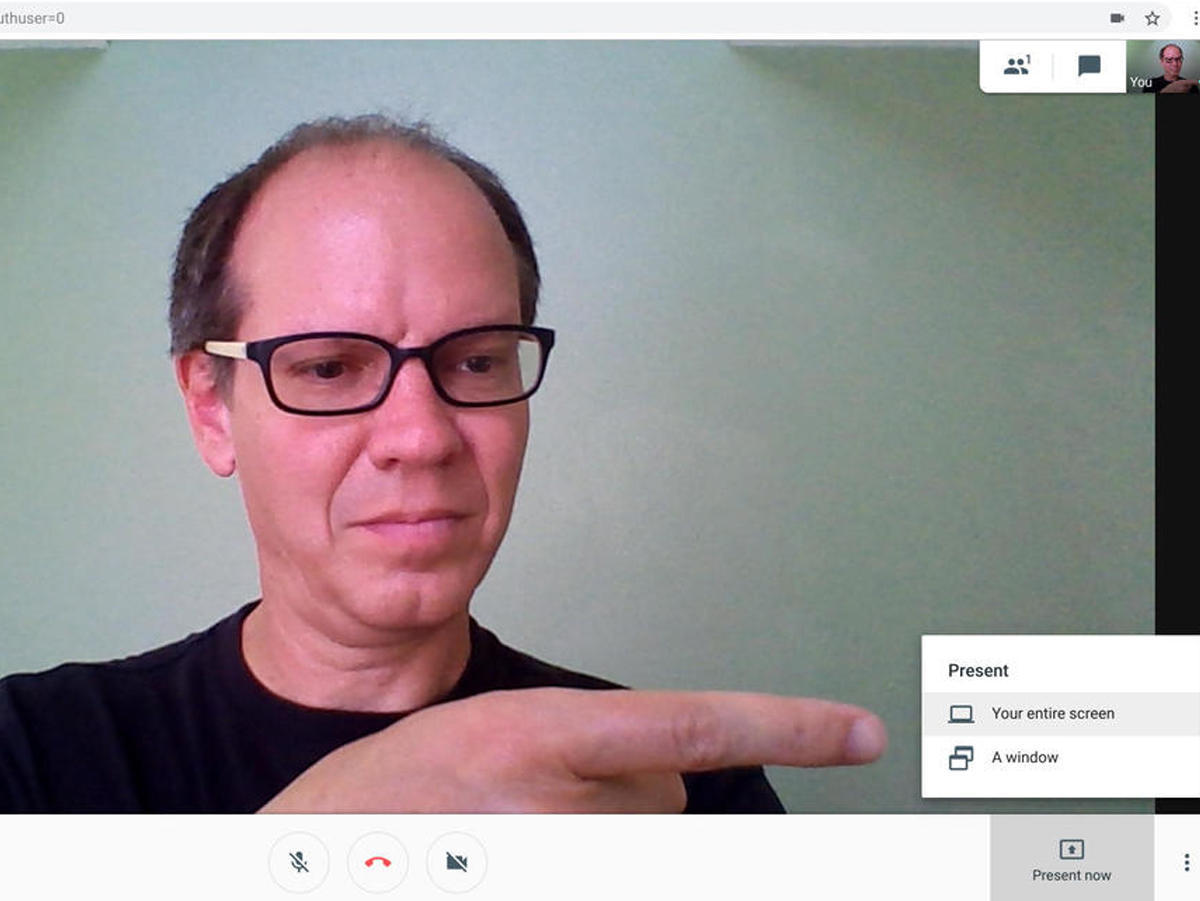
- Best video conferencing services for business: Zoom, WebEx, AnyMeeting, Slack, and more

Identifying and resolving security code vulnerabilities using Snyk in AWS CI/CD Pipeline
https://amazonaws-china.com/blogs/devops/identifying-and-resolving-vulnerabilities-in-your-code/
The majority of companies have embraced open-source software (OSS) at an accelerated rate even when building proprietary applications. Some of the obvious benefits for this shift include transparency, cost, flexibility, and a faster time to market. Snyk’s unique combination of developer-first tooling and best in class security depth enables businesses to easily build security into their continuous development process.
Even for teams building proprietary code, use of open-source packages and libraries is a necessity. In reality, a developer’s own code is often a small core within the app, and the rest is open-source software. While relying on third-party elements has obvious benefits, it also presents numerous complexities. Inadvertently introducing vulnerabilities into your codebase through repositories that are maintained in a distributed fashion and with widely varying levels of security expertise can be common, and opens up applications to effective attacks downstream.
There are three common barriers to truly effective open-source security:
- The security task remains in the realm of security and compliance, often perpetuating the siloed structure that DevOps strives to eliminate and slowing down release pace.
- Current practice may offer automated scanning of repositories, but the remediation advice it provides is manual and often un-actionable.
- The data generated often focuses solely on public sources, without unique and timely insights.
Developer-led application security
This blog post demonstrates techniques to improve your application security posture using Snyk tools to seamlessly integrate within the developer workflow using AWS services such as Amazon ECR, AWS Lambda, AWS CodePipeline, and AWS CodeBuild. Snyk is a SaaS offering that organizations use to find, fix, prevent, and monitor open source dependencies. Snyk is a developer-first platform that can be easily integrated into the Software Development Lifecycle (SDLC). The examples presented in this post enable you to actively scan code checked into source code management, container images, and serverless, creating a highly efficient and effective method of managing the risk inherent to open source dependencies.
Prerequisites
The examples provided in this post assume that you already have an AWS account and that your account has the ability to create new IAM roles and scope other IAM permissions. You can use your integrated development environment (IDE) of choice. The examples reference AWS Cloud9 cloud-based IDE. An AWS Quick Start for Cloud9 is available to quickly deploy to either a new or existing Amazon VPC and offers expandable Amazon EBS volume size.
Sample code and AWS CloudFormation templates are available to simplify provisioning the various services you need to configure this integration. You can fork or clone those resources. You also need a working knowledge of git and how to fork or clone within your source provider to complete these tasks.
cd ~/environment && \
git clone https://github.com/aws-samples/aws-modernization-with-snyk.git modernization-workshop
cd modernization-workshop
git submodule init
git submodule update
Configure your CI/CD pipeline
The workflow for this example consists of a continuous integration and continuous delivery pipeline leveraging AWS CodeCommit, AWS CodePipeline, AWS CodeBuild, Amazon ECR, and AWS Fargate, as shown in the following screenshot.

For simplicity, AWS CloudFormation templates are available in the sample repo for services.yaml, pipeline.yaml, and ecs-fargate.yaml, which deploy all services necessary for this example.
Launch AWS CloudFormation templates
A detailed step-by-step guide can be found in the self-paced workshop, but if you are familiar with AWS CloudFormation, you can launch the templates in three steps. From your Cloud9 IDE terminal, change directory to the location of the sample templates and complete the following three steps.
1) Launch basic services
aws cloudformation create-stack --stack-name WorkshopServices --template-body file://services.yaml \
--capabilities CAPABILITY_NAMED_IAM until [[ `aws cloudformation describe-stacks \
--stack-name "WorkshopServices" --query "Stacks[0].[StackStatus]" \
--output text` == "CREATE_COMPLETE" ]]; do echo "The stack is NOT in a state of CREATE_COMPLETE at `date`"; sleep 30; done &&; echo "The Stack is built at `date` - Please proceed"
2) Launch Fargate:
aws cloudformation create-stack --stack-name WorkshopECS --template-body file://ecs-fargate.yaml \
--capabilities CAPABILITY_NAMED_IAM until [[ `aws cloudformation describe-stacks \
--stack-name "WorkshopECS" --query "Stacks[0].[StackStatus]" \
--output text` == "CREATE_COMPLETE" ]]; do echo "The stack is NOT in a state of CREATE_COMPLETE at `date`"; sleep 30; done &&; echo "The Stack is built at `date` - Please proceed"
3) From your Cloud9 IDE terminal, change directory to the location of the sample templates and run the following command:
aws cloudformation create-stack --stack-name WorkshopPipeline --template-body file://pipeline.yaml \
--capabilities CAPABILITY_NAMED_IAM until [[ `aws cloudformation describe-stacks \
--stack-name "WorkshopPipeline" --query "Stacks[0].[StackStatus]" \
--output text` == "CREATE_COMPLETE" ]]; do echo "The stack is NOT in a state of CREATE_COMPLETE at `date`"; sleep 30; done &&; echo "The Stack is built at `date` - Please proceed"
Improving your security posture
You need to sign up for a free account with Snyk. You may use your Google, Bitbucket, or Github credentials to sign up. Snyk utilizes these services for authentication and does not store your password. Once signed up, navigate to your name and select Account Settings. Under API Token, choose Show, which will reveal the token to copy, and copy this value. It will be unique for each user.
Save your password to the session manager
Run the following command, replacing abc123 with your unique token. This places the token in the session parameter manager.
aws ssm put-parameter --name "snykAuthToken" --value "abc123" --type SecureStringSet up application scanning
Next, you need to insert testing with Snyk after maven builds the application. The simplest method is to insert commands to download, authorize, and run the Snyk commands after maven has built the application/dependency tree.
The sample Dockerfile contains an environment variable from a value passed to the docker build command, which contains the token for Snyk. By using an environment variable, Snyk automatically detects the token when used.
#~~~~~~~SNYK Variable~~~~~~~~~~~~
# Declare Snyktoken as a build-arg ARG snyk_auth_token
# Set the SNYK_TOKEN environment variable ENV
SNYK_TOKEN=${snyk_auth_token}
#~~~~~~~~~~~~~~~~~~~~~~~~~~~~~~~~
Download Snyk, and run a test, looking for medium to high severity issues. If the build succeeds, post the results to Snyk for monitoring and reporting. If a new vulnerability is found, you are notified.
# package the application
RUN mvn package -Dmaven.test.skip=true

#~~~~~~~SNYK test~~~~~~~~~~~~
# download, configure and run snyk. Break build if vulns present, post results to `https://snyk.io/`
RUN curl -Lo ./snyk "https://github.com/snyk/snyk/releases/download/v1.210.0/snyk-linux"
RUN chmod -R +x ./snyk
#Auth set through environment variable
RUN ./snyk test --severity-threshold=medium
RUN ./snyk monitor
Set up docker scanning
Later in the build process, a docker image is created. Analyze it for vulnerabilities in buildspec.yml. First, pull the Snyk token snykAuthToken from the parameter store.
env:
  parameter-store:
    SNYK_AUTH_TOKEN: "snykAuthToken"
Next, in the prebuild phase, install Snyk.
phases:
  pre_build:
    commands:
      - echo Logging in to Amazon ECR...
      - aws --version
      - $(aws ecr get-login --region $AWS_DEFAULT_REGION --no-include-email)
      - REPOSITORY_URI=$(aws ecr describe-repositories --repository-name petstore_frontend --query=repositories[0].repositoryUri --output=text)
      - COMMIT_HASH=$(echo $CODEBUILD_RESOLVED_SOURCE_VERSION | cut -c 1-7)
      - IMAGE_TAG=${COMMIT_HASH:=latest}
      - PWD=$(pwd)
      - PWDUTILS=$(pwd)
      - curl -Lo ./snyk "https://github.com/snyk/snyk/releases/download/v1.210.0/snyk-linux"
      - chmod -R +x ./snyk
Next, in the build phase, pass the token to the docker compose command, where it is retrieved in the Dockerfile code you set up to test the application.
build:
    commands:
      - echo Build started on `date`
      - echo Building the Docker image...
      - cd modules/containerize-application
      - docker build --build-arg snyk_auth_token=$SNYK_AUTH_TOKEN -t $REPOSITORY_URI:latest.
You can further extend the build phase to authorize the Snyk instance for testing the Docker image that’s produced. If it passes, you can pass the results to Snyk for monitoring and reporting.
build:
    commands:
      - $PWDUTILS/snyk auth $SNYK_AUTH_TOKEN
      - $PWDUTILS/snyk test --docker $REPOSITORY_URI:latest
      - $PWDUTILS/snyk monitor --docker $REPOSITORY_URI:latest
      - docker tag $REPOSITORY_URI:latest $REPOSITORY_URI:$IMAGE_TAG
For reference, a sample buildspec.yaml configured with Snyk is available in the sample repo. You can either copy this file and overwrite your existing buildspec.yaml or open an editor and replace the contents.
Testing the application
Now that services have been provisioned and Snyk tools have been integrated into your CI/CD pipeline, any new git commit triggers a fresh build and application scanning with Snyk detects vulnerabilities in your code.
In the CodeBuild console, you can look at your build history to see why your build failed, identify security vulnerabilities, and pinpoint how to fix them.
Testing /usr/src/app...
✗ Medium severity vulnerability found in org.primefaces:primefaces
Description: Cross-site Scripting (XSS)
Info: https://snyk.io/vuln/SNYK-JAVA-ORGPRIMEFACES-31642
Introduced through: org.primefaces:primefaces@6.1
From: org.primefaces:primefaces@6.1
Remediation:
Upgrade direct dependency org.primefaces:primefaces@6.1 to org.primefaces:primefaces@6.2 (triggers upgrades to org.primefaces:primefaces@6.2)
✗ Medium severity vulnerability found in org.primefaces:primefaces
Description: Cross-site Scripting (XSS)
Info: https://snyk.io/vuln/SNYK-JAVA-ORGPRIMEFACES-31643
Introduced through: org.primefaces:primefaces@6.1
From: org.primefaces:primefaces@6.1
Remediation:
Upgrade direct dependency org.primefaces:primefaces@6.1 to org.primefaces:primefaces@6.2 (triggers upgrades to org.primefaces:primefaces@6.2)
Organisation: sample-integrations
Package manager: maven
Target file: pom.xml
Open source: no
Project path: /usr/src/app
Tested 37 dependencies for known vulnerabilities, found 2 vulnerabilities, 2 vulnerable paths.
The command ''/bin/sh -c ./snyk test'' returned a non-zero code: 1
[Container] 2020/02/14 03:46:22 Command did not exit successfully docker build --build-arg snyk_auth_token=$SNYK_AUTH_TOKEN -t $REPOSITORY_URI:latest . exit status 1
[Container] 2020/02/14 03:46:22 Phase complete: BUILD Success: false
[Container] 2020/02/14 03:46:22 Phase context status code: COMMAND_EXECUTION_ERROR Message: Error while executing command: docker build --build-arg snyk_auth_token=$SNYK_AUTH_TOKEN -t $REPOSITORY_URI:latest .. Reason: exit status 1
Remediation
Once you remediate your vulnerabilities and check in your code, another build is triggered and an additional scan is performed by Snyk. This time, you should see the build pass with a status of Succeeded.
You can also drill down into the CodeBuild logs and see that Snyk successfully scanned the Docker Image and found no package dependency issues with your Docker container!
[Container] 2020/02/14 03:54:14 Running command $PWDUTILS/snyk test --docker $REPOSITORY_URI:latest
Testing 300326902600.dkr.ecr.us-west-2.amazonaws.com/petstore_frontend:latest...
Organisation: sample-integrations
Package manager: rpm
Docker image: 300326902600.dkr.ecr.us-west-2.amazonaws.com/petstore_frontend:latest
✓ Tested 190 dependencies for known vulnerabilities, no vulnerable paths found.
Reporting
Snyk provides detailed reports for your imported projects. You can navigate to Projects and choose View Report to set the frequency with which the project is checked for vulnerabilities. You can also choose View Report and then the Dependencies tab to see which libraries were used. Snyk offers a comprehensive database and remediation guidance for known vulnerabilities in their Vulnerability DB. Specifics on potential vulnerabilities that may exist in your code would be contingent on the particular open source dependencies used with your application.
Cleaning up
Remember to delete any resources you may have created in order to avoid additional costs. If you used the AWS CloudFormation templates provided here, you can safely remove them by deleting those stacks from the AWS CloudFormation Console.
Conclusion
In this post, you learned how to leverage various AWS services to build a fully automated CI/CD pipeline and cloud IDE development environment. You also learned how to utilize Snyk to seamlessly integrate with AWS and secure your open-source dependencies and container images. If you are interested in learning more about DevSecOps with Snyk and AWS, then I invite you to check out this workshop and watch this video.
About the Author

Jay is a Senior Partner Solutions Architect at AWS bringing over 20 years of experience in various technical roles. He holds a Master of Science degree in Computer Information Systems and is a subject matter expert and thought leader for strategic initiatives that help customers embrace a DevOps culture.

<> 评论打分预测
综述:
本文将 CNN 与 FM(Factorization Machine) 结合,基于评论文本来进行评分预测。
简介:
目前将神经网络应用推荐系统的研究工作中,有一类思路是把如CNN等神经网络作为特征提取器,从图片、文本等辅助信息中提取特征向量,
’再融合到传统的如BPR, PMF等基于矩阵分解的推荐系统模型中来提升推荐性能。
相较于ConvMF使用物品的文本描述信息来约束物品对应的隐向量,本文构建了两个并行的CNN模型,一个以用户发表的评论文本作为输入,
提取用户的行为特征;另一个以商品收到的评论文本作为输入,学习商品的特性。
在两个CNN模型的输出层之上有一个共享层,使用FM来建模用户的特征与商品的特征之间的关联关系,从而将用户向量和商品向量映射到相同
的特征空间。这就是模型名称中Cooperative一词的由来,同时对用户特征和商品特征进行提取,再通过因子分解机来预测用户对商品的评分值。

详细:
-
Word Representation
user review text 是把每个用户所有的评论 拼接起来,这样用户就对应1篇文档,这篇文档由这个用户的多个评论组成。
-
CNN - layer
传统卷积层,把一篇文档输入后,最后得到这个用户的向量表达。同理,可以得到每个商品的向量表达。
-
FM层
通过 CNN 得到用户 u 的特征向量 x_u 和物品j的特征向量 y_j 后,将两者连接成向量 z =(x_u, y_j)。然后使用因子分解机来预测用户 u 对物品j的打分,
目标函数为公式7,其中 w _0 是全局偏置量,w _i 表示向量z 中第i个分量的权重, 则建模了各分量之间二阶的交互关系。

AI-Quantifying uncertainty: Inference using full joint distribution, independence, Bayes'' rule.
Acting under uncertainty
1. Summarizing uncertainty
In many domains, the agent’s knowledge can at best provide only a degree of belief in the relevant sentences. Our main tool for dealing with degrees of belief is probability theory.
The ontological commitments of logic and probability theory are the same – that the world is composed of facts that do or do not hold in any particular case;
The epistemological commitments of logic and probability theory are different: A logical agent believes each sentence to be true or false or has no opinion, whereas a probabilistic agent may have a numerical degree of belief between 0 (certainly false) and 1 (certainly true).
Probability statements are made with respect to a knowledge state, not with respect to the real world.
Uncertainty arises because of both laziness and ignorance. It is inescapable in complex, nondeterministic, or partially observable environments.
Probabilities express the agent’s inability to reach a definite decision regarding the truth of a sentence. Probabilities summarize the agent’s beliefs relative to the evidence.
2. Uncertainty and rational decisions
Outcome: An outcome is a completely specified states.
Utility theory: Says that every state has a degree of usefulness, or utility, to an agent and that the agent will prefer states with higher utility. We use utility theory to represent and reason with preferences.
To make a rational choice, an agent must first have preferences between the different possible outcomes of the various plans.
The utility of a state is relative to an agent, a utility function can account for any set of preferences.
Decision theory = probability theory + utility theory.
The principle of maximum expected utility (MEU): The fundamental idea of decision theory, says that an agent is rational if and only if it chooses the action that yields the highest expected utility, averaged over all the possible outcomes of the action.
An decision-theoretic agent, at an abstract level, is identical to the agent that maintain a belief state reflecting the history of percepts to date. The primary difference is that the decision-theoretic agents’ belief state represents not just the possibilities for world states but also their probabilities.
Decision theory combines the agent’s beliefs and desires, defining the best action as the one that maximizes expected utility.
Basic probability notation
1. What probabilities are about
Sample space (Ω): The set of all possible worlds (ω).
A possible world is defined to be an assignment of values to all of the random variables under consideration.
The possible worlds are mutually exclusive and exhaustive – two possible worlds cannot both be the case, and one possible world must be the case.

Events: A set of particular possible worlds that probabilistic assertion and queries are usually about. The set are always described by propositions For each proposition, the corresponding set contains just those possible worlds in which the proposition holds.

Basic probability statements include prior probabilities and conditional probabilities over simple and complex propositions.
Unconditional probabilities / Prior probabilities (“priors” for short): Degrees of belief in propositions in the absence of any other information. E.g. P(cavity)
Evidence: Some information that has already been revealed.
Conditional probability / posterior probability (“posterior” for short): P(event|evidence). e.g. P (cavity | toothache)
P(…|…) always means P((…)|(…)).
For any propositions a and b, we have,

which holds whenever P(b) > 0.
The product rule: P(a∧b) = P(a|b)P(b).
2. The language of proposition in probability assertions
random variables: Variables in probability theory, their names begin with an uppercase letter. E.g. Total; Die1.
By convention, propositions of the form A=true are abbreviated simply as a, while A = false is abbreviated as ¬a.
When no ambiguity is possible, it is common to use a value by itself to stand for the proposition that a particular variable has that value. E.g. sunny can stand for Weather = sunny.
Domain: The set of possible value that a random variable can take on.
Variable can have finite or infinite domains – either discrete or continuous.
For any variable with an ordered domain, inequalities are allowed.
Probability distribution: When we assume a predefined ordering on the domain of a random variable, we can write the probabilities of all the possible values as an abbreviation bold P.
e.g.
P(Wether = sunny) = 0.6, P(Wether = rain) = 0.1, P(Weather = cloudy) = 0.29, P(Weather = snow) = 0.01.
As an abbreviation: P(Weather) = <0.6, 0.1, 0.29, 0.01>.
The P notation is also used for conditional distribution: P(X|Y) gives the value of P(X=xi|Y=yi) for each possible i, j pair.
Probability density function (pdfs): For continuous variables, we can define the probability that a random variable takes on some value x as a parameterized function of x.
We write the probability density for a continuous random variable X at variable x as P(X=x) or just P(x);

e.g.
P(NoonTemp=x) = Uniform[18C, 26C](x)
Expresses the belief that the temperature at noon is distributed uniformly between 18C and 26C.

Notice that probabilities are unitless number, whereas density functions are measured with a unit.
(e.g. 1/8C is not a probability, it is a probability density. The probability that NoonTemp is exactly 20.18C is zero because 20.18C is a region of width 0.)
Joint probability distribution: Notation for distribution on multiple variables.
e.g. P(Weather, Cavity) is a 4*2 table of probabilities of all combination of the values of Weather and Cavity.
We can mix variables with and without values.
e.g. P(sunny, Cavity) is a two-element vector giving the probabilities of a sunny day with a cavity and a sunny day with no cavity.
Full joint probability distribution: The joint distribution for all of the random variable, a probability model is completely determined by it.
e.g. if the variable are Cavity, Toothache and Weather, then the full joint distribution is given by P(Cavity, Toothache, Weather).
2. Probability axioms and their reasonableness
The inclusion-exclusion principle: P(a∨b) = P(a) + P(b) – P(a∧b)
Kolmogorov’s axioms:

and
P(a∨b) = P(a) + P(b) – P(a∧b)
The axioms of probability constrain the possible assignments of probabilities to propositions. An agent that violates the axioms must behave irrationally in some cases.
Inference using full joint distribution
Probabilistic inference: The computation of posterior probabilities for query propositions given observed evidence.

The full joint probability distribution specifies the probability of each complete assignment of values to random variables. It is usually too large to create or use in its explicit form, but when it is available it can be used to answer queries simply by adding up entries for the possible worlds corresponding to the query propositions.
Marginalizatiion / summing out: The process of extract the distribution over some subset of variables or a single variable (to get the marginal probability), by summing up the probabilities for each possible value of the other variables, thereby taking them out of the equation.
e.g. The marginal probability of cavity is P(cavity) = 0.108+0.012+0.072+0.008
The general marginalization rule for any sets of variables Y and Z:

The conditioning rule:

Normalization constant (α): 1/P(evidence) can be viewed as a normalization constant for the distribution P(event | evidence), ensuring that it adds up to 1.
X (Cavitiy) is a single variable. Let E (Toothache) be the list of evidence variables, e be the list of observed values for them, Y (Catch) be the remaining unobserved variables. The query P(X|e) can be evaluated as:

e.g.

(We can calculate it even if we don’t know the value of P(toothache).)
Independence
Independence (a.k.a. Marginal independence / absolute independence):
Independence between propositions a and b can be written as: (all equivalent)
P(a|b) = P(a) or P(b|a) = P(b) or P(a∧b) = P(a)P(b).
Independence between variables X and Y can be written as:
P(X|Y) = P(X) or P(Y|X) = P(Y) or P(X, Y) = P(X)P(Y).
Independence assertions can dramatically reduce the amount of information necessary to specify the full joint distribution. If the complete set of variables can be divided into independent subsets, then the full joint distribution can be factored into separate joint distributions on those subsets.
Absolute independence between subsets of random variables allows the full joint distribution to be factored into smaller joint distributions, greatly reducing its complexity. Absolute independence seldom occurs in practice.
Bayes’ rule and its use
The Bayes’ rule:

The Baye’s rule for multivalued variables: (representing a set of equations, each dealing with specific values of the variables)

The Baye’s rule conditionalized on some evidence e:

1. Applying Baye’s rule: the simple case
We perceive as evidence the effect of some unknown cause, and we would like to determine that cause. Apply Baye’s rule:

P(effect|cause) (e.g. P(symptoms|disease)) quantifies the relationship in the causal direction;
P(cause|effect) (e.g. P(disease|symptoms)) describes the diagnostic direction.
e.g.

We can avoid assessing the prior probability of the evidence (P(s)) by instead computing a posterior probability for each value of the query variable (m and ¬m) and then normalizing the result.

The general form of Bayes’ rule with normalization:
P(Y|X) = αP(X|Y)P(Y), where α is the normalization constant needed to make the entries in P(Y|X) sum to 1.
Bayes’ rule allows unknown probabilities to be computed from known conditional probabilities, usually in the causal direction. Applying Bayes’ rule with many pieces of evidence runs into the same scaling problems as does the full joint distribution.
2. Using Bayes’ rule: combining evidence
The general definition of conditional independence of two variable X and Y, given a third variable Z is:
P(X, Y|Z) = P(X|Z)P(Y|Z)
The equivalent forms can also be used:
P(X|Y, Z) = P(X|Z) and P(Y|X, Z) = P(Y|Z)
e.g.
assert conditional independence of the variables Toothache and Catch, given Cavity:
P(Toothache, Catch|Cavity) = P(Toothache|Cavity)P(Catch|Cavity).
Absolute independence assertions allow a decomposition of the full joint distribution into much smaller pieces, the same is true for conditional independence assertions.
Naïve Bayes model: In which a single cause directly influences a number of effects, all of which are conditionally independent, given the cause. The full joint distribution can be written as

Conditional independence brought about by direct causal relationships in the domain might allow the full joint distribution to be factored into smaller, conditional distributions. The naïve Bayes model assumes the conditional independence of all effect variables, given a single cause variable, and grow linearly with the number of effects.
The wumpus world revisited
A wumpus-world agent can calculate probabilities for unobserved aspects of the world, thereby improving on the decisions of a purely logical agent. Conditional independence makes these calculations tractable.

Analysing SWF files for vulnerabilities
hey,this blog post will be covering different forms of vulnerabilities that can exist within SWF’s,and a basic explanation of how to go about auditing actionscript code in order to find these vulnerabilities. It will also contain a few zero-days that i’ve found using these methods.
Before I start,just an apology in advance as this has been sloppily written (even moreso than usual). I originally wrote this 5 months ago and it’s been sitting waiting to be published ever since (while I waited for the affected companies to patch their shit),in those 5 months i’ve came back here a few times and added/removed bits of info,so if it seems like i’m covering stuff in a pretty random manner or if it seems like I cover the same point a few times without realising,then that’s probably because I did.
While waiting for companies to patch before I posted this,I noticed a few similar posts covering flash vulnerabilities popped up. I figured it’s still worth posting this because unlike those posts,I’m not going too much into flash-based exploitation vectors but rather just giving a brief overview before presenting my own personal findings. These other posts that I saw haven’t really covered their personal findings in terms of actual vulnerabilities in the wild but rather their personal research regarding exploitation techniques. They are both very good posts though,highly informative and they will cover some of the concepts I touch upon here,but more in depth. The posts i’m referring to are Flash it baby (not a blog post,but rather slides from a talk) by irsdl and also Finding XSS vulnerabilities in Flash files by smiegles – both are definitely worth reading.
It is mainly going to be covering vulnerabilities that can result in javascript being executed on the target site via an insecure SWF. I won’t be getting into bugs that are specific to versions of flash player or stuff like the recently patched adobe zero-days that can allow flash users’ machines to be compromised. Although there are other similar bugs relating to vulnerable SWF’s (SOME,Open Redirects,Info disclosure,etc) I will just mainly be covering XSS/XSF.
When testing in the wild,I think these are a very good thing to look into. These vulnerabilities are generally pretty easy to find,and many big sites appear to be vulnerable. Although flash is a dying technology,you should take into account the fact that it is still enabled by default within Google Chrome (the most popular browser) therefore a lot of people can potentially be affected by a flash XSS.
Within a week of testing via these methods,I identified vulnerabilities in Microsoft,Bank of America,Dell,HP,Oracle,Intel,Forex,NASDAQ,JPMorgan Chase,NASA,Samsung,Sony,Kodak,Adobe,CNN,Washington Post,US DoD/Army/Navy/Marines/Airforce,United Nations, whitehouse.gov, norad.mil, java.net and more using these methods.
For those who have worked with actionscript before,you’re probably aware of how similar it is to javascript (both being ECMA-based) in terms of Syntax. Like other languages that can be vulnerable to XSS,failure to properly sanatize user inputs within actionscript can allow these vulnerabilities to take place – in addition to this there are a few vulnerabilities specific to actionscript,such as cross site flashing and externalInterface.call(); fuckery
List of unsafe methods in actionscript:
loadVariables()
navigatetoURL()
getURL()
getURLBlankVar()
getURLParentvar()
getURLJSparam()
loadMovie()
loadMovieVar()
loadMovieNum()
FScrollPane.loadScrollContent()
LoadVars.load
LoadVars.send
XML.load ( ''url'' )
XML.sendAndLoad ( ''url'' )
LoadVars.load ( ''url'' )
LoadVars.send ( ''url'' )
Sound.loadSound( ''url'',isstreaming );
NetStream.play( ''url'' );
flash.external.ExternalInterface.call(_root.callback)
externalInterface.addCallback
htmlText
htmlVar
loadClip
AddDLL
I’m sure there’s more,but these are some of the most common ones. I won’t be going in depth on how to exploit all of these (a lot of these are similar),but rather a brief explanation of the different methods for each main kind of vulnerability. Do not expect me to go too much in depth here,I am just covering the bare basics for each of the common methods and related concepts,before moving onto my own findings.
Crossdomain.xml :
Crossdomain policies are a set of rules that determine which clients (such as flash player) can access data across multiple domains. For a full explanation of how crossdomain policies work,you can read the specification here
Here is an example crossdomain policy:
http://gdata.youtube.com/crossdomain.xml
For some of the methods i’m about to describe,you’ll need your crossdomain policy to look something like this:
| <?xml version=”1.0″?> | |
| <!DOCTYPE cross-domain-policy SYstem “http://www.adobe.com/xml/dtds/cross-domain-policy.dtd”> | |
| <cross-domain-policy> | |
| <site-control permitted-cross-domain-policies=”all“/> | |
| <allow-access-from domain=”*”secure=”false“/> | |
| <allow-http-request-headers-fromdomain=”*” headers=”*”secure=”false“/> | |
| </cross-domain-policy> |
I’ll explain why this is useful for exploitation soon,but first i’m going to cover some more Traditional XSS that flash can be susceptible to.
WhiteBox approach to SWF analysis:
SWF files can be easily decompiled,meaning that with some basic actionscript kNowledge it is always possible to perform a whiteBox code audit on the SWF. There are many free tools available for SWF decompilation,but if you’re a Linux user then Flare would be my recommendation due to its simplicity and the fact that it is far more lightweight than most other flash decompilers.
To save the raw SWF there are a few options,you can either get the direct link and wget it to your Box (if its a HTML page then you’ll need to view the page source and CTRL + F for the SWF,it will be stored within an or <object> tag – it is also worth doing this anyway even with a blackBox approach so you can see any associated flashvars and what the status of allowScriptAccess is set to) or you can use your browser and select the ‘save page as’ (CTRL+S) option which will save the SWF for you.
Once decompiled,it will be generally saved in .fla format (or .flr if you’re using flare),you can then open it with a text editor and perform analysis of the source code in order to hunt for potential vulnerabilities (by checking for functions that Could be vulnerable + checking for undefined flashvars and just getting a general understanding of the code flow)
One thing that flare lacks is the ability to mass decompile a bunch of swf’s,which is a little annoying because you have to write up a quick bash script to automate this when it should be included functionality anyway. The ability to mass decompile helps save time because you can just decompile all swf’s within a dir and then grep the contents of them for potentially vulnerable functions,resulting in less time spent auditing code that has no chance of being vuln.
I wrote FlashFuzzr, a simple tool written in C to help aid with both blackBox + whiteBox testing of SWF’s – it is configured to work with flare but supports mass compilation (you supply the directory as input rather than individual files) and it is also useful for performing a quick blackBox test before digging deeper into the source via whiteBox,you just give it a user supplied URL and it begins to fire a bunch of vectors. It has a simple text-based interface and is designed to run on linux:
Flashvars + Undefined variables explanation:
Flashvars are variables that can take user-supplied input for the flash application for use within the application. Generally they are initialized within HTML via embed/object like so
〈embed src="lol.swf" width="1337" height="1337" FlashVars="param=something¶m2=somethingelse¶m3=lol"〉
Within ActionScript3 a developer needs to assign their flashvars to local variables,but within ActionScript2,any global variable that is not initialized is automatically assumed to be a flashvar and treated as such. This means that if you find a global variable that has not been explicitly defined within the source that you’re auditing,then you can assign your own values to that variable by calling it via GET like you would with a flashvar. Depending on the context in which this variable is meant used within the program,this may or may not lead to a multitude of vulnerabilities.
You can check for global variables by looking for strings preceeded with any of the following:
_root
_global
_level0
If any of those are declared but not defined,then there is a good chance of a potential vulnerability being present.
getURL() / NavigatetoURL() :
If getURL or its AS3 equivalent is setup in an incorrect manner,then exploiting it is very trivial. It does as the function name suggests (attempts to get a movie from a remote URL) so you can just exploit this to result in XSS in the same way as you would with an open redirect by callingjavascript:alert(domain) or data:text/html,〈script〉alert(1337)〈/script〉 – also remember that if HTML tags trigger WAF then you can base64 encode the input like so: data:text/html;base64,PHNjcmlwdD5hbGVydCgxMzM3KTwvc2NyaXB0Pg==
So if you decompile an SWF and see a flashvar which you can control being used as the argument for getURL,then you can probably exploit it by calling javascript:// or data:// (or you can turn it into a generic open redirect)
Also somewhat unrelated,and probably already kNown by most who have had a quick look at Owasp,but actionscript can be used to obfuscate XSS vectors in the following manner:
a="get";
b="URL(\"";
c="javascript:";
d="alert(''XSS'');\")";
eval(a+b+c+d);
its a good thing to always remember,and it has helped me out for sure with bypasses on a few occasions!
externalInterface.Call :
This function can be abused for callback functionality – for those who may not be familiar with exploiting callback functionality in actionscript,let me give an example in another language that people may be more familiar with.
Within PHP,PRCE functions can be abused for callback functionality,allowing you to call PHPinfo(); to disclose the uname output,PHP version,etc etc. The most common example of this would be preg_replace(); with the /e modifier active. Actionscript can be vulnerable to something similar (except you’re obvIoUsly not calling PHPinfo();) – externalInterface.call takes two arguments – the name of the JS function to call,and the string to pass to that function. In the case of externalInterface.call,callback functionality can be abused in order to trigger an XSS.
a typical vector used for exploiting externalInterface.call for XSS would look something like this:
\”));throw_error()}catch(e){alert(document.domain))}//
\”);function%20someFunction(a){}prompt(1)//
although in some cases,a simple alert`0` (with template strings) or \’);alert(document.domain); will suffice. Some examples ofexternalInterface.call being exploited for XSS can be seen with the plupload/swfupload XSS,example:
http://btpa.police.uk/wp-includes/js/swfupload/swfupload.swf?movieName=”%5D);}catch(e){}if(!self.a)self.a=!alert(document.domain);//
another (more recent) example of XSS via externalInterface.call would be theflashmediaelement.swf that the guys from cure53 recently released,you can read a detailed write-up here – It should also be noted that this vulnerability isn’t exclusive to wordpress. Here is an example:
http://www.defense.gov/desktopmodules/SharedLibrary/Plugins/MediaElement/flashmediaelement.swf?jsinitfunctio%gn=alert`
[XSS]`
HTML injection / Callback functionality via textfield objects:
Textfield objects within flash allow HTML to be rendered but in a very limited sense,it will only allow certain tags to be rendered. To my kNowledge the only tags that can be used to trigger XSS via this are <a> and <img> – if the <a> tag does not allow you to set hyperlink to a javascript: uri then you can compromise via data: with a base64 encoded input.
In older versions of flash player you Could trigger xss via the src= attrib for <img> by bypassing flash’s internal filter through means of appending an swf extension to your payload,like so:
〈img src=’javascript:alert(document.domain)//.swf’ 〉
it is also possible to set the src attrib of the image to a malicIoUs SWF designed to trigger a js alert.
You can also use the <a> tag to exploit callback functionality by calling both swf public functions and native static asfunctions like so (to circumvent crossdomain policies in this example):
〈a href=’asfunction:System.Security.allowDomain,evilhost’〉
asfunction can be used to achieve XSS also,by calling a native function such as getURL like so:
〈a href=’asfunction:getURL,javascript:alert(document.domain)’〉
Injecting HTML/JS Via CDATA:
CDATA stands for character data and it allows you to include data that Could be considered as XML markup but should not be. For example lets say you’re crafting a malicIoUs XML file to trigger an XSS in a vulnerable SWF and you see a <text> section where you want to inject some HTML that the victom can interact with in order to trigger your javascript payload. If you added your HTML content in its regular form between the <text> tags then it would just be treated as more XML tags (due to the flexibility of XML and the fact that any tag name can be considered potentially valid). You use CDATA so it kNows that your data should not be treat as XML markup,meaning you can add your own HTML markup and it will be treated as valid HTML when rendered. Here is an example of how you would add some HTML via CDATA:
<![CDATA[<h1>My HTML content</h1>]]>
Loading MalicIoUs XML Files:
In some cases,you’ll find files with an external XML config file passed as a flashvar via GET to the SWF. This config file can be used to control both the style and the content of the page. In order to do this,you will need to have a crossdomain policy setup (as described above) on your site. This is generally due to an insecure implementation of loadMovie or XML.load although it can also occur as a result of client-sided javascript being used to control the flash movie (e.g. via getvariable() / setvariable() )
In order to exploit this you need your XML file to conform to their style (so its best to have a copy of the XML file they are using to base your payload off of) and you’ll also need a correctly configured crossdomain policy on your site.
Packet Analysis:
One often overlooked aspect when testing flash applications for bugs is packet analysis. Although this is obvIoUsly not specific to flash,I always play around with it when testing flash applications as due to their interactive nature (web-based games etc) you will generally find results by playing around with packets sent to and from the application.
It is a very good idea to fire up wireshark and see which packets are sent when you make different actions,and what modifying those packets can do (you can also achieve some very nice things with packet-based filters). I’ve found all kinds of crazy bugs in the past via methods like this (such as being able to spawn unlimited in-game currently,having the ability to send a flash based chatBox “back in time” repeatedly,etc).
I think for me to go in detail about this I will need to make a blog post specifically for this. I will get around to that sometime because there are some very interesting techniques here.
Flashnifties XML Slideshow XSS:
This is a trivial to exploit vulnerability for Flashnifties XML Slideshow which allows an attacker to trigger XSS and also perform content forgery via a malicIoUs XML file. Considering these devs refer to themselves as developers of “professional flash tools” i’d figure they’d at least have SOME kind of protections in place.. but nope. Any random kid Could find and exploit this with ease.
Google dork:
intext:flashnifties filetype:swf
MFW they’re actually making people PAY MONEY for this piece of shit software
To exploit this,an attacker needs to supply their own malicIoUs XML file (via the file param i.e. slideshow.swf?file=HERE),lets take a look at an example XML file for flashnifties:
| <?xml version=”1.0″ encoding=”iso-8859-1″?> | |
| <slideshow displayTime=”5” | |
| transitionSpeed=”.7“ | |
| transitionType=”Fade“ | |
| motionType=”None“ | |
| someParam=”blah” | |
| anotherParam=”Blah” | |
| <imageimg=”/Images/Backgrounds/01.jpg” caption=”” /> | |
| <imageimg=”/Images/Backgrounds/02.jpg” caption=”” /> | |
| <imageimg=”/Images/Backgrounds/03.jpg” caption=”” /> | |
| <imageimg=”/Images/Backgrounds/04.jpg” caption=”” /> | |
| <imageimg=”/Images/Backgrounds/05.jpg” caption=”” /> | |
| <imageimg=”/Images/Backgrounds/06.jpg” caption=”” /> | |
| </slideshow> |
As you can see,the locations for the images included in the slideshow are specified in the XML file. An attacker can simply modify this location to javascript:alert(document.domain) and the javascript will trigger as soon as the victim clicks an image (or as soon as the next image within the slideshow loads)
Here is what an example payload from an attacker would look like:
| <slideslow> | |
| <imageimg=”javascript:alert(‘XSS@’%2Bdocument.domain” caption=”” /> | |
| </slideshow> |
Also,a FAR more dangerous vulnerability can be triggered in a similar manner.. I’ve decided to not publicize this one because that’d be mean (although I was tempted,recieved no response from the vendors of this software when I originally reported it). I’m sure some people reading this blog should be able to figure it out for themselves easily though
- 顶
- 0
- 踩
- 0
- 上一篇Double-click me not: Malicious proxy settings in OLE Embedded Script
- 下一篇analyzing-malicious-office-document


![[转帖]Ubuntu 安装 Wine方法(ubuntu如何安装wine)](https://www.gvkun.com/zb_users/cache/thumbs/4c83df0e2303284d68480d1b1378581d-180-120-1.jpg)

