在本文中,我们将给您介绍关于procreatepocket怎样填充颜色?procreatepocket填充颜色方法的详细内容,并且为您解答procreatepocket怎么填充颜色的相关问题,此外,我
在本文中,我们将给您介绍关于procreate pocket怎样填充颜色?procreate pocket填充颜色方法的详细内容,并且为您解答procreate pocket怎么填充颜色的相关问题,此外,我们还将为您提供关于Bean method rocketMQTemplate in RocketMQAutoConfiguration not loaded坑、cocos creator基础-(二十六)Websocket与socket.io、docker compose idea CreateProcess error=2 系统找不到指定的文件的问题、docker 安装 php-fpm 挂载配置文件出错:docker: Error response from daemon: failed to create shi...的知识。
本文目录一览:- procreate pocket怎样填充颜色?procreate pocket填充颜色方法(procreate pocket怎么填充颜色)
- Bean method rocketMQTemplate in RocketMQAutoConfiguration not loaded坑
- cocos creator基础-(二十六)Websocket与socket.io
- docker compose idea CreateProcess error=2 系统找不到指定的文件的问题
- docker 安装 php-fpm 挂载配置文件出错:docker: Error response from daemon: failed to create shi...
")
procreate pocket怎样填充颜色?procreate pocket填充颜色方法(procreate pocket怎么填充颜色)
procreate pocket填充颜色方法。procreate pocket是为iPhone推出的专业画画工具,那么怎样使用它填充颜色呢?下面小编准备好了相关的操作方法,还不会的朋友一起来看看吧。

1、打开procreate pocket

3、点击加号来创建画布

3、画好图形后,将调色板中的颜色拖到图形上

4、它会自动将图形所在区域填充满颜色

以上这里为各位分享了procreate pocket填充颜色方法。有需要的朋友赶快来看看本篇文章吧!
———想要了解更多资讯就请继续关注锁定小编吧!

Bean method rocketMQTemplate in RocketMQAutoConfiguration not loaded坑
一、 异常栈
***************************
APPLICATION FAILED TO START
***************************

Description:

A component required a bean of type ''org.apache.rocketmq.spring.core.RocketMQTemplate'' that could not be found.

The following candidates were found but could not be injected:
	- Bean method ''rocketMQTemplate'' in ''RocketMQAutoConfiguration'' not loaded because @ConditionalOnBean (types: org.apache.rocketmq.client.producer.DefaultMQProducer; SearchStrategy: all) did not find any beans of type org.apache.rocketmq.client.producer.DefaultMQProducer


Action:

Consider revisiting the entries above or defining a bean of type ''org.apache.rocketmq.spring.core.RocketMQTemplate'' in your configuration.
追踪到是DefaultMQProducer配置问题
二、 打开RocketMQAutoConfiguration
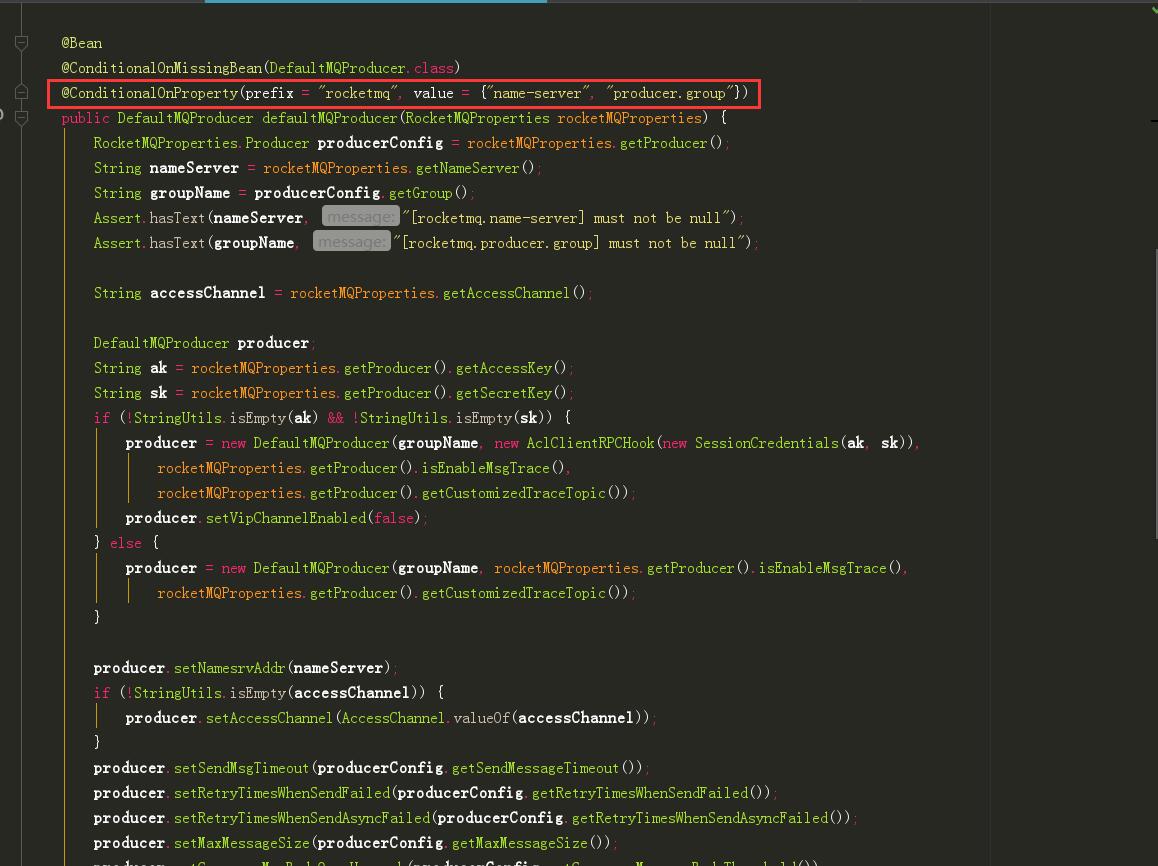
配置生效需要设置rocketmq.producer.group属性
在application.yml中加入默认即可
Websocket与socket.io")
cocos creator基础-(二十六)Websocket与socket.io
TCP的粘包现象
客户端代码
// websocket.js 导出的自己封装的websocket模块
var websocket = {
    sock: null,  // 连接的socket 对象 WebSocket, h5标准对象;

    // 网络连接成功了以后调用
    on_open: function(event) {
        // test
        this.send_data("HelloWorld");
        // end
    },

    // 客户端收到数据的时候
    on_message: function(event) {
        console.log("#####", event.data);
    },

    // 客户端收到socket 关闭的时间的时候调用;
    on_close: function (event) {
        this.close();
    },

    on_error: function (event) {
        this.close();
    },

    close: function() {
        if (this.sock != null) {
            this.sock.close(); // 关闭socket
            this.sock = null;
        }
    },

    // 连接函数,
    connect: function(url) {
        this.sock = new WebSocket(url); // h5标准的websocket对象
        this.sock.binaryType = "arraybuffer"; // 配置接受二进制的数据类型,与服务器保持一次, "Blob"

        // 为这个websocket对象制定对应的回掉函数;
        this.sock.onopen = this.on_open.bind(this);
        this.sock.onmessage = this.on_message.bind(this);
        this.sock.onclose = this.on_close.bind(this);
        this.sock.onerror = this.on_error.bind(this);
    },

    // 发送数据, sock.send;
    send_data: function(data) {
        this.sock.send(data);
    },
};


module.exports = websocket;
// game_scene.js 使用webscoket和socket.io的案例
var websocket = require("websocket");
var net = require("net");
cc.Class({
extends: cc.Component,
properties: {
// foo: {
// default: null, // The default value will be used only when the component attaching
// to a node for the first time
// url: cc.Texture2D, // optional, default is typeof default
// serializable: true, // optional, default is true
// visible: true, // optional, default is true
// displayName: ''Foo'', // optional
// readonly: false, // optional, default is false
// },
// ...
},
// use this for initialization
onLoad: function () {
// net.connect("127.0.0.1:6081");
websocket.connect("ws://127.0.0.1:6080/ws");
},
// called every frame, uncomment this function to activate update callback
// update: function (dt) {
// },
});服务器代码
// echo_server.js websocket服务器代码
var ws = require("ws");
var server = new ws.Server({
    // host: ip, // 如果加了host,外部链接不上
    port: 6080,
});

console.log("#######");
function on_server_client_comming(session) {
    session.on("close", function() {
    });

    // error事件
    session.on("error", function(err) {
    });
    // end

    session.on("message", function(data) {
        console.log("######", data);

        session.send(data);
    });
}
server.on("connection", on_server_client_comming);


var socket_io = require(''socket.io'')
var sio = socket_io(6081);

sio.sockets.on(''connection'',function(socket){
    console.log("connect called");

    // 自定义事件
    socket.on("your_echo", function (data) {
        console.log("your_echo", data);

        socket.emit("your_echo", data);
    });
    // end

    // 系统事件
    socket.on(''disconnect'',function(data){
        console.log("disconnect");
    });


});
客户端代码
// 导出的net模块 net.js
if(window.io == null){ // h5
    window.io = require("socket-io");
}


var net = {
    sio: null,

    connect:function(url) {
        var self = this;

        var opts = {
            ''reconnection'':true,
            ''force new connection'': true,
            ''transports'':[''websocket'', ''polling'']
        }

        this.sio = window.io.connect(url, opts);

        // 监听地城的系统事件
        this.sio.on(''reconnect'',function(){
            console.log(''reconnection'');
        });

        // 连接成功
        this.sio.on(''connect'',function(data){
            self.sio.connected = true;

            console.log("%%%%%%%%%%%%% connect");
            // 事件 + 数据名字
            self.send("your_echo", "HelloWorld");
        });


        // 断开连接
        this.sio.on(''disconnect'',function(data){
            console.log("MMMMMdisconnect");
            self.sio.connected = false;
            // self.close();
        });

        // 连接失败
        this.sio.on(''connect_failed'',function (){
            console.log(''connect_failed'');
        });


        // 自己定义,如果你向要收那种事件的数据,你就监听这个事件
        this.sio.on(''your_echo'',function(data){
            console.log("your_echo", data);
        });
    },


    // 发送数据: 事件+数据的模型;
    send:function(event,data){
        if(this.sio.connected){
            this.sio.emit(event,data);  // 触发一个网络事件,名字 + 数据body ---> 服务器;
        }
    },

    // 关闭socket
    close:function(){
        if(this.sio && this.sio.connected){
            this.sio.connected = false;
            this.sio.disconnect(); // API
            this.sio = null;
        }
    },
};

module.exports = net;
// socket-io.js H5使用的io库文件,自行下载,需要添加判断!CC_JSB && !cc.sys.isNative
if (!CC_JSB && !cc.sys.isNative) {
...
...
}// game_scene.js 使用webscoket和socket.io的案例
var websocket = require("websocket");
var net = require("net");
cc.Class({
extends: cc.Component,
properties: {
// foo: {
// default: null, // The default value will be used only when the component attaching
// to a node for the first time
// url: cc.Texture2D, // optional, default is typeof default
// serializable: true, // optional, default is true
// visible: true, // optional, default is true
// displayName: ''Foo'', // optional
// readonly: false, // optional, default is false
// },
// ...
},
// use this for initialization
onLoad: function () {
net.connect("127.0.0.1:6081");
// websocket.connect("ws://127.0.0.1:6080/ws");
},
// called every frame, uncomment this function to activate update callback
// update: function (dt) {
// },
});服务器代码
// echo_server.js websocket服务器代码
var ws = require("ws");
var server = new ws.Server({
    // host: ip, // 如果加了host,外部链接不上
    port: 6080,
});

console.log("#######");
function on_server_client_comming(session) {
    session.on("close", function() {
    });

    // error事件
    session.on("error", function(err) {
    });
    // end

    session.on("message", function(data) {
        console.log("######", data);

        session.send(data);
    });
}
server.on("connection", on_server_client_comming);

// socketio
var socket_io = require(''socket.io'')
var sio = socket_io(6081);

sio.sockets.on(''connection'',function(socket){
    console.log("connect called");

    // 自定义事件
    socket.on("your_echo", function (data) {
        console.log("your_echo", data);

        socket.emit("your_echo", data);
    });
    // end

    // 系统事件
    socket.on(''disconnect'',function(data){
        console.log("disconnect");
    });


});

docker compose idea CreateProcess error=2 系统找不到指定的文件的问题
Docker Compose
Compose 简介
Compose 是用于定义和运行多容器 Docker 应用程序的工具。通过 Compose,您可以使用 YML 文件来配置应用程序需要的所有服务。然后,使用一个命令,就可以从 YML 文件配置中创建并启动所有服务。
Compose 使用的三个步骤:
使用 Dockerfile 定义应用程序的环境。
使用 docker-compose.yml 定义构成应用程序的服务,这样它们可以在隔离环境中一起运行。
最后,执行 docker-compose up 命令来启动并运行整个应用程序。
下面看下docker-compose idea CreateProcess error=2, 系统找不到指定的文件的问题。
Failed to deploy ‘Compose: docker-compose.yml'': com.intellij.execution.process.ProcessNotCreatedException: Cannot run program “docker-compose” (in directory “G:\ideaWSP\test”): CreateProcess error=2, 系统找不到指定的文件。
Deploying ‘Compose: docker-compose.yml''…
今天实习入职第三天,解决一个小问题记录一下。
问题
在idea中编写docker-compose,然后直接点击文本框旁边的绿色运行图标,报如上错误。
解决方法
我是用的win10,安装docker desktop for windows ,(此处有个vmware和docker冲突的问题,但是由于不需要运行docker,所以不用管这个问题)
然后在build,execution,| Docker | Tools 里面把docker-compose-executable 设置为安装的docker-compose所在位置就行。
docker默认安装位置大家应该都是一样的,大家自己找安装位置把。

总结
到此这篇关于docker compose idea CreateProcess error=2 系统找不到指定的文件的问题的文章就介绍到这了,更多相关docker compose系统找不到指定的文件内容请搜索以前的文章或继续浏览下面的相关文章希望大家以后多多支持!
- 浅谈Docker run 容器处于created状态问题
- 解决Docker network Create加--subnet后遇到问题
- docker create命令的用法说明

docker 安装 php-fpm 挂载配置文件出错:docker: Error response from daemon: failed to create shi...

docker: Error response from daemon: failed to create shim: OCI runtime create failed: container_linux.go:380: starting container process caused: process_linux.go:545: container init caused: rootfs_linux.go:75: mounting "/data001/apps/nginx/conf/php-fpm" to rootfs at "/usr/local/etc/php-fpm.d/www.conf" caused: mount through procfd: not a directory: unknown: Are you trying to mount a directory onto a file (or vice-versa)? Check if the specified host path exists and is the expected type.
原因是 - v 参数挂载的是目录,目录不存在于是自动创建了 www.conf 文件夹
解决:
1. 先启动一个临时容器,并把文件先复制到宿主机
# docker run -itd --name php7-fpm -p 9000:9000 php:7.4-fpm
# docker exec -it php7-fpm /bin/bash(进入容器查看配置文件所在的目录)
# docker cp php7-fpm:/usr/local/etc/php-fpm.d/www.conf /data001/apps/nginx/conf/php-fpm/www.conf

# docker cp php7-fpm:/usr/local/etc/php/php.ini-development /data001/apps/nginx/conf/php/php.ini
现在宿主机文件夹上已经存在了那两个配置文件。
2、再次启动 php-fpm 容器
#先把旧的那个删除掉
docker rm -f php7-fpm

#启动容器
docker run --name php7-fpm -p 9000:9000 \
--link mysql-5.7:mysql \
-v /data001/sites/www:/var/www/html \
-v /data001/apps/nginx/conf/php-fpm/www.conf:/usr/local/etc/php-fpm.d/www.conf:ro \
-v /data001/apps/nginx/conf/php/php.ini:/usr/local/etc/php/php.ini:ro \
-d php:7.4-fpm
今天关于procreate pocket怎样填充颜色?procreate pocket填充颜色方法和procreate pocket怎么填充颜色的讲解已经结束,谢谢您的阅读,如果想了解更多关于Bean method rocketMQTemplate in RocketMQAutoConfiguration not loaded坑、cocos creator基础-(二十六)Websocket与socket.io、docker compose idea CreateProcess error=2 系统找不到指定的文件的问题、docker 安装 php-fpm 挂载配置文件出错:docker: Error response from daemon: failed to create shi...的相关知识,请在本站搜索。
本文标签:


