对于AndroidOTGU盘文件读写感兴趣的读者,本文将提供您所需要的所有信息,我们将详细讲解android读取u盘,并且为您提供关于20131126版本后,可以从PC通过USB-OTGVNC到pcD
对于Android OTG U盘文件读写感兴趣的读者,本文将提供您所需要的所有信息,我们将详细讲解android读取u盘,并且为您提供关于20131126 版本后,可以从 PC 通过 USB-OTG VNC 到 pcDuino、20131126版本后,可以从PC通过USB-OTG VNC到pcDuino、32-bit ARM Cortex-M3 microcontroller; up to 512 kB flash and 96 kB SRAM; USB Device/Host/OTG; Eth...、Android OTG U 盘文件读写的宝贵知识。
本文目录一览:- Android OTG U盘文件读写(android读取u盘)
- 20131126 版本后,可以从 PC 通过 USB-OTG VNC 到 pcDuino
- 20131126版本后,可以从PC通过USB-OTG VNC到pcDuino
- 32-bit ARM Cortex-M3 microcontroller; up to 512 kB flash and 96 kB SRAM; USB Device/Host/OTG; Eth...
- Android OTG U 盘文件读写
")
Android OTG U盘文件读写(android读取u盘)
最近要求对安卓平板开发时导出Excel表格到插在平板的U盘上,初步尝试发现,对U盘的文件读写只能操作Android/包名/的目录,不能直接写在根目录,不方便客户使用,于是研究了libaums的库可用是可用,但是调用其device.init() 方法后,就不能在文件管理里面看到U盘了,所以客户使用起来还是不方便,于是想到了Linux文件操作命令。
思路是先生成文件在内置存储卡中,然后使用Linux命令将文件cp或者mv到U盘根目录
复制命令
cp -r srcPath targetPath
剪切命令
mv srcPath targetPath
首先获取U盘的路径,代码如下,有返回值说明有U盘挂载,返回值为空说明U盘未挂载
    public static String getUdiskRealPath() {
        String filePath = "/proc/mounts";
        File file = new File(filePath);
        List<String> lineList = new ArrayList<>();
        InputStream inputStream =null;
        try {
            inputStream = new FileInputStream(file);
            if (inputStream != null) {
                InputStreamReader inputStreamReader = new InputStreamReader(inputStream, "GBK");
                BufferedReader bufferedReader = new BufferedReader(inputStreamReader);
                String line = "";
                while ((line = bufferedReader.readLine()) != null) {
                    if (line.contains("vfat")) {
                        lineList.add(line);
                    }
                }
            }
        } catch (FileNotFoundException e) {
            e.printstacktrace();
        } catch (IOException e) {
            e.printstacktrace();
        } finally {
            if (inputStream != null) {
                try {
                    inputStream.close();
                } catch (IOException e) {
                    e.printstacktrace();
                }
            }
        }
        if (lineList.isEmpty()){
            Log.i(HEAD, "getUdiskPath no usb disk ");
            return "";
        }
        String editPath = lineList.get(lineList.size() - 1);

        Log.i(HEAD,"edit path = " + editPath);
        int start = editPath.indexOf("/mnt");
        int end = editPath.indexOf(" vfat");
        String path = editPath.substring(start, end);
        return path;
    }
生成你要复制或剪切到U盘的文件并获取其路径srcPath
拼接命令传入下面的执行命令方法中,其中isRooted需传入true
    /**
     * Execute the command.
     *
     * @param commands        The commands.
     * @param isRooted        True to use root, false otherwise.
     * @param isNeedResultMsg True to return the message of result, false otherwise.
     * @return the single {@link CommandResult} instance
     */
    public static CommandResult execCmd(final String[] commands,
                                        final boolean isRooted,
                                        final boolean isNeedResultMsg) {
        int result = -1;
        if (commands == null || commands.length == 0) {
            return new CommandResult(result, null, null);
        }
        Process process = null;
        BufferedReader successResult = null;
        BufferedReader errorResult = null;
        StringBuilder successMsg = null;
        StringBuilder errorMsg = null;
        DataOutputStream os = null;
        try {
            process = Runtime.getRuntime().exec(isRooted ? "su" : "sh");
            os = new DataOutputStream(process.getoutputStream());
            for (String command : commands) {
                if (command == null) continue;
                os.write(command.getBytes());
                os.writeBytes(LINE_SEP);
                os.flush();
            }
            os.writeBytes("exit" + LINE_SEP);
            os.flush();
            result = process.waitFor();
            if (isNeedResultMsg) {
                successMsg = new StringBuilder();
                errorMsg = new StringBuilder();
                successResult = new BufferedReader(new InputStreamReader(process.getInputStream(),
                        "UTF-8"));
                errorResult = new BufferedReader(new InputStreamReader(process.getErrorStream(),
                        "UTF-8"));
                String line;
                if ((line = successResult.readLine()) != null) {
                    successMsg.append(line);
                    while ((line = successResult.readLine()) != null) {
                        successMsg.append(LINE_SEP).append(line);
                    }
                }
                if ((line = errorResult.readLine()) != null) {
                    errorMsg.append(line);
                    while ((line = errorResult.readLine()) != null) {
                        errorMsg.append(LINE_SEP).append(line);
                    }
                }
            }
        } catch (Exception e) {
            e.printstacktrace();
        } finally {
            try {
                if (os != null) {
                    os.close();
                }
            } catch (IOException e) {
                e.printstacktrace();
            }
            try {
                if (successResult != null) {
                    successResult.close();
                }
            } catch (IOException e) {
                e.printstacktrace();
            }
            try {
                if (errorResult != null) {
                    errorResult.close();
                }
            } catch (IOException e) {
                e.printstacktrace();
            }
            if (process != null) {
                process.destroy();
            }
        }
        return new CommandResult(
                result,
                successMsg == null ? null : successMsg.toString(),
                errorMsg == null ? null : errorMsg.toString()
        );
    }
例如
/**源文件*/
String srcPath = "/storage/emulated/0/test.txt";
/**目标位置,如U盘跟路径*/
String targetPath = getUdiskRealPath();
/**拼接复制命令*/
String cmd = "cp -r " + srcPath + " " + targetPath;
/**执行复制命令*/
execCmd(new String[]{cmd},true,true);
即可完成文件写在U盘根目录(或者其他目录)的操作。
写文件会了,读文件也就是反过来进行了,先复制或剪切文件到内置存储卡,在进行基本的文件操作即可。

20131126 版本后,可以从 PC 通过 USB-OTG VNC 到 pcDuino
有些玩家购买 pcDuino 到手后发现自己没有显示器,没有鼠标键盘,有的只有手机的充电器和数据线。pcDuino 开发者了解到粉丝们的郁闷之后,在软件上帮忙大家解决了这个问题。下面就给大家介绍一下。

一,新的上网方式
在这个电子产品泛滥的时代,大家手中最多的不是 iphone,而是数据线。我们就利用这个数据线让电脑远程连接 pcDuino。在版本 1126 中,你可以只连一根 otg 线到电脑就可以启动系统,当然如果你上面插的 shield 比较多,可能供电不足,你要接你的手机充电器用一下给 pcDuino 供电。
otg 的数据线插上电脑后会提示安装驱动,这个驱动必须要手动装。下面是安装方法。
在计算机设备管理里面点击那个有感叹号的选项。点击右键更新驱动程序软件。


经过短暂的 1 分钟后你电脑就安装上了。

下面来给连上的接入点手动设置一个 IP,下面是我的设置
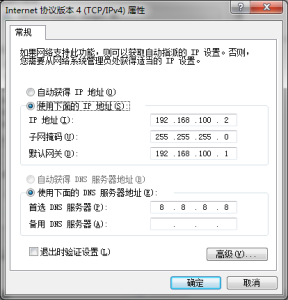
ip 地址 2-100 进行设置。
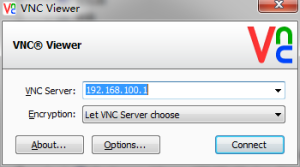
设置完成之后你就可以用 VNC 登陆 pcDuino 了。记住啊,以后这种方式连接 pcDuino 都用固定 ip:192.168.100.1
你会发现 pcDuino 做的确实很好,这样省了很多东西,但是有个问题是,pcDuino 不能上网,其实这个在开发这边版本的时候也是有考虑的,为了避免有些玩家动手能力不足,无法完成 PC 端的配置,下面将 pcDuino 也能上网的方法列出来。这个就要对 pcDuino 系统配置进行修改了。具体如下:
sudo vi /etc/dhcp/dhcpd.conf #注释掉下面的内容
subnet 192.168.100.0 netmask 255.255.255.0 {
range 192.168.100.10 192.168.100.100;
option routers 192.168.100.1;
}
sudo vi /etc/NetworkManager/system-connections/usb0 #修改成如下
[802-3-ethernet]
duplex=full
mac-address=00:11:22:33:44:55
[connection]
id=usb0
uuid=933bb85a-de4d-4451-ba31-2cecbe583730
type=802-3-ethernet
timestamp=1385445105
[ipv6]
method=auto
[ipv4]
method=auto
好了。就这两个文件修改一下,重启一下板子,剩下都是 PC 上的工作了。
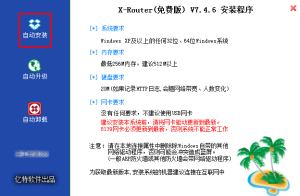
我们在 PC 机上做个软路由。下载软路由软件 X-router, 链接:http://www.yitsoftware.com/XRouter/,建议下载免费版。
安装成功后,打开软件会提示你登陆,不需要输入密码可以直接登陆,然后进入设置向导,这里设置笔记本的无线或者有线网卡为 wlan 口,设置 usb0 为 lan 口。

手动填入你想要的 ip ,手动填入子网掩码

填入自己电脑从路由获得的网络配置信息

下一步结束,向导,
下面就来开始连接 pcDuino
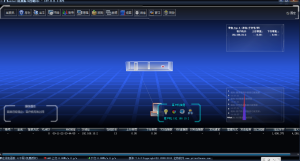
这是软件的设置完成的页面,上面可以清楚看到 pcDuino 的 ip 为 192.168.10.2
用 vnc 连接 pcDuino, 输入百度
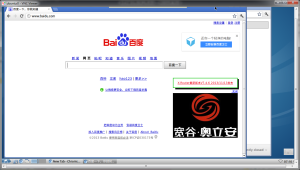
用 ssh 远程 update

本版本对 pcDuino V1,V2 都实用。另外次版本还解决了 pcDuino 的 ADC0 和 ADC1 数据不准确等问题。
linksprite 学习中心

20131126版本后,可以从PC通过USB-OTG VNC到pcDuino
有些玩家购买pcDuino到手后发现自己没有显示器,没有鼠标键盘,有的只有手机的充电器和数据线。pcDuino开发者了解到粉丝们的郁闷之后,在软件上帮忙大家解决了这个问题。下面就给大家介绍一下。
一,新的上网方式
在这个电子产品泛滥的时代,大家手中最多的不是iphone,而是数据线。我们就利用这个数据线让电脑远程连接pcDuino。在版本1126中,你可以只连一根otg线到电脑就可以启动系统,当然如果你上面插的shield比较多,可能供电不足,你要接你的手机充电器用一下给pcDuino供电。
otg的数据线插上电脑后会提示安装驱动,这个驱动必须要手动装。下面是安装方法。
在计算机设备管理里面点击那个有感叹号的选项。点击右键更新驱动程序软件。
经过短暂的1分钟后你电脑就安装上了。
下面来给连上的接入点手动设置一个IP,下面是我的设置
ip地址2-100进行设置。
设置完成之后你就可以用VNC登陆pcDuino了。记住啊,以后这种方式连接pcDuino都用固定ip:192.168.100.1
二,让pcDuino也能上百度
你会发现pcDuino做的确实很好,这样省了很多东西,但是有个问题是,pcDuino不能上网,其实这个在开发这边版本的时候也是有考虑的,为了避免有些玩家动手能力不足,无法完成PC端的配置,下面将pcDuino也能上网的方法列出来。这个就要对pcDuino系统配置进行修改了。具体如下:
sudo vi /etc/dhcp/dhcpd.conf #注释掉下面的内容
subnet 192.168.100.0 netmask 255.255.255.0 {
range 192.168.100.10 192.168.100.100;
option routers 192.168.100.1;
}
sudo vi /etc/NetworkManager/system-connections/usb0 #修改成如下
[802-3-ethernet]
duplex=full
mac-address=00:11:22:33:44:55
[connection]
id=usb0
uuid=933bb85a-de4d-4451-ba31-2cecbe583730
type=802-3-ethernet
timestamp=1385445105
[ipv6]
method=auto
[ipv4]
method=auto
好了。就这两个文件修改一下,重启一下板子,剩下都是PC上的工作了。
我们在PC机上做个软路由。下载软路由软件X-router,链接:http://www.yitsoftware.com/XRouter/,建议下载免费版。
安装成功后,打开软件会提示你登陆,不需要输入密码可以直接登陆,然后进入设置向导,这里设置笔记本的无线或者有线网卡为wlan口,设置usb0为lan口。
手动填入你想要的ip ,手动填入子网掩码
填入自己电脑从路由获得的网络配置信息
下一步结束,向导,
下面就来开始连接pcDuino
这是软件的设置完成的页面,上面可以清楚看到pcDuino的ip为192.168.10.2
用vnc连接pcDuino,输入百度
用ssh远程update
三,说明
本版本对pcDuino V1,V2都实用。另外次版本还解决了pcDuino的ADC0和ADC1数据不准确等问题。
linksprite学习中心

32-bit ARM Cortex-M3 microcontroller; up to 512 kB flash and 96 kB SRAM; USB Device/Host/OTG; Eth...
 点击获取完整资源:32-bit ARM Cortex-M3 microcontroller; up to 512 kB flash and 96 kB SRAM; USB Device/Host/OTG; Ethernet; LCD; EMC
LPC178x/7x 1. General description The LPC178x/7x is an ARM Cortex-M3 based
点击获取完整资源:32-bit ARM Cortex-M3 microcontroller; up to 512 kB flash and 96 kB SRAM; USB Device/Host/OTG; Ethernet; LCD; EMC

Android OTG U 盘文件读写
最近要求对安卓平板开发时导出 Excel 表格到插在平板的 U 盘上,初步尝试发现,对 U 盘的文件读写只能操作 Android / 包名 / 的目录,不能直接写在根目录,不方便客户使用,于是研究了 libaums 的库可用是可用,但是调用其 device.init () 方法后,就不能在文件管理里面看到 U 盘了,所以客户使用起来还是不方便,于是想到了 Linux 文件操作命令。
思路是先生成文件在内置存储卡中,然后使用Linux命令将文件cp或者mv到U盘根目录
复制命令
cp -r srcPath targetPath
剪切命令
mv srcPath targetPath
首先获取 U 盘的路径,代码如下,有返回值说明有 U 盘挂载,返回值为空说明 U 盘未挂载
    public static String getUDiskRealPath() {
        String filePath = "/proc/mounts";
        File file = new File(filePath);
        List<String> lineList = new ArrayList<>();
        InputStream inputStream =null;
        try {
            inputStream = new FileInputStream(file);
            if (inputStream != null) {
                InputStreamReader inputStreamReader = new InputStreamReader(inputStream, "GBK");
                BufferedReader bufferedReader = new BufferedReader(inputStreamReader);
                String line = "";
                while ((line = bufferedReader.readLine()) != null) {
                    if (line.contains("vfat")) {
                        lineList.add(line);
                    }
                }
            }
        } catch (FileNotFoundException e) {
            e.printStackTrace();
        } catch (IOException e) {
            e.printStackTrace();
        } finally {
            if (inputStream != null) {
                try {
                    inputStream.close();
                } catch (IOException e) {
                    e.printStackTrace();
                }
            }
        }
        if (lineList.isEmpty()){
            Log.i(HEAD, "getUDiskPath no usb disk ");
            return "";
        }
        String editPath = lineList.get(lineList.size() - 1);

        Log.i(HEAD,"edit path = " + editPath);
        int start = editPath.indexOf("/mnt");
        int end = editPath.indexOf(" vfat");
        String path = editPath.substring(start, end);
        return path;
    }
生成你要复制或剪切到 U 盘的文件并获取其路径 srcPath
拼接命令传入下面的执行命令方法中,其中 isRooted 需传入 true
    /**
     * Execute the command.
     *
     * @param commands        The commands.
     * @param isRooted        True to use root, false otherwise.
     * @param isNeedResultMsg True to return the message of result, false otherwise.
     * @return the single {@link CommandResult} instance
     */
    public static CommandResult execCmd(final String[] commands,
                                        final boolean isRooted,
                                        final boolean isNeedResultMsg) {
        int result = -1;
        if (commands == null || commands.length == 0) {
            return new CommandResult(result, null, null);
        }
        Process process = null;
        BufferedReader successResult = null;
        BufferedReader errorResult = null;
        StringBuilder successMsg = null;
        StringBuilder errorMsg = null;
        DataOutputStream os = null;
        try {
            process = Runtime.getRuntime().exec(isRooted ? "su" : "sh");
            os = new DataOutputStream(process.getOutputStream());
            for (String command : commands) {
                if (command == null) continue;
                os.write(command.getBytes());
                os.writeBytes(LINE_SEP);
                os.flush();
            }
            os.writeBytes("exit" + LINE_SEP);
            os.flush();
            result = process.waitFor();
            if (isNeedResultMsg) {
                successMsg = new StringBuilder();
                errorMsg = new StringBuilder();
                successResult = new BufferedReader(new InputStreamReader(process.getInputStream(),
                        "UTF-8"));
                errorResult = new BufferedReader(new InputStreamReader(process.getErrorStream(),
                        "UTF-8"));
                String line;
                if ((line = successResult.readLine()) != null) {
                    successMsg.append(line);
                    while ((line = successResult.readLine()) != null) {
                        successMsg.append(LINE_SEP).append(line);
                    }
                }
                if ((line = errorResult.readLine()) != null) {
                    errorMsg.append(line);
                    while ((line = errorResult.readLine()) != null) {
                        errorMsg.append(LINE_SEP).append(line);
                    }
                }
            }
        } catch (Exception e) {
            e.printStackTrace();
        } finally {
            try {
                if (os != null) {
                    os.close();
                }
            } catch (IOException e) {
                e.printStackTrace();
            }
            try {
                if (successResult != null) {
                    successResult.close();
                }
            } catch (IOException e) {
                e.printStackTrace();
            }
            try {
                if (errorResult != null) {
                    errorResult.close();
                }
            } catch (IOException e) {
                e.printStackTrace();
            }
            if (process != null) {
                process.destroy();
            }
        }
        return new CommandResult(
                result,
                successMsg == null ? null : successMsg.toString(),
                errorMsg == null ? null : errorMsg.toString()
        );
    }
例如
/**源文件*/
String srcPath = "/storage/emulated/0/test.txt";
/**目标位置,如U盘跟路径*/
String targetPath = getUDiskRealPath();
/**拼接复制命令*/
String cmd = "cp -r " + srcPath + " " + targetPath;
/**执行复制命令*/
execCmd(new String[]{cmd},true,true);
即可完成文件写在 U 盘根目录(或者其他目录)的操作。
写文件会了,读文件也就是反过来进行了,先复制或剪切文件到内置存储卡,在进行基本的文件操作即可。
今天的关于Android OTG U盘文件读写和android读取u盘的分享已经结束,谢谢您的关注,如果想了解更多关于20131126 版本后,可以从 PC 通过 USB-OTG VNC 到 pcDuino、20131126版本后,可以从PC通过USB-OTG VNC到pcDuino、32-bit ARM Cortex-M3 microcontroller; up to 512 kB flash and 96 kB SRAM; USB Device/Host/OTG; Eth...、Android OTG U 盘文件读写的相关知识,请在本站进行查询。
本文标签:


