以上就是给各位分享【工利其器】必会工具之,其中也会对九AndroidLint篇——为Android量身定做的代码审查利器进行解释,同时本文还将给你拓展AndroidLint、AndroidLint命令
以上就是给各位分享【工利其器】必会工具之,其中也会对九Android Lint 篇 —— 为 Android 量身定做的代码审查利器进行解释,同时本文还将给你拓展Android Lint、Android Lint 命令行工具不解析 Kotlin 文件、Android Lint 实践 —— 简介及常见问题分析、Android Lint 实践之二 —— 自定义 Lint等相关知识,如果能碰巧解决你现在面临的问题,别忘了关注本站,现在开始吧!
本文目录一览:- 【工利其器】必会工具之(九)Android Lint 篇 —— 为 Android 量身定做的代码审查利器
- Android Lint
- Android Lint 命令行工具不解析 Kotlin 文件
- Android Lint 实践 —— 简介及常见问题分析
- Android Lint 实践之二 —— 自定义 Lint
Android Lint 篇 —— 为 Android 量身定做的代码审查利器")
【工利其器】必会工具之(九)Android Lint 篇 —— 为 Android 量身定做的代码审查利器
前言
转载请申明,转自【https://www.cnblogs.com/andy-songwei/p/11832280.html】,谢谢!
我们在进行代码优化的时候,往往是通过开发者的经验来判断哪些代码可能存在潜在问题,哪些资源的使用不合规范等。实际上 Android SDK 提供了一款功能非常强大的工具,来帮助开发者自动检测代码的质量及安全问题,这款工具就叫 Android Lint。Lint 提供了命令行方式以及与 IDE 集成的方式来执行,现在 Android 开发者基本上都使用 Android Studio(后文简称 AS,下同)来进行开发,强大的 AS 也集成了该工具,本文就基于 AS3.2 版本来介绍 Lint。
一、Android Lint 简介
Android Lint 是 SDK Tools 16(ADT16,当前笔者使用的 ADT 已经是 26 了,所以现在就不用担心自己所使用的 SDK 中不包含 lint 工具了)开始引入的一个代码扫描工具,路径为:Sdk\tools\bin\lint.bat。通过它对 Android 工程源代码进行扫描和检查,可发现潜在的问题,以便程序员及早修正这个问题。通过 Lint,无需实际执行应用,也不必编写测试用例,就可以检查 Android 项目中源文件是否存潜在的错误,以及在正确性、安全性、性能、易用性、无障碍性和国际化方面是否需要优化改进。
二、Lint 的工作原理
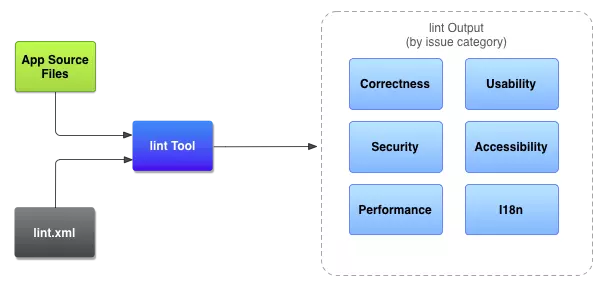
会使用 Lint 了,可以简单了解一下它的原理,即工作过程。Android Lint 的工作过程比较简单,一个基础的 Lint 过程由 Lint Tool(检测工具),Source Files(项目源文件) 和 lint.xml(配置文件) 三个部分组成,Lint Tool 读取 Source Files,根据 lint.xml 配置的规则(issue)输出结果(如下图)。
三、Lint 在 AS 中的使用
由于现在 Lint 是直接集成到 AS 中的,所以可以直接使用,无需再安装。
1、Lint 的启动
Lint 在 Android Studio 中的使用步骤非常简单,有两条途径可以启动 Lint:
(1)从主菜单栏中启动
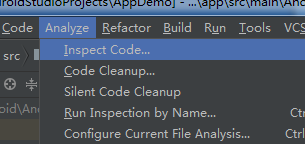
点击主菜单 > Analyze > Inspect Code 会弹出检查范围选择对话框
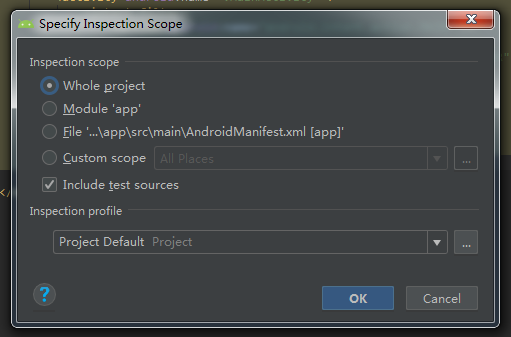
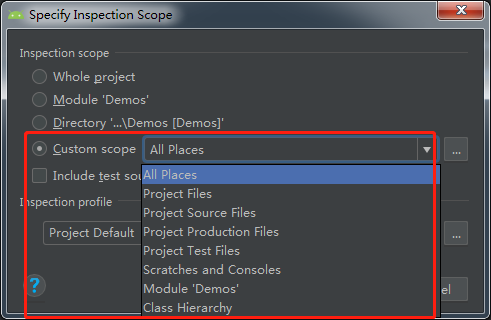
该对话框用于选择要检查的范围,根据实际需要选择即可。其中选择 “Custom scope” 时可以自定义检查范围,
选择好检查范围后,点击 “OK” 后,Lint 就开始启动了,AS 界面的底部会表示正在运行中,稍等一会儿就能看到检查结果了。
(2)通过右键菜单启动
在 AS 界面文件或编辑界面点击右键,在弹出的菜单中也可以看到 “Analyze > Inspect Code” 选项,后面就和上面的方法一样了,这里不再赘述。
2、查看检查结果
检查完成后会可以看到如下界面板了:
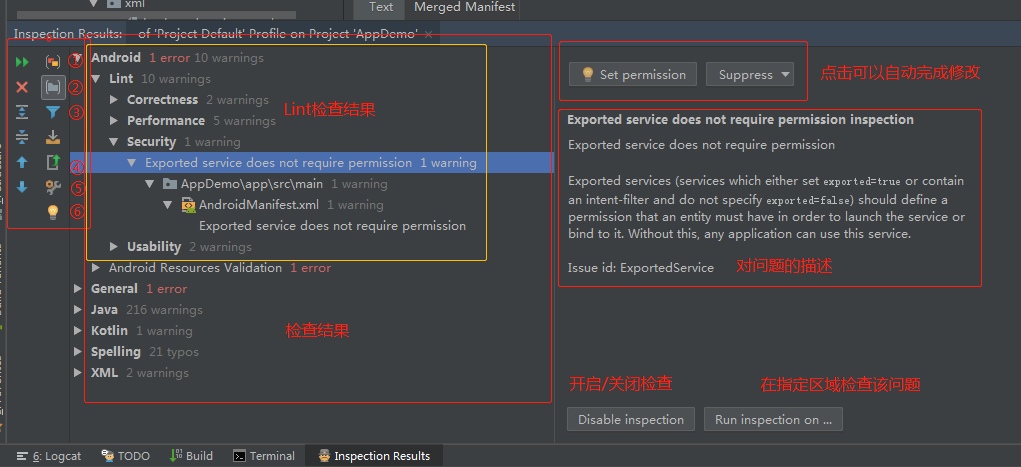
在这个面板中,“Lint 检查结果区” 展示的就是通过 Lint 工具检查出来的结果。当点击这些结果中的问题项时,可以在右边看到该类问题或者具体问题的详情,然后自动完成修改或者根据对问题的描述手动修改。
3、结果面板功能说明
上述结果面板从左到右可以分为三个大区域:工具栏,结果区和问题详情区。
(1)工具栏
工具栏中提供了多个常用的功能,把鼠标移到图标上时会给出相应的提示,这里对部分按钮进行说明:
1)图中①处,Group By Serverity:检查结果按照问题严重程度分组。
2)图中②处,Group By Directory:检查结果按照目录分组。
3)图中③处,Filter resolved items:过滤掉已经解决的问题项。
4)图中④处,Export:导出为 HTML 或者 XML 文档。
5)图中⑤处,Edit Settings:编辑设置,通过这里可以对 Lint 进行设置,后面会详细介绍。
6)图中⑥处,Apply a quickfix:快速修复,点击这里可以直接对所选问题进行快速修复。
(2)检查结果区
由于这里检查代码不仅仅只有 Lint 在工作,还有很多其它插件也在执行,所以结果中有很多其它工具检查出来的问题,Android > Lint 下面的目录就是 Lint 的结果区了。如果展开 Lint 的结果,会发现这些问题都是 Android 所特有的问题,比如布局文件、控件、AndroidManifest 文件中的问题,可见 Lint 就是为 Android 而量身定做的。默认时这些结果是按照一定的分类来分组的,比如,Correctness、Performance、Security 等,这问题类型是否需要检查,也是在设置中设置的,后面会详细介绍。当然通过这个结果区还可以看到 Java、Kotlin、Spelling 等的问题,也一样解决。
(3)问题详情区
如果鼠标在结果区选择的是某一类问题,这部分显示了所选问题的详情,解决建议,以及快速修复等功能。其中 “Run inspection on” 按钮,点击后会弹出如下对话框:
这里选择在哪个范围内检查同类问题。
如果在结果区选择的是具体的问题项,那么右边显示的就是对问题所在的位置进行预览。如下图所示:

通过上面的介绍,可以看到 Lint 的基本使用还是比较简单的。
四、对 Lint 进行设置
1、进入设置界面的两种方式
有两种途径可以进入到 Lint 的设置界面:
(1)File > Settings > Editor > Inspections;
(2)Lint 控制面板工具栏的设置按钮,即第二节中的按钮⑤。
2、设置面板预览
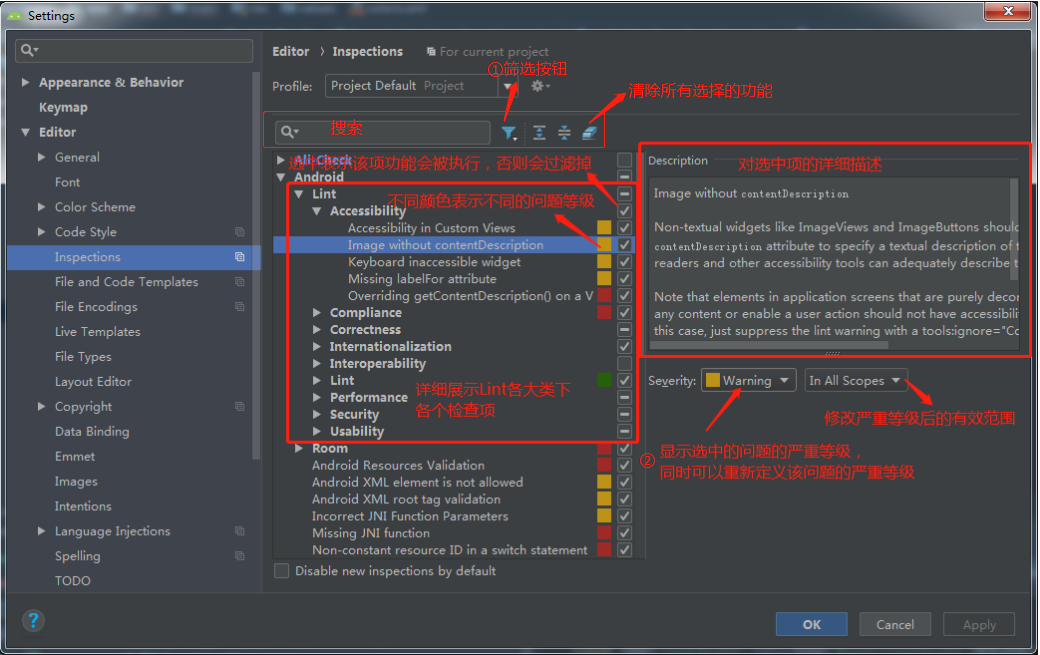
3、设置项功能介绍
设置界面中的各个区域和按钮的功能都在图中标注了,这里再对按钮①和按钮②进行说明。
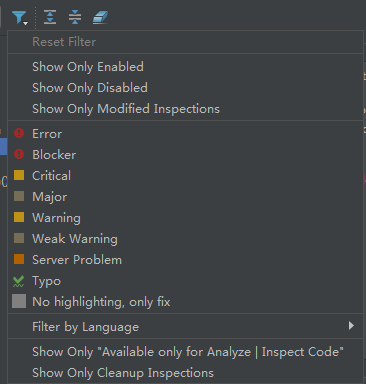
(1)筛选按钮
这是一个下拉框,通过该处可以筛选要显示的功能项。
(2) 问题严重等级设置
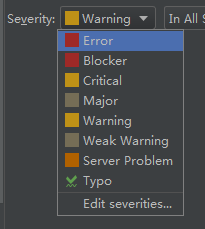
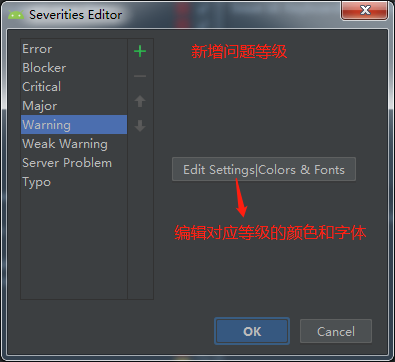
下拉列表,会显示可以自定义的等级及对应颜色,可以通过此处编辑选择项的严重等级。点击 “Edit severities” 可以添加新的严重等级,以及编辑各等级德颜色和字体。当然,系统默认的问题严重性等级和这里略有区别,系统默认的严重等级由高到低依次为:Fatal、Error、Warning、Information、Ignore 5 个等级。
五、Lint 问题种类
从设置面板中可以看到,问题可以分为如下几个大类:
(1)Accessibility 辅助选项,比如 ImageView 的 contentDescription 往往建议在属性中定义等。
(2)Compliance 合规性,违反了 Google Play 的要求,比如使用了过期的库版本,性能、安全性、API 等级等没有遵循新系统的要求等。
(3)Correctness 不够完美的编码,比如硬编码、使用过时 API 等。
(4)Internationalization 国际化,直接使用汉字,没有使用资源引用等
(5)Interoperability 互操作性,比如和 Kotln 的交互等。
(6)Performanc 对性能有影响的编码,比如:静态引用,循环引用等
(7)Security 不安全的编码,比如在 WebView 中允许使用 JavaScriptInterface 等
(8)Usability 可用的,有更好的替换的 比如排版、图标格式建议.png 格式等
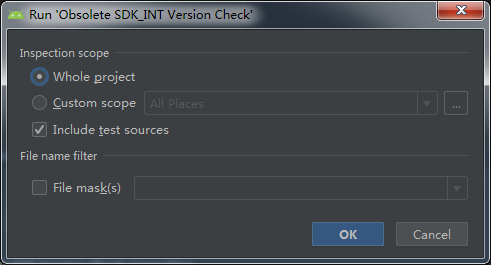
六、根据规则名称来检查
有时候我们需要明确检查某一类问题,比如查找项目中没有使用的资源,并将它们删除,它们会耗性能。可以通过如下的方式来找到这些没有使用的资源:点击 Analyze > Run Inspection By Name,会弹出对话框
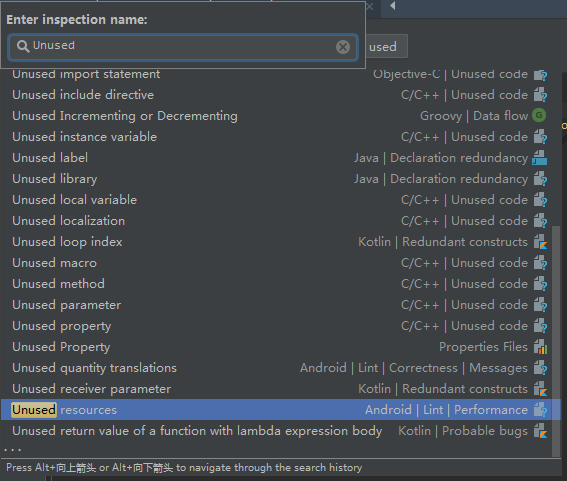
输入该规则的名称,按 “Enter” 键,提示选择检查范围:
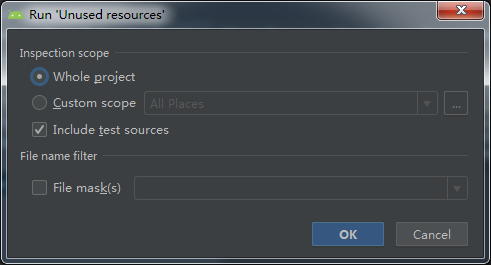
点击 “OK” 按钮,结果中只会显示 “Unused resoures” 的问题项目:

该功能能帮我们明确定位某一类问题。
七、自定义 Lint
对于多数情况,默认的 Lint 已经足够使用了,但总有一些需求是 Lint 自带规则不能满足的,这个时候就需要自定义 Lint 规则了。当然,限于笔者对 Liint 的使用经验有限,对自定义 Lint 还不太熟悉,这里推荐一篇文章,有兴趣的可以深入研究:
自定义 Lint 实践 https://blog.csdn.net/ouyang_peng/article/details/80374867。
参考:
https://blog.csdn.net/luzhenyuxfcy/article/details/79398761
http://tools.android.com/tips/lint
https://developer.android.google.cn/studio/write/lint
https://blog.csdn.net/hudashi/article/details/8333349
https://www.jianshu.com/p/9eaf7c0eee67
结语
本文只介绍了 Android Lint 常见的一些使用方法,一定还有很多很牛的功能,希望读者们多多探索,多多交流,共同进步,谢谢!

Android Lint
Android Lint is a new tool introduced in ADT 16 (and Tools 16) which scans Android project sources for potential bugs. It is available both as a command line tool, as well as integrated with Eclipse. The architecture is deliberately IDE independent so it will hopefully be integrated with other IDEs, with other build tools and with continuous integration systems as well.
Here are some examples of the types of errors that it looks for:
- Missing translations (and unused translations)
- Layout performance problems (all the issues the old
layoutopttool used to find, and more) - Unused resources
- Inconsistent array sizes (when arrays are defined in multiple configurations)
- Accessibility and internationalization problems (hardcoded strings, missing contentDescription, etc)
- Icon problems (like missing densities, duplicate icons, wrong sizes, etc)
- Usability problems (like not specifying an input type on a text field)
- Manifest errors
Command Line Usage
lint.
tools/ directory on your path, you can invoke it as “
lint”. Just point to a specific Android project directory. You can also point to a random directory, which (if it is not an Android project) will be searched recursively and all projects under that directory will be checked. (And you can also specify multiple projects separated by spaces).
$ lint /src/astrid/
Scanning GreenDroid-GoogleAPIs: ..
Scanning stream: ...
Scanning api: ...........................
Scanning GDCatalog: .......................
Scanning GreenDroid: ...........................................................
Scanning tests: ...
Scanning filters: ....
Scanning tests: .....
Scanning astrid: ....................................................................................................................................................
Scanning simple: .......
api/res/values-ca: Error: Locale ca is missing translations for: sync_SPr_bgwifi_key, sync_SPr_forget_key, sync_SPr_interval_values, sync_SPr_logged_in_prefix... (2 more) [MissingTranslation]
astrid/res/values-ca: Error: Locale ca is missing translations for: DLG_cancel, DLG_dismiss, DLG_ok, EPr_deactivated... (117 more) [MissingTranslation]
api/res/values-cs: Error: Locale cs is missing translations for: sync_SPr_bgwifi_key, sync_SPr_forget_key, sync_SPr_interval_values, sync_SPr_logged_in_prefix... (2 more) [MissingTranslation]
(many lines omitted)
43 errors, 466 warnings
Disabling Checks
You can disable a specific check, or a list of checks, by adding the --disable argument, e.g.
$ lint --disable MissingTranslation,UnusedIds,Usability:Icons /src/astrid/
Note that you can list categories as well, such as “Usability:Icons” above, which is the Icons subcategory of the Usability category.
--enable flag.
Finally, you can specify which exact checks to run with the
--check flag. This lets you look for a specific problem in the codebase, such as:
$ lint --check MissingPrefix /src/astrid/
To find out which id’s and categories are available, run
$ lint --list
Valid issue categories:
Correctness
Security
Performance
Usability
Usability:Icons
Accessibility
Internationalization
Valid issue id''s:
"ContentDescription": Ensures that image widgets provide a contentDescription
"DuplicateIds": Checks for duplicate ids within a single layout
"StateListReachable": Looks for unreachable states in a <selector>
"InefficientWeight": Looks for inefficient weight declarations in LinearLayouts
"ScrollViewSize": Checks that ScrollViews use wrap_content in scrolling dimension
"MergeRootFrame": Checks whether a root <FrameLayout> can be replaced with a <merge> tag
...
And to get the explanation for a specific issue use the
--show command along with a list of id’s or categories (or no arguments at all to see everything):
$ lint --show MissingPrefix
MissingPrefix
-------------
Summary: Detect XML attributes not using the Android namespace
Priority: 8 / 10
Severity: Warning
Category: Correctness
Most Android views have attributes in the Android namespace. When
referencing these attributes you *must* include the namespace prefix,
or your attribute will be interpreted by aapt as just a custom
attribute.
HTML Reports
- It includes the longer explanations associated with each issue, and hyperlinks to More Info for issues which provide a more info attribute.
- It includes the actual source code line with the error (and a window of 3 lines around it).
- It can contain links to the associated source files
- For icon errors, the icons themselves are shown in the report for comparison purposes
--html filename as an argument:
$ lint --html /tmp/report.html
By default, links to source files will just use local file:// path resources. You can remap the URLs to a different prefix with the --url option. For example:
$ lint --html /tmp/report.html --url /src/MyProj=http://buildserver/src/MyProj
Other Command Line Options
lint --help to get information on the available arguments.
Eclipse Usage
- Automatic fixes for many warnings
- Lint gets run automatically on various editing operations
- Ability to suppress types of errors as well as specific instances of an error
- Ability to configure issue severities
- Jump directly to the problem source from the lint view
Automatic Lint
- Export an APK. In this case it runs lint in a special mode which only looks for fatal errors (which is faster) and aborts the export if any fatal errors are found. You can turn off this in the Lint Options.
- Edit and Save and XML file, such as a layout file or a manifest file. In this case, all the file-scope checks that apply to the given file are run and editor markers are added for any issues found.
- Use the layout editor. After every UI operation, file-scope checks (such as the various layoutopt rules) are run on the layout file and the results are shown in a special lint window (which can be opened from the error marker which shows in the top right corner of the layout editor when errors are found).
Lint Window

Alternatively you can right click on the project and in the Android Tools sub menu, there is a “Run Lint” action. This will open a Lint Window which contains the various errors. Selecting an error will show the associated explanation in the text area on the right.
You can double click on errors in the lint view to jump to the associated source location, if any. The icon of each warning will indicate its severity, and for warnings which have fixes (see next section) there is a small light bulb overlay.
The window also has an action bar (in the upper right hand side corner), which lets you
- Run the lint checks again to refresh the results (which turns into a Stop button during the refresh if you want to abort it)
- Run the fix associated with this error, if any
- Ignore this fix
- Remove the warning marker
- Remove all warning markers

Quick Fixes
- From the lint view, click the lightbulb to invoke a fix.
- From the layout editor warning summary, click the Fix button to fix.
- And from the XML source editor, invoke the Quick Fix (Ctrl-1 or Command-1) and pick the quick fix associated with the warning.
Suppressing Errors
- Ignore the warning in this file only
- Ignore the warning in this project
- Ignore the warning, period.
- Ignore warnings using annotations or attributes, as explained here.

These choices are stored in a file named
lint.xml in the project, which is also read by the command line tool. Thus, you can ignore warnings from the UI, and check in the
lint.xml file with your source projects, and others running lint will not see warnings you have ignored (presumably because they have been manually verified).
Options

If you select an issue, you can edit its Severity in the dropdown on the bottom right. This lets you designate certain issues as Errors for example (which will abort Export APK if the option near the top of the dialog is enabled).
To turn off an issue check completely, choose “Ignore” as the severity.
Note that this does not edit the per-project lint settings. Open the Project settings dialog (right click on the project), where you’ll find a property page for Android Lint. Manual severity edits in the options dialog are also recorded in the
lint.xml file along with suppressed errors, so others in your team will get the same severity designations you edit for the project.
Installation

Android Lint 命令行工具不解析 Kotlin 文件
如何解决Android Lint 命令行工具不解析 Kotlin 文件
我正在尝试将 ~/Library/Android/sdk/cmdline-tools/lint myProjectPath 中的 lint 作为独立工具运行。但它只是解析 XML 文件而完全忽略 Kotlin 文件。这是预期的行为吗?

Android Lint 实践 —— 简介及常见问题分析
概况
QMUI Android 之前更新了 1.0.4 版本,其中主要的特性是引入了 Android Lint,对项目代码进行优化。Android Lint 是 SDK Tools 16(ADT 16)开始引入的一个代码扫描工具,通过对代码进行静态分析,可以帮助开发者发现代码质量问题和提出一些改进建议。除了检查 Android 项目源码中潜在的错误,对于代码的正确性、安全性、性能、易用性、便利性和国际化方面也会作出检查。
而最终选择了 Android Lint 作为项目的代码检测工具,是因为它具有以下几个特性:
- 已经被集成到 Android Studio,使用方便。
- 能在编写代码时实时反馈出潜在的问题。
- 可以自定义规则。Android Lint 本身包含大量已经封装好的接口,能提供丰富的代码信息,开发者可以基于这些信息进行自定义规则的编写。
开始使用
Android Lint 的工作过程比较简单,一个基础的 Lint 过程由 Lint Tool(检测工具),Source Files(项目源文件) 和 lint.xml(配置文件) 三个部分组成,Lint Tool 读取 Source Files,根据 lint.xml 配置的规则(issue)输出结果(如下图)。

如上面所描述,在 Android Studio 中,Android Lint 已经被集成,只需要点击菜单 —— Analyze —— Inspect Code 即可运行 Android Lint,在弹出的对话框中可以设置执行 Lint 的范围,可以选择整个项目,也可以只选择当前的子模块或者其他自定义的范围:

检查完毕后会弹出 Inspection 的控制台,并在其中列出详细的检查结果:

如上图所展示的,Android Lint 对检查的结果进行了分类,同一个规则(issue)下的问题会聚合,其中针对 Android 的规则类别会在分类前说明是 Android 相关的,主要是六类:
- Accessibility 无障碍,例如
ImageView缺少contentDescription描述,String 编码字符串等问题。 - Correctness 正确性,例如 xml 中使用了不正确的属性值,Java 代码中直接使用了超过最低 SDK 要求的 API 等。
- Internationalization 国际化,如字符缺少翻译等问题。
- Performance 性能,例如在
onMeasure、onDraw中执行 new,内存泄露,产生了冗余的资源,xml 结构冗余等。 - Security 安全性,例如没有使用 HTTPS 连接 Gradle,AndroidManifest 中的权限问题等。
- Usability 易用性,例如缺少某些倍数的切图,重复图标等。
其他的结果条目则是针对 Java 语法的问题,另外每一个问题都有区分严重程度(severity),从高到底依次是:
- Fatal
- Error
- Warning
- Information
- Ignore
其中 Fatal 和 Error 都是指错误,但是 Fatal 类型的错误会直接中断 ADT 导出 APK,更为严重。另外如下图所示,在结果列表中点击一个条目,可以看到详细的源文件名和位置,以及命中的错误规则(issue)、解决方案或者屏蔽提示:

上图的例子是在 ScrollView 的第一层子元素中设置了高度为 match_parent,Android Lint 会直接给出解决办法——使用 wrap_content 代替,大部分静态语法相关的问题 Android Lint 都可以直接给出解决办法。
除了直接在菜单中运行 Lint 外,大部分问题代码在编写时 Android Studio 就会给出提醒:

配置
对于执行 Lint 操作的相关配置,是定义在 gradle 文件的 lintOptions 中,可定义的选项及其默认值包括(翻译自 LintOptions - Android Plugin 2.3.0 DSL Reference):
android {
    lintOptions {
        // 设置为 true,则当 Lint 发现错误时停止 Gradle 构建
        abortOnError false
        // 设置为 true,则当有错误时会显示文件的全路径或绝对路径 (默认情况下为true)
        absolutePaths true
        // 仅检查指定的问题(根据 id 指定)
        check ''NewApi'', ''InlinedApi''
        // 设置为 true 则检查所有的问题,包括默认不检查问题
        checkAllWarnings true
        // 设置为 true 后,release 构建都会以 Fatal 的设置来运行 Lint。
        // 如果构建时发现了致命(Fatal)的问题,会中止构建(具体由 abortOnError 控制)
        checkReleaseBuilds true
        // 不检查指定的问题(根据问题 id 指定)
        disable ''TypographyFractions'',''TypographyQuotes''
        // 检查指定的问题(根据 id 指定)
        enable ''RtlHardcoded'',''RtlCompat'', ''RtlEnabled''
        // 在报告中是否返回对应的 Lint 说明
        explainIssues true
        // 写入报告的路径,默认为构建目录下的 lint-results.html
        htmlOutput file("lint-report.html")
        // 设置为 true 则会生成一个 HTML 格式的报告
        htmlReport true
        // 设置为 true 则只报告错误
        ignoreWarnings true
        // 重新指定 Lint 规则配置文件
        lintConfig file("default-lint.xml")
        // 设置为 true 则错误报告中不包括源代码的行号
        noLines true
        // 设置为 true 时 Lint 将不报告分析的进度
        quiet true
        // 覆盖 Lint 规则的严重程度,例如:
        severityOverrides ["MissingTranslation": LintOptions.SEVERITY_WARNING]
        // 设置为 true 则显示一个问题所在的所有地方,而不会截短列表
        showAll true
        // 配置写入输出结果的位置,格式可以是文件或 stdout
        textOutput ''stdout''
        // 设置为 true,则生成纯文本报告(默认为 false)
        textReport false
        // 设置为 true,则会把所有警告视为错误处理
        warningsAsErrors true
        // 写入检查报告的文件(不指定默认为 lint-results.xml)
        xmlOutput file("lint-report.xml")
        // 设置为 true 则会生成一个 XML 报告
        xmlReport false
        // 将指定问题(根据 id 指定)的严重级别(severity)设置为 Fatal
        fatal ''NewApi'', ''InlineApi''
        // 将指定问题(根据 id 指定)的严重级别(severity)设置为 Error
        error ''Wakelock'', ''TextViewEdits''
        // 将指定问题(根据 id 指定)的严重级别(severity)设置为 Warning
        warning ''ResourceAsColor''
        // 将指定问题(根据 id 指定)的严重级别(severity)设置为 ignore
        ignore ''TypographyQuotes''
    }
}
lint.xml 这个文件则是配置 Lint 需要禁用哪些规则(issue),以及自定义规则的严重程度(severity),lint.xml 文件是通过 issue 标签指定对一个规则的控制,在项目根目录中建立一个 lint.xml 文件后 Android Lint 会自动识别该文件,在执行检查时按照 lint.xml 的内容进行检查。如上面提到的那样,开发者也可以通过 lintOptions 中的 lintConfig 选项来指定配置文件。一个 lint.xml 示例如下:
<?xml version="1.0" encoding="UTF-8"?>
<lint>
    <!-- Disable the given check in this project -->
    <issue id="HardcodedText" severity="ignore"/>
    <issue id="SmallSp" severity="ignore"/>
    <issue id="IconMissingDensityFolder" severity="ignore"/>
    <issue id="RtlHardcoded" severity="ignore"/>
    <issue id="Deprecated" severity="warning">
        <ignore regexp="singleLine"/>
    </issue>
</lint>
issue 标签中使用 id 指定一个规则,severity="ignore" 则表明禁用这个规则。需要注意的是,某些规则可以通过 ignore 标签指定仅对某些属性禁用,例如上面的 Deprecated,表示检查是否有使用不推荐的属性和方法,而在 issue 标签中包裹一个 ignore 标签,在 ignore 标签的 regexp 属性中使用正则表达式指定了 singleLine,则表明对 singleLine 这个属性屏蔽检查。
另外开发者也可以使用 @SuppressLint(issue id) 标注针对某些代码忽略某些 Lint 检查,这个标注既可以加到成员变量之前,也可以加到方法声明和类声明之前,分别针对不同范围进行屏蔽。
常见问题
我们在使用 Android Lint 对项目进行检查后,整理了一些问题及解决方法,下面列举较为常见的场景:
ScrollView size validation
这也是上文提到过的一个情况,在 ScrollView 的第一层子元素中设置了高度为 match_parent,这是错误的写法,实际上在 measure 时这里必定会被当作 wrap_content 去处理,因此按照 Lint 的建议,直接改为 wrap_content 即可。
Handler reference leaks
Handler 引用的内存泄露问题,例如下面的例子:
protected static final int STOP = 0x10000;
protected static final int NEXT = 0x10001;

@BindView(R.id.rectProgressBar) QMUIProgressBar mRectProgressBar;
@BindView(R.id.circleProgressBar) QMUIProgressBar mCircleProgressBar;

int count;

private Handler myHandler = new Handler() {
    @Override
    public void handleMessage(Message msg) {
        super.handleMessage(msg);
        switch (msg.what) {
            case STOP:
                break;
            case NEXT:
                if (!Thread.currentThread().isInterrupted()) {
                    mRectProgressBar.setProgress(count);
                    mCircleProgressBar.setProgress(count);
                }
        }
    }
};
首先非静态的内部类或者匿名类会隐式的持有其外部类的引用,内部类使用了外部类的方法/成员变量也会导致其持有外部类引用,因此上面这种情况会导致 handler 持有了外部类,外部类同时持有 handler,handler 是异步的,当 handler 的消息发送出去后,外部类因 hanlder 的持有而无法销毁,最终导致内存泄露。
解决办法则是把该内部类改为 static,内部类中使用的外部类方法/成员变量改为弱引用,具体如下:
@BindView(R.id.rectProgressBar) QMUIProgressBar mRectProgressBar;
@BindView(R.id.circleProgressBar) QMUIProgressBar mCircleProgressBar;

int count;

private ProgressHandler myHandler = new ProgressHandler();

@Override
protected View onCreateView() {
    myHandler.setProgressBar(mRectProgressBar, mCircleProgressBar);
}

private static class ProgressHandler extends Handler {
    private WeakReference<QMUIProgressBar> weakRectProgressBar;
    private WeakReference<QMUIProgressBar> weakCircleProgressBar;

    public void setProgressBar(QMUIProgressBar rectProgressBar, QMUIProgressBar circleProgressBar) {
        weakRectProgressBar = new WeakReference<>(rectProgressBar);
        weakCircleProgressBar = new WeakReference<>(circleProgressBar);
    }

    @Override
    public void handleMessage(Message msg) {
        super.handleMessage(msg);
        switch (msg.what) {
            case STOP:
                break;
            case NEXT:
                if (!Thread.currentThread().isInterrupted()) {
                    if (weakRectProgressBar.get() != null && weakCircleProgressBar.get() != null) {
                        weakRectProgressBar.get().setProgress(msg.arg1);
                        weakCircleProgressBar.get().setProgress(msg.arg1);
                    }
                }
        }

    }
}
Memory allocations within drawing code
onMeasure、onDraw 都是被频繁调用的方法,因此 Lint 不建议在其中执行 new 操作,可以在 onCreateView 等非频繁调用的时机进行 new 操作,并用成员变量保存,再在 onMeasure 中使用成员变量。
‘private’ method declared ‘final’
private static final void addLinkMovementMethod(TextView t) {
    MovementMethod m = t.getMovementMethod();

    // ...
}
如上面的示例代码,会产生 ‘private’ method declared ‘final’ 的警告,因为私有方法是不会被 override 的,因此完全没有必要声明 final。
参考资料:
使用 Lint 改进您的代码 | Android Studio
LintOptions - Android Plugin 2.3.0 DSL Reference
Android Lint Checks - Android Studio Project Site

Android Lint 实践之二 —— 自定义 Lint
背景
如前文《Android Lint 实践 —— 简介及常见问题分析》所述,为保证代码质量,团队在开发过程中引入了 代码扫描工具 Android Lint,通过对代码进行静态分析,帮助发现代码质量问题和提出改进建议。Android Lint 针对 Android 项目和 Java 语法已经封装好大量的 Lint 规则(issue),但在实际使用中,每个团队因不同的编码规范和功能侧重,可能仍需一些额外的规则,基于这些考虑,我们研究并开发了自定义的 Lint 规则。
基础
创建自定义 Lint 需要创建一个纯 Java 项目,引入相关的包后可以基于 Android Lint 提供的基础类编写规则,最终把项目以 jar 的形式输出后就可以被主项目引用。这里我们以 QMUI Android 中的一个实际场景来说明如何进行自定义 Lint:我们在项目中使用了 Vector Drawable,在 Android 5.0 以下版本的系统中,Vector Drawable 不被直接支持,这时使用 ContextCompat.getDrawable() 去获取一个 Vector Drawable 会导致 crash,而这种情况由于只在 5.0 以下的系统中才会发生,往往不易被发现,因此我们需要在编写代码的阶段就能及时发现并作出提醒。在 QMUI Android 中,提供了 QMUIDrawableHelper.getVectorDrawable 方法,基于 support 包封装了安全的获取 Vector Drawable 的方法,因此我们最终的需求是检查出所有使用 ContextCompat.getDrawable() 和 getResources().getDrawable() 去获取 Vector Drawable 的地方,进行提醒并要求替换为 QMUIDrawableHelper.getVectorDrawable 方法。
创建工程
如上面所述,创建自定义 Lint 需要创建一个 Java 项目,项目中需要引入 Android Lint 的包,项目的 build.gradle 如下:
apply plugin: ''java''

configurations {
    lintChecks
}

dependencies {
    compile "com.android.tools.lint:lint-api:25.1.2"
    compile "com.android.tools.lint:lint-checks:25.1.2"

    lintChecks files(jar)
}

jar {
    manifest {
        attributes(''Lint-Registry'': ''com.qmuiteam.qmui.lint.QMUIIssueRegistry'')
    }
}
其中 lint-api 是 Android Lint 的官方接口,基于这些接口可以获取源代码信息,从而进行分析,lint-checks 是官方已有的检查规则。Lint-Registry 表示给自定义规则注册,以及打包为 jar,这个下面会详细解释。
Detector
Detector 是自定义规则的核心,它的作用是扫描代码,从而获取代码中的各种信息,然后基于这些信息进行提醒和报告,在本场景中,我们需要扫描 Java 代码,找到 getDrawable 方法的调用,然后分析其中传入的 Drawable 是否为 Vector Drawable,如果是则需要进行报告,完整代码如下:
/**
 * 检测是否在 getDrawable 方法中传入了 Vector Drawable,在 4.0 及以下版本的系统中会导致 Crash
 * Created by Kayo on 2017/8/24.
 */

public class QMUIJavaVectorDrawableDetector extends Detector implements Detector.JavaScanner {

    public static final Issue ISSUE_JAVA_VECTOR_DRAWABLE =
            Issue.create("QMUIGetVectorDrawableWithWrongFunction",
                    "Should use the corresponding method to get vector drawable.",
                    "Using the normal method to get the vector drawable will cause a crash on Android versions below 4.0",
                    Category.ICONS, 2, Severity.ERROR,
                    new Implementation(QMUIJavaVectorDrawableDetector.class, Scope.JAVA_FILE_SCOPE));

    @Override
    public List<String> getApplicableMethodNames() {
        return Collections.singletonList("getDrawable");
    }

    @Override
    public void visitMethod(@NonNull JavaContext context, AstVisitor visitor, @NonNull MethodInvocation node) {

        StrictListAccessor<Expression, MethodInvocation> args = node.astArguments();
        if (args.isEmpty()) {
            return;
        }

        Project project = context.getProject();
        List<File> resourceFolder = project.getResourceFolders();
        if (resourceFolder.isEmpty()) {
            return;
        }

        String resourcePath = resourceFolder.get(0).getAbsolutePath();
        for (Expression expression : args) {
            String input = expression.toString();
            if (input != null && input.contains("R.drawable")) {
                // 找出 drawable 相关的参数

                // 获取 drawable 名字
                String drawableName = input.replace("R.drawable.", "");
                try {
                    // 若 drawable 为 Vector Drawable,则文件后缀为 xml,根据 resource 路径,drawable 名字,文件后缀拼接出完整路径
                    FileInputStream fileInputStream = new FileInputStream(resourcePath + "/drawable/" + drawableName + ".xml");
                    BufferedReader reader = new BufferedReader(new InputStreamReader(fileInputStream));
                    String line = reader.readLine();
                    if (line.contains("vector")) {
                        // 若文件存在,并且包含首行包含 vector,则为 Vector Drawable,抛出警告
                        context.report(ISSUE_JAVA_VECTOR_DRAWABLE, node, context.getLocation(node), expression.toString() + " 为 Vector Drawable,请使用 getVectorDrawable 方法获取,避免 4.0 及以下版本的系统产生 Crash");
                    }
                    fileInputStream.close();
                } catch (Exception ignored) {
                }
            }
        }
    }
}
QMUIJavaVectorDrawableDetector 继承于 Detector,并实现了 Detector.JavaScanner 接口,实现什么接口取决于自定义 Lint 需要扫描什么内容,以及希望从扫描的内容中获取何种信息。Android Lint 提供了大量不同范围的 Detector:
Detector.BinaryResourceScanner针对二进制资源,例如 res/raw 等目录下的各种BitmapDetector.ClassScanner相对于Detector.JavaScanner,更针对于类进行扫描,可以获取类的各种信息Detector.GradleScanner针对 Gradle 进行扫描Detector.JavaScanner针对 Java 代码进行扫描Detector.ResourceFolderScanner针对资源目录进行扫描,只会扫描目录本身Detector.XmlScanner针对 xml 文件进行扫描Detector.OtherFileScanner用于除上面6种情况外的其他文件
不同的接口定义了各种方法,实现自定义 Lint 实际上就是实现 Detector 中的各种方法,在上面的例子中,getApplicableMethodNames 的返回值指定了需要被检查的方法,visitMethod 则可以接收检查到的方法对应的信息,这个方法包含三个参数,其作用分别是:
- context 这里的 context 是一个
JavaContext,主要的功能是获取主项目的信息,以及进行报告(包括获取需要被报告的代码的位置等)。 - visitor visitor 是一个
ASTVisitor,即 AST(抽象语法树)的访问者类,Android Lint 把扫描到的代码抽象成 AST,方便开发者以节点 - 属性的形式获取信息,visitor 则可以方便地获取当前节点的相关节点。 - node 这是一个
MethodInvocation实例,MethodInvocation是 Android Lint 里的 AST 子类,在上面的例子中,node 表示的是被扫描到的方法,所以我们可以通过节点 - 属性的形式获取被扫描的方法的参数等各种信息。
在例子中我们获取方法的参数,通过遍历参数拿到 Drawable 参数,分解出 Drawable 的文件名,然后通过 context 获取主项目的资源路径,配合 Drawable 的文件名拼接文件的实际路径,确定文件存在后检查文件内容开头是否包含 “vector” 这个字符串,如果是则表示开发者在普通的 getDrawable 方法中传入了 Vector Drawable,最后调用 context 的 report 方法进行报告。
值得注意的是,在例子中我们并没有直接实例 Drawable,然后通过 Drawable 的方法判断是否为 Vector Drawable,而是通过较为繁琐的步骤检查文件内容,这是因为 Android Lint 的项目是一个纯 Java 项目,不能使用 android.graphics 等包,因而开发时会比较繁琐。
Issue
在上面的例子中,在检查出问题需要进行报告时,context.report 方法中传入了一个 ISSUE_JAVA_VECTOR_DRAWABLE,这里的"issue"是声明一个规则,因此自定义一个 Lint 规则就需要定义一个 issue。issue 由类方法 Issue.create 创建,参数如下:
- id:标记 issue 的唯一值,语义上要能简短描述问题,使用 Java 注解和 XML 属性屏蔽 Lint 时,就需要使用这个 id。
- summary:概况地描述问题,不需要给出解决办法。
- explanation:详细地描述问题以及给出解决办法。
- category:问题类别,在系统给出的分类中选择,后面会详述。
- priority:1-10 的数字,表示优先级,10 为最严重。
- severity:严重级别,在 Fatal,Error,Warning,Informational,Ignore 中选择一个。
- Implementation:Detector 与 Issue 的映射关系,需要传入当前的 Detector 类,以及扫描代码的范围,例如 Java 文件、Resource 文件或目录等范围。
如下图,产生问题时,问题的提醒信息就就会显示相关的 Issue 的 id 等信息。

Category
Category 用于给 Issue 分类,系统已经提供了几个常用的分类,系统 Issue(即 Android Lint 自带的检查规则)也是使用这个 Category:
- Lint
- Correctness (子分类 Messages)
- Security
- Performance
- Usability (子分类 Typography, Icons)
- A11Y (Accessibility)
- I18N (Internationalization,子分类 Rtl)
如果系统分类不能满足需求,也可以创建自定义的分类:
public class QMUICategory {
    public static final Category UI_SPECIFICATION = Category.create("UI Specification", 105);
}
使用如下:
public static final Issue ISSUE_JAVA_VECTOR_DRAWABLE =
        Issue.create("QMUIGetVectorDrawableWithWrongFunction",
                "Should use the corresponding method to get vector drawable.",
                "Using the normal method to get the vector drawable will cause a crash on Android versions below 4.0",
                QMUICategory.UI_SPECIFICATION, 2, Severity.ERROR,
                new Implementation(QMUIJavaVectorDrawableDetector.class, Scope.JAVA_FILE_SCOPE));
Registry
创建自定义 Lint 的最后一步是 “Lint-Registry”,如前面所述,build.gradle 中需要声明 Regisry 类,打包成 jar:
jar {
    manifest {
        attributes(''Lint-Registry'': ''com.qmuiteam.qmui.lint.QMUIIssueRegistry'')
    }
}
而 registry 类中则是注册创建好的 Issue,以 QMUIIssueRegistry 为例:
public final class QMUIIssueRegistry extends IssueRegistry {
    @Override public List<Issue> getIssues() {
        return Arrays.asList(
                QMUIFWordDetector.ISSUE_F_WORD,
                QMUIJavaVectorDrawableDetector.ISSUE_JAVA_VECTOR_DRAWABLE,
                QMUIXmlVectorDrawableDetector.ISSUE_XML_VECTOR_DRAWABLE,
                QMUIImageSizeDetector.ISSUE_IMAGE_SIZE,
                QMUIImageScaleDetector.ISSUE_IMAGE_SCALE
        );
    }
}
QMUIIssueRegistry 继承与 IssueRegistry,IssueRegistry 中注册了 Android Lint 自带的 Issue,而自定义的 Issue 则可以通过 getIssues 系列方法传入。
到这一步,这个用于自定义 Lint 的 Java 项目编写完毕了。
接入项目
按照上面的步骤,完成自定义 Lint 的编写后,编译 Gradle 可以得到对应的 jar 文件,那么 jar 应该如何接入项目,使得执行项目 Lint 时可以识别到这些自定义的规则呢?
Google 官方的方案是把 jar 文件放到 ~/.android/lint/,如果本地没有 lint 目录可以自行创建,这个使用方式较为简单,但也使得 Android Lint 作用于本地所有的项目,不大灵活。
因此我们推荐使用 Google adt-dev 论坛中被讨论推荐的方案,在主项目中新建一个 Module,打包为 aar,把 jar 文件放到该 aar 中,这样各个项目可以以 aar 的方式自行引入自定义 Lint,比较灵活,项目之间不会造成干扰。
Module 的 build.gradle 内容如下(以 QMUI Lint 为例):
apply plugin: ''com.android.library''

configurations {
    lintChecks
}

dependencies {
    lintChecks project(path: '':qmuilintrule'', configuration: ''lintChecks'')
}

task copyLintJar(type: Copy) {
    from(configurations.lintChecks) {
        rename { ''lint.jar'' }
    }
    into ''build/intermediates/lint/''
}

project.afterEvaluate {
    def compileLintTask = project.tasks.find { it.name == ''compileLint'' }
    compileLintTask.dependsOn(copyLintJar)
}
其中 qmuilintrule 是自定义 Lint 规则的 Module,这样这个需要进行 aar 打包的 Module 即可获取到 jar 文件,并放到 build/intermediates/lint/ 这个路径中。把 aar 发布到 Bintray 后,需要用到自定义 Lint 的地方只需要引入 aar 即可,例如:
compile ''com.qmuiteam:qmuilint:1.0.0''另外需要注意,在编写自定义规则的 Lint 代码时,编写后重新构建 gradle,新代码也不一定生效,需要重启 Android Studio 才能确保新代码已经生效。
完整的示例代码可以参考 QMUI Android 的 qmuilint 与 qmuilintrule module。
参考资料
- Writing Custom Lint Rules - Android Studio Project Site
- googlesamples/android-custom-lint-rules: This sample demonstrates how to create a custom lint checks and corresponding lint tests
- Specify custom lint JAR outside of lint tools settings directory
- Writing Custom Lint Checks with Gradle | LinkedIn Engineering
今天关于【工利其器】必会工具之和九Android Lint 篇 —— 为 Android 量身定做的代码审查利器的分享就到这里,希望大家有所收获,若想了解更多关于Android Lint、Android Lint 命令行工具不解析 Kotlin 文件、Android Lint 实践 —— 简介及常见问题分析、Android Lint 实践之二 —— 自定义 Lint等相关知识,可以在本站进行查询。
本文标签:


