本文将为您提供关于android–是否有GalaxyTab10.1的模拟器?的详细介绍,我们还将为您解释三星安卓模拟器的相关知识,同时,我们还将为您提供关于AHK-Tab++框架(用Tab做修饰键,其
本文将为您提供关于android – 是否有Galaxy Tab 10.1的模拟器?的详细介绍,我们还将为您解释三星安卓模拟器的相关知识,同时,我们还将为您提供关于AHK-Tab++ 框架 (用 Tab 做修饰键,其他功能可不受影响) v1.1.0、Android Browser 学习三 多窗口:展示第一个 Tab 的过程、Android Browser 学习五 多窗口: Tab 整体结构、Android TAB 切换汇总的实用信息。
本文目录一览:")
android – 是否有Galaxy Tab 10.1的模拟器?(三星安卓模拟器)
公平警告:我是
Android开发的完整菜鸟
我有一个galaxy Tab 10.1并且想知道它是否存在Android模拟器(附加组件)吗?使用第三方网站http://innovator.samsungmobile.com/android/repository/repository.xml,我得到了一个“galaxy TAB”附加组件,但它适用于Android 2.2(API级别8).
这是galaxy TAB唯一的模拟器插件吗? galaxy 10.1运行的是Android 3.1并且具有不同的外形,我相信它似乎需要有一个模拟器.
解决方法
您可以在AVD(Android虚拟设备)管理器中创建与galaxy Tab 10.1匹配的特定模拟器.
 v1.1.0")
AHK-Tab++ 框架 (用 Tab 做修饰键,其他功能可不受影响) v1.1.0
! 新的版本叫做UMSS,这个不更新了
;;;;;;;;;;;;;;;;;;;;;;;;;;;;;;;;;;;;;;;;;;;;;;;;;;;;;;;;;;;;;;;;;;;;;;;;;;;;;;;;;;;;;;;;;;;;;;
; 脚本名称:AHK-Tab++框架
; 脚本版本号 v1.1.0
; AHK版本:    1.1.30
; 语言:中文
; 作者:心如止水<QQ:2531574300>   <Autohotkey高手群(348016704)>
/*
# 脚本功能:    可用AutoHotKey让Tab作为修饰键,但是其它的功能都不受影响(Tab单击可以保留,但是默认关闭,下面有详细注解)
实现各种功能(当然也可以改造为CapsLock++框架,让CapsLock做修饰键,我还没尝试,不过应该是同理)
# 改造潜力: 1,10月13日-改造为分号,可以使用
# 主力更新地址1 # 主力更新地址2
*/
; ^_^: 如果您有什么新的想法,或者有什么改进意见,欢迎加我的QQ,一起探讨改进 :^_^
;;;;;;;;;;;;;;;;;;;;;;;;;;;;;;;;;;;;;;;;;;;;;;;;;;;;;;;;;;;;;;;;;;;;;;;;;;;;;;;;;;;;;;;;;;;;;;


;;;;;;;;;;;;;;;;;;;;;;;;;;;;;;;;;;;;;;;;;;;;;;;;;;;;;;;;;;;;;;;;;;;;;;;;;;;;;;;;;;;;;;;;;;;;;;
/*
版本信息:
v1.0.2:增补了注释,Tab单击改为默认关闭
v1.0.3:在名字中加入AHK(AutoHotKey)便于搜索引擎的爬取
v1.1.0:1,添加注释(改造潜力/派生方案) 2,增加注释"主更新"地址
*/
;;;;;;;;;;;;;;;;;;;;;;;;;;;;;;;;;;;;;;;;;;;;;;;;;;;;;;;;;;;;;;;;;;;;;;;;;;;;;;;;;;;;;;;;;;;;;;

;# 系统热键白名单
#inputlevel,3
;## 在这个层级是不覆盖系统默认键的,可以设置系统默认键的白名单
;~的意思是不覆盖系统本身的快捷键
~!Tab::
~#Tab::
#inputlevel

#inputlevel,2
;$的意思是使用钩子,防止自己被触发
$Tab::F20
#inputlevel

;# 在这一层级可以用Tab做修饰键
#inputlevel,0

;## 开放单击
;根据需求自己考虑开不开,因为目的是用Tab做修饰键,所以我默认是关的,我用CapsLock+Space替代了Tab的原有功能(在我的主脚本上)

/*

F20::
send,{Tab}
return

*/


;## 这就是真正的作为修饰键的地方,可以搭配各种功能,实现很好的效果。

F20 & j::
MsgBox,任务成功
return

#inputlevel

Android Browser 学习三 多窗口:展示第一个 Tab 的过程
从之前的文章中我们可以看到,BrowserActivity 是浏览器的核心 Activity 了,是浏览器的入口,但是他里面并没有处理很多复杂的逻辑,只是实现一些 android
先看看时序图

系统对 activity 的回调. 这些逻辑交给了 Controller 来处理,那我们首先先入门一下,一步一步的来看看浏览器是怎么从启动到打开 Tab 的 吧
从入口 BrowserActivity 的 onCreate 函数开始:
| 02 |
public void onCreate(Bundle icicle) { |
| 05 |
mController = new Controller(this, icicle == null); |
| 06 |
boolean xlarge = isTablet(this); |
| 09 |
mUi = new XLargeUi(this, mController); |
| 11 |
mUi = new PhoneUi(this, mController); |
| 14 |
mController.setUi(mUi); |
C mController = new Controller(this, icicle == null);
Controller 这个类,这是浏览器的核心,其他我们暂时忽略这里只看 TabControl 的初始化:
| 1 |
public Controller(Activity browser, boolean preloadCrashState) { |
| 3 |
mTabControl = new TabControl (this); // 初始化 tab 的控制器 |
mTabControl = new TabControl (this); // 初始化 tab 的控制器,TabControl 是管理所有 Tab 的 Controller , 将来添加 Tab 添加到这个 链表中.
然后,如果是手机就会执行 pad 版本大同小异就不做介绍了!
mUi = new PhoneUi (this, mController); 这句话,代码如下
| 05 |
public PhoneUi(Activity browser, UiController controller) { |
| 06 |
super(browser, controller); |
| 07 |
setUseQuickControls (BrowserSettings.getInstance ().useQuickControls ()); // 设置快速控制菜单,就是那个 piemenu |
| 08 |
mNavigationBar = (NavigationBarPhone) mTitleBar.getNavigationBar(); |
| 09 |
TypedValue heightValue = new TypedValue(); |
| 10 |
browser.getTheme().resolveAttribute( |
| 11 |
com.android.internal.R.attr.actionBarSize, heightValue, true); |
| 12 |
mActionBarHeight = TypedValue.complexToDimensionPixelSize(heightValue.data, |
| 13 |
browser.getResources().getDisplayMetrics()); |
首先会调用 BaseUI 的构造函数 这里会执行一系列的 View 的初始化,这里传入了 activity 对象,所以可以设置 activity 的各种 UI
| 01 |
public BaseUi(Activity browser, UiController controller) { |
| 03 |
mUiController = controller; |
| 04 |
mTabControl = controller.getTabControl(); |
| 05 |
Resources res = mActivity.getResources(); |
| 06 |
mInputManager = (InputMethodManager) |
| 07 |
browser.getSystemService(Activity.INPUT_METHOD_SERVICE); |
| 08 |
mLockIconSecure = res.getDrawable(R.drawable.ic_secure_holo_dark); |
| 09 |
mLockIconMixed = res.getDrawable(R.drawable.ic_secure_partial_holo_dark); |
| 10 |
FrameLayout frameLayout = (FrameLayout) mActivity.getWindow() |
| 11 |
.getDecorView ().findViewById (android.R.id.content);// 拿到 activity 的 content 然后把 view 加到一个 layout 上 |
| 12 |
LayoutInflater.from(mActivity) |
| 13 |
.inflate (R.layout.custom_screen, frameLayout); // 居然用这种方式这是 activity 的 view! |
| 14 |
mContentView = (FrameLayout) frameLayout.findViewById( |
| 16 |
mCustomViewContainer = (FrameLayout) frameLayout.findViewById( |
| 17 |
R.id.fullscreen_custom_content); |
| 18 |
mErrorConsoleContainer = (LinearLayout) frameLayout |
| 19 |
.findViewById(R.id.error_console); |
| 20 |
setFullscreen(BrowserSettings.getInstance().useFullscreen()); |
| 21 |
mGenericFavicon = res.getDrawable( |
| 22 |
R.drawable.app_web_browser_sm); |
| 23 |
mTitleBar = new TitleBar(mActivity, mUiController, this, |
| 24 |
mContentView);// 初始化 titlebar |
| 25 |
mTitleBar.setProgress(100); |
| 26 |
mNavigationBar = mTitleBar.getNavigationBar(); |
| 27 |
mUrlBarAutoShowManager = new UrlBarAutoShowManager(this); |
着重看这一句话:
FrameLayout frameLayout = (FrameLayout) mActivity.getWindow()
.getDecorView ().findViewById (android.R.id.content);// 拿到 activity 的 content 然后把 view 加到一个 layout 上
好吧,我们知道,每个 activity 的 DecorView 都是由 title + content 组成的,这里就是拿到了 Activity 的 content 对应的 Framelayout 类型的对象,
然后执行这个代码:
LayoutInflater.from(mActivity)
.inflate(R.layout.custom_screen, frameLayout);
这样就可以把 custom_screen attach 到 activityview 的 conten 上了, 没有用 setContentView, 具体原因还不是很清楚,看官可以补充.
view 已经 attach 到 activity 了,剩下的就是初始化第一个 Tab 以及向 custom_screen 中添加 Tab 或者其他东西了!
继续看 onCreate 的代码:
mController.start(icicle, getIntent());
在 UI 初始化 ok 之后就 转发给了 Controller: 个人认为这个函数应该叫 onCreate 最起码是 onStart 吧?总之谷歌的这个代码整体上都很随意.
| 1 |
void start(final Bundle icicle, final Intent intent) { |
| 2 |
boolean noCrashRecovery = intent.getBooleanExtra (NO_CRASH_RECOVERY, false);// 是否设置了崩溃恢复 |
| 3 |
if (icicle != null || noCrashRecovery) { |
| 4 |
doStart(icicle, intent, false); |
| 6 |
mCrashRecoveryHandler.startRecovery(intent); |
他会检查是否是崩溃重启,我们第一次启动,就是否了 执行的是 doStart 函数:
| 01 |
void doStart(final Bundle icicle, final Intent intent, final boolean fromCrash) { |
| 03 |
GoogleAccountLogin.startLoginIfNeeded (mActivity,// 登陆谷歌账户 |
| 05 |
@Override public void run() { |
| 07 |
onPreloginFinished(icicle, intent, currentTabId, restoreIncognitoTabs, |
其他都忽略看 onPreloginFinished () 函数:
| 01 |
/*!! 这是浏览器 第一次启动时候的入口 */ |
| 02 |
private void onPreloginFinished(Bundle icicle, Intent intent, long currentTabId, |
| 03 |
boolean restoreIncognitoTabs, boolean fromCrash) { |
| 04 |
if (currentTabId == -1) { |
| 05 |
BackgroundHandler.execute (new PruneThumbnails (mActivity, null)); // 清空缩略图缓存 |
| 06 |
final Bundle extra = intent.getExtras(); |
| 07 |
// Create an initial tab. |
| 08 |
// If the intent is ACTION_VIEW and data is not null, the Browser is |
| 09 |
// invoked to view the content by another application. In this case, |
| 10 |
// the tab will be close when exit. |
| 11 |
UrlData urlData = IntentHandler.getUrlDataFromIntent(intent); |
| 13 |
if (urlData.isEmpty ()) {// 这里开始打开 tab 了 |
| 14 |
t = openTabToHomePage ();//intent 没有数据 打开 home |
| 16 |
t = openTab (urlData); // 打开对于 url 的 tab |
| 18 |
if (t != null) {// 设置调用应用的 id |
| 19 |
t.setAppId(intent.getStringExtra(Browser.EXTRA_APPLICATION_ID)); |
| 21 |
WebView webView = t.getWebView(); |
| 23 |
int scale = extra.getInt(Browser.INITIAL_ZOOM_LEVEL, 0); |
| 24 |
if (scale > 0 && scale <= 1000) { |
| 25 |
webView.setInitialScale(scale); |
| 28 |
mUi.updateTabs (mTabControl.getTabs ()); // 更新多窗口列表 |
其实是执行了 openToHomePage 和 openTab 的其中一个 这两个函数一个是打开首页一个是外部 app 调用浏览器时候打开对应 url.
我们只看 openToHomePage ()
| 2 |
public Tab openTabToHomePage() { |
| 3 |
return openTab(mSettings.getHomePage(), false, true, false); |
| 01 |
public Tab openTab(String url, boolean incognito, boolean setActive, |
| 02 |
boolean useCurrent, Tab parent) { |
| 03 |
Tab tab = createNewTab(incognito, setActive, useCurrent); |
| 05 |
if (parent != null && parent != tab) { |
| 06 |
parent.addChildTab (tab);// 一个 tab 中可以有子 tab 就可以实现前进后退了 |
最后是调用到了 createNewTab 这个函数
| 01 |
// this method will attempt to create a new tab |
| 02 |
// incognito: private browsing tab |
| 03 |
// setActive: ste tab as current tab |
| 04 |
// useCurrent: if no new tab can be created, return current tab |
| 06 |
* 创建一个新的 tab 选择是否重用当前的 |
| 12 |
private Tab createNewTab(boolean incognito, boolean setActive, |
| 15 |
if (mTabControl.canCreateNewTab()) { |
| 16 |
tab = mTabControl.createNewTab(incognito); |
| 23 |
tab = mTabControl.getCurrentTab(); |
| 26 |
mUi.showMaxTabsWarning(); |
那么第一个 Tab 就创建好了,我们就可以显示在 Activity 了:
在 Activity 的 onResume 函数中:是吧 Activity 只是一个转发各种系统回调的功能:
| 02 |
protected void onResume() { |
| 05 |
Log.v(LOGTAG, "BrowserActivity.onResume: this=" + this); |
| 07 |
if (mController != null) { |
| 08 |
mController.onResume(); |
Controller 收到 onResume 消息,就进行 UI 的一些需要 resume 的操作了,其实 controler 也是做了一次转发:
| 2 |
mUi.onResume (); // 初始化 UI 设置为当前 tab |
回调到了 BaseUI 的 onResume
| 1 |
public void onResume() { |
| 2 |
final Tab ct = mTabControl.getCurrentTab (); // 如果是从 onPause 后再 onResume 的那么就不好执行 setActiveTab, 因为可以拿到 dang''q if (ct != null) { |
如此这般就调用到了 setActiveTab 这个函数 顾名思义是设置当前活动的 Tab 的
| 02 |
public void setActiveTab(final Tab tab) { |
| 03 |
mHandler.removeMessages(MSG_HIDE_TITLEBAR); |
| 04 |
if ((tab != mActiveTab) && (mActiveTab != null)) {// 以前之前的 webview |
| 05 |
removeTabFromContentView(mActiveTab); |
| 06 |
WebView web = mActiveTab.getWebView(); |
| 08 |
web.setOnTouchListener(null); |
| 12 |
WebView web = mActiveTab.getWebView ();// 拿到新的 webview 窗口 |
| 13 |
updateUrlBarAutoShowManagerTarget(); |
| 14 |
attachTabToContentView(tab); |
| 15 |
setShouldShowErrorConsole(tab, mUiController.shouldShowErrorConsole()); |
| 16 |
onTabDataChanged (tab);// 通知多标签数据变化了刷新多标签列表 |
| 17 |
onProgressChanged (tab);// 通知进度条数据变化了 |
这里有一个 attachTabTocontentView 函数,就是把当前 tab 添加到上面的 contentview 上.
| 01 |
protected void attachTabToContentView(Tab tab) { |
| 02 |
if ((tab == null) || (tab.getWebView() == null)) { |
| 05 |
View container = tab.getViewContainer(); |
| 06 |
WebView mainView = tab.getWebView(); |
| 07 |
// Attach the WebView to the container and then attach the |
| 08 |
// container to the content view. |
| 10 |
(FrameLayout) container.findViewById(R.id.webview_wrapper); |
| 11 |
ViewGroup parent = (ViewGroup) mainView.getParent(); |
| 12 |
if (parent != wrapper) { |
| 14 |
Log.w(LOGTAG, "mMainView already has a parent in" |
| 15 |
+ " attachTabToContentView!"); |
| 16 |
parent.removeView(mainView); |
| 18 |
wrapper.addView(mainView); |
| 20 |
Log.w(LOGTAG, "mMainView is already attached to wrapper in" |
| 21 |
+ " attachTabToContentView!"); |
| 23 |
parent = (ViewGroup) container.getParent(); |
| 24 |
if (parent != mContentView) { |
| 26 |
Log.w(LOGTAG, "mContainer already has a parent in" |
| 27 |
+ " attachTabToContentView!"); |
| 28 |
parent.removeView(container); |
| 30 |
mContentView.addView (container, COVER_SCREEN_PARAMS);// 添加 tab 到 Contentview 这样我们就可以看到 tab 了 |
| 32 |
Log.w(LOGTAG, "mContainer is already attached to content in" |
| 33 |
+ " attachTabToContentView!"); |
| 35 |
mUiController.attachSubWindow(tab); |
通过这句话:
mContentView.addView(container, COVER_SCREEN_PARAMS);
添加 tab 到 Contentview 这样我们就可以看到 tab 了!这里的 Tab 是一个含有 View (WebView) 的类,而不是一个 View, 通过 getWebView 才真正的拿到了 View 并添加上,这样 Tab 还可以执行以下别的操作.

Android Browser 学习五 多窗口: Tab 整体结构
前面说了这么多却发现我们的 Tab 还没有介绍,Tab 到底是个什么东西呢?
其实是一个含有两个 WebView 成员一个 WebViewController 成员的类:其中 PageState 用来真正存储这个 tab 网页的一些信息,包括 url 标题 图标等
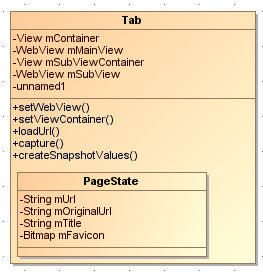
// Main WebView wrapper tab的容器
    private View mContainer;
    // Main WebView 显示网页的webview
    private WebView mMainView;
    // Subwindow container
    private View mSubViewContainer;
    // Subwindow WebView在一个tab可能会弹出 另一个WebView的dialog  使用subwebview实现 (True if the new        window should be a dialog, rather than a full-size window.)
    private WebView mSubView;
其中 mContainer 就是 tab 的主 Ui 了 他一般是一个形如 "
<LinearLayout xmlns:android="http://schemas.android.com/apk/res/android"
    android:orientation="vertical"
    android:fitsSystemWindows="true"
    android:layout_width="match_parent"
    android:layout_height="match_parent">

    <!-- Wrapper layout for the WebView, which must be in a FrameLayout. -->
    <FrameLayout android:id="@+id/webview_wrapper"
        android:layout_width="match_parent"
        android:layout_height="0dip"
        android:layout_weight="1" />

    <!-- Geolocation permissions prompt -->
    <ViewStub android:id="@+id/geolocation_permissions_prompt"
        android:layout="@layout/geolocation_permissions_prompt"
        android:layout_width="match_parent"
        android:layout_height="wrap_content" />

</LinearLayout>
这样的布局,通过 BaseUI 的 onSetWebView 设置:
@Override
    public void onSetWebView(Tab tab, WebView webView) {
        View container = tab.getViewContainer();
        if (container == null) {
            // The tab consists of a container view, which contains the main
            // WebView, as well as any other UI elements associated with the tab.
            container = mActivity.getLayoutInflat().inflate(R.layout.tab,
                    mContentView, false);//把tab的ContainerView  Attach到Activity
            tab.setViewContainer(container);
        }
        if (tab.getWebView() != webView) { //如果tab当前的 mMainWebview 和 以前的webview不一样就把以前的那个webview 从 Container 移除掉
            // Just remove the old one.
            FrameLayout wrapper =
                    (FrameLayout) container.findViewById(R.id.webview_wrapper);
            wrapper.removeView(tab.getWebView());
        }
    }
这个函数是谁调用的呢?终归肯定是 Controller 进行的,但是这里设计就有点乱了:
顺序是这样: Controller::setActiveTab -> TabControl::setCurrentTab -> Tab::setWebView -> Controler ::onSetWebView -> BaseUI::onSetWebView
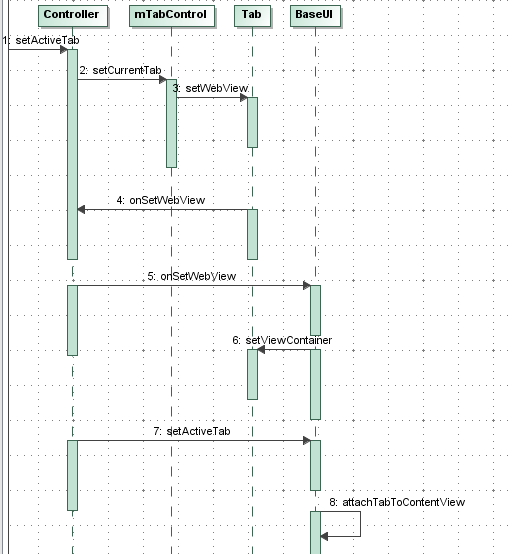
Controller 调用 BaseUI 的 setActiveTab 函数 (其实最后是 attachTabToContentView) 把 Tab 的 mWebView 和 container 关联起来:
protected void attachTabToContentView(Tab tab) {
        if ((tab == null) || (tab.getWebView() == null)) {
            return;
        }
        View container = tab.getViewContainer(); //对应tab的layout
        WebView mainView  = tab.getWebView();
        // Attach the WebView to the container and then attach the
        // container to the content view.
        //把Tab的container添加到mContentView
        FrameLayout wrapper =
                (FrameLayout) container.findViewById(R.id.webview_wrapper);
        ViewGroup parent = (ViewGroup) mainView.getParent();
        if (parent != wrapper) {
            if (parent != null) {
                Log.w(LOGTAG, "mMainView already has a parent in"
                        + " attachTabToContentView!");
                parent.removeView(mainView);
            }
            wrapper.addView(mainView);
        } else {
            Log.w(LOGTAG, "mMainView is already attached to wrapper in"
                    + " attachTabToContentView!");
        }
        parent = (ViewGroup) container.getParent();
        if (parent != mContentView) {
            if (parent != null) {
                Log.w(LOGTAG, "mContainer already has a parent in"
                        + " attachTabToContentView!");
                parent.removeView(container);
            }
            mContentView.addView(container, COVER_SCREEN_PARAMS);
        } else {
            Log.w(LOGTAG, "mContainer is already attached to content in"
                    + " attachTabToContentView!");
        }
        mUiController.attachSubWindow(tab);
    }
这样我们就明白了,Activity 只是一个容器,当哪个 Tab 放到前台,BaseUI 就拿到对应 Tab 的 Container 和 Webview , 把这两个空间 attach 到 Activity 的 ContentView 中去
之所以这样做,可能是因为作者想让 BaseUI 来进行把 View attach 到 Activity 上的操作,Tab 只做控制 Webview load 网页的操作;他们之间的交互由 Controller 来控制。但是感觉这个设计可能有些乱了.
Tab 获取当前快照的函数:
protected void capture() {
        if (mMainView == null || mCapture == null) return;
        if (mMainView.getContentWidth() <= 0 || mMainView.getContentHeight() <= 0) {
            return;
        }
        Canvas c = new Canvas(mCapture);
        final int left = mMainView.getScrollX(); //快照抓取的是tab的顶部
        final int top = mMainView.getScrollY() + mMainView.getVisibleTitleHeight();
        int state = c.save();
        c.translate(-left, -top);
        float scale = mCaptureWidth / (float) mMainView.getWidth();
        c.scale(scale, scale, left, top);
        if (mMainView instanceof BrowserWebView) {
            ((BrowserWebView)mMainView).drawContent(c);
        } else {
            mMainView.draw(c);
        }
        c.restoreToCount(state);
        // manually anti-alias the edges for the tilt
        c.drawRect(0, 0, 1, mCapture.getHeight(), sAlphaPaint);
        c.drawRect(mCapture.getWidth() - 1, 0, mCapture.getWidth(),
                mCapture.getHeight(), sAlphaPaint);
        c.drawRect(0, 0, mCapture.getWidth(), 1, sAlphaPaint);
        c.drawRect(0, mCapture.getHeight() - 1, mCapture.getWidth(),
                mCapture.getHeight(), sAlphaPaint);
        c.setBitmap(null);//释放canvas绘制的bitmap
        mHandler.removeMessages(MSG_CAPTURE);
        persistThumbnail();
        TabControl tc = mWebViewController.getTabControl();
        if (tc != null) {
            OnThumbnailUpdatedListener updateListener
                    = tc.getOnThumbnailUpdatedListener();
            if (updateListener != null) {//通知更新了缩略图
                updateListener.onThumbnailUpdated(this);
            }
        }
    }
Tab 保存 当前网页的函数
/**
     * 保存离线阅读的一些数据
     * @return
     */
    public ContentValues createSnapshotValues() {
        if (mMainView == null) return null;
        SnapshotByteArrayOutputStream bos = new SnapshotByteArrayOutputStream();
        try {
            GZIPOutputStream stream = new GZIPOutputStream(bos);
            if (!mMainView.saveViewState(stream)) {
                return null;
            }
            stream.flush();
            stream.close();
        } catch (Exception e) {
            Log.w(LOGTAG, "Failed to save view state", e);
            return null;
        }
        byte[] data = bos.toByteArray();
        ContentValues values = new ContentValues();
        values.put(Snapshots.TITLE, mCurrentState.mTitle);//标题
        values.put(Snapshots.URL, mCurrentState.mUrl);//url
        values.put(Snapshots.VIEWSTATE, data);
        values.put(Snapshots.BACKGROUND, mMainView.getPageBackgroundColor());//背景
        values.put(Snapshots.DATE_CREATED, System.currentTimeMillis());//时间
        values.put(Snapshots.FAVICON, compressBitmap(getFavicon()));//网址图标
        Bitmap screenshot = Controller.createScreenshot(mMainView,
                Controller.getDesiredThumbnailWidth(mContext),
                Controller.getDesiredThumbnailHeight(mContext));
        values.put(Snapshots.THUMBNAIL, compressBitmap(screenshot));
        return values;
    }

    public byte[] compressBitmap(Bitmap bitmap) {
        if (bitmap == null) {
            return null;
        }
        ByteArrayOutputStream stream = new ByteArrayOutputStream();
        bitmap.compress(CompressFormat.PNG, 100, stream);
        return stream.toByteArray();
    }
处理 SSLError 的函数
private void handleProceededAfterSslError(SslError error) {
        if (error.getUrl().equals(mCurrentState.mUrl)) {
            // The security state should currently be SECURITY_STATE_SECURE.
            setSecurityState(SecurityState.SECURITY_STATE_BAD_CERTIFICATE);
            mCurrentState.mSslCertificateError = error;
        } else if (getSecurityState() == SecurityState.SECURITY_STATE_SECURE) {
            // The page''s main resource is secure and this error is for a
            // sub-resource.
            setSecurityState(SecurityState.SECURITY_STATE_MIXED);
        }
    }
/**
         * Called when an SSL error occurred while loading a resource, but the
         * WebView but chose to proceed anyway based on a decision retained
         * from a previous response to onReceivedSslError(). We update our
         * security state to reflect this.
         */
        @Override
        public void onProceededAfterSslError(WebView view, SslError error) {
            handleProceededAfterSslError(error);
        }

Android TAB 切换汇总
关于 Tab 切换是移动应用开发的常见问题,Android 中的 Tab 切换实现方式多种多样,今天总结下:
Tab 切换要实现的功能不外乎两个方面,一个是指示器,还有就是指示器所对应的视图(滑动切换的功能后面会提到)。对于指示器通常是用 RadioGroup 来实现,点击效果、控件的美化可以慢慢调试来实现对应的要求;每一页的视图通常则是用 Fragment 来实现(也可以通过 xml 中布局多个视图显示和隐藏,不过谁用呢,Activity 中太冗杂,代码看着都烦);
Tab 切换从实现效果上分析,两个方面,可滑动切换(可以通过手势滑动实现 Tab 切换)和不可滑动切换。对于可滑动切换通常用 Viewpage+Fragment 来实现视图,指示器仍然用 RadioGroup,也可以通过监听手势变化判断左划还是右划来实现 (重写 OntouchEvent),但是用户体验没 Viewpager 好。对于不可滑动的切换两种方式,第一就是 Fragment+RadioGutton,二是使用 TabHost 来实现,视图仍然用 Fragment;
我们今天的关于android – 是否有Galaxy Tab 10.1的模拟器?和三星安卓模拟器的分享就到这里,谢谢您的阅读,如果想了解更多关于AHK-Tab++ 框架 (用 Tab 做修饰键,其他功能可不受影响) v1.1.0、Android Browser 学习三 多窗口:展示第一个 Tab 的过程、Android Browser 学习五 多窗口: Tab 整体结构、Android TAB 切换汇总的相关信息,可以在本站进行搜索。


