最近很多小伙伴都在问多apk发布的Android程序的adb安装——adbinstall-multiple和adb安装多个apk这两个问题,那么本篇文章就来给大家详细解答一下,同时本文还将给你拓展(O
最近很多小伙伴都在问多 apk 发布的 Android 程序的 adb 安装 ——adb install-multiple和adb安装多个apk这两个问题,那么本篇文章就来给大家详细解答一下,同时本文还将给你拓展(OK) Graphviz - MANET - multiple interfaces multiple paths、adb install 安装apk adb install 安装的apk在哪个路径、ADB install-multi-package / 希望尽快安装带有单独包的 APK、ADB 学习(2):adb install 命令等相关知识,下面开始了哦!
本文目录一览:- 多 apk 发布的 Android 程序的 adb 安装 ——adb install-multiple(adb安装多个apk)
- (OK) Graphviz - MANET - multiple interfaces multiple paths
- adb install 安装apk adb install 安装的apk在哪个路径
- ADB install-multi-package / 希望尽快安装带有单独包的 APK
- ADB 学习(2):adb install 命令
")
多 apk 发布的 Android 程序的 adb 安装 ——adb install-multiple(adb安装多个apk)
田海立 @CSDN 2020-10-29
Android 由于其设备的多样性或者不好了说碎片化,公开市场的应用程序开发需要支持多架构(arm64 /arm/x86 /x86_64 等),多语言,多 Layout(多种 dpi)等。所以如果每个发布都打包在一起会越来越庞大,就有了多 apk 发布方式 —— 主程序一个 apk,每个 arch,每种 Layout 单独打包 apk。
多个 apk 的一次安装,在 Google 应用商店(Google Play)是没有问题的,因为你在下载程序之前是已经连接到 Google Play 的,你 Device 的 arch/locale/layout 信息 GooglePlay 那里已经有了,会给你安装适合你设备的所需要的 apk。【这也是为什么有些程序,有些手机是找不到的原因,因为那个程序有不兼容你的手机的分发包或所需的 feature 项,当然不仅限于这些,Android 版本 / 地区法律 / SIM 信息等都是因素】
问题来了,Google Play 并不是哪都能用,手里有了一个程序的多个 apk,怎么安装呢?adb 可以一个命令 adb install-mutiple 解决,反而一个一个的 apk 用 adb install 安装是不行的。敲 adb 就会提示你:

adb install-mutiple 后面跟一个一个 apk 就可以了。
adb install-multiple <path>/org.benchmark.demo.apk <path>/config.xxhdpi.apk <path>/config.en.apk <path>/config.arm64_v8a.apk【注】adb 低版本还没有这个功能,你可以敲 adb 看提示是否支持。
adb 版本是否支持的问题,如果你不是 Android 工作 5 年以上了,还一直没有更新过 adb 就应该没问题。这命令已支持很久了。
【后记】本来就记录一个命令而已,一不留神这里还说了:
- 多 apk 发布之所以然:多架构、多语言、多 Layout 等;
- Google Play 应用程序与手机匹配策略。
 Graphviz - MANET - multiple interfaces multiple paths")
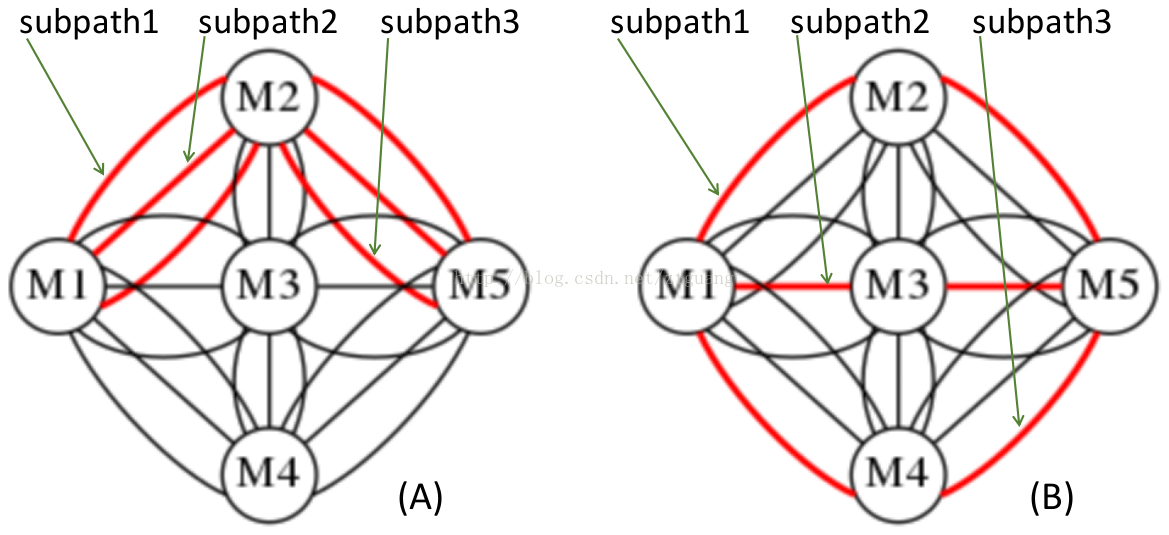
(OK) Graphviz - MANET - multiple interfaces multiple paths
/*
dot example3.dot -Tpng -o example3.png
*/

digraph G {

	size="10,10";

	rankdir=LR					// set graph direction rankdir="TB", "LR", "BT", "RL"

	//ranksep="1.0 equally"
	//splines=line
	nodesep=0.4;
	//node [label=""];

	subgraph cluster_1 {
	 color=white;
	 node [style=solid, color=black, shape=circle, width=.4 height=.4, fixedsize=true];
	 M1;
	 //label = "layer 1";
	}

	subgraph cluster_2 {
	 color=white;
	 node [style=solid, color=black, shape=circle, width=.4 height=.4, fixedsize=true];
	 M2;
	 //label = "layer 2";
	}

	subgraph cluster_3 {
	 color=white;
	 node [style=solid, color=black, shape=circle, width=.4 height=.4, fixedsize=true];
	 M3;
	 //label = "layer 2";
	}

	subgraph cluster_4 {
	 color=white;
	 node [style=solid, color=black, shape=circle, width=.4 height=.4, fixedsize=true];
	 M4;
	 //label = "layer 2";
	}

	subgraph cluster_5 {
	 color=white;
	 node [style=solid, color=black, shape=circle, width=.4 height=.4, fixedsize=true];
	 M5;
	 //label = "layer 3";
	}

	//At present, the recognized style names are "dashed", "dotted", "solid", "invis" and "bold" for nodes and edges, "tapered" for edges only, and "filled", "striped", "wedged", "diagonals" and "rounded" for nodes only. The styles "filled", "striped" and "rounded" are recognized for clusters. The style "radial" is recognized for nodes, clusters and graphs, and indicates a radial-style gradient fill if applicable.


//-------------------------------------------------------------------------------------------------
// original MPTCP
/*
	M1 -> M2 [style=bold, dir="both", arrowhead=none, arrowtail=none, color=red]
	M1 -> M2 [style=bold, dir="both", arrowhead=none, arrowtail=none, color=red]
	M1 -> M2 [style=bold, dir="both", arrowhead=none, arrowtail=none, color=red]

	M1 -> M3 [style=solid, dir="both", arrowhead=none, arrowtail=none]
	M1 -> M3 [style=solid, dir="both", arrowhead=none, arrowtail=none]
	M1 -> M3 [style=solid, dir="both", arrowhead=none, arrowtail=none]

	M1 -> M4 [style=solid, dir="both", arrowhead=none, arrowtail=none]
	M1 -> M4 [style=solid, dir="both", arrowhead=none, arrowtail=none]
	M1 -> M4 [style=solid, dir="both", arrowhead=none, arrowtail=none]

	M2 -> M5 [style=bold, dir="both", arrowhead=none, arrowtail=none, color=red]
	M2 -> M5 [style=bold, dir="both", arrowhead=none, arrowtail=none, color=red]
	M2 -> M5 [style=bold, dir="both", arrowhead=none, arrowtail=none, color=red]

	M3 -> M5 [style=solid, dir="both", arrowhead=none, arrowtail=none]
	M3 -> M5 [style=solid, dir="both", arrowhead=none, arrowtail=none]
	M3 -> M5 [style=solid, dir="both", arrowhead=none, arrowtail=none]

	M4 -> M5 [style=solid, dir="both", arrowhead=none, arrowtail=none]
	M4 -> M5 [style=solid, dir="both", arrowhead=none, arrowtail=none]
	M4 -> M5 [style=solid, dir="both", arrowhead=none, arrowtail=none]

	M2 -> M3 [style=solid, dir="both", arrowhead=none, arrowtail=none, constraint=false]
	M2 -> M3 [style=solid, dir="both", arrowhead=none, arrowtail=none, constraint=false]
	M2 -> M3 [style=solid, dir="both", arrowhead=none, arrowtail=none, constraint=false]

	M4 -> M3 [style=solid, dir="both", arrowhead=none, arrowtail=none, constraint=false]
	M4 -> M3 [style=solid, dir="both", arrowhead=none, arrowtail=none, constraint=false]
	M4 -> M3 [style=solid, dir="both", arrowhead=none, arrowtail=none, constraint=false]
//*/
//-------------------------------------------------------------------------------------------------


//-------------------------------------------------------------------------------------------------
// original MPTCP
//*
	M1 -> M2 [style=solid, dir="both", arrowhead=none, arrowtail=none]
	M1 -> M2 [style=solid, dir="both", arrowhead=none, arrowtail=none]
	M1 -> M2 [style=bold, dir="both", arrowhead=none, arrowtail=none, color=red]

	M1 -> M3 [style=solid, dir="both", arrowhead=none, arrowtail=none]
	M1 -> M3 [style=bold, dir="both", arrowhead=none, arrowtail=none, color=red]
	M1 -> M3 [style=solid, dir="both", arrowhead=none, arrowtail=none]

	M1 -> M4 [style=bold, dir="both", arrowhead=none, arrowtail=none, color=red]
	M1 -> M4 [style=solid, dir="both", arrowhead=none, arrowtail=none]
	M1 -> M4 [style=solid, dir="both", arrowhead=none, arrowtail=none]

	M2 -> M5 [style=solid, dir="both", arrowhead=none, arrowtail=none]
	M2 -> M5 [style=solid, dir="both", arrowhead=none, arrowtail=none]
	M2 -> M5 [style=bold, dir="both", arrowhead=none, arrowtail=none, color=red]

	M3 -> M5 [style=solid, dir="both", arrowhead=none, arrowtail=none]
	M3 -> M5 [style=bold, dir="both", arrowhead=none, arrowtail=none, color=red]
	M3 -> M5 [style=solid, dir="both", arrowhead=none, arrowtail=none]

	M4 -> M5 [style=bold, dir="both", arrowhead=none, arrowtail=none, color=red]
	M4 -> M5 [style=solid, dir="both", arrowhead=none, arrowtail=none]
	M4 -> M5 [style=solid, dir="both", arrowhead=none, arrowtail=none]

	M2 -> M3 [style=solid, dir="both", arrowhead=none, arrowtail=none, constraint=false]
	M2 -> M3 [style=solid, dir="both", arrowhead=none, arrowtail=none, constraint=false]
	M2 -> M3 [style=solid, dir="both", arrowhead=none, arrowtail=none, constraint=false]

	M4 -> M3 [style=solid, dir="both", arrowhead=none, arrowtail=none, constraint=false]
	M4 -> M3 [style=solid, dir="both", arrowhead=none, arrowtail=none, constraint=false]
	M4 -> M3 [style=solid, dir="both", arrowhead=none, arrowtail=none, constraint=false]
//*/
//-------------------------------------------------------------------------------------------------
}
adb install 安装apk adb install 安装的apk在哪个路径
adb install 命令将 apk 安装在 "/data/app" 目录中,每个应用程序都存储在其自己的子目录中,该子目录的名称与应用程序的包名相同。例如,com.example.myapp 的 apk 将存储在 "/data/app/com.example.myapp" 中。

adb install apk 后apk 的安装路径
adb install 命令用于通过 USB 连接将 APK 安装到 Android 设备上。安装的 APK 通常会保存在以下路径:
/data/app
此目录包含设备上安装的所有应用程序的 APK 文件和其他相关数据。每个应用程序都存储在其自己的子目录中,该子目录的名称与应用程序的包名相同。
详细说明:
- 安装过程: adb install 命令通过 Android 调试桥 (ADB) 向设备发送 APK 文件。一旦设备收到文件,它会将其放置在 "/data/local/tmp" 目录中。
-
APK 分区: 然后,Android 系统会将 APK 文件移动到 "/data/app" 目录。此目录被分区为几个分区,每个分区对应一个应用程序类别:
- /data/app:包含来自未知来源的应用程序
- /data/app-private:包含来自 Play 商店下载的应用程序
- /data/app-system:包含系统应用程序
- 子目录: 在 "/data/app" 目录中,每个应用程序都存储在其自己的子目录中。子目录的名称与应用程序的包名相同。例如,com.example.myApp 的 APK 将存储在 "/data/app/com.example.myApp" 中。
- 数据目录: 除了 APK 文件外,每个应用程序还具有一个数据目录,其中包含该应用程序的设置、文件和其他数据。此数据目录位于 "/data/data" 中,其名称与应用程序的包名相同。例如,com.example.myApp 的数据目录将位于 "/data/data/com.example.myApp" 中。
了解安装的 APK 的路径对于调试和故障排除应用程序问题非常有用。它还可以帮助您找到特定应用程序的数据目录,以便备份或进行其他操作。
以上就是adb install 安装apk adb install 安装的apk在哪个路径的详细内容,更多请关注php中文网其它相关文章!

ADB install-multi-package / 希望尽快安装带有单独包的 APK
如何解决ADB install-multi-package / 希望尽快安装带有单独包的 APK
我可以看到 adb install https://developer.android.com/studio/command-line/adb#move
但是 adb install-multiple 和 adb install-multi-package pls 的官方文档在哪里?
我只从这里找到了它们存在的线索:https://adbshell.com/commands/adb-install(特别是 install-multi-package 是我想试一试的)

我尝试时收到“未知命令”,

并且在平台工具版本中提到了对它的修复:

谁能解释一下它的用途? 什么版本支持? 还有更多文档链接吗?
解决方法
最好的文档是代码。检查https://android.googlesource.com/platform/system/core/+/b581ce93bbd8f900b8e2ff63b80872f2748e32a4/adb/client/commandline.cpp#150
" install-multiple [-lrtsdpg] [--instant] PACKAGE...\\n"" push multiple APKs to the device for a single package and install them\\n"" install-multi-package [-lrtsdpg] [--instant] PACKAGE...\\n"" push one or more packages to the device and install them atomically\\n"" -r: replace existing application\\n"" -t: allow test packages\\n"" -d: allow version code downgrade (debuggable packages only)\\n"" -p: partial application install (install-multiple only)\\n"" -g: grant all runtime permissions\\n"" --instant: cause the app to be installed as an ephemeral install app\\n"" --no-streaming: always push APK to device and invoke Package Manager as separate steps\\n"" --streaming: force streaming APK directly into Package Manager\\n"" --fastdeploy: use fast deploy\\n"" --no-fastdeploy: prevent use of fast deploy\\n"" --force-agent: force update of deployment agent when using fast deploy\\n"" --date-check-agent: update deployment agent when local version is newer and using fast deploy\\n"" --version-check-agent: update deployment agent when local version has different version code and using fast deploy\\n"
我担心 ubuntu adb 版本有点过时了。安装最新的平台工具。如何:https://stackoverflow.com/a/55724130/2235381
:adb install 命令")
ADB 学习(2):adb install 命令
一、前言
作为一个测试人员,对于手机的应用软件肯定少不了安装到指定的手机设备中,所以 adb install 这个命令是必不可少的。
二、详解
Ⅰ、当我们只有一台设备连接到 adb 服务器的时候,我们可以直接使用 adb install xx.apk 。注意:xx.apk 是你文件所在的绝对路径,否则,在安装的时候,就会出现找不到安装包的情况报错。
Ⅱ、当我们有两台或者以上的设备连接到 adb 服务器的时候,我们再使用上面的命令,就会出错,因为 adb 它不知道到底为谁去安装这个应用,因为毕竟人家也是有选择困难症的。
所以,这里就需要我们来为它做这个决定,adb -s xxxx install xx.apk 。注意:xxxx 就是 上篇 adb devices 中 device 前面展示的手机序列号。
Ⅲ、如果我们已经安装了这个应用包,但是又执行了安装命令,这时,就会报错。
Ⅳ、我们有时候测试,需要不卸载再安装,而是选择直接覆盖安装,这个时候,我们输入 adb -r xxxx install xx.apk 。就能解决这样的问题。
Ⅴ、除了上述的这些,我们可以执行 adb help 查看其它的参数:
-l :锁定应用程序
-t :允许测试包
-d :允许降级覆盖安装
-p :部分应用安装
-g :为应用程序授予所有运行时的权限
---------------------
作者:MokWing
来源:CSDN
原文:https://blog.csdn.net/weixin_38374974/article/details/83590224
版权声明:本文为博主原创文章,转载请附上博文链接!
关于多 apk 发布的 Android 程序的 adb 安装 ——adb install-multiple和adb安装多个apk的介绍现已完结,谢谢您的耐心阅读,如果想了解更多关于(OK) Graphviz - MANET - multiple interfaces multiple paths、adb install 安装apk adb install 安装的apk在哪个路径、ADB install-multi-package / 希望尽快安装带有单独包的 APK、ADB 学习(2):adb install 命令的相关知识,请在本站寻找。
本文标签:


