本篇文章给大家谈谈ADO.NETTableAdapter参数,以及adaboost参数的知识点,同时本文还将给你拓展.net–TableAdapter配置向导不喜欢SP中的临时表、.net中IDBDa
本篇文章给大家谈谈ADO.NET TableAdapter参数,以及adaboost参数的知识点,同时本文还将给你拓展.net – TableAdapter配置向导不喜欢SP中的临时表、.net中IDBDataAdapter和IDataAdapter有什么区别、13.Android-ListView使用、BaseAdapter/ArrayAdapter/SimpleAdapter适配器使用、ADO.NET 2.0 Dataset和Datatable 新功能新特性等相关知识,希望对各位有所帮助,不要忘了收藏本站喔。
本文目录一览:- ADO.NET TableAdapter参数(adaboost参数)
- .net – TableAdapter配置向导不喜欢SP中的临时表
- .net中IDBDataAdapter和IDataAdapter有什么区别
- 13.Android-ListView使用、BaseAdapter/ArrayAdapter/SimpleAdapter适配器使用
- ADO.NET 2.0 Dataset和Datatable 新功能新特性
")
ADO.NET TableAdapter参数(adaboost参数)
我有一个查询,希望通过ASP.NET TableAdapter运行,该查询包含一个’IN’子句,该子句通过参数来接收它的值。
我的问题是,如何指定此参数?我想到了这样写条件语句:
AND b.group_category_id in (@ParamList)
其中@ParamList是参数的字符串,例如“
4,12,45,23”,但是由于指定的id是Integer,因此它抱怨无法将String转换为Integer。这很有意义,但是有什么方法可以在ASP.NET
TableAdapter的SQL语句中指定这样的列表?

.net – TableAdapter配置向导不喜欢SP中的临时表
此SP使用临时表来存储中间值,以便可以在SP末尾的计算中使用这些值.
临时表在SP结尾处都被彻底删除.
我可以在没有问题的情况下在SSMS中执行SP,并返回我期望的数据.
但是,当使用TableAdapter配置向导在VS2012中更新我的xsd时,它会给出错误无效对象名称’#Held'(其中#Held是其中一个临时表的名称).
这是怎么回事?
解决方法
有些人通过明确选择列名来解决它,例如:
从#temptable中选择column1,column2,…而不是SELECT *(如果你这样做的话)
您也可以尝试使用表变量而不是临时表.

.net中IDBDataAdapter和IDataAdapter有什么区别
The IDataAdapter interface allows an inheriting class to implement a
DataAdapter class,which represents the bridge between a data source and
a DataSet.
The IDbDataAdapter inherits from IDataAdapter and is specific to when
you're using a relational database as your data source(当数据源为数据库时). Data sources
don't have to be databases,you Could have adapters to other external
systems,an XML file,other data files Could be data sources as well.
Usually you don't use the interfaces directly (as a type) unless your
code Could be one of many different types of datasources or DBs at the
same time. For example,if you have code that needs to run using
sqlServer and/or Oracle in your current environment,and you want it to
be switchable (the same code block run with either type of database).
使用这两个接口的场景:当需要有多种类型的数据源或者数据库时,如sql和Oracle并存.可以采用工厂模式对数据访问做封装.
Or if you have a new type of datasource you'd like to add
DataSet-related capabilities to interact with,you would create classes
based on these interfaces....
或者,如果每次添加一种数据源类型时,需要基于这两个接口创建新的类实现数据访问.

13.Android-ListView使用、BaseAdapter/ArrayAdapter/SimpleAdapter适配器使用
https://www.cnblogs.com/lifexy/archive/2020/02/04/12261805.html
1.ListView
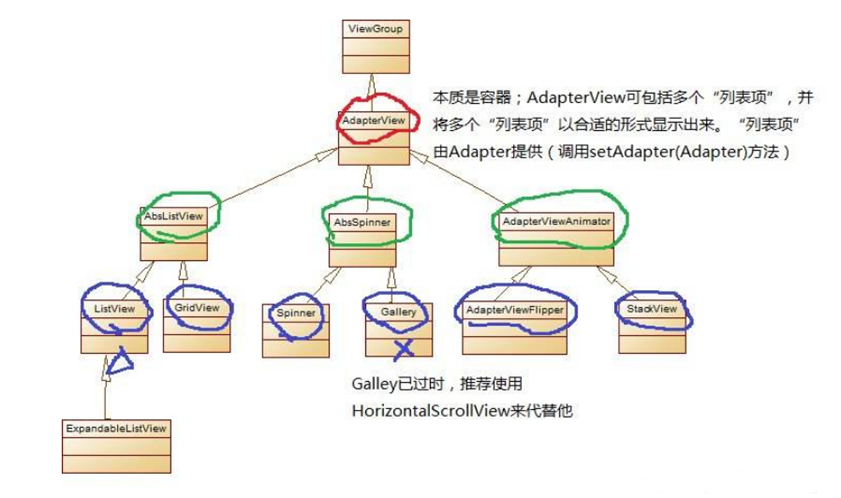
ListView 是 Android 系统为我们提供的一种列表显示的一种控件,使用它可以用来显示我们常见的列表形式。继承自抽象类 AdapterView。继承图如下所示:
以微信好友列表为例:

里面的每个好友就是由一个个 item 组成的,而每个item都存在Adapter适配器类中(负责数据处理),然后通过ListView显示出来.
2.ListView显示原理
ListView显示数据原理实际就是MVC设计模式,如下图所示:
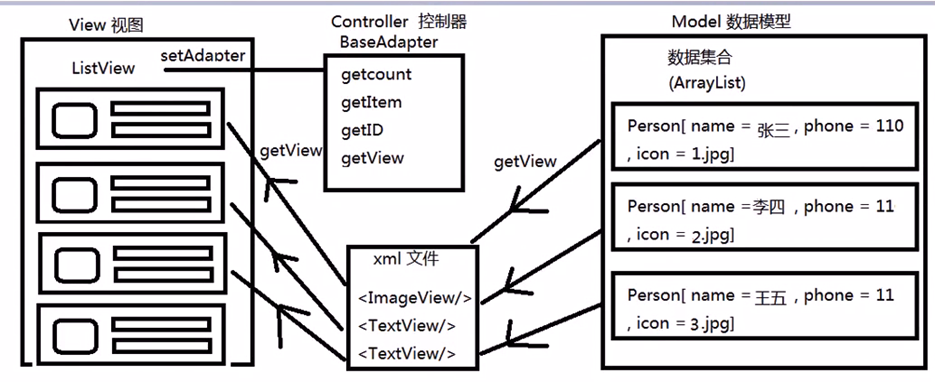
- Model(模型) – 数据集合,用来存储数据组织
- View(视图) – ListView,负责数据显示
- Controller(控制器) - 负责管理Model,并设置要显示的哪个具体数据.
3.使用BaseAdapter适配器
BaseAdapter比较简单,主要是通过继承此类来实现BaseAdapter的四个方法:
public int getCount();
//设置适配器中数据集的数据个数(ListView要显示的所有数据行);

public Object getItem(int position):
//获取数据集中与索引对应的数据项;

public long getItemId(int position);
//获取指定行对应的ID,一般都是直接返回position

public View getView(int position,View convertView,ViewGroup parent);
//获取每一行Item的显示内容。
// position:表示当前获取的Item是哪一行,开头从0开始
// convertView:旧视图复用,如果convertView不为空则表示可以用来复用.无需再次new一个view来使用.
// ViewGroup:只有LinearLayout或者RelativeLayout,如果viewGroup传入一个具体的对象,那么这个方法创建出来的view对象将作为这个viewGroup的childView来显示.
示例效果如下所示:

3.1写activity_main.xml
只是添加了一个ListView:
<RelativeLayout xmlns:android="http://schemas.android.com/apk/res/android"
    xmlns:tools="http://schemas.android.com/tools"
    android:layout_width="match_parent"
    android:layout_height="match_parent"
    android:paddingBottom="@dimen/activity_vertical_margin"
    android:paddingLeft="@dimen/activity_horizontal_margin"
    android:paddingRight="@dimen/activity_horizontal_margin"
    android:paddingTop="@dimen/activity_vertical_margin"
    tools:context=".MainActivity" >

    <ListView
        android:id="@+id/lv_list"
        android:layout_width="match_parent"
        android:layout_height="match_parent"
        android:layout_centerHorizontal="true"
        android:layout_centerVertical="true" >
    </ListView>

</RelativeLayout>
4.2 写item.xml
用来显示每一项item的view视图
<?xml version="1.0" encoding="utf-8"?>
<RelativeLayout xmlns:android="http://schemas.android.com/apk/res/android"
    android:layout_width="match_parent"
    android:layout_height="match_parent"
    android:layout_margin="5dp" >

    <ImageView
        android:id="@+id/imageView1"
        android:layout_width="wrap_content"
        android:layout_height="wrap_content"
        android:src="@drawable/ic_launcher" />

    <TextView
        android:id="@+id/tv_name"
        android:layout_width="wrap_content"
        android:layout_height="wrap_content"
        android:layout_toRightOf="@id/imageView1"
        android:textSize="20sp"
        android:textColor="#000000"
        android:text="name" />

    <TextView
        android:id="@+id/tv_content"
        android:layout_width="wrap_content"
        android:layout_height="wrap_content"
        android:layout_alignBottom="@+id/imageView1"
        android:layout_alignLeft="@+id/tv_name"
        android:text="content"
        android:textColor="#88000000"
        android:textSize="18sp" />

</RelativeLayout>
4.3 写MainActivity.java
package com.example.baseadaptertest;

import java.util.ArrayList;

import android.os.Bundle;
import android.app.Activity;
import android.view.LayoutInflater;
import android.view.Menu;
import android.view.View;
import android.view.ViewGroup;
import android.widget.BaseAdapter;
import android.widget.ListView;
import android.widget.TextView;


class Person {
    String name;
    String content;

    public Person(String name,String content){
        this.name = name;
        this.content = content;
    }
    public String getName() {
        return name;
    }
    public String getContent() {
        return content;
    }
}

public class MainActivity extends Activity {

    ArrayList<Person>    list;

    @Override
    protected void onCreate(Bundle savedInstanceState) {
        super.onCreate(savedInstanceState);
        setContentView(R.layout.activity_main);

        //1.添加要显示的数据
        list  = new ArrayList<Person>();
        list.add(new Person("张三","18岁  电话:158888666"));
        list.add(new Person("李四","21岁  电话:158888777"));
        list.add(new Person("王二","23岁  电话:158888877"));
        list.add(new Person("孙武","25岁  电话:158888997"));

        //2.设置Adapter
        ListView lv_list = (ListView)findViewById(R.id.lv_list);
        lv_list.setAdapter(new MyAdapter());

    }


    class MyAdapter extends BaseAdapter{

        @Override
        public int getCount() {
            return list.size();
        }

        @Override
        public Object getItem(int position) {
            return list.get(position);
        }

        @Override
        public long getItemId(int position) {
            return position;
        }

        @Override
        public View getView(int position, View convertView, ViewGroup parent) {

            View view = null;

            //如果convertView为空则需要重新创建资源视图,如果不为空则表示可以用来复用.无需再次new一个view来使用.
            if(convertView==null){
                 //通过R.layout.item 来创建一个item视图资源
                 view = LayoutInflater.from(getApplicationContext()).inflate(R.layout.item, null);
            }else{

                view = convertView;
            }

            //设置要显示的内容
            TextView  tv_name =  (TextView)view.findViewById(R.id.tv_name);
            TextView  tv_content =  (TextView)view.findViewById(R.id.tv_content);

            tv_name.setText(list.get(position).getName());
            tv_content.setText(list.get(position).getContent());


            return view;
        }
    }

    @Override
    public boolean onCreateOptionsMenu(Menu menu) {
        // Inflate the menu; this adds items to the action bar if it is present.
        getMenuInflater().inflate(R.menu.main, menu);
        return true;
    }
}
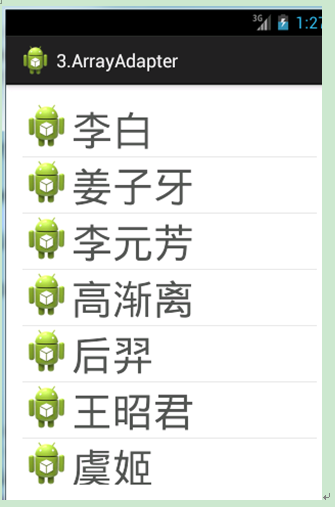
5.使用ArrayAdapter适配器
ArrayAdapter数组适配器用于绑定格式单一的数据,每个item只有一个数据需要被修改,数据源可以是集合或者数组
并且ArrayAdapter可以直接用来使用,无需再继承此类来实现.
ArrayAdapter的构造方法常用的有两种:
public ArrayAdapter(Context context, int resource, T[] objects);
//第一个参数 上下文
//第二个参数 包含且只有一个textview的布局文件id
//第三个参数 要展示的数据数组

public ArrayAdapter(Context context, int resource, int textViewResourceId, T[] objects);
//第一个参数 上下文
//第二个参数 可以包含很多内容(ImageView、textview等)的布局文件id
//第三个参数 指向resource中要显示数据的一个textView控件id
//第三个参数 要展示的数据数组
接下来,我们使用第二种构造方法来演示.
效果如下:
5.1 写activity_main.xml
只是添加了一个ListView,内容和BaseAdapter的activity_main.xml一致
5.2 写item.xml
<?xml version="1.0" encoding="utf-8"?>
<LinearLayout xmlns:android="http://schemas.android.com/apk/res/android"
    android:layout_width="match_parent"
    android:layout_height="match_parent"
    android:orientation="horizontal" >

    <ImageView
        android:id="@+id/imageView1"
        android:layout_width="wrap_content"
        android:layout_height="wrap_content"
        android:src="@drawable/ic_launcher" />

    <TextView
        android:id="@+id/tv_content"
        android:layout_width="match_parent"
        android:layout_height="wrap_content"
        android:text="name"
        android:textColor="#AA000000"
        android:textSize="40sp" />

</LinearLayout>
5.3 写MainActivity.java
package com.example.arrayadapter;

import android.os.Bundle;
import android.app.Activity;
import android.view.Menu;
import android.widget.ArrayAdapter;
import android.widget.ListView;

public class MainActivity extends Activity {

    @Override
    protected void onCreate(Bundle savedInstanceState) {
        super.onCreate(savedInstanceState);
        setContentView(R.layout.activity_main);

        //定义一个String数组
        String[] objects = {"李白","姜子牙","李元芳","高渐离","后羿","王昭君","虞姬"};

        //初始化ArrayAdapter
        ArrayAdapter<String> adapter = new ArrayAdapter<String>(getApplicationContext(), R.layout.item, R.id.tv_content, objects);

        //设置ArrayAdapter
        ListView  lv_list = (ListView)findViewById(R.id.lv_list);
        lv_list.setAdapter(adapter);

    }


    @Override
    public boolean onCreateOptionsMenu(Menu menu) {
        // Inflate the menu; this adds items to the action bar if it is present.
        getMenuInflater().inflate(R.menu.main, menu);
        return true;
    }

}
6.使用SimpleAdapter适配器
SimpleAdapter适配器适用于拥有多数据的item. 每个item通过Map集合来实现.而Map里则可以包含多个数据.
SimpleAdapter的构造方法如下所示:
public SimpleAdapter(Context context, List<? extends Map<String, ?>> data,

            int resource, String[] from, int[] to);

//context: 上下文,填入getApplicationContext()即可
//data:包含了Map(String ,Object)的List数组,每个Map表示每个item数据。
//resource:要加载item的xml布局文件Id
//from:string数组, 用来标识一个item需要设置哪些key.而key对应的value则是要显示的数据
//to:int数组,填入item xml布局文件里的要更改的控件内容ID号 ,用来对应from中的key值,表示设置的key值最终是更改哪些控件内容
效果如下:

6.1 写activity_main.xml
只是添加了一个ListView,内容和BaseAdapter的activity_main.xml一致
6.2 写item.xml
<?xml version="1.0" encoding="utf-8"?>
<RelativeLayout xmlns:android="http://schemas.android.com/apk/res/android"
    android:layout_width="match_parent"
    android:layout_height="match_parent"
    android:layout_margin="5dp" >

    <ImageView
        android:id="@+id/imageView1"
        android:layout_width="wrap_content"
        android:layout_height="60dp"
        android:src="@drawable/ic_launcher" />

    <TextView
        android:id="@+id/tv_title"
        android:layout_width="wrap_content"
        android:layout_height="wrap_content"
        android:layout_toRightOf="@id/imageView1"
        android:textSize="17sp"
        android:textColor="#000000"
        android:text="name" />

    <TextView
        android:id="@+id/tv_content"
        android:layout_width="wrap_content"
        android:layout_height="wrap_content"
        android:layout_alignBottom="@+id/imageView1"
        android:layout_alignLeft="@+id/tv_title"
        android:layout_alignParentRight="true"
        android:layout_below="@+id/tv_title"
        android:text="content"
        android:textColor="#88000000"
        android:textSize="15sp" />

</RelativeLayout>
6.3 写MainActivity.java
package com.example.simpleadapter;

import java.util.ArrayList;
import java.util.HashMap;
import java.util.List;
import java.util.Map;

import android.os.Bundle;
import android.app.Activity;
import android.view.Menu;
import android.widget.ListView;
import android.widget.SimpleAdapter;

public class MainActivity extends Activity {

    @Override
    protected void onCreate(Bundle savedInstanceState) {
        super.onCreate(savedInstanceState);
        setContentView(R.layout.activity_main);


        List<Map<String, String>> data = new ArrayList<Map<String,String>>();
        String[] from = {"title","content"};//用来标识一个item需要设置哪些key.而key对应的value则是要显示的数据,这里设置了2个key
        int[] to={R.id.tv_title,R.id.tv_content}; //填入要更改的控件内容ID号 ,用来对应from中的两个key值,


        //添加内容
        Map<String, String>  map1 = new HashMap<String, String>();
        map1.put("title", "成都5.1级地震");
        map1.put("content", "成都市青白江区5.1级地震尚无人员伤亡报告");
        data.add(map1);

        Map<String, String>  map2 = new HashMap<String, String>();
        map2.put("title", "英雄联盟手游即将上线");
        map2.put("content", "期待已久的英雄联盟即将上线...");
        data.add(map2);

        Map<String, String>  map3 = new HashMap<String, String>();
        map3.put("title", "英语专四考试延期");
        map3.put("content", "2020年英语专四专八考试延期...");
        data.add(map3);

        Map<String, String>  map4 = new HashMap<String, String>();
        map4.put("title", "上海出台减负政策");
        map4.put("content", "上海发布抗疫企业减负政策 中小微企业:希望继续加大...");
        data.add(map4);

        Map<String, String>  map5 = new HashMap<String, String>();
        map5.put("title", "最硬核科蜜");
        map5.put("content", "史上最硬核科蜜!穿着24号肩扛RPG伫立战火中...");
        data.add(map5);

        //初始化SimpleAdapter
        SimpleAdapter adapter = new SimpleAdapter(getApplicationContext(), data, R.layout.item, from, to);


        //设置SimpleAdapter
        ListView  lv_list = (ListView)findViewById(R.id.lv_list);
        lv_list.setAdapter(adapter);

    }


    @Override
    public boolean onCreateOptionsMenu(Menu menu) {
        // Inflate the menu; this adds items to the action bar if it is present.
        getMenuInflater().inflate(R.menu.main, menu);
        return true;
    }

}
Ps:如果要设置Item点击事件,则通过下面方法设置即可
listView.setOnItemClickListener(new AdapterView.OnItemClickListener() {

            @Override
            public void onItemClick(AdapterView<?> parent, View view, int position, long id) {

               //写要实现的事
            }
 });

ADO.NET 2.0 Dataset和Datatable 新功能新特性
<p>1.新的索引引擎更快的执行效率 下面这段代码在2003中需要157秒,在2005中只要11秒就可以完成:
<p>DataSet ds = new DataSet();
<p> ds.Tables.Add("BigTable"); ds.Tables[0].Columns.Add("ID",Type.GetType("system.int32")); ds.Tables[0].Columns["ID"].Unique = true; ds.Tables[0].Columns.Add("Value",Type.GetType("system.int32"));
<p> Cursor.Current = Cursors.WaitCursor;
<p> DateTime datBegin = DateTime.Now;
<p> Random rand = new Random(); int i,intValue; DaTarow dr;
<p> for (i = 1; i <= 500000; i++) { try { intValue = rand.Next();
<p> dr = ds.Tables[0].NewRow();
<p> dr["ID"] = intValue; dr["Value"] = intValue;
<p> ds.Tables[0].Rows.Add(dr); } catch { } }
<p> Cursor.Current = Cursors.Default;
<p> MessageBox.Show("Elapsed Time: " + (DateTime.Now - datBegin).Seconds.ToString()); MessageBox.Show("count = " + ds.Tables[0].Rows.Count.ToString());2.Dataset可以序列化为二进制文件 string connstr = "server=(local);database=northwind;integrated security=true;async=true";
<p> DataSet ds = new DataSet(); sqlDataAdapter dadpt = new sqlDataAdapter("select from [order details]",connstr); dadpt.Fill(ds);
<p> BinaryFormatter bf = new BinaryFormatter(); FileStream fs = new FileStream(@"c:\xml1.txt",FileMode.OpenorCreate);
<p> ds.RemotingFormat = SerializationFormat.Binary;
<p> bf.Serialize(fs,ds); 3.更独立的Datatable DataTable Write XML string connstr = "server=(local);database=northwind;integrated security=true;async=true"; sqlDataAdapter dadpt = new sqlDataAdapter("select from [order details]",connstr); DataTable dt = new DataTable("Customer"); dadpt.Fill(dt);
<p> dt.WriteXml(@"c:\DataTable.xml",true); dt.WriteXmlSchema(@"c:\DataTableSchema.xml"); DataTable Read XML StreamReader sr = new StreamReader(@"C:\DataTableSchema.xml");
<p> DataTable dt = new DataTable(); dt.readxmlSchema(sr);
<p> dt.readxml(new StreamReader(@"c:\dataTable.xml"));
<p> this.dataGridView1.DataSource = dt; DataTable Merge string connstr = "server=(local);database=northwind;integrated security=true;async=true"; sqlDataAdapter dadpt = new sqlDataAdapter("select from customers",connstr); DataTable dt = new DataTable("Customer"); dadpt.Fill(dt);
<p> sqlDataAdapter dadpt1 = new sqlDataAdapter("select from customers",connstr); DataTable dt1 = new DataTable("Customer1"); dadpt1.Fill(dt1);
<p> dt.Merge(dt1);
<p> this.dataGridView1.DataSource = dt; DataTable Load DataReader string connstr = "server=(local);database=northwind;integrated security=true;async=true"; sqlConnection conn = new sqlConnection(connstr); conn.open(); sqlCommand cmd = new sqlCommand("select * from [order details]",conn); sqlDataReader dr = cmd.ExecuteReader();
<p> DataTable dt = new DataTable("Customer"); dt.Load(dr);
<p> this.dataGridView1.DataSource = dt;
我们今天的关于ADO.NET TableAdapter参数和adaboost参数的分享已经告一段落,感谢您的关注,如果您想了解更多关于.net – TableAdapter配置向导不喜欢SP中的临时表、.net中IDBDataAdapter和IDataAdapter有什么区别、13.Android-ListView使用、BaseAdapter/ArrayAdapter/SimpleAdapter适配器使用、ADO.NET 2.0 Dataset和Datatable 新功能新特性的相关信息,请在本站查询。
本文标签:


