此处将为大家介绍关于asp.net-web-api–自定义模型Binder不从SwaggerUI调用的详细内容,此外,我们还将为您介绍关于.NetCoreWebAPISwagger没有找到该网址的网页
此处将为大家介绍关于asp.net-web-api – 自定义模型Binder不从Swagger UI调用的详细内容,此外,我们还将为您介绍关于.Net Core Web API Swagger 没有找到该网址的网页:http://localhost/swagger、.net 框架设置 swagger UI 指向 index.html 而不是 swagger/ui/index、Asp.Net Core 3.0 WebApi 使用Swagger、ASP.NET Core Swagger接入使用IdentityServer4 的 WebApi的有用信息。
本文目录一览:- asp.net-web-api – 自定义模型Binder不从Swagger UI调用
- .Net Core Web API Swagger 没有找到该网址的网页:http://localhost/swagger
- .net 框架设置 swagger UI 指向 index.html 而不是 swagger/ui/index
- Asp.Net Core 3.0 WebApi 使用Swagger
- ASP.NET Core Swagger接入使用IdentityServer4 的 WebApi

asp.net-web-api – 自定义模型Binder不从Swagger UI调用
– 使用的型号:
[ModelBinder(typeof(FieldValueModelBinder))]
    public class Employee
    {
        public int EmployeeID { get; set; }
        public string EmployeeName { get; set; }
        public string City { get; set; }
    }
– 使用的API Post方法:
[HttpPost]
    // POST: api/Employee
    public HttpResponseMessage Post([ModelBinder(typeof(FieldValueModelBinder))]Employee emp)
    {
        if (!ModelState.IsValid)
            return Request.CreateResponse(HttpStatusCode.BadRequest,"Please provide valid input");
        else
            //Add Employee logic here
            return Request.CreateResponse(HttpStatusCode.OK,"Employee added sucessfully");
    }
– 使用的型号粘合剂:
public class FieldValueModelBinder : System.Web.Http.ModelBinding.IModelBinder
{
    /// <summary>
    /// Store received data in API in keyvaluePair
    /// </summary>
    private List<keyvaluePair<string,string>> kvps;

    /// <summary>
    /// Storing error while binding data in Model class
    /// </summary>
    private Dictionary<string,string> dictionaryErrors = new Dictionary<string,string>();

    /// <summary>
    /// Implementing Base method and binding received data in API to its respected property in Model class
    /// </summary>
    /// <param name="actionContext">Http Action Context</param>
    /// <param name="bindingContext">Model Binding Context</param>
    /// <returns>True if no error while binding. False if any error occurs during model binding</returns>
    public bool BindModel(HttpActionContext actionContext,System.Web.Http.ModelBinding.ModelBindingContext bindingContext)
    {
        try
        {
            var bodyString = actionContext.Request.Content.ReadAsstringAsync().Result;
            if (actionContext.Request.Method.Method.toupper().Equals("GET"))
            {
                var uriContext = HttpUtility.ParseQueryString(actionContext.Request.RequestUri.Query);
                if (uriContext.HasKeys())
                {
                    this.kvps = uriContext.AllKeys.ToDictionary(k => k,k => uriContext[k]).ToList<keyvaluePair<string,string>>();
                }
            }
            else if (!string.IsNullOrEmpty(bodyString))
            {
                this.kvps = this.ConvertToKvps(bodyString);
            }
            else
            {
                bindingContext.ModelState.AddModelError(bindingContext.ModelName,"Please provide valid input data.");
                return false;
            }
        }
        catch (Exception ex)
        {
            bindingContext.ModelState.AddModelError(bindingContext.ModelName,"Please provide data in a valid format.");
            return false;
        }

        // Initiate primary object
        var obj = Activator.CreateInstance(bindingContext.ModelType);
        try
        {
            this.SetPropertyValues(obj);
        }
        catch (Exception ex)
        {
            if (this.dictionaryErrors.Any())
            {
                foreach (keyvaluePair<string,string> keyvaluePair in this.dictionaryErrors)
                {
                    bindingContext.ModelState.AddModelError(keyvaluePair.Key,keyvaluePair.Value);
                }
            }
            else
            {
                bindingContext.ModelState.AddModelError("Internal Error",ex.Message);
            }

            this.dictionaryErrors.Clear();
            return false;
        }

        // Assign completed Mapped object to Model
        bindingContext.Model = obj;
        return true;
    }
我面临以下问题:
>当我们在post方法中使用’ModelBinder’时,Swagger UI就是
显示此屏幕,其中输入参数在a中发布
查询字符串和CustomModelBinder被调用并尝试读取
请求正文执行模型绑定和验证并获取null
这个案例.
Public HttpResponseMessage Post([ModelBinder(typeof(FieldValueModelBinder))] Employee emp)

>当我们在post方法中使用’FromBody’时,Swagger UI会显示此信息
屏幕,我们可以在请求正文中发送输入,但在此
case调用CustomModelBinder并且我们无法执行
模型绑定和验证.
public HttpResponseMessage Post([FromBody] Employee emp)

>当我们尝试使用’modelbinder’和’frombody’时,Swagger UI需要
输入作为查询,我们得到以下响应:

尝试使用Postman,API工作正常,我们能够在请求体中传递输入并获得正确的输出.在模型状态无效的情况下,自定义模型绑定也可以工作并填充错误消息,然后我们可以使用这些消息在响应中发送.


需要更改什么以在将输入数据发布到请求正文中的API时从Swagger UI调用自定义模型绑定器.请建议.
解决方法
private class ApplyDocumentvendorExtensions : IDocumentFilter
{
    public void Apply(SwaggerDocument swaggerDoc,SchemaRegistry s,IApiExplorer a)
    {
        if (swaggerDoc != null)
        {
            foreach (var path in swaggerDoc.paths)
            {
                if (path.Value.post != null && path.Value.post.parameters != null )
                {
                    var parameters = path.Value.post.parameters;
                    if (parameters.Count == 3 && parameters[0].name.StartsWith("emp"))
                    {
                        path.Value.post.parameters = EmployeeBodyParam;
                    }
                }
            }
        }
    }

    private IList<Parameter> EmployeeBodyParam
    {
        get
        {
            return new List<Parameter>
            {
                new Parameter {
                    name = "emp",@in = "body",required = true,schema = new Schema {
                        @ref = "#/deFinitions/Employee"
                    }
                }
            };
        }
    }
}

.Net Core Web API Swagger 没有找到该网址的网页:http://localhost/swagger
如何解决.Net Core Web API Swagger 没有找到该网址的网页:http://localhost/swagger?
我正在研究 .NET 核心 Web API,我想将该项目与 Swagger 集成。
我已按照本文中的所有步骤进行操作 https://dev.to/amoenus/how-to-integrate-swagger-ui-in-a-net-core-web-api-application-amoenus-dev-13o1
现在该项目不在 IIS 上运行,所以为了导航到 swagger,我输入了 http://localhost:8080/swagger。
因为我在 StartUp
app.UseSwaggerUI(c =>
        {
            c.SwaggerEndpoint("/swagger/v1/swagger.json","My API");
            c.RoutePrefix = string.Empty;
        });
老实说,我假设端口是 8080,因为我不知道我的端口是什么。
如果我不在 IIS 上运行,有人可以告诉我是否可以大摇大摆,以及如何准确知道我的本地主机端口?
解决方法
设置在 launchSettings.json 中,它位于 web api 根目录的 Properties 文件夹下。以下是我的设置示例。
"profiles": {
    "test-web-api": {
      "commandName": "Project","dotnetRunMessages": "true","launchBrowser": true,"launchUrl": "swagger","applicationUrl": "https://localhost:5001;http://localhost:5000","environmentVariables": {
        "ASPNETCORE_ENVIRONMENT": "local"
      }
    },"IIS Express": {
      "commandName": "IISExpress","environmentVariables": {
        "ASPNETCORE_ENVIRONMENT": "local"
      },"use64Bit": true
    }
  }

.net 框架设置 swagger UI 指向 index.html 而不是 swagger/ui/index
如何解决.net 框架设置 swagger UI 指向 index.html 而不是 swagger/ui/index?
在我们所有使用 swagger 的 .net 核心项目中,要访问它,我们只需转到 URL/index.html。但是,出于某种原因,.net 框架 swagger 指向 URL/swagger/ui/index。我该如何更改它以使其与我的其他项目保持一致。这是我的代码:
public class WebApi
{
    public void Configuration(IAppBuilder app)
    {
        var config = new HttpConfiguration();
        config.EnableCors(new EnableCorsAttribute("*","*","*"));
        config.MapHttpAttributeRoutes();
        config.Routes.MapHttpRoute(
            name: "DefaultApi",routeTemplate: "api/{controller}/{id}",defaults: new { id = RouteParameter.Optional }
        );

        config.EnableSwagger(c =>
        {
            c.SingleApiVersion("v1","stuff");
        })
            .EnableSwaggerUi(c =>
            {
                c.DocumentTitle("Swagger UI");
            });

        app.UseWebApi(config);

        app.UseCors(CorsOptions.AllowAll);
    }
}
解决方法
暂无找到可以解决该程序问题的有效方法,小编努力寻找整理中!
如果你已经找到好的解决方法,欢迎将解决方案带上本链接一起发送给小编。
小编邮箱:dio#foxmail.com (将#修改为@)

Asp.Net Core 3.0 WebApi 使用Swagger
1、安装指定版本: Swashbuckle.AspNetCore 5.0.0-rc4(目前稳定版本4.0.1在AspNetCore3.0中会报错误)

2、后台C#代码要严格格式必须加[HttpPost]或者[HttpGet]

3、Startup类中配置如下代码
     public void ConfigureServices(IServiceCollection services)
      {
            services.AddControllers();
            services.AddRazorPages();


            #region Swagger配置
            services.AddSwaggerGen(c =>
            {
                c.SwaggerDoc("v1", new Microsoft.OpenApi.Models.OpenApiInfo { Title = "My API", Version = "v1" }); c.ResolveConflictingActions(apiDescriptions => apiDescriptions.First()); });

           #endregion
           services.AddMvc().SetCompatibilityVersion(CompatibilityVersion.Latest);
      }
public void Configure(IApplicationBuilder app, IWebHostEnvironment env)
{
if (env.IsDevelopment())
{
app.UseDeveloperExceptionPage();
}
app.UseRouting();
app.UseStaticFiles();//启动静态文件
app.UseAuthorization();
#region session配置
app.UseSession();
#endregion
#region Swagger配置
//启用中间件服务生成Swagger作为JSON终结点
app.UseSwagger();
//启用中间件服务对swagger-ui,指定Swagger JSON终结点
app.UseSwaggerUI(c =>
{
c.SwaggerEndpoint("/swagger/v1/swagger.json", "My API V1");
});
#endregion
app.UseEndpoints(endpoints =>
{
endpoints.MapControllers();
endpoints.MapAreaControllerRoute(
name: "areas", "Admin",
pattern: "{area:exists}/{controller=Users}/{action=Index}/{id?}");
endpoints.MapRazorPages();
});
}
4、地址栏输入地址(注意端口每个人的机器上的端口不一样):http://localhost:56534/swagger/v1/swagger.json

5、地址栏输入地址:http://localhost:56534/swagger/index.html


ASP.NET Core Swagger接入使用IdentityServer4 的 WebApi
写在前面
是这样的,我们现在接口使用了Ocelot做网关,Ocelot里面集成了基于IdentityServer4开发的授权中心用于对Api资源的保护。问题来了,我们的Api用了SwaggerUI做接口的自文档,那就蛋疼了,你接入了IdentityServer4的Api,用SwaggerUI调试、调用接口的话,妥妥的401,未授权啊。那有小伙伴就会说了,你SwaggerUI的Api不经过网关不就ok了?诶,好办法。但是:
- 我不想改变Url规则啊,我是
/api开头的Url都是经过网关的,如果不经过网关要加端口或者改变Url规则,会给其他部门的同事带来麻烦(多个Url规则容易混淆); - 另外是,因为生产环境是接入了IdentityServer4,我想测试环境从一开始就需要调用方熟悉接口的接入,避免平时用没有经过授权中心的Url调试,一到生产就出问题。
ok,废话讲得有点多,我们就直奔主题。
下面我们需要创建两个示例项目:
1、IdentityServer4的授权中心;
2、使用SwaggerUI做自文档的WebApi项目;
写得有点乱,本文源码地址: https://github.com/gebiWangshushu/cnblogs-demos/tree/master/SwggerUI.IdentityServer4.Example
构建基于IdentityServer4授权中心
1、新建空白解决方案,并添加一个空的WebApi项目,IdentityServer

2、引用包。
Install-Package IdentityServer4
3、添加配置类:Config.cs
using IdentityServer4;
using IdentityServer4.Models;
using IdentityServer4.Test;
using System;
using System.Collections.Generic;
using System.Linq;
using System.Threading.Tasks;

namespace IdentityServer
{
    public static class Config
    {
        public static List<TestUser> GetUsers()
        {
            return new List<TestUser>
            {
                new TestUser
                {
                    SubjectId = "1",
                    Username = "alice",
                    Password = "alice"
                }
            };
        }

        public static IEnumerable<IdentityResource> GetIdentityResources()
        {
            return new IdentityResource[]
            {
                new IdentityResources.OpenId(),
                new IdentityResources.Profile(),
            };
        }
        /// <summary>
        /// API信息
        /// </summary>
        /// <returns></returns>
        public static IEnumerable<ApiResource> GetApis()
        {
            return new[]
            {
                new ApiResource("swagger_api", "Demo SwaggerUI integrat Idp")
            };
        }
        /// <summary>
        /// 客服端信息
        /// </summary>
        /// <returns></returns>
        public static IEnumerable<Client> GetClients()
        {
            return new[]
            {
                new Client
                {
                    ClientId = "swagger_client",//客服端名称
                    ClientName = "Swagger UI client",//描述
                    AllowedGrantTypes = GrantTypes.Implicit,//Implicit 方式
                    AllowAccessTokensViaBrowser = true,//是否通过浏览器为此客户端传输访问令牌
                    RedirectUris =
                    {
                        "http://localhost:5001/swagger/oauth2-redirect.html"
                    },
                    AllowedScopes = { "swagger_api" }
                }
            };
        }
    }
}
4、修改Startup.cs
using System;
using System.Collections.Generic;
using System.Linq;
using System.Threading.Tasks;
using Microsoft.AspNetCore.Builder;
using Microsoft.AspNetCore.Hosting;
using Microsoft.AspNetCore.Mvc;
using Microsoft.Extensions.Configuration;
using Microsoft.Extensions.DependencyInjection;
using Microsoft.Extensions.Logging;
using Microsoft.Extensions.Options;

namespace IdentityServer
{
    public class Startup
    {
        public IHostingEnvironment Environment { get; }

        public Startup(IHostingEnvironment environment)
        {
            Environment = environment;
        }
        public void ConfigureServices(IServiceCollection services)
        {
            services.AddMvc().SetCompatibilityVersion(CompatibilityVersion.Version_2_2);
            var builder = services.AddIdentityServer()
                    .AddInMemoryIdentityResources(Config.GetIdentityResources())
                    .AddInMemoryApiResources(Config.GetApis())
                    .AddInMemoryClients(Config.GetClients())
                    .AddTestUsers(Config.GetUsers());

            if (Environment.IsDevelopment())
            {
                builder.AddDeveloperSigningCredential();
            }
            else
            {
                throw new Exception("need to configure key material");
            }
        }

        // This method gets called by the runtime. Use this method to configure the HTTP request pipeline.
        public void Configure(IApplicationBuilder app, IHostingEnvironment env)
        {
            if (env.IsDevelopment())
            {
                app.UseDeveloperExceptionPage();
            }

            app.UseIdentityServer();
            app.UseIdentityServer();
            app.UseMvcWithDefaultRoute();
        }
    }
}
ok,跑起来了

使用SwaggerUI做自文档的WebApi项目
1、添加WebApi项目,SwaggerUIApi
现在项目结构这样:

2、先添加SwaggerUI,先不接入IdentityServer
修改Startup.cs
using System;
using System.Collections.Generic;
using System.IO;
using System.Linq;
using System.Reflection;
using System.Threading.Tasks;
using Microsoft.AspNetCore.Builder;
using Microsoft.AspNetCore.Hosting;
using Microsoft.AspNetCore.Mvc;
using Microsoft.Extensions.Configuration;
using Microsoft.Extensions.DependencyInjection;
using Microsoft.Extensions.Logging;
using Microsoft.Extensions.Options;
using Swashbuckle.AspNetCore.Swagger;

namespace SwggerUIApi
{
    public class Startup
    {
        public Startup(IConfiguration configuration)
        {
            Configuration = configuration;
        }

        public IConfiguration Configuration { get; }

        // This method gets called by the runtime. Use this method to add services to the container.
        public void ConfigureServices(IServiceCollection services)
        {
            services.AddMvc().SetCompatibilityVersion(CompatibilityVersion.Version_2_2);
            services.AddSwaggerGen(c =>
            {
                c.SwaggerDoc("v1", new Info
                {
                    Version = "v1",
                    Title = "ToDo API",
                    Description = "A simple example ASP.NET Core Web API",
                    TermsOfService = "None",
                    Contact = new Contact
                    {
                        Name = "Shayne Boyer",
                        Email = string.Empty,
                        Url = "https://twitter.com/spboyer"
                    },
                    License = new License
                    {
                        Name = "Use under LICX",
                        Url = "https://example.com/license"
                    }
                });
                var xmlFile = $"{Assembly.GetExecutingAssembly().GetName().Name}.xml";
                var xmlPath = Path.Combine(AppContext.BaseDirectory, xmlFile);
                c.IncludeXmlComments(xmlPath);
            });
        }

        // This method gets called by the runtime. Use this method to configure the HTTP request pipeline.
        public void Configure(IApplicationBuilder app, IHostingEnvironment env)
        {
            if (env.IsDevelopment())
            {
                app.UseDeveloperExceptionPage();
            }
            app.UseSwagger();

            // Enable middleware to serve swagger-ui (HTML, JS, CSS, etc.),
            // specifying the Swagger JSON endpoint.
            app.UseSwaggerUI(c =>
            {
                c.SwaggerEndpoint("/swagger/v1/swagger.json", "My API V1");
            });
            app.UseMvc();
        }
    }
}
得到这样的SwaggerUI:
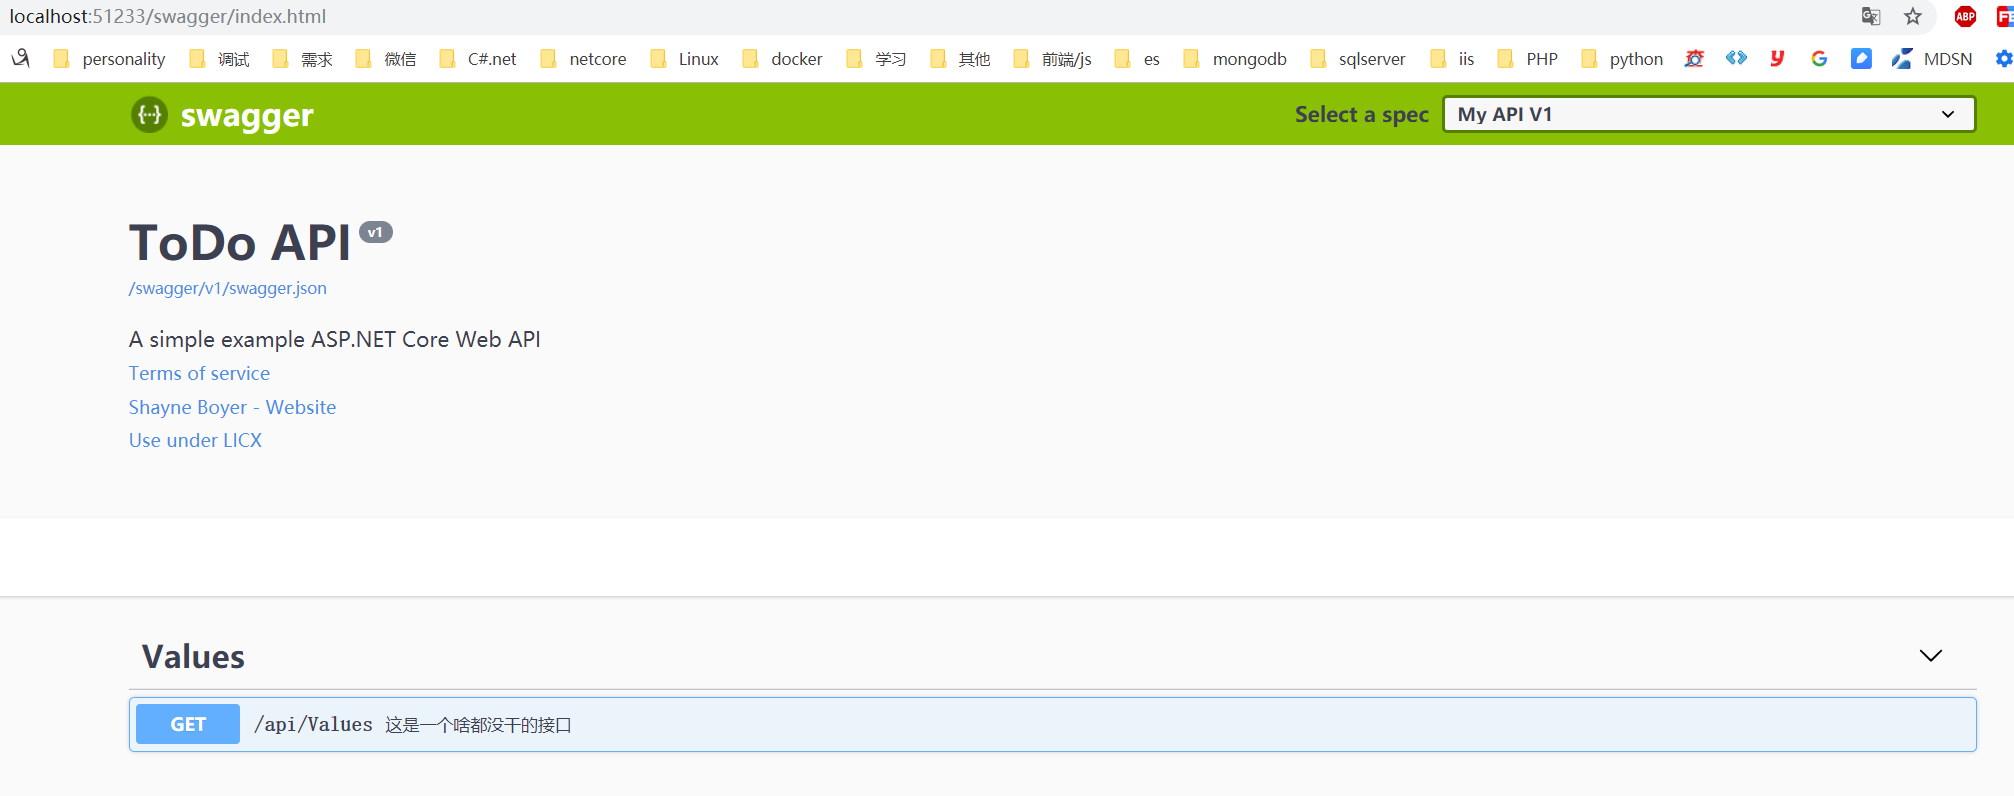
我们调用一下接口:
杠杠的200:

3、接口项目我们接入IdentityServer4
修改:Startup.cs ,ConfigureServices方法,
  services.AddAuthentication(IdentityServerAuthenticationDefaults.AuthenticationScheme)
  .AddIdentityServerAuthentication(options =>
           {
              options.Authority = "http://localhost:5000"; // IdentityServer服务器地址
              options.ApiName = "swagger_api"; // 用于针对进行身份验证的API资源的名称
              options.RequireHttpsMetadata = false; // 指定是否为HTTPS
          });
修改:Startup.cs ,Configure方法
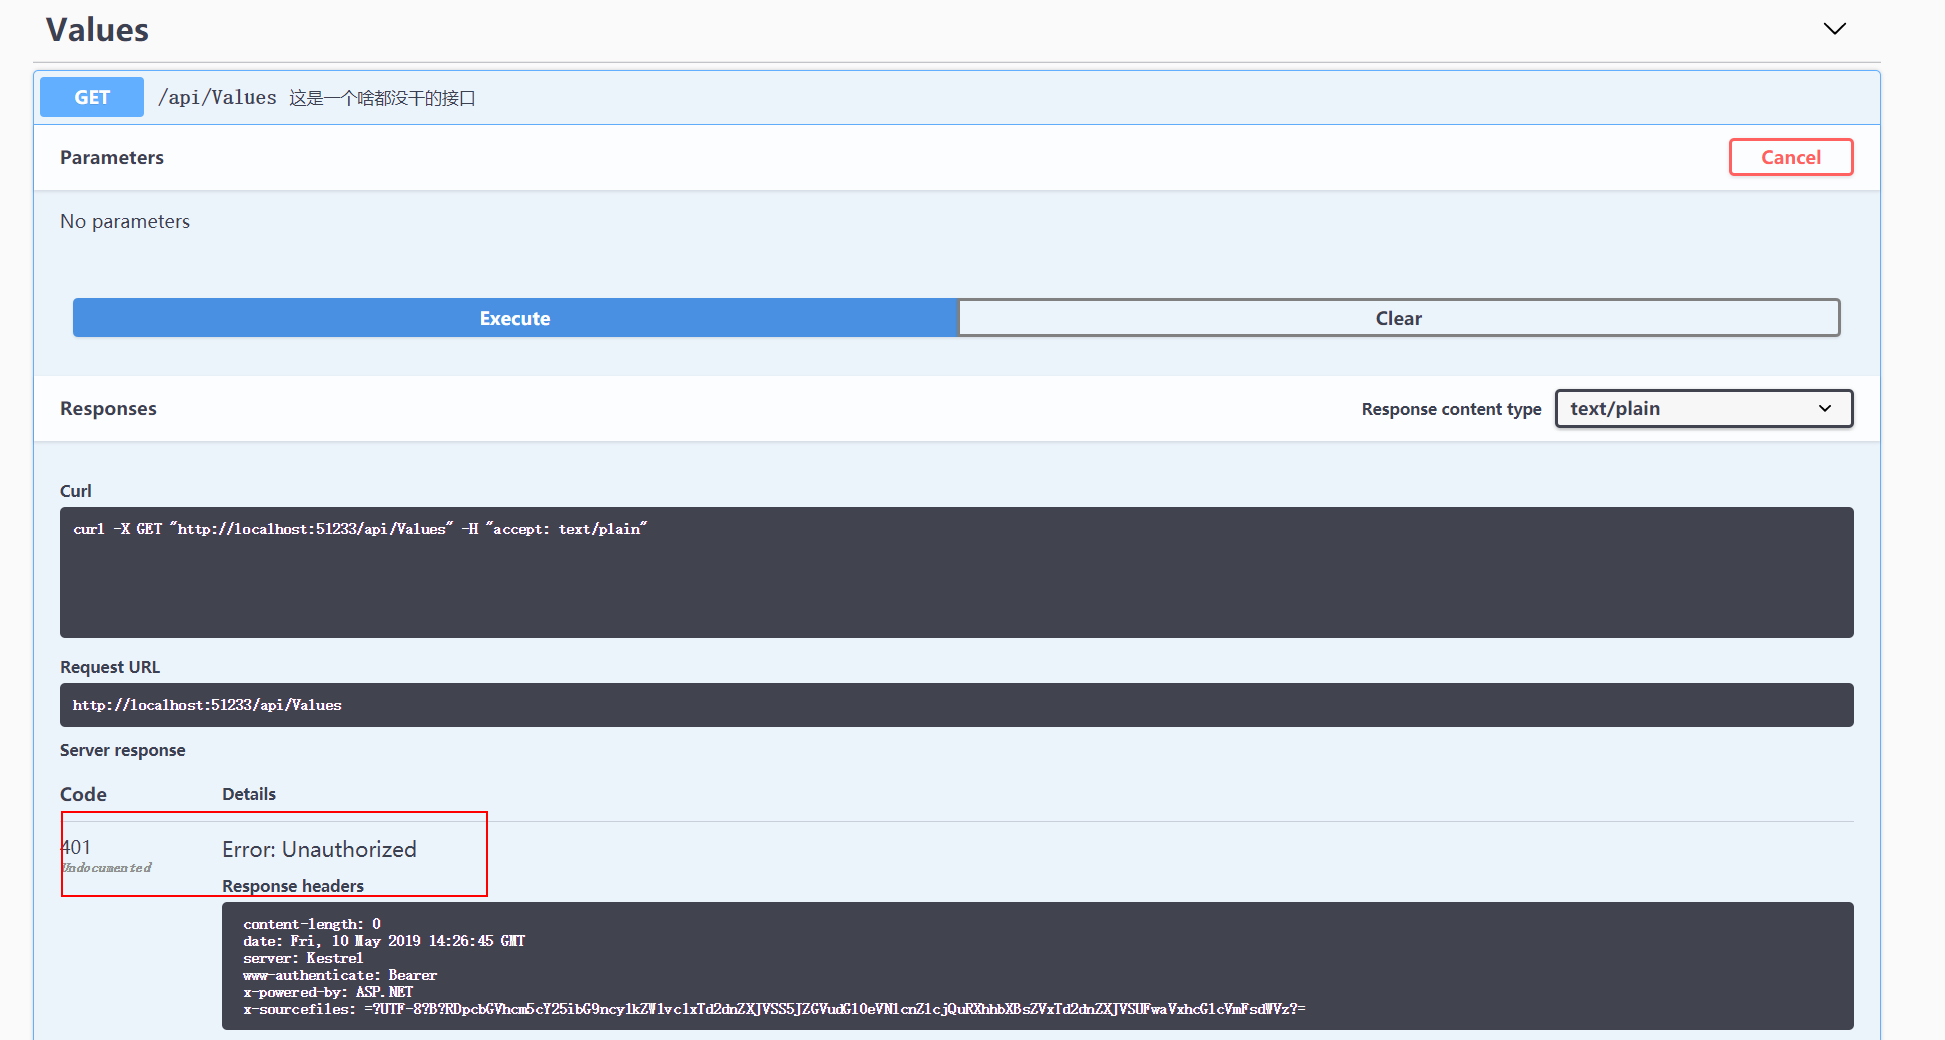
app.UseAuthentication();
Ok,可以看到我们接口接入IdentityServer了。提示401,未授权;
3、接入IdentityServer
1、添加授权响应操作的过滤器,AuthResponsesOperationFilter.cs
using Microsoft.AspNetCore.Authorization;
using Swashbuckle.AspNetCore.Swagger;
using Swashbuckle.AspNetCore.SwaggerGen;
using System;
using System.Collections.Generic;
using System.Linq;
using System.Threading.Tasks;

namespace SwggerUIApi
{
    public class AuthResponsesOperationFilter : IOperationFilter
    {
        public void Apply(Operation operation, OperationFilterContext context)
        {
            //获取是否添加登录特性
            var authAttributes = context.MethodInfo.DeclaringType.GetCustomAttributes(true)
             .Union(context.MethodInfo.GetCustomAttributes(true))
             .OfType<AuthorizeAttribute>().Any();

            if (authAttributes)
            {
                operation.Responses.Add("401", new Response { Description = "暂无访问权限" });
                operation.Responses.Add("403", new Response { Description = "禁止访问" });
                operation.Security = new List<IDictionary<string, IEnumerable<string>>>
                {
                    new Dictionary<string, IEnumerable<string>> {{"oauth2", new[] { "swagger_api" } }}
                };
            }
        }
    }
}
2、修改Startup.cs ,ConfigureServices方法的,services.AddSwaggerGen()
配置成这样:
     services.AddSwaggerGen(c =>
            {
                c.SwaggerDoc("v1", new Info
                {
                    Version = "v1",
                    Title = "ToDo API",
                    Description = "A simple example ASP.NET Core Web API",
                    TermsOfService = "None",
                    Contact = new Contact
                    {
                        Name = "Shayne Boyer",
                        Email = string.Empty,
                        Url = "https://twitter.com/spboyer"
                    },
                    License = new License
                    {
                        Name = "Use under LICX",
                        Url = "https://example.com/license"
                    }
                });
                var xmlFile = $"{Assembly.GetExecutingAssembly().GetName().Name}.xml";
                var xmlPath = Path.Combine(AppContext.BaseDirectory, xmlFile);
                c.IncludeXmlComments(xmlPath);

                //接入identityserver
                c.AddSecurityDefinition("oauth2", new OAuth2Scheme
                {
                    Flow = "implicit", // 只需通过浏览器获取令牌(适用于swagger)
                    AuthorizationUrl = "http://localhost:5000/connect/authorize",//获取登录授权接口
                    Scopes = new Dictionary<string, string> {
                        { "swagger_api_scopde", "swagger_api access" }//指定客户端请求的api作用域。 如果为空,则客户端无法访问
                    }
                });
                c.OperationFilter<AuthResponsesOperationFilter>();
            });
3、我们还需给授权中心添加一个登陆界面
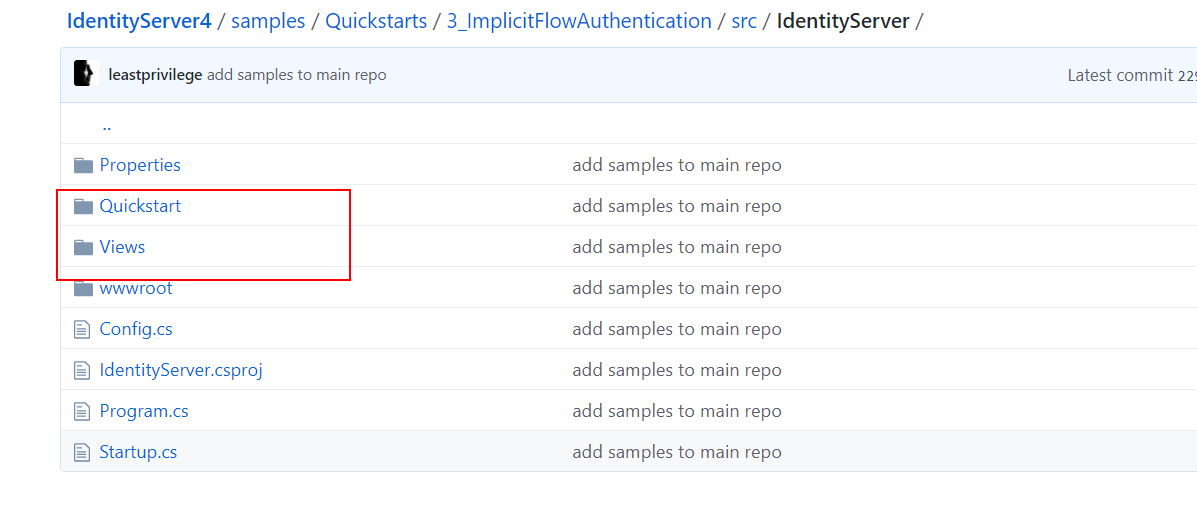
去: https://github.com/IdentityServer/IdentityServer4/tree/master/samples/Quickstarts/3_ImplicitFlowAuthentication/src/IdentityServer
下载这个两个文件夹,复制丢到IdentityServer项目下面:
项目结构:
4、我们运行看看
先启动Identityserver项目
运行SwaggerUI可以看到,这两个地方了个小锁头,表示已启用安全保护:

我们点一下上面的按钮:

哇,我们跳到了这里:

输入:alice/alice,点登录:
哇哇:

当然是Yes啦,然后这边变成这样了:
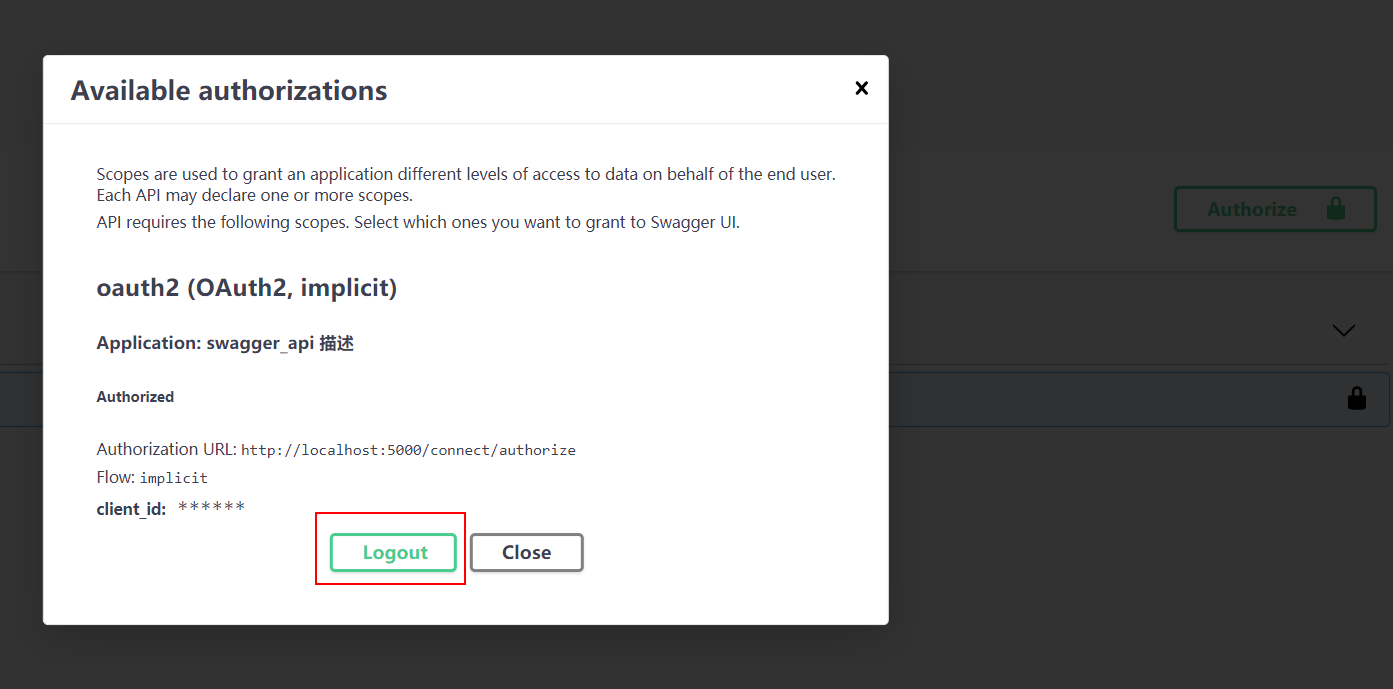
这是已获得授权状态,我们再次调用看看:

这里我们看到已经调用成功,仔细看请求,与前面简短的请求不同的是,现在请求里面带了access_token了,
这才是我们折腾这么久得来的宝贝。
总结
写得有点匆忙,希望大家能看得懂[捂脸];
源码地址:https://github.com/gebiWangshushu/cnblogs-demos/tree/master/SwggerUI.IdentityServer4.Example
参考
https://github.com/domaindrivendev/Swashbuckle.AspNetCore
https://github.com/IdentityServer/IdentityServer4
原文出处:https://www.cnblogs.com/xiaxiaolu/p/10847248.html
今天关于asp.net-web-api – 自定义模型Binder不从Swagger UI调用的介绍到此结束,谢谢您的阅读,有关.Net Core Web API Swagger 没有找到该网址的网页:http://localhost/swagger、.net 框架设置 swagger UI 指向 index.html 而不是 swagger/ui/index、Asp.Net Core 3.0 WebApi 使用Swagger、ASP.NET Core Swagger接入使用IdentityServer4 的 WebApi等更多相关知识的信息可以在本站进行查询。
本文标签:


