本文将为您提供关于C/C++QtStandardItemModel数据模型应用的详细介绍,我们还将为您解释qt数据类型的相关知识,同时,我们还将为您提供关于2.5Vto3.3VUART,5Mbit/s
本文将为您提供关于C/C++ Qt StandardItemModel 数据模型应用的详细介绍,我们还将为您解释qt数据类型的相关知识,同时,我们还将为您提供关于2.5 V to 3.3 V UART, 5 Mbit/s (max.) with 128-byte FIFOs, infrared (IrDA), and 16 mode or 68 mode...、Angular 2:ContenteditableModel:双向数据绑定、c – QAbstractItemModel和QTreeView、c# – .NET Standard 1.6中的System.Threading.Tasks.Parallel在哪里?的实用信息。
本文目录一览:- C/C++ Qt StandardItemModel 数据模型应用(qt数据类型)
- 2.5 V to 3.3 V UART, 5 Mbit/s (max.) with 128-byte FIFOs, infrared (IrDA), and 16 mode or 68 mode...
- Angular 2:ContenteditableModel:双向数据绑定
- c – QAbstractItemModel和QTreeView
- c# – .NET Standard 1.6中的System.Threading.Tasks.Parallel在哪里?
")
C/C++ Qt StandardItemModel 数据模型应用(qt数据类型)
QStandardItemModel 是标准的以项数据为单位的基于M/V模型的一种标准数据管理方式,Model/View 是Qt中的一种数据编排结构,其中Model代表模型,View代表视图,视图是显示和编辑数据的界面组件,而模型则是视图与原始数据之间的接口,通常该类结构都是用在数据库中较多,例如模型结构负责读取或写入数据库,视图结构则负责展示数据,其条理清晰,编写代码便于维护。
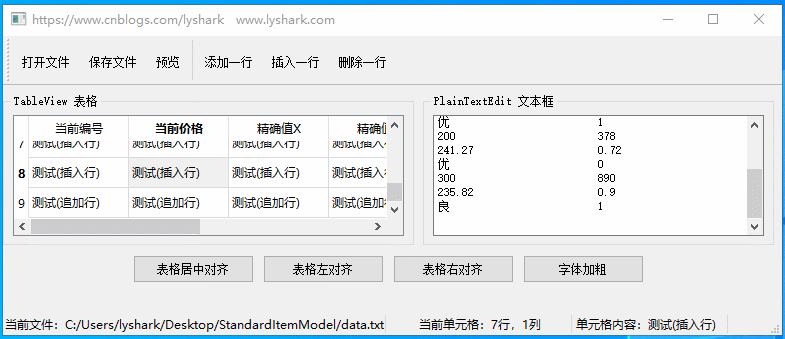
QStandardItemModel组件通常会配合TableView组件一起使用,当数据库或文本中的记录发生变化时会自动同步到组件中,首先绘制UI界面。
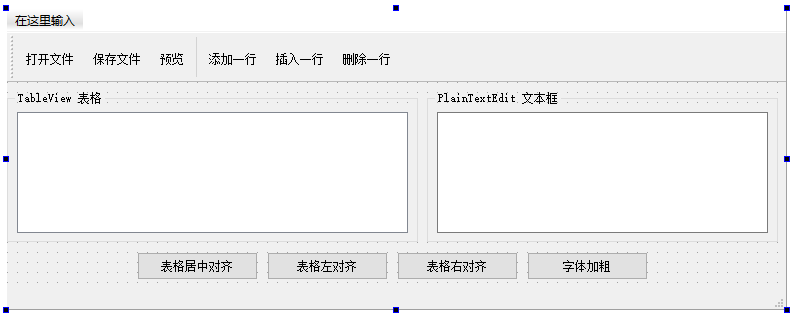
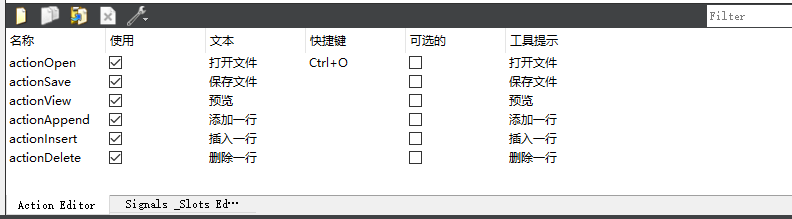
其次绑定顶部ToolBar菜单,分别对菜单增加对应的功能属性的描述等。
<br>
初始化构造函数: 当程序运行时,我们需要对页面中的控件逐一初始化,并将Table表格与模型通过调用ui->tableView->setModel(model)进行绑定。
#include "mainwindow.h"
#include "ui_mainwindow.h"

#include <iostream>
#include <QLabel>
#include <QStandardItem>
#include <QItemSelectionModel>

#include <QFileDialog>
#include <QTextStream>

#include <QList>

// 默认构造函数
// https://www.cnblogs.com/lyshark
MainWindow::MainWindow(QWidget *parent): QMainWindow(parent), ui(new Ui::MainWindow)
{
    ui->setupUi(this);

    // 初始化部分
    model = new QStandardItemModel(3,FixedColumnCount,this);  // 数据模型初始化
    selection = new QItemSelectionModel(model);               // Item选择模型

    // 为TableView设置数据模型
    ui->tableView->setModel(model);               // 设置数据模型
    ui->tableView->setSelectionModel(selection);  // 设置选择模型

    // 默认禁用所有Action选项,只保留打开
    ui->actionSave->setEnabled(false);
    ui->actionView->setEnabled(false);
    ui->actionAppend->setEnabled(false);
    ui->actionDelete->setEnabled(false);
    ui->actionInsert->setEnabled(false);

    // 创建状态栏组件,主要来显示单元格位置
    LabCurFile = new QLabel("当前文件:",this);
    LabCurFile->setMinimumWidth(200);

    LabCellPos = new QLabel("当前单元格:",this);
    LabCellPos->setMinimumWidth(180);
    LabCellPos->setAlignment(Qt::AlignHCenter);

    LabCellText = new QLabel("单元格内容:",this);
    LabCellText->setMinimumWidth(150);

    ui->statusbar->addWidget(LabCurFile);
    ui->statusbar->addWidget(LabCellPos);
    ui->statusbar->addWidget(LabCellText);

    //选择当前单元格变化时的信号与槽
    connect(selection,SIGNAL(currentChanged(QModelIndex,QModelIndex)),this,SLOT(on_currentChanged(QModelIndex,QModelIndex)));
}

MainWindow::~MainWindow()
{
    delete ui;
}
初始化时同时需要绑定一个on_currentChanged(QModelIndex,QModelIndex)信号,当用户选中指定单元格时相应用户。
// 选择单元格变化时的响应,通过在构造函数中绑定信号和槽函数实现触发
// https://www.cnblogs.com/lyshark
void MainWindow::on_currentChanged(const QModelIndex ¤t, const QModelIndex &previous)
{
Q_UNUSED(previous);
if (current.isValid()) //当前模型索引有效
{
LabCellPos->setText(QString::asprintf("当前单元格:%d行,%d列",current.row(),current.column())); //显示模型索引的行和列号
QStandardItem *aItem;
aItem=model->itemFromIndex(current); //从模型索引获得Item
this->LabCellText->setText("单元格内容:"+aItem->text()); //显示item的文字内容
}
}
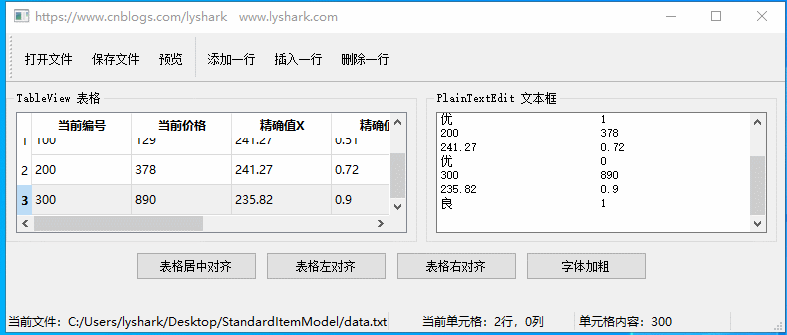
当页面被初始化时,默认界面如下:
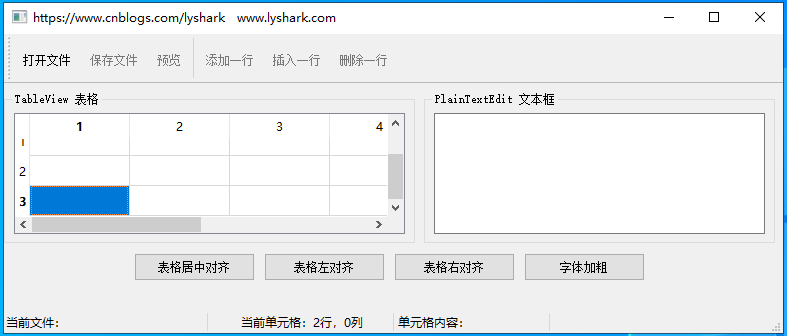
<br>
打开并填充组件: 当工具栏中打开文件被点击后则触发,打开文件时通过aFile.open打开,循环读入文件,并将文件中的内容逐行追加到QStringList fFileContent中,当追加完毕后,直接调用iniModelFromStringList(fFileContent);完成对页面TableView组件的初始化,并设置其他控件状态为可点击。
void MainWindow::on_actionOpen_triggered()
{
    QString curPath=QCoreApplication::applicationDirPath(); // 获取应用程序的路径

    // 调用打开文件对话框打开一个文件
    // https://www.cnblogs.com/lyshark
    QString aFileName=QFileDialog::getOpenFileName(this,"打开一个文件",curPath,"数据文件(*.txt);;所有文件(*.*)");
    if (aFileName.isEmpty())
    {
        return; // 如果未选择文件则退出
    }

    QStringList fFileContent;                              // 文件内容字符串列表
    QFile aFile(aFileName);                                // 以文件方式读出
    if (aFile.open(QIODevice::ReadOnly | QIODevice::Text)) // 以只读文本方式打开文件
    {
        QTextStream aStream(&aFile);       // 用文本流读取文件
        ui->plainTextEdit->clear();        // 清空列表

        // 循环读取只要不为空
        while (!aStream.atEnd())
        {
            QString str=aStream.readLine();          // 读取文件的一行
            ui->plainTextEdit->appendPlainText(str); // 添加到文本框显示
            fFileContent.append(str);                // 添加到StringList
        }
        aFile.close();                               // 关闭文件

        iniModelFromStringList(fFileContent);        // 从StringList的内容初始化数据模型
    }

    // 打开文件完成后,就可以将Action全部开启了
    ui->actionSave->setEnabled(true);
    ui->actionView->setEnabled(true);
    ui->actionAppend->setEnabled(true);
    ui->actionDelete->setEnabled(true);
    ui->actionInsert->setEnabled(true);

    // 打开文件成功后,设置状态栏当前文件列
    this->LabCurFile->setText("当前文件:"+aFileName);//状态栏显示
}
如上iniModelFromStringList(fFileContent);函数是后期增加的,我们需要自己实现,该函数的作用是从传入的StringList中获取数据,并将数据初始化到TableView模型中,实现代码如下。
void MainWindow::iniModelFromStringList(QStringList& aFileContent)
{
    int rowCnt=aFileContent.count();     // 文本行数,第1行是标题
    model->setRowCount(rowCnt-1);        // 实际数据行数,要在标题上减去1

    // 设置表头
    QString header=aFileContent.at(0);         // 第1行是表头

    // 一个或多个空格、TAB等分隔符隔开的字符串、分解为一个StringList
    // https://www.cnblogs.com/lyshark
    QStringList headerList=header.split(QRegExp("\\s+"),QString::SkipEmptyParts);
    model->setHorizontalHeaderLabels(headerList); // 设置表头文字

    // 设置表格中的数据
    int x = 0,y = 0;
    QStandardItem *Item;

    // 有多少列数据就循环多少次
    // https://www.cnblogs.com/lyshark
    for(x=1; x < rowCnt; x++)
    {
        QString LineText = aFileContent.at(x);    // 获取数据区的一行

        // 一个或多个空格、TAB等分隔符隔开的字符串、分解为一个StringList
        QStringList tmpList=LineText.split(QRegExp("\\s+"),QString::SkipEmptyParts);

        // 循环列数,也就是循环FixedColumnCount,其中tmpList中的内容也是.
        for(y=0; y < FixedColumnCount-1; y++)
        {
            Item = new QStandardItem(tmpList.at(y)); // 创建item
            model->setItem(x-1,y,Item);              // 为模型的某个行列位置设置Item
        }

        // 最后一个数据需要取出来判断,并单独设置状态
        Item=new QStandardItem(headerList.at(y));   // 最后一列是Checkable,需要设置
        Item->setCheckable(true);                   // 设置为Checkable

        // 判断最后一个数值是否为0
        if (tmpList.at(y) == "0")
            Item->setCheckState(Qt::Unchecked);   // 根据数据设置check状态
        else
            Item->setCheckState(Qt::Checked);

        model->setItem(x-1,y,Item); //为模型的某个行列位置设置Item
    }
}
初始化组件后效果如下:
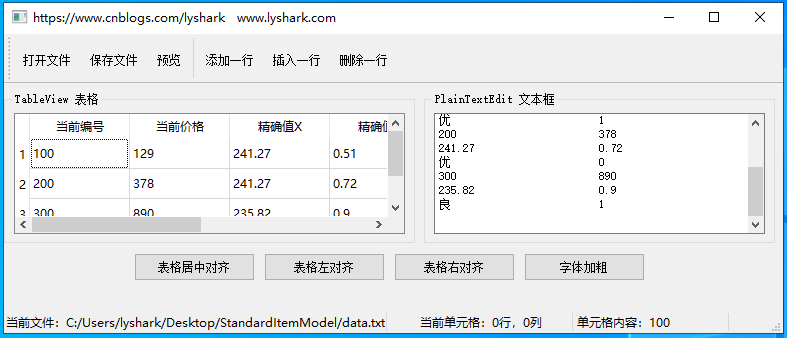
<br>
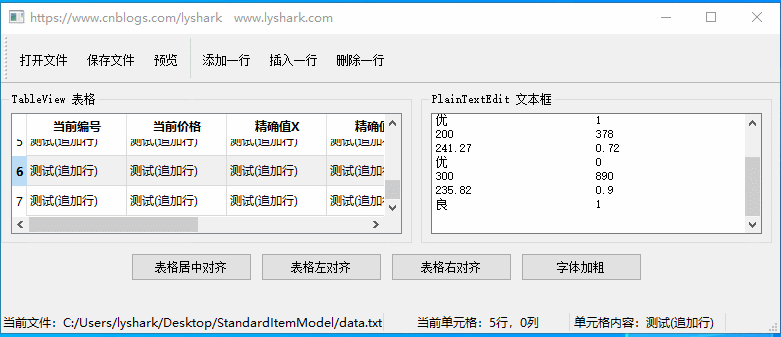
实现添加一行数据: 为TableView添加一行数据,在文件末尾插入。
void MainWindow::on_actionAppend_triggered()
{
    QList<QStandardItem *> ItemList;   // 创建临时容器
    QStandardItem *Item;

    // 模拟添加一列的数据
    for(int x=0; x<FixedColumnCount-1; x++)
    {
        Item = new QStandardItem("测试(追加行)");    // 循环创建每一列
        ItemList << Item;                          // 添加到链表中
    }

    // 创建最后一个列元素,由于是选择框所以需要单独创建
    // https://www.cnblogs.com/lyshark
    // 1.获取到最后一列的表头下标,最后下标为6
    QString str = model->headerData(model->columnCount()-1,Qt::Horizontal,Qt::DisplayRole).toString();

    Item=new QStandardItem(str); // 创建 "是否合格" 字段
    Item->setCheckable(true);    // 设置状态为真
    ItemList << Item;            // 最后一个选项追加进去

    model->insertRow(model->rowCount(),ItemList);                 // 插入一行,需要每个Cell的Item
    QModelIndex curIndex=model->index(model->rowCount()-1,0);     // 创建最后一行的ModelIndex

    selection->clearSelection();                                      // 清空当前选中项
    selection->setCurrentIndex(curIndex,QItemSelectionModel::Select); // 设置当前选中项为当前选择行
}
插入代码演示效果:
<br>
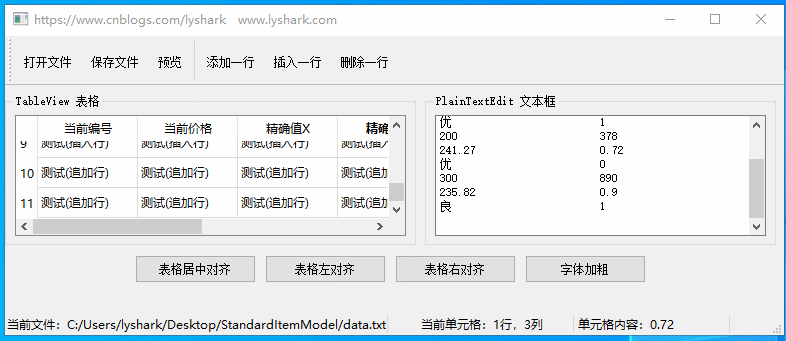
实现插入一行数据: 为TableView插入一行数据(在文件任意位置插入数据)
// https://www.cnblogs.com/lyshark
void MainWindow::on_actionInsert_triggered()
{
    QList<QStandardItem*> ItemList;       // QStandardItem的列表类
    QStandardItem *Item;

    // 模拟插入前五列数据
    for(int i=0;i<FixedColumnCount-1;i++)
    {
        Item= new QStandardItem("测试(插入行)");  // 新建一个QStandardItem
        ItemList << Item;                        // 添加到列表类
    }

    QString str;                               // 获取表头文字
    str=model->headerData(model->columnCount()-1,Qt::Horizontal,Qt::DisplayRole).toString();
    Item=new QStandardItem(str);      // 创建Item
    Item->setCheckable(true);         // 设置为可使用CheckBox
    ItemList<<Item;                   // 添加到列表类

    QModelIndex curIndex=selection->currentIndex(); // 获取当前选中项的索引
    model->insertRow(curIndex.row(),ItemList);      // 在当前行的前面插入一行
    selection->clearSelection();                                       // 清除当前选中项
    selection->setCurrentIndex(curIndex,QItemSelectionModel::Select);  // 设置当前选中项为当前选择行
}
插入代码演示效果:
<br>
实现删除一行数据: 删除数据之前需要通过selection->currentIndex()确定当前选中行,并通过model->removeRow()移除即可。
// https://www.cnblogs.com/lyshark
void MainWindow::on_actionDelete_triggered()
{
    QModelIndex curIndex = selection->currentIndex();  // 获取当前选择单元格的模型索引

    // 先判断是不是最后一行
    if (curIndex.row()==model->rowCount()-1)
    {
        model->removeRow(curIndex.row()); //删除最后一行
    }
    else
    {
        model->removeRow(curIndex.row());//删除一行,并重新设置当前选择行
        selection->setCurrentIndex(curIndex,QItemSelectionModel::Select);
    }
}
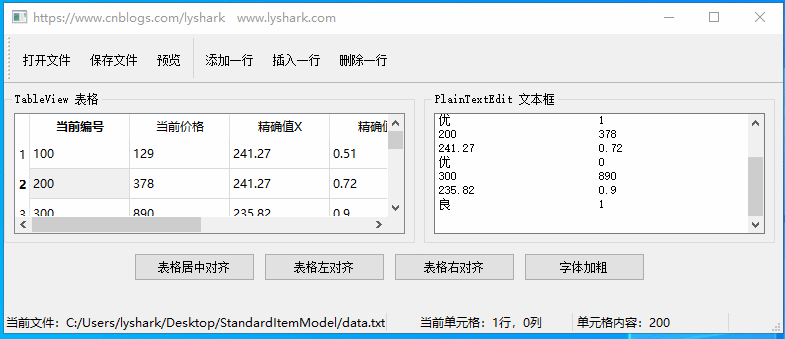
删除代码效果演示:
<br>
实现字体数据对齐: 表格中的字体可以实现多种对其方式,对齐方式分为 居中对齐,左对齐,右对齐 三种。
// 设置表格居中对齐
void MainWindow::on_pushButton_clicked()
{
    if (!selection->hasSelection())
        return;

    QModelIndexList selectedIndex=selection->selectedIndexes();

    QModelIndex Index;
    QStandardItem *Item;

    for (int i=0; i<selectedIndex.count(); i++)
    {
        Index=selectedIndex.at(i);
        Item=model->itemFromIndex(Index);
        Item->setTextAlignment(Qt::AlignHCenter);
    }
}

// 设置表格左对齐
// https://www.cnblogs.com/lyshark
void MainWindow::on_pushButton_2_clicked()
{
    if (!selection->hasSelection()) //没有选择的项
        return;

//获取选择的单元格的模型索引列表,可以是多选
    QModelIndexList selectedIndex=selection->selectedIndexes();

    for (int i=0;i<selectedIndex.count();i++)
    {
        QModelIndex aIndex=selectedIndex.at(i); //获取其中的一个模型索引
        QStandardItem* aItem=model->itemFromIndex(aIndex);//获取一个单元格的项数据对象
        aItem->setTextAlignment(Qt::AlignLeft);//设置文字对齐方式
    }
}

// 设置表格右对齐
void MainWindow::on_pushButton_3_clicked()
{
    if (!selection->hasSelection())
        return;

    QModelIndexList selectedIndex=selection->selectedIndexes();

    QModelIndex aIndex;
    QStandardItem *aItem;

    for (int i=0;i<selectedIndex.count();i++)
    {
        aIndex=selectedIndex.at(i);
        aItem=model->itemFromIndex(aIndex);
        aItem->setTextAlignment(Qt::AlignRight);
    }
}
对齐代码效果演示:
<br>
实现字体数据加粗: 将选中行的字体进行加粗显示。
// 设置字体加粗显示
// https://www.cnblogs.com/lyshark
void MainWindow::on_pushButton_4_clicked()
{
    if (!selection->hasSelection())
        return;

//获取选择单元格的模型索引列表
    QModelIndexList selectedIndex=selection->selectedIndexes();

    for (int i=0;i<selectedIndex.count();i++)
    {
        QModelIndex aIndex=selectedIndex.at(i); //获取一个模型索引
        QStandardItem* aItem=model->itemFromIndex(aIndex);//获取项数据
        QFont font=aItem->font(); //获取字体
        font.setBold(true); //设置字体是否粗体
        aItem->setFont(font); //重新设置字体
    }
}
加粗代码效果演示:
<br>
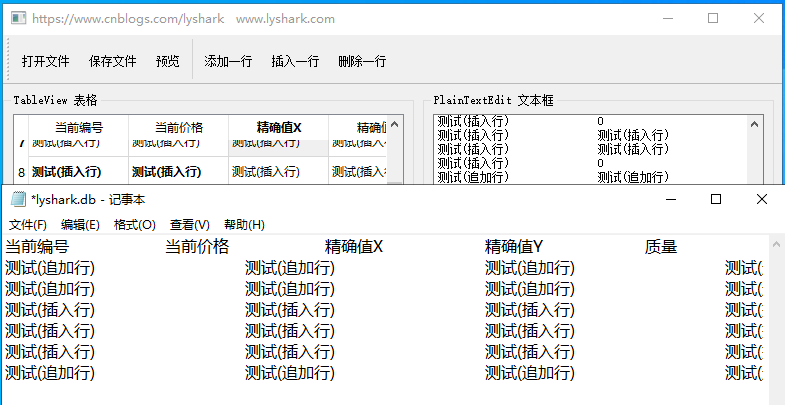
实现保存文件: 当保存文件被点击后触发,通过便利TableWidget模型组件中的数据,并将数据通过aStream << str << "\n";写出到记事本中。
// https://www.cnblogs.com/lyshark
// 【保存文件】
void MainWindow::on_actionSave_triggered()
{
    QString curPath=QCoreApplication::applicationDirPath(); // 获取应用程序的路径

    // 调用打开文件对话框选择一个文件
    QString aFileName=QFileDialog::getSaveFileName(this,tr("选择一个文件"),curPath,"数据文件(*.txt);;所有文件(*.*)");

    if (aFileName.isEmpty()) // 未选择文件则直接退出
        return;

    QFile aFile(aFileName);

    // 以读写、覆盖原有内容方式打开文件
    if (!(aFile.open(QIODevice::ReadWrite | QIODevice::Text | QIODevice::Truncate)))
        return;

    QTextStream aStream(&aFile);    // 用文本流读取文件
    QStandardItem *Item;
    QString str;
    int x = 0,y = 0;

    ui->plainTextEdit->clear();

// 获取表头文字
    for (x=0; x<model->columnCount(); x++)
    {
        Item=model->horizontalHeaderItem(x);     // 获取表头的项数据
        str= str + Item->text() + "\t\t";        // 以TAB制表符隔开
    }
    aStream << str << "\n";                      // 文件里需要加入换行符\n
    ui->plainTextEdit->appendPlainText(str);

// 获取数据区文字
    for ( x=0; x < model->rowCount(); x++)
    {
        str = "";
        for( y=0; y < model->columnCount()-1; y++)
        {
            Item=model->item(x,y);
            str=str + Item->text() + QString::asprintf("\t\t");
        }

        // 对最后一列需要转换一下,如果判断为选中则写1否则写0
        Item=model->item(x,y);
        if (Item->checkState()==Qt::Checked)
            str= str + "1";
        else
            str= str + "0";

         ui->plainTextEdit->appendPlainText(str);
         aStream << str << "\n";
    }
}

// 【导出Txt文件】:将TableView中的数据导出到PlainTextEdit显示
void MainWindow::on_actionView_triggered()
{
        ui->plainTextEdit->clear();
        QStandardItem *Item;
        QString str;

    //获取表头文字
        int x=0,y=0;
        for (x=0; x<model->columnCount(); x++)
        { //
            Item=model->horizontalHeaderItem(x);
            str= str + Item->text() + "\t";
        }
        ui->plainTextEdit->appendPlainText(str);

    //获取数据区的每行
        for (x=0; x<model->rowCount(); x++)
        {
            str="";
            for(y=0; y<model->columnCount()-1; y++)
            {
                Item=model->item(x,y);
                str= str + Item->text() + QString::asprintf("\t");
            }

            Item=model->item(x,y);
            if (Item->checkState()==Qt::Checked)
                str= str + "1";
            else
                str= str + "0";

             ui->plainTextEdit->appendPlainText(str);
        }
}
文件保存后如下:
 with 128-byte FIFOs, infrared (IrDA), and 16 mode or 68 mode...")
2.5 V to 3.3 V UART, 5 Mbit/s (max.) with 128-byte FIFOs, infrared (IrDA), and 16 mode or 68 mode...

 点击获取完整资源:2.5 V to 3.3 V UART, 5 Mbit/s (max.) with 128-byte FIFOs, infrared (IrDA), and 16 mode or 68 mode parallel bus interface
SC16C850 1. General description The SC16C850 is a 2.5 V to 3.3 V, low power
点击获取完整资源:2.5 V to 3.3 V UART, 5 Mbit/s (max.) with 128-byte FIFOs, infrared (IrDA), and 16 mode or 68 mode parallel bus interface

Angular 2:ContenteditableModel:双向数据绑定
contenteditableModelChange工作正常,但不是contenteditableModel
我更新数据的方法是更新this.elementRef.nativeElement.textContent,因为我无法弄清楚如何使用[innerHTML]
该指令基于on this guy code:
但重建角度2.0.
export class pageContent{
    <p
 contenteditable="true"

(contenteditableModelChange)="runthis($event)"
[contenteditableModel]="text"


></p>

    public text:any = 'ddddd';
    constructor(){}
    runthis(ev){
        this.text  = ev
            console.log('updated done ev',ev)
            console.log('text Now should be ',this.text)
    }

}

    import {Directive,ElementRef,Input,Output,EventEmitter,OnChanges} from "@angular/core";

    @Directive({
        selector: '[contenteditableModel]',host: {
            '(blur)': 'onEdit()','(keyup)': 'onEdit()'
        }
    })

    export class ContentEditableDirective implements OnChanges {
        @Input('contenteditableModel') model: any;
        @Output('contenteditableModelChange') update = new EventEmitter();

        constructor(
            private elementRef: ElementRef
        ) {
            console.log('ContentEditableDirective.constructor');
        }

        ngOnChanges(changes) {
            console.log('ContentEditableDirective.ngOnChanges');
            console.log(changes);
            if (changes.model.isFirstChange())
                this.refreshView();
        }

        onEdit() {
            console.log('ContentEditableDirective.onEdit');
            var value = this.elementRef.nativeElement.innerText
            this.update.emit(value)
        }

        private refreshView() {
            console.log('ContentEditableDirective.refreshView');
            this.elementRef.nativeElement.textContent = this.model
        }
    }
顺便说一句,如果有人建议使用textContent属性(而不是值)和输入事件设置我自己的等效属性和事件数据绑定,我已经在这个plunker上尝试了它,并且在IE,Firefox和Safari上存在游标问题设置为0
http://plnkr.co/edit/KCeKTPu8dJI0O1nVMPfb?p=preview
解决方法
ngOnChanges(changes) {
  console.log('ContentEditableDirective.ngOnChanges');
  console.log(changes);
  //if (changes.model.isFirstChange())
  this.refreshView();
}
它的工作正常.
Plnkr:https://plnkr.co/edit/VW4IJvcv1xjtBKTglWXT?p=preview
根据文档:isFirstChange()告诉我们是否第一次分配值.根据您的代码,您只想在第一次更改时更新文本.哪个错了.我认为我们根本不需要担心它.

c – QAbstractItemModel和QTreeView
解决方法

c# – .NET Standard 1.6中的System.Threading.Tasks.Parallel在哪里?
Parallel.ForEach(results,(x) =>
    {
        foo();
    });
当前上下文.NETStandard,Version = v1.6中不存在名称“Parallel”
解决方法
您可以使用nuget来获取此信息.
或者,将以下内容添加到project.json中
"dependencies": {
    //
    "System.Threading.Tasks.Parallel": "4.0.1"
  },
注意:
这已经过时了,因为没有更多的project.json
根据评论,将其添加到您的csproj:
<packagereference Include="System.Threading.Tasks.Parallel" Version="4.3.0" />
我们今天的关于C/C++ Qt StandardItemModel 数据模型应用和qt数据类型的分享已经告一段落,感谢您的关注,如果您想了解更多关于2.5 V to 3.3 V UART, 5 Mbit/s (max.) with 128-byte FIFOs, infrared (IrDA), and 16 mode or 68 mode...、Angular 2:ContenteditableModel:双向数据绑定、c – QAbstractItemModel和QTreeView、c# – .NET Standard 1.6中的System.Threading.Tasks.Parallel在哪里?的相关信息,请在本站查询。
本文标签:


