想了解Android应用如何反馈Crash报告的新动态吗?本文将为您提供详细的信息,我们还将为您解答关于androidcrash分析的相关问题,此外,我们还将为您介绍关于01_Android应用开发环
想了解Android应用如何反馈Crash报告的新动态吗?本文将为您提供详细的信息,我们还将为您解答关于android crash分析的相关问题,此外,我们还将为您介绍关于01_Android应用开发环境_02_Android应用的基本组件、01_Android应用开发环境_05_签名android应用程序、Android 8.0 以上系统应用如何保活、Android 应用崩溃捕获工具 xCrash的新知识。
本文目录一览:- Android应用如何反馈Crash报告(android crash分析)
- 01_Android应用开发环境_02_Android应用的基本组件
- 01_Android应用开发环境_05_签名android应用程序
- Android 8.0 以上系统应用如何保活
- Android 应用崩溃捕获工具 xCrash
")
Android应用如何反馈Crash报告(android crash分析)
为什么需要反馈Crash报告?
做Android应用程序,要尽量避免程序Crash的发生。虽然说零Crash是程序员追逐的最终目标,但是现实的情况是,程序员只能尽量的减少Crash的发生,而几乎不可能完全杜绝Crash。也许,你认为你的应用的健壮性已经近乎完美,轻松的经受住了测试部门魔鬼般的考验,但是当你的应用发布到市场,面对百万甚至千万级别的用户的时候,可能就没有那么幸运了。
基于以上原因,一般的应用程序,都要有一个Crash反馈的机制。程序员可以根据反馈的结果,对当前的版本的代码进行改进,使发布的下一个版本更加稳定。
如何反馈?
先来看如何捕获Crash的发生。
Java中有一个接口,UncaughtExceptionHandler,先看描述。
|
Thread.UncaughtExceptionHandler |
再来看Thread类中的一个方法。
|
setDefaultUncaughtExceptionHandler |
看了这些API,就知道我们需要实现这样一个接口,然后在程序的主线程中设置处理程序。
看下面的接口实现。
package com.arui.framework.android.exception;


import java.lang.Thread.UncaughtExceptionHandler;

import android.content.Context;


/**

 * Default exception handler for all activities.

 *

 * @author http://blog.csdn.net/arui319

 * @version 2011/12/01

 *

 */

public class DefaultExceptionHandler implements UncaughtExceptionHandler {


    private Context act = null;


    public DefaultExceptionHandler(Context act) {

       this.act = act;

    }


    @Override

    public void uncaughtException(Thread thread, Throwable ex) {


       // 收集异常信息 并且发送到服务器

       sendCrashReport(ex);


       // 等待半秒

       try {

           Thread.sleep(500);

       } catch (InterruptedException e) {

           //

       }


       // 处理异常

       handleException();


    }


    private void sendCrashReport(Throwable ex) {


       StringBuffer exceptionStr = new StringBuffer();

       exceptionStr.append(ex.getMessage());


       StackTraceElement[] elements = ex.getStackTrace();

       for (int i = 0; i < elements.length; i++) {

           exceptionStr.append(elements[i].toString());

       }


       //TODO

       //发送收集到的Crash信息到服务器

    }


    private void handleException() {

       //TODO

       //这里可以对异常进行处理。

       //比如提示用户程序崩溃了。

       //比如记录重要的信息,尝试恢复现场。

       //或者干脆记录重要的信息后,直接杀死程序。

    }


}
在主Activity的onCreate(Bundle savedInstanceState)方法中增加如下代码。
Thread.setDefaultUncaughtExceptionHandler(new DefaultExceptionHandler(

       this.getApplicationContext()));
如何发送到服务器?
这个不同的项目组会有不同的方式,具体不在这里讨论了。需要提醒的是,除了把异常的具体信息发送给服务器外,至少还需要发送版本信息,这样程序员才可以判断服务器上的异常信息是哪个版本出现的。除了版本信息,可能还需要手机的SDK版本,屏幕分辨率,手机型号等等信息,有了这些信息,可以更全面的了解异常信息。
更多说明。
只需要在主Activity中设置一次异常处理类即可,不需要在所有的Acitivity都进行设置。
个人感觉Crash发生后,恢复现场继续运行的意义不大。Crash以后,程序的运行情况已经是不可预知的了,用一个错误,去弥补另外一个错误,本身就会导致更多的错误。建议还是尽量避免Crash的发生更合理。
---------------------------------------------------------------------------
GL(arui319)
http://blog.csdn.net/arui319
<本文可以转载,但是请保留以上作者信息。谢谢。>
---------------------------------------------------------------------------

01_Android应用开发环境_02_Android应用的基本组件
Android系统中有著名的四大组件:Activity、Service、BroadcastReceiver、ContentProvider。一个商业的Android应用程序,通常由多个基本的组件联合组成。这四大组件,在使用的时候均需要在清单文件AndroidManifest.xml中进行注册,否则不予使用。本小节将对这些组件进行简单的介绍,使读者对Android应用开发的内容有一个大致的认识。
活动(Activity)
Activity是Android应用中,最直接与用户接触的组件,它负责加载View组件,使其展现给用户,并保持与用户的交互。所有的Activity组件均需要继承Activity类,这是一个Content的间接子类,包装了一些Activity的基本特性。
View组件是所有UI组件、容器组件的基类,也就是说,它可以是一个布局容器,也可以是一个布局容器内的基本UI组件。View组件一般通过XML布局资源文件定义,同时Android系统也对这些View组件提供了对应的实现类。如果需要通过某个Activity把指定的View组件显示出来,调用Activity的setContentView()方法即可,它具有多个重载方法,可以传递一个XML资源ID或者View对象。
例如:
LinearLayout layout=new LinearLayout(this);setContentView(layout);
或者:setContentView(R.layout.main);
Activity为Android应用提供了一个用户界面,当一个Activity被开启之后,它具有自己的生命周期。Activity类也对这些生命周期提供了对应的方法,如果需要对Activity各个不同的生命周期做出响应,可以重写这些生命周期方法实现。对于大多数商业应用而言,整个系统中包含了多个Activity,在应用中逐步导航跳转开启这些Activity之后,会形成Activity的回退栈,当前显示并获得焦点的Activity位于这个回退栈的栈顶。
服务(Service)
Service主要用于在后台完成一些无需向用户展示界面的功能实现。通常位于系统后台运行,它一般不需要与用户进行交互,因此Service组件没有用户界面展示给用户。Service主要用于完成一些类似于下载文件、播放音乐等无需用户界面与用户进行交互的功能。
与Activity组件需要继承Activity类相似,Service组件同样需要继承Service类,Service类也是Context的间接子类,其中包装了一些Service的专有特性。一个Service被运行起来之后,它将具有自己独立的生命周期,Service类中对其各个不同的生命周期提供了对应的方法,开发人员可以通过在Service中重写Service类中这些生命周期方法,来响应Service各个生命周期的功能实现。
广播接收器(BroadcastReceiver)
BroadcastReceiver同样也是Android系统中的一个重要组件,BroadcastReceiver代表了一个广播接收器,用于接收系统中其它组件发送的广播,并对其进行响应或是拦截广播的继续传播。
广播是一个系统级的消息,当系统环境发生改变的时候会发送一些广播供对应的程序进行接收响应,例如:接收到一条短信、开机、关机、插上充电器、插上耳机、充电完成等,均会发送一条广播供需要监听此类广播的应用进行响应。除了一些系统事件的广播,开发人员也可以自定义广播内容。但是大部分情况下,开发应用的时候主要用于接受系统广播并对其进行响应,很少需要发送自定义的广播。
使用BroadcastReceiver组件接收广播非常的简单,只需要实现自己的BroadcastReceiver子类,并重写onReceive()方法,就能完成BroadcastReceiver,而对于这个BroadcastReceiver对什么广播感兴趣,则需要对其进行另行配置。
内容提供者(ContentProvider)
Android系统作为一个智能操作系统,它需要系统中运行的应用程序都必须是相互独立的,各自运行在自己的Dalvik VM实例中。在正常情况下,Android应用之间是不能进行实时的数据交换,而考虑到有些应用的数据需要对外进行共享,Android系统提供了一个标准的数据接口ContentProvider,通过应用提供的ContentProvider,可以在其它应用中对这个应用的暴露出来的数据进行增删改查。
为应用程序暴露数据接口非常的简单,只需要继承ContentProvider类,并且实现insert()、delete()、update()、query()等方法,使外部应用可对本应用的数据进行增删改查。
意图(Intent)
虽然Intent并不是Android应用的组件,也无需专门在清单文件中配置,但是它对于Android应用的作用非常的大。除了ContentProvider之外,其它组件的启动,均需要通过Intent进行指定。Intent不仅可以明确指定一个Android组件进行启动,还可以提供一个标准的行为,再由Android系统配合意图过滤器来选定启动指定组件来完成任务。而Intent在开启对组件的过程中,进行各个组件间数据的传递。
小结
本章简要介绍了Android系统的发展史及其现状,并且介绍了Android系统的架构与Dalvik VM虚拟机,最后还简单介绍了Android开发中的四大组件。通过阅读本章,对Android的历史与现状、系统架构、基本组件有个大致的了解,这对本书接下来的内容理解非常有帮助。

01_Android应用开发环境_05_签名android应用程序
背景:
Android项目以他的包为唯一标识,如果一台设备上安装了两个包名相同的应用,后安装的应用就会覆盖前面安装的应用。
目的:
为了避免覆盖的情况,Android要求对作为成品的应用进行签名。
作用:
在Eclipse的ADT插件或Ant工具会自动生成调试证书对Android应用签名。如果要正式发布一个Android应用,必须使用合适的数字证书来给应用程序签名,不能使用ADT或者Ant工具生成的调试证书来发布。确定发布者身份。
确保应用的完整性。
在Eclipse中对Android应用签名
1、右击项目,Android Tools→Export Singned Application Package…
2、如果系统中没有数字证书,可以在窗口中选择"Create new keystore"单击按钮,填写数字证书的存储路径和密码。
3、填写完成后Next,Eclipse将会弹出让用户填写数字证书的详细信息。
4、Next,指定生成签名后的APK安装包的存储路径。
5、Finish。这样就会在指定目录下生成一个签名后的APK安装包。
一旦数字证书制作完成,以后就可以最直接使用该证书签名了。


使用命令对APK进行签名
1、创建keysrore库,JDK的安装目录下面的BIN中有一个keytool.exe工具生成数字证书。
keytool -genkeypair -alias -keyalg -validity -keystore
- -genkeypair:指定生成数字证书
- -alias:指定生成数字证书别名
- -kayalg:指定生成数字证书的算吗,使用RSA算法
- -validity:指定生成的数字证书的有效期
- -keystore:指定所生成的数字证书的存储路径
2、生成为签名的apk,Android Tools→Export Unsigned Application Package…
3、使用jarsigner命令对未签名的APK进行签名,JDK的Bin子目录下面
jarsigner -verbose -keystore -signedjar
说明:
- -verbose:指定生成详细输出
- -keystore:指定数字证书存储路径
- -singedjar:有三个参数分别是签名后apk包、未签名的APK包、数字证书的别名。
- 回车,以交互的方式输入数字证书keystore的密码。
4、使用zipalign.exe工具优化APK安装包。
zipalign -f -v 4 a.apk a_zip.apk
- -f:指定强制覆盖已有文件
- -v:指定生成详细输出
- 4:指定档案整理所基于的字节数,通常指定为4,也就是基于32为进行整理。
- a.apk、a_zip.apk:分别指定整理前的APK和整理后生成的APK。

Android 8.0 以上系统应用如何保活
最近在做一个埋点的 sdk,由于埋点是分批上传的,不是每次都上传,所以会有个进程保活的机制,这也是自研推送的实现技术之一:如何保证 Android 进程的存活。
对于 Android 来说,保活主要有以下一些方法:
- 开启前台 Service(效果好,推荐)
- Service 中循环播放一段无声音频(效果较好,但耗电量高,谨慎使用)
- 双进程守护(Android 5.0 前有效)
- JobScheduler(Android 5.0 后引入,8.0 后失效)
- 1 像素 activity 保活方案(不推荐)
- 广播锁屏、自定义锁屏(不推荐)
- 第三方推送 SDK 唤醒(效果好,缺点是第三方接入)
下面是具体的实现方案:
1. 监听锁屏广播,开启 1 个像素的 Activity
最早见到这种方案的时候是 2015 年,有个 FM 的 app 为了向投资人展示月活,在 Android 应用中开启一个 1 像素的 Activity。
由于 Activity 的级别是比较高的,所以开启 1 个像素的 Activity 的方式就可以保证进程是不容易被杀掉的。
具体来说,定义一个 1 像素的 Activity,在该 Activity 中动态注册自定义的广播。
class OnePixelActivity : AppCompatActivity() {

    private lateinit var br: BroadcastReceiver

    override fun onCreate(savedInstanceState: Bundle?) {
        super.onCreate(savedInstanceState)
        //设定一像素的activity
        val window = window
        window.setGravity(Gravity.LEFT or Gravity.TOP)
        val params = window.attributes
        params.x = 0
        params.y = 0
        params.height = 1
        params.width = 1
        window.attributes = params
        //在一像素activity里注册广播接受者    接受到广播结束掉一像素
        br = object : BroadcastReceiver() {
            override fun onReceive(context: Context, intent: Intent) {
                finish()
            }
        }
        registerReceiver(br, IntentFilter("finish activity"))
        checkScreenOn()
    }

    override fun onResume() {
        super.onResume()
        checkScreenOn()
    }

    override fun onDestroy() {
        try {
            //销毁的时候解锁广播
            unregisterReceiver(br)
        } catch (e: IllegalArgumentException) {
        }
        super.onDestroy()
    }

    /**
     * 检查屏幕是否点亮
     */
    private fun checkScreenOn() {
        val pm = this@OnePixelActivity.getSystemService(Context.POWER_SERVICE) as PowerManager
        val isScreenOn = if (Build.VERSION.SDK_INT >= Build.VERSION_CODES.KITKAT_WATCH) {
            pm.isInteractive
        } else {
            pm.isScreenOn
        }
        if (isScreenOn) {
            finish()
        }
    }
}
2, 双进程守护
双进程守护,在 Android 5.0 前是有效的,5.0 之后就不行了。首先,我们定义定义一个本地服务,在该服务中播放无声音乐,并绑定远程服务
class LocalService : Service() {
private var mediaPlayer: MediaPlayer? = null
private var mBilder: MyBilder? = null
override fun onCreate() {
super.onCreate()
if (mBilder == null) {
mBilder = MyBilder()
}
}
override fun onBind(intent: Intent): IBinder? {
return mBilder
}
override fun onStartCommand(intent: Intent, flags: Int, startId: Int): Int {
//播放无声音乐
if (mediaPlayer == null) {
mediaPlayer = MediaPlayer.create(this, R.raw.novioce)
//声音设置为0
mediaPlayer?.setVolume(0f, 0f)
mediaPlayer?.isLooping = true//循环播放
play()
}
//启用前台服务,提升优先级
if (KeepLive.foregroundNotification != null) {
val intent2 = Intent(applicationContext, NotificationClickReceiver::class.java)
intent2.action = NotificationClickReceiver.CLICK_NOTIFICATION
val notification = NotificationUtils.createNotification(this, KeepLive.foregroundNotification!!.getTitle(), KeepLive.foregroundNotification!!.getDescription(), KeepLive.foregroundNotification!!.getIconRes(), intent2)
startForeground(13691, notification)
}
//绑定守护进程
try {
val intent3 = Intent(this, RemoteService::class.java)
this.bindService(intent3, connection, Context.BIND_ABOVE_CLIENT)
} catch (e: Exception) {
}
//隐藏服务通知
try {
if (Build.VERSION.SDK_INT < 25) {
startService(Intent(this, HideForegroundService::class.java))
}
} catch (e: Exception) {
}
if (KeepLive.keepLiveService != null) {
KeepLive.keepLiveService!!.onWorking()
}
return Service.START_STICKY
}
private fun play() {
if (mediaPlayer != null && !mediaPlayer!!.isPlaying) {
mediaPlayer?.start()
}
}
private inner class MyBilder : GuardAidl.Stub() {
@Throws(RemoteException::class)
override fun wakeUp(title: String, discription: String, iconRes: Int) {
}
}
private val connection = object : ServiceConnection {
override fun onServiceDisconnected(name: ComponentName) {
val remoteService = Intent(this@LocalService,
RemoteService::class.java)
this@LocalService.startService(remoteService)
val intent = Intent(this@LocalService, RemoteService::class.java)
this@LocalService.bindService(intent, this,
Context.BIND_ABOVE_CLIENT)
}
override fun onServiceConnected(name: ComponentName, service: IBinder) {
try {
if (mBilder != null && KeepLive.foregroundNotification != null) {
val guardAidl = GuardAidl.Stub.asInterface(service)
guardAidl.wakeUp(KeepLive.foregroundNotification?.getTitle(), KeepLive.foregroundNotification?.getDescription(), KeepLive.foregroundNotification!!.getIconRes())
}
} catch (e: RemoteException) {
e.printStackTrace()
}
}
}
override fun onDestroy() {
super.onDestroy()
unbindService(connection)
if (KeepLive.keepLiveService != null) {
KeepLive.keepLiveService?.onStop()
}
}
}
然后再定义一个远程服务,绑定本地服务。
class RemoteService : Service() {

    private var mBilder: MyBilder? = null

    override fun onCreate() {
        super.onCreate()
        if (mBilder == null) {
            mBilder = MyBilder()
        }
    }

    override fun onBind(intent: Intent): IBinder? {
        return mBilder
    }

    override fun onStartCommand(intent: Intent, flags: Int, startId: Int): Int {
        try {
            this.bindService(Intent(this@RemoteService, LocalService::class.java),
                    connection, Context.BIND_ABOVE_CLIENT)
        } catch (e: Exception) {
        }
        return Service.START_STICKY
    }

    override fun onDestroy() {
        super.onDestroy()
        unbindService(connection)
    }

    private inner class MyBilder : GuardAidl.Stub() {
        @Throws(RemoteException::class)
        override fun wakeUp(title: String, discription: String, iconRes: Int) {
            if (Build.VERSION.SDK_INT < 25) {
                val intent = Intent(applicationContext, NotificationClickReceiver::class.java)
                intent.action = NotificationClickReceiver.CLICK_NOTIFICATION
                val notification = NotificationUtils.createNotification(this@RemoteService, title, discription, iconRes, intent)
                this@RemoteService.startForeground(13691, notification)
            }
        }
    }

    private val connection = object : ServiceConnection {
        override fun onServiceDisconnected(name: ComponentName) {
            val remoteService = Intent(this@RemoteService,
                    LocalService::class.java)
            this@RemoteService.startService(remoteService)
            this@RemoteService.bindService(Intent(this@RemoteService,
                    LocalService::class.java), this, Context.BIND_ABOVE_CLIENT)
        }

        override fun onServiceConnected(name: ComponentName, service: IBinder) {}
    }

}

/**
 * 通知栏点击广播接受者
 */
class NotificationClickReceiver : BroadcastReceiver() {

    companion object {
        const val CLICK_NOTIFICATION = "CLICK_NOTIFICATION"
    }

    override fun onReceive(context: Context, intent: Intent) {
        if (intent.action == NotificationClickReceiver.CLICK_NOTIFICATION) {
            if (KeepLive.foregroundNotification != null) {
                if (KeepLive.foregroundNotification!!.getForegroundNotificationClickListener() != null) {
                    KeepLive.foregroundNotification!!.getForegroundNotificationClickListener()?.foregroundNotificationClick(context, intent)
                }
            }
        }
    }
}
3,JobScheduler
JobScheduler 是 Android 从 5.0 增加的支持一种特殊的任务调度机制,可以用它来实现进程保活,不过在 Android8.0 系统中,此种方法也失效。
首先,我们定义一个 JobService,开启本地服务和远程服务。
@SuppressWarnings(value = ["unchecked", "deprecation"])
@RequiresApi(Build.VERSION_CODES.LOLLIPOP)
class JobHandlerService : JobService() {

    private var mJobScheduler: JobScheduler? = null

    override fun onStartCommand(intent: Intent?, flags: Int, startId: Int): Int {
        var startId = startId
        startService(this)
        if (Build.VERSION.SDK_INT >= Build.VERSION_CODES.LOLLIPOP) {
            mJobScheduler = getSystemService(Context.JOB_SCHEDULER_SERVICE) as JobScheduler
            val builder = JobInfo.Builder(startId++,
                    ComponentName(packageName, JobHandlerService::class.java.name))
            if (Build.VERSION.SDK_INT >= 24) {
                builder.setMinimumLatency(JobInfo.DEFAULT_INITIAL_BACKOFF_MILLIS) //执行的最小延迟时间
                builder.setOverrideDeadline(JobInfo.DEFAULT_INITIAL_BACKOFF_MILLIS)  //执行的最长延时时间
                builder.setMinimumLatency(JobInfo.DEFAULT_INITIAL_BACKOFF_MILLIS)
                builder.setBackoffCriteria(JobInfo.DEFAULT_INITIAL_BACKOFF_MILLIS, JobInfo.BACKOFF_POLICY_LINEAR)//线性重试方案
            } else {
                builder.setPeriodic(JobInfo.DEFAULT_INITIAL_BACKOFF_MILLIS)
            }
            builder.setRequiredNetworkType(JobInfo.NETWORK_TYPE_ANY)
            builder.setRequiresCharging(true) // 当插入充电器,执行该任务
            mJobScheduler?.schedule(builder.build())
        }
        return Service.START_STICKY
    }

    private fun startService(context: Context) {
        if (Build.VERSION.SDK_INT >= Build.VERSION_CODES.O) {
            if (KeepLive.foregroundNotification != null) {
                val intent = Intent(applicationContext, NotificationClickReceiver::class.java)
                intent.action = NotificationClickReceiver.CLICK_NOTIFICATION
                val notification = NotificationUtils.createNotification(this, KeepLive.foregroundNotification!!.getTitle(), KeepLive.foregroundNotification!!.getDescription(), KeepLive.foregroundNotification!!.getIconRes(), intent)
                startForeground(13691, notification)
            }
        }
        //启动本地服务
        val localIntent = Intent(context, LocalService::class.java)
        //启动守护进程
        val guardIntent = Intent(context, RemoteService::class.java)
        startService(localIntent)
        startService(guardIntent)
    }

    override fun onStartJob(jobParameters: JobParameters): Boolean {
        if (!isServiceRunning(applicationContext, "com.xiyang51.keeplive.service.LocalService") || !isServiceRunning(applicationContext, "$packageName:remote")) {
            startService(this)
        }
        return false
    }

    override fun onStopJob(jobParameters: JobParameters): Boolean {
        if (!isServiceRunning(applicationContext, "com.xiyang51.keeplive.service.LocalService") || !isServiceRunning(applicationContext, "$packageName:remote")) {
            startService(this)
        }
        return false
    }

    private fun isServiceRunning(ctx: Context, className: String): Boolean {
        var isRunning = false
        val activityManager = ctx
                .getSystemService(Context.ACTIVITY_SERVICE) as ActivityManager
        val servicesList = activityManager
                .getRunningServices(Integer.MAX_VALUE)
        val l = servicesList.iterator()
        while (l.hasNext()) {
            val si = l.next()
            if (className == si.service.className) {
                isRunning = true
            }
        }
        return isRunning
    }
}
4,提高 Service 优先级
在 onStartCommand () 方法中开启一个通知,提高进程的优先级。注意:从 Android 8.0(API 级别 26)开始,所有通知必须要分配一个渠道,对于每个渠道,可以单独设置视觉和听觉行为。然后用户可以在设置中修改这些设置,根据应用程序来决定哪些通知可以显示或者隐藏。
首先,定义一个通知工具类,此工具栏兼容 Android 8.0。
class NotificationUtils(context: Context) : ContextWrapper(context) {

    private var manager: NotificationManager? = null
    private var id: String = context.packageName + "51"
    private var name: String = context.packageName
    private var context: Context = context
    private var channel: NotificationChannel? = null

    companion object {
        @SuppressLint("StaticFieldLeak")
        private var notificationUtils: NotificationUtils? = null

        fun createNotification(context: Context, title: String, content: String, icon: Int, intent: Intent): Notification? {
            if (notificationUtils == null) {
                notificationUtils = NotificationUtils(context)
            }
            var notification: Notification? = null
            notification = if (Build.VERSION.SDK_INT >= 26) {
                notificationUtils?.createNotificationChannel()
                notificationUtils?.getChannelNotification(title, content, icon, intent)?.build()
            } else {
                notificationUtils?.getNotification_25(title, content, icon, intent)?.build()
            }
            return notification
        }
    }

    @RequiresApi(api = Build.VERSION_CODES.O)
    fun createNotificationChannel() {
        if (channel == null) {
            channel = NotificationChannel(id, name, NotificationManager.IMPORTANCE_MIN)
            channel?.enableLights(false)
            channel?.enableVibration(false)
            channel?.vibrationPattern = longArrayOf(0)
            channel?.setSound(null, null)
            getManager().createNotificationChannel(channel)
        }
    }

    private fun getManager(): NotificationManager {
        if (manager == null) {
            manager = getSystemService(Context.NOTIFICATION_SERVICE) as NotificationManager
        }
        return manager!!
    }

    @RequiresApi(api = Build.VERSION_CODES.O)
    fun getChannelNotification(title: String, content: String, icon: Int, intent: Intent): Notification.Builder {
        //PendingIntent.FLAG_UPDATE_CURRENT 这个类型才能传值
        val pendingIntent = PendingIntent.getBroadcast(context, 0, intent, PendingIntent.FLAG_UPDATE_CURRENT)
        return Notification.Builder(context, id)
                .setContentTitle(title)
                .setContentText(content)
                .setSmallIcon(icon)
                .setAutoCancel(true)
                .setContentIntent(pendingIntent)
    }

    fun getNotification_25(title: String, content: String, icon: Int, intent: Intent): NotificationCompat.Builder {
        val pendingIntent = PendingIntent.getBroadcast(context, 0, intent, PendingIntent.FLAG_UPDATE_CURRENT)
        return NotificationCompat.Builder(context, id)
                .setContentTitle(title)
                .setContentText(content)
                .setSmallIcon(icon)
                .setAutoCancel(true)
                .setVibrate(longArrayOf(0))
                .setSound(null)
                .setLights(0, 0, 0)
                .setContentIntent(pendingIntent)
    }
}
5,Workmanager 方式
Workmanager 是 Android JetPac 中的一个 API,借助 Workmanager,我们可以用它来实现应用饿保活。使用前,我们需要依赖 Workmanager 库,如下:
implementation "android.arch.work:work-runtime:1.0.0-alpha06"
Worker 是一个抽象类,用来指定需要执行的具体任务。
public class KeepLiveWork extends Worker {
    private static final String TAG = "KeepLiveWork";

    @NonNull
    @Override
    public WorkerResult doWork() {
        Log.d(TAG, "keep-> doWork: startKeepService");
        //启动job服务
        startJobService();
        //启动相互绑定的服务
        startKeepService();
        return WorkerResult.SUCCESS;
    }
}
然后,启动 keepWork 方法,
    public void startKeepWork() {
        WorkManager.getInstance().cancelAllWorkByTag(TAG_KEEP_WORK);
        Log.d(TAG, "keep-> dowork startKeepWork");
        OneTimeWorkRequest oneTimeWorkRequest = new OneTimeWorkRequest.Builder(KeepLiveWork.class)
                .setBackoffCriteria(BackoffPolicy.LINEAR, 5, TimeUnit.SECONDS)
                .addTag(TAG_KEEP_WORK)
                .build();
        WorkManager.getInstance().enqueue(oneTimeWorkRequest);

    }
关于 WorkManager,可以通过下面的文章来详细了解:WorkManager 浅谈
本文同步分享在 博客 “xiangzhihong8”(CSDN)。
如有侵权,请联系 support@oschina.cn 删除。
本文参与 “OSC 源创计划”,欢迎正在阅读的你也加入,一起分享。

Android 应用崩溃捕获工具 xCrash
https://www.oschina.net/p/xCrash
Crash 能为安卓 APP 提供捕获 Java 崩溃、native 崩溃和 ANR 的能力。不需要 root 权限或任何系统权限。
xCrash 能在 App 进程崩溃或 ANR 时,在你指定的目录中生成一个 tombstone 文件(格式与安卓系统的 tombstone 文件类似)。
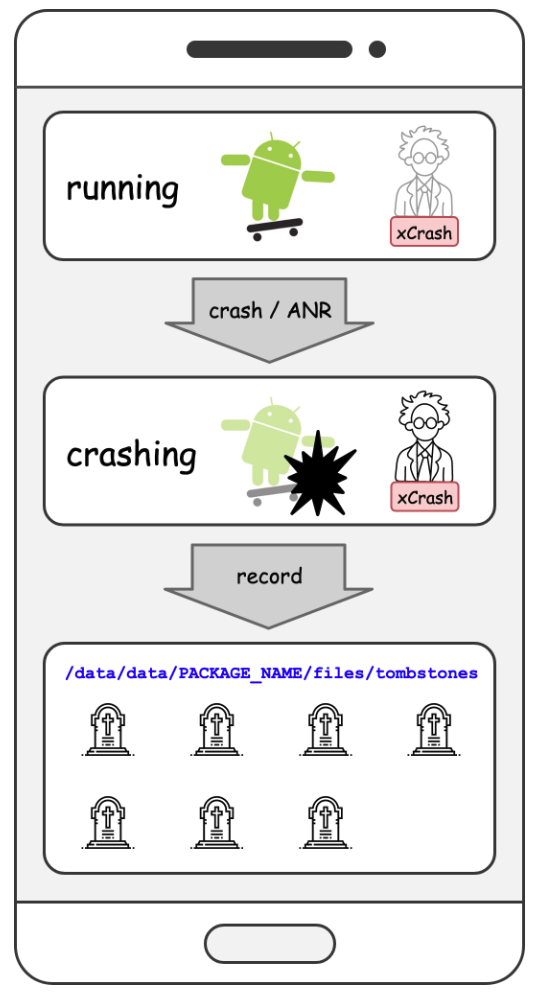
xCrash 已经在爱奇艺的很多安卓 APP(包括爱奇艺视频)中被使用了很多年。
特征
- 支持 Android 4.0 - 10(API level 14 - 29)。
- 支持 armeabi,armeabi-v7a,arm64-v8a,x86 和 x86_64。
- 捕获 java 崩溃,native 崩溃和 ANR。
- 获取详细的内存使用统计信息。
- 通过正则表达式设置需要获取哪些线程的信息。
- 不需要 root 权限或任何系统权限。
关于Android应用如何反馈Crash报告和android crash分析的问题就给大家分享到这里,感谢你花时间阅读本站内容,更多关于01_Android应用开发环境_02_Android应用的基本组件、01_Android应用开发环境_05_签名android应用程序、Android 8.0 以上系统应用如何保活、Android 应用崩溃捕获工具 xCrash等相关知识的信息别忘了在本站进行查找喔。
本文标签:


