想了解CoreDataTutorial:GettingStarted的新动态吗?本文将为您提供详细的信息,此外,我们还将为您介绍关于A2-06-02.GettingStartedwithMySQLSt
想了解Core Data Tutorial: Getting Started的新动态吗?本文将为您提供详细的信息,此外,我们还将为您介绍关于A2-06-02. Getting Started with MySQL Stored Procedures、android.media.MediaRecorder.start(Native Method)中的java.lang.IllegalStateException、Artificial intelligence requires trusted data, and a healthy DataOps ecosystem、c# – AutoFixture CompositeDataAttribute不适用于PropertyDataAttribute的新知识。
本文目录一览:- Core Data Tutorial: Getting Started
- A2-06-02. Getting Started with MySQL Stored Procedures
- android.media.MediaRecorder.start(Native Method)中的java.lang.IllegalStateException
- Artificial intelligence requires trusted data, and a healthy DataOps ecosystem
- c# – AutoFixture CompositeDataAttribute不适用于PropertyDataAttribute

Core Data Tutorial: Getting Started
Note from Ray: This is an abbreviated version of a chapter from Core Data by Tutorials released as part of the iOS 8 Feast to give you a sneak peek of what’s inside the book. We hope you enjoy!
In this tutorial, you’ll write your very first Core Data app using Swift. You’ll see how easy it is to get started with all the resources provided in Xcode, from the starter code templates to the data model editor. By the end of the tutorial you’ll know how to:
- model data you want to store in Core Data using Xcode’s model editor;
- add new records to Core Data;
- fetch a set of records from Core Data;
- display the fetched results to the user in a table view.
You’ll also get a sense of what Core Data is doing behind the scenes, and how you can interact with the various moving pieces there. We’re getting ahead of ourselves though – it’s time to build an app!
Getting Started
Open Xcode and create a new iPhone project based on the Single View Application template. Call the appHitList and make sure Use Core Data is checked:
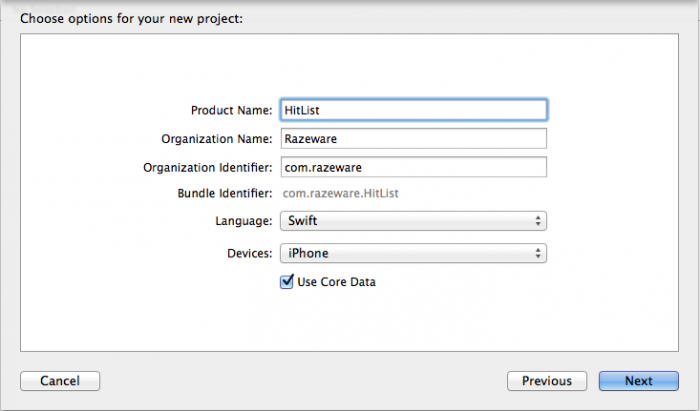
Checking the Use Core Data box will cause Xcode to generate boilerplate code for what’s known as a Core Data stack in AppDelegate.swift.
The Core Data stack consists of a set of objects that facilitate saving and retrieving information from Core Data. There’s an object to manage the Core Data state as a whole, an object representing the data model, and so on.
Note: Not all Xcode templates have the option to start with Core Data. In Xcode 6, only the Master-Detail Application and the Single View Application templates have the Use Core Data checkbox.
The idea for this sample app is simple. There will be a table view with a list of names for your very own “hit list”. You’ll be able to add names to this list and eventually, you’ll use Core Data to make sure the data is stored between sessions. We don’t condone violence in this tutorial so you can think of this app as a “favorites list” to keep track of your friends too, of course! ;]
Click on Main.storyboard to open it in Interface Builder. Select its only view controller and change its size class to Regular Height and Compact Width to match an iPhone in portrait mode:

Next, embed the view controller in a navigation controller. From Xcode’s Editor menu, select Embed In…\ Navigation Controller.

Back in Interface Builder, drag a Table View from the object library into the view controller so that it covers the entire view.
Then, drag a Bar Button Item and place it on the view controller’s newly added navigation bar. Finally, double-click the bar button item to change its text to Add. Your canvas should now look like the following screenshot:

Every time you tap Add on the top-right, an alert containing a text field will appear on the screen. From there you’ll be able to type someone’s name into the text field. Dismissing the alert will save the name and refresh the table view with all the names you’ve saved up to that point.
Before you can do that, you need to make the view controller the table view’s data source. Ctrl-drag from the table view to the yellow view controller icon above the navigation bar, as shown below, and click on dataSource:

In case you were wondering, you don’t need to set up the table view’s delegate since tapping on the cells won’t trigger any action. It doesn’t get simpler than this!
Open the Assistant Editor by hitting Command-Option-Enter or by selecting the middle button on the Editor toolset on the Xcode bar. Ctrl-drag from the table view onto ViewController.swift, inside the class definition to insert an outlet:

Name the new IBOutlet property tableView, resulting in the following line:
Ctrl-drag from the Add bar button item onto ViewController.swift, but this time, create an action instead of an outlet and name the method addName:
You can now refer to the table view and the bar button item’s action in code. Next, set up the model for the table view. Add the following property to ViewController.swift:
names is a mutable Array to hold the strings for the table view to display.
Replace the implementation of viewDidLoad with the following:
This will set a title and register the UITableViewCell class with the table view. You do this so that when you dequeue a cell, the table view will return a cell of the correct type.
Still in ViewController.swift, declare that ViewController will conform to the UITableViewDataSource protocol by editing the class declaration:
Immediately, Xcode will complain about ViewController not conforming to the protocol.
Below viewDidLoad, implement the following data source methods to fix the error:
If you’ve ever worked with UITableView, this code should look very familiar. The first method says that the table view will have as many rows as the names array has strings.
The second method, tableView(_:cellForRowAtIndexPath:), dequeues table view cells and populates them with the corresponding string in the names array.
Don’t run the app just yet. First, you need a way to input names so the table view can display them.
Implement the addName IBAction method you Ctrl-dragged into your code earlier:
Every time you tap the Add bar button item, this method presents an UIAlertController with a text field and two buttons, Save and Cancel.
Save takes whatever text is currently in the text field, inserts it into the name array and reloads the table view. Since the names array is the model backing the table view, whatever you typed into the text field will appear in the table view.
Finally it’s time to build and run your app for the first time. Tap the Add bar button item. The alert controller will look like this:

Add four or five names to the list. You should wind up with something like this:

Your table view will display the data and your array will store the names, but the big thing missing here ispersistence. The array is in memory but if you force quit the app or reboot your device, your hit list will be wiped out.
Core Data provides persistence, meaning it can store data in a more durable state so that it can outlive an app re-launch or a device reboot.
You haven’t added any Core Data yet, so nothing should persist after you navigate away from the app. Let’s test this out. Press the Home button if you’re using a physical device or the equivalent (Shift+⌘+H) if you’re on the Simulator. This will take you back to the familiar app grid on the home screen:

From the home screen, tap the HitList icon to bring the app back to the foreground. The names are still on the screen. What happened?
When you tap the Home button, the app that’s currently in the foreground goes to the background. When this happens, the operating system flash-freezes everything currently in memory, including the strings in the namesarray. Similarly, when it’s time to wake up and return to the foreground, the operating system restores what used to be in memory as if you’d never left.
Apple introduced these advances in multitasking back in iOS 4. They create a seamless experience for iOS users but add a wrinkle to the definition of persistence for iOS developers. Are the names really persisted?
No, not really. If you had completely killed the app in the fast app switcher or turned off your phone, those names would be gone. You can verify this, as well. With the app in the foreground, double tap the Home button to enter the fast app switcher, like so:

From here, flick the HitList app snapshot upwards to terminate the app. There should be no trace of HitList in living memory (no pun intended). Verify that the names are gone by returning to the home screen and tapping on the HitList icon to trigger a fresh launch.
This difference between flash-freezing and persistence may be obvious if you’ve been working with iOS for some time and are familiar with the way multitasking works. In a user’s mind, however, there is no difference. The user doesn’t care if the names are “still there” because the app went into the background and came back, or because the app saved and reloaded them.
All that matters is that the names are still there when she comes back!
So the real test of persistence, the one you will use in this tutorial, is whether your data is still there after a fresh app launch.
Modeling Your Data
Now that you know how to check for persistence, let’s get started with Core Data. Your goal for the HitList app is simple: to persist the names you enter so they’re available for viewing after a fresh app launch.
Up to this point, you’ve been using plain old Swift strings to store the names in memory. In this section, you’ll replace these strings with Core Data objects.
The first step is to create a managed object model, which spells out the way Core Data represents data on disk. By default, Core Data uses an SQLite database as the persistent store (more on this later), so you can think of the data model as the database schema.
Note: You’ll come across the word “managed” quite a bit in this tutorial. If you see “managed” in the name of a class, such as in NSManagedObjectContext, chances are you are dealing with a Core Data class. “Managed” refers to Core Data’s management of the life cycle of Core Data objects.
However, don’t assume that all Core Data classes contain the word “managed”—actually, most don’t. For a comprehensive list of Core Data classes, check out the Objective-C umbrella header CoreData/CoreData.h.
Since you elected to use Core Data when you created the HitList project, Xcode automatically created a data model file for you and named it HitList.xcdatamodeld.
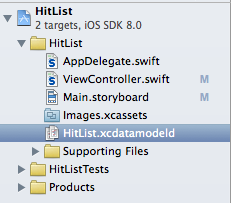
Click on HitList.xcdatamodeld to open it. As you can see, Xcode has a powerful data model editor that looks like this:

The data model editor has a lot of features. For now, let’s focus on creating a single Core Data entity.
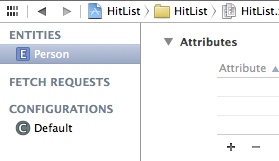
Click on Add Entity on the lower-left to create a new entity. Double-click on the new entity and change its name to Person, like so:
You may be wondering why the model editor uses the term “Entity.” Weren’t you simply defining a new class? As you’ll see shortly, Core Data comes with its own vocabulary. Here’s a quick rundown of some of the terms you’ll commonly encounter:
- An entity is a class definition in Core Data. The classic example is an
Employeeor aCompany. In a relational database, an entity corresponds to a table. - An attribute is a piece of information attached to a particular entity. For example, an
Employeeentity could have attributes for the employee’s name, position and salary. In a database, an attribute corresponds to a particular field in a table. - A relationship is a link between multiple entities. In Core Data, relationships between two entities are called to-one relationships, while those between one and many entities are called to-many relationships. For example, a
Managercan have a to-many relationship with a set of employees, whereas an individualEmployeewill have a to-one relationship with his manager.
Note: As you’ve probably noticed, entities sound a lot like a classes. Likewise, attributes/relationships sound a lot like properties. What’s the difference? You can think of a Core Data entity as a class “definition” and the managed object as an instance of that class.
Now that you know what an attribute is, go back to the model editor and add an attribute to Person. SelectPerson on the left-hand side and click the plus sign (+) under Attributes.
Set the new attribute’s name to, well, name and change its type to String:

In Core Data, an attribute can be of one of several data types — one of them is the string type.
Saving to Core Data
Import the Core Data module at the top of ViewController.swift:
You may have had to link frameworks manually in your project’s Build Phases if you’ve worked with Objective-C frameworks. In Swift, a simple import statement is all you need to start using Core Data APIs in your code.
Next, replace the table view’s model with the following:
You’ll be storing Person entities rather than just names, so you rename the Array that serves as the table view’s data model to people. It now holds instances of NSManagedObject rather than simple Swift strings.
NSManagedObject represents a single object stored in Core Data—you must use it to create, edit, save and delete from your Core Data persistent store. As you’ll see shortly, NSManagedObject is a shape-shifter. It can take the form of any entity in your data model, appropriating whatever attributes and relationships you defined.
Since you’re changing the table view’s model, you must also replace both data source methods you implemented earlier with the following to reflect these changes:
The most significant change to these methods occurs in cellForRowAtIndexPath. Instead of matching cells with the corresponding string in the model array, you now match cells with the corresponding NSManagedObject.
Note how you grab the name attribute from the NSManagedObject. It happens here:
Why do you have to do this? As it turns out, NSManagedObject doesn’t know about the name attribute you defined in your data model, so there’s no way of accessing it directly with a property. The only way Core Data provides to read the value is key-value coding, commonly referred to as KVC.
Note: If you’re new to iOS development, you may not be familiar with key-value coding or KVC.
KVC is a mechanism in Cocoa and Cocoa Touch for accessing an object’s properties indirectly using strings to identify properties. In this case, KVC makes NSMangedObject behave more or less like a dictionary.
Key-value coding is available to all classes that descend from NSObject, including NSManagedObject. You wouldn’t be able to access properties using KVC on a Swift object that doesn’t descend from NSObject.
Next, replace the save action in the addName @IBAction method with the following:
This takes the text in the text field and passes it over to a new method called saveName. Add saveName toViewController.swift, as shown below:
This is where Core Data kicks in! Here’s what the code does:
Before you can save or retrieve anything from your Core Data store, you first need to get your hands on an
NSManagedObjectContext. You can think of a managed object context as an in-memory “scratchpad” for working with managed objects.Think of saving a new managed object to Core Data as a two-step process: first, you insert a new managed object into a managed object context; then, after you’re happy with your shiny new managed object, you “commit” the changes in your managed object context to save it to disk.
Xcode has already generated a managed object context as part of the new project’s template – remember, this only happens if you check the Use Core Data checkbox at the beginning. This default managed object context lives as a property of the application delegate. To access it, you first get a reference to the app delegate.
You create a new managed object and insert it into the managed object context. You can do this in one step with
NSManagedObject’s designated initializer:init(entity:insertIntoManagedObjectContext:).You may be wondering what an
NSEntityDescriptionis all about. Recall that earlier, I calledNSManagedObjecta “shape-shifter” class because it can represent any entity. An entity description is the piece that links the entity definition from your data model with an instance ofNSManagedObjectat runtime.- With an
NSManagedObjectin hand, you set thenameattribute using key-value coding. You have to spell the KVC key (“name” in this case) exactly as it appears on your data model, otherwise your app will crash at runtime. - You commit your changes to
personand save to disk by callingsaveon the managed object context. Note thatsavetakes one parameter, which is a pointer to anNSError; if there is ever an error with the save operation, you can inspect the error and alert the user if necessary. - Congratulations! Your new managed object is now safely ensconced in your Core Data persistent store. Insert the new managed object into the
peoplearray so that it shows up in the table view when it reloads.
That’s a little more complicated than an array of strings, but not too bad. Some of the code here—getting the managed object context and entity¬—could be done just once in your own init or viewDidLoad and then reused later. For simplicity, you’re doing it all at once in one method.
Build and run the app, and add a few names to the table view:

Note: If your application crashed when you tried to add the first name, make sure you renamed your Core Data entity from Entity to Person in HitList.xcdatamodeld. If this happened to you, delete the app and re-build from scratch after you change it to Person.
If the names are actually stored in Core Data, the HitList app should pass the persistence test. Double-tap the Home button to bring up the fast app switcher. Terminate the HitList app by flicking it upwards.
From Springboard, tap the HitList app to trigger a fresh launch. Wait, what happened? The table view is empty:

You saved to Core Data, but after a fresh app launch, the people array is empty! The data is actually sitting there waiting, but you haven’t fetched it yet.
Fetching from Core Data
To get data from your persistent store and into the managed object context, you have to fetch it. Add the following method to ViewController.swift:
Step by step, this is what the code does:
- As mentioned in the previous section, before you can do anything with Core Data, you need a managed object context. Fetching is no different! You pull up the application delegate and grab a reference to its managed object context.
- As the name suggests,
NSFetchRequestis the class responsible for fetching from Core Data. Fetch requests are both powerful and flexible. You can use requests to fetch a set of objects that meet particular criteria (e.g., “give me all employees that live in Wisconsin and have been with the company at least three years”), individual values (e.g., “give me the longest name in the database”) and more.Fetch requests have several qualifiers that refine the set of results they return. For now, you should know that
NSEntityDescriptionis one of these qualifiers (one that is required!).Setting a fetch request’s
entityproperty, or alternatively initializing it withinit(entityName:), fetches all objects of a particular entity. This is what you do here to fetch allPersonentities. - You hand the fetch request over to the managed object context to do the heavy lifting.
executeFetchRequest(_:error:)returns an optional array of managed objects that meets the criteria specified by the fetch request.
Note: If there are no objects that match the fetch request’s criteria, the method returns an optional value containing an empty array.
If an error occurred during the fetch, the method returns an optional value that contains nil. If this happens, you can inspect the NSError and respond appropriately.
Build and run the application once again. Immediately, you should see the list of names you added earlier:

Great! They’re back from the dead. Add a few more names to the list and restart the app to verify that saving and fetching are working properly. Short of deleting the app, resetting the Simulator or throwing your phone off a tall building, the names will appear in the table view no matter what.

Where To Go From Here?
In this tutorial you experienced several fundamental Core Data concepts: data models, entities, attributes, managed objects, managed object contexts and fetch requests. Here is the completed HitList project, fully integrated with Core Data.
There were a few rough edges in the HitList app: you had to get the managed object context from the app delegate each time, and you used KVC to access the attributes rather than a more natural object-style person.name. As you can see, Core Data is a large and extensive topic. There’s a lot more to learn!
If you’d like to learn more about creating Core Data applications using Swift, check out our book Core Data by Tutorials where you can go deeper into more advanced Core Data topics such as iCloud/Core Data integration, versioning and migration.
If you have any questions or comments on this tutorial, please join the forum discussion below!

A2-06-02. Getting Started with MySQL Stored Procedures
转载自:http://www.mysqltutorial.org/getting-started-with-mysql-stored-procedures.aspx
Getting Started with MySQL Stored Procedures
Summary: in this tutorial, we will show you step by step how to develop the first MySQL stored procedure using CREATE PROCEDURE statement. In addition, we will show you how to call stored procedures from SQL statements.
Writing the first MySQL stored procedure
We are going to develop a simple stored procedure named GetAllProducts() to help you get familiar with the syntax. The GetAllProducts() stored procedure selects all products from the products table.
Launch the mysql client tool and type the following commands:
|
1
2
3
4
5
6
|
DELIMITER //
CREATE PROCEDURE GetAllProducts()
BEGIN
SELECT * FROM products;
END //
DELIMITER ;
|

Let’s examine the stored procedure in greater detail:
- The first command is
DELIMITER //, which is not related to the stored procedure syntax. TheDELIMITERstatement changes the standard delimiter which is semicolon (;) to another. In this case, the delimiter is changed from the semicolon(;) to double-slashes//. Why do we have to change the delimiter? Because we want to pass the stored procedure to the server as a whole rather than lettingmysqltool interpret each statement at a time. Following theENDkeyword, we use the delimiter//to indicate the end of the stored procedure. The last command (DELIMITER;) changes the delimiter back to the semicolon (;). - We use the
CREATE PROCEDUREstatement to create a new stored procedure. We specify the name of stored procedure after theCREATE PROCEDUREstatement. In this case, the name of the stored procedure isGetAllProducts. We put the parentheses after the name of the stored procedure. - The section between
BEGINandENDis called the body of the stored procedure. You put the declarative SQL statements in the body to handle business logic. In this stored procedure, we use a simpleSELECTstatement to query data from theproductstable.
It is tedious to write the stored procedure in mysql client tool, especially when the stored procedure is complex. Most of the GUI tools for MySQL allow you to create new stored procedures via an intuitive interface.
For example, in MySQL Workbench, you can create a new stored procedure as follows:
First, right-click on the Routines and choose the Create Procedure… menu item.

Next, enter the stored procedure code and click the Apply button

Then, you can review the code before MySQL stores it in the database. Click the Apply button if everything is good.

After that, MySQL compiles and puts the stored procedure in the database catalog; click the Finishbutton.

Finally, you can see a new stored procedure created under Routines of the classicmodels database.

We have created a new stored procedure. Now, it’s time to learn how to use it.
Calling stored procedures
In order to call a stored procedure, you use the following SQL command:
|
1
|
CALL stored_procedure_name();
|
You use the CALL statement to call a stored procedure e.g., to call the GetAllProducts() stored procedure, you use the following statement:
|
1
|
CALL GetAllProducts();
|
If you execute the statement above, you will get all products in the products table.
In this tutorial, you have learned how to write a simple stored procedure using the CREATE PROCEDURE statement and call it from an SQL statement using the CALL statement.
Related Tutorials
- MySQL Stored Procedure Variables
- Hints for Choosing Between IF and CASE Statements
- MySQL Cursor
- Introduction to MySQL Stored Procedures
- MySQL Loop in Stored Procedures
- Listing Stored Procedures in a MySQL Database
中的java.lang.IllegalStateException")
android.media.MediaRecorder.start(Native Method)中的java.lang.IllegalStateException
我想制作一个录音机应用程序,但是当我点击“开始录制”按钮时它会崩溃.
我在android.media.MediaRecorder.start(Native Method)中收到一条错误说java.lang.IllegalStateException.
我也附上了日志.
package com.example.sahil.chuckit;
import android.os.Bundle;
import android.view.View;
import android.widget.Button;
import android.app.Activity;
import android.media.MediaPlayer;
import android.media.MediaRecorder;
import android.os.Environment;
import java.io.File;

public class MainActivity extends Activity {

    private static Button submit;
    private static Button submit2;
    private static Button submit3;
    private static Button submit4;
    private MediaPlayer mediaPlayer;
    private MediaRecorder recorder;
    private String output_file;

        @Override
        protected void onCreate(Bundle savedInstanceState) {
        super.onCreate(savedInstanceState);
        setContentView(R.layout.activity_main);

        output_file = Environment.getExternalStorageState() +    "/audiorecorder.3gpp";
        OnClickButtonListener();OnClickButtonListener1();
        OnClickButtonListener3();OnClickButtonListener4();
     }
     public void OnClickButtonListener(){
        submit =(Button)findViewById(R.id.button);
        submit.setonClickListener(
                new View.OnClickListener() {
                    @Override
                    public void onClick(View v) {

                        beginRecording();

                    }
                    }

        );

    }
    public void OnClickButtonListener1(){
        submit2 =(Button)findViewById(R.id.button2);
        submit2.setonClickListener(
                new View.OnClickListener() {
                    @Override
                    public void onClick(View v) {
                        stopRecording();
                    }
                }
        );

    }

    public void OnClickButtonListener3(){
        submit3 =(Button)findViewById(R.id.button3);
        submit3.setonClickListener(
                new View.OnClickListener() {
                    @Override
                    public void onClick(View v) {
                        try {
                            playRecording();
                        } catch (Exception e) {
                            e.printstacktrace();
                        }
                    }
                }
        );

    }
    public void OnClickButtonListener4(){
        submit4 =(Button)findViewById(R.id.button4);
        submit4.setonClickListener(
                new View.OnClickListener() {
                    @Override
                    public void onClick(View v) {
                      stopPlayback();
                    }
                }
        );

    }
    private void ditchMediaRecorder() {
        if (recorder != null)
            recorder.release();
    }
    private void beginRecording() {
        ditchMediaRecorder();
        File outFile=new File(output_file);

        if (outFile.exists())
        { outFile.delete();}

        recorder=new MediaRecorder();
        recorder.setAudioSource(MediaRecorder.AudioSource.MIC);
        recorder.setoutputFormat(MediaRecorder.OutputFormat.THREE_GPP);
        recorder.setAudioEncoder(MediaRecorder.AudioEncoder.AMR_NB);
        recorder.setoutputFile(output_file);
        recorder.start();
    }
    private void stopRecording() {
        if(recorder!=null)
            recorder.stop();
    }

    private void playRecording() throws Exception {
        ditchMediaPlayer();
        mediaPlayer=new MediaPlayer();
        mediaPlayer.setDataSource(output_file);
        mediaPlayer.prepare();
        mediaPlayer.start();
    }

    private void ditchMediaPlayer() {
        if(mediaPlayer!=null)
        {
            try{
                mediaPlayer.release();
            }catch (Exception e){
                e.printstacktrace();
            }
        }
    }

    private void stopPlayback() {
        if (mediaPlayer!=null)
            mediaPlayer.stop();
    }


}
logcat的:
LOG:06-30 05:11:12.603 24621-24621/com.example.sahil.chuckit E/AndroidRuntime: FATAL EXCEPTION: main
Process: com.example.sahil.chuckit, PID: 24621 java.lang.IllegalStateException
    at android.media.MediaRecorder.start(Native Method)
    at com.example.sahil.chuckit.MainActivity.beginRecording(MainActivity.java:111)
    at com.example.sahil.chuckit.MainActivity.access$000(MainActivity.java:22)
    at com.example.sahil.chuckit.MainActivity$1.onClick(MainActivity.java:46)
    at android.view.View.performClick(View.java:5198)
    at android.view.View$PerformClick.run(View.java:21147)
    at android.os.Handler.handleCallback(Handler.java:739)
    at android.os.Handler.dispatchMessage(Handler.java:95)
    at android.os.Looper.loop(Looper.java:148)
    at android.app.ActivityThread.main(ActivityThread.java:5417)
    at java.lang.reflect.Method.invoke(Native Method)
    at com.android.internal.os.ZygoteInit$MethodAndArgsCaller.run(ZygoteInit.java:726)
    at com.android.internal.os.ZygoteInit.main(ZygoteInit.java:616)
06-30 05:11:14.891 24621-24621/com.example.sahil.chuckit I/Process: Sending signal. PID: 24621 SIG: 9
解决方法:
你忘了在beginRecording函数中的recordeer.start()函数之前调用recorder.prepare().
准备功能将关注许多事情,例如将模拟数据转换为数字音频以进行压缩以及存储文件的位置等

Artificial intelligence requires trusted data, and a healthy DataOps ecosystem
http://www.zdnet.com/article/artificial-intelligence-requires-trusted-data-and-a-healthy-dataops-ecosystem/
Lately, we''ve seen many "x-Ops" management practices appear on the scene, all derivatives from DevOps, which seeks to coordinate the output of developers and operations teams into a smooth, consistent and rapid flow of software releases. Another emerging practice, DataOps, seeks to achieve a similarly smooth, consistent and rapid flow of data through enterprises. Like many things these days, DataOps is spilling over from the large Internet companies, who process petabytes and exabytes of information on a daily basis.
 Photo: Joe McKendrick
Such an uninhibited data flow is increasingly vital to enterprises seeking to become more data-driven and scale artificial intelligence and machine learning to the point where these technologies can have strategic impact.
Awareness of DataOps is high. A recent survey of 300 companies by 451 Research finds 72 percent have active DataOps efforts underway, and the remaining 28 percent are planning to do so over the coming year. A majority, 86 percent, are increasing their spend on DataOps projects to over the next 12 months. Most of this spending will go to analytics, self-service data access, data virtualization, and data preparation efforts.
In the report, 451 Research analyst Matt Aslett defines DataOps as "The alignment of people, processes and technology to enable more agile and automated approaches to data management."
The catch is "most enterprises are unprepared, often because of behavioral norms -- like territorial data hoarding -- and because they lag in their technical capabilities -- often stuck with cumbersome extract, transform, and load (ETL) and master data management (MDM) systems," according to Andy Palmer and a team of co-authors in their latest report, Getting DataOps Right, published by O''Reilly. Across most enterprises, data is siloed, disconnected, and generally inaccessible. There is also an abundance of data that is completely undiscovered, of which decision-makers are not even aware.
Here are some of Palmer''s recommendations for building and shaping a well-functioning DataOps ecosystem:
Keep it open: The ecosystem in DataOps should resemble DevOps ecosystems in which there are many best-of-breed free and open source software and proprietary tools that are expected to interoperate via APIs." This also includes carefully evaluating and selecting from the raft of tools that have been developed by the large internet companies.
Automate it all: The collection, ingestion, organizing, storage and surfacing of massive amounts of data at as close to a near-real-time pace as possible has become almost impossible for humans to manage. Let the machines do it, Palmer urges. Areas ripe for automaton include "operations, repeatability, automated testing, and release of data." Look to the ways DevOps is facilitating the automation of the software build, test, and release process, he points out.
Process data in both batch and streaming modes. While DataOps is about real-time delivery of data, there''s still a place -- and reason -- for batch mode as well. "The success of Kafka and similar design patterns has validated that a healthy next-generation data ecosystem includes the ability to simultaneously process data from source to consumption in both batch and streaming modes," Palmer points out.
Track data lineage: Trust in the data is the single most important element in a data-driven enterprise, and it simply may cease to function without it. That''s why well-thought-out data governance and a metadata (data about data) layer is important. "A focus on data lineage and processing tracking across the data ecosystem results in reproducibility going up and confidence in data increasing," says Palmer.
Have layered interfaces. Everyone touches data in different ways. "Some power users need to access data in its raw form, whereas others just want to get responses to inquiries that are well formulated," Palmer says. That''s why a layered set of services and design patterns is required for the different personas of users. Palmer says there are three approaches to meeting these multilayered requirements:
- "Data access services that are "View" abstractions over the data and are essentially SQL or SQL-like interfaces. This is the power-user level that data scientists prefer.
- "Messaging services that provide the foundation for stateful data interchange, event processing, and data interchange orchestration.
- "REST services built on or wrapped around APIs providing the ultimate flexible direct access to and interchange of data."
Business leaders are increasingly leaning on their technology leaders and teams to transform their organizations into data-driven digital entities that can react to events and opportunities almost instantaneously. The best way to accomplish this -- especially with the meager budgets and limited support that gets thrown out with this mandate -- is to align the way data flows from source to storage.

c# – AutoFixture CompositeDataAttribute不适用于PropertyDataAttribute
它适用于单组参数,但失败并带有更多参数集.这是代码:
public static IEnumerable<object[]> NumericSequence
{
    get
    {
        yield return new object[] {1};
        //yield return new object[] {2};
    }
}

[Theory]
[AutopropertyData("NumericSequence")]
public void Test(int? p1,int? p2,int? p3)
{
    Assert.NotNull(p1);
    Assert.NotNull(p2);
}

public class AutopropertyDataAttribute : CompositeDataAttribute
{
    public AutopropertyDataAttribute(string propertyName)
        : base(
              new DataAttribute[] {
                  new PropertyDataAttribute(propertyName),new AutoDataAttribute()
              })
    {
    }
}
尝试取消注释第二个yield将使用消息中断测试:
system.invalidOperationException: Expected 2 parameters,got 1 parameters
   at Ploeh.AutoFixture.Xunit.CompositeDataAttribute.<GetData>d__0.MoveNext()
   at Xunit.Extensions.TheoryAttribute.<GetData>d__7.MoveNext()
   at Xunit.Extensions.TheoryAttribute.EnumerateTestCommands(IMethodInfo method)
ClassDataAttribute也是如此
解决方法
NumericSequence [PropertyData]定义了两次迭代.
NumericSequence [PropertyData]与[AutoData]的组合假定每次迭代都有足够的数据.
但是,实际的构成是:
1st iteration:  [PropertyData],[AutoData]

2nd iteration:  [PropertyData],[n/a]
这就是为什么在第二次迭代中你最终会耗尽数据.
组成
CompositeDataAttribute在某种意义上尊重LSP,它是根据所有数据理论DataAttribute类编程的.
(也就是说,没有假设所有属性都在最后用[AutoData]组成.)
因此,它不能简单地从第二次迭代跳转到第一次迭代并获取一些[AutoData]值 – 这将破坏LSP.
你能做什么
使实际构图看起来像:
1st iteration: [PropertyData],[AutoData]
通过定义两个属性:
public static IEnumerable<object[]> FirstPropertyData { get {
    yield return new object[] { 1 }; } }

public static IEnumerable<object[]> OtherPropertyData { get {
    yield return new object[] { 9 }; } }
然后,原始测试可以写成:
[Theory]
[AutopropertyData("FirstPropertyData")]
[AutopropertyData("OtherPropertyData")]
public void Test(int n1,int n2,int n3)
{
}
测试执行两次,n1始终由[PropertyData]提供,而n2和n3始终由[AutoData]提供.
关于Core Data Tutorial: Getting Started的介绍现已完结,谢谢您的耐心阅读,如果想了解更多关于A2-06-02. Getting Started with MySQL Stored Procedures、android.media.MediaRecorder.start(Native Method)中的java.lang.IllegalStateException、Artificial intelligence requires trusted data, and a healthy DataOps ecosystem、c# – AutoFixture CompositeDataAttribute不适用于PropertyDataAttribute的相关知识,请在本站寻找。
本文标签:


