针对CentOS6iptables开放端口80330622等和centos7iptables开放端口这两个问题,本篇文章进行了详细的解答,同时本文还将给你拓展10.15iptablesfilter表小
针对CentOS 6 iptables 开放端口80 3306 22等和centos7 iptables开放端口这两个问题,本篇文章进行了详细的解答,同时本文还将给你拓展10.15 iptables filter 表小案例 10.16/10.17/10.18 iptables nat 表应用、10.15 iptables filter表案例 10.16/10.17/10.18 iptables nat表应用、10.15 iptables filter表案例, iptables nat表应用、11.30 iptables filter表案例 iptables nat表应用等相关知识,希望可以帮助到你。
本文目录一览:- CentOS 6 iptables 开放端口80 3306 22等(centos7 iptables开放端口)
- 10.15 iptables filter 表小案例 10.16/10.17/10.18 iptables nat 表应用
- 10.15 iptables filter表案例 10.16/10.17/10.18 iptables nat表应用
- 10.15 iptables filter表案例, iptables nat表应用
- 11.30 iptables filter表案例 iptables nat表应用
")
CentOS 6 iptables 开放端口80 3306 22等(centos7 iptables开放端口)
CentOS 6 iptables 开放端口80 3306 22等
#/sbin/iptables -I INPUT -p tcp --dport 80 -j ACCEPT
#/sbin/iptables -I INPUT -p tcp --dport 22 -j ACCEPT
#/sbin/iptables -I INPUT -p tcp --dport 3306 -j ACCEPT
#/sbin/iptables -I INPUT -p tcp --dport 8080 -j ACCEPT
然后保存:
#/etc/init.d/iptables save
查看打开的端口:
# /etc/init.d/iptables status
极端情况
#关闭防火墙
/etc/init.d/iptables stop

10.15 iptables filter 表小案例 10.16/10.17/10.18 iptables nat 表应用
10.15 iptables filter 表小案例
iptables 命令、语法总结
iptables-nvL  //查看iptables规则
iptables -F      //清空规则
service iptables save   //保存规则,保存在/etc/sysconfig/iptables,重启的时候会调用这里面的规则
iptables -t nat //-t指定表,如果不用-t,默认对filter 执行
iptables -Z   //可以把计数器清零

iptables -I/-A/-D INPUT -s 1.1.1.1 -j DROP
iptables -I INPUT -s 192.168.1.0/24 -ieth0 -j ACCEPT
-A 和 -I 的区别
- -A 是在规则列表最下方增加
- -I 是在规则列表最上方增加
- 谁在规则列表最上,谁就最先匹配、加载
命令语法
iptables -A INPUT -s 192.168.188.1 -p tcp--sport 1234 -d 192.168.188.128 --dport80 -j DROP
iptables -I [链的名字] -s [源IP] -p [指定协议] --sport [指定源端口] -d [指定目标IP] --dport [指定目标端口] -j [指定行为]
[链的名字]
- INPUT // 进来的包
- OUTPUT // 出去的包
- FORWARD // 比较少用
[指定协议]
- tcp
- udp
- icmp
[指定行为]
- DROP // 丢弃
- ACCEPT // 放行
- REJECT // 拒绝
iptables -nvL --line-numbers  //查看规则的序号
iptables -D INPUT 1      //针对序号删除
iptables -P INPUT DROP  //指定链的默认策略,最好不要直接操作,很有可能导致远程终端直接中断
案例
需求:把 80 端口、22 端口、21 端口放行,22 端口指定 IP 段内的 IP 才能进行访问
使用脚本实现
#! /bin/bash
ipt="/usr/sbin/iptables" //定义了环境变量 ipt
$ipt -F                          //清除filter表的规则
$ipt -P INPUT DROP            //定义INPUT链的默认策略为全部丢掉
$ipt -P OUTPUT ACCEPT     //定义OUTPUT链的默认策略为全部放行
$ipt -P FORWARD ACCEPT  //定义了FORWARD链的默认策略为全部放行
$ipt -A INPUT -m state --state RELATED,ESTABLISHED -j ACCEPT  //针对RELATED,ESTABLISHED这两状态进行放行
$ipt -A INPUT -s 192.168.133.0/24 -p tcp --dport 22 -j ACCEPT  //这个网段的数据包放行
$ipt -A INPUT -p tcp --dport 80 -j ACCEPT                    //80端口放行
$ipt -A INPUT -p tcp --dport 21 -j ACCEPT                   //21端口放行
脚本解释:
定义环境变量的理由,因为正确使用命令是用绝对路径进行使用,这样才不会因为环境变量的改动导致无法使用命令 两种状态:
- RELATED 有关系的端口的,是一个边缘的状态,客户端和服务端建立连接之后,还有继续有一些额外的链接出来,这个时候就变成这个状态
- ESTABLISHED 已建立的连接,保持连接 仅仅是 ESTABLISHED,很有可能其他的通信被禁掉,因为默认策略是 DROP,所以必须加上这个状态,加这个状态的目的就是为了让通信更加顺畅
使用脚本的原因
因为逐个执行命令,会导致远程终端断开连接,如果使用脚本将会在瞬间执行好所有的命令,将不再产生端口终端的状态
查看新增规则状况
[root@aminglinux-02 ~]# !sh
sh /usr/local/sbin/iptables.sh
[root@aminglinux-02 ~]# iptables -nvL
Chain INPUT (policy DROP 0 packets, 0 bytes)
 pkts bytes target     prot opt in     out     source               destination
   26  1888 ACCEPT     all  --  *      *       0.0.0.0/0            0.0.0.0/0            state RELATED,ESTABLISHED
    0     0 ACCEPT     tcp  --  *      *       192.168.133.0/24     0.0.0.0/0            tcp dpt:22
    0     0 ACCEPT     tcp  --  *      *       0.0.0.0/0            0.0.0.0/0            tcp dpt:80
    0     0 ACCEPT     tcp  --  *      *       0.0.0.0/0            0.0.0.0/0            tcp dpt:21
licmp 示例:
禁止 ping 本机
iptables -I INPUT -p icmp --icmp -type 8 -j DROP
10.16/10.17/10.18 iptables nat 表应用
准备工作:
设备情况: A 机器两块网卡 ens33 (192.168.133.130)、ens37 (192.168.100.1),ens33 可以上外网,ens37 仅仅是内部网络,B 机器只有 ens37(192.168.100.101),和 A 机器 ens37 可以通信互联。
- 环境准备
一、克隆一个虚拟机
==PS:克隆好的虚拟机需要修改 hostname 以便区分 ==
二、对两台(aminglinux-02、aminglinux-02 的克隆)虚拟机增加一个网卡,网卡选项选择为 LAN 区段
PS:需要同时对两台虚拟机都进行这个操作,这个操作是目的,为的就是让两台虚拟机都处于同一个虚拟交换机中(LAN 区段,就类似一个虚拟交换机);克隆好虚拟机以后记得修改 hostname 不然也会出错
需要注意的一点,因为实验环境,A 机器是可以内网、外网同时访问,所以 A 机器必须是要有两个网卡;B 机器可以只有一个网卡,所以在配置 B 机器的时候只需要把 B 机器的网络适配器网络连接调整为 LAN 区段也是可以的(但这样做需要改动进入系统内调整网卡配置),但是为了方便,直接重复创建一个网卡,改动网络连接为 LAN 区段即可
三、配置两台机器的 LAN 区段 IP
A 机器: 因为 A 机器配置能访问外网的网卡,所以可以直接通过终端进行访问 配置 LAN 网卡
[root@aminglinux-02 ~]# ifconfig
ens32: flags=4163<UP,BROADCAST,RUNNING,MULTICAST>  mtu 1500
        inet 192.168.133.131  netmask 255.255.255.0  broadcast 192.168.133.255
        inet6 fe80::6e6a:61ff:f17c:5942  prefixlen 64  scopeid 0x20<link>
        ether 00:0c:29:c4:13:b8  txqueuelen 1000  (Ethernet)
        RX packets 2908766  bytes 284945595 (271.7 MiB)
        RX errors 0  dropped 0  overruns 0  frame 0
        TX packets 7085  bytes 1858943 (1.7 MiB)
        TX errors 0  dropped 0 overruns 0  carrier 0  collisions 0

ens34: flags=4163<UP,BROADCAST,RUNNING,MULTICAST>  mtu 1500
        inet6 fe80::44fe:e11f:f99c:4de1  prefixlen 64  scopeid 0x20<link>
        ether 00:0c:29:c4:13:c2  txqueuelen 1000  (Ethernet)
        RX packets 0  bytes 0 (0.0 B)
        RX errors 0  dropped 0  overruns 0  frame 0
        TX packets 51  bytes 8994 (8.7 KiB)
        TX errors 0  dropped 0 overruns 0  carrier 0  collisions 0

lo: flags=73<UP,LOOPBACK,RUNNING>  mtu 65536
        inet 127.0.0.1  netmask 255.0.0.0
        inet6 ::1  prefixlen 128  scopeid 0x10<host>
        loop  txqueuelen 1  (Local Loopback)
        RX packets 68  bytes 5524 (5.3 KiB)
        RX errors 0  dropped 0  overruns 0  frame 0
        TX packets 68  bytes 5524 (5.3 KiB)
        TX errors 0  dropped 0 overruns 0  carrier 0  collisions 0
[root@aminglinux-02 network-scripts]# ifconfig ens34 192.168.100.1/24
[root@aminglinux-02 network-scripts]# ifconfig
ens32: flags=4163<UP,BROADCAST,RUNNING,MULTICAST>  mtu 1500
        inet 192.168.133.131  netmask 255.255.255.0  broadcast 192.168.133.255
        inet6 fe80::6e6a:61ff:f17c:5942  prefixlen 64  scopeid 0x20<link>
        ether 00:0c:29:c4:13:b8  txqueuelen 1000  (Ethernet)
        RX packets 2911127  bytes 285202630 (271.9 MiB)
        RX errors 0  dropped 0  overruns 0  frame 0
        TX packets 8305  bytes 2026122 (1.9 MiB)
        TX errors 0  dropped 0 overruns 0  carrier 0  collisions 0

ens34: flags=4163<UP,BROADCAST,RUNNING,MULTICAST>  mtu 1500
        inet 192.168.100.1  netmask 255.255.255.0  broadcast 192.168.100.255
        inet6 fe80::acc1:13e6:b0b6:33ab  prefixlen 64  scopeid 0x20<link>
        ether 00:0c:29:c4:13:c2  txqueuelen 1000  (Ethernet)
        RX packets 39  bytes 8230 (8.0 KiB)
        RX errors 0  dropped 0  overruns 0  frame 0
        TX packets 81  bytes 11500 (11.2 KiB)
        TX errors 0  dropped 0 overruns 0  carrier 0  collisions 0

lo: flags=73<UP,LOOPBACK,RUNNING>  mtu 65536
        inet 127.0.0.1  netmask 255.0.0.0
        inet6 ::1  prefixlen 128  scopeid 0x10<host>
        loop  txqueuelen 1  (Local Loopback)
        RX packets 72  bytes 5864 (5.7 KiB)
        RX errors 0  dropped 0  overruns 0  frame 0
        TX packets 72  bytes 5864 (5.7 KiB)
        TX errors 0  dropped 0 overruns 0  carrier 0  collisions 0
ifconfig 配置的网卡 IP 只是暂时生效,重启以后又会失效,如果想永久生效,需要更改配置,但是网卡是新创建的并没有网卡配置文件,需要 cp 原有的 ens32 网卡的配置文件,修改 NAME、DEVICE 两个还需要修改相关的 IP B 机器 因为环境需要,我们只用使用一个网卡,所以需要在虚拟机上进行配置
四、测试两台机器的连通状况
A 机器 pingB 机器
[root@aminglinux-02 ~]# ping 192.168.100.100
PING 192.168.100.100 (192.168.100.100) 56(84) bytes of data.
64 bytes from 192.168.100.100: icmp_seq=1 ttl=64 time=0.406 ms
64 bytes from 192.168.100.100: icmp_seq=2 ttl=64 time=0.258 ms
64 bytes from 192.168.100.100: icmp_seq=3 ttl=64 time=0.333 ms
64 bytes from 192.168.100.100: icmp_seq=4 ttl=64 time=0.333 ms
64 bytes from 192.168.100.100: icmp_seq=5 ttl=64 time=0.307 ms
64 bytes from 192.168.100.100: icmp_seq=6 ttl=64 time=0.290 ms
64 bytes from 192.168.100.100: icmp_seq=7 ttl=64 time=0.323 ms
^C
--- 192.168.100.100 ping statistics ---
7 packets transmitted, 7 received, 0% packet loss, time 6004ms
rtt min/avg/max/mdev = 0.258/0.321/0.406/0.045 ms
[root@aminglinux-02 ~]#
B 机器 pingA 机器情况
需求一
可以让 B 机器连接外网
A 机器配置
- 打开路由转发
echo "1">/proc/sys/net/ipv4/ip_forward
要想使用路由转发,必须要修改内核文件,打开端口转发
[root@aminglinux-02 ~]# cat /proc/sys/net/ipv4/ip_forward
0
/proc/sys/net/ipv4/ip_forward  这个文件默认是0 表示没有打开
[root@aminglinux-02 ~]# echo "1" > /proc/sys/net/ipv4/ip_forward
[root@aminglinux-02 ~]# cat /proc/sys/net/ipv4/ip_forward
1
- 增加一个规则
[root@aminglinux-02 ~]# iptables -t nat -A POSTROUTING -s 192.168.100.0/24 -o ens32 -j MASQUERADE
[root@aminglinux-02 network-scripts]# iptables -t nat -nvL
Chain PREROUTING (policy ACCEPT 0 packets, 0 bytes)
 pkts bytes target     prot opt in     out     source               destination

Chain INPUT (policy ACCEPT 0 packets, 0 bytes)
 pkts bytes target     prot opt in     out     source               destination

Chain OUTPUT (policy ACCEPT 0 packets, 0 bytes)
 pkts bytes target     prot opt in     out     source               destination

Chain POSTROUTING (policy ACCEPT 0 packets, 0 bytes)
 pkts bytes target     prot opt in     out     source               destination
    1    84 MASQUERADE  all  --  *      ens32   192.168.100.0/24     0.0.0.0/0
B 机器配置
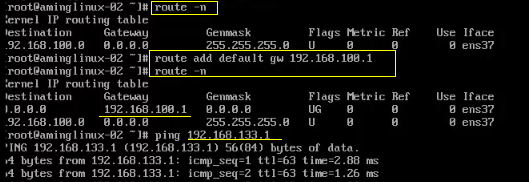
- 增加网关
因为使用 ifconfig 命令添加的 IP 地址是没有网关的,通过下图可以看到
测试连通情况
==PS:之前配置 A 机器的时候出了错误,导致一直 ping 不同外网,最后检查的时候发现,设置的网卡出错了。(因为命令也是复制 PPT 的,PPT 里面针对设置的网卡是 ens33,而我的虚拟机并没有这个网卡)==
需求二:
实现远程登录 B 机器,也就是实现宿主机 C,能 ping 通 B 机器
A 机器配置
- 一、打开端口转发
echo "1">/proc/sys/net/ipv4/ip_forward
因为之前 A 机器 B 机器互通,已经做过了,可以省略
- 二、清除原有规则
因为之前 A 机器 B 机器互通,添加有规则,先把规则清楚,不让他影响到我们之后的操作 [root@aminglinux-02 network-scripts]# iptables -t nat -D POSTROUTING -s 192.168.100.0/24 -o ens32 -j MASQUERADE [root@aminglinux-02 network-scripts]# iptables -t nat -nvL Chain PREROUTING (policy ACCEPT 0 packets, 0 bytes) pkts bytes target prot opt in out source destination
Chain INPUT (policy ACCEPT 0 packets, 0 bytes) pkts bytes target prot opt in out source destination
Chain OUTPUT (policy ACCEPT 1 packets, 76 bytes) pkts bytes target prot opt in out source destination
Chain POSTROUTING (policy ACCEPT 1 packets, 76 bytes) pkts bytes target prot opt in out source destination
- 三、新增规则
1、
iptables -t nat -A PREROUTING -d 192.168.133.131 -p tcp --dport 1122 -j DNAT --to 192.168.100.100:22
命令理解:将 192.168.133.131 端口为 1122 进来的数据转发到 192.168.100.100 端口 22
2、
iptables -t nat -A POSTROUTING -s 192.168.100.100 -j SNAT --to 192.168.133.130
命令理解:将 192.168.100.100 源 IP 转发到 192.168.133.130
B 机器配置
- 在 B 机器上增加网关
route add default gw 192.168.100.1
因为之前需求一的时候,做过这个操作,所以这一步也可以省略
- 用终端连接
做完这些操作就可以尝试在终端上进行连接
证明连接的就是 B 机器 查看一下是否能上网
[root@aminglinux-02-kl ~]# ping www.qq.com
PING www.qq.com (14.17.42.40) 56(84) bytes of data.
64 bytes from 14.17.42.40 (14.17.42.40): icmp_seq=1 ttl=127 time=23.5 ms
64 bytes from 14.17.42.40 (14.17.42.40): icmp_seq=2 ttl=127 time=23.9 ms
64 bytes from 14.17.42.40 (14.17.42.40): icmp_seq=3 ttl=127 time=23.1 ms
^C
--- www.qq.com ping statistics ---
3 packets transmitted, 3 received, 0% packet loss, time 2004ms
rtt min/avg/max/mdev = 23.187/23.574/23.945/0.309 ms
上网也是正常的
经过前面的操作,实现了 C 机器连接 A 机器,同时还能上网,完成了需求

10.15 iptables filter表案例 10.16/10.17/10.18 iptables nat表应用
10.15 iptables filter表小案例
iptables扩展选项(了解)
其实匹配扩展中,还有需要加-m引用模块的显示扩展,默认是隐含扩展,不要使用-m。
状态检测的包过滤:
-
-m state --state {NEW,ESTATBLISHED,INVALID,RELATED} 指定检测那种状态
-
-m multiport 指定多端口号
--sport
--dport
--ports -
-m iprange 指定IP段
--src-range ip-ip
--dst-range ip-ip -
-m connlimit 连接限定
--comlimit-above # 限定大连接个数 -
-m limit 现在连接速率,也就是限定匹配数据包的个数
--limit 指定速率
--limit-burst # 峰值速率,最大限定 -
-m string 按字符串限定
--algo bm|kmp 指定算法bm或kmp
--string "STRING" 指定字符串本身
规则:放行指定端口
使用脚本设定规则:
[root@cham002 ~]# iptables -nvL
Chain INPUT (policy ACCEPT 0 packets, 0 bytes)
 pkts bytes target     prot opt in     out     source               destination
 1501  116K ACCEPT     all  --  *      *       0.0.0.0/0            0.0.0.0/0            state RELATED,ESTABLISHED
    0     0 ACCEPT     icmp --  *      *       0.0.0.0/0            0.0.0.0/0
    3   240 ACCEPT     all  --  lo     *       0.0.0.0/0            0.0.0.0/0
    1    52 ACCEPT     tcp  --  *      *       0.0.0.0/0            0.0.0.0/0            state NEW tcp dpt:22
  301 37516 REJECT     all  --  *      *       0.0.0.0/0            0.0.0.0/0            reject-with icmp-host-prohibited

Chain FORWARD (policy ACCEPT 0 packets, 0 bytes)
 pkts bytes target     prot opt in     out     source               destination
    0     0 REJECT     all  --  *      *       0.0.0.0/0            0.0.0.0/0            reject-with icmp-host-prohibited

Chain OUTPUT (policy ACCEPT 446 packets, 35731 bytes)
 pkts bytes target     prot opt in     out     source               destination

[root@cham002 ~]# vi /usr/local/sbin/iptables.sh

#!/bin/bash
ipt="/usr/sbin/iptables"   # 定义一个变量——iptables命令(定义变量时尽量使用绝对路径,避免环境变量的影响)
$ipt -F                    # 清空原有规则
$ipt -P INPUT DROP
$ipt -P OUTPUT ACCEPT
$ipt -P FORWARD ACCEPT
# 上面三行是定义其默认策略
$ipt -A INPUT -m state --state RELATED,ESTABLISHED -j ACCEPT
# -m是指定检测状态,--state指定数据包状态(配合-m使用),该命令行的目的是使数据处理(通信
)更顺畅
$ipt -A INPUT -s 192.168.230.0/24 -p tcp --dport 22 -j ACCEPT
$ipt -A INPUT -p tcp --dport 80 -j ACCEPT
$ipt -A INPUT -p tcp --dport 21 -j ACCEPT
# 上面三行命令是指定放行的包的类型

[root@cham002 ~]# vim !$
vim /usr/local/sbin/iptables.sh
[root@cham002 ~]# w
 16:38:06 up 2 days,  2:06,  2 users,  load average: 0.00, 0.01, 0.05
USER     TTY      FROM             LOGIN@   IDLE   JCPU   PCPU WHAT
root     tty1                      三15   25:20m  0.11s  0.11s -bash
root     pts/0    192.168.230.1    16:25    6.00s  0.47s  0.36s w
[root@cham002 ~]# vim /usr/local/sbin/iptables.sh
[root@cham002 ~]# w
 16:38:45 up 2 days,  2:07,  2 users,  load average: 0.00, 0.01, 0.05
USER     TTY      FROM             LOGIN@   IDLE   JCPU   PCPU WHAT
root     tty1                      三15   25:21m  0.11s  0.11s -bash
root     pts/0    192.168.230.1    16:25    5.00s  0.11s  0.00s w
[root@cham002 ~]# ls
1.txt  2.txt  anaconda-ks.cfg  a.txt  awk  chamlinux  grep  sed
[root@cham002 ~]# sh /usr/local/sbin/iptables.sh
[root@cham002 ~]# iptables -nvL
Chain INPUT (policy DROP 0 packets, 0 bytes)
 pkts bytes target     prot opt in     out     source               destination
   28  1848 ACCEPT     all  --  *      *       0.0.0.0/0            0.0.0.0/0            state RELATED,ESTABLISHED
    0     0 ACCEPT     tcp  --  *      *       192.168.230.0/24     0.0.0.0/0            tcp dpt:22
    0     0 ACCEPT     tcp  --  *      *       0.0.0.0/0            0.0.0.0/0            tcp dpt:80
    0     0 ACCEPT     tcp  --  *      *       0.0.0.0/0            0.0.0.0/0            tcp dpt:21

Chain FORWARD (policy ACCEPT 0 packets, 0 bytes)
 pkts bytes target     prot opt in     out     source               destination

Chain OUTPUT (policy ACCEPT 15 packets, 1428 bytes)
 pkts bytes target     prot opt in     out     source               destination
[root@cham002 ~]# iptables -nvL
Chain INPUT (policy DROP 0 packets, 0 bytes)
 pkts bytes target     prot opt in     out     source               destination
   33  2168 ACCEPT     all  --  *      *       0.0.0.0/0            0.0.0.0/0            state RELATED,ESTABLISHED
    0     0 ACCEPT     tcp  --  *      *       192.168.230.0/24     0.0.0.0/0            tcp dpt:22
    0     0 ACCEPT     tcp  --  *      *       0.0.0.0/0            0.0.0.0/0            tcp dpt:80
    0     0 ACCEPT     tcp  --  *      *       0.0.0.0/0            0.0.0.0/0            tcp dpt:21

Chain FORWARD (policy ACCEPT 0 packets, 0 bytes)
 pkts bytes target     prot opt in     out     source               destination

Chain OUTPUT (policy ACCEPT 19 packets, 2708 bytes)
 pkts bytes target     prot opt in     out     source               destination
[root@cham002 ~]# ls /usr/local/sbin/iptables.sh
/usr/local/sbin/iptables.sh
[root@cham002 ~]# ls /usr/local/sbin/
iptables.sh
[root@cham002 ~]# cat /usr/local/sbin/iptables.sh
#!/bin/bash
ipt="/usr/sbin/iptables"
$ipt -F
$ipt -P INPUT DROP
$ipt -P OUTPUT ACCEPT
$ipt -P FORWARD ACCEPT
$ipt -A INPUT -m state --state RELATED,ESTABLISHED -j ACCEPT
$ipt -A INPUT -s 192.168.230.0/24 -p tcp --dport 22 -j ACCEPT
$ipt -A INPUT -p tcp --dport 80 -j ACCEPT
$ipt -A INPUT -p tcp --dport 21 -j ACCEPT

注意: 脚本中指定的IP如果和本主机IP不同时不要在远程端口直接运行该脚本!!!!

icmp示例#################################################################################################

[root@cham002 ~]# iptables -nvL
Chain INPUT (policy ACCEPT 0 packets, 0 bytes)
 pkts bytes target     prot opt in     out     source               destination
   28  1848 ACCEPT     all  --  *      *       0.0.0.0/0            0.0.0.0/0            state RELATED,ESTABLISHED
    0     0 ACCEPT     icmp --  *      *       0.0.0.0/0            0.0.0.0/0
    0     0 ACCEPT     all  --  lo     *       0.0.0.0/0            0.0.0.0/0
    0     0 ACCEPT     tcp  --  *      *       0.0.0.0/0            0.0.0.0/0            state NEW tcp dpt:22
    0     0 REJECT     all  --  *      *       0.0.0.0/0            0.0.0.0/0            reject-with icmp-host-prohibited

Chain FORWARD (policy ACCEPT 0 packets, 0 bytes)
 pkts bytes target     prot opt in     out     source               destination
    0     0 REJECT     all  --  *      *       0.0.0.0/0            0.0.0.0/0            reject-with icmp-host-prohibited

Chain OUTPUT (policy ACCEPT 15 packets, 1428 bytes)
 pkts bytes target     prot opt in     out     source               destination

[root@cham002 ~]# iptables -I INPUT -p icmp --icmp-type 8 -j DROP
该规则的含义是:只允许本机访问外网,不允许外网访问本机!
[root@cham002 ~]# ping www.qq.com
PING www.qq.com (59.37.96.63) 56(84) bytes of data.
^C
--- www.qq.com ping statistics ---
4 packets transmitted, 0 received, 100% packet loss, time 3000ms
ping外网可以ping通,外网ping过来是Ping不通的!!

[root@cham002 ~]# iptables -nvL
Chain INPUT (policy ACCEPT 0 packets, 0 bytes)
 pkts bytes target     prot opt in     out     source               destination
    1    60 DROP       icmp --  *      *       0.0.0.0/0            0.0.0.0/0            icmptype 8
   75  5260 ACCEPT     all  --  *      *       0.0.0.0/0            0.0.0.0/0            state RELATED,ESTABLISHED
    1    60 ACCEPT     icmp --  *      *       0.0.0.0/0            0.0.0.0/0
    0     0 ACCEPT     all  --  lo     *       0.0.0.0/0            0.0.0.0/0
    0     0 ACCEPT     tcp  --  *      *       0.0.0.0/0            0.0.0.0/0            state NEW tcp dpt:22
    0     0 REJECT     all  --  *      *       0.0.0.0/0            0.0.0.0/0            reject-with icmp-host-prohibited

Chain FORWARD (policy ACCEPT 0 packets, 0 bytes)
 pkts bytes target     prot opt in     out     source               destination
    0     0 REJECT     all  --  *      *       0.0.0.0/0            0.0.0.0/0            reject-with icmp-host-prohibited

Chain OUTPUT (policy ACCEPT 25 packets, 3136 bytes)
 pkts bytes target     prot opt in     out     source               destination
[root@cham002 ~]# iptables -D INPUT -p icmp --icmp-type 8 -j DROP
10.16-10.18 iptables nat表应用
应用1
环境:
A(cham2)机器两块网卡ens33(192.168.230.135)、ens37(192.168.100.10),ens33可以上外网,ens37仅仅是内部网络,Bcham2(2)机器只有ens37(192.168.100.100),和A机器ens37可以通信互联。
准备工作:
- 准备两台虚拟机
- A机器添加一块网卡ens37,ens37的网络连接方式选择‘VLAN1’(内网交换机连接,该模式下Windows无法与该客户端连接),开机后并设定IP为192.168.100.1
- B机器关闭原有网卡连接,新增网卡ens37,开机后设定IP为192.168.100.100(网络连接模式选择VLAN1区段,并和A机器中的ens37网卡选择相同区段)
设置ens37的IP:
- 方法1:
直接在命令行使用ifconfig命令
[root@cham002 ~]# ifconfig ens37 192.168.100.10/24
[root@cham002 ~]# ifconfig
ens33: flags=4163<UP,BROADCAST,RUNNING,MULTICAST>  mtu 1500
        inet 192.168.230.135  netmask 255.255.255.0  broadcast 192.168.230.255
        inet6 fe80::6f15:52d3:ebeb:e193  prefixlen 64  scopeid 0x20<link>
        ether 00:0c:29:b6:9f:e3  txqueuelen 1000  (Ethernet)
        RX packets 118107  bytes 59389847 (56.6 MiB)
        RX errors 0  dropped 0  overruns 0  frame 0
        TX packets 120509  bytes 41188215 (39.2 MiB)
        TX errors 0  dropped 0 overruns 0  carrier 0  collisions 0

ens33:0: flags=4163<UP,BROADCAST,RUNNING,MULTICAST>  mtu 1500
        inet 192.168.230.150  netmask 255.255.255.0  broadcast 192.168.230.255
        ether 00:0c:29:b6:9f:e3  txqueuelen 1000  (Ethernet)

ens37: flags=4163<UP,BROADCAST,RUNNING,MULTICAST>  mtu 1500
        inet 192.168.100.10  netmask 255.255.255.0  broadcast 192.168.100.255
        inet6 fe80::20c:29ff:feb6:9fed  prefixlen 64  scopeid 0x20<link>
        ether 00:0c:29:b6:9f:ed  txqueuelen 1000  (Ethernet)
        RX packets 17  bytes 5814 (5.6 KiB)
        RX errors 0  dropped 0  overruns 0  frame 0
        TX packets 57  bytes 9472 (9.2 KiB)
        TX errors 0  dropped 0 overruns 0  carrier 0  collisions 0

lo: flags=73<UP,LOOPBACK,RUNNING>  mtu 65536
        inet 127.0.0.1  netmask 255.0.0.0
        inet6 ::1  prefixlen 128  scopeid 0x10<host>
        loop  txqueuelen 1  (Local Loopback)
        RX packets 164  bytes 13656 (13.3 KiB)
        RX errors 0  dropped 0  overruns 0  frame 0
        TX packets 164  bytes 13656 (13.3 KiB)
        TX errors 0  dropped 0 overruns 0  carrier 0  collisions 0
注: 该方法只是临时设定IP,重启后会丢失
- 方法2: 复制ens33的配置文件,然后在配置文件内进行设置!
需求:
-
需求1: 可以让B机器连接外网
- 步骤一:A机器打开路由转发
[root@cham002 ~]# cat /proc/sys/net/ipv4/ip_forward 0 [root@cham002 ~]# echo "1" > !$ echo "1" > /proc/sys/net/ipv4/ip_forward [root@cham002 ~]# cat /proc/sys/net/ipv4/ip_forward 1 - 步骤二:在A机器的nat表中增加一条规则
-
[root@cham002 ~]# iptables -t nat -A POSTROUTING -s 192.168.100.0/24 -o ens33 -j MASQUERADE
[root@cham002 ~]# iptables -t nat -nvL
Chain PREROUTING (policy ACCEPT 0 packets, 0 bytes)
 pkts bytes target     prot opt in     out     source               destination

Chain INPUT (policy ACCEPT 0 packets, 0 bytes)
 pkts bytes target     prot opt in     out     source               destination

Chain OUTPUT (policy ACCEPT 0 packets, 0 bytes)
 pkts bytes target     prot opt in     out     source               destination

Chain POSTROUTING (policy ACCEPT 0 packets, 0 bytes)
 pkts bytes target     prot opt in     out     source               destination
    0     0 MASQUERADE  all  --  *      ens33   192.168.100.0/24     0.0.0.0/0
说明: -o 选项后面跟设备名称,表示出口网卡,MASQUERADE是伪装、冒充的意思。
- 步骤三:为B设置网关为A机器ens37的IP:

- 然后使用ping命令检测,网络通畅!
注: 此时B机器可以连通外网,但是外网机器无法访问B机器,A机器的作用就类似于一个路由器!
- 步骤一:A机器打开路由转发
-
需求2: C机器只能和A通信,让C机器可以直接连通B机器的22端口(端口映射)
- 步骤一:A机器打开路由转发
[root@cham002 ~]# echo "1" > /proc/sys/net/ipv4/ip_forward 该命令是更改内核设置,打开路由转发功能,默认值是0. - 步骤二:在A机器的nat表中增加2条规则(执行该步骤前先清除nat表原有规则)
[root@cham002 ~]# iptables -t nat -D POSTROUTING -s 192.168.100.0/24 -o ens33 -j MASQUERADE规则1: [root@cham002 ~]# iptables -t nat -A PREROUTING -d 192.168.230.135 -p tcp --dport 1122 -j DNAT --to 192.168.100.100:22 规则2: [root@cham002 ~]# iptables -t nat -A POSTROUTING -s 192.168.100.100 -j SNAT --to 192.168.230.135 - 步骤三:为B设置网关为A机器ens37的IP:
-
[root@cham002 ~]# route add default gw 192.168.100.10finishi 打开xshell连接1122端口
10.19 iptables规则备份和恢复
备份(另存为)
命令:iptables-save
[root@cham002 ~]# iptables-save > /tmp/ipt.txt
恢复
[root@cham002 ~]# iptables-restore < /tmp/ipt.txt© 著作权

10.15 iptables filter表案例, iptables nat表应用
iptables常用知识回顾点
- iptables -I/-A/-D 后紧跟 链 ,可以是INPUT,OUTPUT,FORWARD
- -I 插入
- -A 添加
- -D 删除
- iptables -P 用来指定 链的默认策略 --------最好不要直接操作,否则会造成远程的终端断开
iptables案例
需求:
把80,22,21端口放行,但22端口指定一个IP段,只允许这个IP段的IP访问的时候,才可访问到,其他段的一概拒绝; 使用脚本来实现
RELATED状态,这是一个边缘的一个状态
比如:客户端和服务端相互了通信,建立完连接之后,还会有一些额外的链接出来,这时候状态就变成了RELATED(若紧紧只有ESTABLISHED,而没有RELATED,很有可能导致其他的通信被禁掉,因为默认策略是INPUT,DROP)
ESTABLISHED状态, 保持连接
有时,在没有增加-m --state这条规则,导致增加了80或21端口,但是不能正常通信,加这条规则的目的是为了让通信更加顺畅
编辑脚本
[root@linux-128 ~]# vim /usr/local/sbin/iptables.sh
添加内容:
#! /bin/bash
ipt="/usr/sbin/iptables"
#这里ipt是定义个一个变量(写脚本的时候,写全局的路径,就是绝对路径,就是后面再加载它,用变量去代替,看着更加简单)

$ipt -F
#清空之前的规则——>在没有 -t 指定表的时候,默认的就是filter表
$ipt -P INPUT DROP
#把IPPUT的策略给扔掉

$ipt -P OUTPUT ACCEPT
#把OUTPUT放行

$ipt -P FORWARD ACCEPT
#把FORWARD放行

$ipt -A INPUT -m state --state RELATED,ESTABLISHED -j ACCEPT
#增加规则,-m  --state 指定了状态,并针对这些状态放行(-m  --state这种用法并不多见,但是这条规则必须写进来,目的是让相关>的数据包放行)

$ipt -A INPUT -s 192.168.1.88/24 -p tcp --dport 22 -j ACCEPT
#把该网段的22端口数据包放行——>这里的IP段根据自己的IP段来做实验

$ipt -A INPUT -p tcp --dport 80 -j ACCEPT
#把80端口数据包放行

$ipt -A INPUT -p tcp --dport 21 -j ACCEPT
#把21端口数据包放行
执行脚本:
[root@linux-128 ~]# sh /usr/local/sbin/iptables.sh
[root@linux-128 ~]# iptables -nvL
Chain INPUT (policy DROP 0 packets, 0 bytes)
 pkts bytes target     prot opt in     out     source               destination
   30  2148 ACCEPT     all  --  *      *       0.0.0.0/0            0.0.0.0/0            state RELATED,ESTABLISHED
    0     0 ACCEPT     tcp  --  *      *       192.168.1.0/24     0.0.0.0/0            tcp dpt:22
    0     0 ACCEPT     tcp  --  *      *       0.0.0.0/0            0.0.0.0/0            tcp dpt:80
    0     0 ACCEPT     tcp  --  *      *       0.0.0.0/0            0.0.0.0/0            tcp dpt:21

Chain FORWARD (policy ACCEPT 0 packets, 0 bytes)
 pkts bytes target     prot opt in     out     source               destination

Chain OUTPUT (policy ACCEPT 18 packets, 1816 bytes)
 pkts bytes target     prot opt in     out     source               destination
注意:为什么这里要用脚本:因为这里有INPUT DROP,肯定要把你的远程连接给断开,所以需要执行脚本把你的命令批量执行。
icmp示例
- iptables -I INPUT -p icmp --icmp-type 8 -j DROP
这个规则会产生一个效果,让你ping外面的机器可以ping通,但外面ping本机的时候,就不会通了
[root@linux-128 ~]#iptables -I INPUT -p icmp --icmp-type 8 -j DROP
注意:这里会发现可ping通外面的网络,但自己的虚拟机和物理机则无法连接
[root@linux-128 ~]# ping www.baidu.com
PING www.a.shifen.com (180.97.33.107) 56(84) bytes of data.
64 bytes from 180.97.33.107 (180.97.33.107): icmp_seq=1 ttl=128 time=17.4 ms
64 bytes from 180.97.33.107 (180.97.33.107): icmp_seq=2 ttl=128 time=17.5 ms
64 bytes from 180.97.33.107 (180.97.33.107): icmp_seq=3 ttl=128 time=17.8 ms
^C
--- www.a.shifen.com ping statistics ---
3 packets transmitted, 3 received, 0% packet loss, time 2004ms
rtt min/avg/max/mdev = 17.403/17.614/17.895/0.206 ms
这时用自己的物理机去ping虚拟机,会发现无法连接

这时,再来删除这条命令
[root@linux-128 ~]# iptables -D INPUT -p icmp --icmp-type 8 -j DROP
iptables: Bad rule (does a matching rule exist in that chain?).
- service iptables restart
重启iptables服务
[root@linux-128 ~]# service iptables restart    //重启iptables服务
Redirecting to /bin/systemctl restart  iptables.service
[root@linux-128 ~]# iptables -nvL      //这里会看到还没禁掉之前的规则
Chain INPUT (policy ACCEPT 0 packets, 0 bytes)
 pkts bytes target     prot opt in     out     source               destination
   81  6996 ACCEPT     all  --  *      *       0.0.0.0/0            0.0.0.0/0
    0     0 ACCEPT     icmp --  *      *       0.0.0.0/0            0.0.0.0/0
    0     0 ACCEPT     all  --  lo     *       0.0.0.0/0            0.0.0.0/0
    0     0 ACCEPT     tcp  --  *      *       0.0.0.0/0            0.0.0.0/0
    0     0 REJECT     all  --  *      *       0.0.0.0/0            0.0.0.0/0

Chain FORWARD (policy ACCEPT 0 packets, 0 bytes)
 pkts bytes target     prot opt in     out     source               destination
    0     0 REJECT     all  --  *      *       0.0.0.0/0            0.0.0.0/0

Chain OUTPUT (policy ACCEPT 61 packets, 6060 bytes)
 pkts bytes target     prot opt in     out     source               destination
这里物理机去ping虚拟机IP,会发现再次ping通
注意:这里的物理机和虚拟机不通,并不是指不能连接,这里仅仅是做了一个禁ping而已(是可以ping通外网的,但别人无法ping通你)

11.30 iptables filter表案例 iptables nat表应用
10.15 iptables filter表案例
iptables小案例
vi /usr/local/sbin/iptables.sh //加入如下内容
#! /bin/bash
ipt="/usr/sbin/iptables"
$ipt -F
$ipt -P INPUT DROP
$ipt -P OUTPUT ACCEPT
$ipt -P FORWARD ACCEPT
$ipt -A INPUT -m state --state RELATED,ESTABLISHED -j ACCEPT   //加此行是为了让通信更加顺畅
$ipt -A INPUT -s 192.168.133.0/24 -p tcp --dport 22 -j ACCEPT
$ipt -A INPUT -p tcp --dport 80 -j ACCEPT
$ipt -A INPUT -p tcp --dport 21 -j ACCEPT
icmp示例
iptables -I INPUT -p icmp --icmp-type 8 -j DROP
需求:只针对filter表,预设策略INPUT链DROP,其他两个链ACCEPT,然后针对192.168.133.0/24开通22端口,对所有网段开放80端口,对所有网段开放21端口。这个需求不算复杂,但是因为有多条规则,所以最好写成脚本的形式。脚本内容如上所示。
完成脚本的编写后,直接运行 /bin/sh /usr/local/sbin/iptables.sh 即可。如果想开机启动时初始化防火墙规则,则需要在 /etc/rc.d/rc.local 中添加一行 “/bin/sh /usr/local/sbin/iptables.sh”
[root@localhost ~]# sh /usr/local/sbin/iptables.sh
[root@localhost ~]# iptables -nvL
运行脚本后,查看规则就是这样的,可以看到第一条规则中已经有20个包(第一列)被放行过了。
关于icmp的包有一个比较常见的应用:
[root@localhost ~]# iptables -I INPUT -p icmp --icmp-type 8 -j DROP
--icmp-type 这个选项是要跟-p icmp 一起使用的,后面指定类型编号。这个8指的是能在本机ping通其他机器,而其他机器不能ping通本机。这个有必要记一下。
10.16/10.17/10.18 iptables nat表应用
nat表应用
A机器两块网卡ens33(192.168.133.130)、ens37(192.168.100.1),ens33可以上外网,ens37仅仅是内部网络,B机器只有ens37(192.168.100.100),和A机器ens37可以通信互联。
需求1:可以让B机器连接外网
A机器上打开路由转发 echo "1">/proc/sys/net/ipv4/ip_forward
A上执行 iptables -t nat -A POSTROUTING -s 192.168.100.0/24 -o ens33 -j MASQUERADE
B上设置网关为192.168.100.1
需求2:C机器只能和A通信,让C机器可以直接连通B机器的22端口
A上打开路由转发echo "1">/ proc/sys/net/ipv4/ip_forward
A上执行iptables -t nat -A PREROUTING -d 192.168.133.130 -p tcp --dport 1122 -j DNAT --to 192.168.100.100:22
A上执行iptables -t nat -A POSTROUTING -s 192.168.100.100 -j SNAT --to 192.168.133.130
B上设置网关为192.168.100.1
![]()
ifconfig ens37 192.168.100.1/24
ifconfig ens37 192.168.100.100/24
//临时设置网卡ip
其实,linux的iptables功能是十分强大的,可以这样形容linux的网络功能:只有想不到没有做不到!也就是说只要能够想到的关于网络的应用,linux都能实现。在日常生活中相信接触过路由器吧,它的功能就是分享上网。本来一根网线过来(其实只有一个公网IP),通过路由器后,路由器分配了一个网段(私网IP),这样连接路由器的多台pc都能连接intnet而远端的设备认为IP就是那个连接路由器的公网IP。这个路由器的功能其实就是由linux的iptables实现的,而iptables又是通过nat表作用而实现的这个功能。
举一个例子来说明iptables如何实现的这个功能。假设机器上有两块网卡eth0和eth1,其中eth0的IP为10.0.2.68 ,eth1的IP为192.168.1.1 。eth0连接了intnet 但eth1没有连接,现在有另一台机器(192.168.1.2)和eth1是互通的,那么如何设置也能够让连接eth1的这台机器能够连接intnet(即能和10.0.2.68互通)?
[root@localhost ~]# echo "1" > /proc/sys/net/ipv4/ip_forward
[root@localhost ~]# iptables -t nat -A POSTROUTING -s 192.168.1.0/24 -o eth0 -j MASQUERADE
就是这样简单的两条命令就能实现上面的需求。第一个命令涉及到了内核参数相关的配置文件,它的目的是为了打开路由转发功能,否则无法实现我们的应用。第二个命令则是iptables对nat表做了一个IP转发的操作,-o 选项后跟设备名,表示出口的网卡,MASQUERADE表示伪装的意思。 关于nat表,只要学会这个路由转发即可。
vi /etc/resolv.conf

今天关于CentOS 6 iptables 开放端口80 3306 22等和centos7 iptables开放端口的介绍到此结束,谢谢您的阅读,有关10.15 iptables filter 表小案例 10.16/10.17/10.18 iptables nat 表应用、10.15 iptables filter表案例 10.16/10.17/10.18 iptables nat表应用、10.15 iptables filter表案例, iptables nat表应用、11.30 iptables filter表案例 iptables nat表应用等更多相关知识的信息可以在本站进行查询。
本文标签:


