如果您想了解在Swift中使用AutoLayout-VFL(AutoLayout-VFL笔记)和swiftautolayout的知识,那么本篇文章将是您的不二之选。我们将深入剖析在Swift中使用Au
如果您想了解在Swift中使用AutoLayout-VFL(AutoLayout-VFL笔记)和swift autolayout的知识,那么本篇文章将是您的不二之选。我们将深入剖析在Swift中使用AutoLayout-VFL(AutoLayout-VFL笔记)的各个方面,并为您解答swift autolayout的疑在这篇文章中,我们将为您介绍在Swift中使用AutoLayout-VFL(AutoLayout-VFL笔记)的相关知识,同时也会详细的解释swift autolayout的运用方法,并给出实际的案例分析,希望能帮助到您!
本文目录一览:- 在Swift中使用AutoLayout-VFL(AutoLayout-VFL笔记)(swift autolayout)
- Android五大布局:FrameLayout、LinearLayout、AbsoluteLayout、RelativeLayout和TableLayout
- Auto Layout + Manual Layout 混用
- Auto Layout 使用心得(三)—— 自定义 cell 并使用 Auto Layout
- Autolayout
(swift autolayout)")
在Swift中使用AutoLayout-VFL(AutoLayout-VFL笔记)(swift autolayout)
1.背景
iOS开发这几年, UI布局工具从frame到Masonry到SnapKit, sb和xib的AutoLayout也用过, 但是代码版本的AutoLayout倒是没用过, 最近一年, 频频发现一些三方UI组件布局的bug, 作为三方组件不可能去依赖另一个三方的kayout仓库, 所以只能通过代码的AutoLayout来解决. 好吧, 最近我忍不了了, 于是乎就开始学习代码版本的AutoLayout.
学习目标: 不追求用的多么熟练, 至少要会用, 能够看懂别人的布局代码是怎么回事, 能够找别人布局代码的问题出在哪里.
2.入门
首先需要知道, 在cocoa touch中, 有三种布局方式: Manual layout,Autoresizing,Autolayout, 这里要讲解的是第三个AutoLayout. 要想使用代码布局AutoLayout, 首先需要设置translatesAutoresizingMaskIntoConstraints=false, 原因见API注释:
/* By default, the autoresizing mask on a view gives rise to constraints that fully determine
     the view''s position. This allows the auto layout system to track the frames of views whose
     layout is controlled manually (through -setFrame:, for example).
     When you elect to position the view using auto layout by adding your own constraints,
     you must set this property to NO. IB will do this for you.
     */
    @available(iOS 6.0, *)
    open var translatesAutoresizingMaskIntoConstraints: Bool // Default YES
如果不这样设置, 则在运行时候会得到如下的警告(没有编译警告):

3.第一种AutoLayout的实现方法
API中NSLayoutConstraint.init的方法如下定义如下所示:
/*
//NSLayoutConstraint初始化方法在API中的定义:
/* Create constraints explicitly.  Constraints are of the form "view1.attr1 = view2.attr2 * multiplier + constant"
     If your equation does not have a second view and attribute, use nil and NSLayoutAttributeNotAnAttribute.
     */
    public convenience init(item view1: Any, attribute attr1: NSLayoutAttribute, relatedBy relation: NSLayoutRelation, toItem view2: Any?, attribute attr2: NSLayoutAttribute, multiplier: CGFloat, constant c: CGFloat)

item:            指定约束左边的视图view1
attribute:      指定view1的属性attr1,具体见上述枚举值。
relatedBy:     指定左右两边的视图的关系relation,具体见上述枚举值。
toItem:         指定约束右边的视图view2 (可以设置为nil,则attribute=.attribute)
attribute:      指定view2的属性attr2,具体见上述枚举值。
multiplier:     指定一个与view2属性相乘的乘数multiplier
constant:      指定一个与view2属性相加的浮点数constant
*/


public enum NSLayoutRelation : Int {
    case lessThanOrEqual
    case equal
    case greaterThanOrEqual
}

public enum NSLayoutAttribute : Int {
    case left            //左边
    case right
    case top            //顶部
    case bottom
    case leading       //前面
    case trailing        //后面
    case width
    case height
    case centerX
    case centerY
    case lastBaseline
    @available(iOS 8.0, *)
    case firstBaseline
    @available(iOS 8.0, *)
    case leftMargin
    @available(iOS 8.0, *)
    case rightMargin
    @available(iOS 8.0, *)
    case topMargin
    @available(iOS 8.0, *)
    case bottomMargin
    @available(iOS 8.0, *)
    case leadingMargin
    @available(iOS 8.0, *)
    case trailingMargin
    @available(iOS 8.0, *)
    case centerXWithinMargins
    @available(iOS 8.0, *)
    case centerYWithinMargins
    case notAnAttribute
}
left和leading的不同之处, 详见stackoverflow: Difference between NSLayoutAttributeLeft vs NSLayoutAttributeLeading
**一个简单的,设置view约束的示例: **
let leftLayout = NSLayoutConstraint(item: blueView,
                                    attribute: .left,
                                    relatedBy: .equal,
                                    toItem: view,
                                    attribute: .left,
                                    multiplier: 1,
                                    constant: 20)
let topLayout = NSLayoutConstraint(item: blueView,
                                   attribute: .top,
                                   relatedBy: .equal,
                                   toItem: redView,
                                   attribute: .bottom,
                                   multiplier: 1,
                                   constant: 30)
let heightLayout = NSLayoutConstraint(item: blueView,
                                      attribute: .height,
                                      relatedBy: .equal,
                                      toItem: nil,
                                      attribute: .notAnAttribute,
                                      multiplier: 1,
                                      constant: 100)
let rightLayout = NSLayoutConstraint(item: blueView,
                                     attribute: .right,
                                     relatedBy: .equal,
                                     toItem: view,
                                     attribute: .right,
                                     multiplier: 1,
                                     constant: -10)
view.addConstraints([leftLayout, topLayout, heightLayout, rightLayout])
毋庸置疑, NSLayoutConstraint非常强大, 但是代码量也同样非常大, 简单一个view的约束就要写将近30行代码. 其实cocoa touch团队已经想到了这点, 他们为我们提供了另一种更简单的方法, 那就是VFL !
4.第二种实现AutoLayout的方法: VFL(Visual Format Language)
VFL是苹果公司为了简化autolayout的编码而推出的抽象语言。
4.1 了解VFL
VFL(Visual Format Language): “可视化格式语言”, 苹果公司为了简化autolayout的编码而推出的抽象语言.
基本语法表
| 功能 | 表达式 |
|---|---|
| 水平方向 | H: |
| 垂直方向 | V: |
| Views | [view] |
| 关系 | >=,==,<= |
| SuperView | | |
| 空间,间隙 - | - |
| 优先级 | @value |
举几个列子:
例子1: H:|-20-[view1(50)]-11-[view2]-20-|
设置水平方向的布局, view1距离superView左边20个单位, view1的宽度是50, view1的右边是view2, view1和view2的距离是11个单位长度, view2距离superView右边20个单位长度.
列子2:H:[wideView(>=60@700)]
wideView宽度大于等于60point,该约束条件优先级为700(优先级最大值为1000,优先级越高的约束条件越先被满足)
`例子3:V:|-20-[redBox(50)]-20-[yellowBox(==redBox)]``
垂直方向上, redBox距离上面20个单位, redBox的高度是50个单位, redBox右边20个单位之外是yellowBox, yellowBox的高度和redBox的高度相等.
4.2 代码示例
NSLayoutConstraint.constraints在API中的定义如下所示,
/* Create an array of constraints using an ASCII art-like visual format string.
     */
    open class func constraints(withVisualFormat format: String, options opts: NSLayoutFormatOptions = [], metrics: [String : Any]?, views: [String : Any]) -> [NSLayoutConstraint]

    /* This macro is a helper for making view dictionaries for +constraintsWithVisualFormat:options:metrics:views:.
     NSDictionaryOfVariableBindings(v1, v2, v3) is equivalent to [NSDictionary dictionaryWithObjectsAndKeys:v1, @"v1", v2, @"v2", v3, @"v3", nil];
     */


format:VFL语句
opts:约束类型
metrics:VFL语句中用到的具体数值
views:VFL语句中用到的控件

创建一个字典(内部包含VFL语句中用到的控件)的快捷宏定义
NSDictionaryOfVariableBindings(...)
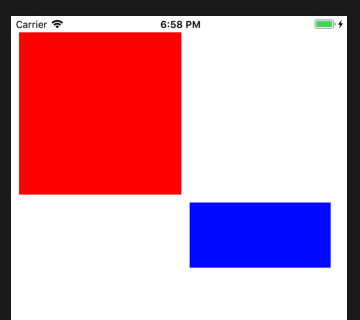
如下是设置redView和greenView的一个代码示例, VFL支持同时设置多个view的约束, 也支持设置相对约束.
let redView = UIView()
redView.backgroundColor = UIColor.red
redView.translatesAutoresizingMaskIntoConstraints = false
let blueView = UIView()
blueView.backgroundColor = UIColor.blue
blueView.translatesAutoresizingMaskIntoConstraints = false
view.addSubview(redView)
view.addSubview(blueView)

 //设置redView的constraints
view.addConstraints(NSLayoutConstraint.constraints(withVisualFormat: "H:|-10-[view(200)]",
                                                   options: NSLayoutFormatOptions(),
                                                   metrics: nil,
                                                   views: ["view": redView]))
view.addConstraints(NSLayoutConstraint.constraints(withVisualFormat: "V:|-20-[view(200)]",
                                                   options: NSLayoutFormatOptions(),
                                                   metrics: nil,
                                                   views: ["view": redView]))


//设置blueView的约束, 此时blueView的约束是相对于redView来设置
//实际上, 可以同时设置redView和blueView的约束, 这里拆开是为了测试VFL支持相对约束
let hMetrics = ["middleSpace": 10, "rightSpace": 20]
let hViews = ["redView": redView, "blueView": blueView]
let hVFL = "H:[redView]-middleSpace-[blueView]-rightSpace-|"
view.addConstraints(NSLayoutConstraint.constraints(withVisualFormat: hVFL,
                                                   options: NSLayoutFormatOptions()
                                                   metrics: hMetrics,
                                                   views: hViews))
let vMetrics = ["topSpace": 10, "height": 80]
let vViews = hViews
let vVFL = "V:[redView]-topSpace-[blueView(height)]"
view.addConstraints(NSLayoutConstraint.constraints(withVisualFormat: vVFL,
                                                   options: NSLayoutFormatOptions()
                                                   metrics: vMetrics,
                                                   views: vViews))
4.3 使用规则(来自网络)
|: 表示父视图
-:表示距离
V: :表示垂直
H: :表示水平


= :表示视图间距、宽度和高度必须大于或等于某个值
<= :表示视图间距、宽度和高度必须小宇或等于某个值
== :表示视图间距、宽度或者高度必须等于某个值
@ :>=、<=、== 限制 最大为 1000
|-[view]-|: 视图处在父视图的左右边缘内
|-[view] : 视图处在父视图的左边缘
|[view] : 视图和父视图左边对齐
-[view]- : 设置视图的宽度高度
|-30.0-[view]-30.0-|: 表示离父视图 左右间距 30
[view(200.0)] : 表示视图宽度为 200.0
|-[view(view1)]-[view1]-| :表示视图宽度一样,并且在父视图左右边缘内
V:|-[view(50.0)] : 视图高度为 50
V:|-(==padding)-[imageView]->=0-[button]-(==padding)-| : 表示离父视图的距离
为Padding,这两个视图间距必须大于或等于0并且距离底部父视图为 padding。
[wideView(>=60@700)] :视图的宽度为至少为60 不能超过 700
如果没有声明方向默认为 水平 V:
转载请注明出处!

Android五大布局:FrameLayout、LinearLayout、AbsoluteLayout、RelativeLayout和TableLayout
Android SDK 定义了多种布局方式以方便用户设计 UI。各种布局方式均为 ViewGroup 类的子类,结构如图 1 所示。

图 1 Android SDK 布局方式结构图
以下将对 FrameLayout(单帧布局)、LinearLayout(线性布局)、AbsoluteLayout(绝对布局)、RelativeLayout(相对布局)和TableLayout(表格布局)进行简单的介绍。
LinearLayout(线性布局)
- 线性布局(LinearLayout)主要以水平或垂直方式来显示界面中的控件。
- 当控件水平排列时,显示顺序依次为从左到右;
- 当控件垂直排列时,显示顺序依次为从上到下。
- 线性布局中,每行或每列中只允许有一个子视图或控件。
-
LinearLayout的最主要的属性有:
-
android:gravity:设置内部控件的显示位置。
-
android:orientation:设置内部控件的排列方向,常量horizontal(默认值)表示水平排列,vertical表示垂直排列。
-
android:layout_weight:设置内部控件在LinearLayout中所占的权重。
-
-
注意:当控件使用权重属性时,布局宽度或高度属性值通常设置为0。
-
所有的组件都有一个 layout_weight 值,默认为0。意思是需要显示多大的视图就占据多大的屏幕空间。
-
若赋值为大于 0 的值,则将可用的空间分割,分割的大小取决于当前的 layout_weight 数值与其他空间的 layout_weight 值的比率,即权重。
-
实例 LinearLayoutDemo 演示了 LinearLayout 布局的使用方法,效果如下图所示。
- 点击Layout,右键New->Layout resource file,给这个布局起一个名字。


- 新建了一个two.xml->点击Design->拖拽Button(3个)->形成如下图:


- 按住Ctrl,点击图中三个Button,再点击右侧菜单中layout_width的下拉菜单,将match_parent改为wrap_content,形成如图:


- 点击Text,查看相关代码,如下:
 1 <?xml version="1.0" encoding="utf-8"?>
 2 <LinearLayout xmlns:android="http://schemas.android.com/apk/res/android"
 3     android:orientation="vertical"
 4     android:layout_width="match_parent"
 5     android:layout_height="match_parent">
 6
 7     <Button
 8         android:id="@+id/button7"
 9         android:layout_width="wrap_content"
10         android:layout_height="wrap_content"
11         android:text="Button" />
12
13     <Button
14         android:id="@+id/button8"
15         android:layout_width="wrap_content"
16         android:layout_height="wrap_content"
17         android:text="Button" />
18
19     <Button
20         android:id="@+id/button10"
21         android:layout_width="wrap_content"
22         android:layout_height="wrap_content"
23         android:text="Button" />
24 </LinearLayout>
- 将第三行的vertical,改为horizontal,可以看到一改完这个界面就变成水平排列的了。
- LinearLayout 布局通过 android:orientation="horizontal" 属性将布局设置为横向线性排列。
- LinearLayout 布局通过 android:orientation="vertical" 属性将布局设置为纵向线性排列。

- 在上面的代码第三与第四行之间添加一句:android:gravity="center",可以看到三个button就居中了(左图),而改为android:gravity="center_horizontal",可以看到三个button就水平居中了(右图)。


将源代码改为如下:
 1 <?xml version="1.0" encoding="utf-8"?>
 2 <LinearLayout xmlns:android="http://schemas.android.com/apk/res/android"
 3     android:orientation="vertical"
 4     android:gravity="center"
 5     android:layout_width="match_parent"
 6     android:layout_height="match_parent">
 7
 8     <Button
 9         android:id="@+id/button7"
10         android:layout_weight="1"
11         android:layout_width="wrap_content"
12         android:layout_height="0dp"
13         android:text="Button" />
14
15     <Button
16         android:id="@+id/button8"
17         android:layout_weight="1"
18         android:layout_width="wrap_content"
19         android:layout_height="0dp"
20         android:text="Button" />
21
22     <Button
23         android:id="@+id/button10"
24         android:layout_weight="1"
25         android:layout_width="wrap_content"
26         android:layout_height="0dp"
27         android:text="Button" />
28 </LinearLayout>

- 你可能会奇怪,每一个button中有两个android:layout_weight,
- 第一个则是每个button在其中所占的权重,而上面有三个,每个都为1,则每个的权重即:每个权重(即1)/所有权重的和(即3),也就是1/3;如上图所示!!!
- 第二个wrap_content:是layout_width和layout_height的属性值之一,表示和自身内容一样的长度。
- LinearLayout 布局可使用嵌套。活用 LinearLayou 布局可以设计出各种各样漂亮的布局方式。

Auto Layout + Manual Layout 混用
约束代码混用的问题
无数人趟过此坑,大部分人在坑中一蹶不振,小部分人爬起来也是跌跌撞撞。
有很多人都说 auto layout 和 manual layout 的坐标设置是不能混用的,会导致出现布局问题。首先声明一点,autolayout 和 manuallayout 是可以混用的。用的时机很重要,auto layout 和 manual layout 有各自的生命周期和作用域,区分他们两个的作用时间很关键,头脑中一定要清楚你所添加的每条约束,在什么时间场合,会造成什么后果。否则,布局就会和预想的不同,各种奇怪的布局问题也就接踵而至。
1) 视图的生命周期顺序
我们在 controller 视图上面用 auto layout 添加了一个 subview,并在各个系统调用声明周期方法中做了打印处理,结果如下:
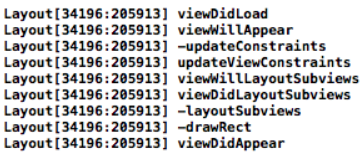
其中前面带有 “-” 符号的表示的是 subview 视图的打印。
autolayout 的作用范围是从上往下第三个方法 - updateConstraints 一直到 viewDidLayoutSubviews, 这期间,系统是通过 view 上的约束来计算 view 上的布局。而我们一般习惯将布局写在 viewDidLoad 里面,这就是我们为什么总是无法用 manual layout 的方法去修改我们的布局。
要想修改布局,必须要在 autolayout 结束之后才会起作用,否则会被系统将我们的布局按照 autolayout 重新刷新,从上面我们可以看到,我们可以在子视图的 - layoutSubviews 和 - drawRect 方法里面修改子视图的布局,但是一般视图为了重用不会在自己的类里面将 frame 写死,这样我们只有通过 controller 的 viewDidAppear 方法修改视图的 frame。但是这样也有问题,在 viewDidAppear 里面修改布局,我们可以看到一个明显的延迟,系统调用次序使然,我们无法去改变。除此之外,如果我们更新了视图的 autolayout,会导致视图重新调用 updateViewConstraints 方法,viewDidAppear 在进入页面的时候却只调用一次,结果就是 subview 又恢复了原来的样子。
所以我的建议就是不要同时 manual layout+auto layout 去控制同一个视图。始终记得如果用了 auto layout 去控制了一个视图,那么就要坚持用下去。
2) 何为混用
我觉得混用的说法不是对于某一个视图说的,是说我们整个布局当中交叉使用了 manual layout + auto layout,比如我们可以用 auto layout 布局 viewA,然后用 manual layout 布局 B,然后将 A 与 B 用两者其一的方式,添加到共同的父 viewC 上,这就是我所认为的混用。
那么它的意义是什么呢?不同 view 的复杂度决定了我们采取哪种方式来对其布局,我们在开发中有可能会遇到某些流式的布局,我们用 autolayout 可以行云流水,但是对于某个视图当中极其复杂的小控件的布局,auto layout 显然要写不少的一大段,当两者组合时也就是混用的意义所在。
3) 如何混用
混用的风险其实一点不比它带来的好处小,首先解释一个名字
NSAutoresizingMaskLayoutConstraint
这个类型和 NSLayoutConstraint 功能类似,它是个私有类,我们无法获取到,因为苹果 ios6 之后推出了 auto layout 技术,但是还想兼容原来的 autoresizing,所以它将 autoresizing 转化为了约束,转化后的约束类型就是 NSAutoresizingMaskLayoutConstraint,这就有可能导致系统为我们添加了许多我们无法预料的约束。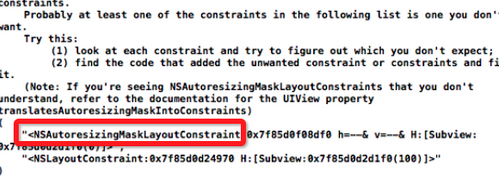
我们有时候会发现我们的约束没有写全,但是布局却很好,千万不要太得意,这只是系统帮你完成你该做的,这种情况固然对我们有好处。但是在 manual layout + auto layout 布局中就会发生大问题,系统不懂我们是在故意不写它的约束(因为我们打算手动布局这一块的视图),它就默默帮我们加上了谁都不知道的约束,并为自己的机智暗自欣喜。我们要明确告诉它我不需要你的帮助才行。
UIView 里 translatesAutoresizingMaskIntoConstraints 属性就是用来控制是否允许系统做这样的转化,默认是 YES。所以我们要把它设置为 NO,然后将你漏掉的约束统统加上。
怎样算作完备的约束呢,我的建议是把视图层次分清楚,每个层次系统内部使用统一的布局方案,并保证系统内的的约束完整。
这是一个视图的层级拓扑结构(原谅我又盗图了,凑合看吧),如果我打算在做黄箭头位置的视图布局时采用 auto layout,其他采用 manual layout 那么我只需保证它及它下面的两个子视图之间的约束完整就可以了,他们三个可以当做一个小的系统,系统内的约束只与他们自己相关,像下面两个红线连接的视图间的约束就是不允许添加的。

图:错误的约束关系
4) 最后
以上就是我想说的,混用这种手段还是希望大家谨慎使用为好,最后总结一下混用的关键点
1. 首先要确保在你打算使用手写 auto layout 为 view 布局前,将其 translatesAutoresizingMaskIntoConstraints 属性设为 NO
2. 不要用对同一个视图同时使用 manual layout + auto layout
3. 确保你的约束在其系统内完整无缺失。
—— 自定义 cell 并使用 Auto Layout")
Auto Layout 使用心得(三)—— 自定义 cell 并使用 Auto Layout
此系列文章代码仓库在 https://github.com/johnlui/AutoLayout ,有不明白的地方可以参考我的 Auto Layout 设置哦,下载到本地打开就可以了。
简介
本篇中我们将尝试自定义一个 UITableViewCell,并使用 Auto Layout 对其进行约束。
自定义 cell 基础
在前面的项目中,我们采用 StoryBoard 来组织页面,StoryBoard 可以视为许多个 xib 的集合,所以我们可以得到两个信息:
- 这个项目通过初始化主 StoryBoard 文件来展现 APP,而 UIViewController 类文件是通过 StoryBoard 文件的绑定来初始化并完成功能的。
- 我们可以创建新的 StoryBoard 文件或者新的 xib 文件来构造 UI,然后动态地加载进页面。
创建文件
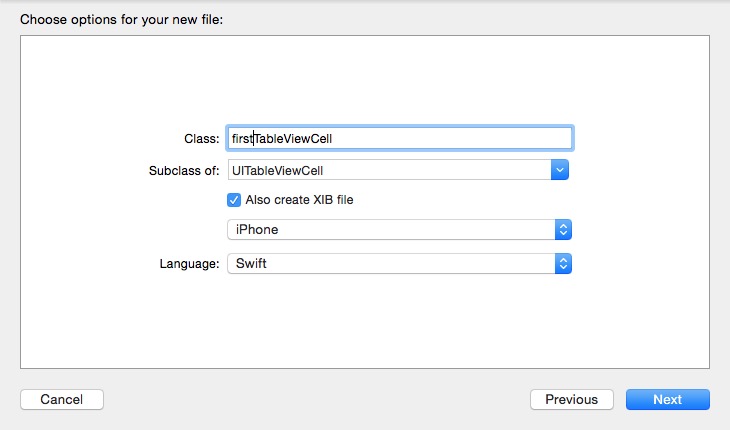
我们可以一次性创建 xib 文件和类的代码文件。
新建 Cocoa Touch Class:
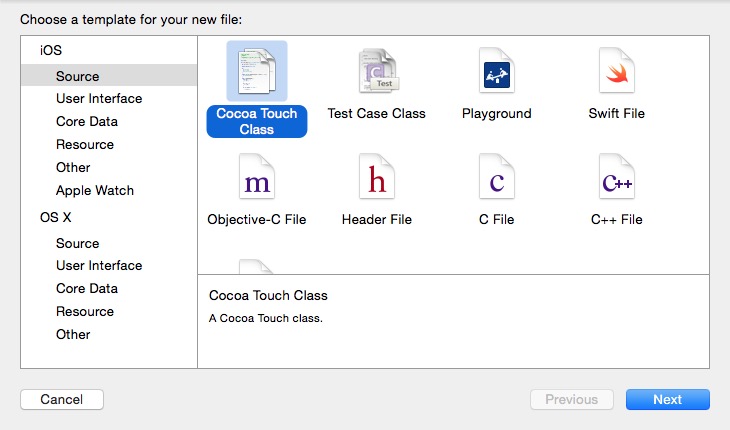
设置和下图相同即可:
检查成果
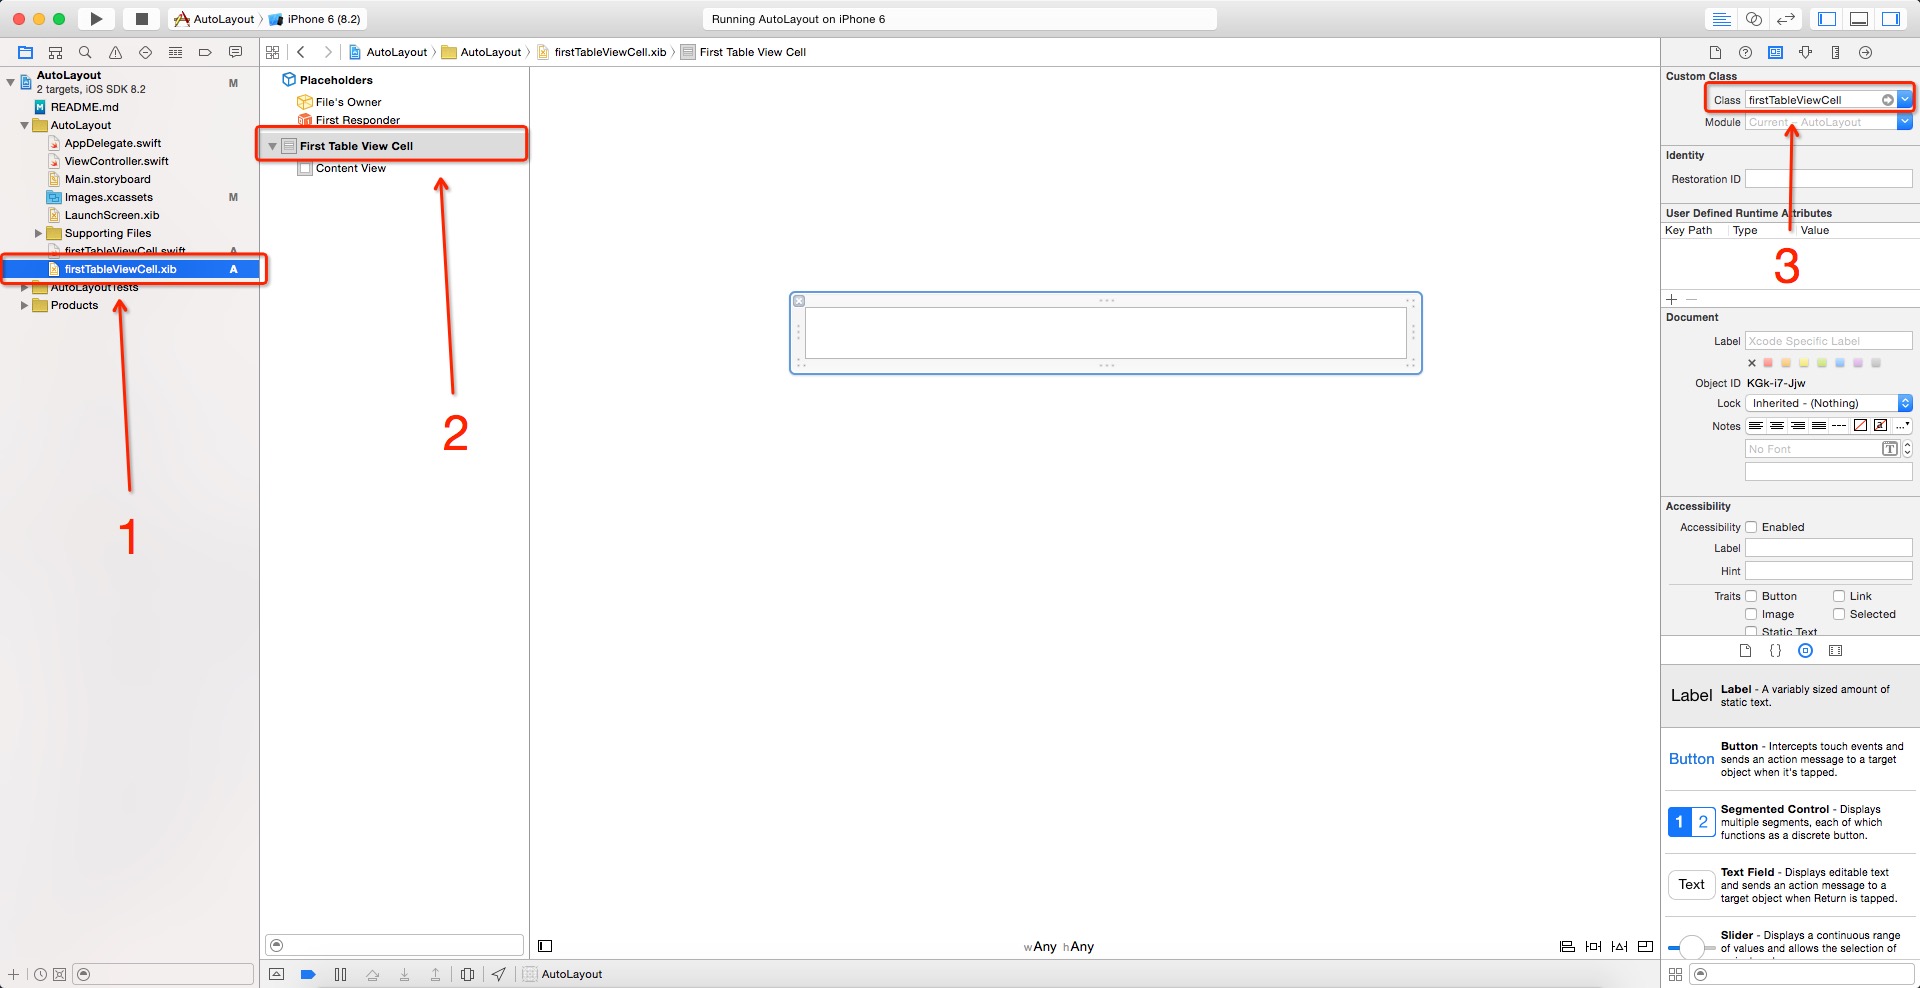
分别选中上图中的 1、2 两处,检查 3 处是否已经自动绑定为 firstTableViewCell,如果没有绑定,请先检查选中的元素确实是 2,然后手动绑定即可。
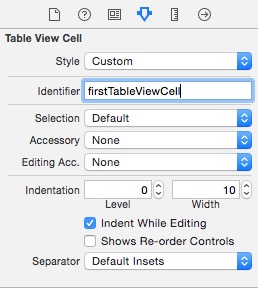
完成绑定工作
切换一页,如下图进行 Identifier 设置:
新建 Table View Controller 页面
新建一个 Table View Controller 页面,并把我们之前创建的 Swift on iOS 那个按钮的点击事件绑定过去,我们得到:
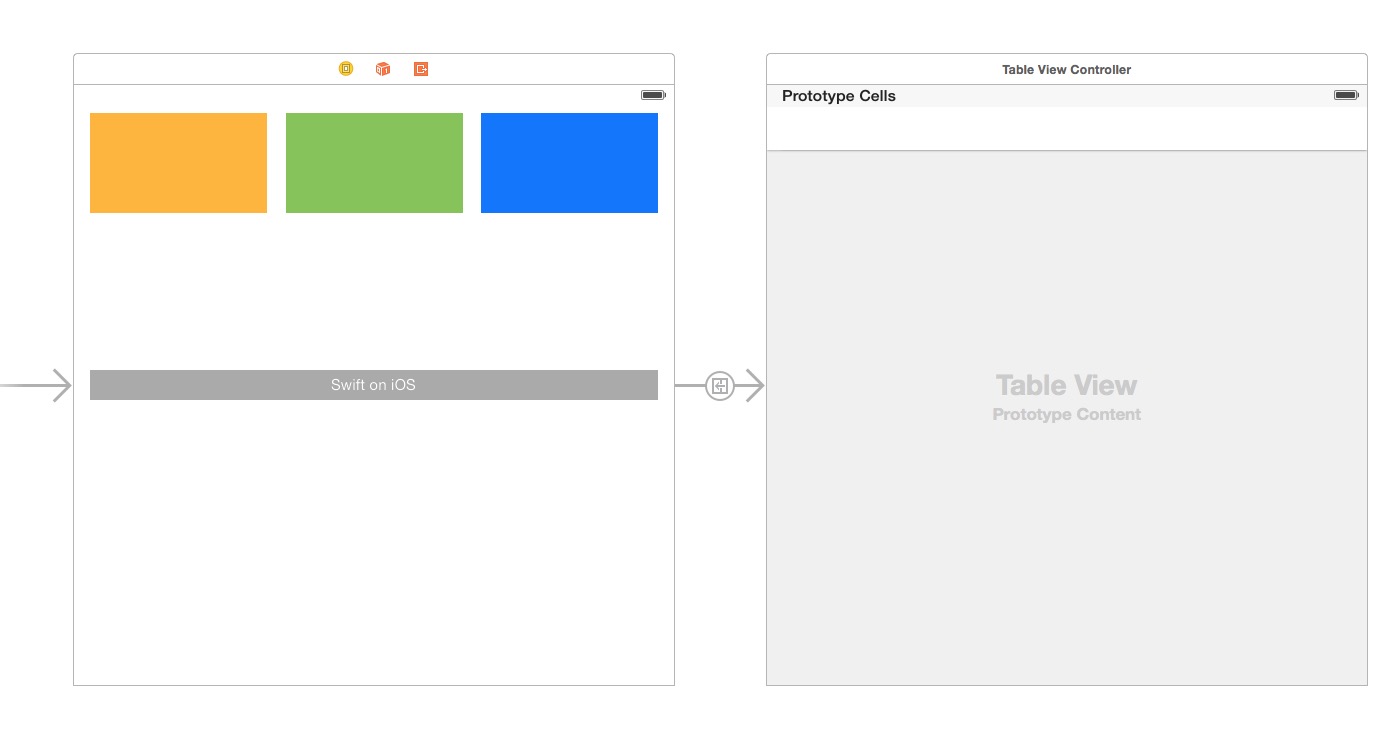
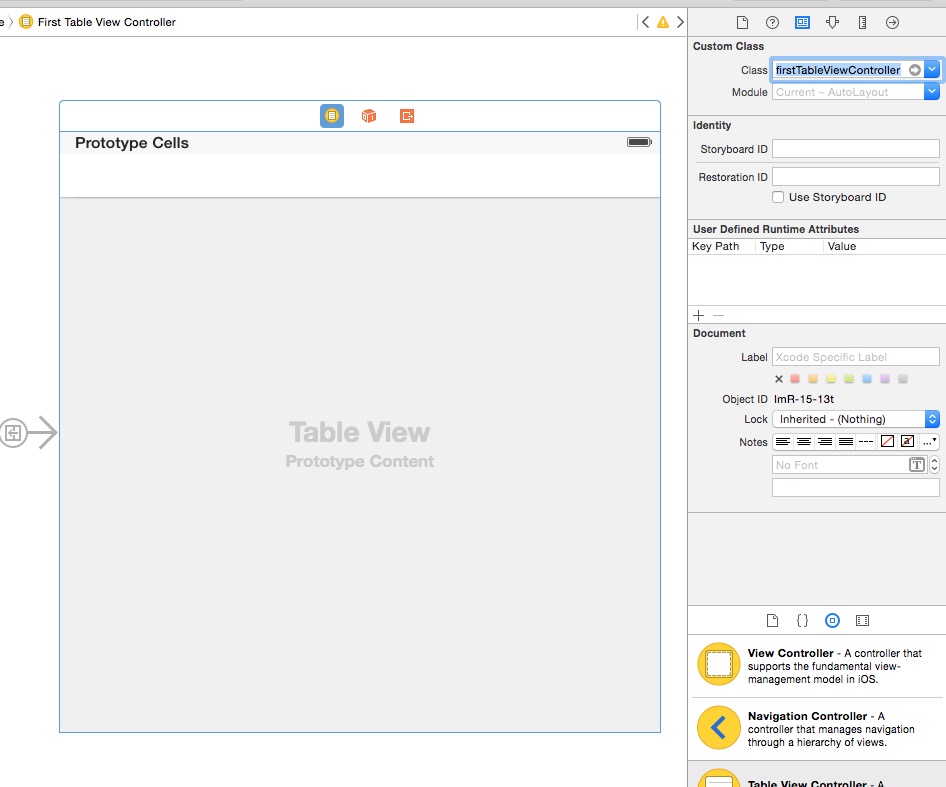
然后创建一个名为 firstTableViewController 的 UITableViewController 类,创建流程跟前面基本一致。不要创建 xib。然后选中 StoryBoard 中的 Table View Controller(选中之后有蓝色边框包裹),在右侧对它和 firstTableViewController 类进行绑定:
调用自定义 cell
修改 firstTableViewController 类中的有效代码如下:
swift
import UIKit

class firstTableViewController: UITableViewController {

    override func viewDidLoad() {
        super.viewDidLoad()

        var nib = UINib(nibName: "firstTableViewCell", bundle: nil)
        self.tableView.registerNib(nib, forCellReuseIdentifier: "firstTableViewCell")
    }

    override func didReceiveMemoryWarning() {
        super.didReceiveMemoryWarning()
    }

    // MARK: - Table view data source

    override func numberOfSectionsInTableView(tableView: UITableView) -> Int {
        return 1
    }

    override func tableView(tableView: UITableView, numberOfRowsInSection section: Int) -> Int {
        return 10
    }

    override func tableView(tableView: UITableView, cellForRowAtIndexPath indexPath: NSIndexPath) -> UITableViewCell {
        let cell = tableView.dequeueReusableCellWithIdentifier("firstTableViewCell", forIndexPath: indexPath) as firstTableViewCell

        cell.textLabel?.text = indexPath.row.description

        return cell
    }
}
viewDidLoad() 中添加的两行代码是载入 xib 的操作。最下面的三个 func 分别是定义:
- self.tableView 中有多少个 section
- 每个 section 中分别有多少个条目
- 实例化每个条目,提供内容
如果你得到以下页面,说明你调用自定义 cell 成功了!

给自定义 cell 添加元素并使用 Auto Layout 约束
首先向 Images.xcassets 中随意加入一张图片。
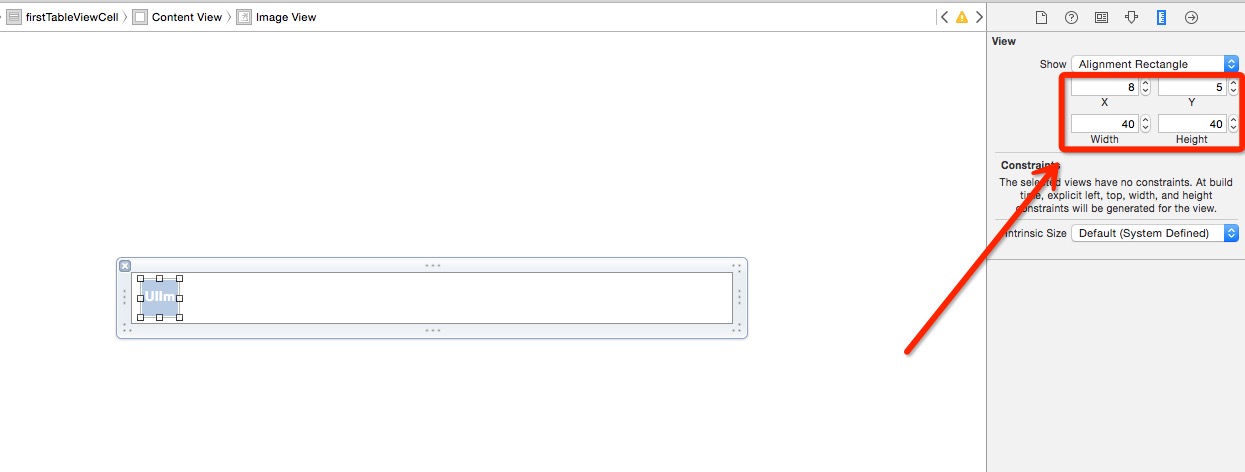
然后在左侧文件树中选中 firstTableViewCell.xib,从右侧组件库中拖进去一个 Image View,并且在右侧将其尺寸设置如下图右侧:
给 ImageView 添加约束:
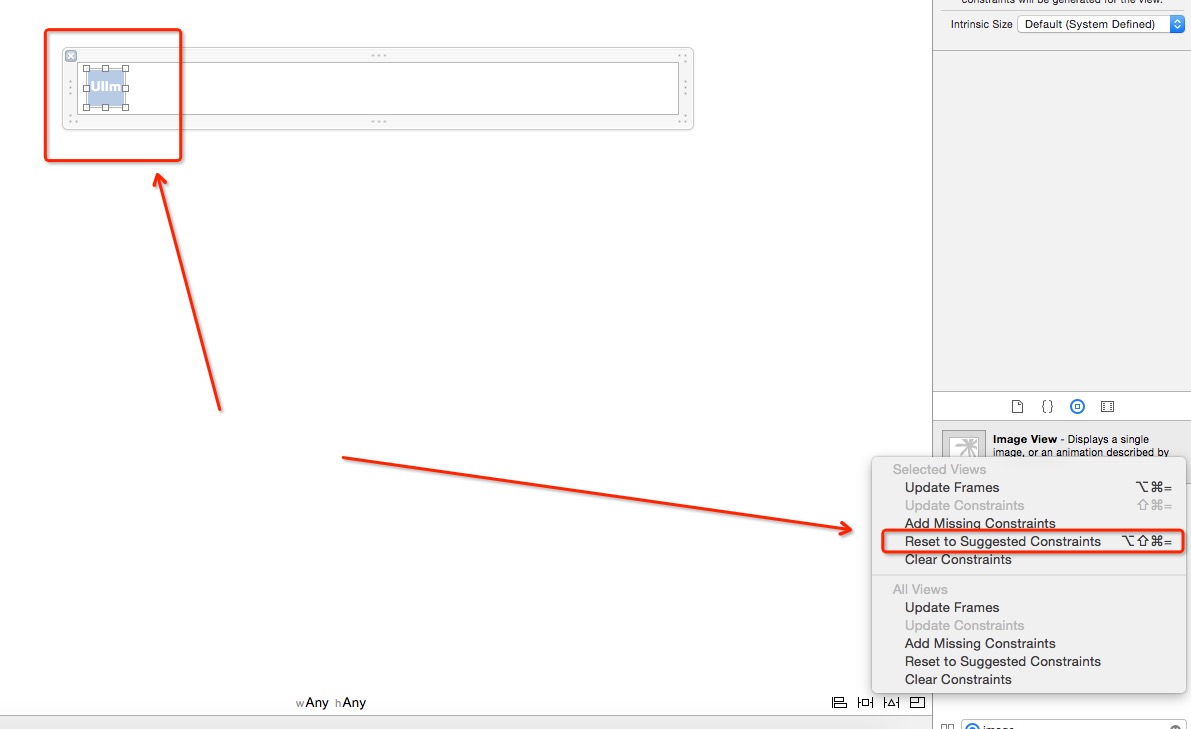
选中该 ImageView(左箭头所示),点击自动 Auto Layout(右箭头所示),即可。
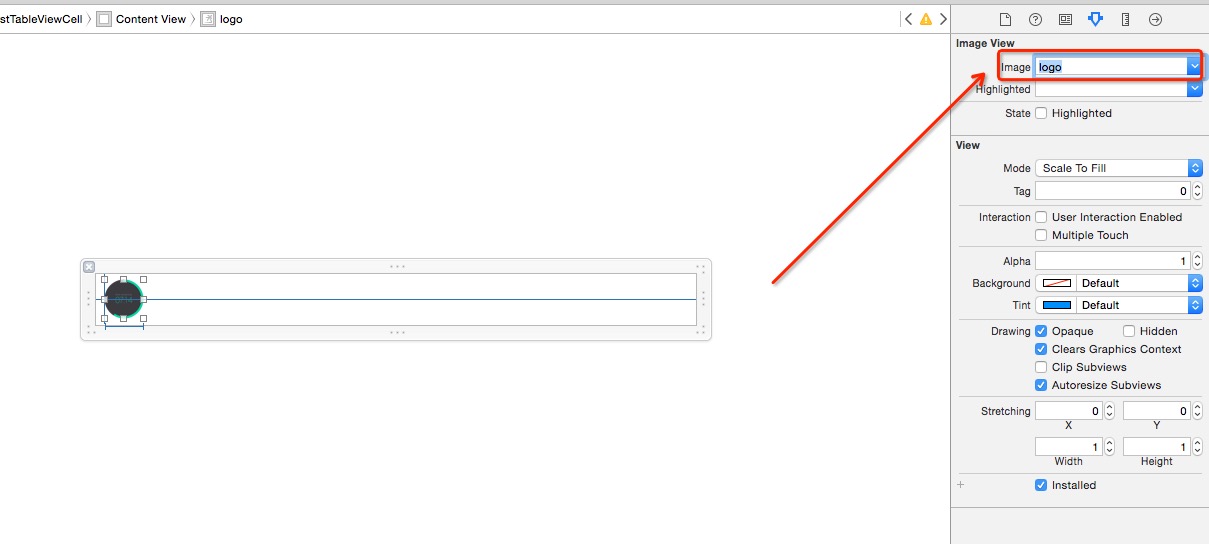
给 ImageView 设置图片:
再从右侧组件库中拖入一个 UILabel,吸附到最右侧,垂直居中,为其添加自动约束,这一步不再赘述。
在 firstTableViewCell 类中绑定 xib 中拖进去的元素
选中 firstTableViewCell.xib,切换到双视图,直接进行拖动绑定:
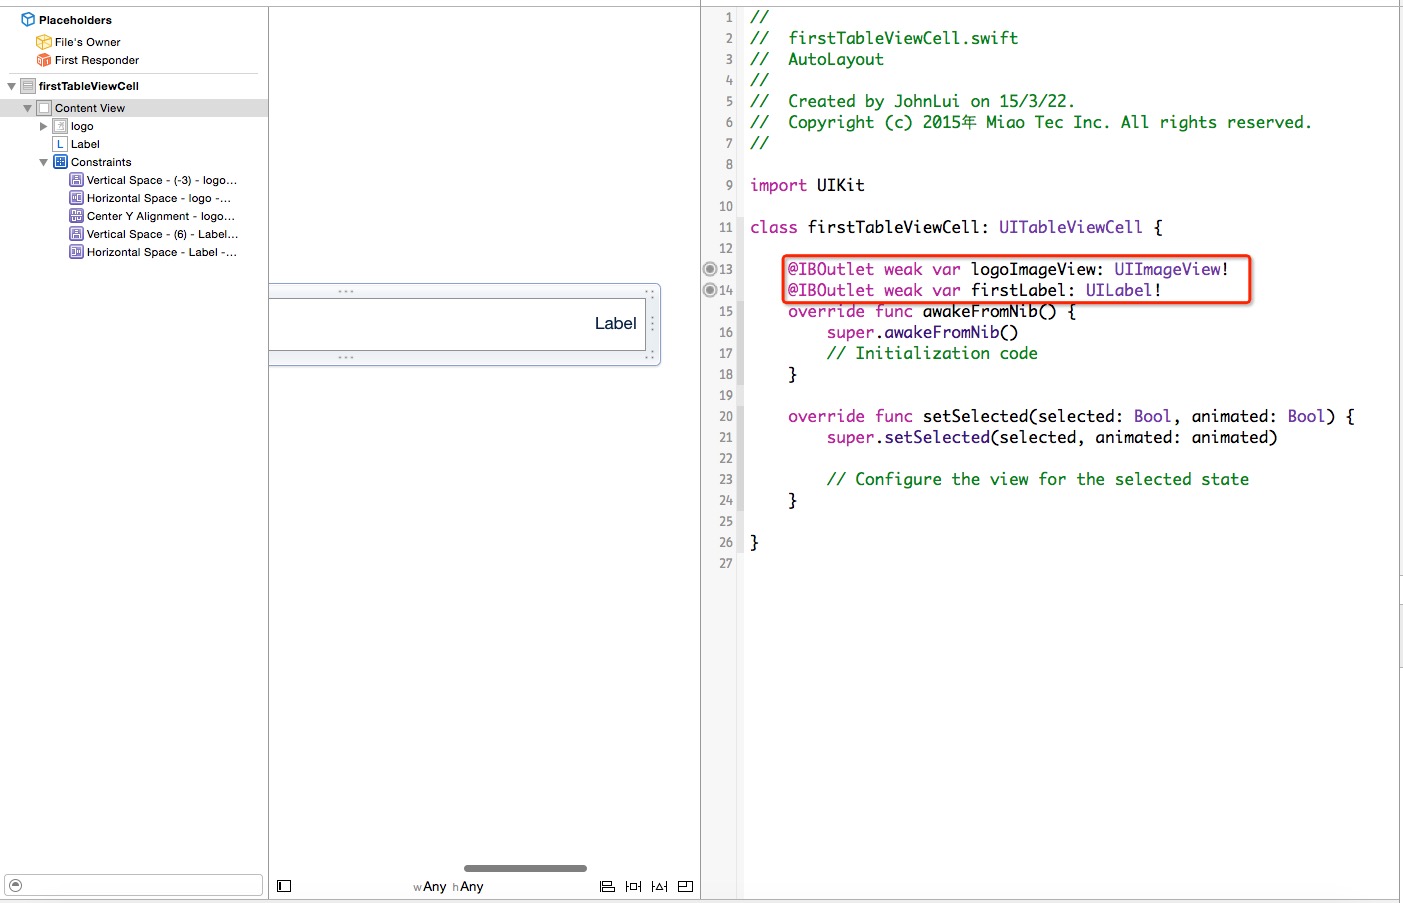
绑定完成!
约束 cell 的高度
在 firstTableViewController 中添加以下方法:
swiftoverride func tableView(tableView: UITableView, heightForRowAtIndexPath indexPath: NSIndexPath) -> CGFloat {
    return 50
}
给自定义的 UILabel 添加内容
修改 firstTableViewController 中以下函数为:
swiftoverride func tableView(tableView: UITableView, cellForRowAtIndexPath indexPath: NSIndexPath) -> UITableViewCell {
    let cell = tableView.dequeueReusableCellWithIdentifier("firstTableViewCell", forIndexPath: indexPath) as firstTableViewCell

    cell.firstLabel.text = indexPath.row.description

    return cell
}
查看结果
4.0 寸:
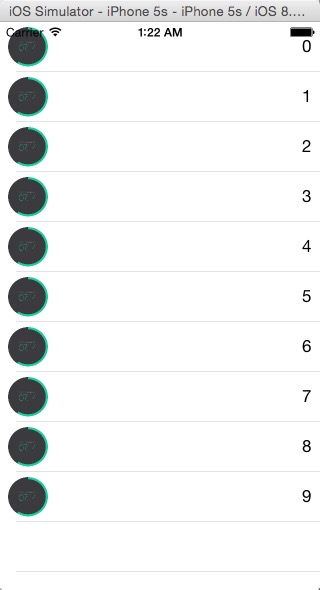
4.7 寸:

如果你得到以上结果,那么恭喜你自定义 cell 并使用 Auto Layout 成功!
下一步:Auto Layout 使用心得(四)—— 22 行代码实现拖动回弹
原文发表在我的个人网站:Auto Layout 使用心得(三)—— 自定义 cell 并使用 Auto Layout

Autolayout
Autolayout是一种“自动布局”技术,专门用来布局UI界面的
Autolayout自iOS 6开始引入,由于Xcode 4的不给力,当时并没有得到很大推广
自iOS 7(Xcode 5)开始,Autolayout的开发效率得到很大的提升
苹果官方也推荐开发者尽量使用Autolayout来布局UI界面
Autolayout能很轻松地解决屏幕适配的问题
简介
Autoresizing
在Autolayout之前,有Autoresizing可以作屏幕适配,但局限性较大,有些任务根本无法完成
相比之下,Autolayout的功能比Autoresizing强大很多
Autolayout的2个核心概念
参照
约束
Autolayout的警告和错误
警告
控件的frame不匹配所添加的约束, 比如
比如约束控件的宽度为100, 而控件现在的宽度是110
错误
缺乏必要的约束, 比如
只约束了宽度和高度, 没有约束具体的位置
两个约束冲突, 比如
1个约束控件的宽度为100, 1个约束控件的宽度为110
添加约束的规则(1)
在创建约束之后,需要将其添加到作用的view上
在添加时要注意目标view需要遵循以下规则:
1)对于两个同层级view之间的约束关系,添加到它们的父view上
代码实现Autolayout
代码实现Autolayout的步骤
利用NSLayoutConstraint类创建具体的约束对象
添加约束对象到相应的view上
- (void)addConstraint:(NSLayoutConstraint *)constraint;
- (void)addConstraints:(NSArray *)constraints;
代码实现Autolayout的注意点
要先禁止autoresizing功能,设置view的下面属性为NO
NSLayoutConstraint
一个NSLayoutConstraint对象就代表一个约束
创建约束对象的常用方法
+(id)constraintWithItem:(id)view1 attribute:(NSLayoutAttribute)attr1 relatedBy:(NSLayoutRelation)relation toItem:(id)view2 attribute:(NSLayoutAttribute)attr2 multiplier:(CGFloat)multiplier constant:(CGFloat)c;
view1 :要约束的控件
attr1 :约束的类型(做怎样的约束)
relation :与参照控件之间的关系
view2 :参照的控件
attr2 :约束的类型(做怎样的约束)
multiplier :乘数
c :常量
自动布局有个核心公式
obj1.property1 =(obj2.property2 * multiplier)+ constant value
view.translatesAutoresizingMaskIntoConstraints = NO;
添加约束之前,一定要保证相关控件都已经在各自的父控件上
不用再给view设置frame
VFL语言
什么是VFL语言
VFL全称是Visual Format Language,翻译过来是“可视化格式语言”
VFL是苹果公司为了简化Autolayout的编码而推出的抽象语言
 VFL示例
VFL示例
H:[cancelButton(72)]-12-[acceptButton(50)]
canelButton宽72,acceptButton宽50,它们之间间距12
H:[wideView(>=60@700)]
wideView宽度大于等于60point,该约束条件优先级为700(优先级最大值为1000,优先级越高的约束越先被满足)
V:[redBox][yellowBox(==redBox)]
竖直方向上,先有一个redBox,其下方紧接一个高度等于redBox高度的yellowBox
H:|-10-[Find]-[FindNext]-[FindField(>=20)]-|
水平方向上,Find距离父view左边缘默认间隔宽度,之后是FindNext距离Find间隔默认宽度;再之后是宽度不小于20的FindField,它和FindNext以及父view右边缘的间距都是默认宽度。(竖线“|” 表示superview的边缘)
VFL的使用
使用VFL来创建约束数组
+ (NSArray *)constraintsWithVisualFormat:(NSString *)format options:(NSLayoutFormatOptions)opts metrics:(NSDictionary *)metrics views:(NSDictionary *)views;
format :VFL语句
opts :约束类型
metrics :VFL语句中用到的具体数值
views :VFL语句中用到的控件
创建一个字典(内部包含VFL语句中用到的控件)的快捷宏定义
NSDictionaryOfVariableBindings(...)
基于Autolayout的动画
在修改了约束之后,只要执行下面代码,就能做动画效果
[UIView animateWithDuration:1.0 animations:^{
[添加了约束的view layoutIfNeeded];
}];
关于在Swift中使用AutoLayout-VFL(AutoLayout-VFL笔记)和swift autolayout的问题我们已经讲解完毕,感谢您的阅读,如果还想了解更多关于Android五大布局:FrameLayout、LinearLayout、AbsoluteLayout、RelativeLayout和TableLayout、Auto Layout + Manual Layout 混用、Auto Layout 使用心得(三)—— 自定义 cell 并使用 Auto Layout、Autolayout等相关内容,可以在本站寻找。
本文标签:


