本文将分享Kubernetes新玩法:在yaml中编程的详细内容,并且还将对kubernetesyaml文件编写进行详尽解释,此外,我们还将为大家带来关于5、kubernetes集群YAML文件详解、
本文将分享Kubernetes 新玩法:在 yaml 中编程的详细内容,并且还将对kubernetes yaml文件编写进行详尽解释,此外,我们还将为大家带来关于5、kubernetes 集群 YAML 文件详解、Docker Kubernetes yaml 创建管理 Pod、Docker Kubernetes YAML 文件常用指令、Kubernetes (yaml 文件详解)的相关知识,希望对你有所帮助。
本文目录一览:- Kubernetes 新玩法:在 yaml 中编程(kubernetes yaml文件编写)
- 5、kubernetes 集群 YAML 文件详解
- Docker Kubernetes yaml 创建管理 Pod
- Docker Kubernetes YAML 文件常用指令
- Kubernetes (yaml 文件详解)
")
Kubernetes 新玩法:在 yaml 中编程(kubernetes yaml文件编写)

引子
性能测试在日常的开发工作中是常规需求,用来摸底服务的性能。
那么如何做性能测试?要么是通过编码的方式完成,写一堆脚本,用完即弃;要么是基于平台,在平台定义的流程中进行。对于后者,通常由于目标场景的复杂性,如部署特定的 workload、观测特定的性能项、网络访问问题等,往往导致性能测试平台要以高成本才能满足不断变化的开发场景的需求。
在云原生的背景下,是否可以更好解决这种问题?
先看两个 yaml 文件:
-
performance-test.yaml 描述了在 K8s 中的操作流程:
- 创建测试用的 Namespace
- 启动针对 Deployment 创建效率和创建成功率的监控
- 下述动作重复 N 次:① 使用 workload 模板创建 Deployment;② 等待 Deployment 变为 Ready
- 删除测试用的 Namespace
- basic-1-pod-deployment.yaml 描述使用的 workload 模板
performance-test.yaml :
apiVersion: aliyun.com/v1alpha1
kind: Beidou
metadata:
  name: performance
  namespace: beidou
spec:
  steps:
  - name: "Create Namespace If Not Exits"
    operations:
    - name: "create namespace"
      type: Task
      op: CreateNamespace
      args:
      - name: NS
        value: beidou
  - name: "Monitor Deployment Creation Efficiency"
    operations:
    - name: "Begin To Monitor Deployment Creation Efficiency"
      type: Task
      op: DeploymentCreationEfficiency
      args:
      - name: NS
        value: beidou
    - name: "Repeat 1 Times"
      type: Task
      op: RepeatNTimes
      args:
      - name: TIMES
        value: "1"
      - name: ACTION
        reference:
          id: deployment-operation
  - name: "Delete namespace"
    operations:
    - name: "delete namespace"
      type: Task
      op: DeleteNamespace
      args:
      - name: NS
        value: beidou
      - name: FORCE
        value: "false"
  references:
  - id: deployment-operation
    steps:
    - name: "Prepare Deployment"
      operations:
      - name: "Prepare Deployment"
        type: Task
        op: PrepareBatchDeployments
        args:
        - name: NS
          value: beidou
        - name: NODE_TYPE
          value: ebm
        - name: BATCH_NUM
          value: "1"
        - name: TEMPLATE
          value: "./templates/basic-1-pod-deployment.yaml"
        - name: DEPLOYMENT_REPLICAS
          value: "1"
        - name: DEPLOYMENT_PREFIX
          value: "ebm"
      - name: "Wait For Deployments To Be Ready"
        type: Task
        op: WaitForBatchDeploymentsReady
        args:
        - name: NS
          value: beidou
        - name: TIMEOUT
          value: "3m"
        - name: CHECK_INTERVAL
          value: "2s"
basic-1-pod-deployment.yaml:
apiVersion: apps/v1
kind: Deployment
metadata:
  labels:
    app: basic-1-pod
spec:
  selector:
    matchLabels:
      app: basic-1-pod
  template:
    metadata:
      labels:
        app: basic-1-pod
    spec:
      containers:
      - name: nginx
        image: registry-vpc.cn-hangzhou.aliyuncs.com/xxx/nginx:1.17.9
        imagePullPolicy: Always
        resources:
          limits:
            cpu: 2
            memory: 4Gi
然后通过一个命令行工具执行 performance-test.yaml:
$ beidou server -c ~/.kube/config services/performance-test.yaml执行效果如下 (每个 Deployment 创建耗时,所有 Deployment 创建耗时的 TP95 值,每个 Deployment 是否创建成功):

这些 metrics 是按照 Prometheus 标准输出,可以被 Prometheus server 收集走,再结合 Grafana 可以可视化展示性能测试数据。
通过在 yaml 中表达想法,编排对 K8s 资源的操作、监控,再也不用为性能测试的实现头疼了 :D
为什么要在 yaml 中编程?
性能测试、回归测试等对于服务质量保障有很大帮助,需要做,但常规的实现方法在初期需要投入较多的时间和精力,新增变更后维护成本比较高。
通常这个过程是以代码的方式实现原子操作,如创建 Deployment、检测 Pod 配置等,然后再组合原子操作来满足需求,如 创建 Deployment -> 等待 Deployment ready -> 检测 Pod 配置等。
有没有办法在实现的过程中既可以尽量低成本实现,又可以复用已有的经验?
可以将原子操作封装为原语,如 CreateDeployment、CheckPod,再通过 yaml 的结构表达流程,那么就可以通过 yaml 而非代码的方式描述想法,又可以复用他人已经写好的 yaml 文件来解决某类场景的需求。
即在 yaml 中编程,减少重复性代码工作,通过 声明式 的方式描述逻辑,并以 yaml 文件来满足场景级别的复用。
业界有很多种类型的 声明式操作 服务,如运维领域中的 Ansible、SaltStack,Kubernetes 中的Argo Workflow、clusterloader2。它们的思想整体比较类似,将高频使用的操作封装为原语,使用者通过原语来表述操作逻辑。
通过声明式的方法,将面向 K8s 的操作抽象成 yaml 中的关键词,在 yaml 中提供串行、并行等控制逻辑,那么就可以通过 yaml 文件完整描述想要进行的工作。
这种思想和 Argo Workflow 比较像,但粒度比 Argo 更细,关注在操作函数上:

下面简单描述该服务的设计和实现。
设计和实现
1. 服务形态
- 使用者在 yaml 中,通过 声明式 的方式描述操作逻辑;
- 以 all-in-one 的二进制工具或 Operator 的方式交付;
- 服务内置常见原语的实现,以关键字的方式在 yaml 中提供;
- 支持配置原生 K8s 资源。
2. 设计
该方案的核心在于配置管理的设计,将操作流程配置化,自上而下有如下概念:
- Service:Modules 或 Tasks 的编排;
- Module:一种任务场景,是操作单元的集合(其中包含 templates/ 目录,表征模板文件的集合,可用来配置 K8s 原生资源);
- Task:操作单元,使用 plugin 及参数执行操作;
- Plugin:操作指令,类似开发语言中的函数。
抽象目标场景中的通用操作,这些通用操作即为可在 yaml 中使用的原语,对应上述 Plugin:
-
K8s 相关
- CreateNamespace
- DeleteNamespace
- PrepareSecret
- PrepareConfigMap
- PrepareBatchDeployments
- WaitForBatchDeploymentsReady
- etc.
-
观测性相关
- DeploymentCreationEfficiency
- PodCreationEfficiency
- etc.
-
检测项相关
- CheckPodAnnotations
- CheckPodObjectInfo
- CheckPodInnerStates
- etc.
-
控制语句相关
- RepeatNTimes
- etc.
上述 4 个概念的关系如下:

示例可参见文章开头的 yaml 文件,对应形式二。
3. 核心实现
CRD 设计:
package v1alpha1

import (
    corev1 "k8s.io/api/core/v1"
    metav1 "k8s.io/apimachinery/pkg/apis/meta/v1"
)

// BeidouType is the type related to Beidou execution.
type BeidouType string

const (
    // BeidouTask represents the Task execution type.
    BeidouTask BeidouType = "Task"
)

// +genclient
// +k8s:deepcopy-gen:interfaces=k8s.io/apimachinery/pkg/runtime.Object

// Beidou represents a crd used to describe serices.
type Beidou struct {
    metav1.TypeMeta   `json:",inline"`
    metav1.ObjectMeta `json:"metadata,omitempty" protobuf:"bytes,1,opt,name=metadata"`

    Spec   BeidouSpec   `json:"spec,omitempty" protobuf:"bytes,2,opt,name=spec"`
    Status BeidouStatus `json:"status,omitempty" protobuf:"bytes,3,opt,name=status"`
}

// BeidouSpec is the spec of a Beidou.
type BeidouSpec struct {
    Steps      []BeidouStep      `json:"steps" protobuf:"bytes,1,opt,name=steps"`
    References []BeidouReference `json:"references" protobuf:"bytes,2,opt,name=references"`
}

// BeidouStep is the spec of step.
type BeidouStep struct {
    Name       string            `json:"name" protobuf:"bytes,1,opt,name=name"`
    Operations []BeidouOperation `json:"operations" protobuf:"bytes,2,opt,name=operations"`
}

// BeidouOperation is the spec of operation.
type BeidouOperation struct {
    Name string      `json:"name" protobuf:"bytes,1,opt,name=name"`
    Type BeidouType  `json:"type" protobuf:"bytes,2,opt,name=type"`
    Op   string      `json:"op" protobuf:"bytes,3,opt,name=op"`
    Args []BeidouArg `json:"args" protobuf:"bytes,4,opt,name=args"`
}

// BeidouArg is the spec of arg.
type BeidouArg struct {
    Name        string                   `json:"name" protobuf:"bytes,1,opt,name=name"`
    Value       string                   `json:"value,omitempty" protobuf:"bytes,2,opt,name=value"`
    Reference   BeidouOperationReference `json:"reference,omitempty" protobuf:"bytes,3,opt,name=reference"`
    Tolerations []corev1.Toleration      `json:"tolerations,omitempty" protobuf:"bytes,4,opt,name=tolerations"`
    Checking    []string                 `json:"checking,omitempty" protobuf:"bytes,5,opt,name=checking"`
}

// BeidouOperationReference is the spec of operation reference.
type BeidouOperationReference struct {
    ID string `json:"id" protobuf:"bytes,1,opt,name=id"`
}

// BeidouReference is the spec of reference.
type BeidouReference struct {
    ID    string       `json:"id" protobuf:"bytes,1,opt,name=id"`
    Steps []BeidouStep `json:"steps" protobuf:"bytes,2,opt,name=steps"`
}

// BeidouStatus represents the current state of a Beidou.
type BeidouStatus struct {
    Message string `json:"message" protobuf:"bytes,1,opt,name=message"`
}

// +k8s:deepcopy-gen:interfaces=k8s.io/apimachinery/pkg/runtime.Object

// BeidouList is a collection of Beidou.
type BeidouList struct {
    metav1.TypeMeta `json:",inline"`
    metav1.ListMeta `json:"metadata" protobuf:"bytes,1,opt,name=metadata"`

    Items []Beidou `json:"items" protobuf:"bytes,2,opt,name=items"`
}
核心流程:
// ExecSteps executes steps.
func ExecSteps(ctx context.Context, steps []v1alpha1.BeidouStep, references []v1alpha1.BeidouReference) error {
    logger, _ := ctx.Value(CtxLogger).(*log.Entry)

    var hasMonitored bool
    for i, step := range steps {
        for j, op := range step.Operations {
            switch op.Op {
            case "DeploymentCreationEfficiency":
                if !hasMonitored {
                    defer func() {
                        err := monitor.Output()
                        if err != nil {
                            logger.Errorf("Failed to output: %s", err)
                        }
                    }()
                }
                hasMonitored = true
            }

            err := ExecOperation(ctx, op, references)
            if err != nil {
                return fmt.Errorf("failed to run operation %s: %s", op.Name, err)
            }
        }
    }

    return nil
}

// ExecOperation executes operation.
func ExecOperation(ctx context.Context, op v1alpha1.BeidouOperation, references []v1alpha1.BeidouReference) error {
    switch op.Type {
    case v1alpha1.BeidouTask:
        if !tasks.IsRegistered(op.Op) {
            return ErrNotRegistered
        }

        if !tasks.DoesSupportReference(op.Op) {
            return ExecTask(ctx, op.Op, op.Args)
        }

        return ExecTaskWithRefer(ctx, op.Op, op.Args, references)
    }

    return nil
}

// ExecTask executes a task.
func ExecTask(ctx context.Context, opname string, args []v1alpha1.BeidouArg) error {
    switch opname {
    case tasks.CreateNamespace:
        var ns string
        for _, arg := range args {
            switch arg.Name {
            case "NS":
                ns = arg.Value
            }
        }

        return op.CreateNamespace(ctx, ns)
    // ...
    }
    // ...
}

// ExecTaskWithRefer executes a task with reference.
func ExecTaskWithRefer(ctx context.Context, opname string, args []v1alpha1.BeidouArg, references []v1alpha1.BeidouReference) error {
    switch opname {
    case tasks.RepeatNTimes:
        var times int
        var steps []v1alpha1.BeidouStep
        var err error
        for _, arg := range args {
            switch arg.Name {
            case "TIMES":
                times, err = strconv.Atoi(arg.Value)
                if err != nil {
                    return ErrParseArgs
                }
            case "ACTION":
                for _, refer := range references {
                    if refer.ID == arg.Reference.ID {
                        steps = refer.Steps
                        break
                    }
                }
            }
        }

        return RepeatNTimes(ctx, times, steps)
    }

    return ErrNotImplemented
}
操作原语的实现示例:
// PodAnnotations is an operation used to check whether annotations of Pod are expected.
func PodAnnotations(ctx context.Context, data PodAnnotationsData) error {
    kclient, ok := ctx.Value(tasks.KubernetesClient).(kubernetes.Interface)
    if !ok {
        return tasks.ErrNoKubernetesClient
    }

    pods, err := kclient.CoreV1().Pods(data.Namespace).List(metav1.ListOptions{})
    if err != nil {
        return fmt.Errorf("failed to list pods in ns %s: %s", data.Namespace, err)
    }

    for _, pod := range pods.Items {
        if pod.Annotations == nil {
            return fmt.Errorf("pod %s in ns %s has no annotations", pod.Name, data.Namespace)
        }

        for _, annotation := range data.Exists {
            if _, exists := pod.Annotations[annotation]; !exists {
                return fmt.Errorf("annotation %s does not exist in pod %s in ns %s", annotation, pod.Name, data.Namespace)
            }
        }

        for k, v := range data.Equal {
            if pod.Annotations[k] != v {
                return fmt.Errorf("value of annotation %s is not %s in pod %s in ns %s", k, v, pod.Name, data.Namespace)
            }
        }
    }

    return nil
}
后续
目前阿里云容器服务团队内部已经实现了初版,已用于部分云产品的内部性能测试以及常规的回归测试,很大程度上提升了我们的工作效率。
在 yaml 中编程,是对云原生场景下声明式操作的体现,也是对声明式服务的一种实践。对于常规工作场景中重复编码或重复操作,可考虑类似的方式进行满足。
欢迎大家对这样的服务形态和项目进行讨论,探索这种模式的价值。
原文链接
本文为阿里云原创内容,未经允许不得转载。

5、kubernetes 集群 YAML 文件详解
文章目录
- 概述
- YAML文件介绍
- YAML概述
- YAML 基本语法
- YAML 支持的数据结构
- 对象
- 数组
- 纯量(scalars)
- YAML文件组成部分
- 控制器的定义
- 被控制的对象
- 如何快速编写YAML文件
- 使用kubectl create命令
- 使用kubectl get命令导出yaml文件
概述
k8s 集群中对资源管理和资源对象编排部署都可以通过声明样式(YAML)文件来解决,也就是可以把需要对资源对象操作编辑到YAML 格式文件中,我们把这种文件叫做资源清单文件,通过kubectl 命令直接使用资源清单文件就可以实现对大量的资源对象进行编排部署了。一般在我们开发的时候,都是通过配置YAML文件来部署集群的。
YAML文件:就是资源清单文件,用于资源编排
YAML文件介绍
YAML概述
YAML :仍是一种标记语言。为了强调这种语言以数据做为中心,而不是以标记语言为重点。
YAML 是一个可读性高,用来表达数据序列的格式。
YAML 基本语法
- 使用空格做为缩进
- 缩进的空格数目不重要,只要相同层级的元素左侧对齐即可
- 低版本缩进时不允许使用Tab 键,只允许使用空格
- 字符后缩进一个空格,比如冒号,逗号后面
- 使用#标识注释,从这个字符一直到行尾,都会被解释器忽略
- 使用 --- 表示新的yaml文件开始
YAML 支持的数据结构
对象
键值对的集合,又称为映射(mapping) / 哈希(hashes) / 字典(dictionary)
# 对象类型:对象的一组键值对,使用冒号结构表示
name: Tom
age: 18

# yaml 也允许另一种写法,将所有键值对写成一个行内对象
hash: {name: Tom, age: 18}
数组
# 数组类型:一组连词线开头的行,构成一个数组
People
- Tom
- Jack

# 数组也可以采用行内表示法
People: [Tom, Jack]
纯量(scalars)
纯量:纯量是最基本的、不可再分的值。以下数据类型都属于纯量
#数值直接以字面量的形式表示
number: 12.30

#布尔值用true和false表示
isset: true


#nu71用~表示
parent: ~

#时间采用Iso8601格式
iso8601:2001-12-14t21:59:43.10-05:00

#日期采用复合iso8601格式的年、月、日表示
date: 1976-07-31

#YAML 允许使用两个感叹号,强制转换数据类型
e: ! !str 123
f: ! !str true

#字符串默认不使用引号表示
str:这是一行字符串

#如果字符串之中包含空格或特殊字符,需要放在引号之中
str: '内容:字符串'

#单引号和双引号都可以使用,双引号不会对特殊字符转义
s1:'内容\n字符串'
s2:"内容\n字符串"

#单引号之中如果还有单引号,必须连续使用两个单引号转义
str: 'labor' 's day'

#字符串可以写成多行,从第二行开始,必须有一个单空格缩进。换行符会被转为空格
str:这是一段
多行
字符串

#多行字符串可以使用|保留换行符,也可以使用>折叠换行
this: |
Foo
Bar
thatFooBar
YAML文件组成部分
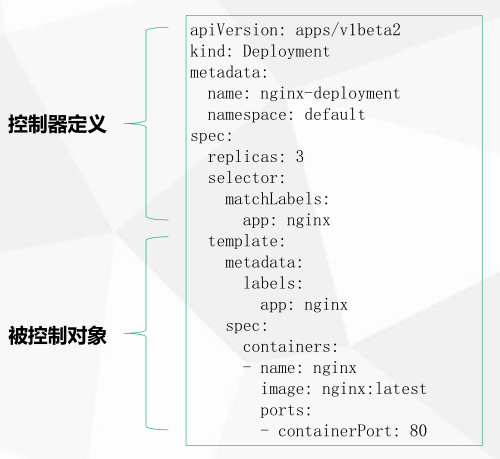
在 k8s 中,一般使用 YAML 格式的文件来创建符合我们预期期望的 pod,这样的 YAML 文件称为资源清单。
主要分为了两部分,一个是控制器的定义 和 被控制的对象
控制器的定义
apiVersion: apps/v1  #api的版本
kind: Deployment  #deployment是用来管理pod的
Metadata:  #元数据对象,固定值写Metadata
 name: Nginx-deployment   #元数据对象的名字,由我们编写,比如命名pod的名字
 namespace: default    #元数据对象的命令空间,由我们自身定义
spec:   #详细定义对象,固定式写spec
 replicas: 3 #有哪些副本
 selector: #用那个选择器
  matchLabels:
   app: nainx #应用的名字
被控制的对象
包含一些 镜像,版本、端口等
template:  #pod模板
 Metadata:
  labels:  #标签
   app: Nginx  #应用名字
  spec:
   containers:
   - name: Nginx
   image: Nginx:latest
   ports:
   - containerPort: 80
常用属性说明
| 属性名称 | 介绍 |
|---|---|
| apiVersion | API版本,可以用kubectl api-versions命令查询 |
| kind | 资源类型,比如pod |
| Metadata | 资源元数据 |
| spec | 资源规格 |
| replicas | 副本数量 |
| selector | 标签选择器 |
| template | Pod模板 |
| Metadata | Pod元数据 |
| spec | Pod规格 |
| containers | 容器配置 |
举例说明
创建一个namespace
apiVersion: v1
kind: namespace
Metadata:  #元数据对象,固定值写Metadata
 name: test
创建一个pod
apiVersion: v1
kind: pod
Metadata:
 name: pod1
spec:
 containers:
 - name: Nginx-containers
   image: Nginx: latest
如何快速编写YAML文件
一般来说,我们很少自己手写YAML文件,因为这里面涉及到了很多内容,我们一般都会借助工具来创建
使用kubectl create命令
这种方式一般用于资源没有部署的时候,我们可以直接创建一个YAML配置文件
# 尝试运行,并不会真正的创建镜像
[root@localhost ~]$ kubectl create deployment web --image=Nginx -o yaml --dry-run
#-o yaml: 把操作用yaml格式生成出来
#--dry-run: 尝试运行,并不真正执行,空跑的意思
或者我们可以输出到一个文件中
[root@localhost ~]$ kubectl create deployment web --image=Nginx -o yaml --dry-run > demo.yaml
使用kubectl get命令导出yaml文件
可以首先查看一个目前已经部署的镜像
[root@localhost ~]$ kubectl get deploy
然后我们导出 Nginx的配置
[root@localhost ~]$ kubectl get deploy Nginx -o=yaml > Nginx.yaml
#会生成一个 Nginx.yaml 的配置文件
#高版本没有--export,如果报错就去掉--export

Docker Kubernetes yaml 创建管理 Pod
Docker Kubernetes yaml 创建管理 Pod
环境:
- 系统:Centos 7.4 x64
- Docker版本:18.09.0
- Kubernetes版本:v1.8
- 管理节点:192.168.1.79
- 工作节点:192.168.1.78
- 工作节点:192.168.1.77
管理节点:创建pod yaml文件
vim pod.yaml
apiVersion: v1
kind: Pod
metadata:
  name: pod-test
  labels:
    os: centos
spec:
  containers:
  - name: hello
    image: centos:6
    env:
    - name: Test
      value: "123456"
    command: ["bash","-c","while true;do date;sleep 1;done"]

# api版本
apiVersion: v1
# 指定创建资源对象
kind: Pod
# 源数据、可以写name,命名空间,对象标签
metadata:
# 服务名称
  name: pod-test
# 标签
  labels:
# 标签名
    os: centos
# 容器资源信息
spec:
# 容器管理
  containers:
# 容器名称
  - name: hello
# 容器镜像
    image: centos:6
# 添加环境变量
    env:
# 创建key
    - name: Test
# 创建value
      value: "123456"
# 启动容器后执行命令
command: ["bash","-c","while true;do date;sleep 1;done"]注:一个pod可指定多个容器。command命令执行一个持续命令避免容器关闭。
管理节点:创建pod
kubectl create -f pod.yaml管理节点:基本管理操作
基本管理:
# 创建pod资源
kubectl create -f pod.yaml
# 查看pods
kubectl get pods pod-test
# 查看pod描述
kubectl describe pod pod-test
# 替换资源
kubectl replace -f pod.yaml -force
# 删除资源
kubectl delete pod pod-test

Docker Kubernetes YAML 文件常用指令
YAML 文件常用指令
配置文件说明:
- 定义配置时,指定最新稳定版 API(当前为 v1)。
- 配置文件应该存储在集群之外的版本控制仓库中。如果需要,可以快速回滚配置、重新创建和恢复。
- 应该使用 YAML 格式编写配置文件,而不是 JSON。尽管这些格式都可以使用,但 YAML 对用户更加友好。
- 可以将相关对象组合成单个文件,通常会更容易管理。
- 不要没必要的指定默认值,简单和最小配置减少错误。
- 在注释中说明一个对象描述更好维护。
- YAML 是一种标记语言很直观的数据序列化格式,可读性高。类似于 XML 数据描述语言,语法比 XML 简单的很多。
- YAML 数据结构通过缩进来表示,连续的项目通过减号来表示,键值对用冒号分隔,数组用中括号括起来,hash 用花括号括起来。
YAML 文件格式注意事项:
- 1. 不支持制表符 tab 键缩进,需要使用空格缩进
- 2. 通常开头缩进 2 个空格
- 3. 字符后缩进 1 个空格,
- 4. “---” 表示 YAML 格式,一个文件的开始
- 5. “#” 注释
- # 指定 api 版本
- apiVersion:
- # 指定需要创建的资源对象
- kind:
- # 源数据、可以写 name,命名空间,对象标签
- metadata:
- # 指定对象名称
- name:


apiVersion: apps/v1beta2
kind: Deployment
metadata:
name: nginx-deployment- # 描述资源相关信息
- spec:
- # 指定 pod 副本数,默认 1
- replicas:


apiVersion: apps/v1beta2
kind: Deployment
metadata:
  name: nginx-deployment
spec:
replicas: 3- # 资源标签选择器
- selector:
- # 描述资源具体信息
- template:
- # 匹配标签字段
- matchLabels:
- # 指定 pod 标签 value:key
- labels:


kind: Deployment
metadata:
  name: nginx-deployment
spec:
  replicas: 3
  selector:
    matchLabels:
      app: nginx
  template:
    metadata:
      labels:
app: nginx- # 指定容器信息
- containers:
- # 指定容器名称
- - name:


apiVersion: apps/v1beta2
kind: Deployment
metadata:
  name: nginx-deployment
spec:
  replicas: 3
  selector:
    matchLabels:
      app: nginx
  template:
    metadata:
      labels:
        app: nginx
    spec:
      containers:
      - name: nginx
        image: nginx:1.9
        ports:
- containerPort: 80- # 指定镜像名称
- image:


apiVersion: apps/v1beta2
kind: Deployment
metadata:
  name: nginx-deployment
spec:
  replicas: 3
  selector:
    matchLabels:
      app: nginx
  template:
    metadata:
      labels:
        app: nginx
    spec:
      containers:
      - name: nginx
        image: nginx:1.9
        ports:
- containerPort: 80- # 暴露容器端口
- ports:


apiVersion: apps/v1beta2
kind: Deployment
metadata:
  name: nginx-deployment
spec:
  replicas: 3
  selector:
    matchLabels:
      app: nginx
  template:
    metadata:
      labels:
        app: nginx
    spec:
      containers:
      - name: nginx
        image: nginx:1.9
        ports:
- containerPort: 80- # 指定暴露容器端口
- - containerPort:


apiVersion: apps/v1beta2
kind: Deployment
metadata:
  name: nginx-deployment
spec:
  replicas: 3
  selector:
    matchLabels:
      app: nginx
  template:
    metadata:
      labels:
        app: nginx
    spec:
      containers:
      - name: nginx
        image: nginx:1.9
        ports:
- containerPort: 80- # 添加环境变量
- env:


apiVersion: v1
kind: Pod
metadata:
  name: pod-test
  labels:
    os: centos
spec:
  containers:
  - name: hello
    image: centos:6
    env:
    # 变量key
    - name: Test
    # 变量value
value: "123456"- # 启动容器后执行命令
- command:


apiVersion: v1
kind: Pod
metadata:
  name: pod-test
  labels:
    os: centos
spec:
  containers:
  - name: hello
    image: centos:6
command: ["bash","-c","while true;do date;sleep 1;done"]- # 重启策略 可添加(Always,OnFailure,Never)
- restartPolicy:


apiVersion: v1
kind: Pod
metadata:
  name: pod-test
  labels:
    os: centos
spec:
  containers:
  - name: hello
    image: centos:6
restartPolicy: OnFailure- # 健康检查模式(httpGet、exec、tcpSocket)
- livenessProbe:


apiVersion: v1
kind: Pod
metadata:
  name: nginx-pod
  labels:
    app: nginx
spec:
  containers:
  - name: nginx
    image: nginx:1.10
    ports:
    - containerPort: 80
    livenessProbe:
       # 健康检查模式
       httpGet:
         # 指定检查目录
         path: /index.html
         # 访问端口
port: 80- # 容器内管理 volume 数据卷
- volumeMounts:


apiVersion: v1
kind: Pod
metadata:
  name: pod-test
  labels:
    test: centos
spec:
  containers:
  - name: hello-read
    image: centos:6
    # 容器内管理数据卷
    volumeMounts:
      # 数据卷名称
      - name: data
        # 容器数据卷路径
        mountPath: /data
  # 数据卷
  volumes:
  # 数据卷名称
  - name: data
    # 数据宿主机卷路径
    hostPath:
      # 指定宿主机数据卷路径
path: /data- # 宿主级管理 volume 数据卷管理
- volumes:


apiVersion: v1
kind: Pod
metadata:
  name: pod-test
  labels:
    test: centos
spec:
  containers:
  - name: hello-read
    image: centos:6
    # 容器内管理数据卷
    volumeMounts:
      # 数据卷名称
      - name: data
        # 容器数据卷路径
        mountPath: /data
  # 数据卷
  volumes:
  # 数据卷名称
  - name: data
    # 数据宿主机卷路径
    hostPath:
      # 指定宿主机数据卷路径
path: /data- # hsotip 监听 IP,可通过哪些宿主级 ip 访问
- hostIP:


apiVersion: v1
kind: Pod
metadata:
  name: nginx-pod2
  labels:
    app: nginx
spec:
  containers:
  - name: nginx
    image: nginx:1.10
# hostport管理
    ports:
# 指定http
    - name: http
# 指定端口
      containerPort: 80
# hsotip监听IP,可通过哪些宿主级ip访问
      hostIP: 0.0.0.0
# 宿主级暴露端口,它会映射到containerport的容器端口
      hostPort: 89
# 指定协议类型
protocol: TCP- # 宿主级暴露端口,它会映射到 containerport 的容器端口
- hostPort:


apiVersion: v1
kind: Pod
metadata:
  name: nginx-pod2
  labels:
    app: nginx
spec:
  containers:
  - name: nginx
    image: nginx:1.10
# hostport管理
    ports:
# 指定http
    - name: http
# 指定端口
      containerPort: 80
# hsotip监听IP,可通过哪些宿主级ip访问
      hostIP: 0.0.0.0
# 宿主级暴露端口,它会映射到containerport的容器端口
      hostPort: 89
# 指定协议类型
protocol: TCP- # 暴露端口的协议类型
- protocol:


apiVersion: v1
kind: Pod
metadata:
  name: nginx-pod2
  labels:
    app: nginx
spec:
  containers:
  - name: nginx
    image: nginx:1.10
# hostport管理
    ports:
# 指定http
    - name: http
# 指定端口
      containerPort: 80
# hsotip监听IP,可通过哪些宿主级ip访问
      hostIP: 0.0.0.0
# 宿主级暴露端口,它会映射到containerport的容器端口
      hostPort: 89
# 指定协议类型
protocol: TCP- # 固定 IP 地址
- clusterIP:


apiVersion: v1
kind: Service
metadata:
  name: nginx-service
spec:
  selector:
    app: nginx
  ports:
  - name: http
    protocol: TCP
    port: 888
    targetPort: 80
clusterIP: "10.10.10.11"- # 服务类型
- type:


apiVersion: v1
kind: Service
metadata:
  name: nginx-service2
  labels:
  app: nginx
spec:
  selector:
    app: nginx
  ports:
  - name: http
    port: 8080
    targetPort: 80
# 服务类型
type: NodePort- # node 节点创建 socker 的暴露端口,默认 30000~32767
- nodePort:


apiVersion: v1
kind: Service
metadata:
  name: nginx-service2
  labels:
  app: nginx
spec:
  selector:
    app: nginx
  ports:
  - name: http
    port: 8080
    targetPort: 80
# 服务类型
  type: NodePort
")
Kubernetes (yaml 文件详解)
# yaml 格式的 pod 定义文件完整内容:
apiVersion: v1 # 必选,版本号,例如 v1
kind: Pod #必选,Pod
metadata: #必选,元数据
name: string # 必选,Pod 名称
namespace: string # 必选,Pod 所属的命名空间
labels: # 自定义标签
- name: string # 自定义标签名字
annotations: # 自定义注释列表
- name: string
spec: #必选,Pod 中容器的详细定义
containers: # 必选,Pod 中容器列表
- name: string # 必选,容器名称
image: string # 必选,容器的镜像名称
imagePullPolicy: [Always | Never | IfNotPresent] # 获取镜像的策略 Alawys 表示下载镜像 IfnotPresent 表示优先使用本地镜像,否则下载镜像,Nerver 表示仅使用本地镜像
command: [string] # 容器的启动命令列表,如不指定,使用打包时使用的启动命令
args: [string] # 容器的启动命令参数列表
workingDir: string # 容器的工作目录
volumeMounts: # 挂载到容器内部的存储卷配置
- name: string # 引用 pod 定义的共享存储卷的名称,需用 volumes [] 部分定义的的卷名
mountPath: string # 存储卷在容器内 mount 的绝对路径,应少于 512 字符
readOnly: boolean # 是否为只读模式
ports: # 需要暴露的端口库号列表
- name: string # 端口号名称
containerPort: int # 容器需要监听的端口号
hostPort: int # 容器所在主机需要监听的端口号,默认与 Container 相同
protocol: string # 端口协议,支持 TCP 和 UDP,默认 TCP
env: # 容器运行前需设置的环境变量列表
- name: string # 环境变量名称
value: string # 环境变量的值
resources: # 资源限制和请求的设置
limits: # 资源限制的设置
cpu: string #Cpu 的限制,单位为 core 数,将用于 docker run --cpu-shares 参数
memory: string # 内存限制,单位可以为 Mib/Gib,将用于 docker run --memory 参数
requests: # 资源请求的设置
cpu: string #Cpu 请求,容器启动的初始可用数量
memory: string # 内存清楚,容器启动的初始可用数量
livenessProbe: # 对 Pod 内个容器健康检查的设置,当探测无响应几次后将自动重启该容器,检查方法有 exec、httpGet 和 tcpSocket,对一个容器只需设置其中一种方法即可
exec: # 对 Pod 容器内检查方式设置为 exec 方式
command: [string] #exec 方式需要制定的命令或脚本
httpGet: # 对 Pod 内个容器健康检查方法设置为 HttpGet,需要制定 Path、port
path: string
port: number
host: string
scheme: string
HttpHeaders:
- name: string
value: string
tcpSocket: # 对 Pod 内个容器健康检查方式设置为 tcpSocket 方式
port: number
initialDelaySeconds: 0 # 容器启动完成后首次探测的时间,单位为秒
timeoutSeconds: 0 # 对容器健康检查探测等待响应的超时时间,单位秒,默认 1 秒
periodSeconds: 0 # 对容器监控检查的定期探测时间设置,单位秒,默认 10 秒一次
successThreshold: 0
failureThreshold: 0
securityContext:
privileged:false
restartPolicy: [Always | Never | OnFailure]#Pod 的重启策略,Always 表示一旦不管以何种方式终止运行,kubelet 都将重启,OnFailure 表示只有 Pod 以非 0 退出码退出才重启,Nerver 表示不再重启该 Pod
nodeSelector: obeject # 设置 NodeSelector 表示将该 Pod 调度到包含这个 label 的 node 上,以 key:value 的格式指定
imagePullSecrets: #Pull 镜像时使用的 secret 名称,以 key:secretkey 格式指定
- name: string
hostNetwork:false #是否使用主机网络模式,默认为 false,如果设置为 true,表示使用宿主机网络
volumes: # 在该 pod 上定义共享存储卷列表
- name: string # 共享存储卷名称 (volumes 类型有很多种)
emptyDir: {} # 类型为 emtyDir 的存储卷,与 Pod 同生命周期的一个临时目录。为空值
hostPath: string # 类型为 hostPath 的存储卷,表示挂载 Pod 所在宿主机的目录
path: string #Pod 所在宿主机的目录,将被用于同期中 mount 的目录
secret: # 类型为 secret 的存储卷,挂载集群与定义的 secre 对象到容器内部
scretname: string
items:
- key: string
path: string
configMap: # 类型为 configMap 的存储卷,挂载预定义的 configMap 对象到容器内部
name: string
items:
- key: string
path: string
我们今天的关于Kubernetes 新玩法:在 yaml 中编程和kubernetes yaml文件编写的分享就到这里,谢谢您的阅读,如果想了解更多关于5、kubernetes 集群 YAML 文件详解、Docker Kubernetes yaml 创建管理 Pod、Docker Kubernetes YAML 文件常用指令、Kubernetes (yaml 文件详解)的相关信息,可以在本站进行搜索。
本文标签:


