最近很多小伙伴都在问Chapter1:ATourofComputerSystems这两个问题,那么本篇文章就来给大家详细解答一下,同时本文还将给你拓展<<Signalsandsystems
最近很多小伙伴都在问Chapter 1: A Tour of Computer Systems这两个问题,那么本篇文章就来给大家详细解答一下,同时本文还将给你拓展<<Signals and systems>> Chapter、2023【ACDU China Tour】即将开启,6月深圳见!、A Swift Tour、A tour of gRPC:01 - 基础理论等相关知识,下面开始了哦!
本文目录一览:- Chapter 1: A Tour of Computer Systems
- <<Signals and systems>> Chapter
- 2023【ACDU China Tour】即将开启,6月深圳见!
- A Swift Tour
- A tour of gRPC:01 - 基础理论

Chapter 1: A Tour of Computer Systems
A computer system consists of hardware and systems software that work together to run application programs.
We begin our study of systems by tracing the lifetime of the hello program, from the time it is created by a programmer, until it runs on a system, prints its simple message, and terminates.
#include <stdio.h>

int main(void)
{
    printf("hello, world\n");
}
1.1 Information Is Bits + Context
The hello.c program is stored in a file as a sequence of bytes, we shows the ASCII representation of the hello.c program:

Files such as hello.c that consist exclusively of ASCII characters are known as text files.All other files are known as binary files.
The representation of hello.c illustrates a fundamental idea: All information in a system--including disk files, programs stored in memory, user data stored in memory, and data transferred across a network--is represented as a bunch of bits.The only thing that distinguishes different data objects is the context in which we view them.
1.2 Programs Are Translated by Other Programs into Different Forms
in order to run hello.c on the system, the individual C statements must be translated by other programs into a sequence of low-level machine-language instructions.These instructions are then packaged in a form called an executable object program and stored as a binary disk file.Object programs are also referred to as executable object files.
we run hello.c in unix system:
lgtdeMacBook-Pro:~ lgt$ gcc -o hello hello.c
lgtdeMacBook-Pro:~ lgt$ ls hello*
hello	hello.c
lgtdeMacBook-Pro:~ lgt$ ./hello
hello, world
Preprocessing phase:The preprocessor(cpp) modifies the original C program according to directives that begin with the # character.For example, the #include<stdio.h> command in line 1 of hello.c tells the preprocessor to read the contents of the system header file stdio.h and insert it directly into the program text. The result is another C program, typically with the .i suffix.
Compilation phase:The compiler(cc1) translates the text file hello.i into the text file hello.s, which contains an assembly-language program.Each statement in an assembly-language program exactly describes one low-level machine-language instruction in a standard text form.Assembly language is useful because it provides a common output language for different compilers for different high-level languages.
Assembly phase: The assembler(as) translates hello.s into machine-language instructions, packages then in a form known as a relocatable object program, and stores the result in the object file hello.o.The hello.o file is a binary file whose bytes encode machine language instructions rather than characters.
Linking phase:The printf function resides in a separate precompiled object file called print.o, which must somehow be merged with our hello.o program. The linker(ld) handles this merging.The result is the hello file, which is an executable object file(or simply executable) that is ready to be loaded into memory and executed by the system.
1.3 It Pays to Understand How Compilation Systems Work
how compilation system work: Optimizing program performance, Understanding link-time errors and Avoiding security holes.
1.4 Processors Read and Interpret Instructions Stored in Memory
1.4.1 Hardware Organization of a System
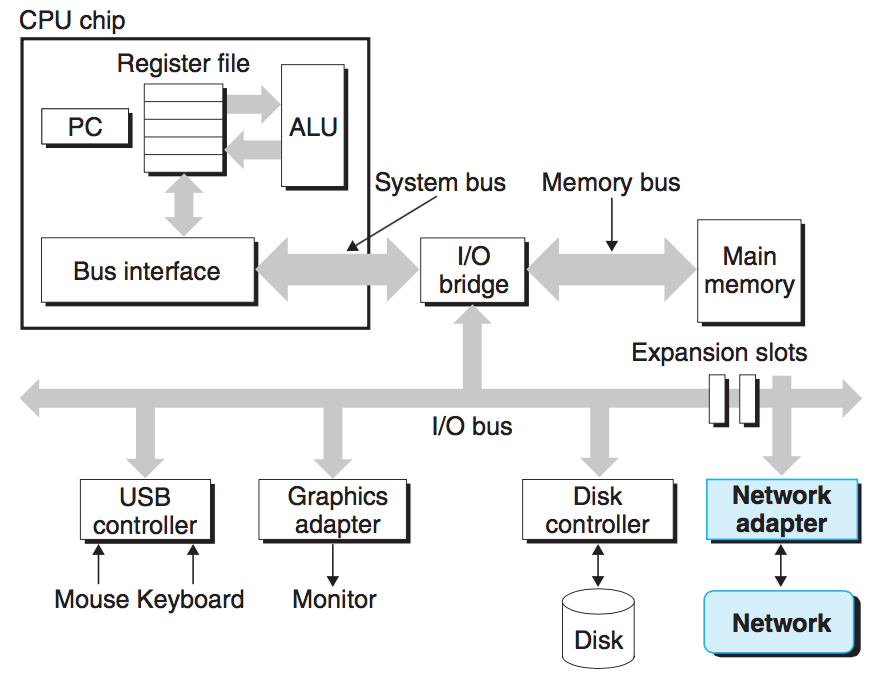
To understand what happens to our hello program when we run it, we need to understand the hardware organization of a typical system:
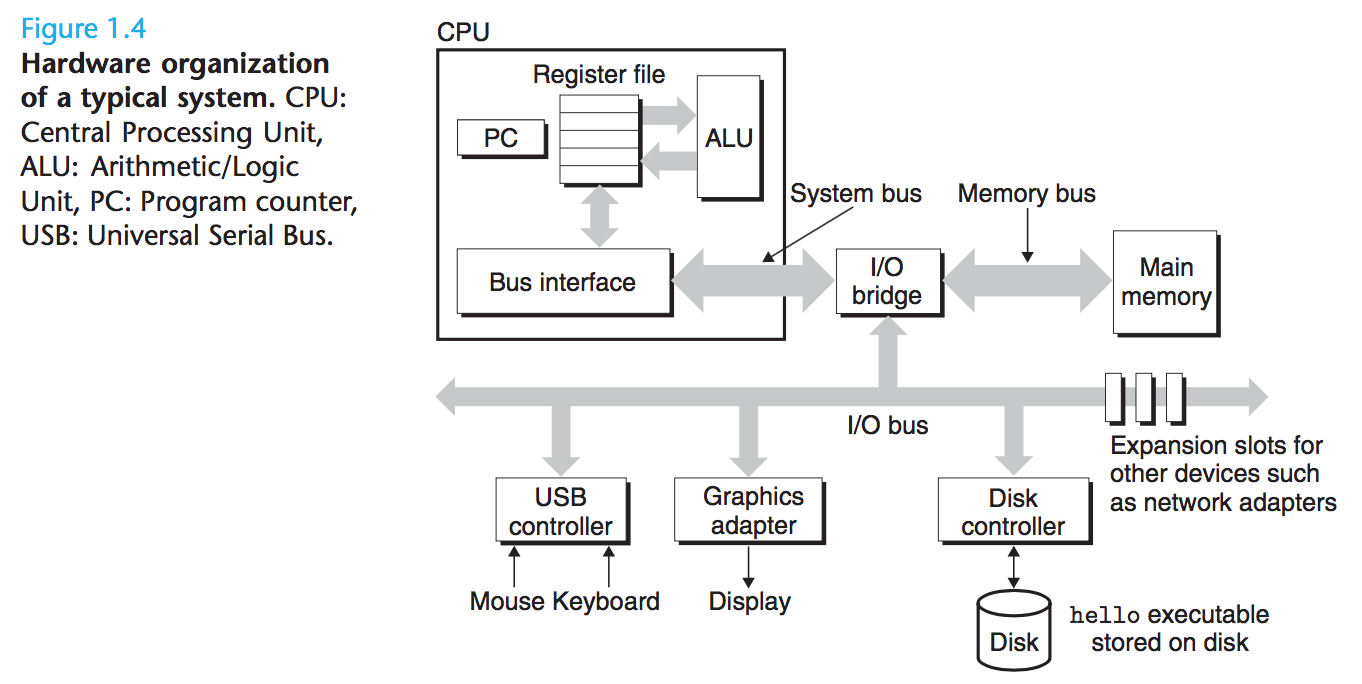
Buses
Running throughout the system is a collection of electrical conduits called buses that carry bytes of information back and forth between the components. Buses are typically designed to transfer fixed-sized chunks of bytes known as words.The number of bytes in a word(the word size) is a fundamental system parameter that varies across systems.
I/O Devices
Input/output(I/O) devices are the system''s connection to the external world.
Each I/O device is connected to the I/O bus by either a controller or an adapter. Controllers are chip sets in the device itself or on the system''s main printed circuit board(often called the mother board). An adapter is a card that plugs into a slot on the motherboard. Regardless, the purpose of each is to transfer information back and forth between the I/O bus and an I/O device.
Main Memory
The main memory is a temporary storage device that holds both a program and the data it manipulates while the processor is executing the program. Physically, main memory consists of a collection of dynamic random access memory(DRAM) chips. Logically, memory is organized as a linear array of bytes, each with its own unique address(array index) starting at zero. In general, each of the machine instructions that constitute a program can consist of a variable number of bytes. The sizes of data items that correspond to C program variables vary according to type.
Processor
The central processing unit(CPU) or simply processor, is the engine that interprets(or executes) instructions stored in main memory.At its core is a word-sized storage device(or register) called the program counter(PC). At any point in time, the PC points at (contains the address of) some machine-language instruction in main memory.
From the time that power is applied to the system, until the time that the power is shut off, a processor repeatedly executes the instruction pointed at by the program counter and updates the program counter to point to the next instruction. A processor appears to operate according to a very simple instruction execution model, defined by its instruction set architecture. In this model, instructions execute in strict sequence, and executing a single instruction involves performing a series of steps. The processor reads the instruction from memory pointed at by the program counter(PC), interprets the bits in the instruction, performs some simple operation dictated by the instruction, and then updates the PC to point to the next instruction, which may or may not be contiguous in memory to the instruction that was just executed.
There are only a few of these simple operations, and they revolve around main memory, the register file, and the arithmetic/logic unit(ALU). The register file is a small storage device that consists of a collection of word-sized registers, each with its own unique name. The ALU computes new data and address values. Here has some example:
Load: Copy a byte or a word from main memory into a register, overwriting the previous contents of the register.
Store: Copy a byte or a word from a register to a location in main memory, overwriting the previous contents of that location.
Operate: Copy the contents of two registers to the ALU, perform an arithmetic operation on the two words, and store the result in a register, overwriting the previous contents of that register.
Jump: Extract a word from the instruction itself and copy that word into the program counter(PC), overwriting the previous value of the PC.
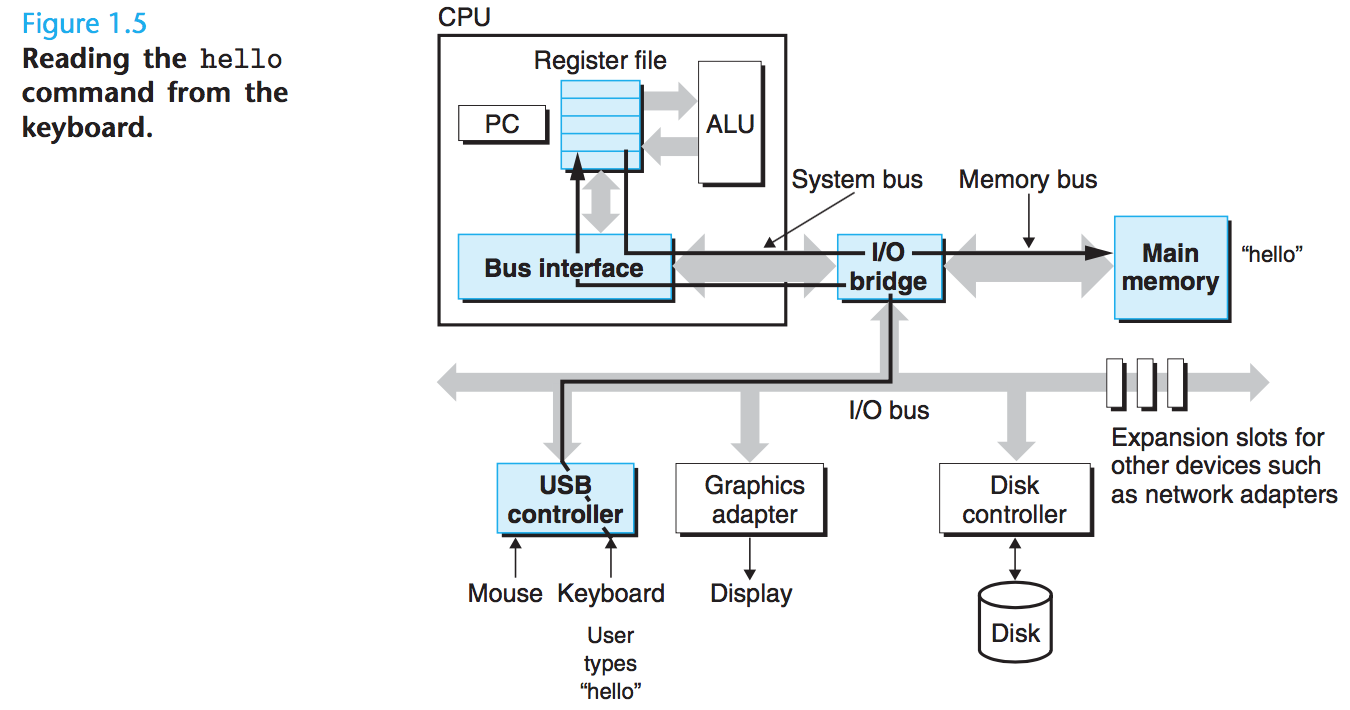
1.4.2 Running the hello Program
When we type the characters "./hello" at the keyboard, the shell program reads each one into a register, and then stores it in memory:
When we hit the enter, the shell then loads the executable hello file by executing a sequence of instructions that copies the code and data in the hello object file from disk to main memory. The data include the string of characters "hello, world\n" that will eventually be printed out:

Once the code and data in the hello object file are loaded into memory, the processor begins executing the machine-language instructions in the hello program''s main routine.

1.5 Caches Matter
We know that processor is faster than main memory, and main memory is faster than disk when moving information from one place to another.
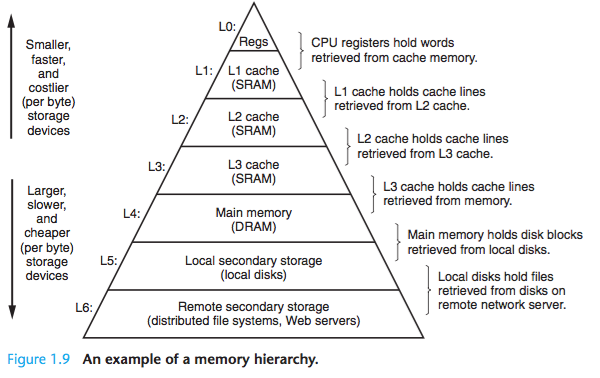
To deal with the processor-memory gap, system designers include smaller faster storage devices called cache memories(or simply caches) that serve as temporary staging areas for information that the processor is likely to need in the near future.

An L1 cache on the processor chip holds tens of thousands of bytes and can be accessed nearly as fast as the register file. A larger L2 cache with hundreds of thousands to millions of bytes is connected to the processor by a special bus. It might take 5 times longer for the process to access the L2 cache than the L1 cache, but this is still faster than accessing the main memory. The L1 and L2 caches are implemented with a hardware technology known as static random access memory(SRAM).
1.6 Storage Devices Form a Hierarchy
memory hierarchy:
1.7 The Operating System Manages the Hardware
Back to our hello example. When the shell loaded and ran the hello program, and when the hello program printed its message, neither program accessed the keyboard, display, disk, or main memory directly. Rather, they relied on the services provided by the operating system. We can think of the operating system as a layer of software interposed between the application program and the hardware. All attempts by an application program to manipulate the hardware must go through the operating system.

The operating system has two primary purposes:(1) to protect the hardware from misuse by runaway applications, and (2) to provide applications with simple and uniform mechanisms for manipulating complicated and often wildly different low-level hardware devices.

files are abstractions for I/O devices, virtual memory is an abstraction for both the main memory and disk I/O devices, and processes are abstractions for the processor, main memory, and I/O devices.
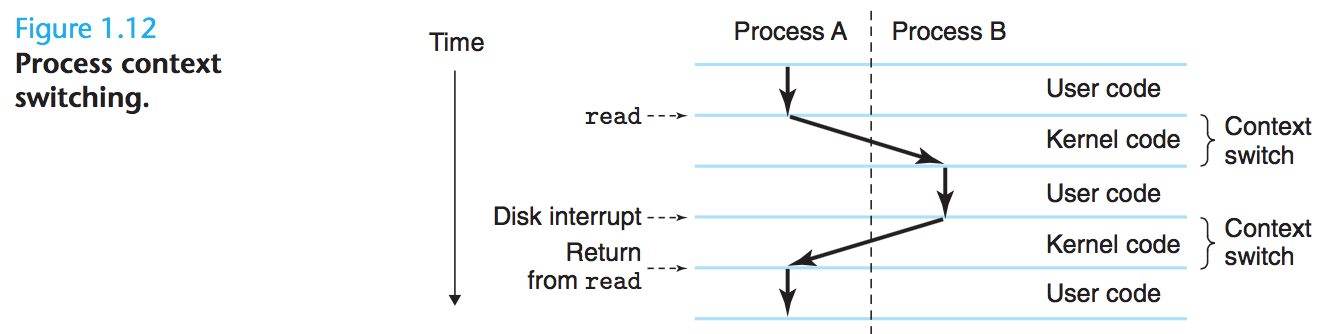
1.7.1 Processes
A process is the operating system''s abstraction for a running program.
The operating system keeps track of all the state information that the process needs in order to run. This state, which is known as the context, includes information such as the current values of the PC, the register file, and the contents of main memory. At any point in time, a uniprocessor system can only execute the code for a single process. When the operating system decides to transfer control from the current process to some new process, it performs a context switch by saving the context of the current process, restoring the context of the new process, and then passing control to the new process.
1.7.2 Threads
threads running in the context of the process and sharing the same code and global data.
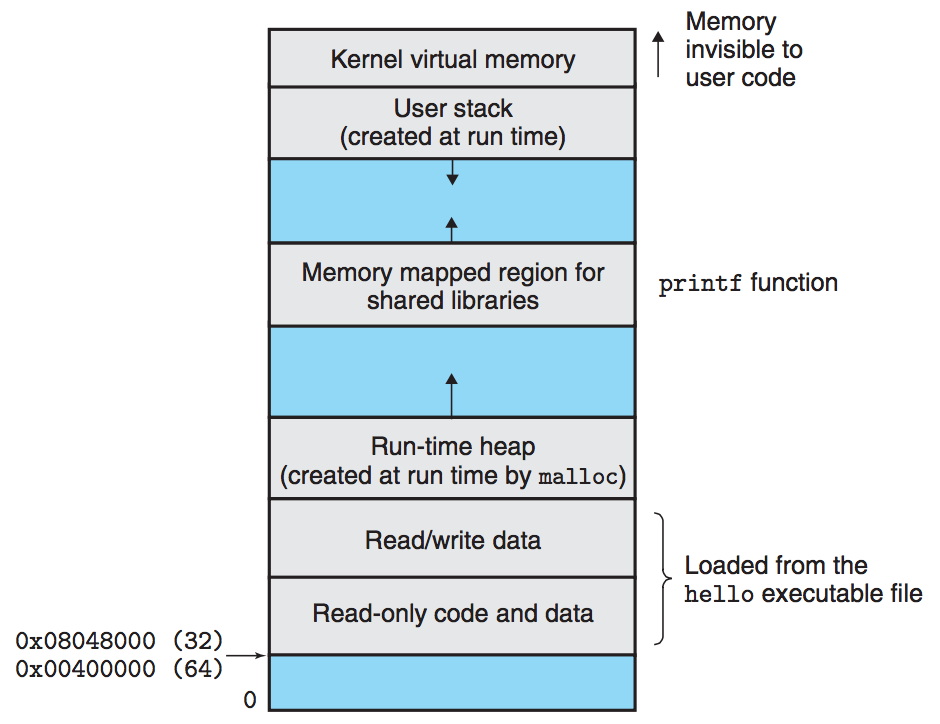
1.7.3 Virtual Memory
Virtual memory is an abstraction that provides each process with the illusion that it has exclusive use of the main memory. Each process has the same uniform view of memory, which is known as its virtual address space.
1.7.4 Files
A file is a sequence of bytes.
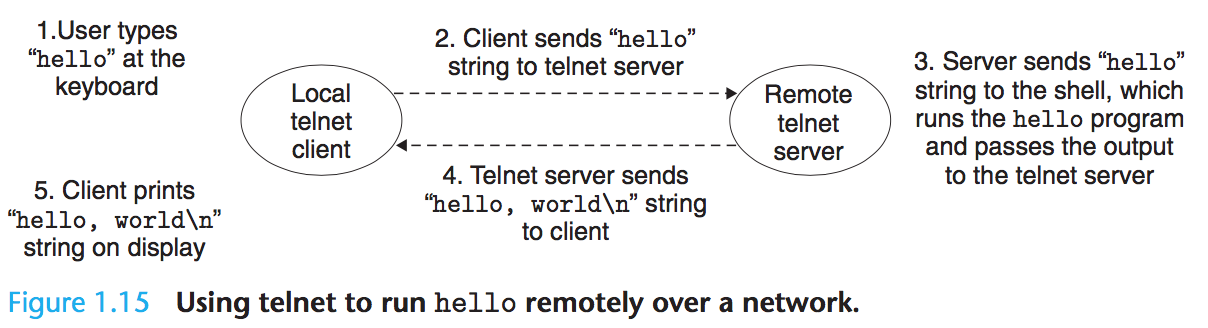
1.8 Systems Communicate with Other Systems Using Networks
The network can be viewed as just another I/O device. With the advent of global networks such as the Internet, copying information from one machine to another has become one of the most important uses of computer systems:
Returning to our hello example, we could use the familiar telnet application to run hello on a remote machine:
1.9 Important Themes
1.9.1 Concurrency and Parallelism
we want computer to do more, and we want them to run faster. Both of these factors improve when the processor does more things at once. We use the term concurrency to refer to the general concept of a system with multiple, simultaneous activities, and the term parallelism to refer to the use of concurrency to make a system run faster.Parallelism can be exploited at multiple levels of abstraction in a computer system.
Thread-Level Concurrency
We use multi-core processors and hyper threading to make a system to consist of multiple processors.
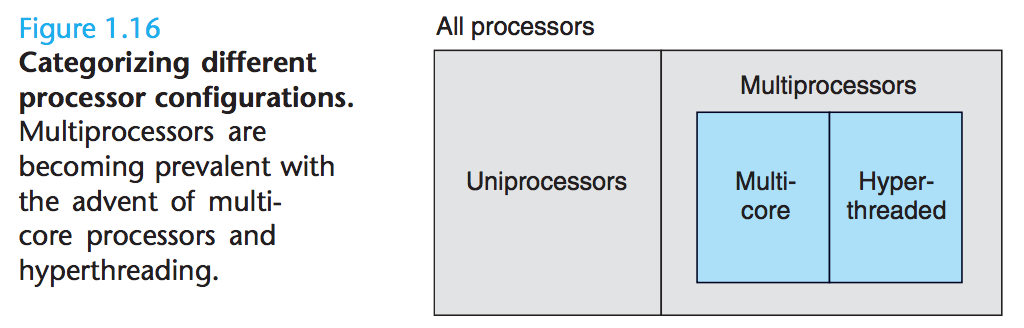
Multi-core processors have several CPUs integrated onto a single integrated-circuit chip:
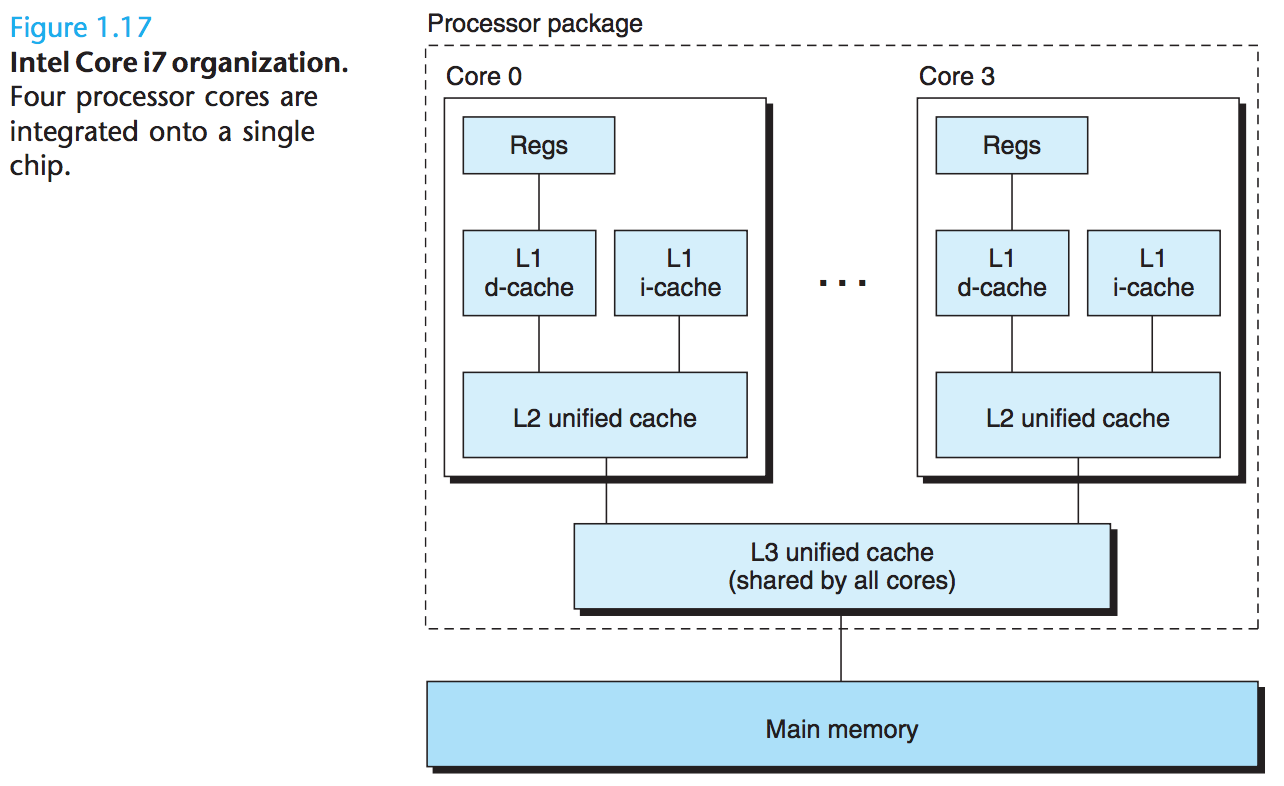
Hyperthreading, sometimes called simultaneous multi-threading, is a technique that allows a single CPU to execute multiple flows of control.It involves having multiple copies of some of the CPU hardware, such as program counters and register files, while having only single copies of other parts of the hardware, such as the units that perform floating-point arithmetic.

<<Signals and systems>> Chapter
Signals and systems Chapter 2 Linear Time-Inverariant Systems 2.1 Discrete-time LTI system: the convolution sum 离散的信号可以用叠合的不同幅的delta函数表示出来 The discret-time unit impulse response and the convolution sum representation o
> Chapter 2
linear time-inverariant systems
2.1 Discrete-time LTI system: the convolution sum
离散的信号可以用叠合的不同幅值的delta函数表示出来
The discret-time unit impulse response and the convolution sum representation of LTI systems
上面的例子很清楚的一步步的解析了卷积和的过程.
卷积和的部分可以去看看我写的这篇《Why should we use convolution?》
对于为什么是x[k]*h[n-k]
这里研究的是LTI系统,h[n]是LTI系统,对于不同时刻k输入x[k],系统的响应仅仅做偏移即可,
x[0]输入的对应h为h[0],x[1]对应的h为h[n-1]... x[k] 对应的就是h[n-k]
为了加深概念的理解,我们再看看时变系统卷积和的过程
输入是X[n],响应是h,注意时变系统的输入响应不同时刻不同,所以这里有三个不同的响应
我们把输入看作impluse 序列,这样,利用delta函数的性质,就很容易get到输出了哇~
要知道对系统输入的是一系列的impulse,于是应该把所有结果(x[-1]h[-1], ...,x[1]h[1])累加起来,得到输出y[n],
这就是为什么下面y[n]卷积和公式里面会有连加符号的原因!
而正是由于时变系统的特性,会导致一种有趣的现象,对于输入x[n]和响应h[n]
计算过程中直接把h[n]反转,然后偏移k个单位,直接于原来的输入信号做乘法,然后把各个单位的结果做累加,得到的就是此刻的输出y[n],最后系统的输出这里书上有一定的“误导性”,之所以打双引号是因为这里h[n]是一个无限长的step function,所以后面无穷逼近于1/(1-alpha).
在计算机中,不可能用无穷序列来模拟...输入序列就是有限的,那么输出就会是
(length of x[n]) + (length of h[n]) -1。
为什么会是减一?想想,如果输出到(length of x[n]) + (length of h[n])个点的时候,两者已经没有重叠区域,于是得到的结果是0.这里我们不考虑这个没有意义的点.于是输出就只有(length of x[n]) + (length of h[n]) -1个点
这里我做了个例子
%code writer : EOF
%code date : 2014.10 .1
%e-mail : jasonleaster@gmail.com
%code file : demo_for_convolution
%code purpose:
% A demo for convolution in LTI-system
clear all
close all
% you could use this varible to define how many number of points in the input sequence.
points = 10;
% x is used as input points
% h is used as responce sequnce.
% %% input sequence one
% x = exp(-[0: (points-1)]);
% h = ones(1,points*10);
%% Input sequence two
alpha = 2;
x = [1 1 1 1 1];
h = alpha.^([0:6]);
length_x = size(x,2);
length_h = size(h,2);
figure(1);
subplot(121);
scatter(1:length_x,x,''r'');
title(''x[n]'');
subplot(122);
scatter(1:length_h,h,''g'');
title(''h[n]'');
output = zeros(1,length_x+length_h -1);
%% Kernel part of our convolution sum :- )
for current_point_n= 1:length_x + length_h
tmp = current_point_n;
while(tmp > 0)
if current_point_n length_x && current_point_n length_x
tmp = tmp -1;
continue;
else
if (current_point_n - tmp + 1) <br><br><p><span><img src="/inc/test.jsp?url=http%3A%2F%2Fimg.blog.csdn.net%2F20141001015131468&refer=http%3A%2F%2Fblog.csdn.net%2Fcinmyheart%2Farticle%2Fdetails%2F39695943" alt="&lt;&lt;Signals and systems&gt;&gt; Chapter" ><br></span></p>
<p><span><br></span></p>
<p><span>上面的输入随意调整都性,程序还是比较健壮的</span></p>
<p><span><br></span></p>
<p><span><img src="/inc/test.jsp?url=http%3A%2F%2Fimg.blog.csdn.net%2F20141001015326265&refer=http%3A%2F%2Fblog.csdn.net%2Fcinmyheart%2Farticle%2Fdetails%2F39695943" alt="&lt;&lt;Signals and systems&gt;&gt; Chapter" ><br></span></p>
<p><span><br></span></p>
<p><span><br></span></p>
<p><span><br></span></p>
<p><span><br></span></p>
<p><span>Properties of LTI systems</span></p>
<p><span>交换律,结合律,分配律</span></p>
<p><span><img src="/inc/test.jsp?url=http%3A%2F%2Fimg.blog.csdn.net%2F20141001021021577&refer=http%3A%2F%2Fblog.csdn.net%2Fcinmyheart%2Farticle%2Fdetails%2F39695943" alt="&lt;&lt;Signals and systems&gt;&gt; Chapter" ><br></span></p>
<p><span><br></span></p>
<p><span>对于可逆性的说明demo:</span></p>
<p><span><br></span></p>
<p><span><img src="/inc/test.jsp?url=http%3A%2F%2Fimg.blog.csdn.net%2F20141001021621579&refer=http%3A%2F%2Fblog.csdn.net%2Fcinmyheart%2Farticle%2Fdetails%2F39695943" alt="&lt;&lt;Signals and systems&gt;&gt; Chapter" > </span></p>
<p><span><br></span></p>
<p><span><br></span></p>
<p><span>对于因果性的探讨,</span></p>
<p><span><br></span></p>
<p><span><img src="/inc/test.jsp?url=http%3A%2F%2Fimg.blog.csdn.net%2F20141001021454312&refer=http%3A%2F%2Fblog.csdn.net%2Fcinmyheart%2Farticle%2Fdetails%2F39695943" alt="&lt;&lt;Signals and systems&gt;&gt; Chapter" ><br></span></p>
<p><br></p>
<p><br></p>
<p><br></p>
<p><br></p>
<p><span>稳定性的探究:</span></p>
<p><span><img src="/inc/test.jsp?url=http%3A%2F%2Fimg.blog.csdn.net%2F20141001021826364&refer=http%3A%2F%2Fblog.csdn.net%2Fcinmyheart%2Farticle%2Fdetails%2F39695943" alt="&lt;&lt;Signals and systems&gt;&gt; Chapter" ><br></span></p>
<p><span><br></span></p>
<p><span><br></span></p>
<p><span>最后,要认识到,微分方程和差分方程仅仅是分别对于连续和离散系统的输入输出关系的描述而已,他们相似于都是对系统输入输出的描述,不可混淆对比.之前我胡乱的做对比,以至于很苦恼</span></p>
<p><span>这里记录了我思考的过程</span></p>
<p>http://blog.csdn.net/cinmyheart/article/details/39499967<br></p>
<p><span><br></span></p>
<p><br></p>

2023【ACDU China Tour】即将开启,6月深圳见!
ACDU ( All China DBA Union - 中国 DBA 联盟)联接数据库厂商和 DBA,助力中国 DBA 的持续成长,促进数据库生态健康发展,为企业新数据库应用培养人才。我们助力中国 DBA 的持续成长,促进数据库生态健康发展,为企业新数据库应用培养人才!
活动信息
由中国DBA联盟(ACDU)发起的【ACDU China Tour】城市行活动也将正式开启,我们陆续前往深圳、上海、成都、西安等地,与各位同行、新老朋友相聚线下,欢迎大家多多关注!
2023 年6月17日(拟),我们将在广东深圳开启今年第一期【ACDU China Tour】线下技术分享,邀请众多业内技术专家与行业同仁共同探索数据库未来发展!
有奖征集
为了让本次线下交流更满足大家的真实需求、能为大家提供开放的交流空间,现发起【议题征集】,欢迎大家点击阅读原文,在数说评论区告诉我们您想了解的议题、期待的嘉宾,主题包含但不限于:
-
数据库技术发展趋势 -
数据库新特性解读 -
数据库故障案例分析 -
金融、能源等各行业的落地应用

本文分享自微信公众号 - 墨天轮(enmocs)。
如有侵权,请联系 support@oschina.cn 删除。
本文参与“OSC源创计划”,欢迎正在阅读的你也加入,一起分享。

A Swift Tour
Tradition suggests that the first program in a new language should print the words “Hello, world!” on the screen. In Swift, this can be done in a single line:
print("Hello, world!")
If you have written code in C or Objective-C, this syntax looks familiar to you—in Swift, this line of code is a complete program. You don’t need to import a separate library for functionality like input/output or string handling. Code written at global scope is used as the entry point for the program, so you don’t need a main()function. You also don’t need to write semicolons at the end of every statement.
This tour gives you enough information to start writing code in Swift by showing you how to accomplish a variety of programming tasks. Don’t worry if you don’t understand something—everything introduced in this tour is explained in detail in the rest of this book.
NOTE
For the best experience, open this chapter as a playground in Xcode. Playgrounds allow you to edit the code listings and see the result immediately.
Download Playground
Simple Values
Use let to make a constant and var to make a variable. The value of a constant doesn’t need to be known at compile time, but you must assign it a value exactly once. This means you can use constants to name a value that you determine once but use in many places.
var myVariable = 42myVariable = 50let myConstant = 42
A constant or variable must have the same type as the value you want to assign to it. However, you don’t always have to write the type explicitly. Providing a value when you create a constant or variable lets the compiler infer its type. In the example above, the compiler infers that myVariable is an integer because its initial value is an integer.
If the initial value doesn’t provide enough information (or if there is no initial value), specify the type by writing it after the variable, separated by a colon.
let implicitInteger = 70let implicitDouble = 70.0let explicitDouble: Double = 70
EXPERIMENT
Create a constant with an explicit type of Float and a value of 4.
Values are never implicitly converted to another type. If you need to convert a value to a different type, explicitly make an instance of the desired type.
let label = "The width is "let width = 94let widthLabel = label + String(width)
EXPERIMENT
Try removing the conversion to String from the last line. What error do you get?
There’s an even simpler way to include values in strings: Write the value in parentheses, and write a backslash (\) before the parentheses. For example:
let apples = 3let oranges = 5let appleSummary = "I have \(apples) apples."let fruitSummary = "I have \(apples + oranges) pieces of fruit."
EXPERIMENT
Use \() to include a floating-point calculation in a string and to include someone’s name in a greeting.
Create arrays and dictionaries using brackets ([]), and access their elements by writing the index or key in brackets. A comma is allowed after the last element.
var shoppingList = ["catfish", "water", "tulips", "blue paint"]shoppingList[1] = "bottle of water"var occupations = ["Malcolm": "Captain","Kaylee": "Mechanic",]occupations["Jayne"] = "Public Relations"
To create an empty array or dictionary, use the initializer syntax.
let emptyArray = [String]()let emptyDictionary = [String: Float]()
If type information can be inferred, you can write an empty array as [] and an empty dictionary as [:]—for example, when you set a new value for a variable or pass an argument to a function.
shoppingList = []occupations = [:]
Control Flow
Use if and switch to make conditionals, and use for-in, for, while, and repeat-while to make loops. Parentheses around the condition or loop variable are optional. Braces around the body are required.
let individualScores = [75, 43, 103, 87, 12]var teamScore = 0for score in individualScores {if score > 50 {teamScore += 3} else {teamScore += 1}}print(teamScore)
In an if statement, the conditional must be a Boolean expression—this means that code such as if score { ... } is an error, not an implicit comparison to zero.
You can use if and let together to work with values that might be missing. These values are represented as optionals. An optional value either contains a value or contains nil to indicate that a value is missing. Write a question mark (?) after the type of a value to mark the value as optional.
var optionalString: String? = "Hello"print(optionalString == nil)var optionalName: String? = "John Appleseed"var greeting = "Hello!"if let name = optionalName {greeting = "Hello, \(name)"}
EXPERIMENT
Change optionalName to nil. What greeting do you get? Add an else clause that sets a different greeting ifoptionalName is nil.
If the optional value is nil, the conditional is false and the code in braces is skipped. Otherwise, the optional value is unwrapped and assigned to the constant after let, which makes the unwrapped value available inside the block of code.
Another way to handle optional values is to provide a default value using the ?? operator. If the optional value is missing, the default value is used instead.
let nickName: String? = nillet fullName: String = "John Appleseed"let informalGreeting = "Hi \(nickName ?? fullName)"
Switches support any kind of data and a wide variety of comparison operations—they aren’t limited to integers and tests for equality.
let vegetable = "red pepper"switch vegetable {case "celery":print("Add some raisins and make ants on a log.")case "cucumber", "watercress":print("That would make a good tea sandwich.")case let x where x.hasSuffix("pepper"):print("Is it a spicy \(x)?")default:print("Everything tastes good in soup.")}
EXPERIMENT
Try removing the default case. What error do you get?
Notice how let can be used in a pattern to assign the value that matched the pattern to a constant.
After executing the code inside the switch case that matched, the program exits from the switch statement. Execution doesn’t continue to the next case, so there is no need to explicitly break out of the switch at the end of each case’s code.
You use for-in to iterate over items in a dictionary by providing a pair of names to use for each key-value pair. Dictionaries are an unordered collection, so their keys and values are iterated over in an arbitrary order.
let interestingNumbers = ["Prime": [2, 3, 5, 7, 11, 13],"Fibonacci": [1, 1, 2, 3, 5, 8],"Square": [1, 4, 9, 16, 25],]var largest = 0for (kind, numbers) in interestingNumbers {for number in numbers {if number > largest {largest = number}}}print(largest)
EXPERIMENT
Add another variable to keep track of which kind of number was the largest, as well as what that largest number was.
Use while to repeat a block of code until a condition changes. The condition of a loop can be at the end instead, ensuring that the loop is run at least once.
var n = 2while n < 100 {n = n * 2}print(n)var m = 2repeat {m = m * 2} while m < 100print(m)
You can keep an index in a loop by using ..< to make a range of indexes.
var total = 0for i in 0..<4 {total += i}print(total)
Use ..< to make a range that omits its upper value, and use ... to make a range that includes both values.
Functions and Closures
Use func to declare a function. Call a function by following its name with a list of arguments in parentheses. Use -> to separate the parameter names and types from the function’s return type.
func greet(person: String, day: String) -> String {return "Hello \(person), today is \(day)."}greet(person: "Bob", day: "Tuesday")
EXPERIMENT
Remove the day parameter. Add a parameter to include today’s lunch special in the greeting.
By default, functions use their parameter names as labels for their arguments. Write a custom argument label before the parameter name, or write _ to use no argument label.
func greet(_ person: String, on day: String) -> String {return "Hello \(person), today is \(day)."}greet("John", on: "Wednesday")
Use a tuple to make a compound value—for example, to return multiple values from a function. The elements of a tuple can be referred to either by name or by number.
func calculateStatistics(scores: [Int]) -> (min: Int, max: Int, sum: Int) {var min = scores[0]var max = scores[0]var sum = 0for score in scores {if score > max {max = score} else if score < min {min = score}sum += score}return (min, max, sum)}let statistics = calculateStatistics(scores: [5, 3, 100, 3, 9])print(statistics.sum)print(statistics.2)
Functions can also take a variable number of arguments, collecting them into an array.
func sumOf(numbers: Int...) -> Int {var sum = 0for number in numbers {sum += number}return sum}sumOf()sumOf(numbers: 42, 597, 12)
EXPERIMENT
Write a function that calculates the average of its arguments.
Functions can be nested. Nested functions have access to variables that were declared in the outer function. You can use nested functions to organize the code in a function that is long or complex.
func returnFifteen() -> Int {var y = 10func add() {y += 5}add()return y}returnFifteen()
Functions are a first-class type. This means that a function can return another function as its value.
func makeIncrementer() -> ((Int) -> Int) {func addOne(number: Int) -> Int {return 1 + number}return addOne}var increment = makeIncrementer()increment(7)
A function can take another function as one of its arguments.
func hasAnyMatches(list: [Int], condition: (Int) -> Bool) -> Bool {for item in list {if condition(item) {return true}}return false}func lessThanTen(number: Int) -> Bool {return number < 10}var numbers = [20, 19, 7, 12]hasAnyMatches(list: numbers, condition: lessThanTen)
Functions are actually a special case of closures: blocks of code that can be called later. The code in a closure has access to things like variables and functions that were available in the scope where the closure was created, even if the closure is in a different scope when it is executed—you saw an example of this already with nested functions. You can write a closure without a name by surrounding code with braces ({}). Use in to separate the arguments and return type from the body.
numbers.map({(number: Int) -> Int inlet result = 3 * numberreturn result})
EXPERIMENT
Rewrite the closure to return zero for all odd numbers.
You have several options for writing closures more concisely. When a closure’s type is already known, such as the callback for a delegate, you can omit the type of its parameters, its return type, or both. Single statement closures implicitly return the value of their only statement.
let mappedNumbers = numbers.map({ number in 3 * number })print(mappedNumbers)
You can refer to parameters by number instead of by name—this approach is especially useful in very short closures. A closure passed as the last argument to a function can appear immediately after the parentheses. When a closure is the only argument to a function, you can omit the parentheses entirely.
let sortedNumbers = numbers.sorted { $0 > $1 }print(sortedNumbers)
Objects and Classes
Use class followed by the class’s name to create a class. A property declaration in a class is written the same way as a constant or variable declaration, except that it is in the context of a class. Likewise, method and function declarations are written the same way.
class Shape {var numberOfSides = 0func simpleDescription() -> String {return "A shape with \(numberOfSides) sides."}}
EXPERIMENT
Add a constant property with let, and add another method that takes an argument.
Create an instance of a class by putting parentheses after the class name. Use dot syntax to access the properties and methods of the instance.
var shape = Shape()shape.numberOfSides = 7var shapeDescription = shape.simpleDescription()
This version of the Shape class is missing something important: an initializer to set up the class when an instance is created. Use init to create one.
class NamedShape {var numberOfSides: Int = 0var name: Stringinit(name: String) {self.name = name}func simpleDescription() -> String {return "A shape with \(numberOfSides) sides."}}
Notice how self is used to distinguish the name property from the name argument to the initializer. The arguments to the initializer are passed like a function call when you create an instance of the class. Every property needs a value assigned—either in its declaration (as with numberOfSides) or in the initializer (as withname).
Use deinit to create a deinitializer if you need to perform some cleanup before the object is deallocated.
Subclasses include their superclass name after their class name, separated by a colon. There is no requirement for classes to subclass any standard root class, so you can include or omit a superclass as needed.
Methods on a subclass that override the superclass’s implementation are marked with override—overriding a method by accident, without override, is detected by the compiler as an error. The compiler also detects methods with override that don’t actually override any method in the superclass.
class Square: NamedShape {var sideLength: Doubleinit(sideLength: Double, name: String) {self.sideLength = sideLengthsuper.init(name: name)numberOfSides = 4}func area() -> Double {return sideLength * sideLength}override func simpleDescription() -> String {return "A square with sides of length \(sideLength)."}}let test = Square(sideLength: 5.2, name: "my test square")test.area()test.simpleDescription()
EXPERIMENT
Make another subclass of NamedShape called Circle that takes a radius and a name as arguments to its initializer. Implement an area() and a simpleDescription() method on the Circle class.
In addition to simple properties that are stored, properties can have a getter and a setter.
class EquilateralTriangle: NamedShape {var sideLength: Double = 0.0init(sideLength: Double, name: String) {self.sideLength = sideLengthsuper.init(name: name)numberOfSides = 3}var perimeter: Double {get {return 3.0 * sideLength}set {sideLength = newValue / 3.0}}override func simpleDescription() -> String {return "An equilateral triangle with sides of length \(sideLength)."}}var triangle = EquilateralTriangle(sideLength: 3.1, name: "a triangle")print(triangle.perimeter)triangle.perimeter = 9.9print(triangle.sideLength)
In the setter for perimeter, the new value has the implicit name newValue. You can provide an explicit name in parentheses after set.
Notice that the initializer for the EquilateralTriangle class has three different steps:
-
Setting the value of properties that the subclass declares.
-
Calling the superclass’s initializer.
-
Changing the value of properties defined by the superclass. Any additional setup work that uses methods, getters, or setters can also be done at this point.
If you don’t need to compute the property but still need to provide code that is run before and after setting a new value, use willSet and didSet. The code you provide is run any time the value changes outside of an initializer. For example, the class below ensures that the side length of its triangle is always the same as the side length of its square.
class TriangleAndSquare {var triangle: EquilateralTriangle {willSet {square.sideLength = newValue.sideLength}}var square: Square {willSet {triangle.sideLength = newValue.sideLength}}init(size: Double, name: String) {square = Square(sideLength: size, name: name)triangle = EquilateralTriangle(sideLength: size, name: name)}}var triangleAndSquare = TriangleAndSquare(size: 10, name: "another test shape")print(triangleAndSquare.square.sideLength)print(triangleAndSquare.triangle.sideLength)triangleAndSquare.square = Square(sideLength: 50, name: "larger square")print(triangleAndSquare.triangle.sideLength)
When working with optional values, you can write ? before operations like methods, properties, and subscripting. If the value before the ? is nil, everything after the ? is ignored and the value of the whole expression is nil. Otherwise, the optional value is unwrapped, and everything after the ? acts on the unwrapped value. In both cases, the value of the whole expression is an optional value.
let optionalSquare: Square? = Square(sideLength: 2.5, name: "optional square")let sideLength = optionalSquare?.sideLength
Enumerations and Structures
Use enum to create an enumeration. Like classes and all other named types, enumerations can have methods associated with them.
enum Rank: Int {case ace = 1case two, three, four, five, six, seven, eight, nine, tencase jack, queen, kingfunc simpleDescription() -> String {switch self {case .ace:return "ace"case .jack:return "jack"case .queen:return "queen"case .king:return "king"default:return String(self.rawValue)}}}let ace = Rank.acelet aceRawValue = ace.rawValue
EXPERIMENT
Write a function that compares two Rank values by comparing their raw values.
By default, Swift assigns the raw values starting at zero and incrementing by one each time, but you can change this behavior by explicitly specifying values. In the example above, Ace is explicitly given a raw value of 1, and the rest of the raw values are assigned in order. You can also use strings or floating-point numbers as the raw type of an enumeration. Use the rawValue property to access the raw value of an enumeration case.
Use the init?(rawValue:) initializer to make an instance of an enumeration from a raw value.
if let convertedRank = Rank(rawValue: 3) {let threeDescription = convertedRank.simpleDescription()}
The case values of an enumeration are actual values, not just another way of writing their raw values. In fact, in cases where there isn’t a meaningful raw value, you don’t have to provide one.
enum Suit {case spades, hearts, diamonds, clubsfunc simpleDescription() -> String {switch self {case .spades:return "spades"case .hearts:return "hearts"case .diamonds:return "diamonds"case .clubs:return "clubs"}}}let hearts = Suit.heartslet heartsDescription = hearts.simpleDescription()
EXPERIMENT
Add a color() method to Suit that returns “black” for spades and clubs, and returns “red” for hearts and diamonds.
Notice the two ways that the hearts case of the enumeration is referred to above: When assigning a value to the hearts constant, the enumeration case Suit.hearts is referred to by its full name because the constant doesn’t have an explicit type specified. Inside the switch, the enumeration case is referred to by the abbreviated form .hearts because the value of self is already known to be a suit. You can use the abbreviated form anytime the value’s type is already known.
If an enumeration has raw values, those values are determined as part of the declaration, which means every instance of a particular enumeration case always has the same raw value. Another choice for enumeration cases is to have values associated with the case—these values are determined when you make the instance, and they can be different for each instance of an enumeration case. You can think of the associated values as behaving like stored properties of the enumeration case instance. For example, consider the case of requesting the sunrise and sunset times from a server. The server either responds with the requested information, or it responds with a description of what went wrong.
enum ServerResponse {case result(String, String)case failure(String)}let success = ServerResponse.result("6:00 am", "8:09 pm")let failure = ServerResponse.failure("Out of cheese.")switch success {case let .result(sunrise, sunset):print("Sunrise is at \(sunrise) and sunset is at \(sunset).")case let .failure(message):print("Failure... \(message)")}
EXPERIMENT
Add a third case to ServerResponse and to the switch.
Notice how the sunrise and sunset times are extracted from the ServerResponse value as part of matching the value against the switch cases.
Use struct to create a structure. Structures support many of the same behaviors as classes, including methods and initializers. One of the most important differences between structures and classes is that structures are always copied when they are passed around in your code, but classes are passed by reference.
struct Card {var rank: Rankvar suit: Suitfunc simpleDescription() -> String {return "The \(rank.simpleDescription()) of \(suit.simpleDescription())"}}let threeOfSpades = Card(rank: .three, suit: .spades)let threeOfSpadesDescription = threeOfSpades.simpleDescription()
EXPERIMENT
Add a method to Card that creates a full deck of cards, with one card of each combination of rank and suit.
Protocols and Extensions
Use protocol to declare a protocol.
protocol ExampleProtocol {var simpleDescription: String { get }mutating func adjust()}
Classes, enumerations, and structs can all adopt protocols.
class SimpleClass: ExampleProtocol {var simpleDescription: String = "A very simple class."var anotherProperty: Int = 69105func adjust() {simpleDescription += " Now 100% adjusted."}}var a = SimpleClass()a.adjust()let aDescription = a.simpleDescriptionstruct SimpleStructure: ExampleProtocol {var simpleDescription: String = "A simple structure"mutating func adjust() {simpleDescription += " (adjusted)"}}var b = SimpleStructure()b.adjust()let bDescription = b.simpleDescription
EXPERIMENT
Write an enumeration that conforms to this protocol.
Notice the use of the mutating keyword in the declaration of SimpleStructure to mark a method that modifies the structure. The declaration of SimpleClass doesn’t need any of its methods marked as mutating because methods on a class can always modify the class.
Use extension to add functionality to an existing type, such as new methods and computed properties. You can use an extension to add protocol conformance to a type that is declared elsewhere, or even to a type that you imported from a library or framework.
extension Int: ExampleProtocol {var simpleDescription: String {return "The number \(self)"}mutating func adjust() {self += 42}}print(7.simpleDescription)
EXPERIMENT
Write an extension for the Double type that adds an absoluteValue property.
You can use a protocol name just like any other named type—for example, to create a collection of objects that have different types but that all conform to a single protocol. When you work with values whose type is a protocol type, methods outside the protocol definition are not available.
let protocolValue: ExampleProtocol = aprint(protocolValue.simpleDescription)// print(protocolValue.anotherProperty) // Uncomment to see the error
Even though the variable protocolValue has a runtime type of SimpleClass, the compiler treats it as the given type of ExampleProtocol. This means that you can’t accidentally access methods or properties that the class implements in addition to its protocol conformance.
Error Handling
You represent errors using any type that adopts the Error protocol.
enum PrinterError: Error {case outOfPapercase noTonercase onFire}
Use throw to throw an error and throws to mark a function that can throw an error. If you throw an error in a function, the function returns immediately and the code that called the function handles the error.
func send(job: Int, toPrinter printerName: String) throws -> String {if printerName == "Never Has Toner" {throw PrinterError.noToner}return "Job sent"}
There are several ways to handle errors. One way is to use do-catch. Inside the do block, you mark code that can throw an error by writing try in front of it. Inside the catch block, the error is automatically given the nameerror unless you give it a different name.
do {let printerResponse = try send(job: 1040, toPrinter: "Bi Sheng")print(printerResponse)} catch {print(error)}
EXPERIMENT
Change the printer name to "Never Has Toner", so that the send(job:toPrinter:) function throws an error.
You can provide multiple catch blocks that handle specific errors. You write a pattern after catch just as you do after case in a switch.
do {let printerResponse = try send(job: 1440, toPrinter: "Gutenberg")print(printerResponse)} catch PrinterError.onFire {print("I''ll just put this over here, with the rest of the fire.")} catch let printerError as PrinterError {print("Printer error: \(printerError).")} catch {print(error)}
EXPERIMENT
Add code to throw an error inside the do block. What kind of error do you need to throw so that the error is handled by the first catch block? What about the second and third blocks?
Another way to handle errors is to use try? to convert the result to an optional. If the function throws an error, the specific error is discarded and the result is nil. Otherwise, the result is an optional containing the value that the function returned.
let printerSuccess = try? send(job: 1884, toPrinter: "Mergenthaler")let printerFailure = try? send(job: 1885, toPrinter: "Never Has Toner")
Use defer to write a block of code that is executed after all other code in the function, just before the function returns. The code is executed regardless of whether the function throws an error. You can use defer to write setup and cleanup code next to each other, even though they need to be executed at different times.
var fridgeIsOpen = falselet fridgeContent = ["milk", "eggs", "leftovers"]func fridgeContains(_ food: String) -> Bool {fridgeIsOpen = truedefer {fridgeIsOpen = false}let result = fridgeContent.contains(food)return result}fridgeContains("banana")print(fridgeIsOpen)
Generics
Write a name inside angle brackets to make a generic function or type.
func makeArray<Item>(repeating item: Item, numberOfTimes: Int) -> [Item] {var result = [Item]()for _ in 0..<numberOfTimes {result.append(item)}return result}makeArray(repeating: "knock", numberOfTimes:4)
You can make generic forms of functions and methods, as well as classes, enumerations, and structures.
// Reimplement the Swift standard library''s optional typeenum OptionalValue<Wrapped> {case nonecase some(Wrapped)}var possibleInteger: OptionalValue<Int> = .nonepossibleInteger = .some(100)
Use where right before the body to specify a list of requirements—for example, to require the type to implement a protocol, to require two types to be the same, or to require a class to have a particular superclass.
func anyCommonElements<T: Sequence, U: Sequence>(_ lhs: T, _ rhs: U) -> Boolwhere T.Iterator.Element: Equatable, T.Iterator.Element == U.Iterator.Element {for lhsItem in lhs {for rhsItem in rhs {if lhsItem == rhsItem {return true}}}return false}anyCommonElements([1, 2, 3], [3])
EXPERIMENT
Modify the anyCommonElements(_:_:) function to make a function that returns an array of the elements that any two sequences have in common.
Writing <T: Equatable> is the same as writing <T> ... where T: Equatable.

A tour of gRPC:01 - 基础理论
gRPC的动机
在实际工程中后端服务实现方式往往不止一种,并且由于技术或者业务的限制,通常会存在着多种语言 编写的服务。而服务间为了相互通讯就必须使用一种统一的 API 契约达成一种一致的协议。该协议要规 定诸如:通讯信道,身份验证机制、负载格式、数据模型和如何处理异常情况。
当然我们希望通讯可以做到高效(快速且轻量),由于微服务间服务信息交换的数量通常是巨大的,所以通信也理应越快越好。同时在例如移动应用或其他网速和带宽是有限的情景下,有一个轻量级的通信协议与后端服务进行交互非常重要。
最后,我们也希望通信尽可能的简单,例如我们现在一个拥有千个服务的系统,我们不想花大量的时间编写让服务相互通信的代码。我们想要的是某种框架,让框架来帮我们完成一切通信相关内容,让开发人员专注于实现服务的核心业务逻辑。
gRPC 是什么?
gRPC 最初由 google 所开发,所以 gRPC 中的 g 往往被认为代表 google 的意思,事实上在 gRPC 1.0的时候确实是这样,不过后续版本的 g 相当于一个版本代号 (例如1.1 的 g 代表 good),可以在 gRPC版本代号 进行查看。而 gRPC 现在属于 云原生基金会(CNCF) 的一部分(如同 k8s)。那么RPC代表什 么呢?Remote Procedure Calls它是一种调用的形式,通俗的说,它通过底层框架进行的自动处理,允 许一台计算机上的程序调用另一台计算机上的程序。这种调用在服务端看来,我们直接在客户端上调用 了一个服务端代码的方法(或函数)。
gRPC 是如何工作的?
client 拥有一个 stub (桩)它提供与Server 相同的方法,stub 由 gRpc自动生成。 Stub 在后台调用gRPC 框架通过网络与 server 交换信息 。由于 stub 的存在,client 和 server 现在只需要关心实现业务 的核心逻辑 。

gRPC 代码生成
gRPC是如何帮助我们生成 stub的?
为了给 server 和 client 生成 stub 我们必须要先在 Protocol Buffer 文件中编写 API 合约(规则),包 括 服务的描述 和它的 有效消息载荷(payload)。
下面展示一个简单的 protoBuf 格式的 Protocol Buffer
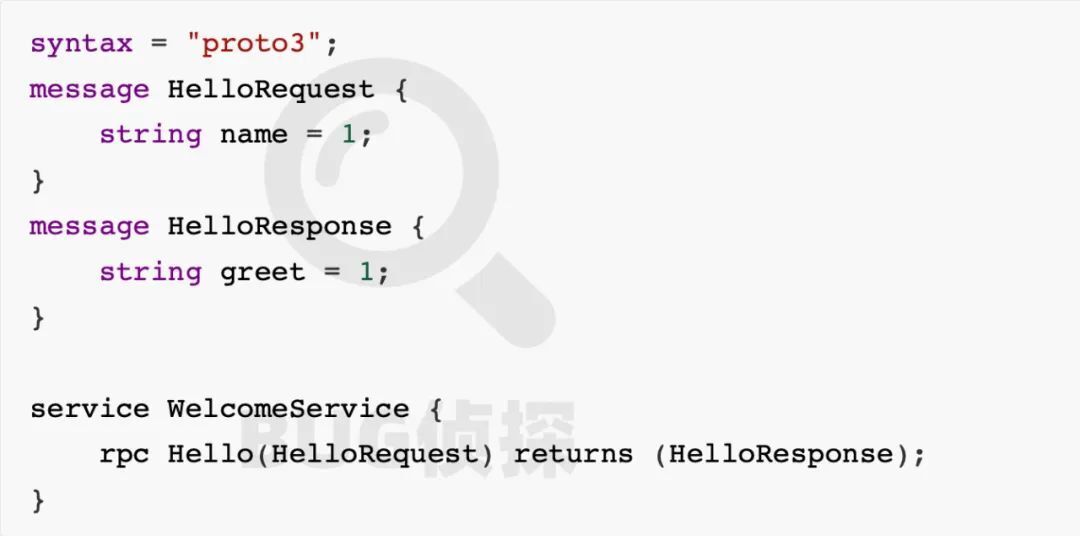
在上的示例文件中,定义了Hello 方法(函数),它以 HelloRequest 作为输入,并返回一个HelloResponse ,其中 HelloRequest 仅包含一个字符串 name, HelloResponse 也有一个字符串greet 。从类似这样的原始文件中,由协议缓冲区编译器根据编程语言,生成server 和 client 的 stub 代码。
那么 gRPC 为什么使用了 protocol buffer 作为 API规约?
1. 它非常容易阅读和理解
2. 让不同编程语言,拥有统一的一种描述
3. 使用二进制格式,同JSON/XML等基于文本的格式相比,更小、更易传输 和 更好的序列/反序列化性能
4. 提供了 client 和 server 间的 强类型(Strongly typed) API 合约
5. 拥有大量的 API 演化规则,保证了API的向前/向后 兼容
事实上 gRPC 并不与 Protocol Buffer 强绑定,我们可以使用 Google Flatbuffers 或 Microsoft Bond代替 Protocol Buffer 。但是 Protocol Buffer 是一个棒的规则,因为它被多种编程语言所支持。
原生实现:GO、Java、NodeJS
包装实现:C/C++、C#、Objective-C、Python、Ruby、Dart、PHP
非官方支持的第三方库:swift rust typescript ....
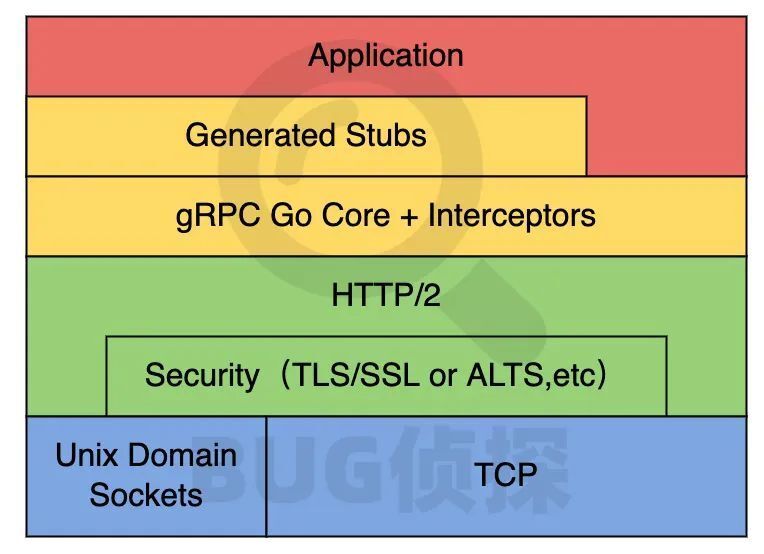
gRPC 为什么高效
gRPC 使用 HTTP/2 作为其传输协议,因此,它继承了 HTTP/2 所提供的一些出色的功能 。例如 二进制 格式,与其他使用基于文本的协议相比,性能更高、更健壮、传输更轻便、解码更安全,与 protocol buffer 的结合也更好;同时 Http/2还使用 HPACK压缩 HEAD,减少开销并提高性能;Http/2 中还可以 进行多路复用,这意味着客户端和服务端可以通过单个TPC连接并行的发送多个请求和接收多个响应, 这能有效减少延迟以提高网络的利用效率;Http/2 还允许服务器进行推送,在客户端发出单个请求的情 况下,服务端可以返回多个响应,在多数情况下,这对减少 客户端 和 服务端 之间的往返延迟非常有价值。
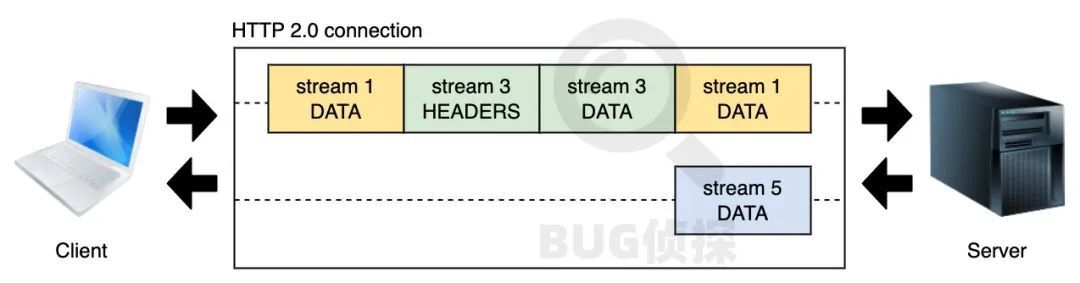
Http/2 底层是怎么运行的
HTTP/2 一个 TCP 连接可承受多个双向流,每个流都有唯一的标识符并携带多个双向消息,每个消息 (请求/响应)都可以分解为多个二进制帧,帧是承载不同数据类型的最小单位,如:HEADERS(头)、SETTINGS(设置)、PRIORITY(优先级)、DATA(数据等)等。

不同流上的帧在连接上交错,并将在到达另一端时重新组装。
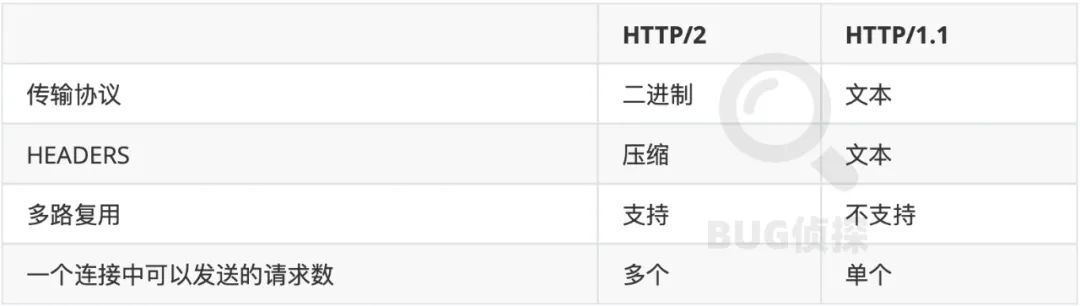
HTTP/2 vs HTTP/1.1
我们再看一眼 HTTP/2 与我们熟悉的 HTTP/1.1 的对比
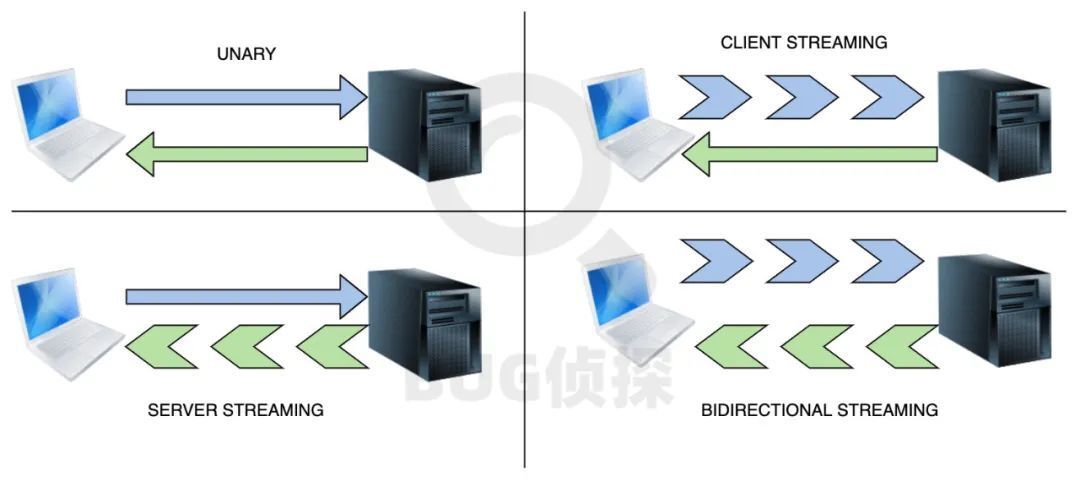
gRPC 的四种类型
一元 unary:client发送一个请求,server 回复一个响应
客户端流 client streaming:客户端发送多个消息流请求,期望server仅回复一个响应
服务器流 server streaming:客户端仅发送一个请求,服务端回复多个消息流响应
双向流 bidirectional streaming:客户端和服务器将平行发送多个请求和响应,它非常灵活并且是 非阻塞的,这意味着,任何一方都不需要在发送下一条消息之前等待响应。
gRPC vs REST

gRPC 的适用场景
微服务是 gRPC 真正发挥作用的地方,因为它可以实现低延迟和高吞吐的通信。由于许多编程语言提供 了开箱即用的代码生成,所以它也适用于多种语言环境。点对点通信也是使用gRPC的好地方因为它对双 向流提供了良好的支持。最后,因为它轻量的消息格式,对于网络受限的环境也是一个不错的选择。


关于Chapter 1: A Tour of Computer Systems的介绍现已完结,谢谢您的耐心阅读,如果想了解更多关于<<Signals and systems>> Chapter、2023【ACDU China Tour】即将开启,6月深圳见!、A Swift Tour、A tour of gRPC:01 - 基础理论的相关知识,请在本站寻找。
本文标签:


