在本文中,我们将为您详细介绍如何使用python访问个人OneNote笔记本?的相关知识,并且为您解答关于python怎么访问的疑问,此外,我们还会提供一些关于Evernote转移笔记到OneNote
在本文中,我们将为您详细介绍如何使用 python 访问个人 OneNote 笔记本?的相关知识,并且为您解答关于python怎么访问的疑问,此外,我们还会提供一些关于Evernote 转移笔记到 OneNote、Graph API OneNote:创建包含页面内容的部分、icloud/onenote/onedrive/microoutlook/ 百度云账号都是怎么回事(未完成)、java 反射 (测试下用 onenote 把笔记发送到 oschina 上,文章来源网络)的有用信息。
本文目录一览:- 如何使用 python 访问个人 OneNote 笔记本?(python怎么访问)
- Evernote 转移笔记到 OneNote
- Graph API OneNote:创建包含页面内容的部分
- icloud/onenote/onedrive/microoutlook/ 百度云账号都是怎么回事(未完成)
- java 反射 (测试下用 onenote 把笔记发送到 oschina 上,文章来源网络)
")
如何使用 python 访问个人 OneNote 笔记本?(python怎么访问)
如何解决如何使用 python 访问个人 OneNote 笔记本?
背景
我的目标是使用 python 访问我的 OneNote 笔记本来创建一个自动化的实验本。例如, 分析结果,例如绘图,会自动保存到新的 OneNote 页面的某个位置。
据我了解 Mircosoft 的网页,这应该是可行的(至少在理论上)。网页:
https://docs.microsoft.com/en-us/samples/azure-samples/ms-identity-python-daemon/ms-identity-python-webapp/ 包含一个关于如何与底层 Microsoft Graph-API 建立连接的示例。
但是,我发现该教程非常违反直觉,因为可能存在指向其他要求(例如 Azure AD tenant)的交叉链接。
因此,我在创建第一个工作示例时遇到了问题,因此寻求帮助。
问题
有人可以提供更全面的解释/教程,说明如何将 microsoft-graph-API 与 python 结合使用吗?
到目前为止我尝试了什么
有一次,我尝试遵循以下示例中提供的 1-Call-MsGraph-WithSecret:
https://docs.microsoft.com/en-us/samples/azure-samples/ms-identity-python-daemon/ms-identity-python-webapp/
因此,我面临以下问题:
- 所包含的
README.md的第 2 步指出,我必须在注册客户端应用程序 (daemon-console) 小节中更改 API 权限。但是,在我的应用中,按钮Grant/revoke admin consent for {tenant}不存在。
示例代码
随后的代码旨在阐明我的意图,并提供一个共同的基线,一个潜在的教程可以从中开始。
import numpy as nppath_to_plot = ''my_data.png''# Create example data setxdata = np.linspace(0,2 * np.pi,100)ydata = np.sin(xdata)# Example data analysismean_of_ydata = np.mean(ydata)std_of_ydata = np.std(ydata,ddof=1)# Plot and save datafig,ax = plt.subplots(1,1)ax.plot(xdata,ydata,label=''My data'')fig.savefig(path_to_plot)# One Note integration# 1. Create a new OneNote page in a certain OneNote notebook or update a existing one# 2. Save analysis results to the OneNote page# 3. Import the create *.png to the OneNote page

Evernote 转移笔记到 OneNote
Evernote最近更改了使用协议,免费版只允许2台设备进行同步,对于拥有超过2台设备的人来说,没办法在所有设备中进行数据同步了,但付费功能实在是没有任何吸引力,所以最近把笔记转移到OneNote了,幸好微软官方提供了笔记转移工具。
打开EverNote,全选所有笔记,依次点击"文件"->"导出笔记",选择导出路径,按"存储"保存所有笔记。 

到微软官网下载转移工具 http://www.onenote.com/import-evernote-to-onenote
下载完成后,按提示安装好软件 
打开软件,同意使用协议,点击"Get started"进入下一步  选择在第一步备份好的EverNote笔记文件,然后点击"Continue"进入下一步
选择微软个人账号,登录自己的微软账号 

点击"Import"就可以导入EverNote的笔记了,导入过程需要时间,要耐心等待 
导入成功后,打开OneNote应用,就可以在OneDrive上查看刚才导入的EverNote笔记了 

Graph API OneNote:创建包含页面内容的部分
如何解决Graph API OneNote:创建包含页面内容的部分
我有一个需求,需要下载 OneNote 笔记本并按需重新上传。
我正在使用 Graph API (DriveItem API) 来跟踪 OneNote 笔记本中的更改并下载。
现在,当我下载它时,我看到部分和页面只下载了一个文件。这个文件有二进制数据,我认为是页面数据和部分元数据。
当我再次上传时,我正在使用 OneNote API。这是因为 Graph API 不支持创建 NoteBook 项目。
所以我可以使用 OneNote API 创建笔记本,但我不知道如何将下载的内容(部分+页面数据)上传到这个新创建的笔记本。我可以单独创建部分和页面,但我的问题是在下载时我将部分和页面数据合并到一个文件中。
如果有人遇到过这样的问题并且知道任何修复/解决方法,请告诉我。
解决方法
我假设您正在使用 microsoft-graph 的 OneDrive-API 组件下载 OneNote Notebook(这是一个特殊文件夹)及其组成文件(OneNote .one 文件是带页面的部分,.onetoc2 是索引文件用于订购部分)。生成的笔记本不能简单地上传,因为它们没有特殊标志来向 OneNote 表明它们是 OneNote 笔记本。但是,您可以创建一个空的 Notebook,然后通过 OneDrive-API 上传 PUT 请求将 .one 文件上传到其中。 另一种方法是将 Sharepoint 站点视为 WebDAV 服务器并使用诸如 rclone 之类的实用程序。
")
icloud/onenote/onedrive/microoutlook/ 百度云账号都是怎么回事(未完成)
在用一些跨机器跨平台软件的时候,一旦换了电脑或者手机,我经常出现蒙的状态,不知道怎么同步或者使用了,在这里总结一下。
一、icloud 账号
当我们买 iphone 或者 macbook 的时候,一开机它会让你先注册个 appleID,或者用之前已有的 appleID 来作为唯一标识码。会让你填三项:
| 姓名 | 英文的名 + 姓 |
| 联络方式(即 appleID) | 两种方式:手机号码、或者邮箱。 邮箱可以是任意邮箱,或者苹果邮箱 @icloud.com (苹果的邮箱账号)。 当然 appleID 后来也是可以改的。 |
| 设置密码 | 上面邮箱的密码 |
这样,就用你的 appleID 作为你的唯一标识符,来对 iphone、macbook、Appstore 进行统一管理,在进行登录或者操作的时候可能需要你输入邮箱密码进行验证。
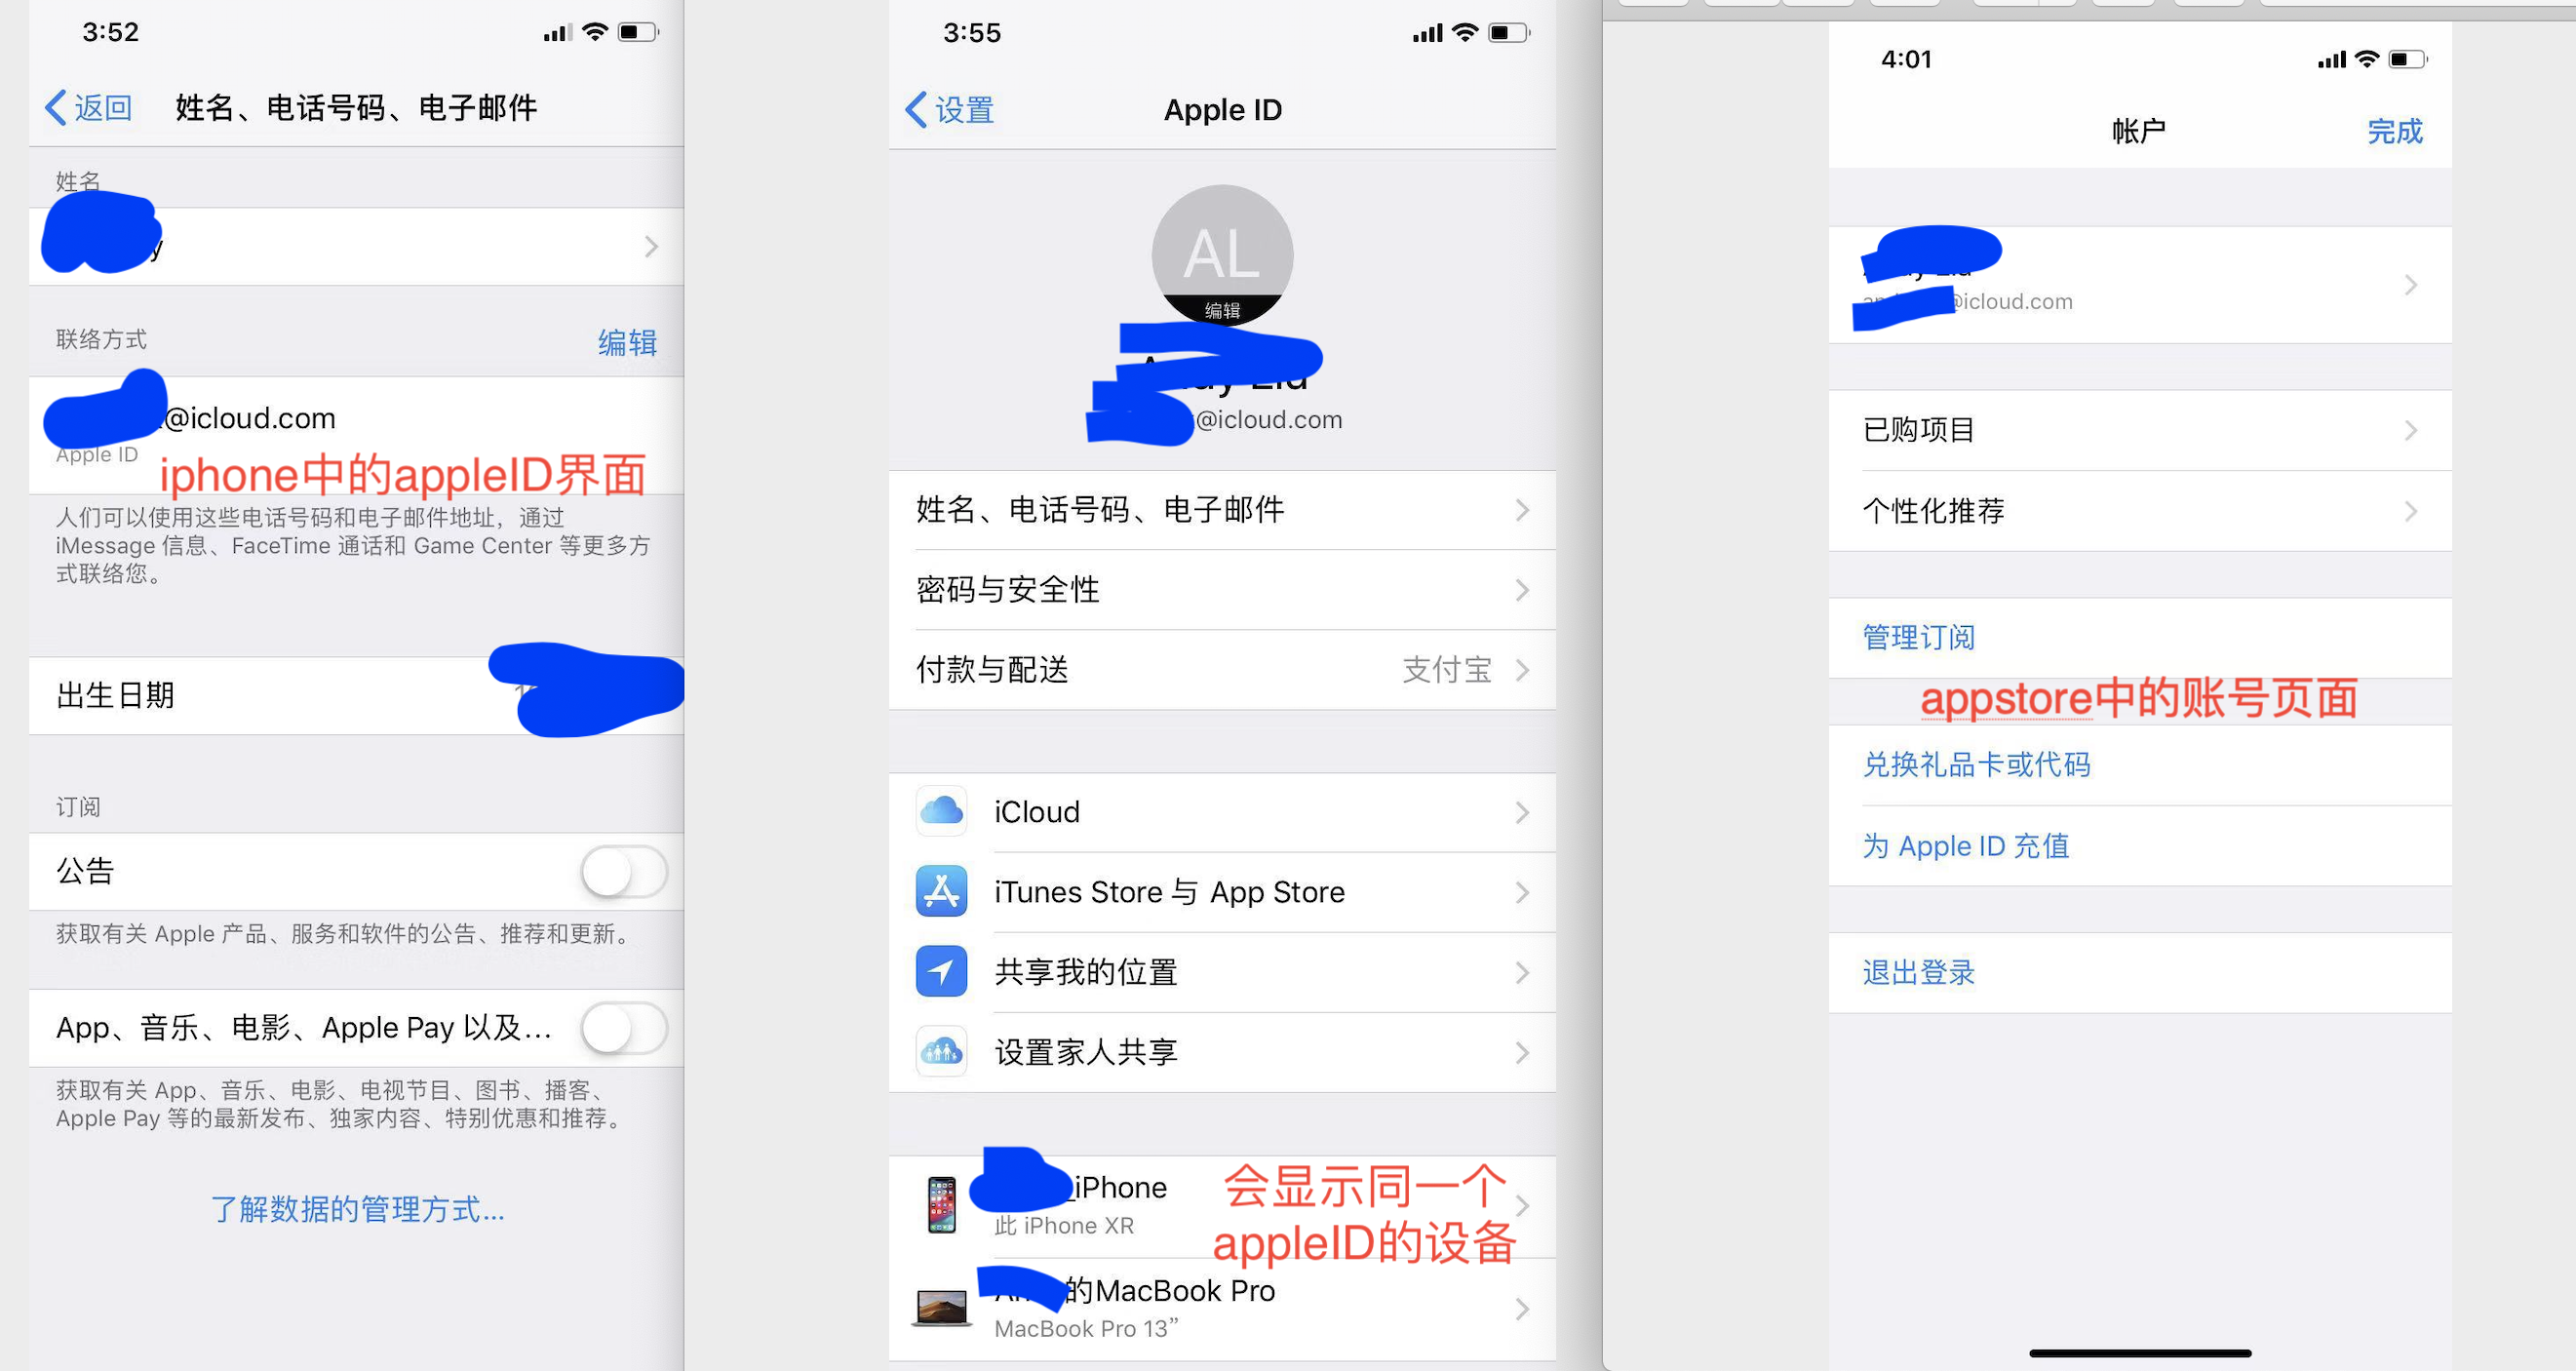
这个倒还好,只是个唯一标识码,同一账号的设备之间传东西都比较方便。而且如果你用 appleid 在 A 手机登录了,当你在 B 手机用这个 id 登录时,会把相应的数据给你同步过来,比如备忘录,这样换手机时尽可能的做成无感切换。
但它又有了一个 icloud 云服务,可以有免费 5g 的云存储空间,在 iphone 和 macbook 都可以把相关数据传到云端,如果要扩容,需要购买,反正感觉它这个搞得有点乱乱的,ID 就 ID 嘛,怎么还非得用 icloud 账号注册,为了推广云服务也不是这么推广的啊,或者苹果邮箱就不要用 @icloud.com,感觉怪怪的。有了这个云服务,苹果机器(手机或电脑)可以把好多资料同步存储到云端,防止文件丢失以及快速访问云端资料等操作。下图是登录 icloud 网络账户时的界面,这些资料都可以在云端备份。

苹果 id 账号是否必须 @icloud.com?
二、one note、one drive、microsoft outlook 账号
三、百度云
")
java 反射 (测试下用 onenote 把笔记发送到 oschina 上,文章来源网络)
来源:http://www.cnblogs.com/rollenholt/archive/2011/09/02/2163758.html
本篇文章依旧采用小例子来说明,因为我始终觉的,案例驱动是最好的,要不然只看理论的话,看了也不懂,不过建议大家在看完文章之后,在回过头去看看理论,会有更好的理解。
下面开始正文。
【案例 1】通过一个对象获得完整的包名和类名
1
2
3
4
5
6
7
8
9
10
11
12
13
14
15
package Reflect;
/**
* 通过一个对象获得完整的包名和类名
* */
class Demo{
//other codes...
}
class hello{
public static void main(String[] args) {
Demo demo=new Demo();
System.out.println(demo.getClass().getName());
}
}
【运行结果】:Reflect.Demo
添加一句:所有类的对象其实都是 Class 的实例。
【案例 2】实例化 Class 类对象
1
2
3
4
5
6
7
8
9
10
11
12
13
14
15
16
17
18
19
20
21
22
23
24
25
package Reflect;
class Demo{
//other codes...
}
class hello{
public static void main(String[] args) {
Class<?> demo1=null;
Class<?> demo2=null;
Class<?> demo3=null;
try{
// 一般尽量采用这种形式
demo1=Class.forName("Reflect.Demo");
}catch(Exception e){
e.printStackTrace();
}
demo2=new Demo().getClass();
demo3=Demo.class;
System.out.println(" 类名称 "+demo1.getName());
System.out.println(" 类名称 "+demo2.getName());
System.out.println(" 类名称 "+demo3.getName());
}
}
【运行结果】:
类名称 Reflect.Demo
类名称 Reflect.Demo
类名称 Reflect.Demo
【案例 3】通过 Class 实例化其他类的对象
通过无参构造实例化对象
1
2
3
4
5
6
7
8
9
10
11
12
13
14
15
16
17
18
19
20
21
22
23
24
25
26
27
28
29
30
31
32
33
34
35
36
37
38
39
40
41
42
43
44
45
46
47
package Reflect;
class Person{
public String getName() {
return name;
}
public void setName(String name) {
this.name = name;
}
public int getAge() {
return age;
}
public void setAge(int age) {
this.age = age;
}
@Override
public String toString(){
return "["+this.name+" "+this.age+"]";
}
private String name;
private int age;
}
class hello{
public static void main(String[] args) {
Class<?> demo=null;
try{
demo=Class.forName("Reflect.Person");
}catch (Exception e) {
e.printStackTrace();
}
Person per=null;
try {
per=(Person)demo.newInstance();
} catch (InstantiationException e) {
// TODO Auto-generated catch block
e.printStackTrace();
} catch (IllegalAccessException e) {
// TODO Auto-generated catch block
e.printStackTrace();
}
per.setName("Rollen");
per.setAge(20);
System.out.println(per);
}
}
【运行结果】:
[Rollen 20]
但是注意一下,当我们把 Person 中的默认的无参构造函数取消的时候,比如自己定义只定义一个有参数的构造函数之后,会出现错误:
比如我定义了一个构造函数:
1
2
3
4
public Person(String name, int age) {
this.age=age;
this.name=name;
}
然后继续运行上面的程序,会出现:
java.lang.InstantiationException: Reflect.Person
at java.lang.Class.newInstance0(Class.java:340)
at java.lang.Class.newInstance(Class.java:308)
at Reflect.hello.main(hello.java:39)
Exception in thread "main" java.lang.NullPointerException
at Reflect.hello.main(hello.java:47)
所以大家以后再编写使用 Class 实例化其他类的对象的时候,一定要自己定义无参的构造函数
【案例】通过 Class 调用其他类中的构造函数 (也可以通过这种方式通过 Class 创建其他类的对象)
1
2
3
4
5
6
7
8
9
10
11
12
13
14
15
16
17
18
19
20
21
22
23
24
25
26
27
28
29
30
31
32
33
34
35
36
37
38
39
40
41
42
43
44
45
46
47
48
49
50
51
52
53
54
55
56
57
58
59
60
61
package Reflect;
import java.lang.reflect.Constructor;
class Person{
public Person() {
}
public Person(String name){
this.name=name;
}
public Person(int age){
this.age=age;
}
public Person(String name, int age) {
this.age=age;
this.name=name;
}
public String getName() {
return name;
}
public int getAge() {
return age;
}
@Override
public String toString(){
return "["+this.name+" "+this.age+"]";
}
private String name;
private int age;
}
class hello{
public static void main(String[] args) {
Class<?> demo=null;
try{
demo=Class.forName("Reflect.Person");
}catch (Exception e) {
e.printStackTrace();
}
Person per1=null;
Person per2=null;
Person per3=null;
Person per4=null;
// 取得全部的构造函数
Constructor<?> cons[]=demo.getConstructors();
try{
per1=(Person)cons[0].newInstance();
per2=(Person)cons[1].newInstance("Rollen");
per3=(Person)cons[2].newInstance(20);
per4=(Person)cons[3].newInstance("Rollen",20);
}catch(Exception e){
e.printStackTrace();
}
System.out.println(per1);
System.out.println(per2);
System.out.println(per3);
System.out.println(per4);
}
}
【运行结果】:
[null 0]
[Rollen 0]
[null 20]
[Rollen 20]
【案例】
返回一个类实现的接口:
1
2
3
4
5
6
7
8
9
10
11
12
13
14
15
16
17
18
19
20
21
22
23
24
25
26
27
28
29
30
31
32
33
34
35
36
37
38
39
40
41
42
43
44
45
46
47
48
package Reflect;
interface China{
public static final String name="Rollen";
public static int age=20;
public void sayChina();
public void sayHello(String name, int age);
}
class Person implements China{
public Person() {
}
public Person(String sex){
this.sex=sex;
}
public String getSex() {
return sex;
}
public void setSex(String sex) {
this.sex = sex;
}
@Override
public void sayChina(){
System.out.println("hello ,china");
}
@Override
public void sayHello(String name, int age){
System.out.println(name+" "+age);
}
private String sex;
}
class hello{
public static void main(String[] args) {
Class<?> demo=null;
try{
demo=Class.forName("Reflect.Person");
}catch (Exception e) {
e.printStackTrace();
}
// 保存所有的接口
Class<?> intes[]=demo.getInterfaces();
for (int i = 0; i < intes.length; i++) {
System.out.println(" 实现的接口 "+intes[i].getName());
}
}
}
【运行结果】:
实现的接口 Reflect.China
(注意,以下几个例子,都会用到这个例子的 Person 类,所以为节省篇幅,此处不再粘贴 Person 的代码部分,只粘贴主类 hello 的代码)
【案例】:取得其他类中的父类
1
2
3
4
5
6
7
8
9
10
11
12
13
class hello{
public static void main(String[] args) {
Class<?> demo=null;
try{
demo=Class.forName("Reflect.Person");
}catch (Exception e) {
e.printStackTrace();
}
// 取得父类
Class<?> temp=demo.getSuperclass();
System.out.println(" 继承的父类为: "+temp.getName());
}
}
【运行结果】
继承的父类为: java.lang.Object
【案例】:获得其他类中的全部构造函数
这个例子需要在程序开头添加 import java.lang.reflect.*;
然后将主类编写为:
1
2
3
4
5
6
7
8
9
10
11
12
13
14
class hello{
public static void main(String[] args) {
Class<?> demo=null;
try{
demo=Class.forName("Reflect.Person");
}catch (Exception e) {
e.printStackTrace();
}
Constructor<?>cons[]=demo.getConstructors();
for (int i = 0; i < cons.length; i++) {
System.out.println(" 构造方法: "+cons[i]);
}
}
}
【运行结果】:
构造方法: public Reflect.Person()
构造方法: public Reflect.Person(java.lang.String)
但是细心的读者会发现,上面的构造函数没有 public 或者 private 这一类的修饰符
下面这个例子我们就来获取修饰符
1
2
3
4
5
6
7
8
9
10
11
12
13
14
15
16
17
18
19
20
21
22
23
24
25
26
class hello{
public static void main(String[] args) {
Class<?> demo=null;
try{
demo=Class.forName("Reflect.Person");
}catch (Exception e) {
e.printStackTrace();
}
Constructor<?>cons[]=demo.getConstructors();
for (int i = 0; i < cons.length; i++) {
Class<?> p[]=cons[i].getParameterTypes();
System.out.print(" 构造方法: ");
int mo=cons[i].getModifiers();
System.out.print(Modifier.toString(mo)+" ");
System.out.print(cons[i].getName());
System.out.print("(");
for(int j=0;j<p.length;++j){
System.out.print(p[j].getName()+" arg"+i);
if(j<p.length-1){
System.out.print(",");
}
}
System.out.println("){}");
}
}
}
【运行结果】:
构造方法: public Reflect.Person(){}
构造方法: public Reflect.Person(java.lang.String arg1){}
有时候一个方法可能还有异常,呵呵。下面看看:
1
2
3
4
5
6
7
8
9
10
11
12
13
14
15
16
17
18
19
20
21
22
23
24
25
26
27
28
29
30
31
32
33
34
35
36
37
38
39
class hello{
public static void main(String[] args) {
Class<?> demo=null;
try{
demo=Class.forName("Reflect.Person");
}catch (Exception e) {
e.printStackTrace();
}
Method method[]=demo.getMethods();
for(int i=0;i<method.length;++i){
Class<?> returnType=method[i].getReturnType();
Class<?> para[]=method[i].getParameterTypes();
int temp=method[i].getModifiers();
System.out.print(Modifier.toString(temp)+" ");
System.out.print(returnType.getName()+" ");
System.out.print(method[i].getName()+" ");
System.out.print("(");
for(int j=0;j<para.length;++j){
System.out.print(para[j].getName()+" "+"arg"+j);
if(j<para.length-1){
System.out.print(",");
}
}
Class<?> exce[]=method[i].getExceptionTypes();
if(exce.length>0){
System.out.print(") throws ");
for(int k=0;k<exce.length;++k){
System.out.print(exce[k].getName()+" ");
if(k<exce.length-1){
System.out.print(",");
}
}
}else{
System.out.print(")");
}
System.out.println();
}
}
}
【运行结果】:
public java.lang.String getSex ()
public void setSex (java.lang.String arg0)
public void sayChina ()
public void sayHello (java.lang.String arg0,int arg1)
public final native void wait (long arg0) throws java.lang.InterruptedException
public final void wait () throws java.lang.InterruptedException
public final void wait (long arg0,int arg1) throws java.lang.InterruptedException
public boolean equals (java.lang.Object arg0)
public java.lang.String toString ()
public native int hashCode ()
public final native java.lang.Class getClass ()
public final native void notify ()
public final native void notifyAll ()
【案例】接下来让我们取得其他类的全部属性吧,最后我讲这些整理在一起,也就是通过 class 取得一个类的全部框架
1
2
3
4
5
6
7
8
9
10
11
12
13
14
15
16
17
18
19
20
21
22
23
24
25
26
27
28
29
30
31
32
33
34
class hello {
public static void main(String[] args) {
Class<?> demo = null;
try {
demo = Class.forName("Reflect.Person");
} catch (Exception e) {
e.printStackTrace();
}
System.out.println("=============== 本类属性 ========================");
// 取得本类的全部属性
Field[] field = demo.getDeclaredFields();
for (int i = 0; i < field.length; i++) {
// 权限修饰符
int mo = field[i].getModifiers();
String priv = Modifier.toString(mo);
// 属性类型
Class<?> type = field[i].getType();
System.out.println(priv + " " + type.getName() + " "
+ field[i].getName() + ";");
}
System.out.println("=============== 实现的接口或者父类的属性 ========================");
// 取得实现的接口或者父类的属性
Field[] filed1 = demo.getFields();
for (int j = 0; j < filed1.length; j++) {
// 权限修饰符
int mo = filed1[j].getModifiers();
String priv = Modifier.toString(mo);
// 属性类型
Class<?> type = filed1[j].getType();
System.out.println(priv + " " + type.getName() + " "
+ filed1[j].getName() + ";");
}
}
}
【运行结果】:
=============== 本类属性 ========================
private java.lang.String sex;
=============== 实现的接口或者父类的属性 ========================
public static final java.lang.String name;
public static final int age;
【案例】其实还可以通过反射调用其他类中的方法:
1
2
3
4
5
6
7
8
9
10
11
12
13
14
15
16
17
18
19
20
21
class hello {
public static void main(String[] args) {
Class<?> demo = null;
try {
demo = Class.forName("Reflect.Person");
} catch (Exception e) {
e.printStackTrace();
}
try{
// 调用 Person 类中的 sayChina 方法
Method method=demo.getMethod("sayChina");
method.invoke(demo.newInstance());
// 调用 Person 的 sayHello 方法
method=demo.getMethod("sayHello", String.class,int.class);
method.invoke(demo.newInstance(),"Rollen",20);
}catch (Exception e) {
e.printStackTrace();
}
}
}
【运行结果】:
hello ,china
Rollen 20
【案例】调用其他类的 set 和 get 方法
1
2
3
4
5
6
7
8
9
10
11
12
13
14
15
16
17
18
19
20
21
22
23
24
25
26
27
28
29
30
31
32
33
34
35
36
37
38
39
40
41
42
43
44
45
46
47
48
49
50
51
52
53
class hello {
public static void main(String[] args) {
Class<?> demo = null;
Object obj=null;
try {
demo = Class.forName("Reflect.Person");
} catch (Exception e) {
e.printStackTrace();
}
try{
obj=demo.newInstance();
}catch (Exception e) {
e.printStackTrace();
}
setter(obj,"Sex"," 男 ",String.class);
getter(obj,"Sex");
}
/**
* @param obj
* 操作的对象
* @param att
* 操作的属性
* */
public static void getter(Object obj, String att) {
try {
Method method = obj.getClass().getMethod("get" + att);
System.out.println(method.invoke(obj));
} catch (Exception e) {
e.printStackTrace();
}
}
/**
* @param obj
* 操作的对象
* @param att
* 操作的属性
* @param value
* 设置的值
* @param type
* 参数的属性
* */
public static void setter(Object obj, String att, Object value,
Class<?> type) {
try {
Method method = obj.getClass().getMethod("set" + att, type);
method.invoke(obj, value);
} catch (Exception e) {
e.printStackTrace();
}
}
}// end class
【运行结果】:
男
【案例】通过反射操作属性
1
2
3
4
5
6
7
8
9
10
11
12
13
14
class hello {
public static void main(String[] args) throws Exception {
Class<?> demo = null;
Object obj = null;
demo = Class.forName("Reflect.Person");
obj = demo.newInstance();
Field field = demo.getDeclaredField("sex");
field.setAccessible(true);
field.set(obj, " 男 ");
System.out.println(field.get(obj));
}
}// end class
【案例】通过反射取得并修改数组的信息:
1
2
3
4
5
6
7
8
9
10
11
12
import java.lang.reflect.*;
class hello{
public static void main(String[] args) {
int[] temp={1,2,3,4,5};
Class<?>demo=temp.getClass().getComponentType();
System.out.println(" 数组类型: "+demo.getName());
System.out.println(" 数组长度 "+Array.getLength(temp));
System.out.println(" 数组的第一个元素: "+Array.get(temp, 0));
Array.set(temp, 0, 100);
System.out.println(" 修改之后数组第一个元素为: "+Array.get(temp, 0));
}
}
【运行结果】:
数组类型: int
数组长度 5
数组的第一个元素: 1
修改之后数组第一个元素为: 100
【案例】通过反射修改数组大小
1
2
3
4
5
6
7
8
9
10
11
12
13
14
15
16
17
18
19
20
21
22
23
24
25
26
27
28
29
30
31
32
33
34
35
class hello{
public static void main(String[] args) {
int[] temp={1,2,3,4,5,6,7,8,9};
int[] newTemp=(int[])arrayInc(temp,15);
print(newTemp);
System.out.println("=====================");
String[] atr={"a","b","c"};
String[] str1=(String[])arrayInc(atr,8);
print(str1);
}
/**
* 修改数组大小
* */
public static Object arrayInc(Object obj,int len){
Class<?>arr=obj.getClass().getComponentType();
Object newArr=Array.newInstance(arr, len);
int co=Array.getLength(obj);
System.arraycopy(obj, 0, newArr, 0, co);
return newArr;
}
/**
* 打印
* */
public static void print(Object obj){
Class<?>c=obj.getClass();
if(!c.isArray()){
return;
}
System.out.println(" 数组长度为: "+Array.getLength(obj));
for (int i = 0; i < Array.getLength(obj); i++) {
System.out.print(Array.get(obj, i)+" ");
}
}
}
【运行结果】:
数组长度为: 15
1 2 3 4 5 6 7 8 9 0 0 0 0 0 0 =====================
数组长度为: 8
a b c null null null null null
动态代理
【案例】首先来看看如何获得类加载器:
1
2
3
4
5
6
7
8
9
class test{
}
class hello{
public static void main(String[] args) {
test t=new test();
System.out.println(" 类加载器 "+t.getClass().getClassLoader().getClass().getName());
}
}
【程序输出】:
类加载器 sun.misc.Launcher$AppClassLoader
其实在 java 中有三种类类加载器。
1)Bootstrap ClassLoader 此加载器采用 c++ 编写,一般开发中很少见。
2)Extension ClassLoader 用来进行扩展类的加载,一般对应的是 jre\lib\ext 目录中的类
3)AppClassLoader 加载 classpath 指定的类,是最常用的加载器。同时也是 java 中默认的加载器。
如果想要完成动态代理,首先需要定义一个 InvocationHandler 接口的子类,已完成代理的具体操作。
1
2
3
4
5
6
7
8
9
10
11
12
13
14
15
16
17
18
19
20
21
22
23
24
25
26
27
28
29
30
31
32
33
34
35
36
37
38
39
40
41
package Reflect;
import java.lang.reflect.*;
// 定义项目接口
interface Subject {
public String say(String name, int age);
}
// 定义真实项目
class RealSubject implements Subject {
@Override
public String say(String name, int age) {
return name + " " + age;
}
}
class MyInvocationHandler implements InvocationHandler {
private Object obj = null;
public Object bind(Object obj) {
this.obj = obj;
return Proxy.newProxyInstance(obj.getClass().getClassLoader(), obj
.getClass().getInterfaces(), this);
}
@Override
public Object invoke(Object proxy, Method method, Object[] args)
throws Throwable {
Object temp = method.invoke(this.obj, args);
return temp;
}
}
class hello {
public static void main(String[] args) {
MyInvocationHandler demo = new MyInvocationHandler();
Subject sub = (Subject) demo.bind(new RealSubject());
String info = sub.say("Rollen", 20);
System.out.println(info);
}
}
【运行结果】:
Rollen 20
类的生命周期
在一个类编译完成之后,下一步就需要开始使用类,如果要使用一个类,肯定离不开 JVM。在程序执行中 JVM 通过装载,链接,初始化这 3 个步骤完成。
类的装载是通过类加载器完成的,加载器将.class 文件的二进制文件装入 JVM 的方法区,并且在堆区创建描述这个类的 java.lang.Class 对象。用来封装数据。 但是同一个类只会被类装载器装载以前
链接就是把二进制数据组装为可以运行的状态。
链接分为校验,准备,解析这 3 个阶段
校验一般用来确认此二进制文件是否适合当前的 JVM(版本),
准备就是为静态成员分配内存空间,。并设置默认值
解析指的是转换常量池中的代码作为直接引用的过程,直到所有的符号引用都可以被运行程序使用(建立完整的对应关系)
完成之后,类型也就完成了初始化,初始化之后类的对象就可以正常使用了,直到一个对象不再使用之后,将被垃圾回收。释放空间。
当没有任何引用指向 Class 对象时就会被卸载,结束类的生命周期
将反射用于工厂模式
先来看看,如果不用反射的时候,的工厂模式吧:
http://www.cnblogs.com/rollenholt/archive/2011/08/18/2144851.html
1
2
3
4
5
6
7
8
9
10
11
12
13
14
15
16
17
18
19
20
21
22
23
24
25
26
27
28
29
30
31
32
33
34
35
36
37
38
39
40
41
/**
* @author Rollen-Holt 设计模式之 工厂模式
*/
interface fruit{
public abstract void eat();
}
class Apple implements fruit{
public void eat(){
System.out.println("Apple");
}
}
class Orange implements fruit{
public void eat(){
System.out.println("Orange");
}
}
// 构造工厂类
// 也就是说以后如果我们在添加其他的实例的时候只需要修改工厂类就行了
class Factory{
public static fruit getInstance(String fruitName){
fruit f=null;
if("Apple".equals(fruitName)){
f=new Apple();
}
if("Orange".equals(fruitName)){
f=new Orange();
}
return f;
}
}
class hello{
public static void main(String[] a){
fruit f=Factory.getInstance("Orange");
f.eat();
}
}
这样,当我们在添加一个子类的时候,就需要修改工厂类了。如果我们添加太多的子类的时候,改的就会很多。
现在我们看看利用反射机制:
1
2
3
4
5
6
7
8
9
10
11
12
13
14
15
16
17
18
19
20
21
22
23
24
25
26
27
28
29
30
31
32
33
34
35
36
37
package Reflect;
interface fruit{
public abstract void eat();
}
class Apple implements fruit{
public void eat(){
System.out.println("Apple");
}
}
class Orange implements fruit{
public void eat(){
System.out.println("Orange");
}
}
class Factory{
public static fruit getInstance(String ClassName){
fruit f=null;
try{
f=(fruit)Class.forName(ClassName).newInstance();
}catch (Exception e) {
e.printStackTrace();
}
return f;
}
}
class hello{
public static void main(String[] a){
fruit f=Factory.getInstance("Reflect.Apple");
if(f!=null){
f.eat();
}
}
}
现在就算我们添加任意多个子类的时候,工厂类就不需要修改。
上面的爱吗虽然可以通过反射取得接口的实例,但是需要传入完整的包和类名。而且用户也无法知道一个接口有多少个可以使用的子类,所以我们通过属性文件的形式配置所需要的子类。
下面我们来看看: 结合属性文件的工厂模式
首先创建一个 fruit.properties 的资源文件,
内容为:
1
2
apple=Reflect.Apple
orange=Reflect.Orange
然后编写主类代码:
1
2
3
4
5
6
7
8
9
10
11
12
13
14
15
16
17
18
19
20
21
22
23
24
25
26
27
28
29
30
31
32
33
34
35
36
37
38
39
40
41
42
43
44
45
46
47
48
49
50
51
52
53
54
55
56
57
package Reflect;
import java.io.*;
import java.util.*;
interface fruit{
public abstract void eat();
}
class Apple implements fruit{
public void eat(){
System.out.println("Apple");
}
}
class Orange implements fruit{
public void eat(){
System.out.println("Orange");
}
}
// 操作属性文件类
class init{
public static Properties getPro() throws FileNotFoundException, IOException{
Properties pro=new Properties();
File f=new File("fruit.properties");
if(f.exists()){
pro.load(new FileInputStream(f));
}else{
pro.setProperty("apple", "Reflect.Apple");
pro.setProperty("orange", "Reflect.Orange");
pro.store(new FileOutputStream(f), "FRUIT CLASS");
}
return pro;
}
}
class Factory{
public static fruit getInstance(String ClassName){
fruit f=null;
try{
f=(fruit)Class.forName(ClassName).newInstance();
}catch (Exception e) {
e.printStackTrace();
}
return f;
}
}
class hello{
public static void main(String[] a) throws FileNotFoundException, IOException{
Properties pro=init.getPro();
fruit f=Factory.getInstance(pro.getProperty("apple"));
if(f!=null){
f.eat();
}
}
}
【运行结果】:Apple
今天关于如何使用 python 访问个人 OneNote 笔记本?和python怎么访问的讲解已经结束,谢谢您的阅读,如果想了解更多关于Evernote 转移笔记到 OneNote、Graph API OneNote:创建包含页面内容的部分、icloud/onenote/onedrive/microoutlook/ 百度云账号都是怎么回事(未完成)、java 反射 (测试下用 onenote 把笔记发送到 oschina 上,文章来源网络)的相关知识,请在本站搜索。
本文标签:


