本文将分享与RedHat联手,Fedora要支持ARM笔记本的详细内容,并且还将对downloadfedoraredhat进行详尽解释,此外,我们还将为大家带来关于bash:/usr/local/ar
本文将分享与 Red Hat 联手,Fedora 要支持 ARM 笔记本的详细内容,并且还将对download fedora redhat进行详尽解释,此外,我们还将为大家带来关于bash:/usr/local/arm/arm-2009q3/bin/arm-none-linux-gnueabi-gcc: not found、dnf - Upgrade from Fedora 24 to Fedora 25, then Upgrade from Fedora 25 to Fedora 26、HADOOP(3.0.0)在CENTOS7(RED HAT 7)下完全分布式环境搭建、Install MongoDB Community Edition on Red Hat or CentOS的相关知识,希望对你有所帮助。
本文目录一览:- 与 Red Hat 联手,Fedora 要支持 ARM 笔记本(download fedora redhat)
- bash:/usr/local/arm/arm-2009q3/bin/arm-none-linux-gnueabi-gcc: not found
- dnf - Upgrade from Fedora 24 to Fedora 25, then Upgrade from Fedora 25 to Fedora 26
- HADOOP(3.0.0)在CENTOS7(RED HAT 7)下完全分布式环境搭建
- Install MongoDB Community Edition on Red Hat or CentOS
")
与 Red Hat 联手,Fedora 要支持 ARM 笔记本(download fedora redhat)
Red Hat 正讨论与 Fedora 合作,要将 Fedora 带到 ARM 笔记本上。

Linux 拥趸一直希望基于 ARM 的笔记本能够更加完整并友好地运行 Ubuntu 等桌面版本,此前就有开发者开发了一个名为 aarch64-laptops 的项目,根据介绍,它允许用户在基于 ARM 的笔记本上运行 Ubuntu,支持设备包括基于高通骁龙的华硕 NovaGo TP370QL、惠普 Envy x2 与联想 Mixx 630。
关于该项目的最新消息可以从前边的图片中了解到,这是一位开发者日前在其推特中提及的,我们发现其中支持平台多出了一个联想 Yoga C630,支持的桌面 Linux 增加了 Arch 与 Debian。
而另一边,Red Hat 首席 IoT 架构师 Peter Robinson 公开了 Red Hat 正在讨论与 Fedora 合作,要将 Fedora 带到 ARM 笔记本上的消息,他表示最开始将聚焦于像联想这样的 SD850 设备。

虽然在此之前开发者是可以自行编译 Linux 桌面操作系统源码,构建并运行在 ARM 平台上的,但是这过于复杂与专业化,同时还可能需要做一些阉割,aarch64-laptops 项目的出现,让简化安装和设置,并且更加全面地支持桌面 Linux 成为可能。如今 Red Hat 与 Fedora 两元 Linux 大佬联手要让 Fedora 支持 ARM 平台,实在是 Linux 爱好者的一大喜事。
不过前几天 Fedora 30 才刚发布 Beta 版本,而且正式版也预计下个月初就要发布,在更新日志中还没有看到该消息的相关内容,所以期望短期内 Fedora 就实现该计划估计要失望。

bash:/usr/local/arm/arm-2009q3/bin/arm-none-linux-gnueabi-gcc: not found
是因为我的系统是64位的,需要安装32位库:
sudo apt-get install ia32-libs
如果在安装的时候提示ia32-libs无法安装,可用下面的替换: sudo apt-get install lib32z1 或者: sudo apt-get install lib32ncurses5

dnf - Upgrade from Fedora 24 to Fedora 25, then Upgrade from Fedora 25 to Fedora 26
Upgrade from Fedora 24 to Fedora 25, then Upgrade from Fedora 25 to Fedora 26#++++++++++++++++++++++++ Upgrade from Fedora 24 to Fedora 25
1. Update packages of Fedora 24 and reboot.
# dnf upgrade -y
# reboot
2. Install the DNF plugin
# dnf install -y dnf-plugin-system-upgrade
3. Start the update with DNF
# dnf system-upgrade -y download --refresh --releasever=25
# dnf system-upgrade reboot
#++++++++++++++++++++++++ Upgrade from Fedora 25 to Fedora 26
1. Update packages of Fedora 25 and reboot.
# dnf upgrade -y
# reboot
2. Install the DNF plugin
# dnf install -y dnf-plugin-system-upgrade
3. Start the update with DNF
# dnf system-upgrade -y download --refresh --releasever=26
# dnf system-upgrade reboot
在CENTOS7(RED HAT 7)下完全分布式环境搭建")
HADOOP(3.0.0)在CENTOS7(RED HAT 7)下完全分布式环境搭建
一、环境简介
本教程服务器主机都是CentOS 7(Red Hat 7 亦可),集群结点分布情况如下表:
+---------------+-----------+----------------------------------
|IP             |HOSTNAME   |备注
+---------------+-----------+----------------------------------
|192.168.6.171  |hdpmmaster |ResourceManager 进程所在机器
+---------------+-----------+----------------------------------
|192.168.6.172  |hdpsmaster |SecondaryNameNode 主机的备机
+---------------+-----------+----------------------------------
|198.168.6.67   |hdpslave67 |datanode
+---------------+-----------+----------------------------------
|198.168.6.68   |hdpslave68 |datanode
+---------------+-----------+----------------------------------
|198.168.6.69   |hdpslave68 |datanode
+---------------+-----------+----------------------------------
二、Linux 环境准备
01. 创建hadoop用户
01) 新建用户: adduser hadoop(注: 在创建hadoop用户的同时也创建了hadoop用户组)
02) 给hadoop用户添加登录密码: passwd hadoop
03) 把hadoop用户加入到hadoop用户组: usermod -a -G hadoop hadoop
03) 赋予用户root权限, 向/etc/sudoers中添加"hadoop ALL=(ALL) ALL",如果没有写的权限需要先执行 chmod +w /etc/sudoers
注:以上所有操作都是在root用户下完成,非root用户可以在所有命令前加sudo
02. HOSTNAME 处理
01) 修改服务器的 hostname,使用命令 hostnamectl set-hostname <new_host_name>
192.168.6.171 中: hostnamectl set-hostname hdpmmaster
192.168.6.172 中: hostnamectl set-hostname hdpsmaster
192.168.6.67  中: hostnamectl set-hostname hdpslave67
192.168.6.68  中: hostnamectl set-hostname hdpslave68
192.168.6.69  中: hostnamectl set-hostname hdpslave69
02) 向/etc/hosts文件中添加域名和IP的映射,内容如下
192.168.6.171           hdpmmaster
192.168.6.172           hdpsmaster
192.168.6.67            hdpslave67
192.168.6.68            hdpslave68
192.168.6.69            hdpslave69
注:以上所有操作都是在root用户下完成,非root用户可以在所有命令前加sudo
03. ssh免密码登录
01) ssh安装,使用命令 sudo yum isntall -y openssd
02) ssh dsa算法密钥对生成,分别在5台机器执行以下3条命令
ssh-keygen -t dsa -P '''' -f ~/.ssh/id_dsa
cat ~/.ssh/id_dsa.pub >> ~/.ssh/authorized_keys
chmod 600 ~/.ssh/authorized_keys
03) 复制公钥到集群服务器,使用命令 ssh-copy-id <user>@<host>
示例:复制 hdpslave67(192.168.6.67) 的公钥到 hdpslave68(192.168.6.68)
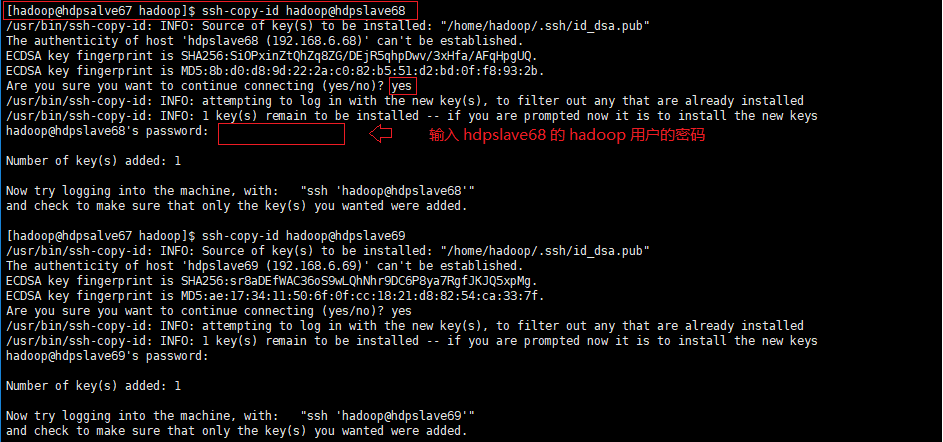
注:可以执行 ssh hadoop@hdpslave68 命令看是否需要输入登录密码来确认是否陈功,同时避免以后检查出什么问题最好保证集群中的服务器能够两两无密码登录。
04. JDK 安装
01) 下载并安装JDK
01) 下载 jdk 的 rpm 安装文件
02) 使用命令 sudo rpm -ivh jdk-8u144-linux-x64.rpm 安装
02) JDK 环境变量配置:sudo vi /etc/profile
export JAVA_HOME=/usr/java/jdk1.8.0_144
export JRE_HOME=${JAVA_HOME}/jre
export CLASSPATH=$CLASSPATH:.:${JAVA_HOME}/lib:${JAVA_HOME}/jre/lib
export PATH=${JAVA_HOME}/bin:${JAVA_HOME}/jre/bin:$PATH
注:jdk的环境变量配置也可写入 hadoop 用户目录下的 .bashrc 文件,或者 .bash_profile 文件
05. 关闭所有服务器的防火墙
sudo systemctl stop firewalld    #停止防火墙服务
sudo systemctl disable firewalld #禁用防火墙服务开机启动
三、HAOOP 安装以及配置
01) 下载并安装 hadoop (版本:3.0.0)
wget http://mirrors.shuosc.org/apache/hadoop/common/hadoop-3.0.0/hadoop-3.0.0.tar.gz
tar -xzf hadoop-3.0.0.tar.gz -C /usr/local/
cd /usr/local/
ln -s hadoop-3.0.0/ hadoop #建立软链接, 也可直接使用 mv hadoop-3.0.0 hadoop 命令改名
02) 配置 hadoop 环境变量,向 /home/hadoop/.bashrc 文件添加以下内容
# HADOOP
export HADOOP_HOME=/usr/local/hadoop
export PATH=$HADOOP_HOME/bin:$HADOOP_HOME/sbin:$PATH
export HADOOP_CONF_DIR=$HADOOP_HOME/etc/hadoop
export HADOOP_INSTALL=$HADOOP_HOME
export HADOOP_MAPRED_HOME=$HADOOP_HOME
export HADOOP_COMMON_HOME=$HADOOP_HOME
export HADOOP_HDFS_HOME=$HADOOP_HOME
export HADOOP_YARN_HOME=$HADOOP_HOME
export HADOOP_COMMON_LIB_NATIVE_DIR=$HADOOP_HOME/lib/native
03) 配置 hadoop 安装目录(/usr/local/hadoop)下的 etc/hadoop/core-site.xml
<configuration>
    <property>
        <name>fs.defaultFS</name>
        <value>hdfs://hdpmmaster:9000</value>
    </property>
    <property>
        <name>hadoop.tmp.dir</name>
        <value>file:///usr/local/hadoop/hdptmp</value>
        <description>Abase for other temporary directories.</description>
    </property>
</configuration>
04) 配置 hadoop 安装目录(/usr/local/hadoop)下的 etc/hadoop/hdfs-site.xml
<configuration>
    <property>
        <name>dfs.replication</name>
        <value>1</value>
    </property>
    <property>
        <name>dfs.namenode.name.dir</name>
        <value>file:///usr/local/hadoop/hadoop_data/hdfs/namenode</value>
    </property>
    <property>
        <name>dfs.datanode.data.dir</name>
        <value>file:///usr/local/hadoop/hadoop_data/hdfs/datanode</value>
    </property>
    <property>
        <name>dfs.namenode.secondary.http-address</name>
        <value>hdpsmaster:9868</value>
    </property>
</configuration>
05) 配置 hadoop 安装目录(/usr/local/hadoop)下的 etc/hadoop/mapred-site.xml
<configuration>
    <property>
        <name>mapreduce.framework.name</name>
        <value>yarn</value>
    </property>
    <property>
        <name>mapreduce.jobhistory.address</name>
        <value>hdpmmaster:10020</value>
    </property>
    <property>
        <name>mapreduce.jobhistory.webapp.address</name>
        <value>hdpmmaster:19888</value>
    </property>
</configuration>
06) 配置 hadoop 安装目录(/usr/local/hadoop)下的 etc/hadoop/yarn-site.xml
<configuration>

<!-- Site specific YARN configuration properties -->

    <property>
        <name>yarn.nodemanager.aux-services</name>
        <value>mapreduce_shuffle</value>
    </property>

    <property>
        <name>yarn.nodemanager.env-whitelist</name>
        <value>JAVA_HOME,HADOOP_COMMON_HOME,HADOOP_HDFS_HOME,HADOOP_CONF_DIR,CLASSPATH_PREPEND_DISTCACHE,HADOOP_YARN_HOME,HADOOP_MAPRED_HOME</value>
    </property>

    <property>
        <name>yarn.nodemanager.resource.cpu-vcores</name>
        <value>2</value>
    </property>

<!--
    <property>
        <name>yarn.nodemanager.resource.memory-mb</name>
        <value>3072</value>
    </property>
    <property>
        <name>yarn.scheduler.maximum-allocation-mb></name>
        <value>3052</value>
    </property>
-->

    <property>
        <name>yarn.resourcemanager.scheduler.address</name>
        <value>hdpmmaster:8030</value>
    </property>
    <property>
        <name>yarn.resourcemanager.resource-tracker.address</name>
        <value>hdpmmaster:8031</value>
    </property>
    <property>
        <name>yarn.resourcemanager.address</name>
        <value>hdpmmaster:8032</value>
    </property>
    <property>
        <name>yarn.resourcemanager.admin.address</name>
        <value>hdpmmaster:8033</value>
    </property>
    <property>
        <name>yarn.resourcemanager.webapp.address</name>
        <value>hdpmmaster:8088</value>
    </property>
    <property>
        <name>yarn.nodemanager.vmem-check-enabled</name>
        <value>false</value>
    </property>
</configuration>
07) 配置 hadoop 安装目录(/usr/local/hadoop)下的 etc/hadoop/workers
hdpsmaster
hdpslave67
hdpslave68
hdpslave69
注:该 workers 文件也可以配置为ip,如下
192.168.6.171
192.168.6.67
192.168.6.68
192.168.6.69
08) 配置 hadoop 安装目录(/usr/local/hadoop)下的 etc/hadoop/hadoop-env.sh
export JAVA_HOME=/usr/java/latest #去掉前面的''#'', 且写入jdk的安装路径, 这里的写法用latest是为了以后jdk升级不用修改该配置, 当然也可以写jdk安装的绝对路径, 即"/usr/java1.8.0_144"
09) 格式化namenode
hdfs namenode -format注:格式化之前需要将剩余的主机都如此配置hadoop,最简单的做法就是配置好一台,然后直接复制到剩余的主机服务器上。同时后续可能需要修改配置文件每次都需要同步配置文件,可以写个简单的同步脚本,内容如下。
# 名称: scphdp.sh
# 路径: /usr/local/hadoop
# 备注: 01. 需要添加执行权限, chmod +x /usr/local/hadoop/scphdp.sh
#       02. 注意修改集群的ip
echo "==========6.67 begin=========="
scp -r etc/hadoop hadoop@192.168.6.67:/usr/local/hadoop/etc
echo "===========6.67 end==========="

echo "==========6.68 begin=========="
scp -r etc/hadoop hadoop@192.168.6.68:/usr/local/hadoop/etc
echo "===========6.68 end==========="

echo "==========6.69 begin=========="
scp -r etc/hadoop hadoop@192.168.6.69:/usr/local/hadoop/etc
echo "===========6.69 end==========="


#echo "==========6.172 begin=========="
#scp -r etc/hadoop hadoop@192.168.6.172:/usr/local/hadoop/etc
#echo "===========6.172 end==========="
10) 启动集群
start-all.sh注:启动之后通过 jps 命令查看java后台进程,各个结点的java进程信息如下
+---------------+-----------+--------------------------------------------------
|IP             |HOSTNAME   |java进程
+---------------+-----------+--------------------------------------------------
|192.168.6.171  |hdpmmaster |ResourceManager, NameNode, Jps
+---------------+-----------+--------------------------------------------------
|192.168.6.172  |hdpsmaster |Jps, SecondaryNameNode, NodeManager, DataNode
+---------------+-----------+--------------------------------------------------
|198.168.6.67   |hdpslave67 |NodeManager, Jps, DataNode
+---------------+-----------+--------------------------------------------------
|198.168.6.68   |hdpslave68 |NodeManager, Jps, DataNode
+---------------+-----------+--------------------------------------------------
|198.168.6.69   |hdpslave68 |NodeManager, Jps, DataNode
+---------------+-----------+--------------------------------------------------
11) 在有图形界面的pc上访问下面两个地址链接,查看相关信息
http://hdpmmaster:8088/ #NameNode图形界面, 任务分配和任务进度信息的查询
http://hdpmmaster:9870/ #集群结点(Node Of Cluster)图形界面
注:以域名访问需要向该pc的hosts文件中加入 "192.168.6.171 hdpmmaster",Windows 操作系统的hosts文件路径在 "C:\Windows\System32\drivers\etc\hosts",CentOS操作系统的hosts文件路径在"/etc/hosts"。
12) 单词统计示例运行
hadoop fs -mkdir /input
hadoop fs -chmod -R 775 /input
hadoop fs -put /usr/local/hadoop/LICENSE.txt /input
hadoop jar /usr/local/hadoop/share/hadoop/mapreduce/hadoop-mapreduce-examples-3.0.0.jar wordcount /input /output
注:01. 每次执行上面的 hadoop jar 命令,需要确认集群结点上的 /output 目录是否存在,存在则使用命令 "hadoop fs -rmr -f /output"删除该目录
02. 执行成功之后可以在 http://hdpmmaster:9870/explorer.html 中的"/output"文件夹中找到输出结果,允许下载和预览该结果文件
13) 停止集群
stop-all.sh14) 任务历史服务启动与关闭,web访问地址是 http://hdpmmaster:19888/jobhistory/ 端口是在mapred-site.xml中配置的
mapred --daemon start historyserver #启动
mapred --daemon stop historyserver #关闭
四、FAQ
01. 物理内存或虚拟内存监测溢出
问题描述: 执行任务的时虚拟内存溢出
报错信息: Container [pid=5623,containerID=container_1514514155753_0001_01_000002] is running beyond virtual memory limits. Current usage: 155.1 MB of 1 GB physical memory used; 2.4 GB of 2.1 GB virtual memory used. Killing container.
解决方案:
    方案一: 关闭虚拟内存监测, 在yarn-site.xml文件中添加"yarn.nodemanager.vmem-check-enabled"配置, 值为"false"(该方案不建议在正式环境中使用)
    方案二: 提高内存配置, 参考 http://blog.chinaunix.net/uid-25691489-id-5587957.html
02. datanode和namenode都启动成功,但datanode没有与namenode关联成功
问题描述: 集群启动正常, 使用jps查看各个结点的java进程也是对的, 但是无法打开http://hdpmmaster:8088, 虽然http://hdpmmaster:9870能访问, 但是查看 DataNode 页面没有看到任何一个结点。
报错信息: 查看任何一个 DataNode 结点的日志文件(HADOOP_HOME/logs/hadoop-hadoop-datanode-hdpsmaster.log)发现以下信息
          Retrying connect to server: hdpmmaster/192.168.6.171:9000. Already tried 0 time(s); retry policy is RetryUpToMaximumCountWithFixedSleep(maxRetries=10, sleepTime=1000 MILLISECONDS)
解决方案: 查看 hdpmmaster/192.168.6.171 主机的hosts文件中是否有"127.0.0.1 hdpmmaster", 删除该行, 重新格式化集群(hdfs namenode -format).
问题原因: 因为将hdpmmaster映射在了localhost, 所以DataNode结点无法访问到该NameNode, 同时也无法打开http://hdpmmaster:8088. 可以通过查看格式化集群结点时最后的提示信息来判定是否有出现该问题. 如果是"SHUTDOWN_MSG: Shutting down NameNode at localhost/127.0.0.1", 表示映射错误; 如果是"SHUTDOWN_MSG: Shutting down NameNode at hdpmmaster/192.168.6.171", 表示映射是正确的. 当然这一切都要在所有集群主机能够互相ping通的前提下, 即需要的所有端口都开放, 或者直接关闭防火墙, 该教程为简洁就是直接关闭集群所有主机的防火墙.
03. unhealthy状态的datanode处理(下面只是该现象其中一种原因)
问题描述: 在http://hdpmmaster:8088/cluster/nodes的界面出现unhealthy结点
报错信息: yarn.server.nodemanager.DirectoryCollection: Directory /var/lib/hadoop-yarn/cache/yarn/nm-local-dir error, used space above threshold of 90.0%, removing from list of valid directories
解决方案: 加大磁盘容量, 或者清理磁盘空间, 当然也可以提高yarn的监测数值, 即在yarn-site.xml中添加"yarn.nodemanager.disk-health-checker.max-disk-utilization-per-disk-percentage"配置, 值是一个百分比数值, 例如"95.0"
问题原因: 该结点主机的磁盘使用超过90%,

Install MongoDB Community Edition on Red Hat or CentOS

- Edition on Red Hat or CentOS
Install MongoDB Community Edition on Red Hat or CentOS
On this page
- Overview
- Considerations
- Install MongoDB Community Edition
- Run MongoDB Community Edition
- Uninstall MongoDB Community Edition
- Additional Information
Overview
Use this tutorial to install MongoDB 3.6 Community Edition on Red Hat Enterprise Linux, CentOS Linux, or Oracle Linux [1] using the yum package manager.
MongoDB Version
This tutorial installs MongoDB 3.6 Community Edition. To install a different version of MongoDB Community, use the version drop-down menu in the upper-left corner of this page to select the documentation for that version.
Considerations
Platform Support
MongoDB 3.6 Community Edition supports the following 64-bit versions of Red Hat Enterprise Linux (RHEL), CentOS Linux, and Oracle Linux [1] on x86_64 architecture:
- RHEL / CentOS / Oracle 8 (Starting in MongoDB Enterprise 3.6.17)
- RHEL / CentOS / Oracle 7
- RHEL / CentOS / Oracle 6
MongoDB only supports the 64-bit versions of these platforms.
See Supported Platforms for more information.
| [1] | (1, 2) MongoDB only supports Oracle Linux running the Red Hat Compatible Kernel (RHCK). MongoDB does not support the Unbreakable Enterprise Kernel (UEK). |
Windows Subsystem for Linux (WSL) - Unsupported
MongoDB does not support the Windows Subsystem for Linux (WSL).
Production Notes
Before deploying MongoDB in a production environment, consider the Production Notes document which offers performance considerations and configuration recommendations for production MongoDB deployments.
Install MongoDB Community Edition
Follow these steps to install MongoDB Community Edition using the yum package manager.
Configure the package management system (yum).
Create a /etc/yum.repos.d/mongodb-org-3.6.repo file so that you can install MongoDB directly using yum:
Changed in version 3.0: MongoDB Linux packages are in a new repository beginning with 3.0.
For MongoDB 3.6
Use the following repository file:
[mongodb-org-3.6]
name=MongoDB Repository
baseurl=https://repo.mongodb.org/yum/redhat/$releasever/mongodb-org/3.6/x86_64/
gpgcheck=1
enabled=1
gpgkey=https://www.mongodb.org/static/pgp/server-3.6.asc
For versions of MongoDB earlier than 3.6
To install the packages from an earlier release series such as 3.4, you can specify the release series in the repository configuration. For example, to restrict your system to the 3.4 release series, create a /etc/yum.repos.d/mongodb-org-3.4.repo file to hold the following configuration information for the MongoDB 3.4 repository:
[mongodb-org-3.4]
name=MongoDB 3.4 Repository
baseurl=https://repo.mongodb.org/yum/redhat/$releasever/mongodb-org/3.4/x86_64/
gpgcheck=0
enabled=1
You can also download the .rpm files directly from the MongoDB repository. Downloads are organized by Red Hat / CentOS version (e.g. 7), then MongoDB release version (e.g. 3.6), then architecture (e.g. x86_64). Odd-numbered MongoDB release versions, such as 3.7, are development versions and are unsuitable for production deployment.
Install the MongoDB packages.
To install the latest stable version of MongoDB, issue the following command:
sudo yum install -y mongodb-org
To install a specific release of MongoDB, specify each component package individually and append the version number to the package name, as in the following example:
sudo yum install -y mongodb-org-3.6.19 mongodb-org-server-3.6.19 mongodb-org-shell-3.6.19 mongodb-org-mongos-3.6.19 mongodb-org-tools-3.6.19
You can specify any available version of MongoDB. However yum will upgrade the packages when a newer version becomes available. To prevent unintended upgrades, pin the package. To pin a package, add the following exclude directive to your /etc/yum.conf file:
exclude=mongodb-org,mongodb-org-server,mongodb-org-shell,mongodb-org-mongos,mongodb-org-tools
Run MongoDB Community Edition
Prerequisites
ulimit
Directory Paths
To Use Default Directories
By default, MongoDB runs using the mongod user account and uses the following default directories:
/var/lib/mongo(the data directory)/var/log/mongodb(the log directory)
➤ If you installed via the package manager,
The default directories are created, and the owner and group for these directories are set to mongod.
➤ If you installed by downloading the tarballs,
The default MongoDB directories are not created. To create the MongoDB data and log directories:
sudo mkdir -p /var/lib/mongo
sudo mkdir -p /var/log/mongodb
By default, MongoDB runs using the mongod user account. Once created, set the owner and group of these directories to mongod:
sudo chown -R mongod:mongod <directory>
To Use Non-Default Directories
To use a data directory and/or log directory other than the default directories:
-
Create the new directory or directories.
-
Edit the configuration file
/etc/mongod.confand modify the following fields accordingly:storage.dbPathto specify a new data directory path (e.g./some/data/directory)systemLog.pathto specify a new log file path (e.g./some/log/directory/mongod.log)
-
Ensure that the user running MongoDB has access to the directory or directories:
-
sudo chown -R mongod:mongod <directory>
If you change the user that runs the MongoDB process, you must give the new user access to these directories.
-
Configure SELinux if enforced. See Configure SELinux.
Configure SELinux
Important
If SELinux is in enforcing mode, you must customize your SELinux policy for MongoDB.
The current SELinux Policy does not allow the MongoDB process to access /sys/fs/cgroup, which is required to determine the available memory on your system. If you intend to run SELinux in enforcing mode, you will need to make the following adjustment to your SELinux policy:
-
Ensure your system has the
checkpolicypackage installed:
-
sudo yum install checkpolicy
-
Create a custom policy file
mongodb_cgroup_memory.te: -
cat > mongodb_cgroup_memory.te <<EOF
module mongodb_cgroup_memory 1.0;

require {
    type cgroup_t;
    type mongod_t;
    class dir search;
    class file { getattr open read };
}

#============= mongod_t ==============
allow mongod_t cgroup_t:dir search;
allow mongod_t cgroup_t:file { getattr open read };
EOF
-
Once created, compile and load the custom policy module by running these three commands:
-
checkmodule -M -m -o mongodb_cgroup_memory.mod mongodb_cgroup_memory.te
semodule_package -o mongodb_cgroup_memory.pp -m mongodb_cgroup_memory.mod
sudo semodule -i mongodb_cgroup_memory.pp
The MongoDB process is now able to access the correct files with SELinux set to enforcing.
Important
You will also need to further customize your SELinux policy in the following two cases if SELinux is in enforcing mode:
- You are not using the default MongoDB directories (for RHEL 7.0), and/or
- You are not using default MongoDB ports.
Non-Default MongoDB Directory Path(s)
-
Update the SELinux policy to allow the
mongodservice to use the new directory:
-
semanage fcontext -a -t <type> </some/MongoDB/directory.*>
where specify one of the following types as appropriate:
mongod_var_lib_tfor data directorymongod_log_tfor log file directorymongod_var_run_tfor pid file directory
Note
Be sure to include the
.*at the end of the directory. -
Update the SELinux user policy for the new directory:
-
chcon -Rv -u system_u -t <type> </some/MongoDB/directory>
where specify one of the following types as appropriate:
mongod_var_lib_tfor data directorymongod_log_tfor log directorymongod_var_run_tfor pid file directory
-
Apply the updated SELinux policies to the directory:
-
restorecon -R -v </some/MongoDB/directory>
For examples:
Tip
- Depending on your user permission, you may need to use
sudoto perform these operations. - Be sure to include the
.*at the end of the directory for thesemanage fcontextoperations.
-
If using a non-default MongoDB data path of
/mongodb/data:
-
semanage fcontext -a -t mongod_var_lib_t ''/mongodb/data.*''
chcon -Rv -u system_u -t mongod_var_lib_t ''/mongodb/data''
restorecon -R -v ''/mongodb/data''
-
If using a non-default MongoDB log directory of
/mongodb/log(e.g. if the log file path is/mongodb/log/mongod.log):
-
semanage fcontext -a -t mongod_log_t ''/mongodb/log.*''
chcon -Rv -u system_u -t mongod_log_t ''/mongodb/log''
restorecon -R -v ''/mongodb/log''
Non-Default MongoDB Ports
Tip
Depending on your user permission, you may need to use sudo to perform the operation.
semanage port -a -t mongod_port_t -p tcp <portnumber>
Optional. Suppress FTDC Warnings
The current SELinux Policy does not allow the MongoDB process to open and read /proc/net/netstat for Diagnostic Parameters (FTDC). As such, the audit log may include numerous messages regarding lack of access to this path.
To track the proposed fix, see https://github.com/fedora-selinux/selinux-policy-contrib/pull/79.
Optionally, as a temporary fix, you can manually adjust the SELinux Policy:
-
Ensure your system has the
checkpolicypackage installed:
-
sudo yum install checkpolicy
-
Create a custom policy file
mongodb_proc_net.te: -
cat > mongodb_proc_net.te <<EOF
module mongodb_proc_net 1.0;

require {
    type proc_net_t;
    type mongod_t;
    class file { open read };
}

#============= mongod_t ==============
allow mongod_t proc_net_t:file { open read };
EOF
-
Once created, compile and load the custom policy module by running these three commands:
Tip
Depending on your user permission, you may need to use
sudoto perform thesemoduleoperation.
-
checkmodule -M -m -o mongodb_proc_net.mod mongodb_proc_net.te
semodule_package -o mongodb_proc_net.pp -m mongodb_proc_net.mod
semodule -i mongodb_proc_net.pp
Procedure
Follow these steps to run MongoDB Community Edition on your system. These instructions assume that you are using the default settings.
Init System
To run and manage your mongod process, you will be using your operating system’s built-in init system. Recent versions of Linux tend to use systemd (which uses the systemctl command), while older versions of Linux tend to use System V init (which uses the service command).
If you are unsure which init system your platform uses, run the following command:
ps --no-headers -o comm 1
Then select the appropriate tab below based on the result:
systemd- select the systemd (systemctl) tab below.init- select the System V Init (service) tab below.
- systemd (systemctl)
- System V Init (service)
Start MongoDB.
You can start the mongod process by issuing the following command:
sudo systemctl start mongod
If you receive an error similar to the following when starting mongod:
Failed to start mongod.service: Unit mongod.service not found.
Run the following command first:
sudo systemctl daemon-reload
Then run the start command above again.
Verify that MongoDB has started successfully.
You can verify that the mongod process has started successfully by issuing the following command:
sudo systemctl status mongod
You can optionally ensure that MongoDB will start following a system reboot by issuing the following command:
sudo systemctl enable mongod
Stop MongoDB.
As needed, you can stop the mongod process by issuing the following command:
sudo systemctl stop mongod
Restart MongoDB.
You can restart the mongod process by issuing the following command:
sudo systemctl restart mongod
You can follow the state of the process for errors or important messages by watching the output in the /var/log/mongodb/mongod.log file.
Begin using MongoDB.
Start a mongo shell on the same host machine as the mongod. Use the --host command line option to specify the localhost address and port that the mongod listens on:
mongo --host 127.0.0.1:27017
Later, to stop MongoDB, press Control+C in the terminal where the mongod instance is running.
Uninstall MongoDB Community Edition
To completely remove MongoDB from a system, you must remove the MongoDB applications themselves, the configuration files, and any directories containing data and logs. The following section guides you through the necessary steps.
Warning
This process will completely remove MongoDB, its configuration, and all databases. This process is not reversible, so ensure that all of your configuration and data is backed up before proceeding.
Stop MongoDB.
Stop the mongod process by issuing the following command:
sudo service mongod stop
Remove Packages.
Remove any MongoDB packages that you had previously installed.
sudo yum erase $(rpm -qa | grep mongodb-org)
Remove Data Directories.
Remove MongoDB databases and log files.
sudo rm -r /var/log/mongodb
sudo rm -r /var/lib/mongo
Additional Information
Localhost Binding by Default
By default, MongoDB launches with bindIp set to 127.0.0.1, which binds to the localhost network interface. This means that the mongod can only accept connections from clients that are running on the same machine. Remote clients will not be able to connect to the mongod, and the mongod will not be able to initialize a replica set unless this value is set to a valid network interface.
This value can be configured either:
- in the MongoDB configuration file with
bindIp, or - via the command-line argument
--bind_ip
Warning
Before binding to a non-localhost (e.g. publicly accessible) IP address, ensure you have secured your cluster from unauthorized access. For a complete list of security recommendations, see Security Checklist. At minimum, consider enabling authentication and hardening network infrastructure.
For more information on configuring bindIp, see MongoDB Configuration Hardening.
MongoDB Community Edition Packages
MongoDB Community Edition is available from its own dedicated repository, and contains the following officially-supported packages:
| Package Name | Description |
|---|---|
mongodb-org |
A metapackage that will automatically install the four component packages listed below. |
mongodb-org-server |
Contains the mongod daemon and associated configuration and init scripts. |
mongodb-org-mongos |
Contains the mongos daemon. |
mongodb-org-shell |
Contains the mongo shell. |
mongodb-org-tools |
Contains the following MongoDB tools: mongoimport bsondump, mongodump, mongoexport, mongofiles, mongoperf, mongorestore, mongostat, and mongotop. |
The mongodb-org-server package provides an initialization script that starts mongod with the /etc/mongod.conf configuration file.
See Run MongoDB Community Edition for details on using this initialization script.
© MongoDB, Inc 2008-present. MongoDB, Mongo, and the leaf logo are registered trademarks of MongoDB, Inc.
今天关于与 Red Hat 联手,Fedora 要支持 ARM 笔记本和download fedora redhat的分享就到这里,希望大家有所收获,若想了解更多关于bash:/usr/local/arm/arm-2009q3/bin/arm-none-linux-gnueabi-gcc: not found、dnf - Upgrade from Fedora 24 to Fedora 25, then Upgrade from Fedora 25 to Fedora 26、HADOOP(3.0.0)在CENTOS7(RED HAT 7)下完全分布式环境搭建、Install MongoDB Community Edition on Red Hat or CentOS等相关知识,可以在本站进行查询。
本文标签:


