对于基于OpenVINO的端到端DL网络-AYearinComputerVision中关于图像增强系列部分感兴趣的读者,本文将提供您所需要的所有信息,并且为您提供关于2018,Luckyyear,Ch
对于基于 OpenVINO 的端到端 DL 网络 - A Year in Computer Vision 中关于图像增强系列部分感兴趣的读者,本文将提供您所需要的所有信息,并且为您提供关于2018,Lucky year,Challenging year!、3D Computer Vision、awesome computer vision repo、Azure Computer Vision 之 Smart Crop 智能裁剪图片的宝贵知识。
本文目录一览:- 基于 OpenVINO 的端到端 DL 网络 - A Year in Computer Vision 中关于图像增强系列部分
- 2018,Lucky year,Challenging year!
- 3D Computer Vision
- awesome computer vision repo
- Azure Computer Vision 之 Smart Crop 智能裁剪图片

基于 OpenVINO 的端到端 DL 网络 - A Year in Computer Vision 中关于图像增强系列部分
http://www.themtank.org/a-year-in-computer-vision
部分中文翻译汇总:https://blog.csdn.net/chengyq116/article/details/78660521
The M Tank 编辑了一份报告《A Year in Computer Vision》,记录了 2016 至 2017 年计算机视觉领域的研究成果,对开发者和研究人员来说是不可多得的一份详细材料。虽然该文已经过去一年多的时间了,但是考虑到研究成果由理论到落地的滞后性,里面的很多东西现在反而能够读出新味道。
目前在计算机视觉处理领域,有两类方法,一类是深度学习,一类是传统计算机视觉,在物体检测、目标识别等方面深度学习已经开始崭露优势,替代传统的计算机视觉,然而在其他视觉领域,包括光流计算或图像增强等依然是传统的计算机视觉处理方法更有优势。
以下是翻译和原文。
超分辨率、风格迁移和着色
计算机视觉领域的所有研究并非都是为了扩展机器的认知能力,神经网络以及其他 ML 技术常常适用于各种其他新颖的应用,这些应用往往和我们的日常生活精密联系。在这个方面,"超分辨率"、“风格转移” 和 “着色” 的进步占据了整个领域。
1、超分辨率指的是从低分辨率对应物估计高分辨率图像的过程,以及不同放大倍数下图像特征的预测,这是人脑几乎毫不费力地完成的。最初的超分辨率是通过简单的技术,如 bicubic-interpolation 和最近邻。在商业应用方面,克服低分辨率限制和实现 “CSI Miami” 风格图像增强的愿望推动了该领域的研究。以下是今年的一些进展及其潜在的影响:
-
Neural Enhance 是 Alex J. Champandard 的创意,结合四篇不同研究论文的方法来实现超分辨率方法。
-
实时视频超分辨率解决方案也在 2016 年进行了两次著名的尝试。
-
RAISR:来自 Google 的快速而准确的图像超分辨率方法。通过使用低分辨率和高分辨率图像对训练滤波器,避免了神经网络方法的昂贵内存和速度要求。作为基于学习的框架,RAISR 比同类算法快两个数量级,并且与基于神经网络的方法相比,具有最小的存储器需求。因此超分辨率可以扩展到个人设备。
生成对抗网络(GAN)的使用代表了当前用于超分辨率的 SOTA:
-
SRGAN 通过训练区分超分辨率和原始照片真实图像的辨别器网络,在公共基准测试中提供多采样图像的逼真纹理。
尽管 SRResNet 在峰值信噪比(PSNR)方面的表现最佳,但 SRGAN 获得更精细的纹理细节并达到最佳的平均评分(MOS),SRGAN 表现最佳。(SRGAN 在人为主管测试上获得最佳)
“据我们所知,这是第一个能够推出 4 倍放大因子的照片般真实的自然图像的框架。” 以前所有的方法都无法在较大的放大因子下恢复更精细的纹理细节。
-
Amortised MAP Inference for Image Super-resolution 提出了一种使用卷积神经网络计算最大后验(MAP)推断的方法。但是,他们的研究提出了三种优化方法,GAN 在其中实时图像数据上表现明显更好。

2.Style Transfer 集中体现了神经网络在公共领域的新用途,特别是去年的 Facebook 集成以及像 Prisma 和 Artomatix 这样的公司。(Prisma. Available: https://prisma-ai.com/ [Accessed: 01/04/2017].Artomatix. Available: https://services.artomatix.com/ [Accessed: 01/04/2017].)风格转换是一种较旧的技术,但在 2015 年出版了一个神经算法的艺术风格转换为神经网络。从那时起,风格转移的概念被 Nikulin 和 Novak 扩展,并且也被用于视频,就像计算机视觉中其他的共同进步一样。


图:风格迁移的例子
风格转换作为一个主题,一旦可视化是相当直观的,比如,拍摄一幅图像,并用不同的图像的风格特征呈现。例如,以着名的绘画或艺术家的风格。今年 Facebook 发布了 Caffe2Go,将其深度学习系统整合到移动设备中。谷歌也发布了一些有趣的作品,试图融合多种风格,生成完全独特的图像风格。
除了移动端集成之外,风格转换还可以用于创建游戏资产。我们团队的成员最近看到了 Artomatix 的创始人兼首席技术官 Eric Risser 的演讲,他讨论了该技术在游戏内容生成方面的新颖应用(纹理突变等),因此大大减少了传统纹理艺术家的工作。【在动漫和游戏领域的确大有作为】
3、着色是将单色图像更改为新的全色版本的过程。最初,这是由那些精心挑选的颜色由负责每个图像中的特定像素的人手动完成的。2016 年,这一过程自动化成为可能,同时保持了以人类为中心的色彩过程的现实主义的外观。虽然人类可能无法准确地表现给定场景的真实色彩,但是他们的真实世界知识允许以与图像一致的方式和观看所述图像的另一个人一致的方式应用颜色。
着色的过程是有趣的,因为网络基于对物体位置,纹理和环境的理解(例如,图像)为图像分配最可能的着色。它知道皮肤是粉红色,天空是蓝色的。
“而且,我们的架构可以处理任何分辨率的图像,而不像现在大多数基于 CNN 的方法。”
在一个测试中,他们的色彩是多么的自然,用户从他们的模型中得到一个随机的图像,并被问到,“这个图像看起来是自然的吗?
他们的方法达到了 92.6%,基线达到了大约 70%,而实际情况(实际彩色照片)被认为是自然的 97.7%。

我为什么对这三者非常感兴趣,拿出来单独研究,原因是多方面的:
Super-resolution, Style Transfer & Colourisation
Not all research in Computer Vision serves to extend the pseudo-cognitive abilities of machines, and often the fabled malleability of neural networks, as well as other ML techniques, lend themselves to a variety of other novel applications that spill into the public space. Last year’s advancements in Super-resolution, Style Transfer & Colourisation occupied that space for us.
Super-resolution refers to the process of estimating a high resolution image from a low resolution counterpart, and also the prediction of image features at different magnifications, something which the human brain can do almost effortlessly. Originally super-resolution was performed by simple techniques like bicubic-interpolation and nearest neighbours. In terms of commercial applications, the desire to overcome low-resolution constraints stemming from source quality and realisation of ‘CSI Miami’ style image enhancement has driven research in the field. Here are some of the year’s advances and their potential impact:
- Neural Enhance[65] is the brainchild of Alex J. Champandard and combines approaches from four different research papers to achieve its Super-resolution method.
- Real-Time Video Super Resolution was also attempted in 2016 in two notable instances.[66],[67]
- RAISR: Rapid and Accurate Image Super-Resolution[68] from Google avoids the costly memory and speed requirements of neural network approaches by training filters with low-resolution and high-resolution image pairs. RAISR, as a learning-based framework, is two orders of magnitude faster than competing algorithms and has minimal memory requirements when compared with neural network-based approaches. Hence super-resolution is extendable to personal devices. There is a research blog available here.[69]
Figure 7: Super-resolution SRGAN example
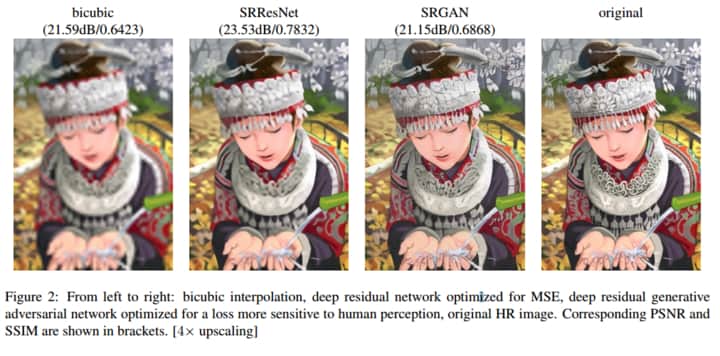
Note: From left to right: bicubic interpolation (the objective worst performer for focus), Deep residual network optimised for MSE, deep residual generative adversarial network optimized for a loss more sensitive to human perception, original High Resolution (HR) image. Corresponding peak signal to noise ratio (PSNR) and structural similarity (SSIM) are shown in two brackets. [4 x upscaling] The reader may wish to zoom in on the middle two images (SRResNet and SRGAN) to see the difference between image smoothness vs more realistic fine details.
Source: Ledig et al. (2017)[70]
The use of Generative Adversarial Networks (GANs) represent current SOTA for Super-resolution:
- SRGAN[71] provides photo-realistic textures from heavily downsampled images on public benchmarks, using a discriminator network trained to differentiate between super-resolved and original photo-realistic images.
Qualitatively SRGAN performs the best, although SRResNet performs best with peak-signal-to-noise-ratio (PSNR) metric but SRGAN gets the finer texture details and achieves the best Mean Opinion Score (MOS). “To our knowledge, it is the first framework capable of inferring photo-realistic natural images for 4× upscaling factors.”[72] All previous approaches fail to recover the finer texture details at large upscaling factors.
- Amortised MAP Inference for Image Super-resolution[73] proposes a method for calculation of Maximum a Posteriori (MAP) inference using a Convolutional Neural Network. However, their research presents three approaches for optimisation, all of which GANs perform markedly better on real image data at present.
Figure 8: Style Transfer from Nikulin & Novakle

Note: Transferring different styles to a photo of a cat (original top left).
Source: Nikulin & Novak (2016)
Undoubtedly, Style Transfer epitomises a novel use of neural networks that has ebbed into the public domain, specifically through last year’s facebook integrations and companies like Prisma[74] and Artomatix[75]. Style transfer is an older technique but converted to a neural networks in 2015 with the publication of a Neural Algorithm of Artistic Style.[76] Since then, the concept of style transfer was expanded upon by Nikulin and Novak[77] and also applied to video,[78] as is the common progression within Computer Vision.
Figure 9: Further examples of Style Transfer
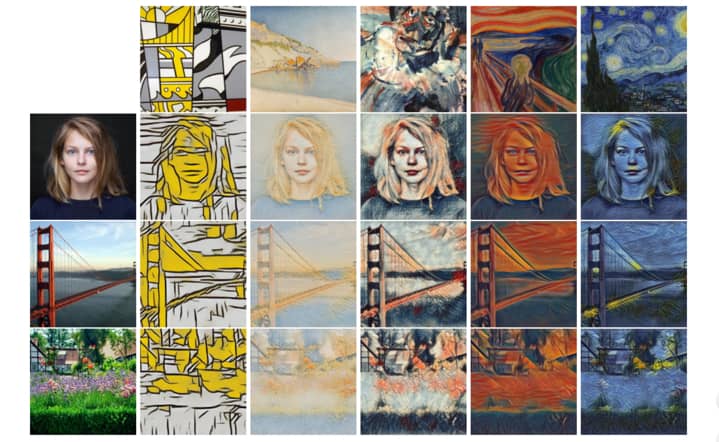
Note: The top row (left to right) represent the artistic style which is transposed onto the original images which are displayed in the first column (Woman, Golden Gate Bridge and Meadow Environment). Using conditional instance normalisation a single style transfer network can capture 32 style simultaneously, five of which are displayed here. The full suite of images in available in the source paper’s appendix. This work will feature in the International Conference on Learning Representations (ICLR) 2017.
Source: Dumoulin et al. (2017, p. 2)[79]
Style transfer as a topic is fairly intuitive once visualised; take an image and imagine it with the stylistic features of a different image. For example, in the style of a famous painting or artist. This year Facebook released Caffe2Go,[80] their deep learning system which integrates into mobile devices. Google also released some interesting work which sought to blend multiple styles to generate entirely unique image styles: Research blog[81] and full paper.[82]
Besides mobile integrations, style transfer has applications in the creation of game assets. Members of our team recently saw a presentation by the Founder and CTO of Artomatix, Eric Risser, who discussed the technique’s novel application for content generation in games (texture mutation, etc.) and, therefore, dramatically minimises the work of a conventional texture artist.
Colourisation is the process of changing monochrome images to new full-colour versions. Originally this was done manually by people who painstakingly selected colours to represent specific pixels in each image. In 2016, it became possible to automate this process while maintaining the appearance of realism indicative of the human-centric colourisation process. While humans may not accurately represent the true colours of a given scene, their real world knowledge allows the application of colours in a way which is consistent with the image and another person viewing said image.
The process of colourisation is interesting in that the network assigns the most likely colouring for images based on its understanding of object location, textures and environment, e.g. it learns that skin is pinkish and the sky is blueish.
Three of the most influential works of the year are as follows:
- Zhang et al.[83] produced a method that was able to successfully fool humans on 32% of their trials. Their methodology is comparable to a “colourisation Turing test.”
- Larsson et al.[84] fully automate their image colourisation system using Deep Learning for Histogram estimation.
- Finally, Lizuka, Simo-Serra and Ishikawa[85] demonstrate a colourisation model also based upon CNNs. The work outperformed the existing SOTA, we [the team] feel as though this work is qualitatively best also, appearing to be the most realistic. Figure 10 provides comparisons, however the image is taken from Lizuka et al.
Figure 10: Comparison of Colourisation Research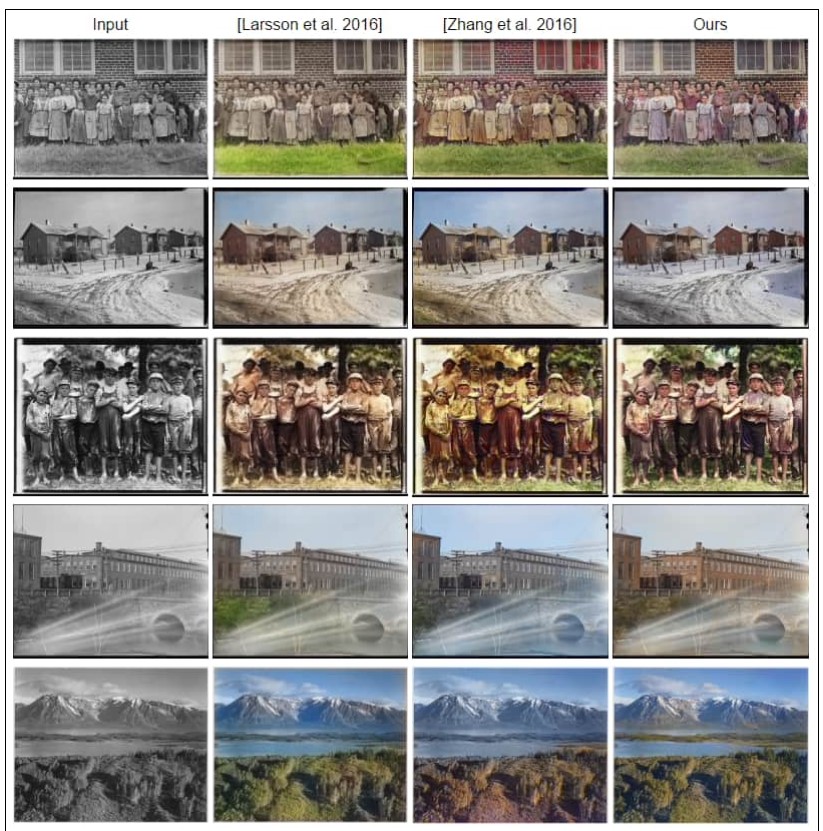
Note: From top to bottom - column one contains the original monochrome image input which is subsequently colourised through various techniques. The remaining columns display the results generated by other prominent colourisation research in 2016. When viewed from left to right, these are Larsson et al. 84 2016 (column two), Zhang et al. 83 2016 (Column three), and Lizuka, Simo-Serra and Ishikawa. 85 2016, also referred to as “ours” by the authors (Column four). The quality difference in colourisation is most evident in row three (from the top) which depicts a group of young boys. We believe Lizuka et al.’s work to be qualitatively superior (Column four).
Source: Lizuka et al. 2016[86]
“Furthermore, our architecture can process images of any resolution, unlike most existing approaches based on CNN.”
In a test to see how natural their colourisation was, users were given a random image from their models and were asked, "does this image look natural to you?"
Their approach achieved 92.6%, the baseline achieved roughly 70% and the ground truth (the actual colour photos) were considered 97.7% of the time to be natural.

2018,Lucky year,Challenging year!
怎么都不会想到今年的2018总结居然是写在了一个技术社区,想当初我可是文艺女青年啊,哈哈!Segmentfault 是我接触到的第一个技术社区,也是我想要在这里深耕细作的地方。
2018年的8月,经朋友推荐初识 Nervos,2018年的10月,正式加入 Nervos。就这样,离开了工作3年多的上海来到杭州,为什么说自己是幸运的?因为加入了一个充满开源文化的公司,在这里充满了爱与分享。我在的部门是市场部,我们每天有自己的 scrum ,每周有自己的 workshop,leader 非常的 nice。为什么说是充满挑战呢?在这里的节奏一点不比上海慢,因为这是一家技术型的互联网公司,之前对区块链的认知太浮于表面,所以每天都需要有新的硬核知识给自己充电。
我所知道的 Nervos 的一年

2018年2月:「Nervos CKB: A common knowledge base for blockchains and applications」白皮书面世
2018年6月:「NervosNetwork」公众号发布第一篇文章「Nervos,为了更好的世界」
2018年7月-2018年11月:4个月,10座城,15场线下 Meetup
2018年8月-2018年12月:每周三杭州的 Dev Meetup 15场
2018年11月31日:Nervos CKB 正式开源
我深刻地记得每次线下 Meetup 的最后招聘环节人事小姐姐每次说的一句很重要的话:我们是一家对工程师好的公司,这句话很令我感动。我们在杭州的 Dev Meetup 鼓励自己的工程师出去给大家分享知识,内外部一起学习,同时也邀请外部工程师来做演讲。
哇咔,这不是我的风格呀?!完全没有写自己呀,我曾经是一个热爱生活的人啊,怕是进入了一家魔性的公司了。不过我还是很享受现在的状态,因为每天都会觉得自己在吸收新知识,认识新朋友,尤其是工程师们,他们还是很有趣滴~~
告别2018,期待2019!
2018对我来说是一个很大的跨越,不仅仅是行业的跨越,也是对自己挑战的跨越,这才仅仅是个开始!
2019的期望:
在 Nervos 可以最大限度地发挥自己的可能性,多看书学习
在 Segmentfault 可以输出更多关于区块链的优质内容,学习做视频,结识更多真正爱好技术的人
合理分配自己的工作和生活,继续和同伴玩尤克里里(年会上弹唱一点都不满意,都怪那条裙子太滑。。。)玩音乐,探店,晒太阳。。。。。
对了,还要加入公司的“小黑裙”,去学跳舞!
希望明年可以把更多的总结写在这里,大家新年快乐!

3D Computer Vision
3D Computer Vision
Programming Assignment 2 – Epipolar Geometry
You will upload your codes and a short report (PDF) in a zip file to the NewE3 system. Grading will be done
at demo time (face-to-face or Skype).
A C++ Visual Studio project is provided. To build the code, install VS 2019 (Community). When open the
solution file (project2.sln), be sure NOT to upgrade the Windows SDK Version nor the Platform Toolset:
The project should be buildable and runnable on a Windows system. Your tasks are:
- [2p] For the test stereo images (pictures/stereo1_left.png , stereo1_right.png), find 8 matching pairs of
2D points. List them as g_matching_left and g_matching_right. Note: x and y are in [-1,1] range. You
can define the matching manually or
[Bonus: +1~2p to mid-term] use off-the-shelf matching methods (such as OpenGL feature matching or
others). The bonus amount depends on how well you understood and explains your matching method. - [5p] Implement the normalized eight-point method in EpipolarGeometry() to calculate the fundamental
matrix (same as essential matrix). Remember to fill your result in g_epipolar_E To verify your result, the
eight “*multiply:” stdout should output values very close to zero (around e-6 ~ e-7). The rendering
should look like:
(Here the 8 matching are the 8 vertices of the “cube”. But your matching can be anything.) - [1p] Explain what line 382-389 do? What does the “multiply” result means? Why should all the multiply
values be (close to) zero? - [3p] Download the OpenCV sfm module source code at https://github.com/opencv/ope... Go
to \modules\sfm\src\libmv_light\libmv\multiview. Explain the following functions:
FundamentalFromEssential () in fundamental.cc [1p].
MotionFromEssential() in fundamental.cc [1p].
P_From_KRt () in projection.cc [1p].
Note: “HZ” means the textbook “Multiple View Geometry in Computer Vision” by Richard Hartley and
Andrew Zisserman and a pdf is provided for your reference.
WX:codehelp

awesome computer vision repo
https://blog.csdn.net/guoyunfei20/article/details/88530159
# AwesomeComputerVision
**Multi-Object-Tracking-Paper-List**
https://github.com/SpyderXu/multi-object-tracking-paper-list
**awesome-object-detection**
https://github.com/hoya012/deep_learning_object_detection
**awesome-image-classification**
https://github.com/weiaicunzai/awesome-image-classification
**Visual-Tracking-Paper-List**
https://github.com/foolwood/benchmark_results
**awesome-semantic-segmentation**
https://github.com/mrgloom/awesome-semantic-segmentation
**awesome-human-pose-estimation**
https://github.com/cbsudux/awesome-human-pose-estimation
**awesome-Face-Recognition**
————————————————
版权声明:本文为CSDN博主「guoyunfei20」的原创文章,遵循 CC 4.0 BY-SA 版权协议,转载请附上原文出处链接及本声明。
原文链接:https://blog.csdn.net/guoyunfei20/article/details/88530159

Azure Computer Vision 之 Smart Crop 智能裁剪图片
前言
一个网站通常有许多地方会用到同一张图,但是比例又不一样.
一般的做法就是用 CSS 的 cover 和 contain 来处理.
由于 cover 只会保留中间信息, 所以很多时候需要人工裁剪.
于是就有了智能裁剪的需求了.
Azure Computer Vision
参考:
官网示范

价格
价格还可以

Azure SDK for .NET
Sample code
实现步骤
1. 到 Azure portal 创建 Computer Vision

没有什么特别的, 默认就可以了 (注: 一个 account 只能有一个 free 的 Computer Vision 哦)
2. 进入 Computer Vision Resource > Keys and Endpoint 把 key 和 endpoint 抄起来

3. 安装 SDK
dotnet add package Microsoft.Azure.CognitiveServices.Vision.ComputerVision
2 个核心功能, 第 1 个是获取全图焦点, 第 2 个是给定要求智能裁剪
[HttpPost("SmartCrop")]
public async Task<ActionResult> SmartCropAsync()
{
    var subscriptionKey = "key";
    var endpoint = "https://jbreviews-cv.cognitiveservices.azure.com/";
    var client = new ComputerVisionClient(new ApiKeyServiceClientCredentials(subscriptionKey))
    {
        Endpoint = endpoint
    };
    var imageFileFullPath = @"WebApi\\Controller\\Test\\SmartCrop\\10.png";
    using var imagestream = new FileStream(imageFileFullPath, FileMode.Open);
    // get area of interest
    var areaOfInterestResult = await client.GetAreaOfInterestInStreamAsync(imagestream); // 这里返回之后 imagestream 就自动被 close 了
    using var image = Image.Load(imageFileFullPath);
    var croppedImage = image.Clone(imageProcessing =>
    {
        imageProcessing.Crop(new Rectangle(
            x: areaOfInterestResult.AreaOfInterest.X,
            y: areaOfInterestResult.AreaOfInterest.Y,
            width: areaOfInterestResult.AreaOfInterest.W,
            height: areaOfInterestResult.AreaOfInterest.H)
        );
    });
    croppedImage.SaveAsJpeg(
        @"WebApi\\Controller\\Test\\SmartCrop\\11.png", new SixLabors.ImageSharp.Formats.Jpeg.JpegEncoder
        {
            Quality = 85
        }
    );

    // get smart crop image
    using var imagestream2 = new FileStream(imageFileFullPath, FileMode.Open);
    var croppedimagestream = await client.GenerateThumbnailInStreamAsync(300, 100, imagestream2, smartCropping: true);
    using var imageFileStream = System.IO.File.Create(@"WebApi\\Controller\\Test\\SmartCrop\\12.png");
    croppedimagestream.copyTo(imageFileStream);
    return Ok();
}
今天关于基于 OpenVINO 的端到端 DL 网络 - A Year in Computer Vision 中关于图像增强系列部分的分享就到这里,希望大家有所收获,若想了解更多关于2018,Lucky year,Challenging year!、3D Computer Vision、awesome computer vision repo、Azure Computer Vision 之 Smart Crop 智能裁剪图片等相关知识,可以在本站进行查询。
本文标签:


