关于物联网架构成长之路(23)-Docker练习之Elasticsearch服务搭建和物联网服务端开源框架的问题就给大家分享到这里,感谢你花时间阅读本站内容,更多关于Centos7使用Docker启动
关于物联网架构成长之路(23)-Docker练习之Elasticsearch服务搭建和物联网服务端开源框架的问题就给大家分享到这里,感谢你花时间阅读本站内容,更多关于Centos7使用Docker启动elasticsearch服务秒退、Docker 中部署 ElasticSearch+ElasticSearch-Head、docker 安装 elasticsearch、docker 搭建 Elasticsearch 和 Kibana等相关知识的信息别忘了在本站进行查找喔。
本文目录一览:- 物联网架构成长之路(23)-Docker练习之Elasticsearch服务搭建(物联网服务端开源框架)
- Centos7使用Docker启动elasticsearch服务秒退
- Docker 中部署 ElasticSearch+ElasticSearch-Head
- docker 安装 elasticsearch
- docker 搭建 Elasticsearch 和 Kibana
-Docker练习之Elasticsearch服务搭建(物联网服务端开源框架)")
物联网架构成长之路(23)-Docker练习之Elasticsearch服务搭建(物联网服务端开源框架)
0. 前言
最近基本都是学一些环境配置,和一些中间件的安装与配置。没有实际编写代码。可能看起来有点水,我对自己的学习方式是,先要了解各个中间件的安装配置以及简单使用,理论应用场景,然后我在小项目中,逐步引入这些高大上的中间件,看实际效果怎样,合不合适我自己用。一开始绝对不会花太多时间去了解技术系统,我觉得,我的工作是做应用开发,不是底层研发。开发就是以满足实际需求为前提,怎么做到适合自己使用,怎么方便怎么来。
也有和一些人聊过,一般开发人员太爱自己造轮子了,实际项目,还是要用市场上普遍使用的开源软件。只有自己平时学习与提高时,造一些轮子。但是造轮子对于我来说,目前还是太难了。能合理用好各个组件,快速实现业务需求,才是我应该注重的点。每个人对自己的要求是不一样的。
1. 下载Image
如果不清楚最新版本的,可以到https://hub.docker.com/r/library/elasticsearch/ 这里查询
docker pull elasticsearch:6.4.2运行es
docker run -d --name es -p 9200:9200 -e http.port=9200 -e http.cors.allow-origin="*" -e http.cors.enabled=true -e http.cors.allow-headers=X-Requested-With,X-Auth-Token,Content-Type,Content-Length,Authorization -e http.cors.allow-credentials=true elasticsearch:6.4.2运行elastichd
docker run -p 9800:9800 -d --link es:demo containerize/elastichd这里的集群监控状态为:Yellow,表示当前只有一个节点,没有配置集群

运行dejavu
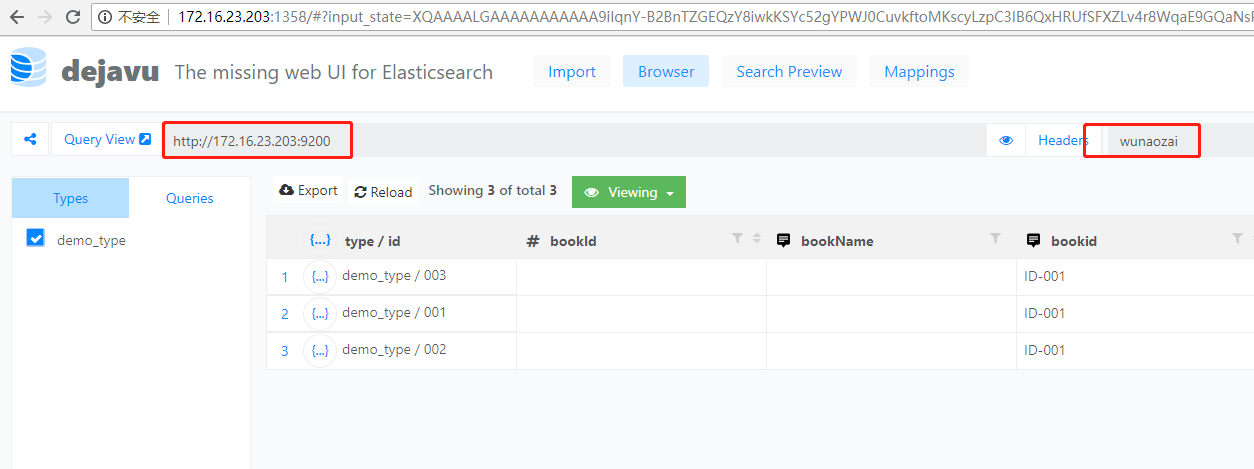
docker run -d -p 1358:1358 appbaseio/dejavu这个要注意,如果要成功连接到ES的话,要先创建好索引(Index) 参考下面第3点,curl -X PUT -H "Content-Type: application/json" http://172.16.23.203:2101/wunaozai, 创建后,才能进行连接
2. 配置集群及测试
创建一个虚拟网络
docker network create --driver bridge --subnet 172.22.17.0/24 --gateway 172.22.17.254 es_net创建3个elasticsearch节点
 1 # node1
 2 docker run -d --name es_1 --net es_net --ip 172.22.17.1 \
 3     -p 2101:9200 -p 3101:9300 -v /etc/localtime:/etc/localtime \
 4     -e "cluster.name=wunaozai" \
 5     -e "node.name=node1" \
 6     -e "network.host=172.22.17.1" \
 7     -e "network.bind_host=0.0.0.0" \
 8     -e "discovery.zen.ping.unicast.hosts=172.22.17.1,172.22.17.2,172.22.17.3" \
 9     -e "discovery.zen.minimum_master_nodes=1" \
10     -e "http.port=9200" \
11     -e "http.cors.allow-origin=*" \
12     -e "http.cors.enabled=true" \
13     -e "http.cors.allow-headers=X-Requested-With,X-Auth-Token,Content-Type,Content-Length,Authorization" \
14     -e "http.cors.allow-credentials=true" \
15     elasticsearch:6.4.2
16 # node2
17 docker run -d --name es_2 --net es_net --ip 172.22.17.2 \
18     -p 2102:9200 -p 3102:9300 -v /etc/localtime:/etc/localtime \
19     -e "cluster.name=wunaozai" \
20     -e "node.name=node2" \
21     -e "network.host=172.22.17.2" \
22     -e "network.bind_host=0.0.0.0" \
23     -e "discovery.zen.ping.unicast.hosts=172.22.17.1,172.22.17.2,172.22.17.3" \
24     -e "discovery.zen.minimum_master_nodes=1" \
25     -e "http.port=9200" \
26     -e "http.cors.allow-origin=*" \
27     -e "http.cors.enabled=true" \
28     -e "http.cors.allow-headers=X-Requested-With,X-Auth-Token,Content-Type,Content-Length,Authorization" \
29     -e "http.cors.allow-credentials=true" \
30     elasticsearch:6.4.2
31 # node3
32 docker run -d --name es_3 --net es_net --ip 172.22.17.3 \
33     -p 2103:9200 -p 3103:9300 -v /etc/localtime:/etc/localtime \
34     -e "cluster.name=wunaozai" \
35     -e "node.name=node3" \
36     -e "network.host=172.22.17.3" \
37     -e "network.bind_host=0.0.0.0" \
38     -e "discovery.zen.ping.unicast.hosts=172.22.17.1,172.22.17.2,172.22.17.3" \
39     -e "discovery.zen.minimum_master_nodes=1" \
40     -e "http.port=9200" \
41     -e "http.cors.allow-origin=*" \
42     -e "http.cors.enabled=true" \
43     -e "http.cors.allow-headers=X-Requested-With,X-Auth-Token,Content-Type,Content-Length,Authorization" \
44     -e "http.cors.allow-credentials=true" \
45     elasticsearch:6.4.2
运行,上面es_1,es_2,es_3是集群的3个几点。下面那个es是上面运行的单节点。

访问 ElisticHD http://172.16.23.203:9800/ 从下图,可以看到集群的一些信息
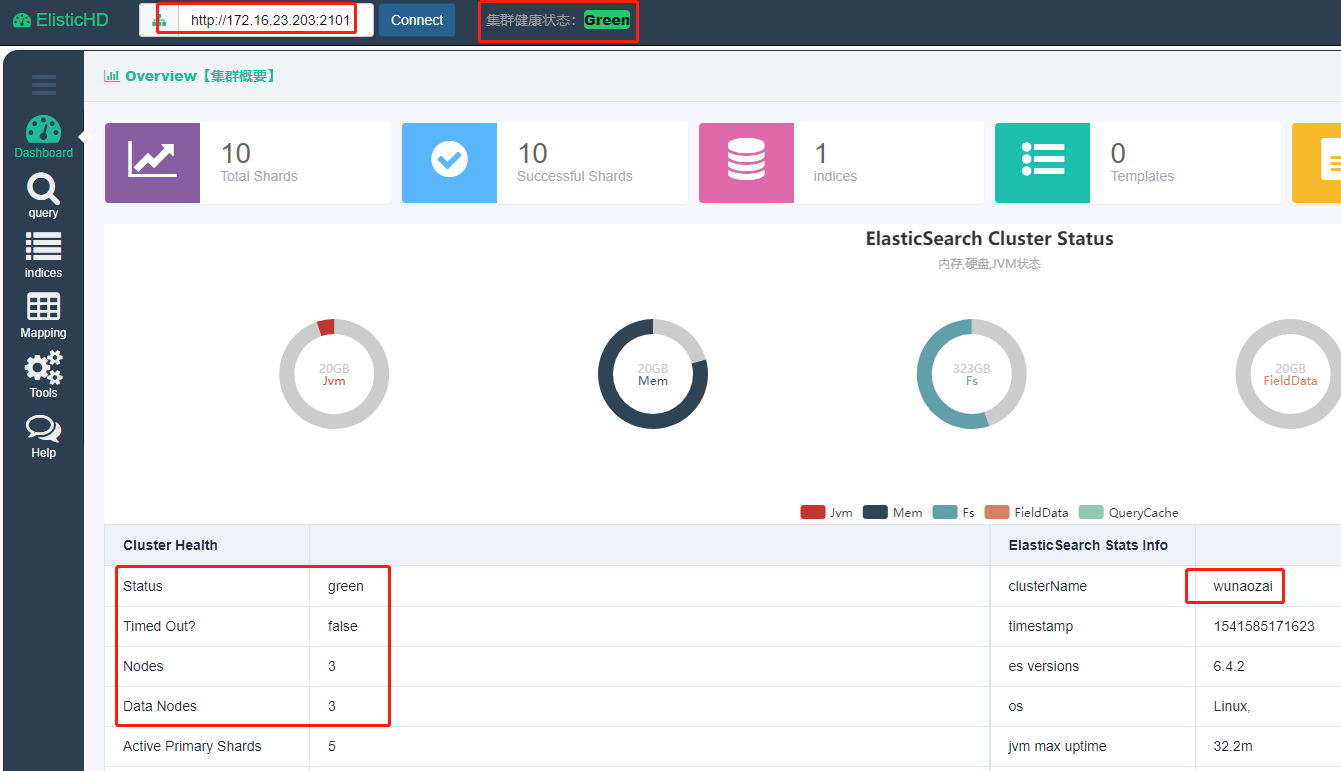
集群节点如下,访问任意一个节点,效果都是一样的,都是操作同一份数据。
1 http://172.16.23.203:2101/
2 http://172.16.23.203:2102/
3 http://172.16.23.203:2103/
3. 数据测试
创建index
 1 curl -X PUT -H "Content-Type: application/json" http://172.16.23.203:2101/wunaozai -d ''
 2 {
 3     "mappings":{
 4         "it": {
 5             "properties": {
 6                 "bookId": {"type": "long"},
 7                 "bookName": {"type": "text"},
 8                 "publishDate": {"type": "date"}
 9             }
10         }
11     }
12 }
13 ''
查看index
curl -X GET http://172.16.23.203:2101/wunaozai删除index
curl -X DELETE http://172.16.23.203:2101/wunaozai查询type
curl -X GET -H "Content-Type: application/json" http://172.16.23.203:2101/wunaozai/_mapping插入数据
1 curl -H "Content-Type: application/json" -X POST http://172.16.23.203:2101/wunaozai/it/001 -d ''{"bookId": 1, "bookName":"<aa>", "publishDate":"2018-01-01"}''
2 curl -H "Content-Type: application/json" -X POST http://172.16.23.203:2102/wunaozai/it/002 -d ''{"bookId": 2, "bookName":"<bb>", "publishDate":"2018-01-02"}''
3 curl -H "Content-Type: application/json" -X POST http://172.16.23.203:2103/wunaozai/it/003 -d ''{"bookId": 3, "bookName":"<cc>", "publishDate":"2018-01-03"}''
更多操作就要参考官方文档
4. 数据持久化
一开始无论是通过 -v 还是通过 --volumes-from 进行挂载,都会提示以下错误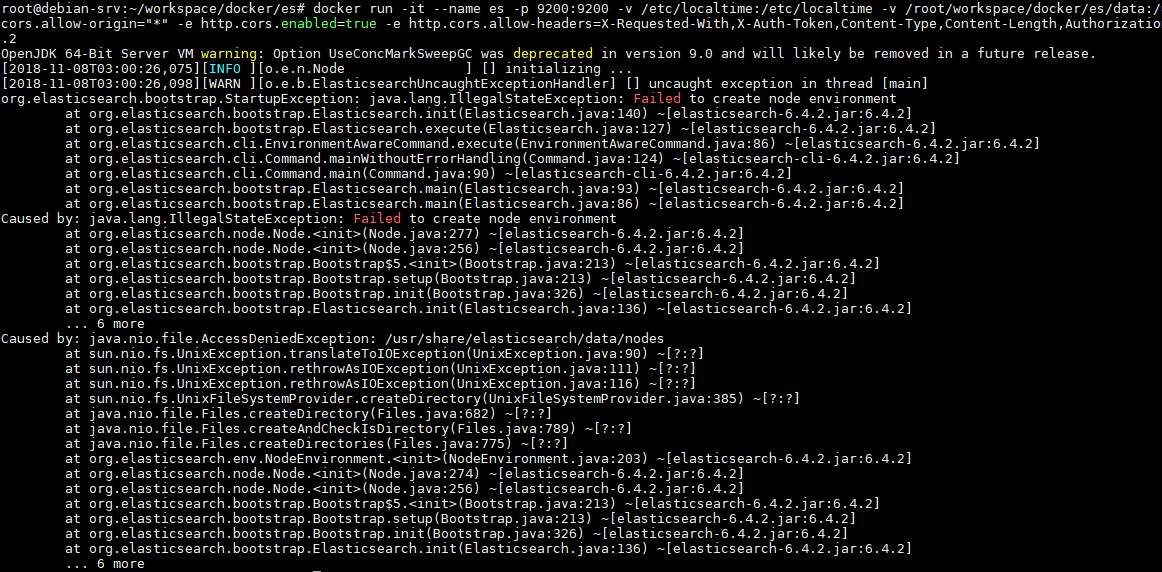
后来查询资料发现,es是不能在root权限下运行的,同理,在elasticsearch:6.4.2容器里,是以elasticsearch用户运行的,因此只要把需要进行挂载的Volumn用户组改为elasticsearch即可,这里需要用1000:1000 ,要用用户ID和组ID,因为host里的用户ID与Container里的用户ID是不一样的。
1 chown 1000:1000 -R data
2
3 docker run -it --name es -p 9200:9200 -v /etc/localtime:/etc/localtime -v /root/workspace/docker/es/data:/usr/share/elasticsearch/data -e http.port=9200 -e http.cors.allow-origin="*" -e http.cors.enabled=true -e http.cors.allow-headers=X-Requested-With,X-Auth-Token,Content-Type,Content-Length,Authorization -e http.cors.allow-credentials=true elasticsearch:6.4.2
通过上面命令运行后,插入数据,然后停止容器,删除容器,再重新创建容器,上次创建的数据还是存在的,自此就实现了ES数据的host持久化。
参考资料:
https://github.com/appbaseio/dejavu/
https://hub.docker.com/_/elasticsearch/
http://www.codesheep.cn/2018/10/30/es-visualization/
http://www.codesheep.cn/2018/11/06/es-2-node-cluster/
https://github.com/elastic/elasticsearch-docker/issues/111
https://www.elastic.co/guide/en/elasticsearch/reference/5.5/docker.html#_b_bind_mounted_configuration
本文地址: https://www.cnblogs.com/wunaozai/p/9928962.html

Centos7使用Docker启动elasticsearch服务秒退
首先查看docker启动日志
docker logs -f 容器id
查看报错信息
OpenJDK 64-Bit Server VM warning: Option UseConcmarkSweepGC was deprecated in version 9.0 and will likely be removed in a future release.
[2019-11-24T11:17:55,311][WARN ][o.e.c.l.LogConfigurator  ] [unkNown] Some logging configurations have %marker but don't have %node_name. We will automatically add %node_name to the pattern to ease the migration for users who customize log4j2.properties but will stop this behavior in 7.0. You should manually replace `%node_name` with `[%node_name]%marker ` in these locations:
  /usr/share/elasticsearch/config/log4j2.properties
[2019-11-24T11:18:02,295][INFO ][o.e.e.nodeenvironment    ] [l6-XUOr] using [1] data paths, mounts [[/ (rootfs)]], net usable_space [11gb], net total_space [37.6gb], types [rootfs]
[2019-11-24T11:18:02,296][INFO ][o.e.e.nodeenvironment    ] [l6-XUOr] heap size [247.6mb], compressed ordinary object pointers [true]
[2019-11-24T11:18:02,319][INFO ][o.e.n.Node               ] [l6-XUOr] node name derived from node ID [l6-XUOrfQuSDM1xQLV4irA]; set [node.name] to override
[2019-11-24T11:18:02,319][INFO ][o.e.n.Node               ] [l6-XUOr] version[6.5.0], pid[1], build[default/tar/816e6f6/2018-11-09T18:58:36.352602Z], OS[Linux/3.10.0-1062.4.1.el7.x86_64/amd64], JVM[Oracle Corporation/OpenJDK 64-Bit Server VM/11.0.1/11.0.1+13]
[2019-11-24T11:18:02,319][INFO ][o.e.n.Node               ] [l6-XUOr] JVM arguments [-xms1g, -Xmx1g, -XX:+UseConcmarkSweepGC, -XX:CMSInitiatingOccupancyFraction=75, -XX:+UseCMSInitiatingOccupancyOnly, -XX:+AlwaysPretouch, -Xss1m, -Djava.awt.headless=true, -Dfile.encoding=UTF-8, -Djna.nosys=true, -XX:-OmitStackTraceInFastThrow, -dio.netty.noUnsafe=true, -dio.netty.noKeySetoptimization=true, -dio.netty.recycler.maxCapacityPerThread=0, -Dlog4j.shutdownHookEnabled=false, -Dlog4j2.disable.jmx=true, -Djava.io.tmpdir=/tmp/elasticsearch.IPIWmr7p, -XX:+HeapDumpOnOutOfMemoryError, -XX:HeapDumpPath=data, -XX:ErrorFile=logs/hs_err_pid%p.log, -Xlog:gc*,gc+age=trace,safepoint:file=logs/gc.log:utctime,pid,tags:filecount=32,filesize=64m, -Djava.locale.providers=COMPAT, -XX:UseAVX=2, -Des.cgroups.hierarchy.override=/, -xms256m, -Xmx256m, -Des.path.home=/usr/share/elasticsearch, -Des.path.conf=/usr/share/elasticsearch/config, -Des.distribution.flavor=default, -Des.distribution.type=tar]
[2019-11-24T11:18:12,063][INFO ][o.e.p.PluginsService     ] [l6-XUOr] loaded module [aggs-matrix-stats]
[2019-11-24T11:18:12,063][INFO ][o.e.p.PluginsService     ] [l6-XUOr] loaded module [analysis-common]
[2019-11-24T11:18:12,063][INFO ][o.e.p.PluginsService     ] [l6-XUOr] loaded module [ingest-common]
[2019-11-24T11:18:12,063][INFO ][o.e.p.PluginsService     ] [l6-XUOr] loaded module [lang-expression]
[2019-11-24T11:18:12,063][INFO ][o.e.p.PluginsService     ] [l6-XUOr] loaded module [lang-mustache]
[2019-11-24T11:18:12,063][INFO ][o.e.p.PluginsService     ] [l6-XUOr] loaded module [lang-painless]
[2019-11-24T11:18:12,063][INFO ][o.e.p.PluginsService     ] [l6-XUOr] loaded module [mapper-extras]
[2019-11-24T11:18:12,063][INFO ][o.e.p.PluginsService     ] [l6-XUOr] loaded module [parent-join]
[2019-11-24T11:18:12,063][INFO ][o.e.p.PluginsService     ] [l6-XUOr] loaded module [percolator]
[2019-11-24T11:18:12,063][INFO ][o.e.p.PluginsService     ] [l6-XUOr] loaded module [rank-eval]
[2019-11-24T11:18:12,063][INFO ][o.e.p.PluginsService     ] [l6-XUOr] loaded module [reindex]
[2019-11-24T11:18:12,063][INFO ][o.e.p.PluginsService     ] [l6-XUOr] loaded module [repository-url]
[2019-11-24T11:18:12,063][INFO ][o.e.p.PluginsService     ] [l6-XUOr] loaded module [transport-netty4]
[2019-11-24T11:18:12,063][INFO ][o.e.p.PluginsService     ] [l6-XUOr] loaded module [tribe]
[2019-11-24T11:18:12,063][INFO ][o.e.p.PluginsService     ] [l6-XUOr] loaded module [x-pack-ccr]
[2019-11-24T11:18:12,063][INFO ][o.e.p.PluginsService     ] [l6-XUOr] loaded module [x-pack-core]
[2019-11-24T11:18:12,063][INFO ][o.e.p.PluginsService     ] [l6-XUOr] loaded module [x-pack-deprecation]
[2019-11-24T11:18:12,064][INFO ][o.e.p.PluginsService     ] [l6-XUOr] loaded module [x-pack-graph]
[2019-11-24T11:18:12,064][INFO ][o.e.p.PluginsService     ] [l6-XUOr] loaded module [x-pack-logstash]
[2019-11-24T11:18:12,064][INFO ][o.e.p.PluginsService     ] [l6-XUOr] loaded module [x-pack-ml]
[2019-11-24T11:18:12,064][INFO ][o.e.p.PluginsService     ] [l6-XUOr] loaded module [x-pack-monitoring]
[2019-11-24T11:18:12,064][INFO ][o.e.p.PluginsService     ] [l6-XUOr] loaded module [x-pack-rollup]
[2019-11-24T11:18:12,064][INFO ][o.e.p.PluginsService     ] [l6-XUOr] loaded module [x-pack-security]
[2019-11-24T11:18:12,064][INFO ][o.e.p.PluginsService     ] [l6-XUOr] loaded module [x-pack-sql]
[2019-11-24T11:18:12,064][INFO ][o.e.p.PluginsService     ] [l6-XUOr] loaded module [x-pack-upgrade]
[2019-11-24T11:18:12,064][INFO ][o.e.p.PluginsService     ] [l6-XUOr] loaded module [x-pack-watcher]
[2019-11-24T11:18:12,064][INFO ][o.e.p.PluginsService     ] [l6-XUOr] loaded plugin [ingest-geoip]
[2019-11-24T11:18:12,065][INFO ][o.e.p.PluginsService     ] [l6-XUOr] loaded plugin [ingest-user-agent]
[2019-11-24T11:18:32,588][INFO ][o.e.x.s.a.s.FileRolesstore] [l6-XUOr] parsed [0] roles from file [/usr/share/elasticsearch/config/roles.yml]
[2019-11-24T11:18:34,749][INFO ][o.e.x.m.j.p.l.CppLogMessageHandler] [l6-XUOr] [controller/62] [Main.cc@109] controller (64 bit): Version 6.5.0 (Build 71882a589e5556) copyright (c) 2018 Elasticsearch BV
[2019-11-24T11:18:37,168][INFO ][o.e.d.discoveryModule    ] [l6-XUOr] using discovery type [zen] and host providers [settings]
[2019-11-24T11:18:40,908][INFO ][o.e.n.Node               ] [l6-XUOr] initialized
[2019-11-24T11:18:40,908][INFO ][o.e.n.Node               ] [l6-XUOr] starting ...
[2019-11-24T11:18:41,448][INFO ][o.e.t.TransportService   ] [l6-XUOr] publish_address {172.17.0.2:9300}, bound_addresses {[::]:9300}
[2019-11-24T11:18:41,488][INFO ][o.e.b.BootstrapChecks    ] [l6-XUOr] bound or publishing to a non-loopback address, enforcing bootstrap checks
ERROR: [1] bootstrap checks Failed
[1]: max virtual memory areas vm.max_map_count [65530] is too low, increase to at least [262144]
[2019-11-24T11:18:41,538][INFO ][o.e.n.Node               ] [l6-XUOr] stopping ...
[2019-11-24T11:18:41,608][INFO ][o.e.n.Node               ] [l6-XUOr] stopped
[2019-11-24T11:18:41,608][INFO ][o.e.n.Node               ] [l6-XUOr] closing ...
[2019-11-24T11:18:41,619][INFO ][o.e.n.Node               ] [l6-XUOr] closed
[2019-11-24T11:18:41,621][INFO ][o.e.x.m.j.p.NativeController] [l6-XUOr] Native controller process has stopped - no new native processes can be started
OpenJDK 64-Bit Server VM warning: Option UseConcmarkSweepGC was deprecated in version 9.0 and will likely be removed in a future release.
[2019-11-24T11:22:59,885][WARN ][o.e.c.l.LogConfigurator  ] [unkNown] Some logging configurations have %marker but don't have %node_name. We will automatically add %node_name to the pattern to ease the migration for users who customize log4j2.properties but will stop this behavior in 7.0. You should manually replace `%node_name` with `[%node_name]%marker ` in these locations:
  /usr/share/elasticsearch/config/log4j2.properties
修改配置文件
vim /etc/sysctl.conf
添加下面配置:
vm.max_map_count=655360
然后重新启动容器
docker start my_es(my_es为容器名称)

Docker 中部署 ElasticSearch+ElasticSearch-Head
Docker 中部署 ElasticSearch+ElasticSearch-Head
一、Docker 部署 ElasticSearch
1、拉取 es 镜像:
[root@TrueDei ~]# docker pull elasticsearch:7.10.1
2、运行容器
ElasticSearch的默认端口是 9200,我们把宿主环境 9200 端口映射到Docker容器中的 9200 端口,就可以访问到Docker容器中的ElasticSearch服务了,同时我们把这个容器命名为truedei-es。
[root@TrueDei ~]#
[root@TrueDei ~]# docker images
REPOSITORY                TAG       IMAGE ID       CREATED         SIZE
elasticsearch             7.10.1    558380375f1a   3 weeks ago     774MB
hello-world               latest    bf756fb1ae65   12 months ago   13.3kB
centos/mysql-57-centos7   latest    f83a2938370c   14 months ago   452MB
[root@TrueDei ~]#
[root@TrueDei ~]# docker run -d --name truedei-es -p 9200:9200 -p 9300:9300 -e "discovery.type=single-node" elasticsearch:7.10.1
ad6e6d2914272a131ce904e8d1ed9c5580e077c68464cd6cd8bbc00c353098e0
[root@TrueDei ~]#
[root@TrueDei ~]#
3、进入到 es:
因为要对 es 进行配置,所以要进入到容器才可以
[root@TrueDei ~]#
[root@TrueDei ~]# docker exec -it truedei-es /bin/bash
[root@ad6e6d291427 elasticsearch]#
4、进行配置
加入跨域配置
[root@TrueDei ~]#
[root@TrueDei ~]# docker exec -it truedei-es /bin/bash
[root@ad6e6d291427 elasticsearch]#
[root@ad6e6d291427 elasticsearch]#
[root@ad6e6d291427 elasticsearch]# ls
LICENSE.txt  NOTICE.txt  README.asciidoc  bin  config  data  jdk  lib  logs  modules  plugins
[root@ad6e6d291427 elasticsearch]#
[root@ad6e6d291427 elasticsearch]#
[root@ad6e6d291427 elasticsearch]# cd config/
[root@ad6e6d291427 config]#
[root@ad6e6d291427 config]# ls
elasticsearch.keystore  elasticsearch.yml  jvm.options  jvm.options.d  log4j2.properties  role_mapping.yml  roles.yml  users  users_roles
[root@ad6e6d291427 config]#
[root@ad6e6d291427 config]#
[root@ad6e6d291427 config]# vi elasticsearch.yml
[root@ad6e6d291427 config]#
[root@ad6e6d291427 config]# cat elasticsearch.yml
cluster.name: "docker-cluster"
network.host: 0.0.0.0
http.cors.enabled: true
http.cors.allow-origin: "*"
[root@ad6e6d291427 config]#
5、退出重启 es
[root@ad6e6d291427 config]#
[root@ad6e6d291427 config]# exit
exit
[root@TrueDei ~]#
[root@TrueDei ~]# docker restart truedei-es
truedei-es
[root@TrueDei ~]#
[root@TrueDei ~]#
6、查看是否启动成功
[root@TrueDei ~]# docker ps -a
CONTAINER ID   IMAGE                     COMMAND                  CREATED         STATUS                   PORTS                              NAMES
ad6e6d291427   elasticsearch:7.10.1      "/tini -- /usr/local…"   4 minutes ago   Up 27 seconds            0.0.0.0:9200->9200/tcp, 9300/tcp   truedei-es
7、测试是否成功
浏览器输入:http://IP:9200
二、Docker 部署 ElasticSearch-Head
为什么要安装 ElasticSearch-Head 呢,原因是需要有一个管理界面进行查看 ElasticSearch 相关信息
1、拉取镜像
[root@TrueDei ~]# docker pull mobz/elasticsearch-head:5
2、运行容器
[root@TrueDei ~]#
[root@TrueDei ~]# docker run -d --name truedei-es-head -p 9100:9100 mobz/elasticsearch-head:5
2433913241a2504981088d8ec6c1cc10f7457c1d3abfdb99255e8b2111c81922
[root@TrueDei ~]#
3、测试
浏览器访问:http://IP:9100
然后输入你 ES 服务的地址即可链接
在创建索引的时候发现存在问题
解决办法以及步骤:
进入 ElasticSearch-Head 中修改配置文件;
1、进入 ElasticSearch-Head 容器:
[root@TrueDei ~]#
[root@TrueDei ~]#
[root@TrueDei ~]# docker exec -it truedei-es-head /bin/bash
root@2433913241a2:/usr/src/app#
root@2433913241a2:/usr/src/app#
root@2433913241a2:/usr/src/app#
root@2433913241a2:/usr/src/app# cd
root@2433913241a2:~#
root@2433913241a2:~#
root@2433913241a2:~# cd /usr/src/app/
root@2433913241a2:/usr/src/app# ll
bash: ll: command not found
root@2433913241a2:/usr/src/app# ls
Dockerfile    LICENCE         _site                               elasticsearch-head.sublime-workspace  index.html    package.json                  src
Gruntfile.js  README.textile  elasticsearch-head.sublime-project  grunt_fileSets.js                     node_modules  plugin-descriptor.properties  test
root@2433913241a2:/usr/src/app#
root@2433913241a2:/usr/src/app#
root@2433913241a2:/usr/src/app# cd _site/
root@2433913241a2:/usr/src/app/_site#
root@2433913241a2:/usr/src/app/_site# vi vendor.js
bash: vi: command not found
root@2433913241a2:/usr/src/app/_site#
在编辑 vendor.js 的时候说 vi 编辑器不存在,那么就需要安装一下 vim 了:
apt-get update
apt-get install vim
1、进入 head 安装目录;
2、cd _site/
3、编辑 vendor.js 共有两处
6886 行 /contentType: "application/x-www-form-urlencoded
改成
contentType: "application/json;charset=UTF-8"
7574 行 var inspectData = s.contentType === "application/x-www-form-urlencoded" &&
改成
var inspectData = s.contentType === "application/json;charset=UTF-8" &&
然后重启一下即可
此时创建索引也是 OK 的
查询也 ok 了:
本文分享自微信公众号 - TrueDei(monkeystudy)。
如有侵权,请联系 support@oschina.cn 删除。
本文参与 “OSC 源创计划”,欢迎正在阅读的你也加入,一起分享。

docker 安装 elasticsearch
docker run --name elasticsearch -p 9200:9200 -p 9300:9300 -e "discovery.type=single-node" -e ES_JAVA_OPTS="-Xms64m -Xmx4096m" -d elasticsearch:7.14.1docker run --name kibana --link=elasticsearch:test -p 5601:5601 -d kibana:7.14.1
docker start kibana参考文章:
Docker下安装ElasticSearch和Kibana
Docker 安装 ElasticSearch

docker 搭建 Elasticsearch 和 Kibana
一、ElasticSearch
1 pull
ElasticSearch的 docker 镜像不支持默认的 latest 标签,所以在 Pull 时需要指定标签:
docker pull elasticsearch:7.12.02 创建网络连接
用来与其他容器服务进行通信,比如 Kibana。
docker network create es-test3 创建容器
docker run -itd --name es --net es-test -p 9200:9200 -p 9300:9300 -e "discovery.type=single-node" elasticsearch:7.12.04 修改配置,允许跨域访问
docker exec -it es bash
echo -e "http.cors.enabled: true\nhttp.cors.allow-origin: \"*\"" >> config/elasticsearch.yml
5 安装 ik 分词器
es自带的分词器对中文分词不是很友好,所以我们下载开源的 IK 分词器来解决这个问题。
下面的命令接上一步:
cd plugins
elasticsearch-plugin install https://ghproxy.com/https://github.com/medcl/elasticsearch-analysis-ik/releases/download/v7.12.0/elasticsearch-analysis-ik-7.12.0.zip
6 重启 es
exit
docker restart es
访问 http://localhost:9200 ,成功的话会得到类似以下响应:
{
    "name": "0d096b662146",
    "cluster_name": "docker-cluster",
    "cluster_uuid": "KFeS1JjNTlqo56RmN8DiFw",
    "version": {
        "number": "7.12.0",
        "build_flavor": "default",
        "build_type": "docker",
        "build_hash": "78722783c38caa25a70982b5b042074cde5d3b3a",
        "build_date": "2021-03-18T06:17:15.410153305Z",
        "build_snapshot": false,
        "lucene_version": "8.8.0",
        "minimum_wire_compatibility_version": "6.8.0",
        "minimum_index_compatibility_version": "6.0.0-beta1"
    },
    "tagline": "You Know, for Search"
}
二、Kibana
1 pull
拉取对应版本的 Kibana:
docker pull kibana:7.12.02 创建容器
docker run -itd --name kibana --net es-test -p 5601:5601 kibana:7.12.03 修改配置
需要修改ElasticSearch的连接,因为创建容器时已经映射了端口,所以只需要替换为本机的 ip 地址,以 192.168.31.152 为例:
docker exec -it kibana bash
sed -i "s/elasticsearch:9200/192.168.31.152:9200/g" config/kibana.yml
4 重启
退出 docker 容器的 bash 命令行,除了exit命令外,还可以使用ctrl+D退出。
然后重启容器:
docker restart kibana访问 http://localhost:5601 会进入 Kibana 控制台。
三、测试
在 Kibana 控制台的 Dev tools 中进行测试,也可以直接在终到用 curl 工具测试。
1 创建一个索引
PUT /test2 测试分词功能
POST test/_analyze
{
  "analyzer": "ik_max_word",
  "text": "我昨天去北京出差时逛了逛北京大学"
}这里测试时选用的是最大分词ik_max_word,会将一句话或一段话中所有的可能组成的词组或字提取出来,这是搜索引擎中常见的方式。
你也可以使用智能模式ik_smart,只要能组成词就不会继续向下细分。
可以切换这两个模式查看不同的结果。
关于物联网架构成长之路(23)-Docker练习之Elasticsearch服务搭建和物联网服务端开源框架的介绍已经告一段落,感谢您的耐心阅读,如果想了解更多关于Centos7使用Docker启动elasticsearch服务秒退、Docker 中部署 ElasticSearch+ElasticSearch-Head、docker 安装 elasticsearch、docker 搭建 Elasticsearch 和 Kibana的相关信息,请在本站寻找。
本文标签:


