针对CSSdisplay属性详解和css中display属性这两个问题,本篇文章进行了详细的解答,同时本文还将给你拓展(OK)Androidgraphic(12)—display上层相关概念、关系-m
针对CSS display 属性详解和css中display属性这两个问题,本篇文章进行了详细的解答,同时本文还将给你拓展(OK) Android graphic (12)—display 上层相关概念、关系 - mLogicalDisplays.get (Display.DEFAULT_DISPLAY)、CS5212AN 设计 Display to Vga 高清转接器产品 | Display to Vga 高清 1080P 转接线产品、css float 属性详解、css – display:block inside display:inline等相关知识,希望可以帮助到你。
本文目录一览:- CSS display 属性详解(css中display属性)
- (OK) Android graphic (12)—display 上层相关概念、关系 - mLogicalDisplays.get (Display.DEFAULT_DISPLAY)
- CS5212AN 设计 Display to Vga 高清转接器产品 | Display to Vga 高清 1080P 转接线产品
- css float 属性详解
- css – display:block inside display:inline
")
CSS display 属性详解(css中display属性)
原文地址:
http://zhanfang.github.io/2016/07/22/display属性详解
转载请注明地址及作者:zhanfang
最近瞎忙了好长一段时间,一直没时间写文章,想深入学习一下css的相关属性,所以有了这篇文章,如有错误请指针。
display的所有属性
/* CSS 1 */
display: none;
display: inline;
display: block;
display: list-item;

/* CSS 2.1 */
display: inline-block;

display: table;
display: inline-table;
display: table-cell;
display: table-column;
display: table-column-group;
display: table-footer-group;
display: table-header-group;
display: table-row;
display: table-row-group;
display: table-caption;
/* CSS 2.1 */

/* CSS 3 */
display: inline-list-item;
display: flex;
display: box;
display: inline-flex;

display: grid;
display: inline-grid;

display: ruby;
display: ruby-base;
display: ruby-text;
display: ruby-base-container;
display: ruby-text-container;
/* CSS 3 */

/* Experimental values */
display: contents;
display: run-in;
/* Experimental values */

/* Global values */
display: inherit;
display: initial;
display: unset;
下面就display的重要属性进行讲解,并配合一些相关的例子
基本属性
display: none
none 是 CSS 1 就提出来的属性,将元素设置为none的时候既不会占据空间,也无法显示,相当于该元素不存在。
该属性可以用来改善重排与重绘,同时我也经常用它来做模态窗等效果。
display: inline
inline也是 CSS 1 提出的属性,它主要用来设置行内元素属性,设置了该属性之后设置高度、宽度都无效,同时text-align属性设置也无效,但是设置了line-height会让inline元素居中

同时从上图可以看到两个inline标签之间出现了奇怪的间隔,改间隔的原因是div换行产生的换行空白,解决办法
将两个inline标签写到一行
<body>
  <div>123</div><div>123</div>
</body>
或者使用一点技巧
<!DOCTYPE html>
<html>
<head>
  <meta charset="utf-8">
  <title>JS Bin</title>
</head>
<body>
  <div>
    <div>zhan</div>
    <div>123</div>
  </div>

</body>
</html>


html{
  -webkit-text-size-adjust:none;/* 使用webkit的私有属性,让字体大小不受设备终端的调整,可定义字体大小小于12px */
}
.main{
  font-size:0;
  *word-spacing:-1px;/* 使用word-spacing 修复 IE6、7 中始终存在的 1px 空隙,减少单词间的空白(即字间隔) */
}
.test{
  display:inline;
  width: 10000px;
  height:10000px;
  border:1px solid;
  font-size:12px;

  letter-spacing: normal;/* 设置字母、字间距为0 */
  word-spacing: normal; /* 设置单词、字段间距为0 */
}
实测chome49浏览器只用设置父元素的font-size为0即可。
目前有很多原生的元素都是inline的,span、a、label、input、 img、 strong 和em就是典型的行内元素元素。
链接:http://www.css88.com/archives...
display: block
设置元素为块状元素,如果不指定宽高,默认会继承父元素的宽度,并且独占一行,即使宽度有剩余也会独占一行,高度一般以子元素撑开的高度为准,当然也可以自己设置宽度和高度。
在设计的过程中有时需要设计一个div宽高都是整个屏幕,整个时候宽度很好设置,可是高度一般很难设置,因为页面一般都是可以滚动的,所以高度一般可变,所以这个时候可以使用一个小技巧,如下。
<!DOCTYPE html>
<html>
<head>
  <meta charset="utf-8">
  <title>JS Bin</title>
</head>
<body>
  <div>
  </div>
</body>
</html>

html{
  height: 100%;
}
body{
  height: 100%;
  padding: 0;
  margin:0;
}
.main{
  background: red;
  width: 100%;
  height: 100%;
}
基本原理:div继承的是父元素body的高度,body是继承html的高度,html是继承的浏览器屏幕的高度。
display: list-item
此属性默认会把元素作为列表显示,要完全模仿列表的话还需要加上 list-style-position,list-style-type
<!DOCTYPE html>
<html>
<head>
  <meta charset="utf-8">
  <title>JS Bin</title>
</head>
<body>
<div>
  <span>111111</span>
  <span>222222</span>
  <span>333333</span>
</div>
</body>
</html>
div{
padding-left:30px;
}
span{
display:list-item;
list-style:disc outside none;
}效果图如下:

通过上面样式设置,就能仿出一个类似的列表,一定要在div上加padding,因为默认的列表之前的·在box外面
display: inline-block
inline-block为 CSS 2.1 新增的属性。 inline-block既具有block的宽高特性又具有inline的同行元素特性。 通过inline-block结合text-align: justify 还可以实现固定宽高的列表两端对齐布局,如下例子:
<!DOCTYPE html>
<html>
<head>
<meta charset="utf-8">
<title>JS Bin</title>
</head>
<body>
<div>
<div>111111</div>
<div>222222</div>
<div>333333</div>
<div>111111</div>
<div>222222</div>
<div>333333</div>
<div> </div>
<div> </div>
<div> </div>
<div> </div>
<div> </div>
</div>
</body>
</html>body{
margin:0;
padding:0;
}
.main{
text-align:justify;
}
.col{
display: inline-block;
margin-top:10px;
width:100px;
height: 100px;
text-align: center;
line-height: 100px;
color: #fff;
}
.col1{
background: red;
}
.col2{
background: green;
}
.col3{
background: blue;
}
.fix{
height:0;
padding:0;
overflow:hidden;
}效果图如下:

text-align: justify属性会使行内元素两端对齐,但是要求这些行内元素总宽度至少占满一行,所以在总宽度不足一行的时候这个属性没用,因此在最后需要加上一些占位符。
详情可以查看 张鑫旭老师的博客
Tip: inline-block会形成一个BFC
display: table
table 此元素会作为块级表格来显示(类似table),表格前后带有换行符。CSS表格能够解决所有那些我们在使用绝对定位和浮动定位进行多列布局时所遇到的问题。例如,display:table的CSS声明能够让一个HTML元素和它的子节点像table元素一样。使用基于表格的CSS布局,使我们能够轻松定义一个单元格的边界、背景等样式, 而不会产生因为使用了table那样的制表标签所导致的语义化问题。
利用table的特性,我们能够轻易的实现三栏布局,并且能够兼容IE8,如下是使用table属性,实现三栏布局的例子:
<!DOCTYPE html>
<html>
<head>
  <meta charset="utf-8">
  <title>JS Bin</title>
</head>
<body>
<div>
  <div>
    <div>head1</div>
    <div>head2</div>
    <div>head3</div>
  </div>
  <div>
    <div>123</div>
    <div>123</div>
    <div>123</div>
  </div>
</div>
</body>
</html>
.main{
display: table;
width:100%;
border-collapse: collapse;/*为表格设置合并边框模型:*/
}
.tr{
display: table-row;
border-color: inherit;
}
.tr1 .td{
height:50px;
vertical-align: middle;
}
.td{
display: table-cell;
border: 1px solid;
}
.td:nth-of-type(1){
width: 100px;
}
.td:nth-of-type(3){
width: 100px;
}效果如下图:

CSS2.1表格模型中的元素,可能不会全部包含在除HTML之外的文档语言中。这时,那些“丢失”的元素会被模拟出来,从而使得表格模型能够正常工作。所有的表格元素将会自动在自身周围生成所需的匿名table对象,使其符合table/inline-table、table-row、table-cell的三层嵌套关系。
所以在一般情况下我们也可以不写外面的table-row元素以及table元素。
display: inline-list-item
我在MDN上面看到有这个属性,但是我实际尝试发现这个属性是不能使用的,在 http://caniuse.com/#search=in... 上面也没有找到这个元素的兼容性,所以应该是不能使用的,支持度全无。
display: flex
flex是一种弹性布局属性
注意,设为Flex布局以后,子元素的float、clear和vertical-align属性将失效。
主要属性有两大类:容器属性和项目的属性
容器属性
flex-direction: 属性决定主轴的方向(即项目的排列方向)。
flex-wrap: 默认情况下,项目都排在一条线(又称"轴线")上。flex-wrap属性定义,如果一条轴线排不下,如何换行。
flex-flow: 属性是flex-direction属性和flex-wrap属性的简写形式,默认值为row nowrap。
justify-content: 属性定义了项目在主轴上的对齐方式。
align-items: 属性定义项目在交叉轴上如何对齐。
align-content: 属性定义了多根轴线的对齐方式。如果项目只有一根轴线,该属性不起作用。
项目属性
order: 定义项目的排列顺序。数值越小,排列越靠前,默认为0。
flex-grow: 定义项目的放大比例,默认为0,即如果存在剩余空间,也不放大。
flex-shrink: 属性定义了项目的缩小比例,默认为1,即如果空间不足,该项目将缩小。
flex-basis: 属性定义了在分配多余空间之前,项目占据的主轴空间(main size)。浏览器根据这个属性,计算主轴是否有多余空间。它的默认值为auto,即项目的本来大小。
flex: 属性是flex-grow, flex-shrink 和 flex-basis的简写,默认值为0 1 auto。后两个属性可选。
align-self: 属性允许单个项目有与其他项目不一样的对齐方式,可覆盖align-items属性。默认值为auto,表示继承父元素的align-items属性,如果没有父元素,则等同于stretch。
以上关于flex的基础知识基本是从阮一峰老师那copy过来的,有兴趣的同学,可以到阮一峰老师的博客深入阅读
http://www.ruanyifeng.com/blo...
http://www.ruanyifeng.com/blo...
实例:实现一个固定宽度但内容可变的列表
目前我有一个需求,有一个列表页,左侧固定,右侧固定,总宽度固定,但是左侧的内容可能会增加,右侧的内容也可能会增加,要求平时一行展示,增加的时候两行展示,左侧两行,右侧还是一行,并且都居中。
先上效果图,不然可能会迷糊:

为了实现上述效果,代码如下
<!DOCTYPE html>
<html>
<head>
  <meta charset="utf-8">
  <title>JS Bin</title>
</head>
<body>
  <div>
    <ul>
      <li>
        <span>累积的分为:123</span>
        <div>
          <span>123</span>
          <span>x 10</span>
          <button>submit</button>
        </div>
      </li>
      <li>
        <span>累积的分为:1234</span>
        <div>
          <img src="http://7xltvd.com1.z0.glb.clouddn.com/css1.png" alt="">
          <span>x 10</span>
          <button>submit</button>
        </div>
      </li>
    </ul>
  </div>
</body>
</html>
.main{
height: 200px;
width: 300px;
border: 1px solid;
}
ul{
padding: 0px;
margin-top: 10px;
}
li{
display: flex;
justify-content: space-between;
align-items: center;
padding: 10px 0;
margin-bottom: 10px;
border: 1px solid;
}
button{
height: 20px;
vertical-align: middle;
border:0;
background: green;
outline:none;
}
img{
width:30px;
vertical-align: middle;
}
.col2-span{
vertical-align: middle;
}
.col1{
width: 130px;
padding-left:8px;
}
.col2{
padding-right: 8px;
vertical-align: middle;
}display: -webkit-box
由于某X5浏览器某些版本还不支持最新版的flex布局,所以为了保证良好的运行,建议还是使用display: box,box和flex布局的主要差别如下:
容器属性
display: box
该显示样式的新值可将此元素及其直系子代加入弹性框模型中。Flexbox 模型只适用于直系子代。box-orient
值:horizontal | vertical | inherit
框的子代是如何排列的?还有两个值:inline-axis(真正的默认值)和 block-axis,但是它们分别映射到水平和垂直方向。
box-pack
值:start | end | center | justify
设置沿 box-orient 轴的框排列方式。因此,如果 box-orient 是水平方向,就会选择框的子代的水平排列方式,反之亦然。
box-align
值:start | end | center | baseline | stretch
基本上而言是 box-pack 的同级属性。设置框的子代在框中的排列方式。如果方向是水平的,该属性就会决定垂直排列,反之亦然。
项目属性
box-flex
值:0 | 任意整数
该子代的弹性比。弹性比为 1 的子代占据父代框的空间是弹性比为 2 的同级属性的两倍。其默认值为 0,也就是不具有弹性。
用box改造上述例子
基本只修改了容器元素li的属性,如下所示
li{
  display: -webkit-box;
  -webkit-box-orient:horizontal;
  -webkit-box-pack: justify;
  -webkit-box-align: center;
  padding: 10px 0;
  margin-bottom: 10px;
  border: 1px solid;
}
display: inline-flex
我发现在chrome条件下设置了inline-flex,其子元素全部变成了inline模式,设置flex并没有什么用,不知道是不是我写的有问题,目前没找到这个属性的用法
<!DOCTYPE html>
<html>
<head>
  <meta charset="utf-8">
  <title>JS Bin</title>
</head>
<body>
  <div>
    <div>123</div>
    <div>123</div>
  </div>
</body>
</html>
.main{
display: -webkit-inline-flex;
justify-content: center;
}
.sp1{
flex:1;
}其他
以下属性是实验性质的,支持度都很低,不建议使用,知道就行。
run-in: 此元素会根据上下文作为块级元素或内联元素显示;
grid: 栅格模型,类似block
inline-grid: 栅格模型,类似inline-block
ruby, ruby-base, ruby-text, ruby-base-container, ruby-text-container
contents
 Android graphic (12)—display 上层相关概念、关系 - mLogicalDisplays.get (Display.DEFAULT_DISPLAY)")
(OK) Android graphic (12)—display 上层相关概念、关系 - mLogicalDisplays.get (Display.DEFAULT_DISPLAY)
http://blog.csdn.net/lewif/article/details/50827430
涉及的 java 类
DisplayManagerService
Manages attached displays.
The DisplayManagerService manages the global lifecycle of displays,
decides how to configure logical displays based on the physical display devices currently
attached, sends notifications to the system and to applications when the state
changes, and so on.
The display manager service relies on a collection of DisplayAdapter components,
for discovering and configuring physical display devices attached to the system.
There are separate display adapters for each manner that devices are attached:
one display adapter for built-in local displays, one for simulated non-functional
displays when the system is headless, one for simulated overlay displays used for
development, one for wifi displays, etc.
Display adapters are only weakly coupled to the display manager service.
Display adapters communicate changes in display device state to the display manager
service asynchronously via a DisplayAdapter.Listener registered
by the display manager service.  This separation of concerns is important for
two main reasons.  First, it neatly encapsulates the responsibilities of these
two classes: display adapters handle individual display devices whereas
the display manager service handles the global state.  Second, it eliminates
the potential for deadlocks resulting from asynchronous display device discovery.
DisplayAdapter
A display adapter makes zero or more display devices available to the system
and provides facilities for discovering when displays are connected or disconnected.
For now, all display adapters are registered in the system server but
in principle it could be done from other processes.
现在支持的 4 种 Adapter,分别对应不同类型的 display。
1.LocalDisplayAdapter
A display adapter for the local displays managed by Surface Flinger
2.WifiDisplayAdapter
Connects to Wifi displays that implement the Miracast protocol.
This class is responsible for connecting to Wifi displays and mediating
the interactions between Media Server, Surface Flinger and the Display Manager Service.
3.VirtualDisplayAdapter
4.OverlayDisplayAdapter
DisplayDevice
 Represents a physical display device such as the built-in display an external monitor, or a WiFi display.
WifiDisplayDevice
VirtualDisplayDevice
OverlayDisplayDevice
LocalDisplayDevice
DisplayManagerGlobal
Manager communication with the display manager service on behalf of an application process.
DisplayManager
Manages the properties of attached displays.
LogicalDisplay
Describes how a logical display is configured.
At this time, we only support logical displays that are coupled to a particular
primary display device from which the logical display derives its basic properties
such as its size, density and refresh rate.
A logical display may be mirrored onto multiple display devices in addition to its
primary display device.  Note that the contents of a logical display may not
always be visible, even on its primary display device, such as in the case where
the primary display device is currently mirroring content from a different
logical display.
Note: The display manager architecture does not actually require logical displays
to be associated with any individual display device.  Logical displays and
display devices are orthogonal concepts.  Some mapping will exist between
logical displays and display devices but it can be many-to-many and
and some might have no relation at all.
Display
Provides information about the size and density of a logical display.
DisplayContent
Utility class for keeping track of the WindowStates and other pertinent contents of a particular Display.
DisplayInfo
Describes the characteristics of a particular logical display.
类之间的关系
以添加系统 built in display 为例,下面是各个类之间的关系图,
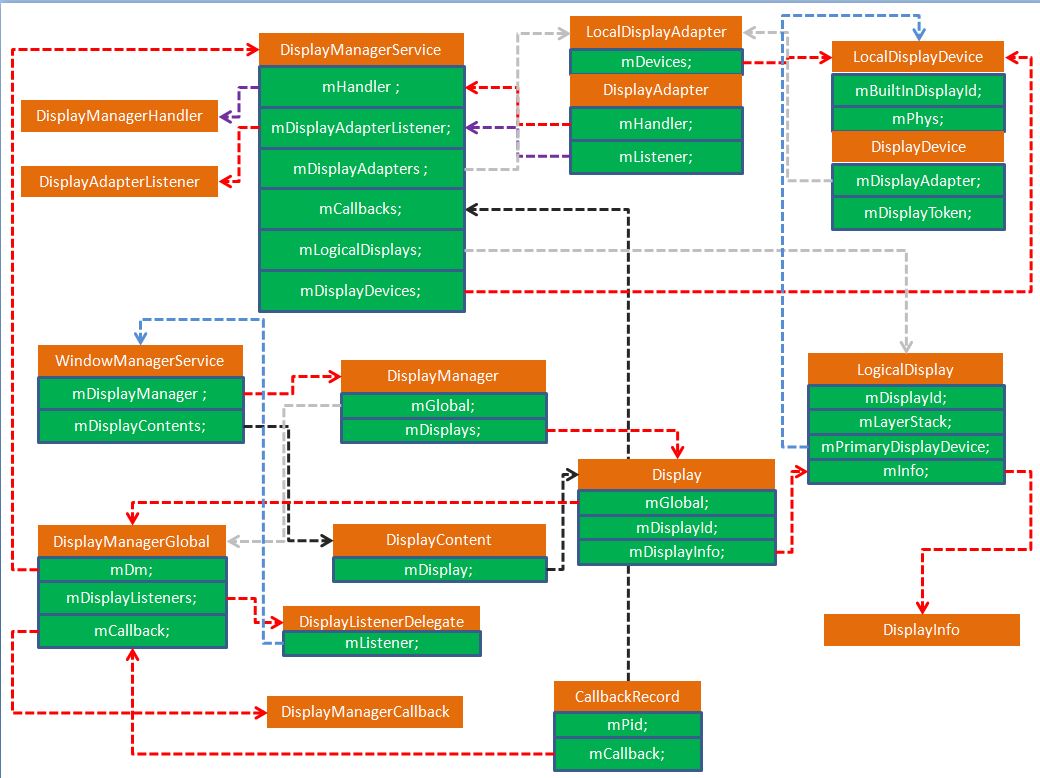
其中,LocalDisplayDevice 中的 mPhys 是向 surface flinger 获取的 display 的硬件相关属性,而 mDisplayToken 是 surfacefinger 中为 display 创建的 new BBinder 对应的代理对象。
默认屏幕的上层初始化分析
1.
systemserver.Java
/*--------------systemserver.java---------------------------*/
    // 专门为window manager创建了一个handler thread
    // Create a handler thread just for the window manager to enjoy.
        HandlerThread wmHandlerThread = new HandlerThread("WindowManager");
        wmHandlerThread.start();
        //创建一个window manager的Handler(looper是wmHandlerThread线程的)
        Handler wmHandler = new Handler(wmHandlerThread.getLooper());
        wmHandler.post(new Runnable() {
            @Override
            public void run() {
                //Looper.myLooper().setMessageLogging(new LogPrinter(
                //        android.util.Log.DEBUG, TAG, android.util.Log.LOG_ID_SYSTEM));
                android.os.Process.setThreadPriority(
                        android.os.Process.THREAD_PRIORITY_DISPLAY);
                android.os.Process.setCanSelfBackground(false);

                // For debug builds, log event loop stalls to dropbox for analysis.
                if (StrictMode.conditionallyEnableDebugLogging()) {
                    Slog.i(TAG, "Enabled StrictMode logging for WM Looper");
                }
            }
        });
/*--------------systemserver.java---------------------------*/
    // DisplayManagerService display = null;
    // 新建DisplayManagerService服务
        Slog.i(TAG, "Display Manager");
            display = new DisplayManagerService(context, wmHandler);
            ServiceManager.addService(Context.DISPLAY_SERVICE, display, true);
         //需要等待第一个display初始化完成后,才继续进行,否则一直循环
        if (!display.waitForDefaultDisplay()) {
                reportWtf("Timeout waiting for default display to be initialized.",
                        new Throwable());
            }
/*--------------DisplayManagerService.java---------------------------*/
    // 在mSyncRoot wait,直到mLogicalDisplays.get(Display.DEFAULT_DISPLAY)不为null
    // 即有地方添加了默认display的LogicalDisplay
    /**
     * Pauses the boot process to wait for the first display to be initialized.
     */
    public boolean waitForDefaultDisplay() {
        synchronized (mSyncRoot) {
            long timeout = SystemClock.uptimeMillis() + WAIT_FOR_DEFAULT_DISPLAY_TIMEOUT;
            while (mLogicalDisplays.get(Display.DEFAULT_DISPLAY) == null) {
                long delay = timeout - SystemClock.uptimeMillis();
                if (delay <= 0) {
                    return false;
                }
                if (DEBUG) {
                    Slog.d(TAG, "waitForDefaultDisplay: waiting, timeout=" + delay);
                }
                try {
                    mSyncRoot.wait(delay);
                } catch (InterruptedException ex) {
                }
            }
        }
        return true;
    }
/*--------------DisplayManagerService.java---------------------------*/
   public DisplayManagerService(Context context, Handler mainHandler) {
        mContext = context;
        mHeadless = SystemProperties.get(SYSTEM_HEADLESS).equals("1");
    //新建个DisplayManagerHandler
        mHandler = new DisplayManagerHandler(mainHandler.getLooper());
        mUiHandler = UiThread.getHandler();
        //新建个DisplayAdapterListener
        mDisplayAdapterListener = new DisplayAdapterListener();
        //persist.demo.singledisplay是只创建默认display的logical display
        mSingleDisplayDemoMode = SystemProperties.getBoolean("persist.demo.singledisplay", false);

        mHandler.sendEmptyMessage(MSG_REGISTER_DEFAULT_DISPLAY_ADAPTER);
    }
DisplayManagerHandler 的消息处理函数,
/*--------------DisplayManagerService.java---------------------------*/
private final class DisplayManagerHandler extends Handler {
        public DisplayManagerHandler(Looper looper) {
            super(looper, null, true /*async*/);
        }

        @Override
        public void handleMessage(Message msg) {
            switch (msg.what) {
                case MSG_REGISTER_DEFAULT_DISPLAY_ADAPTER:
                    registerDefaultDisplayAdapter();
                    break;

                case MSG_REGISTER_ADDITIONAL_DISPLAY_ADAPTERS:
                    registerAdditionalDisplayAdapters();
                    break;

                case MSG_DELIVER_DISPLAY_EVENT:
                    deliverDisplayEvent(msg.arg1, msg.arg2);
                    break;

                case MSG_REQUEST_TRAVERSAL:
                    mWindowManagerFuncs.requestTraversal();
                    break;

                case MSG_UPDATE_VIEWPORT: {
                    synchronized (mSyncRoot) {
                        mTempDefaultViewport.copyFrom(mDefaultViewport);
                        mTempExternalTouchViewport.copyFrom(mExternalTouchViewport);
                    }
                    mInputManagerFuncs.setDisplayViewports(
                            mTempDefaultViewport, mTempExternalTouchViewport);
                    break;
                }
            }
        }
    }
DisplayAdapterListener 类,
/*--------------DisplayManagerService.java---------------------------*/
    private final class DisplayAdapterListener implements DisplayAdapter.Listener {
        @Override
        public void onDisplayDeviceEvent(DisplayDevice device, int event) {
            switch (event) {
                case DisplayAdapter.DISPLAY_DEVICE_EVENT_ADDED:
                    handleDisplayDeviceAdded(device);
                    break;

                case DisplayAdapter.DISPLAY_DEVICE_EVENT_CHANGED:
                    handleDisplayDeviceChanged(device);
                    break;

                case DisplayAdapter.DISPLAY_DEVICE_EVENT_REMOVED:
                    handleDisplayDeviceRemoved(device);
                    break;
            }
        }

        @Override
        public void onTraversalRequested() {
            synchronized (mSyncRoot) {
                scheduleTraversalLocked(false);
            }
        }
    }
mHeadless = SystemProperties.get(SYSTEM_HEADLESS).equals("1");
/* ro.config.headless
    系统中判断ro.config.headless的总共有几个地方
    a、SurfaceControl.java在构造函数中判断如果是headless设备则抛出异常,说明headless的设备不应该构造任何显示画面
    b、在SystemUI中判断headless为true的情况下不启动WallpaperManagerService和SystemUIService
    c、在PhoneWindowManager的systemReady中判断headless为true的情况下不起动KeyguardServiceDelegate,不显示启动提示消息,屏蔽滑盖(lid)状态,屏蔽一些按键
    d、DisplayManagerService在创建默认显示设备的时候(registerDefaultDisplayAdapter)判断headless为true的情况下创建的是HeadlessDisplayAdapter而非LocalDisplayAdapter,前者并没有通过SurfaceFlinger.getBuiltInDisplay获取一个对应的DisplayDevice,也就是说上层的默认显示设备是空
    e、ActivityManagerService在startHomeActivityLocked断headless为true的情况下不启动HomeActivity,不能启动Activity,不能重启挂掉的进程(即使是persistent),不能更新屏幕配置。
*/
mHandler 的 MSG_REGISTER_DEFAULT_DISPLAY_ADAPTER 处理函数为,
/*--------------DisplayManagerService.java---------------------------*/
    private void registerDefaultDisplayAdapter() {
        // Register default display adapter.
        synchronized (mSyncRoot) {
            if (mHeadless) {
                registerDisplayAdapterLocked(new HeadlessDisplayAdapter(
                        mSyncRoot, mContext, mHandler, mDisplayAdapterListener));
            } else {
                //走这个分支
                registerDisplayAdapterLocked(new LocalDisplayAdapter(
                        mSyncRoot, mContext, mHandler, mDisplayAdapterListener));
            }
        }
    }
LocalDisplayAdapter 构造函数的 mHandler 和 mDisplayAdapterListener 分别为 DisplayManagerHandler 和 DisplayAdapterListener。
/*--------------LocalDisplayAdapter.java---------------------------*/
    /* class LocalDisplayAdapter extends DisplayAdapter */
    // Called with SyncRoot lock held.
    public LocalDisplayAdapter(DisplayManagerService.SyncRoot syncRoot,
            Context context, Handler handler, Listener listener) {
        super(syncRoot, context, handler, listener, TAG);
    }
    /*--------------DisplayAdapter.java---------------------------*/
   // LocalDisplayAdapter是 DisplayAdapter的子类
   public DisplayAdapter(DisplayManagerService.SyncRoot syncRoot,
            Context context, Handler handler, Listener listener, String name) {
        mSyncRoot = syncRoot;
        mContext = context;
        mHandler = handler;
        mListener = listener;
        mName = name;
    }
/*--------------DisplayManagerService.java---------------------------*/
//    private final ArrayList<DisplayAdapter> mDisplayAdapters = new ArrayList<DisplayAdapter>();
        private void registerDisplayAdapterLocked(DisplayAdapter adapter) {
        mDisplayAdapters.add(adapter);
        adapter.registerLocked();
    }
LocalDisplayAdapter.registerLocked(),
/*--------------LocalDisplayAdapter.java---------------------------*/
        private static final int[] BUILT_IN_DISPLAY_IDS_TO_SCAN = new int[] {
            SurfaceControl.BUILT_IN_DISPLAY_ID_MAIN,
            SurfaceControl.BUILT_IN_DISPLAY_ID_HDMI,
    };

    // LocalDisplayAdapter.registerLocked
        public void registerLocked() {
        super.registerLocked();

        mHotplugReceiver = new HotplugDisplayEventReceiver(getHandler().getLooper());
    //对默认屏幕和HDMI调用tryConnectDisplayLocked
        for (int builtInDisplayId : BUILT_IN_DISPLAY_IDS_TO_SCAN) {
            tryConnectDisplayLocked(builtInDisplayId);
        }
    }
调用 tryConnectDisplayLocked (),这里主要是和底层 framework 去交互,获取底层注册的 displays 的相关信息。
/*--------------LocalDisplayAdapter.java---------------------------*/
      // LocalDisplayAdapter.mDevices
      // private final SparseArray<LocalDisplayDevice> mDevices =new SparseArray<LocalDisplayDevice>();
      private void tryConnectDisplayLocked(int builtInDisplayId) {
      //获取surface flinger中的new BBinder对应的client IBinder
        IBinder displayToken = SurfaceControl.getBuiltInDisplay(builtInDisplayId);
        //获取display的硬件属性,新建LocalDisplayDevice
        if (displayToken != null && SurfaceControl.getDisplayInfo(displayToken, mTempPhys)) {
            LocalDisplayDevice device = mDevices.get(builtInDisplayId);
            if (device == null) {
                // Display was added.
                device = new LocalDisplayDevice(displayToken, builtInDisplayId, mTempPhys);
                mDevices.put(builtInDisplayId, device);
                //给DisplayManagerService的DisplayManagerHandler发消息
                sendDisplayDeviceEventLocked(device, DISPLAY_DEVICE_EVENT_ADDED);
            } else if (device.updatePhysicalDisplayInfoLocked(mTempPhys)) {
                // Display properties changed.
                sendDisplayDeviceEventLocked(device, DISPLAY_DEVICE_EVENT_CHANGED);
            }
        } else {
            // The display is no longer available. Ignore the attempt to add it.
            // If it was connected but has already been disconnected, we''ll get a
            // disconnect event that will remove it from mDevices.
        }
    }
/*--------------SurfaceControl.java---------------------------*/
    //SurfaceControl.java,都是static,类函数
    //通过id获取display token
    public static IBinder getBuiltInDisplay(int builtInDisplayId) {
        return nativeGetBuiltInDisplay(builtInDisplayId);
    }
        //通过display token,获取display硬件属性
        public static boolean getDisplayInfo(IBinder displayToken, SurfaceControl.PhysicalDisplayInfo outInfo) {
        if (displayToken == null) {
            throw new IllegalArgumentException("displayToken must not be null");
        }
        if (outInfo == null) {
            throw new IllegalArgumentException("outInfo must not be null");
        }
        return nativeGetDisplayInfo(displayToken, outInfo);
    }
其中,nativeGetBuiltInDisplay 最终会调用 surfaceflinger 中的 getBuiltInDisplay,通过 Binder 传回代理对象。
/*--------------SurfaceFlinger.cpp---------------------------*/
sp<IBinder> SurfaceFlinger::getBuiltInDisplay(int32_t id) {
    if (uint32_t(id) >= DisplayDevice::NUM_BUILTIN_DISPLAY_TYPES) {
        ALOGE("getDefaultDisplay: id=%d is not a valid default display id", id);
        return NULL;
    }
    return mBuiltinDisplays[id];
}
nativeGetDisplayInfo—>SurfaceFlinger::getDisplayInfo,
/*--------------SurfaceFlinger.cpp---------------------------*/
status_t SurfaceFlinger::getDisplayInfo(const sp<IBinder>& display, DisplayInfo* info) {
    int32_t type = NAME_NOT_FOUND;
    for (int i=0 ; i<DisplayDevice::NUM_BUILTIN_DISPLAY_TYPES ; i++) {
        if (display == mBuiltinDisplays[i]) {
            type = i;
            break;
        }
    }

    if (type < 0) {
        return type;
    }

    const HWComposer& hwc(getHwComposer());
    float xdpi = hwc.getDpiX(type);
    float ydpi = hwc.getDpiY(type);

    // TODO: Not sure if display density should handled by SF any longer
    class Density {
        static int getDensityFromProperty(char const* propName) {
            char property[PROPERTY_VALUE_MAX];
            int density = 0;
            if (property_get(propName, property, NULL) > 0) {
                density = atoi(property);
            }
            return density;
        }
    public:
        static int getEmuDensity() {
            return getDensityFromProperty("qemu.sf.lcd_density"); }
        static int getBuildDensity()  {
            return getDensityFromProperty("ro.sf.lcd_density"); }
    };

    if (type == DisplayDevice::DISPLAY_PRIMARY) {
        // The density of the device is provided by a build property
        float density = Density::getBuildDensity() / 160.0f;
        if (density == 0) {
            // the build doesn''t provide a density -- this is wrong!
            // use xdpi instead
            ALOGE("ro.sf.lcd_density must be defined as a build property");
            density = xdpi / 160.0f;
        }
        if (Density::getEmuDensity()) {
            // if "qemu.sf.lcd_density" is specified, it overrides everything
            xdpi = ydpi = density = Density::getEmuDensity();
            density /= 160.0f;
        }
        info->density = density;

        // TODO: this needs to go away (currently needed only by webkit)
        sp<const DisplayDevice> hw(getDefaultDisplayDevice());
        info->orientation = hw->getOrientation();
    } else {
        // TODO: where should this value come from?
        static const int TV_DENSITY = 213;
        info->density = TV_DENSITY / 160.0f;
        info->orientation = 0;
    }

    info->w = hwc.getWidth(type);
    info->h = hwc.getHeight(type);
    info->xdpi = xdpi;
    info->ydpi = ydpi;
    info->fps = float(1e9 / hwc.getRefreshPeriod(type));

    // All non-virtual displays are currently considered secure.
    info->secure = true;

    return NO_ERROR;
}
创建完 LocalDisplayDevice,给 DisplayManagerService 的 DisplayManagerHandler 发消息,
/*--------------DisplayAdapter.java---------------------------*/
    /**
     * Sends a display device event to the display adapter listener asynchronously.
     */
    protected final void sendDisplayDeviceEventLocked(
            final DisplayDevice device, final int event) {
        mHandler.post(new Runnable() {
            @Override
            public void run() {
                mListener.onDisplayDeviceEvent(device, event);
            }
        });
    }
LocalDisplayAdapter 构造函数的 mHandler 和 mDisplayAdapterListener 分别为 DisplayManagerHandler 和 DisplayAdapterListener,进而会去调用,
/*--------------DisplayManagerService.java---------------------------*/
        private void handleDisplayDeviceAdded(DisplayDevice device) {
        synchronized (mSyncRoot) {
            handleDisplayDeviceAddedLocked(device);
        }
    }
/*--------------DisplayManagerService.java---------------------------*/
    //输入为LocalDisplayDevice
    //    private final ArrayList<DisplayDevice> mDisplayDevices = new ArrayList<DisplayDevice>();
    private void handleDisplayDeviceAddedLocked(DisplayDevice device) {
        if (mDisplayDevices.contains(device)) {
            Slog.w(TAG, "Attempted to add already added display device: "
                    + device.getDisplayDeviceInfoLocked());
            return;
        }

        Slog.i(TAG, "Display device added: " + device.getDisplayDeviceInfoLocked());
    // List of all currently connected display devices.
    //将LocalDisplayDevice添加到mDisplayDevices
        mDisplayDevices.add(device);
        //为一个物理display添加一个logical display
        addLogicalDisplayLocked(device);
        updateDisplayBlankingLocked(device);
        scheduleTraversalLocked(false);
    }
为物理屏幕创建一个 logical display,
/*--------------DisplayManagerService.java---------------------------*/
// Adds a new logical display based on the given display device.
    // Sends notifications if needed.
    private void addLogicalDisplayLocked(DisplayDevice device) {
        DisplayDeviceInfo deviceInfo = device.getDisplayDeviceInfoLocked();
        boolean isDefault = (deviceInfo.flags
                & DisplayDeviceInfo.FLAG_DEFAULT_DISPLAY) != 0;
        //主屏,同时mLogicalDisplays包含了这个device
        if (isDefault && mLogicalDisplays.get(Display.DEFAULT_DISPLAY) != null) {
            Slog.w(TAG, "Ignoring attempt to add a second default display: " + deviceInfo);
            isDefault = false;
        }
        //不是主屏,但是mSingleDisplayDemoMode为真,即设置了单屏模式
        //这时候不会去为这个物理display创建新的logical display,如果
        //有hdmi,这时候会mirror主屏的内容
        //看来逻辑display就是和显示的内容有很大的关系
        if (!isDefault && mSingleDisplayDemoMode) {
            Slog.i(TAG, "Not creating a logical display for a secondary display "
                    + " because single display demo mode is enabled: " + deviceInfo);
            return;
        }

        final int displayId = assignDisplayIdLocked(isDefault);
        // layerStack 就是displayId id,主屏0,hdmi 1
        final int layerStack = assignLayerStackLocked(displayId);

        //新建LogicalDisplay
        LogicalDisplay display = new LogicalDisplay(displayId, layerStack, device);
        display.updateLocked(mDisplayDevices);
        if (!display.isValidLocked()) {
            // This should never happen currently.
            Slog.w(TAG, "Ignoring display device because the logical display "
                    + "created from it was not considered valid: " + deviceInfo);
            return;
        }

        mLogicalDisplays.put(displayId, display);

        //如果添加的是built-in display,需要mSyncRoot.notifyAll()
        //因为systemserver.java中调用了waitForDefaultDisplay,这时候systemserver可以继续运行了
        // Wake up waitForDefaultDisplay.
        if (isDefault) {
            mSyncRoot.notifyAll();
        }
    //给mHandler发消息去处理
        sendDisplayEventLocked(displayId, DisplayManagerGlobal.EVENT_DISPLAY_ADDED);
    }
/*--------------LogicalDisplay.java---------------------------*/
    public LogicalDisplay(int displayId, int layerStack, DisplayDevice primaryDisplayDevice) {
        mDisplayId = displayId;
        mLayerStack = layerStack;
        mPrimaryDisplayDevice = primaryDisplayDevice;
    }
进而去调用 mHandler 的 deliverDisplayEvent,先不去管 mCallbacks 是在哪里注册的,进而会去调用 mTempCallbacks.get(i).notifyDisplayEventAsync(displayId, event);
/*--------------DisplayManagerService.java---------------------------*/
   private void deliverDisplayEvent(int displayId, int event) {
        if (DEBUG) {
            Slog.d(TAG, "Delivering display event: displayId="
                    + displayId + ", event=" + event);
        }

        // Grab the lock and copy the callbacks.
        final int count;
        synchronized (mSyncRoot) {
        //这里的mCallbacks是哪里注册的??
            count = mCallbacks.size();
            mTempCallbacks.clear();
            for (int i = 0; i < count; i++) {
                mTempCallbacks.add(mCallbacks.valueAt(i));
            }
        }

        // After releasing the lock, send the notifications out.
        for (int i = 0; i < count; i++) {
            mTempCallbacks.get(i).notifyDisplayEventAsync(displayId, event);
        }
        mTempCallbacks.clear();
    }
2. mCallbacks 的由来, 上面在添加了默认 display 的 LogicalDisplay 后,会去调用下面代码,使得 systemserver.java 从 waitForDefaultDisplay () 中返回。
/*--------------systemserver.java---------------------------*/
        if (isDefault) {
            mSyncRoot.notifyAll();
        }
进而,systemserver.java 的 initAndLoop () 会去注册 WindowManagerService,
/*--------------systemserver.java---------------------------*/
            wm = WindowManagerService.main(context, power, display, inputManager,
                    wmHandler, factoryTest != SystemServer.FACTORY_TEST_LOW_LEVEL,
                    !firstBoot, onlyCore);
下面分析下,WindowManagerService 的构造函数中做了什么和 display 相关的,
/*--------------WindowManagerService.java---------------------------*/
/*
class WindowManagerService extends IWindowManager.Stub
        implements Watchdog.Monitor, WindowManagerPolicy.WindowManagerFuncs,
                DisplayManagerService.WindowManagerFuncs, DisplayManager.DisplayListener
*/
    //WindowManagerService实现了DisplayManager.DisplayListener接口

    private WindowManagerService(Context context, PowerManagerService pm,
            DisplayManagerService displayManager, InputManagerService inputManager,
            boolean haveInputMethods, boolean showBootMsgs, boolean onlyCore) {

    mDisplayManagerService = displayManager;
    //新建个DisplayManager
    mDisplayManager = (DisplayManager)context.getSystemService(Context.DISPLAY_SERVICE);
    //由于WindowManagerService实现了DisplayManager.DisplayListener接口,
    //将WindowManagerService注册到DisplayManager中
    mDisplayManager.registerDisplayListener(this, null);

    }
/*--------------DisplayManager.java---------------------------*/
        public DisplayManager(Context context) {
        mContext = context;
        mGlobal = DisplayManagerGlobal.getInstance();
    }
/*--------------DisplayManagerGlobal.java---------------------------*/

// class DisplayManagerService extends IDisplayManager.Stub
   public static DisplayManagerGlobal getInstance() {
        synchronized (DisplayManagerGlobal.class) {
            if (sInstance == null) {
                IBinder b = ServiceManager.getService(Context.DISPLAY_SERVICE);
                if (b != null) {
                //输入参数是DisplayManagerService 的代理
                    sInstance = new DisplayManagerGlobal(IDisplayManager.Stub.asInterface(b));
                }
            }
            return sInstance;
        }
    }

public final class DisplayManagerGlobal {

    //mDm是DisplayManagerService 的代理,用来和DisplayManagerService打交道
    private final IDisplayManager mDm;

        private DisplayManagerGlobal(IDisplayManager dm) {
        mDm = dm;
    }

}
接着将 WindowManagerService 注册到 DisplayManager 中,
/*--------------DisplayManager.java---------------------------*/
        //输入参数为WindowManagerService,null
        public void registerDisplayListener(DisplayListener listener, Handler handler) {
        mGlobal.registerDisplayListener(listener, handler);
    }
/*--------------DisplayManagerGlobal.java---------------------------*/
        // DisplayManagerGlobal
        public void registerDisplayListener(DisplayListener listener, Handler handler) {
        if (listener == null) {
            throw new IllegalArgumentException("listener must not be null");
        }
   // private final ArrayList<DisplayListenerDelegate> mDisplayListeners =
    //        new ArrayList<DisplayListenerDelegate>();
        synchronized (mLock) {
            int index = findDisplayListenerLocked(listener);
            if (index < 0) {
             //新建一个display listener的代理者
                mDisplayListeners.add(new DisplayListenerDelegate(listener, handler));
             //将DisplayManagerGlobal 和DisplayManagerService 联系起来
            registerCallbackIfNeededLocked();
            }
        }
    }

 public DisplayListenerDelegate(DisplayListener listener, Handler handler) {
            super(handler != null ? handler.getLooper() : Looper.myLooper(), null, true /*async*/);
            mListener = listener;
        }
/*--------------DisplayManagerGlobal.java---------------------------*/
// 将    DisplayManagerGlobal 和DisplayManagerService 联系起来
        private void registerCallbackIfNeededLocked() {
        if (mCallback == null) {
            mCallback = new DisplayManagerCallback();
            try {
                //调用DisplayManagerService 的registerCallback将
                //DisplayManagerGlobal 中的DisplayManagerCallback注册到DisplayManagerService中
                mDm.registerCallback(mCallback);
            } catch (RemoteException ex) {
                Log.e(TAG, "Failed to register callback with display manager service.", ex);
                mCallback = null;
            }
        }
    }
private final class DisplayManagerCallback extends IDisplayManagerCallback.Stub {
        @Override
        public void onDisplayEvent(int displayId, int event) {
            if (DEBUG) {
                Log.d(TAG, "onDisplayEvent: displayId=" + displayId + ", event=" + event);
            }
            handleDisplayEvent(displayId, event);
        }
    }
DisplayManagerService 中调用 registerCallback,将 DisplayManagerCallback 保存到 mCallbacks 中,
/*--------------DisplayManagerService.java---------------------------*/
  @Override // Binder call
    public void registerCallback(IDisplayManagerCallback callback) {
        if (callback == null) {
            throw new IllegalArgumentException("listener must not be null");
        }

        synchronized (mSyncRoot) {
            int callingPid = Binder.getCallingPid();
            if (mCallbacks.get(callingPid) != null) {
                throw new SecurityException("The calling process has already "
                        + "registered an IDisplayManagerCallback.");
            }

            CallbackRecord record = new CallbackRecord(callingPid, callback);
            try {
                IBinder binder = callback.asBinder();
                binder.linkToDeath(record, 0);
            } catch (RemoteException ex) {
                // give up
                throw new RuntimeException(ex);
            }
        //保存的是CallbackRecord
            mCallbacks.put(callingPid, record);
        }
    }
/*--------------DisplayManagerService.java---------------------------*/
    private final class CallbackRecord implements DeathRecipient {
        public final int mPid;
        private final IDisplayManagerCallback mCallback;

        public boolean mWifiDisplayScanRequested;

        public CallbackRecord(int pid, IDisplayManagerCallback callback) {
            mPid = pid;
            mCallback = callback;
        }

        @Override
        public void binderDied() {
            if (DEBUG) {
                Slog.d(TAG, "Display listener for pid " + mPid + " died.");
            }
            onCallbackDied(this);
        }

        public void notifyDisplayEventAsync(int displayId, int event) {
            try {
                mCallback.onDisplayEvent(displayId, event);
            } catch (RemoteException ex) {
                Slog.w(TAG, "Failed to notify process "
                        + mPid + " that displays changed, assuming it died.", ex);
                binderDied();
            }
        }
    }
3. 回到最开始的 deliverDisplayEvent 函数,会调用 CallbackRecord 的 notifyDisplayEventAsync (displayId, event),进而 mCallback.onDisplayEvent(displayId, event),进而调用 DisplayManagerGlobal 的 handleDisplayEvent(displayId, event),
/*--------------DisplayManagerService.java---------------------------*/
 private void deliverDisplayEvent(int displayId, int event) {
        if (DEBUG) {
            Slog.d(TAG, "Delivering display event: displayId="
                    + displayId + ", event=" + event);
        }

        // Grab the lock and copy the callbacks.
        final int count;
        synchronized (mSyncRoot) {
        //这里的mCallbacks是哪里注册的??
            count = mCallbacks.size();
            mTempCallbacks.clear();
            for (int i = 0; i < count; i++) {
                mTempCallbacks.add(mCallbacks.valueAt(i));
            }
        }

        // After releasing the lock, send the notifications out.
        for (int i = 0; i < count; i++) {
            mTempCallbacks.get(i).notifyDisplayEventAsync(displayId, event);
        }
        mTempCallbacks.clear();
    }
handleDisplayEvent 中的 mDisplayListeners 就是前面注册的 DisplayListenerDelegate,其中的 listener 和 handler 分别为 WindowManagerService 和 null,
/*--------------DisplayManagerGlobal.java---------------------------*/
    private void handleDisplayEvent(int displayId, int event) {
        synchronized (mLock) {
            if (USE_CACHE) {
                mDisplayInfoCache.remove(displayId);

                if (event == EVENT_DISPLAY_ADDED || event == EVENT_DISPLAY_REMOVED) {
                    mDisplayIdCache = null;
                }
            }

            final int numListeners = mDisplayListeners.size();
            for (int i = 0; i < numListeners; i++) {
                mDisplayListeners.get(i).sendDisplayEvent(displayId, event);
            }
        }
    }
调用 DisplayListenerDelegate 的 sendDisplayEvent,进而调用 mListener.onDisplayAdded(msg.arg1);,即 WindowManagerService 的 onDisplayAdded,
/*--------------DisplayManagerGlobal.java---------------------------*/
 private static final class DisplayListenerDelegate extends Handler {
        public final DisplayListener mListener;

        public DisplayListenerDelegate(DisplayListener listener, Handler handler) {
            super(handler != null ? handler.getLooper() : Looper.myLooper(), null, true /*async*/);
            mListener = listener;
        }

        public void sendDisplayEvent(int displayId, int event) {
            Message msg = obtainMessage(event, displayId, 0);
            sendMessage(msg);
        }

        public void clearEvents() {
            removeCallbacksAndMessages(null);
        }

        @Override
        public void handleMessage(Message msg) {
            switch (msg.what) {
                case EVENT_DISPLAY_ADDED:
                    mListener.onDisplayAdded(msg.arg1);
                    break;
                case EVENT_DISPLAY_CHANGED:
                    mListener.onDisplayChanged(msg.arg1);
                    break;
                case EVENT_DISPLAY_REMOVED:
                    mListener.onDisplayRemoved(msg.arg1);
                    break;
            }
        }
    }
}
转到 WindowManagerService 中,
/*--------------WindowManagerService.java---------------------------*/
    @Override
    public void onDisplayAdded(int displayId) {
        mH.sendMessage(mH.obtainMessage(H.DO_DISPLAY_ADDED, displayId, 0));
    }
/*--------------WindowManagerService.java---------------------------*/
                    case DO_DISPLAY_ADDED:
                    synchronized (mWindowMap) {
                        handleDisplayAddedLocked(msg.arg1);
                    }
                    break;

        private void handleDisplayAddedLocked(int displayId) {
        final Display display = mDisplayManager.getDisplay(displayId);
        if (display != null) {
            createDisplayContentLocked(display);
            displayReady(displayId);
        }
    }
调用 DisplayManager 的 getDisplay,
/*--------------DisplayManager.java---------------------------*/
        public Display getDisplay(int displayId) {
        synchronized (mLock) {
            return getOrCreateDisplayLocked(displayId, false /*assumeValid*/);
        }
    }
/*--------------DisplayManager.java---------------------------*/
    //  private final SparseArray<Display> mDisplays = new SparseArray<Display>();
        private Display getOrCreateDisplayLocked(int displayId, boolean assumeValid) {
        Display display = mDisplays.get(displayId);
        if (display == null) {
            display = mGlobal.getCompatibleDisplay(displayId,
                    mContext.getDisplayAdjustments(displayId));
            if (display != null) {
                mDisplays.put(displayId, display);
            }
        } else if (!assumeValid && !display.isValid()) {
            display = null;
        }
        return display;
    }
/*--------------DisplayManagerGlobal.java---------------------------*/

    public Display getCompatibleDisplay(int displayId, DisplayAdjustments daj) {
        DisplayInfo displayInfo = getDisplayInfo(displayId);
        if (displayInfo == null) {
            return null;
        }
        return new Display(this, displayId, displayInfo, daj);
    }
/*--------------DisplayManagerGlobal.java---------------------------*/
//mDm DisplayManagerService
     public DisplayInfo getDisplayInfo(int displayId) {
        try {
            synchronized (mLock) {
                DisplayInfo info;
                if (USE_CACHE) {
                    info = mDisplayInfoCache.get(displayId);
                    if (info != null) {
                        return info;
                    }
                }
        //调用DisplayManagerService的getDisplayInfo,获取显示器信息
                info = mDm.getDisplayInfo(displayId);
                if (info == null) {
                    return null;
                }

                if (USE_CACHE) {
                    mDisplayInfoCache.put(displayId, info);
                }
                //前面已经注册过了,mCallback不为Null
                registerCallbackIfNeededLocked();

                if (DEBUG) {
                    Log.d(TAG, "getDisplayInfo: displayId=" + displayId + ", info=" + info);
                }
                return info;
            }
        } catch (RemoteException ex) {
            Log.e(TAG, "Could not get display information from display manager.", ex);
            return null;
        }
    }
/*--------------DisplayManagerGlobal.java---------------------------*/
    //已经注册过了,mCallback不为Null
        private void registerCallbackIfNeededLocked() {
        if (mCallback == null) {
            mCallback = new DisplayManagerCallback();
            try {
                mDm.registerCallback(mCallback);
            } catch (RemoteException ex) {
                Log.e(TAG, "Failed to register callback with display manager service.", ex);
                mCallback = null;
            }
        }
    }
/*--------------WindowManagerService.java---------------------------*/
    //Display已经创建,创建display content
    public void createDisplayContentLocked(final Display display) {
        if (display == null) {
            throw new IllegalArgumentException("getDisplayContent: display must not be null");
        }
        getDisplayContentLocked(display.getDisplayId());
    }
/** All DisplayContents in the world, kept here */
    // SparseArray<DisplayContent> mDisplayContents = new SparseArray<DisplayContent>(2);

        public DisplayContent getDisplayContentLocked(final int displayId) {
        DisplayContent displayContent = mDisplayContents.get(displayId);
        if (displayContent == null) {
            final Display display = mDisplayManager.getDisplay(displayId);
            // 走到这个分支,创建displayContent
            if (display != null) {
                displayContent = newDisplayContentLocked(display);
            }
        }
        return displayContent;
    }
新建一个 DisplayContent,保存到 WindowManagerService 的 mDisplayContents (displayId, displayContent)。
private DisplayContent newDisplayContentLocked(final Display display) {
        DisplayContent displayContent = new DisplayContent(display, this);
        final int displayId = display.getDisplayId();
        mDisplayContents.put(displayId, displayContent);

        DisplayInfo displayInfo = displayContent.getDisplayInfo();
        final Rect rect = new Rect();
        mDisplaySettings.getOverscanLocked(displayInfo.name, rect);
        synchronized (displayContent.mDisplaySizeLock) {
            displayInfo.overscanLeft = rect.left;
            displayInfo.overscanTop = rect.top;
            displayInfo.overscanRight = rect.right;
            displayInfo.overscanBottom = rect.bottom;
            mDisplayManagerService.setDisplayInfoOverrideFromWindowManager(
                    displayId, displayInfo);
        }
        configureDisplayPolicyLocked(displayContent);

        // TODO: Create an input channel for each display with touch capability.
        if (displayId == Display.DEFAULT_DISPLAY) {
            displayContent.mTapDetector = new StackTapPointerEventListener(this, displayContent);
            registerPointerEventListener(displayContent.mTapDetector);
        }

        return displayContent;
    }
CS5212AN 设计 Display to Vga 高清转接器产品 | Display to Vga 高清 1080P 转接线产品
Display to Vga 高清转接器产品 / Display to Vga 高清 1080P 转接线产品特点:
DisplayPort 为新一代影像显示接口技术的规格之一,可将笔记型计算机和消费电子设备连接到显示器,传递高画质影像信号。根据 iSuppli 的预测,迅速崛起的 DisplayPort 技术将可望承袭 VGA 与 DVI 接口的市场,成为 PC 领域的主流技术,与主导消费性电子领域的 HDMI 技术并驾齐驱。这两种技术的并存则创造了于两种接口间讯号传输时电压转换的需求。
产品内置转换芯片,能将 DISPLAYPORT 的信号转换成 HDMI/DVI/VGA 信号,并能符合 HDMI 1.4 版的要求达到 10.2G 的带宽。如增加 HDMI 公转 DVI 母的线或转接头能连接 DVI 的显示设备且支持 1080P。
Display to Vga 高清转接器产品 / Display to Vga 高清 1080P 转接线产品特性:
◇支持 DisplayPort v1.1;
◇支持 DisplayPort 信号到 HDMII 信号的转换;
◇支持 20pin 的 DisplayPort 接口;
◇支持高达 10.8Gbps 的视频带宽;
◇最高支持 QXGA (1920*1200)分辨率输出;
◇支持 1Mbps 的双向辅助通道;
◇支持单向、单通道、四线连接;
◇支持热插拔。
◇内置转换芯片,无需外接电源
◇严格按照 DisplayPort 标准设计,端口采用锁扣设计,信号传输稳定可靠
Display to Vga 高清转接器产品 / Display to Vga 高清 1080P 转接线产品主要适用所有带 DisplayPort 接口的电脑,DV,平板,MP4 等输出到 VGA 的显示器投影仪.

CS5212AN 设计 Display to Vga 高清转接器产品 / Display to Vga 高清 1080P 转接线产品
参数说明:
* 视频输入信号:5Volts p-p (TTL)
* 最大信号联接范围达到 1920x1200, 1080p
* 视频扩大器带宽:154MHz/144MHZ
* 输入输出联接:
输入:DisplayPort 公头 20pin;
RGB 模拟视频输出:HDMI、DVI、VGA 15PIN 母头;
* 环保符合 ROHS 指令;
支持分辨率:800*600,1024*768,1280*720,1280*1024,1920*1080
CS5212AN 设计 Display to Vga 高清转接器产品 / Display to Vga 高清 1080P 转接线产品结构方框图如下:

具体 CS5212AN 设计 Display to Vga 高清转接器产品 / Display to Vga 高清 1080P 转接线产品 PCB 板图如下:

CS5212AN 设计 Display to Vga 高清转接器产品 / Display to Vga 高清 1080P 转接线产品设计原理图如下所示:

设计以上产品形态如下图所示:

CS5212 详细的设计资料和设计规格书如下面附件中:
https://download.csdn.net/download/qq1659747718/12657042

css float 属性详解
定义和用法
float 属性定义元素在哪个方向浮动。以往这个属性总应用于图像,使文本围绕在图像周围,不过在 CSS 中,任何元素都可以浮动。浮动元素会生成一个块级框,而不论它本身是何种元素。
如果浮动非替换元素,则要指定一个明确的宽度;否则,它们会尽可能地窄。
注释:假如在一行之上只有极少的空间可供浮动元素,那么这个元素会跳至下一行,这个过程会持续到某一行拥有足够的空间为止。
| 值 | 描述 |
|---|---|
| left | 元素向左浮动 |
| right | 元素向右浮动 |
| none | 默认值。元素不浮动,并会显示在其在文本中出现的位置 |
| inherit | 规定应该从父元素继承 float 属性的值 |
下面举几个例子来看看 float 有哪些妙用
实例 1

css 代码
.wrap{
    width: 40%;
    margin:0 auto;
    background: #eee;
}
.div1{
width: 200px;
height: 100px;
border:1px solid red;
}
.div2{
    width:100px;
    height: 80px;
    border:1px solid green;
}
.div3{
    width:80px;
    height: 60px;
    border:1px solid blue;
}
这是按照正常文档流来输出的。
下面我们改一下 div1 的样式
css 代码
.div1{
width: 200px;
height: 100px;
float:left;
border:1px solid red;
}
再来看下效果
div2 由于受到 div1 的浮动影响,div2 填充了 div1 遗留下来的空间,发生重叠,div2 在上面。div2 的文本则被 div1 挡住,围绕在 div1 的周围。
这是因为浮动是不彻底的脱离文档流,当某个元素使用 float 时,其他盒子会无视这个元素,但其他盒子内的文本依然会为这个元素让出位置,环绕在周围。而对于使用绝对布局脱离文档流的元素,其他盒子与其他盒子内的文本都会无视它。
可以通过给受影响的元素设置 clear 属性来清楚浮动,值可以是 left,right,both。
再来看一个例子
实例 2
css 代码
.wrap{
width: 40%;
margin:0 auto;
background: #eee;
}
.div1{
width: 200px;
height: 100px;
float:left;
border:1px solid red;
}
.div2{
    width:100px;
    height: 80px;
    float:left;
    border:1px solid green;
}
.div3{
    width:80px;
    height: 60px;
    float:left;
    border:1px solid blue;
}
效果:
当把 3 个 div 都设置为左浮动后,由于没有给 wrap 设置高度,没有未浮动的内容给它撑开,wrap 的高度缩为 0。
可以给 wrap 设置 overflow 来清楚浮动影响:
css 代码
.wrap{
width: 40%;
margin:0 auto;
background: #eee;
overflow: hidden;
_zoom:1;
}
效果:
_zoom:1; 属性是 IE 浏览器的专有属性,Firefox 等其它浏览器不支持。它可以设置或检索对象的缩放比例。
效果:
实例 3
css 代码
img
{
float:right;
border:1px dotted black;
}
span
{
float:left;
width:2.5em;
font:400%/80%  bold algerian,courier;
}
效果:
通过给和设置浮动,让它们显示在父元素
的左上角和右上角,同时实现文字环绕。
float 还可以用来实现横向两列布局,三列布局,水平菜单等,这里就不列举了。

css – display:block inside display:inline
这种情况在CSS 2.1规范的Anonymous block boxes部分中描述:该示例包括以下规则…
body { display: inline }
p    { display: block }
…和随附的文字说…
The BODY element contains a chunk (C1)
of anonymous text followed by a
block-level element followed by
another chunk (C2) of anonymous text.
The resulting Boxes would be an
anonymous block Box around the BODY,
containing an anonymous block Box
around C1,the P block Box,and
another anonymous block Box around C2.
如果你有一个display:inline parent元素,如果这个父级有一个子元素是display:block,那么该子元素的存在似乎使父元素几乎像display:block,并且忽略它被定义为display :inline(因为父元素现在只包含匿名和非匿名块子元素,即它不再包含任何内联子元素)?
我的问题是,在这种情况下(有一个显示:块子)然后什么是父的定义显示之间的差异:内联而不是显示:块?
编辑:我更感兴趣了解CSS 2.1标准比如何和是否各种浏览器实现在实践中的行为。
第二编辑:
规格中注明了一个差异。在下面的文档中,第二’块’段的边框围绕整个段落和页面的整个宽度;而第一’内嵌段落的边框在段落内的每一行(即使有多行),并且不超过每行的精确宽度(每行小于页面宽度)。
<html>
<head>
<style type="text/css">
p.one
{
border-style:solid;
border-width:1px;
display: inline;
}
p.two
{
border-style:solid;
border-width:1px;
}
</style>
</head>
<body>
<p>Some text. <b>Note:</b> The "border-width"
property does not work if it is used alone. Use the
"border-style" property to set the borders first.</p>
<p>Some text.</p>
</body>
</html>
如果我添加以下样式规则…
b
{
display: block;
}
…然后,在第一个内联段落中的“注意:”变成一个块,它分割段落(根据规范,段落的第一和最后部分现在在一个匿名块)。但是,段落的第一部分和最后部分的边界仍然是“内联”样式的边界:因此,仍然不同于p.one已被声明为display:block。
有一个引用规范,说,
Properties set on elements that cause
anonymous block Boxes to be generated
still apply to the Boxes and content
of that element. For example,if a
border had been set on the BODY
element in the above example,the
border would be drawn around C1 (open
at the end of the line) and C2 (open
at the start of the line).
是“border-style”属性是唯一可以看到差异的属性类型吗?
解决方法
When an inline Box contains a block Box,the inline Box […] [is] broken around the block. The [in]line Boxes before the break and after the break are enclosed in anonymous Boxes,and the block Box becomes a sibling of those anonymous Boxes.
<BODYhttps://www.jb51.cc/tag/dis/" target="_blank">display: inline; ">
This is anonymous text before the P.
<P>This is the content of P.</P>
This is anonymous text after the P.
</BODY>
The resulting Boxes would be an anonymous block Box around the BODY,containing an anonymous block Box around C1,and another anonymous block Box around C2.
或者,视觉上:
+- anonymous block Box around body ---+
| +- anonymous block Box around C1 -+ |
| |                                 + |
| +---------------------------------+ |
|                                     |
| +- P block Box -------------------+ |
| |                                 + |
| +---------------------------------+ |
|                                     |
| +- anonymous block Box around C2 -+ |
| |                                 + |
| +---------------------------------+ |
+-------------------------------------+
现在到您的问题:这是不同于< BODY style =“display:block;”> ;? 是的。而它仍然是4盒(匿名块框周围的身体现在是BODY块盒),规格告诉区别:
Properties set on elements that cause anonymous block Boxes to be generated still apply to the [generated anonymous block] Boxes and content of that element. For example,if a border had been set on the BODY element in the above example,the border would be drawn around C1 (open at the end of the line) and C2 (open at the start of the line):
+--------------------------------------
| This is anonymous text before the P.
+--------------------------------------
  This is the content of P.
 --------------------------------------+
  This is anonymous text after the P.  |
 --------------------------------------+
这不同于< BODY style =“display:block;”> ;:
+--------------------------------------+
| This is anonymous text before the P. |
|                                      |
| This is the content of P.            |
|                                      |
| This is anonymous text after the P.  |
+--------------------------------------+
今天关于CSS display 属性详解和css中display属性的介绍到此结束,谢谢您的阅读,有关(OK) Android graphic (12)—display 上层相关概念、关系 - mLogicalDisplays.get (Display.DEFAULT_DISPLAY)、CS5212AN 设计 Display to Vga 高清转接器产品 | Display to Vga 高清 1080P 转接线产品、css float 属性详解、css – display:block inside display:inline等更多相关知识的信息可以在本站进行查询。
本文标签:


