对于想了解ApacheShiro和SSO的读者,本文将提供新的信息,并且为您提供关于ApacheShiro、ApacheShiro(五)-登录认证和权限管理ssm、ApacheShiroArchite
对于想了解Apache Shiro和SSO的读者,本文将提供新的信息,并且为您提供关于Apache Shiro、Apache Shiro (五)- 登录认证和权限管理 ssm、Apache Shiro Architecture、Apache Shiro 使用手册的有价值信息。
本文目录一览:- Apache Shiro和SSO
- Apache Shiro
- Apache Shiro (五)- 登录认证和权限管理 ssm
- Apache Shiro Architecture
- Apache Shiro 使用手册

Apache Shiro和SSO
Apache Shiro是一个Java安全框架并支持SSO。 我有多个子域,每个子域都有单独的应用程序运行。 我如何使用Apache Shiro网页filter(或任何其他)来提供单点login。
在使用Apache Shiro之前,我是否需要SSO服务器或服务(如CAS?)? 或者Apache Shiro不需要SSO服务器或服务(如CAS)?
谢谢
自定义404错误与Apache的问题
如何让Apache发送500的PHP错误的情况下?
URL重写和redirect(使用数据库数据)
让Rails 3和Passenger在CentOS 5.4上工作 – Apache错误
CentOS Subversion,基本身份validation密码文件不起作用
如何使Apache mod_deflate和传输编码:分块一起工作?
有没有其他的主机文件从多台PC访问虚拟主机?
WAMP 2.4上的Mod_rewrite
检查Web服务器,并且不从同一台服务器上的configuration文件parsing端口80和端口8080
Apache文件所有权/组
我认为这对你有用。
您可以专注于SSO方面,并将Stormpath特定的配置放在一边。
我不是四郎的专家,但我会尽力帮助你。
根据我的理解,Shiro不提供开箱即用的SSO服务。 您需要使用CAS过滤器作为SSO服务。 请看下面的页面来解释如何定义Shiro CasFilter: http ://shiro.apache.org/cas.html
总结
以上是小编为你收集整理的Apache Shiro和SSO全部内容。
如果觉得小编网站内容还不错,欢迎将小编网站推荐给好友。

Apache Shiro
- Apache Shiro是一个强大且易用的Java安全框架,执行身份验证、授权、密码学和会话管理。
- 使用Shiro的易于理解的API,您可以快速、轻松地获得任何应用程序,从最小的移动应用程序到最大的网络和企业应用程序。
Shiro 主要分为两个部分就是认证和授权,
- 在个人感觉来看就是查询数据库做相应的判断而已,
- Shiro只是一个框架而已,其中的内容需要自己的去构建,前后是自己的,中间是Shiro帮我们去搭建和配置好的
- 个人认为需要看一下其中的一些源码,更有帮助的深入的去了解Shiro的原理。
Shiro有三大核心组件:
Subject:即当前用户
- 在权限管理的应用程序里往往需要知道谁能够操作什么,谁拥有操作该程序的权利,shiro中则需要通过Subject来提供基础的当前用户信息
- 所有的Subject都要绑定到SecurityManager上,与Subject的交互实际上是被转换为与SecurityManager的交互。
SecurityManager:即所有Subject的管理者
- 这是Shiro框架的核心组件,可以把他看做是一个Shiro框架的全局管理组件,用于调度各种Shiro框架的服务。
- 作用类似于SpringMVC中的DispatcherServlet,用于拦截所有请求并进行处理。
Realm:Realm是用户的信息认证器和用户的权限人证器
- 我们需要自己来实现Realm来自定义的管理我们自己系统内部的权限规则。
- SecurityManager要验证用户,需要从Realm中获取用户。
- 可以把Realm看做是数据源。
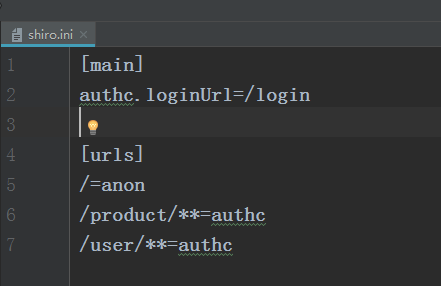
编写shiro配置文件
- 在resources目录下编写shiro配置文件,shiro.ini
Shiro+MySQL动态权限验证
- 在resources文件夹下创建配置文件shiro-mysql.ini:
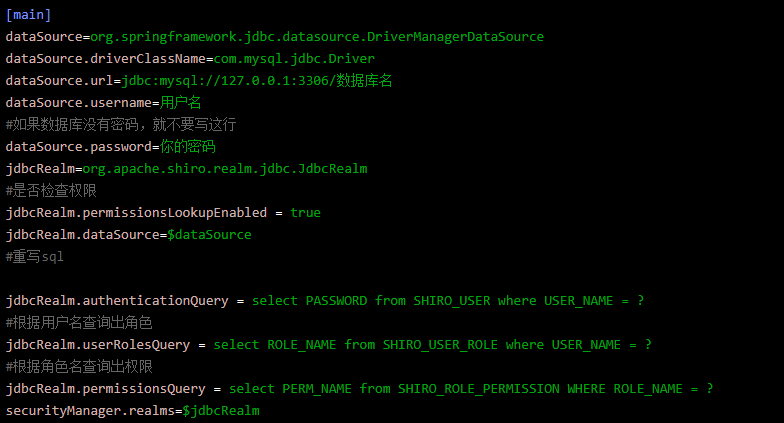
- 注意sql语句,每次只查询一个shiro要求查询的字段,如果写select *就会报错了。
- ini配置文件要求必须是key=value的形式,
- 如果有些人没有设置数据库的密码,就不要写对应的配置。
- 只写”dataSource.password=”等号右面没有值会报错。

其权限过滤器及配置释义:
- anon:
- 例子/admins/**=anon 没有参数,表示可以匿名使用。
- authc:
- 例如/admins/user/**=authc表示需要认证(登录)才能使用,没有参数
- roles(角色):
- 例子/admins/user/**=roles[admin],参数可以写多个,参数之间用逗号分割,当有多个参数时,例如admins/user/**=roles["admin,guest"],每个参数通过才算通过,相当于hasAllRoles()方法。
- perms(权限):
- 例子/admins/user/**=perms[add],参数可以写多个,例如/admins/user/**=perms["add, modify"],当有多个参数时必须每个参数都通过才通过,想当于isPermitedAll()方法。
- rest:
- 例子/admins/user/**=rest[user],根据请求的方法,相当于/admins/user/**=perms[user:method] ,其中method为post,get,delete等。
- port:
- 例子/admins/user/**=port[8081],当请求的url的端口不是8081是跳转到schemal://serverName:8081?queryString,其中schmal是协议http或https等,serverName是你访问的host,8081是url配置里port的端口,queryString是你访问的url里的问号(?)后面的参数。
- authcBasic:
- 例如/admins/user/**=authcBasic没有参数.表示httpBasic认证
- ssl:
- 例子/admins/user/**=ssl没有参数,表示安全的url请求,协议为https
- user:
- 例如/admins/user/**=user没有参数表示必须存在用户,当登入操作时不做检查
- 例如/admins/user/**=user没有参数表示必须存在用户,当登入操作时不做检查
- 登录认证和权限管理 ssm")
Apache Shiro (五)- 登录认证和权限管理 ssm
创建一个 web 动态项目

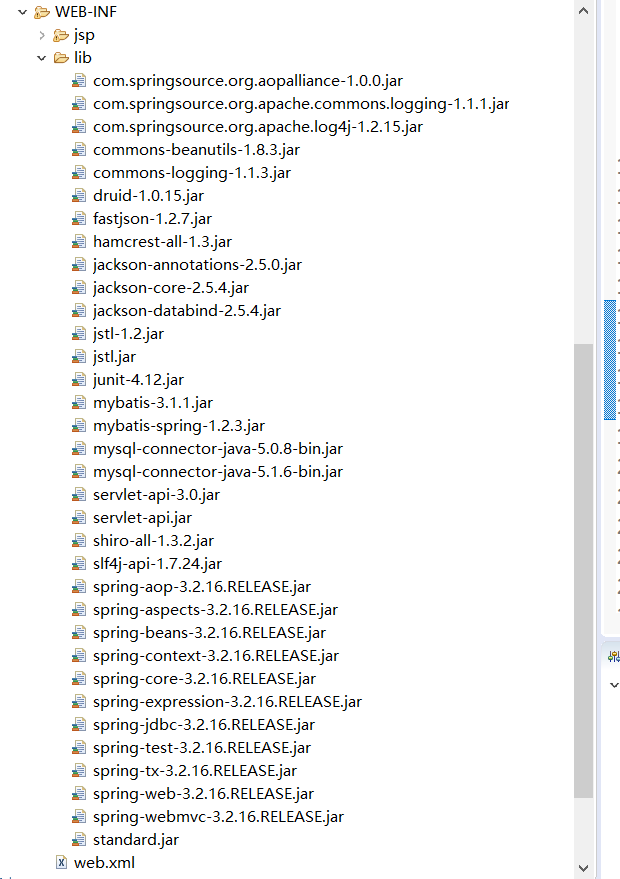
jar 包
web.xml
web.xml 做了如下几件事情
1. 指定 spring 的配置文件有两个
1 applicationContext.xml: 用于链接数据库的
2 applicationContext-shiro.xml: 用于配置shiro的
2. 指定 springmvc 的配置文件
1 springMVC.xml3. 使用 shiro 过滤器
1 <filter-class>org.springframework.web.filter.DelegatingFilterProxy</filter-class>

 1 <?xml version="1.0" encoding="UTF-8"?>
 2 <web-app xmlns:xsi="http://www.w3.org/2001/XMLSchema-instance"
 3          xmlns="http://java.sun.com/xml/ns/javaee"
 4          xmlns:web="http://java.sun.com/xml/ns/javaee"
 5          xsi:schemaLocation="http://java.sun.com/xml/ns/javaee http://java.sun.com/xml/ns/javaee/web-app_2_5.xsd" version="2.5">
 6
 7     <!-- spring的配置文件-->
 8     <context-param>
 9         <param-name>contextConfigLocation</param-name>
10         <param-value>
11             classpath:applicationContext.xml,
12             classpath:applicationContext-shiro.xml
13         </param-value>
14     </context-param>
15     <listener>
16         <listener-class>org.springframework.web.context.ContextLoaderListener</listener-class>
17     </listener>
18
19     <!-- spring mvc核心:分发servlet -->
20     <servlet>
21         <servlet-name>mvc-dispatcher</servlet-name>
22         <servlet-class>org.springframework.web.servlet.DispatcherServlet</servlet-class>
23         <!-- spring mvc的配置文件 -->
24         <init-param>
25             <param-name>contextConfigLocation</param-name>
26             <param-value>classpath:springMVC.xml</param-value>
27         </init-param>
28         <load-on-startup>1</load-on-startup>
29     </servlet>
30     <servlet-mapping>
31         <servlet-name>mvc-dispatcher</servlet-name>
32         <url-pattern>/</url-pattern>
33     </servlet-mapping>
34
35     <!-- Shiro配置 -->
36     <filter>
37         <filter-name>shiroFilter</filter-name>
38         <filter-class>org.springframework.web.filter.DelegatingFilterProxy</filter-class>
39         <init-param>
40             <param-name>targetFilterLifecycle</param-name>
41             <param-value>true</param-value>
42         </init-param>
43     </filter>
44     <filter-mapping>
45         <filter-name>shiroFilter</filter-name>
46         <url-pattern>/*</url-pattern>
47     </filter-mapping>
48
49 </web-app>applicationContext.xml
2. 扫描 mybatis 的 mapper 什么的,虽然目前还没有提供 mapper 类


 1 <?xml version="1.0" encoding="UTF-8"?>
 2 <beans xmlns="http://www.springframework.org/schema/beans"
 3     xmlns:xsi="http://www.w3.org/2001/XMLSchema-instance" xmlns:aop="http://www.springframework.org/schema/aop"
 4     xmlns:tx="http://www.springframework.org/schema/tx" xmlns:jdbc="http://www.springframework.org/schema/jdbc"
 5     xmlns:context="http://www.springframework.org/schema/context"
 6     xmlns:mvc="http://www.springframework.org/schema/mvc"
 7     xsi:schemaLocation="
 8      http://www.springframework.org/schema/context http://www.springframework.org/schema/context/spring-context-3.0.xsd
 9      http://www.springframework.org/schema/beans http://www.springframework.org/schema/beans/spring-beans-3.0.xsd
10      http://www.springframework.org/schema/jdbc http://www.springframework.org/schema/jdbc/spring-jdbc-3.0.xsd
11      http://www.springframework.org/schema/tx http://www.springframework.org/schema/tx/spring-tx-3.0.xsd
12      http://www.springframework.org/schema/aop http://www.springframework.org/schema/aop/spring-aop-3.0.xsd
13      http://www.springframework.org/schema/mvc http://www.springframework.org/schema/mvc/spring-mvc.xsd">
14
15    <context:annotation-config />
16     <context:component-scan base-package="com.how2java.service" />
17
18     <bean id="dataSource" class="org.springframework.jdbc.datasource.DriverManagerDataSource">
19       <property name="driverClassName">
20           <value>com.mysql.jdbc.Driver</value>
21       </property>
22       <property name="url">
23           <value>jdbc:mysql://localhost:3306/shiro?characterEncoding=UTF-8</value>
24
25       </property>
26       <property name="username">
27           <value>root</value>
28       </property>
29       <property name="password">
30           <value>admin</value>
31       </property>
32     </bean>
33
34     <bean id="sqlSession" class="org.mybatis.spring.SqlSessionFactoryBean">
35         <property name="typeAliasesPackage" value="com.how2java.pojo" />
36         <property name="dataSource" ref="dataSource"/>
37         <property name="mapperLocations" value="classpath:com/how2java/mapper/*.xml"/>
38     </bean>
39
40     <bean class="org.mybatis.spring.mapper.MapperScannerConfigurer">
41         <property name="basePackage" value="com.how2java.mapper"/>
42     </bean>
43
44 </beans>applicationContext-shiro.xml
提供 shiro 的相关配置,简单的说,就是把 shiro.ini 里的内容搬到这个 xml 文件里面来了,只是写法不同。


 1 <?xml version="1.0" encoding="UTF-8"?>
 2 <beans xmlns:xsi="http://www.w3.org/2001/XMLSchema-instance"
 3     xmlns="http://www.springframework.org/schema/beans" xmlns:util="http://www.springframework.org/schema/util"
 4     xmlns:context="http://www.springframework.org/schema/context" xmlns:p="http://www.springframework.org/schema/p"
 5     xmlns:tx="http://www.springframework.org/schema/tx" xmlns:mvc="http://www.springframework.org/schema/mvc"
 6     xmlns:aop="http://www.springframework.org/schema/aop"
 7     xsi:schemaLocation="http://www.springframework.org/schema/beans
 8     http://www.springframework.org/schema/beans/spring-beans-4.0.xsd http://www.springframework.org/schema/tx
 9     http://www.springframework.org/schema/tx/spring-tx-4.0.xsd http://www.springframework.org/schema/context
10     http://www.springframework.org/schema/context/spring-context-4.0.xsd http://www.springframework.org/schema/mvc
11     http://www.springframework.org/schema/mvc/spring-mvc.xsd http://www.springframework.org/schema/aop
12     http://www.springframework.org/schema/aop/spring-aop-4.0.xsd http://www.springframework.org/schema/util
13     http://www.springframework.org/schema/util/spring-util.xsd">
14
15     <!-- 配置shiro的过滤器工厂类,id- shiroFilter要和我们在web.xml中配置的过滤器一致 -->
16     <bean id="shiroFilter" class="org.apache.shiro.spring.web.ShiroFilterFactoryBean">
17         <!-- 调用我们配置的权限管理器 -->
18         <property name="securityManager" ref="securityManager" />
19         <!-- 配置我们的登录请求地址 -->
20         <property name="loginUrl" value="/login" />
21         <!-- 如果您请求的资源不再您的权限范围,则跳转到/403请求地址 -->
22         <property name="unauthorizedUrl" value="/unauthorized" />
23         <!-- 退出 -->
24         <property name="filters">
25             <util:map>
26                 <entry key="logout" value-ref="logoutFilter" />
27             </util:map>
28         </property>
29         <!-- 权限配置 -->
30         <property name="filterChainDefinitions">
31             <value>
32                 <!-- anon表示此地址不需要任何权限即可访问 -->
33                 /login=anon
34                 /index=anon
35                 /static/**=anon
36                 /doLogout=logout
37                 <!--所有的请求(除去配置的静态资源请求或请求地址为anon的请求)都要通过登录验证,如果未登录则跳到/login -->
38                 /** = authc
39             </value>
40         </property>
41     </bean>
42     <!-- 退出过滤器 -->
43     <bean id="logoutFilter" class="org.apache.shiro.web.filter.authc.LogoutFilter">
44         <property name="redirectUrl" value="/index" />
45     </bean>
46
47     <!-- 会话ID生成器 -->
48     <bean id="sessionIdGenerator"
49         class="org.apache.shiro.session.mgt.eis.JavaUuidSessionIdGenerator" />
50     <!-- 会话Cookie模板 关闭浏览器立即失效 -->
51     <bean id="sessionIdCookie" class="org.apache.shiro.web.servlet.SimpleCookie">
52         <constructor-arg value="sid" />
53         <property name="httpOnly" value="true" />
54         <property name="maxAge" value="-1" />
55     </bean>
56     <!-- 会话DAO -->
57     <bean id="sessionDAO"
58         class="org.apache.shiro.session.mgt.eis.EnterpriseCacheSessionDAO">
59         <property name="sessionIdGenerator" ref="sessionIdGenerator" />
60     </bean>
61     <!-- 会话验证调度器,每30分钟执行一次验证 ,设定会话超时及保存 -->
62     <bean name="sessionValidationScheduler"
63         class="org.apache.shiro.session.mgt.ExecutorServiceSessionValidationScheduler">
64         <property name="interval" value="1800000" />
65         <property name="sessionManager" ref="sessionManager" />
66     </bean>
67     <!-- 会话管理器 -->
68     <bean id="sessionManager"
69         class="org.apache.shiro.web.session.mgt.DefaultWebSessionManager">
70         <!-- 全局会话超时时间(单位毫秒),默认30分钟 -->
71         <property name="globalSessionTimeout" value="1800000" />
72         <property name="deleteInvalidSessions" value="true" />
73         <property name="sessionValidationSchedulerEnabled" value="true" />
74         <property name="sessionValidationScheduler" ref="sessionValidationScheduler" />
75         <property name="sessionDAO" ref="sessionDAO" />
76         <property name="sessionIdCookieEnabled" value="true" />
77         <property name="sessionIdCookie" ref="sessionIdCookie" />
78     </bean>
79
80     <!-- 安全管理器 -->
81     <bean id="securityManager" class="org.apache.shiro.web.mgt.DefaultWebSecurityManager">
82         <property name="realm" ref="databaseRealm" />
83         <property name="sessionManager" ref="sessionManager" />
84     </bean>
85     <!-- 相当于调用SecurityUtils.setSecurityManager(securityManager) -->
86     <bean
87         class="org.springframework.beans.factory.config.MethodInvokingFactoryBean">
88         <property name="staticMethod"
89             value="org.apache.shiro.SecurityUtils.setSecurityManager" />
90         <property name="arguments" ref="securityManager" />
91     </bean>
92
93     <bean id="databaseRealm" class="com.how2java.realm.DatabaseRealm">
94     </bean>
95
96     <!-- 保证实现了Shiro内部lifecycle函数的bean执行 -->
97     <bean id="lifecycleBeanPostProcessor" class="org.apache.shiro.spring.LifecycleBeanPostProcessor" />
98 </beans>springMVC.xml
1. springmvc 的基本配置
2. 增加了对 shiro 的支持
这样可以在控制器 Controller 上,使用像 @RequireRole 这样的注解,来表示某个方法必须有相关的角色才能访问
3. 指定了异常处理类 DefaultExceptionHandler,这样当访问没有权限的资源的时候,就会跳到统一的页面去显示错误信息


 1 <?xml version="1.0" encoding="UTF-8"?>
 2 <beans xmlns="http://www.springframework.org/schema/beans"
 3     xmlns:xsi="http://www.w3.org/2001/XMLSchema-instance" xmlns:aop="http://www.springframework.org/schema/aop"
 4     xmlns:tx="http://www.springframework.org/schema/tx" xmlns:jdbc="http://www.springframework.org/schema/jdbc"
 5     xmlns:context="http://www.springframework.org/schema/context"
 6     xmlns:mvc="http://www.springframework.org/schema/mvc"
 7     xsi:schemaLocation="http://www.springframework.org/schema/jdbc http://www.springframework.org/schema/jdbc/spring-jdbc-3.0.xsd
 8         http://www.springframework.org/schema/aop http://www.springframework.org/schema/aop/spring-aop-3.0.xsd
 9         http://www.springframework.org/schema/beans http://www.springframework.org/schema/beans/spring-beans-3.0.xsd
10         http://www.springframework.org/schema/context http://www.springframework.org/schema/context/spring-context-3.0.xsd
11         http://www.springframework.org/schema/tx http://www.springframework.org/schema/tx/spring-tx-3.0.xsd
12         http://www.springframework.org/schema/mvc http://www.springframework.org/schema/mvc/spring-mvc-3.2.xsd">
13
14     <context:annotation-config/>
15
16     <context:component-scan base-package="com.how2java.controller">
17           <context:include-filter type="annotation"
18           expression="org.springframework.stereotype.Controller"/>
19     </context:component-scan>
20
21     <mvc:annotation-driven />
22
23     <mvc:default-servlet-handler />
24
25     <bean
26         class="org.springframework.web.servlet.view.InternalResourceViewResolver">
27         <property name="viewClass"
28             value="org.springframework.web.servlet.view.JstlView" />
29         <property name="prefix" value="/WEB-INF/jsp/" />
30         <property name="suffix" value=".jsp" />
31     </bean>
32
33     <!--启用shiro注解 -->
34     <bean
35         class="org.springframework.aop.framework.autoproxy.DefaultAdvisorAutoProxyCreator"
36         depends-on="lifecycleBeanPostProcessor">
37         <property name="proxyTargetClass" value="true" />
38     </bean>
39     <bean
40         class="org.apache.shiro.spring.security.interceptor.AuthorizationAttributeSourceAdvisor">
41         <property name="securityManager" ref="securityManager" />
42     </bean>
43
44     <!-- 控制器异常处理 -->
45     <bean id="exceptionHandlerExceptionResolver" class="org.springframework.web.servlet.mvc.method.annotation.ExceptionHandlerExceptionResolver">
46     </bean>
47     <bean class="com.how2java.exception.DefaultExceptionHandler"/>
48
49 </beans>log4j.properties
1 # Global logging configuration
2 log4j.rootLogger=ERROR, stdout
3 # MyBatis logging configuration...
4 log4j.logger.com.how2java=TRACE
5 # Console output...
6 log4j.appender.stdout=org.apache.log4j.ConsoleAppender
7 log4j.appender.stdout.layout=org.apache.log4j.PatternLayout
8 log4j.appender.stdout.layout.ConversionPattern=%5p [%t] - %m%n
PageController
因为使用 ssm,所以 jsp 通常都会放在 WEB-INF/jsp 下面,而这个位置是无法通过浏览器直接访问的,所以就会专门做这么一个类,便于访问这些 jsp。
比如要访问 WEB-INF/jsp/index.jsp 文件,那么就通过 /index 这个路径来访问。
这个类还有两点需要注意:
1. /login 只支持 get 方式。 post 方式是后续用来进行登录行为的,这里的 get 方式仅仅用于显示登录页面
2. 权限注解:
通过注解: @RequiresRoles ("admin") 指明了 访问 deleteProduct 需要角色 "admin"
通过注解:@RequiresPermissions ("deleteOrder") 指明了 访问 deleteOrder 需要权限 "deleteOrder"


 1 package com.how2java.controller;
 2
 3 import org.apache.shiro.authz.annotation.RequiresPermissions;
 4 import org.apache.shiro.authz.annotation.RequiresRoles;
 5 import org.springframework.stereotype.Controller;
 6 import org.springframework.web.bind.annotation.RequestMapping;
 7 import org.springframework.web.bind.annotation.RequestMethod;
 8
 9 //专门用于显示页面的控制器
10 @Controller
11 @RequestMapping("")
12 public class PageController {
13
14     @RequestMapping("index")
15     public String index(){
16         return "index";
17     }
18
19     @RequiresPermissions("deleteOrder")
20     @RequestMapping("deleteOrder")
21     public String deleteOrder(){
22         return "deleteOrder";
23     }
24     @RequiresRoles("admin")
25     @RequestMapping("deleteProduct")
26     public String deleteProduct(){
27         return "deleteProduct";
28     }
29     @RequestMapping("listProduct")
30     public String listProduct(){
31         return "listProduct";
32     }
33
34     @RequestMapping(value="/login",method=RequestMethod.GET)
35     public String login(){
36         return "login";
37     }
38     @RequestMapping("unauthorized")
39     public String noPerms(){
40         return "unauthorized";
41     }
42
43 }index.jsp
index 页面


 1 <%@ page language="java" contentType="text/html; charset=UTF-8"
 2     pageEncoding="UTF-8"%>
 3 <html>
 4 <head>
 5 <meta http-equiv="Content-Type" content="text/html; charset=UTF-8">
 6
 7 <%@ taglib uri="http://java.sun.com/jsp/jstl/core" prefix="c"%>
 8
 9 <link rel="stylesheet" type="text/css" href="static/css/style.css" />
10
11 </head>
12 <body>
13
14 <div class="workingroom">
15     <div class="loginDiv">
16
17     <c:if test="${empty subject.principal}">
18         <a href="login">登录</a><br>
19     </c:if>
20     <c:if test="${!empty subject.principal}">
21         <span class="desc">你好,${subject.principal},</span>
22         <a href="doLogout">退出</a><br>
23     </c:if>
24
25     <a href="listProduct">查看产品</a><span class="desc">(登录后才可以查看) </span><br>
26     <a href="deleteProduct">删除产品</a><span  class="desc">(要有产品管理员角色, zhang3没有,li4 有) </span><br>
27     <a href="deleteOrder">删除订单</a><span class="desc">(要有删除订单权限, zhang3有,li4没有) </span><br>
28 </div>
29
30 </body>
31 </html>listProduct.jsp
需要登录才能访问的页面


 1 <%@ page language="java" contentType="text/html; charset=UTF-8"
 2     pageEncoding="UTF-8" import="java.util.*"%>
 3
 4 <!DOCTYPE html>
 5
 6 <meta http-equiv="Content-Type" content="text/html; charset=UTF-8">
 7 <link rel="stylesheet" type="text/css" href="static/css/style.css" />
 8
 9 <div class="workingroom">
10
11     listProduct.jsp ,能进来,就表示已经登录成功了
12     <br>
13     <a href="#" onClick="javascript:history.back()">返回</a>
14 </div>deleteProduct.jsp
需要角色才能访问的页面


 1 <%@ page language="java" contentType="text/html; charset=UTF-8"
 2     pageEncoding="UTF-8" import="java.util.*"%>
 3
 4 <!DOCTYPE html>
 5
 6 <meta http-equiv="Content-Type" content="text/html; charset=UTF-8">
 7 <link rel="stylesheet" type="text/css" href="static/css/style.css" />
 8
 9 <div class="workingroom">
10
11     deleteProduct.jsp,能进来<br>就表示拥有 productManager 角色
12     <br>
13     <a href="#" onClick="javascript:history.back()">返回</a>
14 </div>deleteOrder.jsp
需要权限 deleteOrder 才能访问的页面


 1 <%@ page language="java" contentType="text/html; charset=UTF-8"
 2     pageEncoding="UTF-8" import="java.util.*"%>
 3
 4 <!DOCTYPE html>
 5
 6 <meta http-equiv="Content-Type" content="text/html; charset=UTF-8">
 7 <link rel="stylesheet" type="text/css" href="static/css/style.css" />
 8
 9 <div class="workingroom">
10
11     deleteOrder.jsp ,能进来,就表示有deleteOrder权限
12     <br>
13     <a href="#" onClick="javascript:history.back()">返回</a>
14 </div>login.jsp
登陆页面


 1 <%@ page language="java" contentType="text/html; charset=UTF-8"
 2     pageEncoding="UTF-8" import="java.util.*"%>
 3
 4 <!DOCTYPE html>
 5
 6 <meta http-equiv="Content-Type" content="text/html; charset=UTF-8">
 7 <link rel="stylesheet" type="text/css" href="static/css/style.css" />
 8
 9 <div class="workingroom">
10
11 <div class="errorInfo">${error}</div>
12     <form action="login" method="post">
13         账号: <input type="text" name="name"> <br>
14         密码: <input type="password" name="password"> <br>
15         <br>
16         <input type="submit" value="登录">
17         <br>
18         <br>
19     <div>
20         <span class="desc">账号:zhang3 密码:12345 角色:admin</span><br>
21         <span class="desc">账号:li4 密码:abcde 角色:productManager</span><br>
22     </div>
23
24     </form>
25 </div>unauthorized.jsp
没有角色,没有权限都会跳转到这个页面来


 1 <%@ page language="java" contentType="text/html; charset=UTF-8"
 2     pageEncoding="UTF-8" import="java.util.*"%>
 3
 4 <!DOCTYPE html>
 5
 6 <meta http-equiv="Content-Type" content="text/html; charset=UTF-8">
 7 <link rel="stylesheet" type="text/css" href="static/css/style.css" />
 8
 9 <div class="workingroom">
10
11     权限不足,具体原因:${ex.message}
12     <br>
13     <a href="#" onClick="javascript:history.back()">返回</a>
14 </div>style.css
样式文件


 1 span.desc{
 2     margin-left:20px;
 3     color:gray;
 4 }
 5 div.workingroom{
 6     margin:200px auto;
 7     width:400px;
 8 }
 9 div.workingroom a{
10     display:inline-block;
11     margin-top:20px;
12 }
13 div.loginDiv{
14     text-align: left;
15 }
16 div.errorInfo{
17     color:red;
18     font-size:0.65em;
19 }User 一套
一套是指实体类,Mapper,xml 文件, Service 接口,Service 实现类
需要说明的是 UserMapper 是得到一个 User 对象,但是在 UserService 里又返回的是这个对象的 password 属性,这样做是为了和前面教程里 DAO 里的做法保持一直
1.User.java


 1 package com.how2java.pojo;
 2
 3 public class User {
 4
 5     private int id;
 6     private String name;
 7     private String password;
 8     public String getName() {
 9         return name;
10     }
11     public void setName(String name) {
12         this.name = name;
13     }
14     public String getPassword() {
15         return password;
16     }
17     public void setPassword(String password) {
18         this.password = password;
19     }
20     public int getId() {
21         return id;
22     }
23     public void setId(int id) {
24         this.id = id;
25     }
26
27 }2.UserMapper.java


1 package com.how2java.mapper;
2
3 import com.how2java.pojo.User;
4
5 public interface UserMapper {
6
7     public User getByName(String name);
8 }3.User.xml


 1 <?xml version="1.0" encoding="UTF-8"?>
 2 <!DOCTYPE mapper
 3     PUBLIC "-//mybatis.org//DTD Mapper 3.0//EN"
 4     "http://mybatis.org/dtd/mybatis-3-mapper.dtd">
 5
 6     <mapper namespace="com.how2java.mapper.UserMapper">
 7         <select id="getByName"  parameterType="string" resultType="User">
 8             select * from user where name = #{0}
 9         </select>
10 </mapper>4.UserService.java


1 package com.how2java.service;
2
3 public interface UserService {
4     public String getPassword(String name);
5 }5.UserServiceImpl.java


 1 package com.how2java.service.impl;
 2
 3 import org.springframework.beans.factory.annotation.Autowired;
 4 import org.springframework.stereotype.Service;
 5
 6 import com.how2java.mapper.UserMapper;
 7 import com.how2java.pojo.User;
 8 import com.how2java.service.UserService;
 9
10 @Service
11 public class UserServiceImpl  implements UserService{
12
13     @Autowired UserMapper userMapper;
14
15     @Override
16     public String getPassword(String name) {
17         // TODO Auto-generated method stub
18         User u  = userMapper.getByName(name);
19         if(null==u)
20             return null;
21         return u.getPassword();
22     }
23
24 }Role 一套
Role 一套,与 User 一套类似的,RoleMapper 返回的是 Role 的集合,而 RoleService 里返回的就是 String 的集合了
1.Role.java


 1 package com.how2java.pojo;
 2
 3 public class Role {
 4     private int id;
 5     private String name;
 6     public int getId() {
 7         return id;
 8     }
 9     public void setId(int id) {
10         this.id = id;
11     }
12     public String getName() {
13         return name;
14     }
15     public void setName(String name) {
16         this.name = name;
17     }
18     @Override
19     public String toString() {
20         return "Role [id=" + id + ", name=" + name + "]";
21     }
22
23 }2.RoleMapper.java


 1 package com.how2java.mapper;
 2
 3 import java.util.List;
 4
 5 import com.how2java.pojo.Role;
 6
 7 public interface RoleMapper {
 8     public List<Role> listRolesByUserName(String userName);
 9
10 }3.Role.xml


 1 <?xml version="1.0" encoding="UTF-8"?>
 2 <!DOCTYPE mapper
 3     PUBLIC "-//mybatis.org//DTD Mapper 3.0//EN"
 4     "http://mybatis.org/dtd/mybatis-3-mapper.dtd">
 5
 6     <mapper namespace="com.how2java.mapper.RoleMapper">
 7         <select id="listRolesByUserName"  parameterType="string" resultType="Role">
 8             select r.id, r.name from user u
 9                 left join user_role ur
10                     on u.id = ur.uid
11                 left join Role r
12                     on r.id = ur.rid
13             where u.name = #{0}
14         </select>
15 </mapper>4.RoleService.java


1 package com.how2java.service;
2
3 import java.util.Set;
4
5 public interface RoleService {
6     public Set<String> listRoles(String userName);
7 }5.RoleServiceImpl


 1 package com.how2java.service.impl;
 2
 3 import java.util.HashSet;
 4 import java.util.List;
 5 import java.util.Set;
 6
 7 import org.springframework.beans.factory.annotation.Autowired;
 8 import org.springframework.stereotype.Service;
 9
10 import com.how2java.mapper.RoleMapper;
11 import com.how2java.pojo.Role;
12 import com.how2java.service.RoleService;
13
14 @Service
15 public class RoleServiceImpl  implements RoleService{
16
17     @Autowired RoleMapper roleMapper;
18
19     @Override
20     public Set<String> listRoles(String userName) {
21         List<Role> roles = roleMapper.listRolesByUserName(userName);
22         Set<String> result = new HashSet<>();
23         for (Role role: roles) {
24             result.add(role.getName());
25         }
26         return result;
27     }
28 }Permission 一套
Permission 一套,与 User 一套类似的,PermissionMapper 返回的是 Permission 的集合,而 PermissionService 里返回的就是 String 的集合了
1.Permission.java


 1 package com.how2java.pojo;
 2
 3 public class Permission {
 4     private int id;
 5     private String name;
 6     public int getId() {
 7         return id;
 8     }
 9     public void setId(int id) {
10         this.id = id;
11     }
12     public String getName() {
13         return name;
14     }
15     public void setName(String name) {
16         this.name = name;
17     }
18     @Override
19     public String toString() {
20         return "Permission [id=" + id + ", name=" + name + "]";
21     }
22
23 }2.PermissionMapper.java


 1 package com.how2java.mapper;
 2
 3 import java.util.List;
 4
 5 import com.how2java.pojo.Permission;
 6
 7 public interface PermissionMapper {
 8     public List<Permission> listPermissionsByUserName(String userName);
 9
10 }3.Permission.xml


 1 <?xml version="1.0" encoding="UTF-8"?>
 2 <!DOCTYPE mapper
 3     PUBLIC "-//mybatis.org//DTD Mapper 3.0//EN"
 4     "http://mybatis.org/dtd/mybatis-3-mapper.dtd">
 5
 6     <mapper namespace="com.how2java.mapper.PermissionMapper">
 7         <select id="listPermissionsByUserName"  parameterType="string" resultType="Permission">
 8             select p.id, p.name from user u
 9                 left join user_role ru
10                     on u.id = ru.uid left
11                 join role r
12                     on r.id = ru.rid
13                 left join role_permission rp
14                     on r.id = rp.rid
15                 left join permission p
16                     on p.id = rp.pid
17             where u.name =#{0}
18         </select>
19 </mapper>4.PermissionService.java


1 package com.how2java.service;
2
3 import java.util.Set;
4
5 public interface PermissionService {
6     public Set<String> listPermissions(String userName);
7 }5.PermissionServiceImpl.java


 1 package com.how2java.service.impl;
 2
 3 import java.util.HashSet;
 4 import java.util.List;
 5 import java.util.Set;
 6
 7 import org.springframework.beans.factory.annotation.Autowired;
 8 import org.springframework.stereotype.Service;
 9
10 import com.how2java.mapper.PermissionMapper;
11 import com.how2java.pojo.Permission;
12 import com.how2java.service.PermissionService;
13
14 @Service
15 public class PermissionServiceImpl  implements PermissionService{
16
17     @Autowired PermissionMapper permissionMapper;
18
19     @Override
20     public Set<String> listPermissions(String userName) {
21         List<Permission> permissions = permissionMapper.listPermissionsByUserName(userName);
22         Set<String> result = new HashSet<>();
23         for (Permission permission: permissions) {
24             result.add(permission.getName());
25         }
26         return result;
27     }
28 }LoginController
进行登录的控制器,和 LoginServlet 一样,获取账号密码进行验证,如果成功了就客户端跳转到 index, 否则就返回 login.jsp 页面。
需要注意的是,这里用的是 post 方式
@RequestMapping(value="/login",method=RequestMethod.POST)
区别于 PageController 里用 get 方式的 login


 1 package com.how2java.controller;
 2
 3 import org.apache.shiro.SecurityUtils;
 4 import org.apache.shiro.authc.AuthenticationException;
 5 import org.apache.shiro.authc.UsernamePasswordToken;
 6 import org.apache.shiro.session.Session;
 7 import org.apache.shiro.subject.Subject;
 8 import org.springframework.stereotype.Controller;
 9 import org.springframework.ui.Model;
10 import org.springframework.web.bind.annotation.RequestMapping;
11 import org.springframework.web.bind.annotation.RequestMethod;
12
13 @Controller
14 @RequestMapping("")
15 public class LoginController {
16     @RequestMapping(value="/login",method=RequestMethod.POST)
17     public String login(Model model,String name, String password) {
18         Subject subject = SecurityUtils.getSubject();
19         UsernamePasswordToken token = new UsernamePasswordToken(name, password);
20         try {
21             subject.login(token);
22             Session session=subject.getSession();
23             session.setAttribute("subject", subject);
24             return "redirect:index";
25
26         } catch (AuthenticationException e) {
27             model.addAttribute("error", "验证失败");
28             return "login";
29         }
30     }
31
32 }DatabaseRealm
这里才是真正做登录验证和授权的地方
做法和 数据库支持 教程中的 DatabaseRealm 做法一模一样,区别只是在于把 DAO 换成了 Service
而这个 DatabaseRealm 的使用,是声明在 applicationContext-shiro.xml 中的:
<bean id="databaseRealm"></bean>
<bean id="securityManager"><property name="realm" ref="databaseRealm" /><property name="sessionManager" ref="sessionManager" /></bean>


 1 package com.how2java.realm;
 2
 3 import java.util.Set;
 4
 5 import org.apache.shiro.authc.AuthenticationException;
 6 import org.apache.shiro.authc.AuthenticationInfo;
 7 import org.apache.shiro.authc.AuthenticationToken;
 8 import org.apache.shiro.authc.SimpleAuthenticationInfo;
 9 import org.apache.shiro.authc.UsernamePasswordToken;
10 import org.apache.shiro.authz.AuthorizationInfo;
11 import org.apache.shiro.authz.SimpleAuthorizationInfo;
12 import org.apache.shiro.realm.AuthorizingRealm;
13 import org.apache.shiro.subject.PrincipalCollection;
14 import org.springframework.beans.factory.annotation.Autowired;
15
16 import com.how2java.service.PermissionService;
17 import com.how2java.service.RoleService;
18 import com.how2java.service.UserService;
19
20 public class DatabaseRealm extends AuthorizingRealm {
21
22     @Autowired
23     private UserService userService;
24     @Autowired
25     private RoleService roleService;
26     @Autowired
27     private PermissionService permissionService;
28
29     @Override
30     protected AuthorizationInfo doGetAuthorizationInfo(PrincipalCollection principalCollection) {
31         //能进入到这里,表示账号已经通过验证了
32         String userName =(String) principalCollection.getPrimaryPrincipal();
33         //通过service获取角色和权限
34         Set<String> permissions = permissionService.listPermissions(userName);
35         Set<String> roles = roleService.listRoles(userName);
36
37         //授权对象
38         SimpleAuthorizationInfo s = new SimpleAuthorizationInfo();
39         //把通过service获取到的角色和权限放进去
40         s.setStringPermissions(permissions);
41         s.setRoles(roles);
42         return s;
43     }
44
45     @Override
46     protected AuthenticationInfo doGetAuthenticationInfo(AuthenticationToken token) throws AuthenticationException {
47         //获取账号密码
48         UsernamePasswordToken t = (UsernamePasswordToken) token;
49         String userName= token.getPrincipal().toString();
50         String password= new String( t.getPassword());
51         //获取数据库中的密码
52         String passwordInDB = userService.getPassword(userName);
53
54         //如果为空就是账号不存在,如果不相同就是密码错误,但是都抛出AuthenticationException,而不是抛出具体错误原因,免得给破解者提供帮助信息
55         if(null==passwordInDB || !passwordInDB.equals(password))
56             throw new AuthenticationException();
57
58         //认证信息里存放账号密码, getName() 是当前Realm的继承方法,通常返回当前类名 :databaseRealm
59         SimpleAuthenticationInfo a = new SimpleAuthenticationInfo(userName,password,getName());
60         return a;
61     }
62
63 }DefaultExceptionHandler
最后是异常处理,当发生 UnauthorizedException 异常的时候,就表示访问了无授权的资源,那么就会跳转到 unauthorized.jsp,而在 unauthorized.jsp 中就会把错误信息通过变量 ex 取出来。
DefaultExceptionHandler 的使用,是声明在 springMVC.xml 的最后几行:
<bean id="exceptionHandlerExceptionResolver"></bean><bean/>


 1 package com.how2java.exception;
 2
 3 import org.apache.shiro.authz.UnauthorizedException;
 4 import org.springframework.http.HttpStatus;
 5 import org.springframework.web.bind.annotation.ControllerAdvice;
 6 import org.springframework.web.bind.annotation.ExceptionHandler;
 7 import org.springframework.web.bind.annotation.ResponseStatus;
 8 import org.springframework.web.context.request.NativeWebRequest;
 9 import org.springframework.web.servlet.ModelAndView;
10
11 @ControllerAdvice
12 public class DefaultExceptionHandler {
13     @ExceptionHandler({UnauthorizedException.class})
14     @ResponseStatus(HttpStatus.UNAUTHORIZED)
15     public ModelAndView processUnauthenticatedException(NativeWebRequest request, UnauthorizedException e) {
16         ModelAndView mv = new ModelAndView();
17         mv.addObject("ex", e);
18         mv.setViewName("unauthorized");
19         return mv;
20     }
21 }

Apache Shiro Architecture
原文链接
Apache Shiro''s design goals are to simplify application security by being intuitive and easy to use. Shiro''s core design models how most people think about application security - in the context of someone (or something) interacting with an application.
设计ApacheShiro的目的就是通过直观、易于使用的方式来简化应用程序安全性相关的开发。Shiro的核心设计模式和大多数人对应用程序安全性的理解一样:应用程序进行交互的某人(或某物)的上下文环境
Software applications are usually designed based on user stories. That is, you''ll often design user interfaces or service APIs based on how a user would (or should) interact with the software. For example, you might say, "If the user interacting with my application is logged in, I will show them a button they can click to view their account information. If they are not logged in, I will show a sign-up button."
通常,应用程序会基于用户的行为进行设计。也就是说,你可能经常基于用户行为来设计UI或者ServicAPI。例如:如果和我的应用程序打交道的用户处于已登录状态,那么将会显示一个按钮,点击这个按钮可以查看他的帐号信息;但是如果他们还没有登录,那么将会显一个登录按钮。
This example statement indicates that applications are largely written to satisfy user requirements and needs. Even if the ''user'' is another software system and not a human being, you still write code to reflect behavior based on who (or what) is currently interacting with your software.
上面这个例子说明应用程序开发者将会写大量的代码来满足用户需求。即使这个“用户”不是人类(比如说另外的软件系统),你需要书写代码才能将用户的形为反映到应用程序中。
Shiro reflects these concepts in its own design. By matching what is already intuitive for software developers, Apache Shiro remains intuitive and easy to use in practically any application.
Apache Shiro的这种理念反应在自己的设计中,通过将直观的概念暴露给开发人员,使得Apache Shiro在几乎所有的应用中都易于使用。
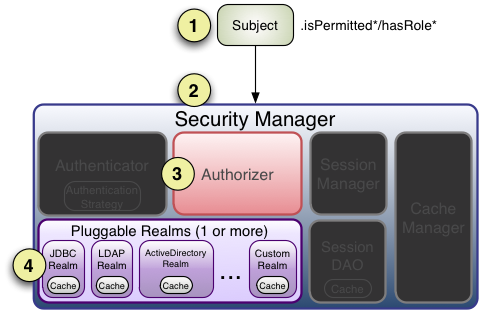
High-Level Overview(鸟瞰)
At the highest conceptual level, Shiro''s architecture has 3 primary concepts: the Subject, SecurityManager and Realms. The following diagram is a high-level overview of how these components interact, and we''ll cover each concept below:
Shiro最顶层的层次中,有3个主要的概念:Subject(主体),SecurityManager(安全管理器)和Realms(领域)。下图从最高层次展现了这些组件如何交互,下文会覆盖所有的概念:

Subject: As we''ve mentioned in our Tutorial, the Subject is essentially a security specific ''view'' of the the currently executing user. Whereas the word ''User'' often implies a human being, a Subject can be a person, but it could also represent a 3rd-party service, daemon account, cron job, or anything similar - basically anything that is currently interacting with the software.
主体:正如我们在Tutorial中提到的那样,Subject(主体)实质上是当前用户的具体的安全“视图”(翻译成映射是不是更好一点?),然而“用户”这个词语通常指代人类。Subject可能是一个人,但也可以指代第3方的Service,服务帐号,定时任务等任何与软件系统交互的东西。
Subject instances are all bound to (and require) a SecurityManager. When you interact with a Subject, those interactions translate to subject-specific interactions with the SecurityManager.
Subject的实例都会绑定到SecurityManager(也是必须的),当你和Subject交互时,实际上会被转换成与这个Subject相关的SecurityManager的交互。
SecurityManager: The SecurityManager is the heart of Shiro’s architecture and acts as a sort of ''umbrella’ object that coordinates its internal security components that together form an object graph. However, once the SecurityManager and its internal object graph is configured for an application, it is usually left alone and application developers spend almost all of their time with the Subject API
SecurityManager:SecurityManager处于Shiro架构的核心,同时扮演了一种“保护伞”的角色。它协调内部的各个安全组件,构成一张对象图。无论如何,一旦给应用程序配置好了SecurityManager以及它内部的对象图, 开发者就可以把它扔在一边,把大部分时间和精力花在使用SubjectAPI上面。
We will talk about the SecurityManager in detail later on, but it is important to realize that when you interact with a Subject, it is really the SecurityManager behind the scenes that does all the heavy lifting for any Subject security operation. This is reflected in the basic flow diagram above.
我们将会在后面讨论SecurityManager的细节,但是有一点很重要,你必须意识到当你和Subject打交道时,实际上是SecurityManager在后面做了所有的重活。这个流程反映在上面的图中了,可以参考理解。
Realms: Realms act as the ‘bridge’ or ‘connector’ between Shiro and your application’s security data. When it comes time to actually interact with security-related data like user accounts to perform authentication (login) and authorization (access control), Shiro looks up many of these things from one or more Realms configured for an application.
Realms(领域):Realm在Shiro和应用程序的安全性相关数据中间,扮演了一种“桥梁”或“连接”的角色。当需要获取用户帐户进行认证(登录)和授权(访问控制)操作时,Shiro会在应用程序的配置文件中查找一个或多个负责此事的Realm。
In this sense a Realm is essentially a security-specific DAO: it encapsulates connection details for data sources and makes the associated data available to Shiro as needed. When configuring Shiro, you must specify at least one Realm to use for authentication and/or authorization. The SecurityManager may be configured with multiple Realms, but at least one is required.
这一点来说,Realm本质上是一种安全相关的DAO:它封装了与数据源连接的细节,提供Shiro需要的与安全相关的数据。配置Shiro时,必须至少配置1个Realm用于认证、授权。SecurityManager可以配置多个Realm,但是必须至少配置1个。
Shiro provides out-of-the-box Realms to connect to a number of security data sources (aka directories) such as LDAP, relational databases (JDBC), text configuration sources like INI and properties files, and more. You can plug-in your own Realm implementations to represent custom data sources if the default Realms do not meet your needs.
Shiro提供一些现成的连接安全数据源的Realm实现,例如LDAP,数据库(JDBC),文本文件配置(ini、properties文件)等等。此外当这些现成的Realm不能满足你的需求时,你还可以嵌入你自己实现的Realm。
Like other internal components, the Shiro SecurityManager manages how Realms are used to acquire security and identity data to be represented as Subject instances.
和其它内部组件一样,Shiro的SecurityManager管理着Realms如何获取和验证安全数据,以及将这些数据重新展现为Subject的实例。
Detailed Architecture(详细的架构)
The following diagram shows Shiro''s core architectural concepts followed by short summaries of each:
下图展示了Shiro构架中的核心概念,接下来会简要的介绍每一个概念:

Subject (org.apache.shiro.subject.Subject)
A security-specific ''view'' of the entity (user, 3rd-party service, cron job, etc) currently interacting with the software.安全和Entity(实体)之间的映射,实体可以是用户,第3方Service,定时任务等。
SecurityManager (org.apache.shiro.mgt.SecurityManager)
As mentioned above, the SecurityManager is the heart of Shiro''s architecture. It is mostly an ''umbrella'' object that coordinates its managed components to ensure they work smoothly together. It also manages Shiro''s view of every application user, so it knows how to perform security operations per user.SecurityManager是Shiro架构的核心。它就像一把保护伞一样,协调受它管理的组件,使这些组件能够和谐共处。它还管理了每一个应用程序的用户,所以它知道怎么把安全操作应用到每一个用户。
Authenticator (org.apache.shiro.authc.Authenticator)
The Authenticator is the component that is responsible for executing and reacting to authentication (log-in) attempts by users. When a user tries to log-in, that logic is executed by the Authenticator. The Authenticator knows how to coordinate with one or more Realms that store relevant user/account information. The data obtained from these Realms is used to verify the user''s identity to guarantee the user really is who they say they are.
认证组件(认证器)是响应用户发起的认证请求的组件。当用户尝试登录时,这些逻辑就会被Authenticator执行。Authenticator知道怎么去协调一个或多个存储了用户帐户信息的Realm。这些从Realm中获取到的安全数据将会被用来验证用户身份,以及保证用户同其宣称的相符合。Authentication Strategy (org.apache.shiro.authc.pam.AuthenticationStrategy)
If more than one Realm is configured, the AuthenticationStrategy will coordinate the Realms to determine the conditions under which an authentication attempt succeeds or fails (for example, if one realm succeeds but others fail, is the attempt successful? Must all realms succeed? Only the first?).
认证策略如果配置了1个以上的Realm,AuthenticationStrategy(认证策略)将会协调这些Realm,并决定认证请求是否成功的策略。(例如,如果1个Realm成功了,但是另外的都失败了,那认证成功吗?必须是所有Realm都成功?只需要第1个成功?)
Authorizer (org.apache.shiro.authz.Authorizer)
The Authorizer is the component responsible determining users'' access control in the application. It is the mechanism that ultimately says if a user is allowed to do something or not. Like the Authenticator, the Authorizer also knows how to coordinate with multiple back-end data sources to access role and permission information. The Authorizer uses this information to determine exactly if a user is allowed to perform a given action.
授权组件授权组件决定用户的在应用程序中的权限范围(访问控制),它是一种最终决定用户是否允许做某事的机制。和Authenticator一样,Authorizer也知道如何协调各个后端保存角色信息和权限信息的数组源。Authorizer使用这些信息来决定用户是否能够执行指定的动作。
SessionManager (org.apache.shiro.session.mgt.SessionManager)
The SessionManager knows how to create and manage user Session lifecycles to provide a robust Session experience for users in all environments. This is a unique feature in the world of security frameworks - Shiro has the ability to natively manage user Sessions in any environment, even if there is no Web/Servlet or EJB container available. By default, Shiro will use an existing session mechanism if available, (e.g. Servlet Container), but if there isn''t one, such as in a standalone application or non-web environment, it will use its built-in enterprise session management to offer the same programming experience. The SessionDAO exists to allow any datasource to be used to persist sessions.SessionManager知道如何创建和管理会话的生命周期,它为所有用户提供了稳定的会话环境。
SessionDAO (org.apache.shiro.session.mgt.eis.SessionDAO)
The SessionDAO performs Session persistence (CRUD) operations on behalf of the SessionManager. This allows any data store to be plugged in to the Session Management infrastructure.CacheManager (org.apache.shiro.cache.CacheManager)
The CacheManager creates and manages Cache instance lifecycles used by other Shiro components. Because Shiro can access many back-end data sources for authentication, authorization and session management, caching has always been a first-class architectural feature in the framework to improve performance while using these data sources. Any of the modern open-source and/or enterprise caching products can be plugged in to Shiro to provide a fast and efficient user-experience.Cryptography (org.apache.shiro.crypto.*)
Cryptography is a natural addition to an enterprise security framework. Shiro''s crypto package contains easy-to-use and understand representations of crytographic Ciphers, Hashes (aka digests) and different codec implementations. All of the classes in this package are carefully designed to be very easy to use and easy to understand. Anyone who has used Java''s native cryptography support knows it can be a challenging animal to tame. Shiro''s crypto APIs simplify the complicated Java mechanisms and make cryptography easy to use for normal mortal human beings.Realms (org.apache.shiro.realm.Realm)
As mentioned above, Realms act as the ‘bridge’ or ‘connector’ between Shiro and your application’s security data. When it comes time to actually interact with security-related data like user accounts to perform authentication (login) and authorization (access control), Shiro looks up many of these things from one or more Realms configured for an application. You can configure as many Realms as you need (usually one per data source) and Shiro will coordinate with them as necessary for both authentication and authorization.
The SecurityManager
Because Shiro''s API encourages a Subject-centric programming approach, most application developers will rarely, if ever, interact with the SecurityManager directly (framework developers however might sometimes find it useful). Even so, it is still important to know how the SecurityManager functions, especially when configuring one for an application.
Design
As stated previously, the application''s SecurityManager performs security operations and manages state for all application users. In Shiro''s default SecurityManager implementations, this includes:
Authentication
Authorization
Session Management
Cache Management
Realm coordination
Event propagation
"Remember Me" Services
Subject creation
Logout
and more.
But this is a lot of functionality to try to manage in a single component. And, making these things flexible and customizable would be very difficult if everything were lumped into a single implementation class.
To simplify configuration and enable flexible configuration/pluggability, Shiro''s implementations are all highly modular in design - so modular in fact, that the SecurityManager implementation (and its class-hierarchy) does not do much at all. Instead, the SecurityManager implementations mostly act as a lightweight ''container'' component, delegating almost all behavior to nested/wrapped components. This ''wrapper'' design is reflected in the detailed architecture diagram above.
While the components actually execute the logic, the SecurityManager implementation knows how and when to coordinate the components for the correct behavior.
The SecurityManager implementations and are also JavaBeans compatible, which allows you (or a configuration mechanism) to easily customize the pluggable components via standard JavaBeans accessor/mutator methods (get*/set*). This means the Shiro''s architectural modularity can translate into very easy configuration for custom behavior.

Apache Shiro 使用手册
Apache Shiro 使用手册 博客分类: java (一)Shiro架构介绍 认证就是验证用户身份的过程。在认证过程中,用户需要提交实体信息(Principals)和凭据信息(Credentials)以检验用户是否合法。最常见的“实体/凭证”组合便是“用户名/密码”组合。 一、Shiro认证过程 1、收集实体/凭据信息 (三)Shiro 授权 (四)Realm 实现 (五)Shiro 配置说明(一)Shiro架构介绍
Apache Shiro是一个强大易用的Java安全框架,提供了认证、授权、加密和会话管理等功能:
- 认证 - 用户身份识别,常被称为用户“登录”;
- 授权 - 访问控制;
- 密码加密 - 保护或隐藏数据防止被偷窥;
- 会话管理 - 每用户相关的时间敏感的状态。
对于任何一个应用程序,Shiro都可以提供全面的安全管理服务。并且相对于其他安全框架,Shiro要简单的多。
二、Shiro的架构介绍
首先,来了解一下Shiro的三个核心组件:Subject, SecurityManager 和 Realms. 如下图: 
Subject:即“当前操作用户”。但是,在Shiro中,Subject这一概念并不仅仅指人,也可以是第三方进程、后台帐户(Daemon Account)或其他类似事物。它仅仅意味着“当前跟软件交互的东西”。但考虑到大多数目的和用途,你可以把它认为是Shiro的“用户”概念。
Subject代表了当前用户的安全操作,SecurityManager则管理所有用户的安全操作。
SecurityManager:它是Shiro框架的核心,典型的Facade模式,Shiro通过SecurityManager来管理内部组件实例,并通过它来提供安全管理的各种服务。
Realm: Realm充当了Shiro与应用安全数据间的“桥梁”或者“连接器”。也就是说,当对用户执行认证(登录)和授权(访问控制)验证时,Shiro会从应用配置的Realm中查找用户及其权限信息。
从这个意义上讲,Realm实质上是一个安全相关的DAO:它封装了数据源的连接细节,并在需要时将相关数据提供给Shiro。当配置Shiro时,你必须至少指定一个Realm,用于认证和(或)授权。配置多个Realm是可以的,但是至少需要一个。
Shiro内置了可以连接大量安全数据源(又名目录)的Realm,如LDAP、关系数据库(JDBC)、类似INI的文本配置资源以及属性文件等。如果缺省的Realm不能满足需求,你还可以插入代表自定义数据源的自己的Realm实现。
Shiro完整架构图: 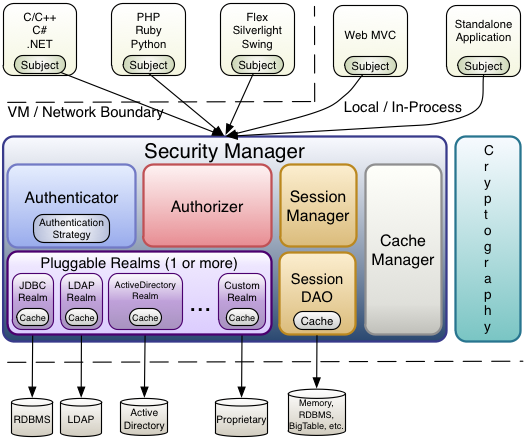
除前文所讲Subject、SecurityManager 、Realm三个核心组件外,Shiro主要组件还包括:
Authenticator :认证就是核实用户身份的过程。这个过程的常见例子是大家都熟悉的“用户/密码”组合。多数用户在登录软件系统时,通常提供自己的用户名(当事人)和支持他们的密码(证书)。如果存储在系统中的密码(或密码表示)与用户提供的匹配,他们就被认为通过认证。
Authorizer :授权实质上就是访问控制 - 控制用户能够访问应用中的哪些内容,比如资源、Web页面等等。
SessionManager :在安全框架领域,Apache Shiro提供了一些独特的东西:可在任何应用或架构层一致地使用Session API。即,Shiro为任何应用提供了一个会话编程范式 - 从小型后台独立应用到大型集群Web应用。这意味着,那些希望使用会话的应用开发者,不必被迫使用Servlet或EJB容器了。或者,如果正在使用这些容器,开发者现在也可以选择使用在任何层统一一致的会话API,取代Servlet或EJB机制。
CacheManager :对Shiro的其他组件提供缓存支持。
(二)Shiro 认证
一、Shiro认证过程
1、收集实体/凭据信息


- //Example using most common scenario of username/password pair:
- UsernamePasswordToken token = new UsernamePasswordToken(username, password);
- //”Remember Me” built-in:
- token.setRememberMe(true);
但是,“已记住”和“已认证”是有区别的:
已记住的用户仅仅是非匿名用户,你可以通过subject.getPrincipals()获取用户信息。但是它并非是完全认证通过的用户,当你访问需要认证用户的功能时,你仍然需要重新提交认证信息。
这一区别可以参考亚马逊网站,网站会默认记住登录的用户,再次访问网站时,对于非敏感的页面功能,页面上会显示记住的用户信息,但是当你访问网站账户信息时仍然需要再次进行登录认证。
2、提交实体/凭据信息
- Subject currentUser = SecurityUtils.getSubject();
- currentUser.login(token);
3、认证处理
- try {
- currentUser.login(token);
- } catch ( UnknownAccountException uae ) { ...
- } catch ( IncorrectCredentialsException ice ) { ...
- } catch ( LockedAccountException lae ) { ...
- } catch ( ExcessiveAttemptsException eae ) { ...
- } ... catch your own ...
- } catch ( AuthenticationException ae ) {
- //unexpected error?
- }
相反,如果login方法执行过程中抛出异常,那么将认为认证失败。Shiro有着丰富的层次鲜明的异常类来描述认证失败的原因,如代码示例。
二、登出操作
登出操作可以通过调用subject.logout()来删除你的登录信息,如:
- currentUser.logout(); //removes all identifying information and invalidates their session too.
三、认证内部处理机制
以上,是Shiro认证在应用程序中的处理过程,下面将详细解说Shiro认证的内部处理机制。

如上图,我们通过Shiro架构图的认证部分,来说明Shiro认证内部的处理顺序:
1、应用程序构建了一个终端用户认证信息的AuthenticationToken 实例后,调用Subject.login方法。
2、Sbuject的实例通常是DelegatingSubject类(或子类)的实例对象,在认证开始时,会委托应用程序设置的securityManager实例调用securityManager.login(token)方法。
3、SecurityManager接受到token(令牌)信息后会委托内置的Authenticator的实例(通常都是ModularRealmAuthenticator类的实例)调用authenticator.authenticate(token). ModularRealmAuthenticator在认证过程中会对设置的一个或多个Realm实例进行适配,它实际上为Shiro提供了一个可拔插的认证机制。
4、如果在应用程序中配置了多个Realm,ModularRealmAuthenticator会根据配置的AuthenticationStrategy(认证策略)来进行多Realm的认证过程。在Realm被调用后,AuthenticationStrategy将对每一个Realm的结果作出响应。
注:如果应用程序中仅配置了一个Realm,Realm将被直接调用而无需再配置认证策略。
5、判断每一个Realm是否支持提交的token,如果支持,Realm将调用getAuthenticationInfo(token); getAuthenticationInfo 方法就是实际认证处理,我们通过覆盖Realm的doGetAuthenticationInfo方法来编写我们自定义的认证处理。
四、使用多个Realm的处理机制:
1、Authenticator
默认实现是ModularRealmAuthenticator,它既支持单一Realm也支持多个Realm。如果仅配置了一个Realm,ModularRealmAuthenticator 会直接调用该Realm处理认证信息,如果配置了多个Realm,它会根据认证策略来适配Realm,找到合适的Realm执行认证信息。
自定义Authenticator的配置:
- [main]
- ...
- authenticator = com.foo.bar.CustomAuthenticator
- securityManager.authenticator = $authenticator
2、AuthenticationStrategy(认证策略)
当应用程序配置了多个Realm时,ModularRealmAuthenticator将根据认证策略来判断认证成功或是失败。
例如,如果只有一个Realm验证成功,而其他Realm验证失败,那么这次认证是否成功呢?如果大多数的Realm验证成功了,认证是否就认为成功呢?或者,一个Realm验证成功后,是否还需要判断其他Realm的结果?认证策略就是根据应用程序的需要对这些问题作出决断。
认证策略是一个无状态的组件,在认证过程中会经过4次的调用:
- 在所有Realm被调用之前
- 在调用Realm的getAuthenticationInfo 方法之前
- 在调用Realm的getAuthenticationInfo 方法之后
- 在所有Realm被调用之后
Shiro有3中认证策略的具体实现:
| AtLeastOneSuccessfulStrategy | 只要有一个(或更多)的Realm验证成功,那么认证将被视为成功 |
| FirstSuccessfulStrategy | 第一个Realm验证成功,整体认证将被视为成功,且后续Realm将被忽略 |
| AllSuccessfulStrategy | 所有Realm成功,认证才视为成功 |
ModularRealmAuthenticator 内置的认证策略默认实现是AtLeastOneSuccessfulStrategy 方式,因为这种方式也是被广泛使用的一种认证策略。当然,你也可以通过配置文件定义你需要的策略,如:
- [main]
- ...
- authcStrategy = org.apache.shiro.authc.pam.FirstSuccessfulStrategy
- securityManager.authenticator.authenticationStrategy = $authcStrategy
- ...
3、Realm的顺序
由刚才提到的认证策略,可以看到Realm在ModularRealmAuthenticator 里面的顺序对认证是有影响的。
ModularRealmAuthenticator 会读取配置在SecurityManager里的Realm。当执行认证是,它会遍历Realm集合,对所有支持提交的token的Realm调用getAuthenticationInfo 。
因此,如果Realm的顺序对你使用的认证策略结果有影响,那么你应该在配置文件中明确定义Realm的顺序,如:
- blahRealm = com.company.blah.Realm
- ...
- fooRealm = com.company.foo.Realm
- ...
- barRealm = com.company.another.Realm
- securityManager.realms = $fooRealm, $barRealm, $blahRealm
(三)Shiro 授权
如,判断一个用户有查看页面的权限,编辑数据的权限,拥有某一按钮的权限,以及是否拥有打印的权限等等。
一、授权的三要素
授权有着三个核心元素:权限、角色和用户。
权限
权限是Apache Shiro安全机制最核心的元素。它在应用程序中明确声明了被允许的行为和表现。一个格式良好好的权限声明可以清晰表达出用户对该资源拥有的权限。
大多数的资源会支持典型的CRUD操作(create,read,update,delete),但是任何操作建立在特定的资源上才是有意义的。因此,权限声明的根本思想就是建立在资源以及操作上。
而我们通过权限声明仅仅能了解这个权限可以在应用程序中做些什么,而不能确定谁拥有此权限。
于是,我们就需要在应用程序中对用户和权限建立关联。
通常的做法就是将权限分配给某个角色,然后将这个角色关联一个或多个用户。
权限声明及粒度
Shiro权限声明通常是使用以冒号分隔的表达式。就像前文所讲,一个权限表达式可以清晰的指定资源类型,允许的操作,可访问的数据。同时,Shiro权限表达式支持简单的通配符,可以更加灵活的进行权限设置。
下面以实例来说明权限表达式。
可查询用户数据
User:view
可查询或编辑用户数据
User:view,edit
可对用户数据进行所有操作
User:* 或 user
可编辑id为123的用户数据
User:edit:123
角色
Shiro支持两种角色模式:
1、传统角色:一个角色代表着一系列的操作,当需要对某一操作进行授权验证时,只需判断是否是该角色即可。这种角色权限相对简单、模糊,不利于扩展。
2、权限角色:一个角色拥有一个权限的集合。授权验证时,需要判断当前角色是否拥有该权限。这种角色权限可以对该角色进行详细的权限描述,适合更复杂的权限设计。
下面将详细描述对两种角色模式的授权实现。
二、授权实现
Shiro支持三种方式实现授权过程:
- 编码实现
- 注解实现
- JSP Taglig实现
1.1基于传统角色授权实现
当需要验证用户是否拥有某个角色时,可以调用Subject 实例的hasRole*方法验证。
- Subject currentUser = SecurityUtils.getSubject();
- if (currentUser.hasRole("administrator")) {
- //show the admin button
- } else {
- //don''t show the button? Grey it out?
- }
相关验证方法如下:
| Subject方法 | 描述 |
| hasRole(String roleName) | 当用户拥有指定角色时,返回true |
| hasRoles(List<String> roleNames) | 按照列表顺序返回相应的一个boolean值数组 |
| hasAllRoles(Collection<String> roleNames) | 如果用户拥有所有指定角色时,返回true |
断言支持
Shiro还支持以断言的方式进行授权验证。断言成功,不返回任何值,程序继续执行;断言失败时,将抛出异常信息。使用断言,可以使我们的代码更加简洁。
- Subject currentUser = SecurityUtils.getSubject();
- //guarantee that the current user is a bank teller and
- //therefore allowed to open the account:
- currentUser.checkRole("bankTeller");
- openBankAccount();
断言的相关方法:
| Subject方法 | 描述 |
| checkRole(String roleName) | 断言用户是否拥有指定角色 |
| checkRoles(Collection<String> roleNames) | 断言用户是否拥有所有指定角色 |
| checkRoles(String... roleNames) | 对上一方法的方法重载 |
1.2 基于权限角色授权实现
相比传统角色模式,基于权限的角色模式耦合性要更低些,它不会因角色的改变而对源代码进行修改,因此,基于权限的角色模式是更好的访问控制方式。
它的代码实现有以下几种实现方式:
1、基于权限对象的实现
创建org.apache.shiro.authz.Permission的实例,将该实例对象作为参数传递给Subject.isPermitted()进行验证。
- Permission printPermission = new PrinterPermission("laserjet4400n", "print");
- Subject currentUser = SecurityUtils.getSubject();
- if (currentUser.isPermitted(printPermission)) {
- //show the Print button
- } else {
- //don''t show the button? Grey it out?
- }
- Permission printPermission = new PrinterPermission("laserjet4400n", "print");
- Subject currentUser = SecurityUtils.getSubject();
- if (currentUser.isPermitted(printPermission)) {
- //show the Print button
- } else {
- //don''t show the button? Grey it out?
- }
相关方法如下:
| Subject方法 | 描述 |
| isPermitted(Permission p) | Subject拥有制定权限时,返回treu |
| isPermitted(List<Permission> perms) | 返回对应权限的boolean数组 |
| isPermittedAll(Collection<Permission> perms) | Subject拥有所有制定权限时,返回true |
2、 基于字符串的实现
相比笨重的基于对象的实现方式,基于字符串的实现便显得更加简洁。
- Subject currentUser = SecurityUtils.getSubject();
- if (currentUser.isPermitted("printer:print:laserjet4400n")) {
- //show the Print button
- } else {
- //don''t show the button? Grey it out?
- }
使用冒号分隔的权限表达式是org.apache.shiro.authz.permission.WildcardPermission 默认支持的实现方式。
这里分别代表了 资源类型:操作:资源ID
类似基于对象的实现相关方法,基于字符串的实现相关方法:
isPermitted(String perm)、isPermitted(String... perms)、isPermittedAll(String... perms)
基于权限对象的断言实现
- Subject currentUser = SecurityUtils.getSubject();
- //guarantee that the current user is permitted
- //to open a bank account:
- Permission p = new AccountPermission("open");
- currentUser.checkPermission(p);
- openBankAccount();
基于字符串的断言实现
- Subject currentUser = SecurityUtils.getSubject();
- //guarantee that the current user is permitted
- //to open a bank account:
- currentUser.checkPermission("account:open");
- openBankAccount();
断言实现的相关方法
| Subject方法 | 说明 |
| checkPermission(Permission p) | 断言用户是否拥有制定权限 |
| checkPermission(String perm) | 断言用户是否拥有制定权限 |
| checkPermissions(Collection<Permission> perms) | 断言用户是否拥有所有指定权限 |
| checkPermissions(String... perms) | 断言用户是否拥有所有指定权限 |
2、基于注解的授权实现
Shiro注解支持AspectJ、Spring、Google-Guice等,可根据应用进行不同的配置。
相关的注解:
@ RequiresAuthentication
可以用户类/属性/方法,用于表明当前用户需是经过认证的用户。
- @RequiresAuthentication
- public void updateAccount(Account userAccount) {
- //this method will only be invoked by a
- //Subject that is guaranteed authenticated
- ...
- }
@ RequiresGuest
表明该用户需为”guest”用户
@ RequiresPermissions
当前用户需拥有制定权限
- @RequiresPermissions("account:create")
- public void createAccount(Account account) {
- //this method will only be invoked by a Subject
- //that is permitted to create an account
- ...
- }
@RequiresRoles
当前用户需拥有制定角色
@ RequiresUser
当前用户需为已认证用户或已记住用户
3、基于JSP TAG的授权实现
Shiro提供了一套JSP标签库来实现页面级的授权控制。
在使用Shiro标签库前,首先需要在JSP引入shiro标签:
- <%@ taglib prefix="shiro" uri="http://shiro.apache.org/tags" %>
下面一一介绍Shiro的标签:
guest标签
验证当前用户是否为“访客”,即未认证(包含未记住)的用户
- <shiro:guest>
- Hi there! Please <a href="login.jsp">Login</a> or <a href="signup.jsp">Signup</a> today!
- </shiro:guest>
user标签
认证通过或已记住的用户
- <shiro:user>
- Welcome back John! Not John? Click <a href="login.jsp">here<a> to login.
- </shiro:user>
authenticated标签
已认证通过的用户。不包含已记住的用户,这是与user标签的区别所在。
- <shiro:authenticated>
- <a href="updateAccount.jsp">Update your contact information</a>.
- </shiro:authenticated>
notAuthenticated标签
未认证通过用户,与authenticated标签相对应。与guest标签的区别是,该标签包含已记住用户。
- <shiro:notAuthenticated>
- Please <a href="login.jsp">login</a> in order to update your credit card information.
- </shiro:notAuthenticated>
principal 标签
输出当前用户信息,通常为登录帐号信息
- Hello, <shiro:principal/>, how are you today?
hasRole标签
验证当前用户是否属于该角色
- <shiro:hasRole name="administrator">
- <a href="admin.jsp">Administer the system</a>
- </shiro:hasRole>
lacksRole标签
与hasRole标签逻辑相反,当用户不属于该角色时验证通过
- <shiro:lacksRole name="administrator">
- Sorry, you are not allowed to administer the system.
- </shiro:lacksRole>
hasAnyRole标签
验证当前用户是否属于以下任意一个角色。
- <shiro:hasAnyRoles name="developer, project manager, administrator">
- You are either a developer, project manager, or administrator.
- </shiro:lacksRole>
hasPermission标签
验证当前用户是否拥有制定权限
- <shiro:hasPermission name="user:create">
- <a href="createUser.jsp">Create a new User</a>
- </shiro:hasPermission>
lacksPermission标签
与hasPermission标签逻辑相反,当前用户没有制定权限时,验证通过
- <shiro:hasPermission name="user:create">
- <a href="createUser.jsp">Create a new User</a>
- </shiro:hasPermission>
三、Shiro授权的内部处理机制
1、在应用程序中调用授权验证方法(Subject的isPermitted*或hasRole*等)
2、Sbuject的实例通常是DelegatingSubject类(或子类)的实例对象,在认证开始时,会委托应用程序设置的securityManager实例调用相应的isPermitted*或hasRole*方法。
3、接下来SecurityManager会委托内置的Authorizer的实例(默认是ModularRealmAuthorizer 类的实例,类似认证实例,它同样支持一个或多个Realm实例认证)调用相应的授权方法。
4、每一个Realm将检查是否实现了相同的 Authorizer 接口。然后,将调用Reaml自己的相应的授权验证方法。
当使用多个Realm时,不同于认证策略处理方式,授权处理过程中:
1、当调用Realm出现异常时,将立即抛出异常,结束授权验证。
2、只要有一个Realm验证成功,那么将认为授权成功,立即返回,结束认证。
(四)Realm 实现
一、认证实现
正如前文所提到的,Shiro的认证过程最终会交由Realm执行,这时会调用Realm的getAuthenticationInfo(token)方法。
该方法主要执行以下操作:
1、检查提交的进行认证的令牌信息
2、根据令牌信息从数据源(通常为数据库)中获取用户信息
3、对用户信息进行匹配验证。
4、验证通过将返回一个封装了用户信息的AuthenticationInfo实例。
5、验证失败则抛出AuthenticationException异常信息。
而在我们的应用程序中要做的就是自定义一个Realm类,继承AuthorizingRealm抽象类,重载doGetAuthenticationInfo (),重写获取用户信息的方法。
- protected AuthenticationInfo doGetAuthenticationInfo(AuthenticationToken authcToken) throws AuthenticationException {
- UsernamePasswordToken token = (UsernamePasswordToken) authcToken;
- User user = accountManager.findUserByUserName(token.getUsername());
- if (user != null) {
- return new SimpleAuthenticationInfo(user.getUserName(), user.getPassword(), getName());
- } else {
- return null;
- }
- }
二、授权实现
而授权实现则与认证实现非常相似,在我们自定义的Realm中,重载doGetAuthorizationInfo()方法,重写获取用户权限的方法即可。
- protected AuthorizationInfo doGetAuthorizationInfo(PrincipalCollection principals) {
- String userName = (String) principals.fromRealm(getName()).iterator().next();
- User user = accountManager.findUserByUserName(userName);
- if (user != null) {
- SimpleAuthorizationInfo info = new SimpleAuthorizationInfo();
- for (Group group : user.getGroupList()) {
- info.addStringPermissions(group.getPermissionList());
- }
- return info;
- } else {
- return null;
- }
- }
(五)Shiro 配置说明
- 对象和属性的定义与配置
- URL的过滤器配置
- 静态用户配置
- 静态角色配置
Apache Shiro的大多数组件是基于POJO的,因此我们可以使用POJO兼容的任何配置机制进行配置,例如:Java代码、Sping XML、YAML、JSON、ini文件等等。下面,以Spring XML的配置方式为例,并且对其中的一些配置参数进行一些简单说明。
Shiro对象的配置:
主要是对Shiro各个组件的实现进行定义配置,主要组件在前文已做过简单介绍,这里不再一一说明。
- <bean id="securityManager" class="org.apache.shiro.mgt.DefaultSecurityManager">
- <property name="cacheManager" ref="cacheManager"/>
- <property name="sessionMode" value="native"/>
- <!-- Single realm app. If you have multiple realms, use the ''realms'' property instead. -->
- <property name="realm" ref="myRealm"/>
- <property name="sessionManager" ref="sessionManager"/>
- </bean>
Shiro过滤器的配置
Shiro主要是通过URL过滤来进行安全管理,这里的配置便是指定具体授权规则定义。
- <bean id="shiroFilter" class="org.apache.shiro.spring.web.ShiroFilterFactoryBean">
- <property name="securityManager" ref="securityManager"/>
- <property name="loginUrl" value="/login.jsp"/>
- <property name="successUrl" value="/home.jsp"/>
- <property name="unauthorizedUrl" value="/unauthorized.jsp"/> -->
- <property name="filterChainDefinitions">
- <value>
- # some example chain definitions:
- /admin/** = authc, roles[admin]
- /docs/** = authc, perms[document:read]
- /** = authc
- # more URL-to-FilterChain definitions here
- </value>
- </property>
- </bean>
URL过滤器配置说明:
Shiro可以通过配置文件实现基于URL的授权验证。FilterChain定义格式:
URL_Ant_Path_Expression = Path_Specific_Filter_Chain
每个URL配置,表示匹配该URL的应用程序请求将由对应的过滤器进行验证。
例如:
[urls]
/index.html = anon
/user/create = anon
/user/** = authc
/admin/** = authc, roles[administrator]
/rest/** = authc, rest
/remoting/rpc/** = authc, perms["remote:invoke"]
URL表达式说明
1、URL目录是基于HttpServletRequest.getContextPath()此目录设置
2、URL可使用通配符,**代表任意子目录
3、Shiro验证URL时,URL匹配成功便不再继续匹配查找。所以要注意配置文件中的URL顺序,尤其在使用通配符时。
Filter Chain定义说明
1、一个URL可以配置多个Filter,使用逗号分隔
2、当设置多个过滤器时,全部验证通过,才视为通过
3、部分过滤器可指定参数,如perms,roles
Shiro内置的FilterChain
| Filter Name | Class |
| anon | org.apache.shiro.web.filter.authc.AnonymousFilter |
| authc | org.apache.shiro.web.filter.authc.FormAuthenticationFilter |
| authcBasic | org.apache.shiro.web.filter.authc.BasicHttpAuthenticationFilter |
| perms | org.apache.shiro.web.filter.authz.PermissionsAuthorizationFilter |
| port | org.apache.shiro.web.filter.authz.PortFilter |
| rest | org.apache.shiro.web.filter.authz.HttpMethodPermissionFilter |
| roles | org.apache.shiro.web.filter.authz.RolesAuthorizationFilter |
| ssl | org.apache.shiro.web.filter.authz.SslFilter |
| user | org.apache.shiro.web.filter.authc.UserFilter |
http://www.360doc.com/content/12/0104/13/834950_177177202.shtml
今天关于Apache Shiro和SSO的讲解已经结束,谢谢您的阅读,如果想了解更多关于Apache Shiro、Apache Shiro (五)- 登录认证和权限管理 ssm、Apache Shiro Architecture、Apache Shiro 使用手册的相关知识,请在本站搜索。
本文标签:


