如果您对FirebugTutorial(Section1)–Logging,ProfilingandCommandLine(PartII)感兴趣,那么这篇文章一定是您不可错过的。我们将详细讲解Fire
如果您对Firebug Tutorial (Section 1)– Logging, Profiling and CommandLine (Part II)感兴趣,那么这篇文章一定是您不可错过的。我们将详细讲解Firebug Tutorial (Section 1)– Logging, Profiling and CommandLine (Part II)的各种细节,此外还有关于11:12:21.924 [main] DEBUG org.apache.ibatis.logging.LogFactory - Logging initialized using ''c...、48-Command line is too long. Shorten command line、Angular 2 User Registration and Login Example & Tutorial - Built with Angular 2.0 Final.、Automating code reviews and application profiling with Amazon CodeGuru的实用技巧。
本文目录一览:- Firebug Tutorial (Section 1)– Logging, Profiling and CommandLine (Part II)
- 11:12:21.924 [main] DEBUG org.apache.ibatis.logging.LogFactory - Logging initialized using ''c...
- 48-Command line is too long. Shorten command line
- Angular 2 User Registration and Login Example & Tutorial - Built with Angular 2.0 Final.
- Automating code reviews and application profiling with Amazon CodeGuru
– Logging, Profiling and CommandLine (Part II)")
Firebug Tutorial (Section 1)– Logging, Profiling and CommandLine (Part II)
Firebug Tutorial – Logging, Profiling and CommandLine (Part II)
Firebug Tutorial
Section 1: Console Tab : Logging, Profiling and CommandLine (Part II)
Introduction
This tutorial is the part II of “Firebug Tutorial – Logging, Profiling and CommandLine“. (If you haven’t read the part I of this tutorial, I would recommend you to read the part 1 first.)
The following topic will be covered in this section.
- Javascript Profiler
- Tracing error
- Tracing XmlHttpRequest object
#1. Javascript Profiler
Javascript Profiler is very useful feature of Firebug for measuring the execution time of each javascript code. It is useful for improving the performance of your code or if you wanna find out why a particular function takes soooo long. It is a bit similar to console.time() that I mentioned already to previous part but Javascript Profiler can give you more detailed information about what’s happening with your code.
There are three ways to use Javascript Profiler. You can call this function by clicking “Profile” button on the toolbar of Firebug console or through code “console.profile()” or by typing “profile()” in commandline. I will cover first two in this tutorial but not for using profile() in commandline. If you want to know how to use it in commandline, please check-out this article.
console.profile()
- Copy and paste the code in notepad and then, save as a htm file
<!DOCTYPE html PUBLIC "-//W3C//DTD XHTML 1.0 Transitional//EN" "http://www.w3.org/TR/xhtml1/DTD/xhtml1-transitional.dtd">
<html xmlns="http://www.w3.org/1999/xhtml" >
<head>
<title>Firebug</title>
<script language="javascript" type="text/javascript">
function startDoSomething(){
<strong>console.profile(''Measuring time'');</strong>
doSomething();
<strong>console.profileEnd();</strong>
}
function doSomething(){
doThis(1000);
doThis(100000);
doThat(10000);
doThisAndThat(1000,10000);
}
function doThis(count){
for(var i=0;i<count;i++){}
}
function doThat(count){
for(var i=0;i<count;i++){}
}
function doThisAndThat(countThis,countThat){
for(var i=0;i<countThis;i++){ for(var j=0;j<countThat;j++){} }
}
</script>
</head>
<body>
Open the console tab. Click the button below and wait a lit.. <br />
<input type="button" value="Start" onclick="startDoSomething();"/>
</body>
</html>- Open this file in Firefox browser.
- Open the Console tab on Firebug console.
- Click “Start” button and wait a lit.. (You will get the result like the screenshot below. )

(The list is sorted based on the execution time.)
Columns and Description of Profiler
- Function column : It show the name of each function.
- Call column : It shows the count of how many a particular function has been invoked. (2 times for doThis() function in our case. )
- Percent column : It shows the time consuming of each function in percentage.
- Own Time column : It shows the duration of own script in a particular function. For example: doSomething() function has no its own code. Instead, it is just calling other functions. So, its own execution time will be 0ms as shown in picture. If you wanna see some values for that column, add some looping in this function.
- Time column : It shows the duration of execution from start point of a function to the end point of a function. For example: doSomething() has no code. So, its own execution time is 0 ms but we call other functions in that function. So, the total execution time of other functions is 923 ms. So, it shows 923 ms in that column. Not clear? Feel free to let me know. I can try once more.. I don’t mind to explain you again. (That’s my problem in writing .. I can’t write very clear.. Sorry about that. )
- Avg column : It shows the average execution time of a particular function. If you are calling a function one time only, you won’t see the differences. If you are calling more than one time, you will see the differences. Take a look the doThis() function at second line of picture above.
The formula for that column is ~
Avg = Own Ttime / Call; - Min column and Max column: It shows the minimum execution time of a particular function. In our example, we call doThis() function twice. When we passed 1000 as an parameter, it probably took only a few millisecond. (let’s say 1 ms.). then, we passed 100000 to that function again. It took much longer than first time. (let’s say 50 ms.) . So, in that case, “1 ms” will be shown in Min column and “50 ms” will be shown in Max column.
- File column : the file name of file where the function located.
Note: You can set the title of profiler by passing one string to console.profile() function. In our example (console.profile(‘Measuring time’);), ‘Measuring time’ is the title of profiler.
Profiler button from Console tab’s toolbar
If you don’t want to profile thru the code, you can use “Profile” button from the toolbar of Firebug console.

In order to test this,
- you need to remove two lines (console.profile(‘Measuring time’); and console.profileEnd();) from doSomething() function.
- Open this file in Firefox.
- Open Console tab of Firebug console.
- Click “Profile” button ( right button on the toolbar of Firebug console.)
- Click “Start” button on your page.
- Wait for 1 min ( or a lit less than that.)
- Click “Profile” button again. ( You will get the same graph as the picture above.)
That’s all about Javascript Profiler. Let me know if you have any question or comment.
Okay. Let’s move on to next topic.
#2. Options of Console tab
There is one link called “Options” at the right-side of Firebug console. If you click this link, you will see the menu as shown in picture below.

I will divided those times in three categories.
- Errors Tracing
- Show Javascript Error
- Show Javascript Warnings
- Show CSS Errors
- Show XML Errors
- XmlHttpRequest Tracing
- Show XMLHttpRequests
- CommandLine
- Larger Command Line
#2.1 Errors Tracing and Filtering
- Show Javascript Errors
- Show Javascript Warning
- Show CSS Errors
- Show XML Errors
Those options are used for tracing the errors of your script, style sheet and XML. You can also filter the error messages based on the type of error that you wanna.
Example Code
<!DOCTYPE html PUBLIC "-//W3C//DTD XHTML 1.0 Transitional//EN" "http://www.w3.org/TR/xhtml1/DTD/xhtml1-transitional.dtd">
<html xmlns="http://www.w3.org/1999/xhtml" >
<head>
<title>Firebug</title>
<style type="text/css">
.normalText{
bcolor : red;  /* This is ERROR!! */
}
</style>
<script language="javascript" type="text/javascript">
function foo(){
var objTxt = doucmnet.getElementById(''nameTextBox'');  //This is ERROR!!
alert(objTxt.value);
}
</script>
</head>
<body>

<input id="nameTextBox" class="normalText" type="text" />
<input type="button" value="Start" onclick="foo();"/>
</body>
</html>
Output ~

- Copy and paste the code in notepage.
- Save as a .htm file.
- Check “Shows Javascript errors” and “Shows CSS errors” on Console tab.
- Reload the page
- First, you will get the CSS error. ( Reason : We wrote bcolor instead of color in “normalText” class. )
- Click the button
- then, we will get the another error. ( because we wrote “doucmnet” instead of “document” in the code. )
I think those options are very sample to use. If you wanna see the errors, just check the option in menu. then, Firebug will give very good information about the errors that you are getting. Uncheck it if you don’t want.
#2.2. Tracing XmlHttpRequest object
This is also one of the most popular feature of Firebug and it is really helpful for Ajax developer. The problem with Ajax is that it is very difficult to figure out if something goes wrong in XmlHttpRequest. Sometimes, you have no idea about what’s going on behind the sense while the indicator keep on cycling all the time. One of the problem that I face when I was playing around with ajax, it is difficult to find out whether the response format from Web service are correct or not.
but things are very simple with Firebug. You only need to select “Show XmlHttpRequest” option. Firebug will tell the following thing.
- The execution time
- Parameters (QueryString)
- HTTP Header
- Response
Example : I used Yahoo UI DataTable in this sample. This sample is the updated version of this sample from Yahoo UI.
Download : SourceCode
- Download the zip file from the link above
- Extract the zip file and put all files to PHP directory.
- Try to call this file “dt_xhrlocalxml_clean.html” from Firefox ( http://localhost/yui-php/dt_xhrlocalxml_clean.html in my case.)
- Open the Console tab in Firebug console.
- Select “Show XmlHttpRequests” option
- Click the button “Load Data” on the page
- The following result as shown in picture will be shown. (The style might be a lit bit different since I didn’t change the path in some CSS files. )

- And check the Console tab in Firebug console.
- You will the detailed response in XML format as shown in the picture below.

Note: If you don’t wanna download or if you don’t have PHP installed on your machine, you may try to check this online sample from Yahoo. But there won’t be any button so you should select the “Show XmlHttpRequests” option first and reload or open the link…
Okay. That’s all for today. I was thinking to write about CommandLine in this part but I don’t have the enough time to write it today. Don’t worry. I will tell about CommandLine tomorrow.
Cya. Don’t hesitate to drop a comment if you have any suggestion or comment. I appreciate it.
posted in Firebug, Firefox by Michael Sync
![11:12:21.924 [main] DEBUG org.apache.ibatis.logging.LogFactory - Logging initialized using ''c...](http://www.gvkun.com/zb_users/upload/2025/02/18b20b9d-e333-41d6-a719-66869e2732531739580705777.jpg "11:12:21.924 [main] DEBUG org.apache.ibatis.logging.LogFactory - Logging initialized using ''c...")
11:12:21.924 [main] DEBUG org.apache.ibatis.logging.LogFactory - Logging initialized using ''c...
11:12:21.924 [main] DEBUG org.apache.ibatis.logging.LogFactory - Logging initialized using ''class org.apache.ibatis.logging.slf4j.Slf4jImpl'' adapter.

org.apache.ibatis.exceptions.PersistenceException:
### Error opening session.  Cause: java.lang.NullPointerException
### Cause: java.lang.NullPointerException

	at org.apache.ibatis.exceptions.ExceptionFactory.wrapException(ExceptionFactory.java:30)
	at org.apache.ibatis.session.defaults.DefaultSqlSessionFactory.openSessionFromDataSource(DefaultSqlSessionFactory.java:100)
	at org.apache.ibatis.session.defaults.DefaultSqlSessionFactory.openSession(DefaultSqlSessionFactory.java:47)
	at com.website.DB.DBAcess.getSqlSession(DBAcess.java:15)
	at com.website.controller.ProductControllerTest.insert(ProductControllerTest.java:58)
	at sun.reflect.NativeMethodAccessorImpl.invoke0(Native Method)
	at sun.reflect.NativeMethodAccessorImpl.invoke(NativeMethodAccessorImpl.java:62)
	at sun.reflect.DelegatingMethodAccessorImpl.invoke(DelegatingMethodAccessorImpl.java:43)
	at java.lang.reflect.Method.invoke(Method.java:498)
	at org.junit.runners.model.FrameworkMethod$1.runReflectiveCall(FrameworkMethod.java:50)
	at org.junit.internal.runners.model.ReflectiveCallable.run(ReflectiveCallable.java:12)
	at org.junit.runners.model.FrameworkMethod.invokeExplosively(FrameworkMethod.java:47)
	at org.junit.internal.runners.statements.InvokeMethod.evaluate(InvokeMethod.java:17)
	at org.junit.runners.ParentRunner.runLeaf(ParentRunner.java:325)
	at org.junit.runners.BlockJUnit4ClassRunner.runChild(BlockJUnit4ClassRunner.java:78)
	at org.junit.runners.BlockJUnit4ClassRunner.runChild(BlockJUnit4ClassRunner.java:57)
	at org.junit.runners.ParentRunner$3.run(ParentRunner.java:290)
	at org.junit.runners.ParentRunner$1.schedule(ParentRunner.java:71)
	at org.junit.runners.ParentRunner.runChildren(ParentRunner.java:288)
	at org.junit.runners.ParentRunner.access$000(ParentRunner.java:58)
	at org.junit.runners.ParentRunner$2.evaluate(ParentRunner.java:268)
	at org.junit.runners.ParentRunner.run(ParentRunner.java:363)
	at org.junit.runner.JUnitCore.run(JUnitCore.java:137)
	at com.intellij.junit4.JUnit4IdeaTestRunner.startRunnerWithArgs(JUnit4IdeaTestRunner.java:68)
	at com.intellij.rt.execution.junit.IdeaTestRunner$Repeater.startRunnerWithArgs(IdeaTestRunner.java:47)
	at com.intellij.rt.execution.junit.JUnitStarter.prepareStreamsAndStart(JUnitStarter.java:242)
	at com.intellij.rt.execution.junit.JUnitStarter.main(JUnitStarter.java:70)
Caused by: java.lang.NullPointerException
	at org.apache.ibatis.session.defaults.DefaultSqlSessionFactory.openSessionFromDataSource(DefaultSqlSessionFactory.java:95)
	... 25 more


Process finished with exit code -1
我使用Mybatis的时候,遇到了这个报错,不明所以,后来发现是因为我没有写数据库配置的原因
<!-- 设置一个默认的连接环境信息 -->
    <environments default="mysql_developer">
        <environment id="mysql_developer">
            <!-- mybatis使用jdbc事务管理方式 -->
            <transactionManager type="JDBC"></transactionManager>
            <!-- mybatis使用连接池方式来获取连接 -->
            <dataSource type="POOLED">
                <!-- 配置与数据库交互的4个必要属性,不要直接写,单独写在一个配置文件中 -->
                <property name="driver" value="com.mysql.cj.jdbc.Driver"/>
                <property name="url" value="jdbc:mysql://127.0.0.1:3306/shuyunquan?serverTimezone=UTC"/>
                <property name="username" value="root"/>
                <property name="password" value="123"/>
            </dataSource>
        </environment>
    </environments>
就是这个,我没配置,我在application.yml里面已经配置了数据库连接了,所以这里没有配置,同时也忘了使用properties标签去引入数据库配置。所以才导致了这个错误。

48-Command line is too long. Shorten command line
Command line is too long. Shorten command line for Test or also for Application default configuration?
报错内容:
Error running ''ServiceStarter'': Command line is too long. Shorten command line for ServiceStarter or also for Application default configuration.
解决办法:
修改项目下 .idea\workspace.xml,找到标签 <component name="PropertiesComponent"> , 在标签里 <property name="dynamic.classpath" value="true" />

Angular 2 User Registration and Login Example & Tutorial - Built with Angular 2.0 Final.
http://jasonwatmore.com/post/2016/09/29/angular-2-user-registration-and-login-example-tutorial
Built with Angular 2.0 Final.
After getting a lot of interest in a previous tutorial I posted on how to build a User Registration and Login with Angular 1, and since Angular 2 Final was recently released I thought it was time to post an updated example built with Angular 2 and TypeScript.
The project is available on GitHub at https://github.com/cornflourblue/angular2-registration-login-example.
The example uses a fake backend that stores users in HTML5 local storage, to switch to using a real web service simply remove the fake backend providers in the app.module.ts file below the comment "// providers used to create fake backend".
Here it is in action: (See on Plunker at http://plnkr.co/edit/9luTng?p=preview)
Running the Angular 2 User Registration & Login Example Locally
- Install NodeJS (> v4) and NPM (> v3) from https://nodejs.org/en/download/, you can check the versions you have installed by running
node -vandnpm -vfrom the command line.
- Download the project source code from https://github.com/cornflourblue/angular2-registration-login-example
- Install all required npm packages by running
npm installfrom the command line in the project root folder (where the package.json is located).
- Start the application by running
npm startfrom the command line in the project root folder.
Angular 2 Project Structure
I used the Angular 2 quickstart project as a base for the application, it''s written in TypeScript and uses systemjs for loading modules. If you''re new to angular 2 I''d recommend checking out the quickstart as it provides details on the project tooling and configuration files which aren''t covered in this post.
The project and code structure mostly follows the recommendations in the official Angular 2 style guide, with my own tweaks here and there.
Each feature has it''s own folder (home & login), other code such as services, models, guards etc are placed in folders prefixed with an underscore to easily differentiate them and group them together at the top of the folder structure.
Here''s the project structure:
- app
- _directives
- alert.component.html
- alert.component.ts
- index.ts
- _guards
- auth.guard.ts
- index.ts
- _helpers
- fake-backend.ts
- index.ts
- _models
- user.ts
- index.ts
- _services
- alert.service.ts
- authentication.service.ts
- index.ts
- user.service.ts
- home
- home.component.html
- home.component.ts
- index.ts
- login
- index.ts
- login.component.html
- login.component.ts
- register
- index.ts
- register.component.html
- register.component.ts
- app.component.html
- app.component.ts
- app.module.ts
- app.routing.ts
- main.ts
- _directives
- app.css
- index.html
- package.json
- system.config.js
- tsconfig.json
- typings.json
Below are brief descriptions and the code for the main files of the example application, all files are available in the github project linked at the top of the post.
Angular 2 Alert Component Template
The alert component template contains the html for displaying alert messages at the top of the page.
|
1
|
<
div
*
ngIf
=
"message"
[ngClass]="{ ''alert'': message, ''alert-success'': message.type === ''success'', ''alert-danger'': message.type === ''error'' }">{{message.text}}</
div
>
|
Angular 2 Alert Component
The alert component passes alert messages to the template whenever a message is received from the alert service. It does this by subscribing to the alert service''s getMessage() method which returns an Observable.
|
1
2
3
4
5
6
7
8
9
10
11
12
13
14
15
16
17
18
19
|
import { Component, OnInit } from
''@angular/core''
;
import { AlertService } from
''../_services/index''
;
@Component({
moduleId: module.id,
selector:
''alert''
,
templateUrl:
''alert.component.html''
})
export class AlertComponent {
message: any;
constructor(private alertService: AlertService) { }
ngOnInit() {
this
.alertService.getMessage().subscribe(message => {
this
.message = message; });
}
}
|
Angular 2 Auth Guard
The auth guard is used to prevent unauthenticated users from accessing restricted routes, in this example it''s used in app.routing.ts to protect the home page route. For more information about angular 2 guards you can check out this post on the thoughtram blog.
|
1
2
3
4
5
6
7
8
9
10
11
12
13
14
15
16
17
18
19
|
import { Injectable } from
''@angular/core''
;
import { Router, CanActivate } from
''@angular/router''
;
@Injectable()
export class AuthGuard implements CanActivate {
constructor(private router: Router) { }
canActivate() {
if
(localStorage.getItem(
''currentUser''
)) {
// logged in so return true
return
true
;
}
// not logged in so redirect to login page
this
.router.navigate([
''/login''
]);
return
false
;
}
}
|
Angular 2 Fake Backend Provider
The fake backend provider enables the example to run without a backend / backendless, it uses HTML5 local storage for storing registered user data and provides fake implementations for authentication and CRUD methods, these would be handled by a real api and database in a production application.
It uses the Angular 2 MockBackend to replace the default backend used by the Http service, the MockBackend enables you to intercept http requests made within the application and provide fake responses, it''s also used for unit testing.
|
1
2
3
4
5
6
7
8
9
10
11
12
13
14
15
16
17
18
19
20
21
22
23
24
25
26
27
28
29
30
31
32
33
34
35
36
37
38
39
40
41
42
43
44
45
46
47
48
49
50
51
52
53
54
55
56
57
58
59
60
61
62
63
64
65
66
67
68
69
70
71
72
73
74
75
76
77
78
79
80
81
82
83
84
85
86
87
88
89
90
91
92
93
94
95
96
97
98
99
100
101
102
103
104
105
106
107
108
109
110
111
112
113
114
115
116
117
118
119
120
121
122
123
124
125
126
|
import { Http, BaseRequestOptions, Response, ResponseOptions, RequestMethod } from
''@angular/http''
;
import { MockBackend, MockConnection } from
''@angular/http/testing''
;
export let fakeBackendProvider = {
// use fake backend in place of Http service for backend-less development
provide: Http,
useFactory: (backend, options) => {
// array in local storage for registered users
let users: any[] = JSON.parse(localStorage.getItem(
''users''
)) || [];
// configure fake backend
backend.connections.subscribe((connection: MockConnection) => {
// wrap in timeout to simulate server api call
setTimeout(() => {
// authenticate
if
(connection.request.url.endsWith(
''/api/authenticate''
) && connection.request.method === RequestMethod.Post) {
// get parameters from post request
let params = JSON.parse(connection.request.getBody());
// find if any user matches login credentials
let filteredUsers = users.filter(user => {
return
user.username === params.username && user.password === params.password;
});
if
(filteredUsers.length) {
// if login details are valid return 200 OK with user details and fake jwt token
let user = filteredUsers[0];
connection.mockRespond(
new
Response(
new
ResponseOptions({
status: 200,
body: {
id: user.id,
username: user.username,
firstName: user.firstName,
lastName: user.lastName,
token:
''fake-jwt-token''
}
})));
}
else
{
// else return 400 bad request
connection.mockError(
new
Error(
''Username or password is incorrect''
));
}
}
// get users
if
(connection.request.url.endsWith(
''/api/users''
) && connection.request.method === RequestMethod.Get) {
// check for fake auth token in header and return users if valid, this security is implemented server side in a real application
if
(connection.request.headers.get(
''Authorization''
) ===
''Bearer fake-jwt-token''
) {
connection.mockRespond(
new
Response(
new
ResponseOptions({ status: 200, body: users })));
}
else
{
// return 401 not authorised if token is null or invalid
connection.mockRespond(
new
Response(
new
ResponseOptions({ status: 401 })));
}
}
// get user by id
if
(connection.request.url.match(/\/api\/users\/\d+$/) && connection.request.method === RequestMethod.Get) {
// check for fake auth token in header and return user if valid, this security is implemented server side in a real application
if
(connection.request.headers.get(
''Authorization''
) ===
''Bearer fake-jwt-token''
) {
// find user by id in users array
let urlParts = connection.request.url.split(
''/''
);
let id = parseInt(urlParts[urlParts.length - 1]);
let matchedUsers = users.filter(user => {
return
user.id === id; });
let user = matchedUsers.length ? matchedUsers[0] :
null
;
// respond 200 OK with user
connection.mockRespond(
new
Response(
new
ResponseOptions({ status: 200, body: user })));
}
else
{
// return 401 not authorised if token is null or invalid
connection.mockRespond(
new
Response(
new
ResponseOptions({ status: 401 })));
}
}
// create user
if
(connection.request.url.endsWith(
''/api/users''
) && connection.request.method === RequestMethod.Post) {
// get new user object from post body
let newUser = JSON.parse(connection.request.getBody());
// validation
let duplicateUser = users.filter(user => {
return
user.username === newUser.username; }).length;
if
(duplicateUser) {
return
connection.mockError(
new
Error(
''Username "''
+ newUser.username +
''" is already taken''
));
}
// save new user
newUser.id = users.length + 1;
users.push(newUser);
localStorage.setItem(
''users''
, JSON.stringify(users));
// respond 200 OK
connection.mockRespond(
new
Response(
new
ResponseOptions({ status: 200 })));
}
// delete user
if
(connection.request.url.match(/\/api\/users\/\d+$/) && connection.request.method === RequestMethod.Delete) {
// check for fake auth token in header and return user if valid, this security is implemented server side in a real application
if
(connection.request.headers.get(
''Authorization''
) ===
''Bearer fake-jwt-token''
) {
// find user by id in users array
let urlParts = connection.request.url.split(
''/''
);
let id = parseInt(urlParts[urlParts.length - 1]);
for
(let i = 0; i < users.length; i++) {
let user = users[i];
if
(user.id === id) {
// delete user
users.splice(i, 1);
localStorage.setItem(
''users''
, JSON.stringify(users));
break
;
}
}
// respond 200 OK
connection.mockRespond(
new
Response(
new
ResponseOptions({ status: 200 })));
}
else
{
// return 401 not authorised if token is null or invalid
connection.mockRespond(
new
Response(
new
ResponseOptions({ status: 401 })));
}
}
}, 500);
});
return
new
Http(backend, options);
},
deps: [MockBackend, BaseRequestOptions]
};
|
Angular 2 User Model
The user model is a small class that defines the properties of a user.
|
1
2
3
4
5
6
|
export class User {
username: string;
password: string;
firstName: string;
lastName: string;
}
|
Angular 2 Alert Service
The alert service enables any component in the application to display alert messages at the top of the page via the alert component.
It has methods for displaying success and error messages, and a getMessage() method that returns an Observable that is used by the alert component to subscribe to notifications for whenever a message should be displayed.
|
1
2
3
4
5
6
7
8
9
10
11
12
13
14
15
16
17
18
19
20
21
22
23
24
25
26
27
28
29
30
31
32
33
34
35
36
37
38
39
|
import { Injectable } from
''@angular/core''
;
import { Router, NavigationStart } from
''@angular/router''
;
import { Observable } from
''rxjs''
;
import { Subject } from
''rxjs/Subject''
;
@Injectable()
export class AlertService {
private subject =
new
Subject<any>();
private keepAfterNavigationChange =
false
;
constructor(private router: Router) {
// clear alert message on route change
router.events.subscribe(event => {
if
(event
instanceof
NavigationStart) {
if
(
this
.keepAfterNavigationChange) {
// only keep for a single location change
this
.keepAfterNavigationChange =
false
;
}
else
{
// clear alert
this
.subject.next();
}
}
});
}
success(message: string, keepAfterNavigationChange =
false
) {
this
.keepAfterNavigationChange = keepAfterNavigationChange;
this
.subject.next({ type:
''success''
, text: message });
}
error(message: string, keepAfterNavigationChange =
false
) {
this
.keepAfterNavigationChange = keepAfterNavigationChange;
this
.subject.next({ type:
''error''
, text: message });
}
getMessage(): Observable<any> {
return
this
.subject.asObservable();
}
}
|
Angular 2 Authentication Service
The authentication service is used to login and logout of the application, to login it posts the users credentials to the api and checks the response for a JWT token, if there is one it means authentication was successful so the user details including the token are added to local storage.
The logged in user details are stored in local storage so the user will stay logged in if they refresh the browser and also between browser sessions until they logout. If you don''t want the user to stay logged in between refreshes or sessions the behaviour could easily be changed by storing user details somewhere less persistent such as session storage or in a property of the authentication service.
|
1
2
3
4
5
6
7
8
9
10
11
12
13
14
15
16
17
18
19
20
21
22
23
24
25
26
|
import { Injectable } from
''@angular/core''
;
import { Http, Headers, Response } from
''@angular/http''
;
import { Observable } from
''rxjs/Observable''
;
import
''rxjs/add/operator/map''
@Injectable()
export class AuthenticationService {
constructor(private http: Http) { }
login(username, password) {
return
this
.http.post(
''/api/authenticate''
, JSON.stringify({ username: username, password: password }))
.map((response: Response) => {
// login successful if there''s a jwt token in the response
let user = response.json();
if
(user && user.token) {
// store user details and jwt token in local storage to keep user logged in between page refreshes
localStorage.setItem(''currentUser
'', JSON.stringify(user));
}
});
}
logout() {
// remove user from local storage to log user out
localStorage.removeItem(''
currentUser'');
}
}
|
Angular 2 User Service
The user service contains a standard set of CRUD methods for managing users, it contains a jwt() method that''s used to add the JWT token from local storage to the Authorization header of each http request.
|
1
2
3
4
5
6
7
8
9
10
11
12
13
14
15
16
17
18
19
20
21
22
23
24
25
26
27
28
29
30
31
32
33
34
35
36
37
38
|
import { Injectable } from
''@angular/core''
;
import { Http, Headers, RequestOptions, Response } from
''@angular/http''
;
@Injectable()
export class UserService {
constructor(private http: Http) { }
getAll() {
return
this
.http.get(
''/api/users''
,
this
.jwt()).map((response: Response) => response.json());
}
getById(id) {
return
this
.http.get(
''/api/users/''
+ id,
this
.jwt()).map((response: Response) => response.json());
}
create(user) {
return
this
.http.post(
''/api/users''
, user,
this
.jwt()).map((response: Response) => response.json());
}
update(user) {
return
this
.http.put(
''/api/users/''
+ user.id, user,
this
.jwt()).map((response: Response) => response.json());
}
delete
(id) {
return
this
.http.
delete
(
''/api/users/''
+ id,
this
.jwt()).map((response: Response) => response.json());
}
// private helper methods
private jwt() {
// create authorization header with jwt token
let currentUser = JSON.parse(localStorage.getItem(
''currentUser''
));
if
(currentUser && currentUser.token) {
let headers =
new
Headers({
''Authorization''
:
''Bearer ''
+ currentUser.token });
return
new
RequestOptions({ headers: headers });
}
}
}
|
Angular 2 Home Component Template
The home component template contains html and angular 2 template syntax for displaying a simple welcome message, a list of users and a logout link.
|
1
2
3
4
5
6
7
8
9
10
11
12
|
<
div
class
=
"col-md-6 col-md-offset-3"
>
<
h1
>Hi {{currentUser.firstName}}!</
h1
>
<
p
>You''re logged in with Angular 2!!</
p
>
<
h3
>All registered users:</
h3
>
<
ul
>
<
li
*
ngFor
=
"let user of users"
>
{{user.username}} ({{user.firstName}} {{user.lastName}})
- <
a
(click)="deleteUser(user.id)">Delete</
a
>
</
li
>
</
ul
>
<
p
><
a
[routerLink]="[''/login'']">Logout</
a
></
p
>
</
div
>
|
Angular 2 Home Component
The home component gets the current user from local storage and all users from the user service, and makes them available to the template.
|
1
2
3
4
5
6
7
8
9
10
11
12
13
14
15
16
17
18
19
20
21
22
23
24
25
26
27
28
29
30
|
import { Component, OnInit } from
''@angular/core''
;
import { User } from
''../_models/index''
;
import { UserService } from
''../_services/index''
;
@Component({
moduleId: module.id,
templateUrl:
''home.component.html''
})
export class HomeComponent implements OnInit {
currentUser: User;
users: User[] = [];
constructor(private userService: UserService) {
this
.currentUser = JSON.parse(localStorage.getItem(
''currentUser''
));
}
ngOnInit() {
this
.loadAllUsers();
}
deleteUser(id) {
this
.userService.
delete
(id).subscribe(() => {
this
.loadAllUsers() });
}
private loadAllUsers() {
this
.userService.getAll().subscribe(users => {
this
.users = users; });
}
}
|
Angular 2 Login Component Template
The login component template contains a login form with username and password fields. It displays validation messages for invalid fields when the submit button is clicked. On submit the login() method is called as long as the form is valid.
|
1
2
3
4
5
6
7
8
9
10
11
12
13
14
15
16
17
18
19
20
|
<
div
class
=
"col-md-6 col-md-offset-3"
>
<
h2
>Login</
h2
>
<
form
name
=
"form"
(ngSubmit)="f.form.valid && login()" #
f
=
"ngForm"
novalidate>
<
div
class
=
"form-group"
[ngClass]="{ ''has-error'': f.submitted && !username.valid }">
<
label
for
=
"username"
>Username</
label
>
<
input
type
=
"text"
class
=
"form-control"
name
=
"username"
[(ngModel)]="model.username" #
username
=
"ngModel"
required />
<
div
*
ngIf
=
"f.submitted && !username.valid"
class
=
"help-block"
>Username is required</
div
>
</
div
>
<
div
class
=
"form-group"
[ngClass]="{ ''has-error'': f.submitted && !password.valid }">
<
label
for
=
"password"
>Password</
label
>
<
input
type
=
"password"
class
=
"form-control"
name
=
"password"
[(ngModel)]="model.password" #
password
=
"ngModel"
required />
<
div
*
ngIf
=
"f.submitted && !password.valid"
class
=
"help-block"
>Password is required</
div
>
</
div
>
<
div
class
=
"form-group"
>
<
button
[disabled]="loading"
class
=
"btn btn-primary"
>Login</
button
>
<
img
*
ngIf
=
"loading"
src
=
"data:image/gif;base64,R0lGODlhEAAQAPIAAP///wAAAMLCwkJCQgAAAGJiYoKCgpKSkiH/C05FVFNDQVBFMi4wAwEAAAAh/hpDcmVhdGVkIHdpdGggYWpheGxvYWQuaW5mbwAh+QQJCgAAACwAAAAAEAAQAAADMwi63P4wyklrE2MIOggZnAdOmGYJRbExwroUmcG2LmDEwnHQLVsYOd2mBzkYDAdKa+dIAAAh+QQJCgAAACwAAAAAEAAQAAADNAi63P5OjCEgG4QMu7DmikRxQlFUYDEZIGBMRVsaqHwctXXf7WEYB4Ag1xjihkMZsiUkKhIAIfkECQoAAAAsAAAAABAAEAAAAzYIujIjK8pByJDMlFYvBoVjHA70GU7xSUJhmKtwHPAKzLO9HMaoKwJZ7Rf8AYPDDzKpZBqfvwQAIfkECQoAAAAsAAAAABAAEAAAAzMIumIlK8oyhpHsnFZfhYumCYUhDAQxRIdhHBGqRoKw0R8DYlJd8z0fMDgsGo/IpHI5TAAAIfkECQoAAAAsAAAAABAAEAAAAzIIunInK0rnZBTwGPNMgQwmdsNgXGJUlIWEuR5oWUIpz8pAEAMe6TwfwyYsGo/IpFKSAAAh+QQJCgAAACwAAAAAEAAQAAADMwi6IMKQORfjdOe82p4wGccc4CEuQradylesojEMBgsUc2G7sDX3lQGBMLAJibufbSlKAAAh+QQJCgAAACwAAAAAEAAQAAADMgi63P7wCRHZnFVdmgHu2nFwlWCI3WGc3TSWhUFGxTAUkGCbtgENBMJAEJsxgMLWzpEAACH5BAkKAAAALAAAAAAQABAAAAMyCLrc/jDKSatlQtScKdceCAjDII7HcQ4EMTCpyrCuUBjCYRgHVtqlAiB1YhiCnlsRkAAAOwAAAAAAAAAAAA=="
/>
<
a
[routerLink]="[''/register'']"
class
=
"btn btn-link"
>Register</
a
>
</
div
>
</
form
>
</
div
>
|
Angular 2 Login Component
The login component uses the authentication service to login and logout of the application. It automatically logs the user out when it initializes (ngOnInit) so the login page can also be used to logout.
|
1
2
3
4
5
6
7
8
9
10
11
12
13
14
15
16
17
18
19
20
21
22
23
24
25
26
27
28
29
30
31
32
33
34
35
36
37
|
import { Component, OnInit } from
''@angular/core''
;
import { Router } from
''@angular/router''
;
import { AlertService, AuthenticationService } from
''../_services/index''
;
@Component({
moduleId: module.id,
templateUrl:
''login.component.html''
})
export class LoginComponent implements OnInit {
model: any = {};
loading =
false
;
constructor(
private router: Router,
private authenticationService: AuthenticationService,
private alertService: AlertService) { }
ngOnInit() {
// reset login status
this
.authenticationService.logout();
}
login() {
this
.loading =
true
;
this
.authenticationService.login(
this
.model.username,
this
.model.password)
.subscribe(
data => {
this
.router.navigate([
''/''
]);
},
error => {
this
.alertService.error(error);
this
.loading =
false
;
});
}
}
|
Angular 2 Register Component Template
The register component template contains a simplae registration form with fields for first name, last name, username and password. It displays validation messages for invalid fields when the submit button is clicked. On submit the register() method is called if the form is valid.
|
1
2
3
4
5
6
7
8
9
10
11
12
13
14
15
16
17
18
19
20
21
22
23
24
25
26
27
28
29
30
|
<
div
class
=
"col-md-6 col-md-offset-3"
>
<
h2
>Register</
h2
>
<
form
name
=
"form"
(ngSubmit)="f.form.valid && register()" #
f
=
"ngForm"
novalidate>
<
div
class
=
"form-group"
[ngClass]="{ ''has-error'': f.submitted && !username.valid }">
<
label
for
=
"firstName"
>First Name</
label
>
<
input
type
=
"text"
class
=
"form-control"
name
=
"firstName"
[(ngModel)]="model.firstName" #
firstName
=
"ngModel"
required />
<
div
*
ngIf
=
"f.submitted && !firstName.valid"
class
=
"help-block"
>First Name is required</
div
>
</
div
>
<
div
class
=
"form-group"
[ngClass]="{ ''has-error'': f.submitted && !username.valid }">
<
label
for
=
"lastName"
>Last Name</
label
>
<
input
type
=
"text"
class
=
"form-control"
name
=
"lastName"
[(ngModel)]="model.lastName" #
lastName
=
"ngModel"
required />
<
div
*
ngIf
=
"f.submitted && !lastName.valid"
class
=
"help-block"
>Last Name is required</
div
>
</
div
>
<
div
class
=
"form-group"
[ngClass]="{ ''has-error'': f.submitted && !username.valid }">
<
label
for
=
"username"
>Username</
label
>
<
input
type
=
"text"
class
=
"form-control"
name
=
"username"
[(ngModel)]="model.username" #
username
=
"ngModel"
required />
<
div
*
ngIf
=
"f.submitted && !username.valid"
class
=
"help-block"
>Username is required</
div
>
</
div
>
<
div
class
=
"form-group"
[ngClass]="{ ''has-error'': f.submitted && !password.valid }">
<
label
for
=
"password"
>Password</
label
>
<
input
type
=
"password"
class
=
"form-control"
name
=
"password"
[(ngModel)]="model.password" #
password
=
"ngModel"
required />
<
div
*
ngIf
=
"f.submitted && !password.valid"
class
=
"help-block"
>Password is required</
div
>
</
div
>
<
div
class
=
"form-group"
>
<
button
[disabled]="loading"
class
=
"btn btn-primary"
>Register</
button
>
<
img
*
ngIf
=
"loading"
src
=
"data:image/gif;base64,R0lGODlhEAAQAPIAAP///wAAAMLCwkJCQgAAAGJiYoKCgpKSkiH/C05FVFNDQVBFMi4wAwEAAAAh/hpDcmVhdGVkIHdpdGggYWpheGxvYWQuaW5mbwAh+QQJCgAAACwAAAAAEAAQAAADMwi63P4wyklrE2MIOggZnAdOmGYJRbExwroUmcG2LmDEwnHQLVsYOd2mBzkYDAdKa+dIAAAh+QQJCgAAACwAAAAAEAAQAAADNAi63P5OjCEgG4QMu7DmikRxQlFUYDEZIGBMRVsaqHwctXXf7WEYB4Ag1xjihkMZsiUkKhIAIfkECQoAAAAsAAAAABAAEAAAAzYIujIjK8pByJDMlFYvBoVjHA70GU7xSUJhmKtwHPAKzLO9HMaoKwJZ7Rf8AYPDDzKpZBqfvwQAIfkECQoAAAAsAAAAABAAEAAAAzMIumIlK8oyhpHsnFZfhYumCYUhDAQxRIdhHBGqRoKw0R8DYlJd8z0fMDgsGo/IpHI5TAAAIfkECQoAAAAsAAAAABAAEAAAAzIIunInK0rnZBTwGPNMgQwmdsNgXGJUlIWEuR5oWUIpz8pAEAMe6TwfwyYsGo/IpFKSAAAh+QQJCgAAACwAAAAAEAAQAAADMwi6IMKQORfjdOe82p4wGccc4CEuQradylesojEMBgsUc2G7sDX3lQGBMLAJibufbSlKAAAh+QQJCgAAACwAAAAAEAAQAAADMgi63P7wCRHZnFVdmgHu2nFwlWCI3WGc3TSWhUFGxTAUkGCbtgENBMJAEJsxgMLWzpEAACH5BAkKAAAALAAAAAAQABAAAAMyCLrc/jDKSatlQtScKdceCAjDII7HcQ4EMTCpyrCuUBjCYRgHVtqlAiB1YhiCnlsRkAAAOwAAAAAAAAAAAA=="
/>
<
a
[routerLink]="[''/login'']"
class
=
"btn btn-link"
>Cancel</
a
>
</
div
>
</
form
>
</
div
>
|
Angular 2 Register Component
The register component has a single register() method that creates a new user with the user service when the register form is submitted.
|
1
2
3
4
5
6
7
8
9
10
11
12
13
14
15
16
17
18
19
20
21
22
23
24
25
26
27
28
29
30
31
32
33
34
|
import { Component } from
''@angular/core''
;
import { Router } from
''@angular/router''
;
import { AlertService, UserService } from
''../_services/index''
;
@Component({
moduleId: module.id,
templateUrl:
''register.component.html''
})
export class RegisterComponent {
model: any = {};
loading =
false
;
constructor(
private router: Router,
private userService: UserService,
private alertService: AlertService) { }
register() {
this
.loading =
true
;
this
.userService.create(
this
.model)
.subscribe(
data => {
// set success message and pass true paramater to persist the message after redirecting to the login page
this
.alertService.success(
''Registration successful''
,
true
);
this
.router.navigate([
''/login''
]);
},
error => {
this
.alertService.error(error);
this
.loading =
false
;
});
}
}
|
Angular 2 App Component Template
The app component template is the root component template of the application, it contains a router-outlet directive for displaying the contents of each view based on the current route, and an alert directive for displaying alert messages from anywhere in the system.
|
1
2
3
4
5
6
7
8
9
|
<!-- main app container -->
<
div
class
=
"jumbotron"
>
<
div
class
=
"container"
>
<
div
class
=
"col-sm-8 col-sm-offset-2"
>
<
alert
></
alert
>
<
router-outlet
></
router-outlet
>
</
div
>
</
div
>
</
div
>
|
Angular 2 App Component
The app component is the root component of the application, it defines the root tag of the app as <app></app> with the selector property.
The moduleId property is set to allow a relative path to be used for the templateUrl.
|
1
2
3
4
5
6
7
8
9
|
import { Component } from
''@angular/core''
;
@Component({
moduleId: module.id,
selector:
''app''
,
templateUrl:
''app.component.html''
})
export class AppComponent { }
|
Angular 2 App Module
The app module defines the root module of the application along with metadata about the module. For more info about angular 2 modules check out this page on the official docs site.
This is where the fake backend provider is added to the application, to switch to a real backend simply remove the providers located under the comment "// providers used to create fake backend".
|
1
2
3
4
5
6
7
8
9
10
11
12
13
14
15
16
17
18
19
20
21
22
23
24
25
26
27
28
29
30
31
32
33
34
35
36
37
38
39
40
41
42
43
44
45
46
47
48
49
|
import { NgModule } from
''@angular/core''
;
import { BrowserModule } from
''@angular/platform-browser''
;
import { FormsModule } from
''@angular/forms''
;
import { HttpModule } from
''@angular/http''
;
// used to create fake backend
import { fakeBackendProvider } from
''./_helpers/index''
;
import { MockBackend, MockConnection } from
''@angular/http/testing''
;
import { BaseRequestOptions } from
''@angular/http''
;
import { AppComponent } from
''./app.component''
;
import { routing } from
''./app.routing''
;
import { AlertComponent } from
''./_directives/index''
;
import { AuthGuard } from
''./_guards/index''
;
import { AlertService, AuthenticationService, UserService } from
''./_services/index''
;
import { HomeComponent } from
''./home/index''
;
import { LoginComponent } from
''./login/index''
;
import { RegisterComponent } from
''./register/index''
;
@NgModule({
imports: [
BrowserModule,
FormsModule,
HttpModule,
routing
],
declarations: [
AppComponent,
AlertComponent,
HomeComponent,
LoginComponent,
RegisterComponent
],
providers: [
AuthGuard,
AlertService,
AuthenticationService,
UserService,
// providers used to create fake backend
fakeBackendProvider,
MockBackend,
BaseRequestOptions
],
bootstrap: [AppComponent]
})
export class AppModule { }
|
Angular 2 App Routing
The app routing file defines the routes of the application, each route contains a path and associated component. The home route is secured by passing the AuthGuard to the canActivate property of the route.
|
1
2
3
4
5
6
7
8
9
10
11
12
13
14
15
16
17
|
import { Routes, RouterModule } from
''@angular/router''
;
import { HomeComponent } from
''./home/index''
;
import { LoginComponent } from
''./login/index''
;
import { RegisterComponent } from
''./register/index''
;
import { AuthGuard } from
''./_guards/index''
;
const appRoutes: Routes = [
{ path:
''''
, component: HomeComponent, canActivate: [AuthGuard] },
{ path:
''login''
, component: LoginComponent },
{ path:
''register''
, component: RegisterComponent },
// otherwise redirect to home
{ path:
''**''
, redirectTo:
''''
}
];
export const routing = RouterModule.forRoot(appRoutes);
|
Angular 2 Main (Bootstrap) File
The main file is the entry point used by angular to launch and bootstrap the application.
|
1
2
3
4
5
|
import { platformBrowserDynamic } from
''@angular/platform-browser-dynamic''
;
import { AppModule } from
''./app.module''
;
platformBrowserDynamic().bootstrapModule(AppModule);
|
Angular 2 Development Consultant Sydney
Feel free to drop me a line if you''re looking for an Angular 2 development consultant in Sydney Australia, I also provide remote contracting services for clients outside Sydney.
By Jason Watmore
Tags: Angular 2, Login, Registration, Authentication and Authorization

Automating code reviews and application profiling with Amazon CodeGuru
https://amazonaws-china.com/blogs/devops/automating-code-reviews-and-application-profiling-with-amazon-codeguru/
Amazon CodeGuru is a machine learning-based service released during re:Invent 2019 for automated code reviews and application performance recommendations. CodeGuru equips the development teams with the tools to maintain a high bar for coding standards in their software development process.
CodeGuru Reviewer helps developers avoid introducing issues that are difficult to detect, troubleshoot, reproduce, and root-cause. It also enables them to improve application performance. This not only improves the reliability of the software, but also cuts down the time spent chasing difficult issues like race conditions, slow resource leaks, thread safety issues, use of un-sanitized inputs, inappropriate handling of sensitive data, and application performance impact, to name a few.
CodeGuru is powered by machine learning, best practices, and hard-learned lessons across millions of code reviews and thousands of applications profiled on open source projects and internally at Amazon.
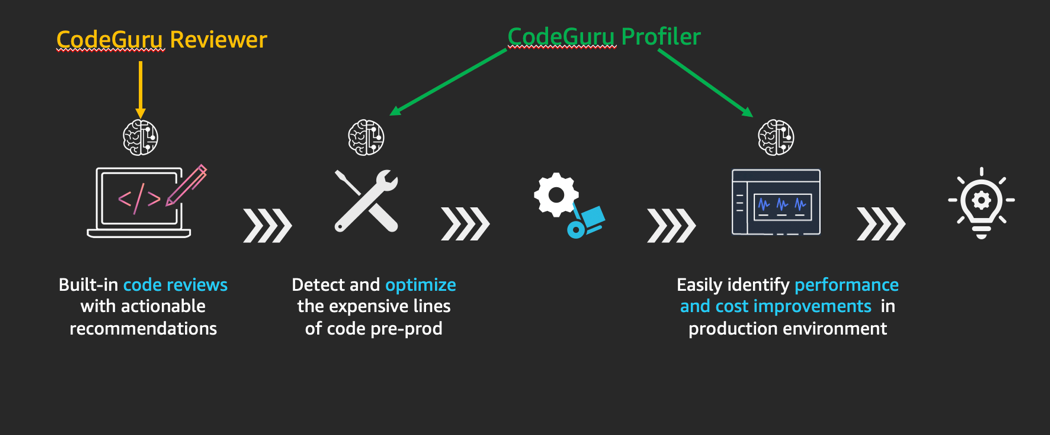
The service leverages machine-learning abilities to provide following two functionalities:
a) Reviewer: provides automated code reviews for static code analysis
b) Profiler: provides visibility into and recommendations about application performance during runtime
This blog post provides a short workshop to get a feel for both the above functionalities.
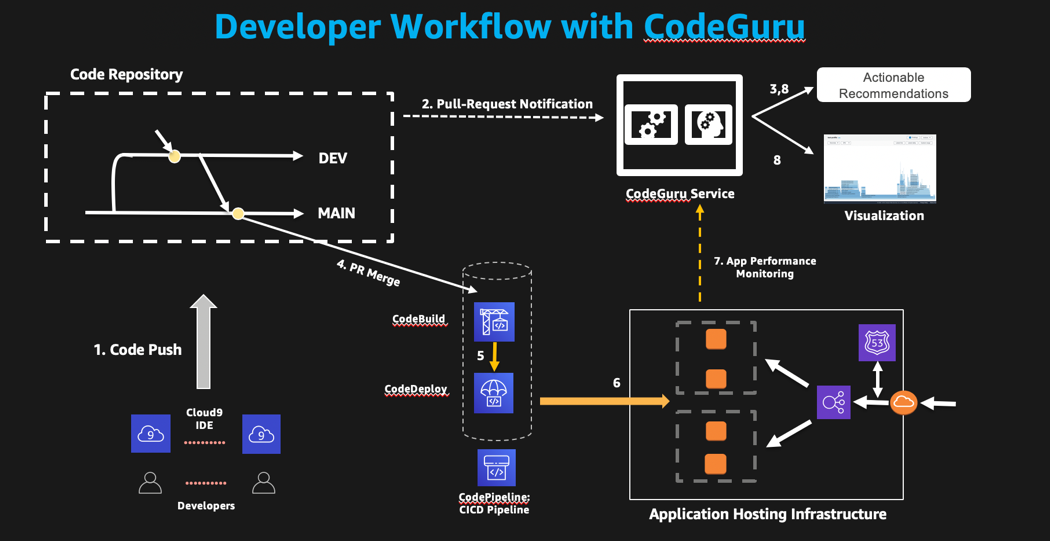
Solution overview
The following diagram illustrates a typical developer workflow in which the CodeGuru service is used in the code-review stage and the application performance-monitoring stage. The code reviewer is used for static code analysis backed with trained machine-learning models, and the profiler is used to monitor application performance when the code artifact is deployed and executed on the target compute.
The following diagram depicts additional details to show the big picture in the overall schema of the CodeGuru workflow:
This blog workshop automates the deployment of a sample application from a GitHub link via an AWS CloudFormation template, including the dependencies needed. It also demonstrates the Reviewer functionality.
Pre-requisites
Follow these steps to get set up:
1. Set up your AWS Cloud9 environment and access the bash terminal, preferably in the us-east-1 region.
2. Ensure you have an individual GitHub account.
3. Configure an Amazon EC2 key-pair (preferably in the us-east-1 region) and make the .pem file available from the terminal being used.
CodeGuru Reviewer
This section demonstrates how to configure CodeGuru Reviewer functionality and associate it with the GitHub repository. Execute the following configuration steps:
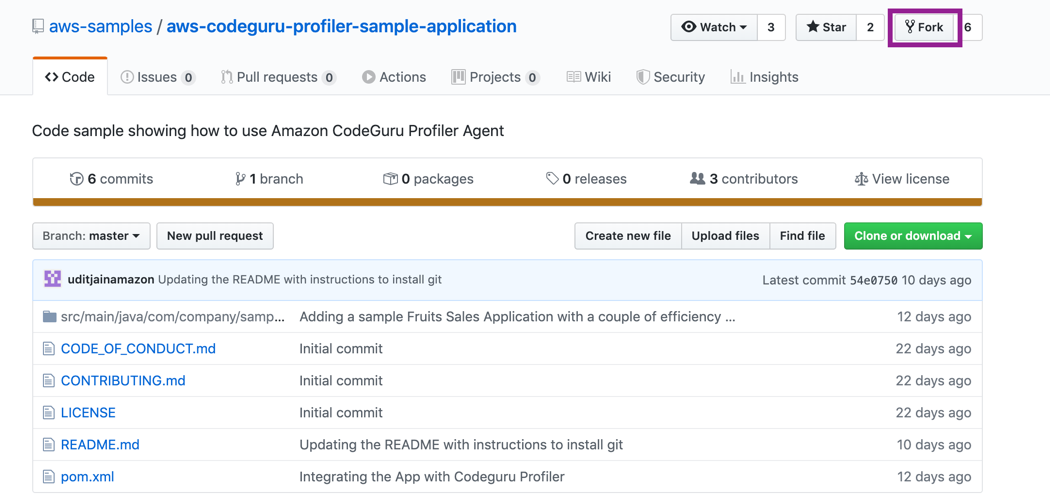
Step 1: Fork the GitHub repository
First, log in to your GitHub account and navigate to this sample code. Choose Fork and wait for it to create a fork in your account, as shown in the following screenshot.
Step 2: Associate the GitHub repository
Log in to the CodeGuru dashboard and follow these steps:
1. Choose Reviewer from the left panel and choose Associate repository.
2. Choose GitHub and then choose Connect to GitHub.
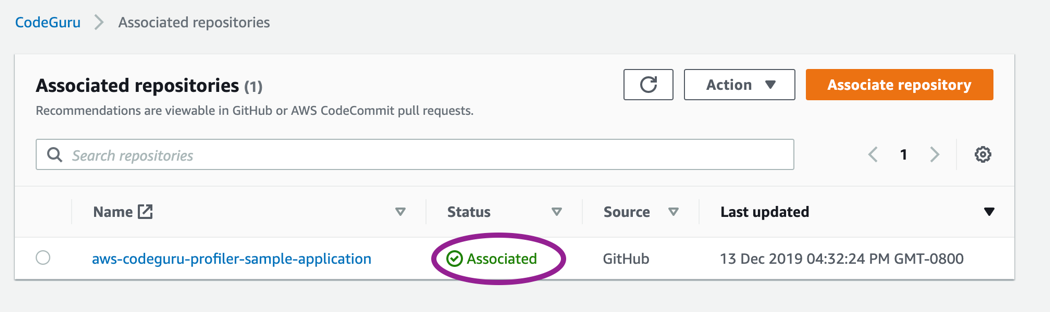
3. Once authenticated and connection made, you can select the repository aws-codeguru-profiler-sample-application from the Repository location drop-down list and choose Associate, as shown in the following screenshot.
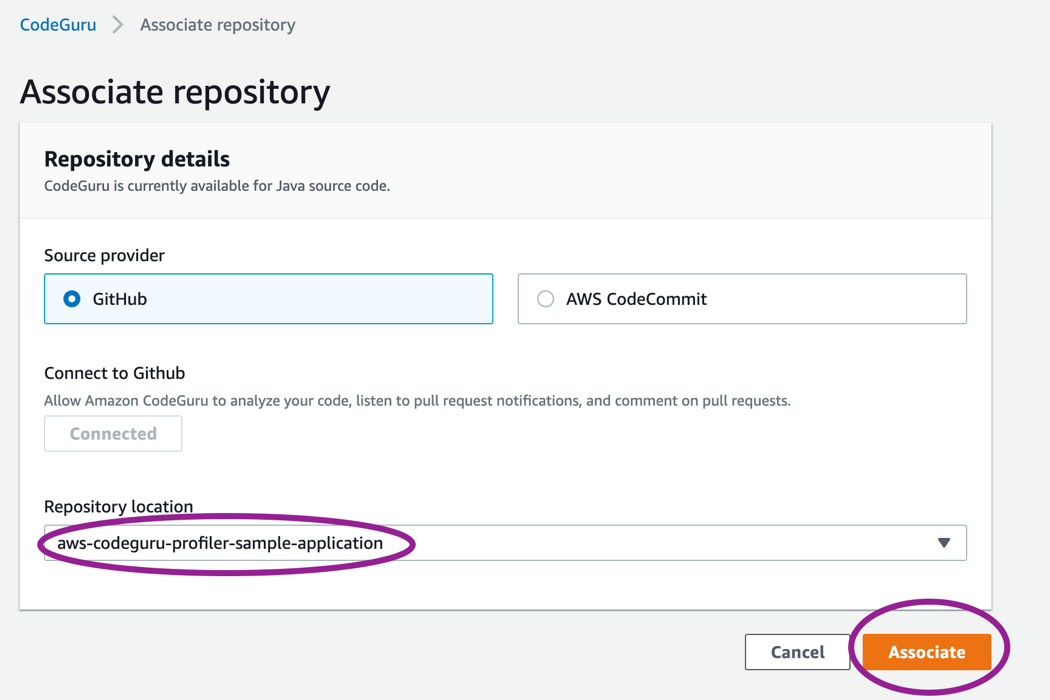
This associates the CodeGuru Reviewer with the specified repository and continues to listen for any pull-request events.
Step 3: Prepare your code
From your AWS Cloud9 terminal, clone the repository, create a new branch, using the following example commands:
git clone https://github.com/<your-userid>/aws-codeguru-profiler-sample-application.git
cd aws-codeguru-profiler-sample-application
git branch dev
git checkout dev
cd src/main/java/com/company/sample/application/
Open the file: CreateOrderThread.java and goto the line 63. Below line 63 which adds an order entry, insert the if statement under the comment to introduce an order entry check. Please indent the lines with spaces so they are well aligned as shown below.
SalesSystem.orders.put(orderDate, order);
//Check if the Order entered and present
if (SalesSystem.orders.containsKey(orderDate)) {
        System.out.println("New order verified to be present in hashmap: " + SalesSystem.orders.get(orderDate));
}
id++;
Once the above changes are introduced in the file, save and commit it to git and push it to the Repository.
git add .
git commit -s -m "Introducing new code that is potentially thread unsafe and inefficient"
cd ../../../../../../../
ls src/main/java/com/company/sample/application/
Now, upload the new branch to the GitHub repository using the following commands. Enter your credentials when asked to authenticate against your GitHub account:
git status
git push --set-upstream origin dev
ls
Step 4: Create a Pull request on GitHub:
In your GitHub account, you should see a new branch: dev.
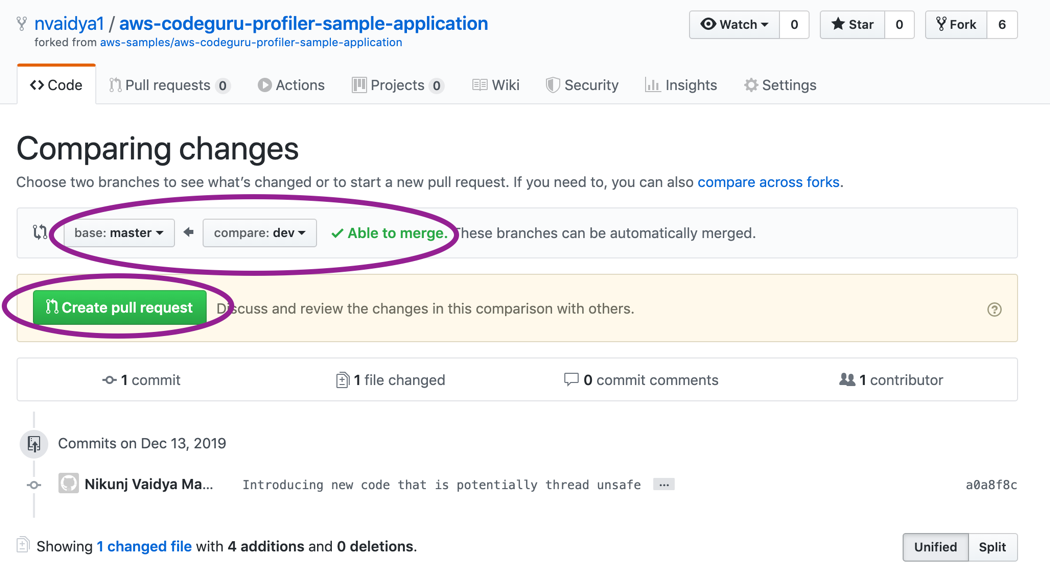
1. Go to your GitHub account and choose the Pull requests tab.
2. Select New pull request.
3. Under Comparing Changes, select <userid>/aws-codeguru-profiler-sample-application as the source branch.
4. Select the options from the two drop-down lists that selects a merge proposal from the dev branch to the master branch, as shown in the following screenshot.
5. Review the code diffs shown. It should say that the diffs are mergeable (able to merge). Choose Create Pull request to complete the process.
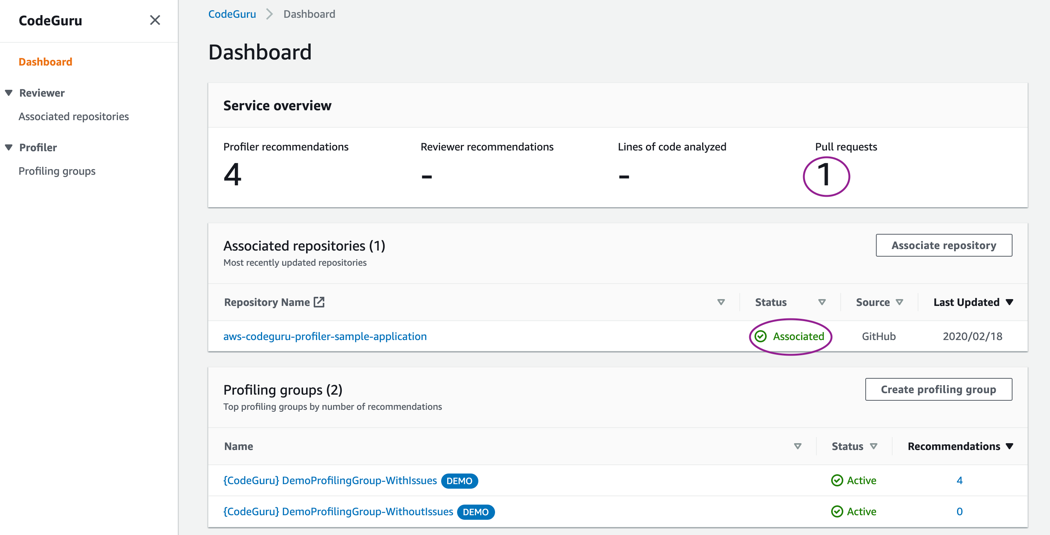
This sends a Pull request notification to the CodeGuru service and is reflected on the CodeGuru dashboard, as shown in the following screenshot.
After a short time, a set of recommendations appears on the same GitHub page on which the Pull request was created.
The demo profiler configuration and recommendations shown on the dashboard are provided by default as a sample application profile. See the profiler section of this post for further discussion.
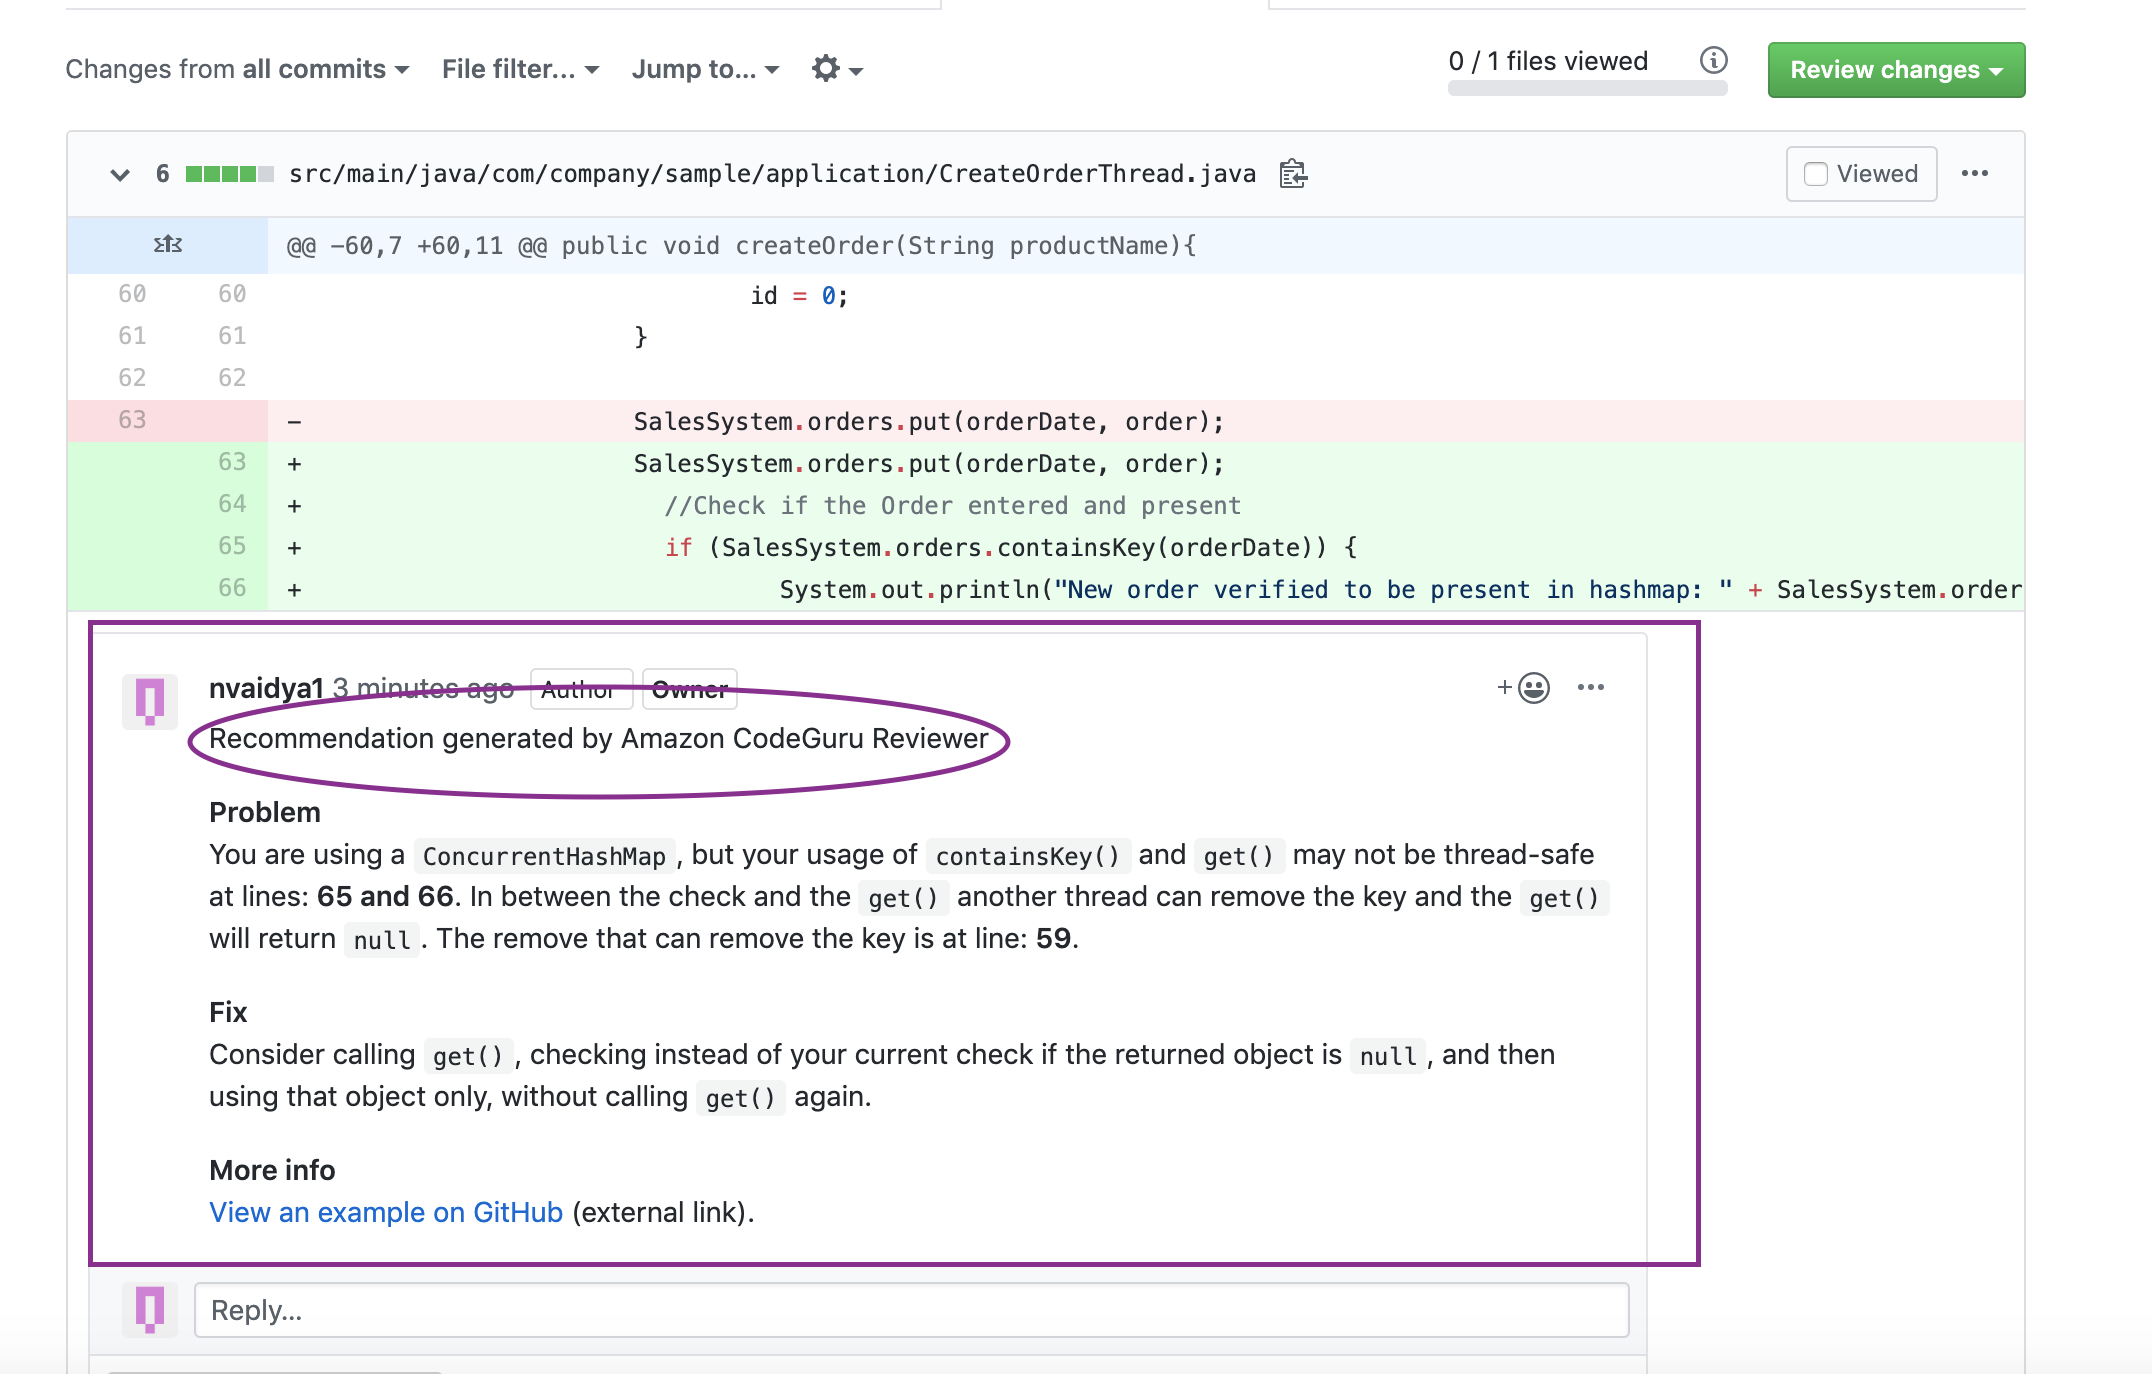
The following screenshot shows a recommendation generated about potential thread concurrency susceptibility:
Another example below to show how the developer can provide feedback about recommendations using emojis:
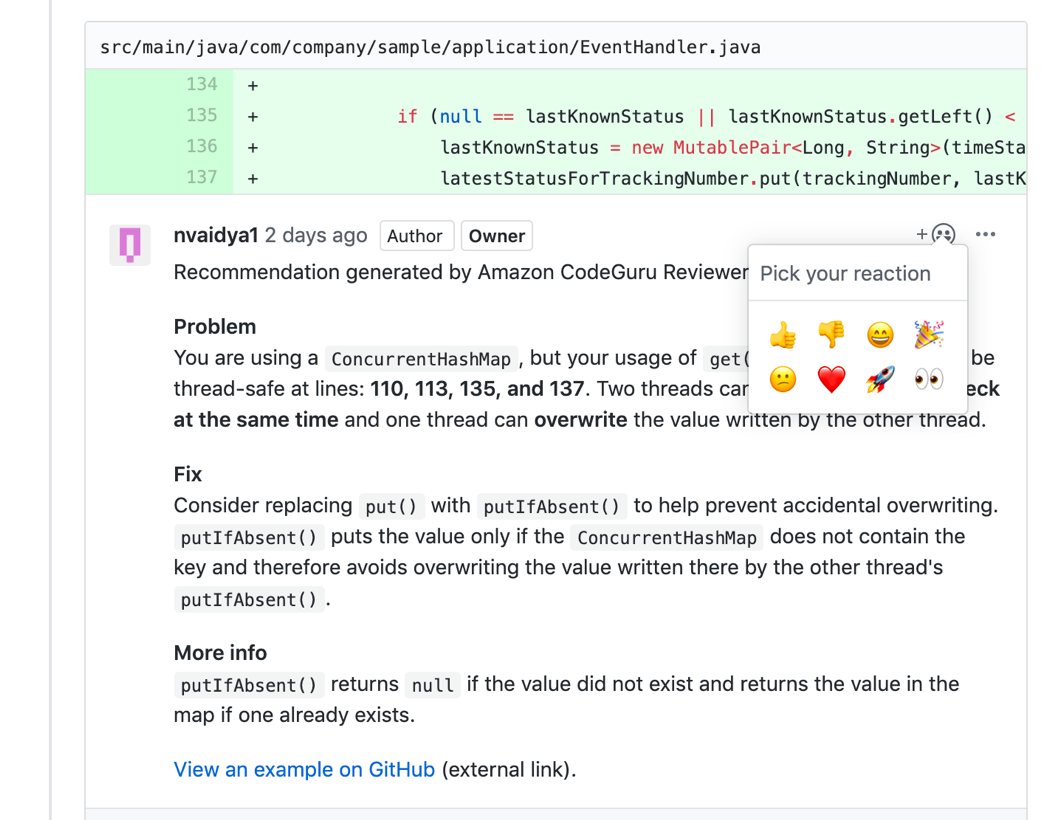
As you can see from the recommendations, not only are the code issues detected, but a detailed recommendation is also provided on how to fix the issues, along with a link to examples, and documentation, wherever applicable. For each of the recommendations, a developer can give feedback about whether the recommendation was useful or not with a simple emoji selection under Pick your reaction.
Please note that the CodeGuru service is used to identify difficult-to-find functional defects and not syntactical errors. Syntax errors should be flagged by the IDE and addressed at an early stage of development. CodeGuru is introduced at a later stage in a developer workflow, when the code is already developed, unit-tested, and ready for code-review.
CodeGuru Profiler
CodeGuru Profiler functionality focuses on searching for application performance optimizations, identifying your most “expensive” lines of code that take unnecessarily long times or higher-than-expected CPU cycles, for which there is a better/faster/cheaper alternative. It generates recommendations with actions you can take in order to reduce your CPU use, lower your compute costs, and overall improve your application’s performance. The profiler simplifies the troubleshooting and exploration of the application’s runtime behavior using visualizations. Examples of such issues include excessive recreation of expensive objects, expensive deserialization, usage of inefficient libraries, and excessive logging.
This post provides two sample application Demo profiles by default in the profiler section to demonstrate the visualization of CPU and latency characteristics of those profiles. This offers a quick and easy way to check the profiler output without onboarding an application. Additionally, there are recommendations shown for the {CodeGuru} DemoProfilingGroup-WithIssues application profile. However, if you would like to run a proof-of-concept with real application, please follow the procedure below.
The following steps launch a sample application on Amazon EC2 and configure Profiler to monitor the application performance from the CodeGuru service.
Step 1: Create a profiling group
Follow these steps to create a profiling group:
1. From the CodeGuru dashboard, choose Profiler from the left panel.
2. Under Profiling groups, select Create profiling group and type the name of your group. This workshop uses the name DemoProfilingGroup.
3. After typing the name, choose Create in the bottom right corner.
The output page shows you instructions on how to onboard the CodeGuru Profiler Agent library into your application, along with the necessary permissions required to successfully submit data to CodeGuru. This workshop uses the AWS CloudFormation template to automate the onboarding configuration and launch Amazon EC2 with the application and its dependencies.
Step 2: Run AWS Cloudformation to launch Amazon EC2 with the Java application:
This example runs an AWS CloudFormation template that does all the undifferentiated heavy lifting of launching an Amazon EC2 machine and installing JDK, Maven, and the sample demo application.
Once done, it configures the application to use a profiling group named DemoProfilingGroup, compiles the application, and executes it as a background process. This results in the sample demo application running in the region you choose, and submits profiling data to the CodeGuru Profiler Service under the DemoProfilingGroup profiling group created in the previous step.
To launch the AWS CloudFormation template that deploys the demo application, choose the following Launch Stack button, and fill in the Stack name, Key-pair name, and Profiling Group name.

Once the AWS CloudFormation deployment succeeds, log in to your terminal of choice and use ssh to connect to the Amazon EC2 machine. Check the running application using the following commands:
ssh -i ''<path-to-keypair.pem-file>'' ec2-user@<ec2-ip-address>
java -version
mvn -v
ps -ef | grep SalesSystem  => This is the java application running in the background
tail /var/log/cloud-init-output.log  => You should see output as INFO: Successfully reported profile
Once the CodeGuru agent is imported into the application, a separate profiler thread spawns when the application runs. It samples the application CPU and Latency characteristics and delivers them to the backend Profiler service for building the application profile.
Step 3: Check the Profiler flame-graphs:
Wait for 10-15 minutes for your profiling-group to become active (if not already) and for profiling data to be submitted and aggregated by the CodeGuru Profiler service.
Visit the Profiling Groups page and choose DemoProfilingGroup. You should see the following page showing your application’s profiling data in a visualization called a flame-graph, as shown in the screenshot below. Detailed explanation about flame-graphs and how to read them follow.
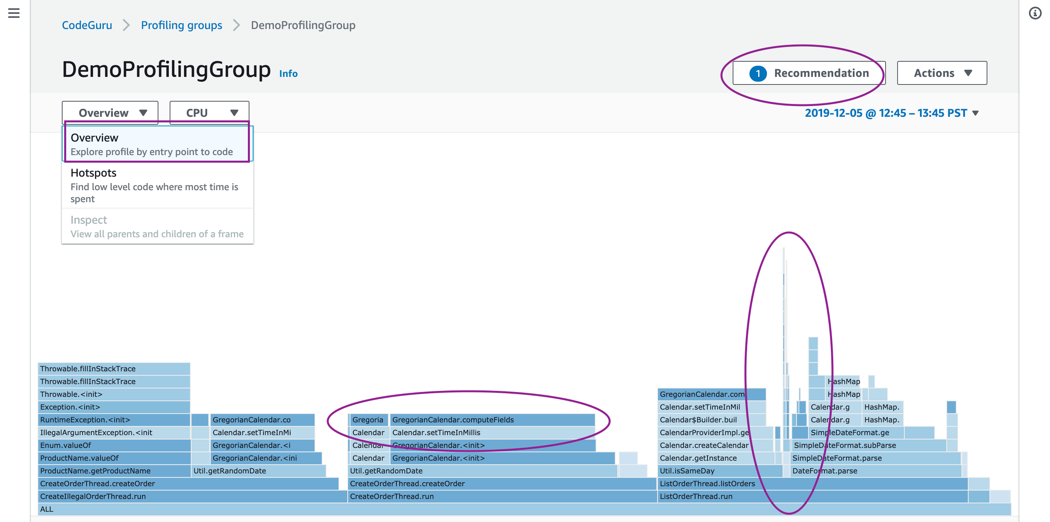
Profiler extensively uses flame-graph visualizations to display your application’s profiling data since they’re a great way to convey issues once you understand how to read them.
The x-axis shows the stack profile population (collection of stack traces) sorted alphabetically (not chronologically), and the y-axis shows stack depth, counting from zero at the bottom. Each rectangle represents a stack frame. The wider a frame is is, the more often it was present in the stacks. The top edge shows what is on CPU, and beneath it is its ancestry. The colors are usually not significant (they’re picked randomly to differentiate frames).
As shown in the preceding screenshot, the stack traces for the three threads are shown, which are triggered by the code in the SalesSystem.java file.
1) createOrderThread.run
2) createIllegalOrderThread.run
3) listOrderThread.run
The flame-graph also depicts the stack depth and points out specific function names when you hover over that block. The marked areas in the flame-graph highlight the top block functions on-CPU and spikes in stack-trace. This may indicate an opportunity to optimize.
It is evident from the preceding diagram that significant CPU time is being used by an exception stack trace (leftmost). It’s also highlighted in the recommendation report as described in Step 4 below.
The exception is caused by trying to instantiate an Enum class giving it invalid String values. If you review the file CreateIllegalOrderThread.java, you should notice the constructors being called with illegal product names, which are defined in ProductName.java.
Step 4: Profiler Recommendations:
Apart from the real-time visualization of application performance described in the preceding section, a recommendation report (generated after a period of time) may appear, pointing out suspected inefficiencies to fix to improve the application performance. Once the recommendation appears, select the Recommendation link to see the details.
Each section in the Recommendations report can be expanded in order to get instructions on how to resolve the issue, or to examine several locations in which there were issues in your data, as shown in the following screenshot.
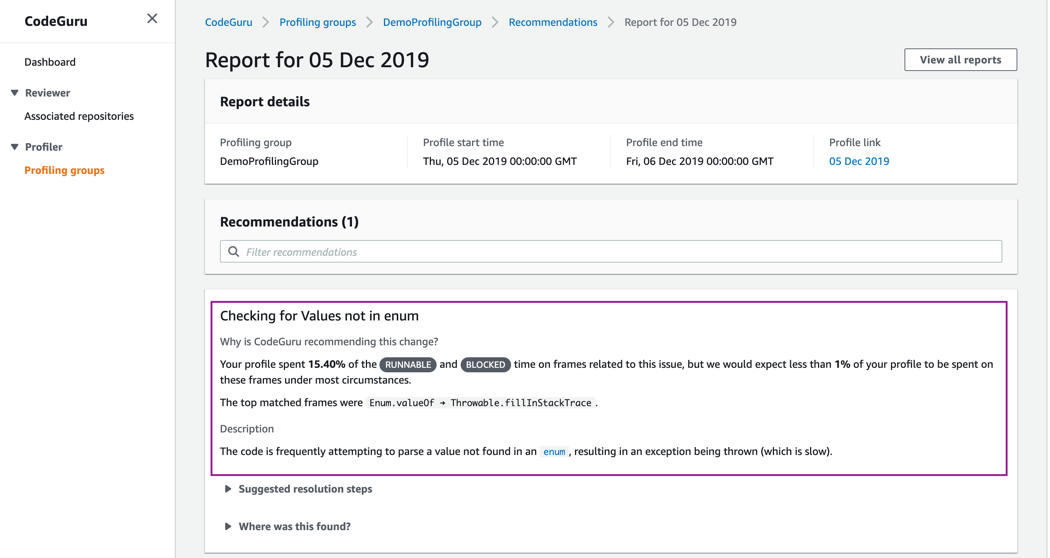
In the preceding example, the report includes an issue named Checking for Values not in enum, in which it conveys that more time (15.4%) was spent processing exceptions than expected (less than 1%). The reason for the exceptions is described in Step 3 and the resolution recommendations are provided in the report.
CodeGuru supportability:
CodeGuru currently supports native Java-based applications for the Reviewer and Profiler functionality. The Reviewer functionality currently supports AWS CodeCommit and all cloud-hosted non-enterprise versions of GitHub products, including Free/Pro/Team, as code repositories.
Amazon CodeGuru Profiler does not have any code repository dependence and works with Java applications hosted on Amazon EC2, containerized applications running on Amazon ECS and Amazon EKS, serverless applications running on AWS Fargate, and on-premises hosts with adequate AWS credentials.
Cleanup
At the end of this workshop, once the testing is completed, follow these steps to disable the service to avoid incurring any further charges.
1. Reviewer: Remove the association of the CodeGuru service to the repository, so that any further Pull-request notifications don’t trigger the CodeGuru service to perform an automated code-review.
2. Profiler: Remove the profiling group.
3. Amazon EC2 Compute: Go to the Amazon EC2 service, select the CodeGuru EC2 machine, and select the option to terminate the Amazon EC2 compute.
Conclusion
This post reviewed the CodeGuru service and implemented code examples for the Reviewer and Profiler functionalities. It described Reviewer functionality providing automated code-reviews and detailed guidance on fixes. The Profiler functionality enabled you to visualize your real-time application stack for granular inspection and generate recommendations that provided guidance on performance improvements.
I hope this post was informative and enabled you to onboard and test the service, as well as to leverage this service in your application development workflow.
About the Author

Nikunj Vaidya is a Sr. Solutions Architect with Amazon Web Services, focusing in the area of DevOps services. From his past experience in Sr. Engineering roles, he cares about improving the software quality and customer experience, and closely works with the customers to offer technical guidance on building DevOps solutions.
我们今天的关于Firebug Tutorial (Section 1)– Logging, Profiling and CommandLine (Part II)的分享就到这里,谢谢您的阅读,如果想了解更多关于11:12:21.924 [main] DEBUG org.apache.ibatis.logging.LogFactory - Logging initialized using ''c...、48-Command line is too long. Shorten command line、Angular 2 User Registration and Login Example & Tutorial - Built with Angular 2.0 Final.、Automating code reviews and application profiling with Amazon CodeGuru的相关信息,可以在本站进行搜索。
对于【mybatis】根据model自动生成 mapper service dao 层的工具类感兴趣的读者,本文将会是一篇不错的选择,我们将详细介绍mybatis怎么自动生成mapper,并为您提供关于eclipse maven 插件 自动生成 mybatis dao、mapper 、pojo、idea + groovy + mybatis 自动生成 Dao、mappings 和 实体类、IDEA 利用 mybatis-generator 自动生成 dao 和 mapper、idea 集成 MyBatis Generator 插件,自动生成 dao,model,sql map 文件的有用信息。
本文目录一览:- 【mybatis】根据model自动生成 mapper service dao 层的工具类(mybatis怎么自动生成mapper)
- eclipse maven 插件 自动生成 mybatis dao、mapper 、pojo
- idea + groovy + mybatis 自动生成 Dao、mappings 和 实体类
- IDEA 利用 mybatis-generator 自动生成 dao 和 mapper
- idea 集成 MyBatis Generator 插件,自动生成 dao,model,sql map 文件
")
【mybatis】根据model自动生成 mapper service dao 层的工具类(mybatis怎么自动生成mapper)
import java.io.*;
import java.lang.reflect.Field;
import java.lang.reflect.InvocationTargetException;
import java.lang.reflect.Method;
import java.util.ArrayList;
import java.util.HashMap;
import java.util.List;
import java.util.Map;
/**
* 用户:LX
* 创建时间: 2017/10/9. 9:49
* 地点:广州
* 目的: 根据model 自动生成 mapper service dao 层的工具
* 结果:
* 颜色设置:
* 40: 黑 30: 黑
* 41: 红 31: 红
* 42: 绿 32: 绿
* 43: 黄 33: 黄
* 44: 蓝 34: 蓝
* 45: 紫 35: 紫
* 46: 深绿 36: 深绿
* 47: 白色 37: 白色
*
* \033[0m 关闭所有属性
* \033[1m 设置高亮度
* \03[4m 下划线
* \033[5m 闪烁
* \033[7m 反显
* \033[8m 消隐
*/
public class CRUPUtils {
/**
* 使用说明:
* 本工具类的作用: 根据model自动生成dao service mapper,另外将基础的 增加、修改、根据主键查询自动生成这个sql和接口方法
* 本工具类有几个约定,model的第一个属性是默认的id,如果不是请自行调整
* 本工具类的默认使用utf-8的编码,如果需要其他编码,请自行指定
* 生成代码的时候可能会有一些数据类型不识别,需要自行查看报错信息并解决。
*
* 如果已经存在要生成的文件,则会跳过不进行处理
* 默认生成的代码文件格式和命名规范是这样的:
* service
* 类名Service
* impl
* 类名ServiceImpl
* dao
* 类名Dao
*
* 使用:直接修改 servicePath 和 daoPath 以及 xmlMapping 变量名即可
* 指定好要生成的位置之后,文件会放在这个目录之下,如果不希望生成文件,只需要生成sql的话,直接调用 findIdMapper()
* insertMapper() updateMapper() 方法即可,对于有30个以上字段的model,可以快速方便的将update insert语句生成
*/
/**
* 指定编码
*/
private String encode = "UTF-8";
/**
* 指定service层路径
*/
private String servicePath = "E:\\IDEATest\\modelDemo1\\src\\service";
/**
* 指定dao层路径
*/
private String daoPath = "E:\\IDEATest\\modelDemo1\\src\\dao";
/**
* mapping文件的位置,在他的下面创建文件。 会生成 类名Mapper.xml 的xml文件
*/
private String xmlMapping = "E:\\IDEATest\\noWifi\\modelDemo1\\src\\mapper";
public static void main(String[] args) {
CRUPUtils crupUtils = new CRUPUtils();
Test card = new Test();
// crupUtils.findIdMapper(card);
// crupUtils.insertMapper(card);
// crupUtils.updateMapper(card);
//生成xml文件 和serivce文件
crupUtils.serviceGenerate(card);
crupUtils.xmlMapping(card);
}
/**
* 自动生成service
* @param obj
*/
private void serviceGenerate(Object obj){
StringBuffer sb = new StringBuffer();
String namePackage = obj.getClass().getName(); //获取类名
String name = namePackage.substring(namePackage.lastIndexOf(".") + 1, namePackage.length()); //对类名进行剪切
String className = name + "Service";
//包的路径
String packageStr = servicePath.substring(servicePath.indexOf("src\\") + 4, servicePath.length());
packageStr = packageStr.replace(''\\'', ''.'');
sb.append("package ");
sb.append(packageStr);
sb.append(";");
sb.append("\r\n"); //换行
sb.append("\r\n"); //换行
sb.append("import " + namePackage + ";");
sb.append("\r\n"); //换行
sb.append("\r\n"); //换行
sb.append("public interface ");
sb.append(className + " {");
sb.append("\r\n"); //换行
sb.append("\r\n"); //换行
//生成根据主键查询的sql
Map xmlMap = findIdMapper(obj);
if (xmlMap != null){
sb.append("\t" + name + " " + xmlMap.get("id") + "(String id);");
sb.append("\r\n"); //换行
sb.append("\r\n"); //换行
}
//生成更新的sql
Map updateMap = updateMapper(obj);
if (updateMap != null){
sb.append("\t" + "void " + updateMap.get("id") + "(" + name + " " + name.toLowerCase() + ");");
sb.append("\r\n"); //换行
sb.append("\r\n"); //换行
}
//生成新增的sql
Map addMap = insertMapper(obj);
if (addMap != null){
sb.append("\t" + name + " " + addMap.get("id") + "(" + name + " " + name.toLowerCase() + ");");
sb.append("\r\n"); //换行
sb.append("\r\n"); //换行
}
sb.append("}");
System.out.println("\033[37;1m" + "" + "\033[0m"); //对颜色进行初始化操作
System.out.println(sb.toString());
//对路径进行初始化
init(servicePath);
File fileJava = new File(servicePath + "\\" +className +".java");
createFileWrite(sb.toString(), fileJava);
/**
* 生成service的实现层
*/
StringBuffer sbu = new StringBuffer();
sbu.append("package ");
sbu.append(packageStr + ".impl");
sbu.append(";");
sbu.append("\r\n"); //换行
sbu.append("\r\n"); //换行
sbu.append("import " + namePackage + ";");
sbu.append("\r\n"); //换行
sbu.append("import " + packageStr + "." + className + ";");
sbu.append("\r\n"); //换行
sbu.append("\r\n"); //换行
sbu.append("import org.springframework.beans.factory.annotation.Autowired;");
sbu.append("\r\n"); //换行
sbu.append("import org.springframework.stereotype.Service;");
sbu.append("\r\n"); //换行
sbu.append("\r\n"); //换行
sbu.append("@Service"); //换行
sbu.append("\r\n"); //换行
sbu.append("public class " + className + "Impl" + " implements " + className + " {");
sbu.append("\r\n"); //换行
sbu.append("\r\n"); //换行
sbu.append("\t//压制全部警告");
sbu.append("\r\n"); //换行
sbu.append("\t@SuppressWarnings(\"all\")");
sbu.append("\r\n"); //换行
sbu.append("\t@Autowired");
sbu.append("\r\n"); //换行
sbu.append("\tprivate " + name + "Dao " + name.toLowerCase() + "Dao;");
sbu.append("\r\n"); //换行
sbu.append("\r\n"); //换行
//根据id查询的语句
if (xmlMap != null){
sbu.append("\t@Override");
sbu.append("\r\n"); //换行
sbu.append("\tpublic " + name + " " + xmlMap.get("id") + "(String id){");
sbu.append("\r\n"); //换行
sbu.append("\t\t" + name.toLowerCase() + "Dao." + xmlMap.get("id") + "(id);");
sbu.append("\r\n"); //换行
sbu.append("\t}");
sbu.append("\r\n"); //换行
sbu.append("\r\n"); //换行
}
//生成更新的sql
if (updateMap != null){
sbu.append("\t@Override");
sbu.append("\r\n"); //换行
sbu.append("\tpublic " + "void " + updateMap.get("id") + "(" + name + " " + name.toLowerCase() + "){");
sbu.append("\r\n"); //换行
sbu.append("\t\t" + name.toLowerCase() + "Dao." + updateMap.get("id") + "(" + name.toLowerCase() + ");");
sbu.append("\r\n"); //换行
sbu.append("\t}");
sbu.append("\r\n"); //换行
sbu.append("\r\n"); //换行
}
//生成新增的sql
if (addMap != null){
sbu.append("\t@Override");
sbu.append("\r\n"); //换行
sbu.append("\tpublic " + "void " + addMap.get("id") + "(" + name + " " + name.toLowerCase() + "){");
sbu.append("\r\n"); //换行
sbu.append("\t\t" + name.toLowerCase() + "Dao." + addMap.get("id") + "(" + name.toLowerCase() + ");");
sbu.append("\r\n"); //换行
sbu.append("\t}");
sbu.append("\r\n"); //换行
sbu.append("\r\n"); //换行
}
init(servicePath + "\\impl");
File fileJavaImpl = new File(servicePath + "\\impl\\" + className +"Impl.java");
createFileWrite(sbu.toString(), fileJavaImpl);
}
/**
* 自动生成dao 层
* @param obj
* 返回dao层的接口
*/
private String daoGenerate(Object obj){
StringBuffer sb = new StringBuffer();
String namePackage = obj.getClass().getName(); //获取类名
String name = namePackage.substring(namePackage.lastIndexOf(".") + 1, namePackage.length()); //对类名进行剪切
String className = name + "Dao";
//包的路径
String packageStr = daoPath.substring(daoPath.indexOf("src\\") + 4, daoPath.length());
packageStr = packageStr.replace(''\\'', ''.'');
sb.append("package ");
sb.append(packageStr);
sb.append(";");
sb.append("\r\n"); //换行
sb.append("\r\n"); //换行
sb.append("import " + namePackage + ";");
sb.append("\r\n"); //换行
sb.append("\r\n"); //换行
sb.append("public interface ");
sb.append(className + " {");
sb.append("\r\n"); //换行
sb.append("\r\n"); //换行
//生成根据主键查询的sql
Map xmlMap = findIdMapper(obj);
if (xmlMap != null){
sb.append("\t" + name + " " + xmlMap.get("id") + "(String id);");
sb.append("\r\n"); //换行
sb.append("\r\n"); //换行
}
//生成更新的sql
Map updateMap = updateMapper(obj);
if (updateMap != null){
sb.append("\t" + "void " + updateMap.get("id") + "(" + name + " " + name.toLowerCase() + ");");
sb.append("\r\n"); //换行
sb.append("\r\n"); //换行
}
//生成新增的sql
Map addMap = insertMapper(obj);
if (addMap != null){
sb.append("\t" + name + " " + addMap.get("id") + "(" + name + " " + name.toLowerCase() + ");");
sb.append("\r\n"); //换行
sb.append("\r\n"); //换行
}
sb.append("}");
System.out.println("\033[37;1m" + "" + "\033[0m"); //对颜色进行初始化操作
System.out.println(sb.toString());
//对路径进行初始化
init(daoPath);
File fileJava = new File(daoPath + "\\" +className +".java");
createFileWrite(sb.toString(), fileJava);
return packageStr + "." + className;
}
/**
* 自动生成mapper文件到指定位置,并生成相应的常用代码
* @param obj model对象
*/
private void xmlMapping(Object obj){
//生成dao
String dao = daoGenerate(obj);
String namePackage = obj.getClass().getName(); //获取类名
String name = namePackage.substring(namePackage.lastIndexOf(".") + 1, namePackage.length()); //对类名进行剪切
//拼成mapper
String mapperName = (name.toLowerCase()) + "Mapper.xml";
String mapperPath = xmlMapping + "\\" + mapperName;
StringBuffer sb = new StringBuffer();
sb.append("<?xml version=\"1.0\" encoding=\"UTF-8\" ?>");
sb.append("\r\n"); //换行
sb.append("<!DOCTYPE mapper PUBLIC \"-//mybatis.org//DTD Mapper 3.0//EN\" \"http://mybatis.org/dtd/mybatis-3-mapper.dtd\">");
sb.append("\r\n"); //换行
sb.append("\r\n"); //换行
sb.append("<mapper namespace=\"" + dao + "\">");
sb.append("\r\n"); //换行
sb.append("\r\n"); //换行
//生成根据主键查询的sql
Map findMap = findIdMapper(obj);
if (findMap != null){
sb.append(findMap.get("sql"));
sb.append("\r\n"); //换行
sb.append("\r\n"); //换行
}
//生成更新的sql
Map updateMap = updateMapper(obj);
if (updateMap != null){
sb.append(updateMap.get("sql"));
sb.append("\r\n"); //换行
sb.append("\r\n"); //换行
}
//生成新增的sql
Map addMap = insertMapper(obj);
if (addMap != null){
sb.append(addMap.get("sql"));
sb.append("\r\n"); //换行
sb.append("\r\n"); //换行
}
sb.append("\r\n"); //换行
sb.append("\r\n"); //换行
sb.append("</mapper>");
System.out.println("\033[37;1m" + "" + "\033[0m"); //对颜色进行初始化操作
System.out.println(sb.toString());
//对路径进行初始化
init(xmlMapping);
File fileXML = new File(mapperPath);
createFileWrite(sb.toString(), fileXML);
}
/**
* 生成根据主键查询的sql,不能正常转换的不会自动处理,只会提醒
* @param obj model对象
*/
private Map findIdMapper(Object obj){
if (obj != null){
StringBuffer sb = new StringBuffer();
String namePackage = obj.getClass().getName(); //获取类名
String name = namePackage.substring(namePackage.lastIndexOf(".") + 1, namePackage.length()); //对类名进行剪切
System.out.println(name + "==========生成根据主键查询的sql start==============================================================================" );
//获取全部是属性名
String[] strArr = getFiledName(obj);
String attributeName = strArr[0]; //获得属性名,默认第一个是主键
String transformation = transformation(attributeName, obj);
//出错的
String st = "";
String sqlId = ""; //生成的sql的id
if (!"jdbcType=暂无对应数据".equals(transformation)){
Map map = new HashMap<>();
map.put("name", attributeName); //属性名
map.put("type", transformation); //字段类型
sqlId = "get" + name + "ById";
sb.append("<select id=\"" + sqlId + "\" parameterType=\"java.lang.String\" resultType=\"" + namePackage + "\">");
sb.append("\r\n"); //换行
sb.append("\tselect * from ");
sb.append(name);
sb.append(" where " + attributeName + " = #{" + map.get("name") + ", " + map.get("type") + "}");
sb.append("\r\n"); //换行
sb.append("</select>");
} else {
//错误的进行记录,防止错误的漏了
st = attributeName;
}
System.out.println("\033[33;1m" + sb.toString() + "\033[0m");
System.out.println(name +"==========生成根据主键查询的sql end==============================================================================");
System.out.println("无法转换的属性:" + "\033[31;1m" + st + "\033[0m");
Map m = new HashMap();
m.put("id", sqlId); //xml上的id
m.put("sql", sb.toString()); //生成的sql加拼好的外壳
return m;
} else {
return null;
}
}
/**
* 生成更新的语句 不能正常转换的不会自动处理,只会提醒
* @param obj
*/
private Map updateMapper(Object obj){
if (obj != null) {
System.out.println("\033[37;1m" + "" + "\033[0m"); //对颜色进行初始化操作
System.out.println("==========生成update 语句 start==============================================================================");
String namePack = obj.getClass().getName(); //获取类名
String name = namePack.substring(namePack.lastIndexOf(".") + 1, namePack.length()); //对类名进行剪切
StringBuffer sb = new StringBuffer();
String sqlId = ""; //生成的sql的id
sqlId = "update" + name;
sb.append("<update id=\"" + sqlId + "\" parameterType=\"" + namePack + "\">");
sb.append("\r\n"); //换行
sb.append("\tupdate ");
sb.append(name);
sb.append("\r\n"); //换行
sb.append("\t<set>" + "\r\n");
//获取全部是属性名
String[] strArr = getFiledName(obj);
List<Map> list = new ArrayList<Map>(); //用于保存返回的jdbc类型
StringBuffer st = new StringBuffer();
if (strArr != null && strArr.length > 0){
for (int i = 0; i < strArr.length; i ++ ){
String attributeName = strArr[i]; //获得属性名
String transformation = transformation(attributeName, obj);
if (!"jdbcType=暂无对应数据".equals(transformation)){
Map map = new HashMap<>();
map.put("name", attributeName); //属性名
map.put("type", transformation); //字段类型
list.add(map);
} else {
//错误的进行记录,防止错误的漏了
st.append(attributeName);
}
}
//获取到全部属性名与字段类型后的处理
String id = "";
if (list != null && list.size() > 0){
for (int i = 0; i < list.size(); i ++){
//默认第一条为主键
if (i == 0){
if ("error=1".equals(list.get(i).get("type"))){
id = "where " + list.get(i).get("name") + " = #{" + list.get(i).get("name") + "}";
} else {
id = "where " + list.get(i).get("name") + " = #{" + list.get(i).get("name") + "," + list.get(i).get("type") + "}";
}
} else {
if ("error=1".equals(list.get(i).get("type"))){
sb.append("\t\t" + "<if test=\"" + list.get(i).get("name") + " != null and " + list.get(i).get("name") + " != ''''\"" + ">");
// sb.append("\r\n"); 暂时去掉,
sb.append("\t\t\t" + list.get(i).get("name") + " = #{" + list.get(i).get("name") + "},");
// sb.append("\r\n"); 暂时去掉,
sb.append("\t\t" + "</if>");
sb.append("\t\r\n");
} else {
sb.append("\t\t" + "<if test=\"" + list.get(i).get("name") + " != null and " + list.get(i).get("name") + " != ''''\"" + ">");
// sb.append("\r\n");
sb.append("\t\t\t" + list.get(i).get("name") + " = #{" + list.get(i).get("name") + "," + list.get(i).get("type") + "},");
// sb.append("\r\n");
sb.append("\t\t" + "</if>");
sb.append("\r\n");
}
}
}
sb.append("\t</set>");
sb.append("\r\n");
sb.append("\t" + id);
sb.append("\r\n");
sb.append("</update>");
System.out.println("\033[33;1m" + sb.toString() + "\033[0m");
System.out.println("==========生成update 语句 end==============================================================================");
System.out.println("无法转换的属性:" + "\033[31;1m" + st + "\033[0m");
Map m = new HashMap();
m.put("id", sqlId); //xml上的id
m.put("sql", sb.toString()); //生成的sql加拼好的外壳
return m;
}
}
}
return null;
}
/**
* 生成insert 语句,不能正常转换的不会自动处理,只会提醒
* @param obj
*/
private Map insertMapper(Object obj){
if (obj != null){
//初始化颜色
System.out.println("\033[37;1m" + "" + "\033[0m");
System.out.println("==========生成insert 语句 start==============================================================================");
String namePack = obj.getClass().getName(); //获取类名
String name = namePack.substring(namePack.lastIndexOf(".") + 1, namePack.length()); //对类名进行剪切
StringBuffer sb = new StringBuffer();
String sqlId = ""; //生成的sql的id
sqlId = "add" + name;
sb.append("<insert id=\"" + sqlId + "\" parameterType=\"" + namePack + "\">");
sb.append("\r\n"); //换行
sb.append("\tinsert into ");
sb.append(name + "(");
sb.append("\r\n"); //换行
//获取全部是属性名
String[] strArr = getFiledName(obj);
List<Map> list = new ArrayList<Map>(); //用于保存返回的jdbc类型
StringBuffer st = new StringBuffer();
if (strArr != null && strArr.length > 0){
for (int i = 0; i < strArr.length; i ++ ){
String attributeName = strArr[i]; //获得属性名
String transformation = transformation(attributeName, obj);
if (!"jdbcType=暂无对应数据".equals(transformation)) {
Map map = new HashMap<>();
map.put("name", attributeName); //属性名
map.put("type", transformation); //字段类型
list.add(map);
if ((strArr.length - 1) == i) {
sb.append(attributeName); //最后一个就不需要逗号
} else {
if (i == 0){ //第一个的话加制表符,使格式化
sb.append("\t\t" + attributeName + ",");
} else {
sb.append(attributeName + ",");
}
}
} else {
//错误的进行记录,防止错误的漏了
st.append(attributeName);
}
}
sb.append("\r\n"); //换行
sb.append("\t) values (");
sb.append("\r\n"); //换行
if (list != null && list.size() > 0){
for (int i = 0; i < list.size(); i ++){
if ((list.size() - 1) == i){
if ("error=1".equals(list.get(i).get("type"))){
sb.append("#{" + list.get(i).get("name") + "}");//最后一个就不需要逗号
} else {
sb.append("#{" + list.get(i).get("name") + "," + list.get(i).get("type") + "}");//最后一个就不需要逗号
}
} else {
if (i == 0){ //第一个的话加制表符,使格式化
//日期的暂时不指定
if ("error=1".equals(list.get(i).get("type"))){
sb.append("\t\t" + "#{" + list.get(i).get("name") + "},");
} else {
sb.append("\t\t" + "#{" + list.get(i).get("name") + "," + list.get(i).get("type") + "},");
}
} else {
//日期的暂时不指定
if ("error=1".equals(list.get(i).get("type"))){
sb.append("#{" + list.get(i).get("name") + "},");
} else {
sb.append("#{" + list.get(i).get("name") + "," + list.get(i).get("type") + "},");
}
}
}
}
sb.append("\r\n"); //换行
sb.append("\t)");
}
}
sb.append("\r\n"); //换行
sb.append("</insert>");
System.out.println("\033[33;1m" + sb.toString() + "\033[0m");
System.out.println("==========生成insert 语句 end==============================================================================");
System.out.println("无法转换的属性:" + "\033[31;1m" + st + "\033[0m");
Map m = new HashMap();
m.put("id", sqlId); //xml上的id
m.put("sql", sb.toString()); //生成的sql加拼好的外壳
return m;
}
return null;
}
/**
* 对文件夹位置进行初始化,没有就创建
* path : 文件路径
*/
public String init(String path){
File file = new File(path);
//判断目标文件所在的目录是否存在
if (! folderisExists(file)){
//如果目标文件所在的目录不存在,则创建目录(注意,如果是文件夹,应该是创建父目录,否则创建目录即可)
boolean mkdirs = file.mkdirs();
if (mkdirs){
System.out.println("创建文件夹成功,path:" + path);
}
}
return path;
}
/**
* 创建文件并写入数据(注意,如果已经存在文件,是不会去进行重新生成或者插入的)
* @param str 要写入的东西
* @param file 要写入的文件
*/
public void createFileWrite(String str, File file){
//判断是否存在这个文件
if (!fileIsExists(file)){
try {
//创建这个文件
file.createNewFile();
FileOutputStream writerStream = new FileOutputStream(file);
BufferedWriter writer = new BufferedWriter(new OutputStreamWriter(writerStream, encode));
//写入数据
writer.write(str.toString());
writer.close();
System.out.println("路径:" + file.getPath());
} catch (IOException e) {
e.printStackTrace();
System.out.println("创建文件失败");
}
} else {
System.out.println("已经存在mapper文件,不做处理");
}
}
/**
* 判断文件是否存在
* @param file 文件
* @return true 存在 false 不存在
*/
public boolean fileIsExists(File file) {
if (file.exists()) {
//文件存在
return true;
} else {
//文件不存在
return false;
}
}
/**
* 文件夹是否存在
* @param file
* @return true 存在 false 不存在
*/
public boolean folderisExists(File file){
if (!file.exists() && !file.isDirectory()){
//文件不存在
return false;
} else {
//文件夹存在
return true;
}
}
/**
* 根据属性名转换为对应的 mybatis 的 jdbcType类型
* @param attribute 属性名
* @param obj model
* @return
*/
public String transformation(String attribute, Object obj){
String type = getHandleType(attribute, obj);
if (type != null && !"".equals(type) && !"null".equals(type)){
if ("String".equals(type)){
return "jdbcType=VARCHAR";
} else if ("BigDecimal".equals(type)){
return "jdbcType=NUMERIC";
} else if ("boolean".equals(type)){
return "jdbcType=BOOLEAN";
} else if ("byte".equals(type)){
return "jdbcType=TINYINT";
} else if ("short".equals(type)){
return "jdbcType=SMALLINT";
} else if ("int".equals(type)){
return "jdbcType=INTEGER";
} else if ("Integer".equals(type)){
return "jdbcType=INTEGER";
} else if ("long".equals(type)){
return "jdbcType=BIGINT";
} else if ("float".equals(type)){
return "jdbcType=REAL";
} else if ("double".equals(type)){
return "jdbcType=DOUBLE";
} else if ("Time".equals(type)){
return "jdbcType=TIME";
} else if ("Timestamp".equals(type)){
return "jdbcType=TIMESTAMP";
} else if ("Clob".equals(type)){
return "jdbcType=CLOB";
} else if ("Blob".equals(type)){
return "jdbcType=BLOB";
} else if ("Array".equals(type)){
return "jdbcType=ARRAY";
} else if ("Struct".equals(type)){
return "jdbcType=STRUCT";
} else if ("Long".equals(type)){
return "jdbcType=BIGINT";
/*注意,发现date类型存在一个问题。如果传入实体对象里的字段是java.util.Date或者java.sql.Date或者java.sql.Time或者java.sql.Timestamp
1, jdbcType并未指定的情况下,则返回日期和时分秒,
2, jdbcType指定为”JdbcType.DATE”,则只返回日期,不带时分秒
3, jdbcType指定为”JdbcType.TIME”,则只有时分秒有效!
上述情况,还与数据库有关系,现测试到sybase如果传入new Date(), 那么保存的只有日期,没有具体时间,所以日期暂时不指定jdbcType
对于Ibatis操作Date/Time/DateTime,总结如下:
将pojo的属性类型设置为java.sql.Date(或java.sql.Time, java.sql.Timestamp),此时会严格遵循这三种类型的语义。但此方法因存在前文中提到的性能问题,在JDK1.6以前的JDK版本中能少使用就少使用。
如果你想在pojo中使用java.util.Date, 则要注意:
完整的日期时间,要确保jdbcType为空,或为DATE,TIME以外的值
只需要时间,要指定jdbcType=”TIME”
只需要日期,要指定jdbcType=”DATE”
*/
} else if ("Date".equals(type)){
// return "jdbcType=DATE";
return "error=1";
} else if ("class [B".equals(type)){ //对应byte[]
return "jdbcType=BINARY";
} else {
return "jdbcType=暂无对应数据";
}
}
return "jdbcType=暂无对应数据";
}
/**
* 获取字符串处理后的 属性类型
* 经过本方法处理后的不在是 class java.lang.String 这种类型,而是 String 这样的类型
* @param attribute 属性名
* @param obj model
* @return 属性对应的类型
*/
private String getHandleType(String attribute, Object obj){
List<Map> typeValueByName = getTypeValueByName(attribute, obj);
if (typeValueByName != null && typeValueByName.size() == 1){
String type = null;
for (int i = 0; i < typeValueByName.size(); i ++ ){
Map map = typeValueByName.get(0);
type = (String)map.get("type");
}
if (type != null){
int contain = type.indexOf(".");
//判断是否有.来确定是否要截取
if (contain != -1){
type = type.substring(type.lastIndexOf(".") + 1, type.length()); //截取 从 . 最后出现的位置开始
return type;
} else {
return type;
}
}
}
return null;
}
/**
* 根据属性名获取属性值 和 类型
* @param fieldName 属性名
* @param obj 对象
* @return 属性值 和 类型
*/
private List<Map> getTypeValueByName(String fieldName, Object obj){
try {
String firstLetter = fieldName.substring(0, 1).toUpperCase();
String getTer = "get" + firstLetter + fieldName.substring(1);
Method method = obj.getClass().getMethod(getTer, new Class[]{});
Object value = method.invoke(obj, new Object[]{});
List<Map> list = new ArrayList<>();
Map map = new HashMap<>();
map.put("value", value); //值
Field declaredField = obj.getClass().getDeclaredField(fieldName);//根据属性名获取属性
String type = declaredField.getType().toString();
map.put("type", type);
list.add(map);
return list;
} catch (NoSuchMethodException | IllegalAccessException | InvocationTargetException | NoSuchFieldException e) {
e.printStackTrace();
return null;
}
}
/**
* 根据属性名获取属性值
* @param fieldName 属性名
* @param obj 对象
* @return 属性值
*/
private Object getFieldValueByName(String fieldName, Object obj){
try {
String firstLetter = fieldName.substring(0, 1).toUpperCase();
String getTer = "get" + firstLetter + fieldName.substring(1);
Method method = obj.getClass().getMethod(getTer, new Class[]{});
Object value = method.invoke(obj, new Object[]{});
return value;
} catch (NoSuchMethodException | IllegalAccessException | InvocationTargetException e) {
e.printStackTrace();
return null;
}
}
/**
* 获取全部属性名并返回一个属性数组
* */
private String[] getFiledName(Object o){
Field[] fields = o.getClass().getDeclaredFields(); // Field类的属性信息
String[] fieldNames = new String[fields.length];
for(int i = 0; i < fields.length; i ++){
fieldNames[i]=fields[i].getName();
}
return fieldNames;
}
/**
* 获取属性类型(type),属性名(name),属性值(value)的map组成的list
* */
private List getFiledsInfo(Object o){
Field[] fields = o.getClass().getDeclaredFields();
String[] fieldNames = new String[fields.length];
List<Map> list = new ArrayList<Map>();
Map infoMap = null;
for(int i = 0; i < fields.length;i ++){
infoMap = new HashMap();
infoMap.put("type", fields[i].getType().toString());
infoMap.put("name", fields[i].getName());
infoMap.put("value", getFieldValueByName(fields[i].getName(), o));
list.add(infoMap);
}
return list;
}
/**
* 获取对象的所有属性值,返回一个对象数组
* */
public Object[] getFiledValues(Object o){
String[] fieldNames=this.getFiledName(o);
Object[] value=new Object[fieldNames.length];
for(int i=0;i<fieldNames.length;i++){
value[i]=this.getFieldValueByName(fieldNames[i], o);
}
return value;
}
}

eclipse maven 插件 自动生成 mybatis dao、mapper 、pojo
1、首先,用 eclipse 创建一个 maven 项目。
2、其次,在 pom 文件下,加入如下插件配置:
pom.xml
<project xmlns="http://maven.apache.org/POM/4.0.0" xmlns:xsi="http://www.w3.org/2001/XMLSchema-instance"
  xsi:schemaLocation="http://maven.apache.org/POM/4.0.0 http://maven.apache.org/maven-v4_0_0.xsd">
  <modelVersion>4.0.0</modelVersion>
  <groupId>com.liyi.test</groupId>
  <artifactId>hello-mybatis</artifactId>
  <packaging>war</packaging>
  <version>0.0.1-SNAPSHOT</version>
  <name>hello-mybatis Maven Webapp</name>
  <url>http://maven.apache.org</url>
  <dependencies>
    <dependency>
      <groupId>junit</groupId>
      <artifactId>junit</artifactId>
      <version>3.8.1</version>
      <scope>test</scope>
    </dependency>
  </dependencies>
  <build>
    <finalName>hello-mybatis</finalName>
      <pluginManagement>
         <plugins>
           <plugin>
            <groupId>org.mybatis.generator</groupId>
            <artifactId>mybatis-generator-maven-plugin</artifactId>
            <version>1.3.2</version>
            <configuration>
                <configurationFile>src/main/resources/mybatis-generator/generator.xml</configurationFile>
                <verbose>true</verbose>
                <overwrite>true</overwrite>
             </configuration>
             <executions>
                <execution>
                    <id>Generate MyBatis Artifacts</id>
                    <goals>
                        <goal>generate</goal>
                    </goals>
                </execution>
             </executions>
             <dependencies>
                <dependency>
                    <groupId>org.mybatis.generator</groupId>
                    <artifactId>mybatis-generator-core</artifactId>
                    <version>1.3.2</version>
                </dependency>
             </dependencies>
            </plugin>
        </plugins>
       </pluginManagement>
  </build>
</project>
3、从 pom.xml 中找到 configurationFile 标签,按照标签上的路径放入一下生成代码的核心配置文件,generator.xml:
<?xml version="1.0" encoding="UTF-8"?>
 <!DOCTYPE generatorConfiguration PUBLIC "-//mybatis.org//DTD MyBatis Generator Configuration 1.0//EN" "http://mybatis.org/dtd/mybatis-generator-config_1_0.dtd">
 <generatorConfiguration>
     <!-- 数据库驱动包位置 -->
     <classPathEntry location="C:\Users\Administrator\.m2\repository\mysql\mysql-connector-java\5.1.21\mysql-connector-java-5.1.21.jar" />
     <!-- <classPathEntry location="C:\oracle\product\10.2.0\db_1\jdbc\lib\ojdbc14.jar" />-->
     <context id="DB2Tables" targetRuntime="MyBatis3">
         <commentGenerator>
             <property name="suppressAllComments" value="true" />
         </commentGenerator>
         <!-- 数据库链接URL、用户名、密码 -->
          <jdbcConnection driverClass="com.mysql.jdbc.Driver" connectionURL="jdbc:mysql://localhost:3306/test" userId="root" password="1234">
         <!--<jdbcConnection driver connectionURL="jdbc:oracle:thin:@localhost:1521:orcl" userId="msa" password="msa">-->
         </jdbcConnection>
         <javaTypeResolver>
             <property name="forceBigDecimals" value="false" />
         </javaTypeResolver>
         <!-- 生成实体类的包名和位置,这里配置将生成的实体类放在com.liyi.test.domain这个包下 -->
         <javaModelGenerator targetPackage="com.liyi.test.domain" targetProject="M:\workspace\hello-mybatis\src\main\java\">

             <property name="enableSubPackages" value="true" />
             <property name="trimStrings" value="true" />
         </javaModelGenerator>
         <!-- 生成的SQL映射文件包名和位置,这里配置将生成的SQL映射文件放在com.liyi.test.mapping这个包下 -->
         <sqlMapGenerator targetPackage="com.liyi.test.mapping" targetProject="M:\workspace\hello-mybatis\src\main\java\">
             <property name="enableSubPackages" value="true" />
         </sqlMapGenerator>
         <!-- 生成DAO的包名和位置,这里配置将生成的dao类放在com.liyi.test.mapping这个包下 -->
         <javaClientGenerator type="XMLMAPPER" targetPackage="com.liyi.test.dao" targetProject="M:\workspace\hello-mybatis\src\main\java\">
             <property name="enableSubPackages" value="true" />
         </javaClientGenerator>
         <!-- 要生成那些表(更改tableName和domainObjectName就可以) -->
         <table tableName="tab_user" domainObjectName="User" enableCountByExample="false" enableUpdateByExample="false" enableDeleteByExample="false" enableSelectByExample="false" selectByExampleQueryId="false" />
     </context>
</generatorConfiguration>
4、cmd 打开 dos 窗口,到项目的根路径,比如我的
M:
cd workspace/hello-mybatis/
执行 mvn mybatis-generator:generate (前提是你的电脑配置了 maven 的环境变量,可以用 mvn 命令)
刷新项目就有以下效果了。


idea + groovy + mybatis 自动生成 Dao、mappings 和 实体类
背景
在 windows 系统中,idea 在 C:\Users\用户名\.IntelliJIdea2018.2\config\extensions\com.intellij.database\schema 目录下默认存在如下 Groovy 文件:Generate POJOs.groovy,配合 idea 的 Database 数据库管理工具,可以快速生成 POJO 类。
于是我想何不基于这个类编写 groovy 代码自动生成 mappings 和 dao 呢,并按自己项目需要改造 Generate POJOs.groovy。
Groovy
groovy 是在 java 平台上的、具有象 Python,Ruby 和 Smalltalk 语言特性的灵活动态语言,groovy 保证了这些
特性象 java 语法一样被 java 开发者使用。 -- 《Groovy in action》
Groovy 跟 java 一样是运行于 JVM 之上的语言,比起 java 拥有许多语法上的便利,可以无缝使用 java 类库及其特性,甚至可以直接用 Groovy 开发 Web 程序。
实现
无论是修改 Generate POJOs.groovy 还是在其基础之上编写新的 groovy 文件都需要将其放于 C:\Users\用户名\.IntelliJIdea2018.2\config\extensions\com.intellij.database\schema 目录下,这样文件中引入的 com.intellij.database.* 才能找到,新建 idea 项目也会在 Scratches and Consoles 目录下找到。
连接数据库

打开项目:
1、点击右侧的 datesource 图标,要是没有该图标,请去自行百度
2、点击 + 号
3、选择 datasource
4、选择 mysql

1、填写一个连接名,随便填什么都行
2、不用选择,默认就行
3、填写数据库连接的 IP 地址,比如本地数据库可以填写:localhost 或者 127.0.0.1
4、填写数据库开放的端口号,一般没设置的话默认都是 3306
5、填写你需要连接的数据库名
6、填写数据库的用户名
7、填写数据库密码
8、这里会有一个驱动需要点击下载,图中是已经下载好了
9、填写自己的数据库连接 url,然后可以点击 9 所在按钮进行测试连接,本地连接失败检查是否开启了 mysql 服务
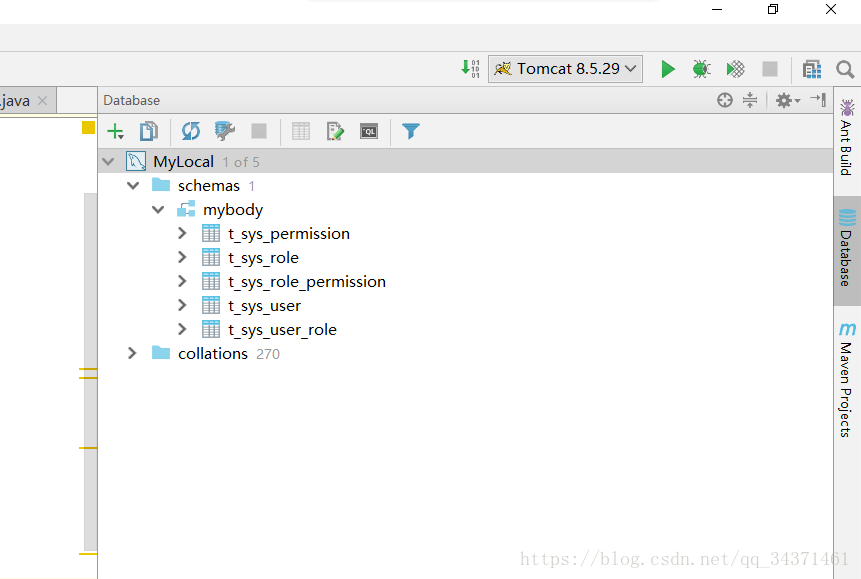
连接好了如上图所示,可以看到自己的数据库和表,选择一个表右键

Generate MyPOJOs.groovy 文件(生成实体类):
import com.intellij.database.model.DasTable
import com.intellij.database.model.ObjectKind
import com.intellij.database.util.Case
import com.intellij.database.util.DasUtil
import java.io.*
import java.text.SimpleDateFormat

/*
 * Available context bindings:
 *   SELECTION   Iterable<DasObject>
 *   PROJECT     project
 *   FILES       files helper
 */
packageName = "com.gx.entity"
typeMapping = [

        (~/(?i)bigint/)      : "Long",
        (~/(?i)smallint|mediumint|tinyint|int/)      : "Integer",
        (~/(?i)bool|bit/)                        : "Boolean",
        (~/(?i)float|double|decimal|real/)       : "Double",
        (~/(?i)datetime|timestamp|date|time/)    : "Date",
        (~/(?i)blob|binary|bfile|clob|raw|image/): "InputStream",
        (~/(?i)/)                                : "String"
]


FILES.chooseDirectoryAndSave("Choose directory", "Choose where to store generated files") { dir ->
    SELECTION.filter { it instanceof DasTable && it.getKind() == ObjectKind.TABLE }.each { generate(it, dir) }
}

def generate(table, dir) {
    //def className = javaClassName(table.getName(), true)
    def className = javaName(table.getName(), true)
    def fields = calcFields(table)
    packageName = getPackageName(dir)
    PrintWriter printWriter = new PrintWriter(new OutputStreamWriter(new FileOutputStream(new File(dir, className + ".java")), "UTF-8"))
    printWriter.withPrintWriter {out -> generate(out, className, fields,table)}

//    new File(dir, className + ".java").withPrintWriter { out -> generate(out, className, fields,table) }
}

// 获取包所在文件夹路径
def getPackageName(dir) {
    return dir.toString().replaceAll("\\\\", ".").replaceAll("/", ".").replaceAll("^.*src(\\.main\\.java\\.)?", "") + ";"
}

def generate(out, className, fields,table) {
    def tableName = table.getName()
    out.println "package $packageName"
    out.println ""
    out.println "import javax.persistence.*;"
    /*out.println "import javax.persistence.Entity;"
    out.println "import javax.persistence.Table;"*/
    out.println "import java.io.Serializable;"
    out.println "import lombok.Data;"
    /*out.println "import lombok.AllArgsConstructor;"
    out.println "import lombok.Builder;"
    out.println "import lombok.NoArgsConstructor;"*/

    Set types = new HashSet()

    fields.each() {
        types.add(it.type)
    }

    if (types.contains("Date")) {
        out.println "import java.util.Date;"
    }

    if (types.contains("InputStream")) {
        out.println "import java.io.InputStream;"
    }
    out.println ""
    out.println "/**\n" +
            " * @Description  \n" +
            " * @Author  GX\n" +
            " * @Date "+ new SimpleDateFormat("yyyy-MM-dd HH:mm:ss").format(new Date()) + " \n" +
            " */"
    out.println "@Data"
    out.println "@Entity"
    out.println "@Table ( name =\""+table.getName() +"\" )"
    out.println "public class $className  implements Serializable {"
    out.println genSerialID()


    // 判断自增
    /*if ((tableName + "_id").equalsIgnoreCase(fields[0].colName) || "id".equalsIgnoreCase(fields[0].colName)) {
        out.println "\t@Id"
        out.println "\t@GeneratedValue(generator = \"idGenerator\")"
        out.println "\t@GenericGenerator(name = \"idGenerator\", strategy = ChiticCoreConstant.ID_GENERATOR_COMMON)"
    }*/


    fields.each() {
        out.println ""
        // 输出注释
        if (isNotEmpty(it.commoent)) {
            out.println "\t/**"
            out.println "\t * ${it.commoent.toString()}"
            out.println "\t */"
        }

        if (it.annos != ""){
            if (it.annos.contains("[@Id]")){
                out.println "\t@Id"
                out.println "\t@GeneratedValue(generator = \"idGenerator\")"
                out.println "\t@GenericGenerator(name = \"idGenerator\", strategy = ChiticCoreConstant.ID_GENERATOR_COMMON)"
            }
            out.println "   ${it.annos.replace("[@Id]", "")}"
        }


        // 输出成员变量
        out.println "\tprivate ${it.type} ${it.name};"
    }

    // 输出get/set方法
//    fields.each() {
//        out.println ""
//        out.println "\tpublic ${it.type} get${it.name.capitalize()}() {"
//        out.println "\t\treturn this.${it.name};"
//        out.println "\t}"
//        out.println ""
//
//        out.println "\tpublic void set${it.name.capitalize()}(${it.type} ${it.name}) {"
//        out.println "\t\tthis.${it.name} = ${it.name};"
//        out.println "\t}"
//    }
    out.println ""
    out.println "}"
}

def calcFields(table) {
    DasUtil.getColumns(table).reduce([]) { fields, col ->
        def spec = Case.LOWER.apply(col.getDataType().getSpecification())

        def typeStr = typeMapping.find { p, t -> p.matcher(spec).find() }.value
        def comm =[
                colName : col.getName(),
                name :  javaName(col.getName(), false),
                type : typeStr,
                commoent: col.getComment(),
                annos: "\t@Column(name = \""+col.getName()+"\" )"]
        if("id".equals(Case.LOWER.apply(col.getName())))
            comm.annos +=["@Id"]
        fields += [comm]
    }
}

// 处理类名(这里是因为我的表都是以t_命名的,所以需要处理去掉生成类名时的开头的T,
// 如果你不需要那么请查找用到了 javaClassName这个方法的地方修改为 javaName 即可)
def javaClassName(str, capitalize) {
    def s = com.intellij.psi.codeStyle.NameUtil.splitNameIntoWords(str)
            .collect { Case.LOWER.apply(it).capitalize() }
            .join("")
            .replaceAll(/[^\p{javaJavaIdentifierPart}[_]]/, "_")
    // 去除开头的T  http://developer.51cto.com/art/200906/129168.htm
    s = s[1..s.size() - 1]
    capitalize || s.length() == 1? s : Case.LOWER.apply(s[0]) + s[1..-1]
}

def javaName(str, capitalize) {
//    def s = str.split(/(?<=[^\p{IsLetter}])/).collect { Case.LOWER.apply(it).capitalize() }
//            .join("").replaceAll(/[^\p{javaJavaIdentifierPart}]/, "_")
//    capitalize || s.length() == 1? s : Case.LOWER.apply(s[0]) + s[1..-1]
    def s = com.intellij.psi.codeStyle.NameUtil.splitNameIntoWords(str)
            .collect { Case.LOWER.apply(it).capitalize() }
            .join("")
            .replaceAll(/[^\p{javaJavaIdentifierPart}[_]]/, "_")
    capitalize || s.length() == 1? s : Case.LOWER.apply(s[0]) + s[1..-1]
}

def isNotEmpty(content) {
    return content != null && content.toString().trim().length() > 0
}

static String changeStyle(String str, boolean toCamel){
    if(!str || str.size() <= 1)
        return str

    if(toCamel){
        String r = str.toLowerCase().split(''_'').collect{cc -> Case.LOWER.apply(cc).capitalize()}.join('''')
        return r[0].toLowerCase() + r[1..-1]
    }else{
        str = str[0].toLowerCase() + str[1..-1]
        return str.collect{cc -> ((char)cc).isUpperCase() ? ''_'' + cc.toLowerCase() : cc}.join('''')
    }
}

static String genSerialID()
{
    return "\tprivate static final long serialVersionUID =  "+Math.abs(new Random().nextLong())+"L;"
}
Generate Dao.groovy 文件(生成 dao):
package src

import com.intellij.database.model.DasTable
import com.intellij.database.util.Case
import com.intellij.database.util.DasUtil

/*
 * Available context bindings:
 *   SELECTION   Iterable<DasObject>
 *   PROJECT     project
 *   FILES       files helper
 */

packageName = "**;" // 需手动配置 生成的 dao 所在包位置

FILES.chooseDirectoryAndSave("Choose directory", "Choose where to store generated files") { dir ->
    SELECTION.filter { it instanceof DasTable }.each { generate(it, dir) }
}

def generate(table, dir) {
    def baseName = javaName(table.getName(), true)
    new File(dir, baseName + "Mapper.java").withPrintWriter { out -> generateInterface(out, baseName) }
}

def generateInterface(out, baseName) {
    def date = new Date().format("yyyy/MM/dd")
    out.println "package $packageName"
    out.println "import cn.xx.entity.${baseName}Entity;" // 需手动配置
    out.println "import org.springframework.stereotype.Repository;"
    out.println ""
    out.println "/**"
    out.println " * Created on $date."
    out.println " *"
    out.println " * @author GX" // 可自定义
    out.println " */"
    out.println "@Repository"
    out.println "public interface ${baseName}Dao extends BaseDao<${baseName}Entity> {" // 可自定义
    out.println ""
    out.println "}"
}

def javaName(str, capitalize) {
    def s = com.intellij.psi.codeStyle.NameUtil.splitNameIntoWords(str)
            .collect { Case.LOWER.apply(it).capitalize() }
            .join("")
            .replaceAll(/[^\p{javaJavaIdentifierPart}[_]]/, "_")
    name = capitalize || s.length() == 1 ? s : Case.LOWER.apply(s[0]) + s[1..-1]
}
Generate DaoXml.groovy 文件(生成 dao.xml):
package src

import com.intellij.database.model.DasTable
import com.intellij.database.util.Case
import com.intellij.database.util.DasUtil

/*
 * Available context bindings:
 *   SELECTION   Iterable<DasObject>
 *   PROJECT     project
 *   FILES       files helper
 */

// entity(dto)、mapper(dao) 与数据库表的对应关系在这里手动指明,idea Database 窗口里只能选下列配置了的 mapper
// tableName(key) : [mapper(dao),entity(dto)]
typeMapping = [
        (~/(?i)int/)                      : "INTEGER",
        (~/(?i)float|double|decimal|real/): "DOUBLE",
        (~/(?i)datetime|timestamp/)       : "TIMESTAMP",
        (~/(?i)date/)                     : "TIMESTAMP",
        (~/(?i)time/)                     : "TIMESTAMP",
        (~/(?i)/)                         : "VARCHAR"
]

basePackage = "com.chitic.bank.mapping" // 包名需手动填写

FILES.chooseDirectoryAndSave("Choose directory", "Choose where to store generated files") { dir ->
    SELECTION.filter { it instanceof DasTable }.each { generate(it, dir) }
}

def generate(table, dir) {
    def baseName = mapperName(table.getName(), true)
    def fields = calcFields(table)
    new File(dir, baseName + "Mapper.xml").withPrintWriter { out -> generate(table, out, baseName, fields) }
}

def generate(table, out, baseName, fields) {
    def baseResultMap = ''BaseResultMap''
    def base_Column_List = ''Base_Column_List''
    def date = new Date().format("yyyy/MM/dd")
    def tableName = table.getName()

    def dao = basePackage + ".dao.${baseName}Mapper"
    def to = basePackage + ".to.${baseName}TO"

    out.println mappingsStart(dao)
    out.println resultMap(baseResultMap, to, fields)
    out.println sql(fields, base_Column_List)
    out.println selectById(tableName, fields, baseResultMap, base_Column_List)
    out.println deleteById(tableName, fields)
    out.println delete(tableName, fields, to)
    out.println insert(tableName, fields, to)
    out.println update(tableName, fields, to)
    out.println selectList(tableName, fields, to, base_Column_List, baseResultMap)
    out.println mappingsEnd()

}

static def resultMap(baseResultMap, to, fields) {

    def inner = ''''
    fields.each() {
        inner += ''\t\t<result column="'' + it.sqlFieldName + ''" jdbcType="'' + it.type + ''" property="'' + it.name + ''"/>\n''
    }

    return ''''''\t<resultMap id="'''''' + baseResultMap + ''''''" type="'''''' + to + ''''''">
        <id column="id" jdbcType="INTEGER" property="id"/>
'''''' + inner + ''''''\t</resultMap>
''''''
}

def calcFields(table) {
    DasUtil.getColumns(table).reduce([]) { fields, col ->
        def spec = Case.LOWER.apply(col.getDataType().getSpecification())
        def typeStr = typeMapping.find { p, t -> p.matcher(spec).find() }.value
        fields += [[
                           comment     : col.getComment(),
                           name        : mapperName(col.getName(), false),
                           sqlFieldName: col.getName(),
                           type        : typeStr,
                           annos       : ""]]
    }

}

def mapperName(str, capitalize) {
    def s = com.intellij.psi.codeStyle.NameUtil.splitNameIntoWords(str)
            .collect { Case.LOWER.apply(it).capitalize() }
            .join("")
            .replaceAll(/[^\p{javaJavaIdentifierPart}[_]]/, "_")
    name = capitalize || s.length() == 1 ? s : Case.LOWER.apply(s[0]) + s[1..-1]
}

// ------------------------------------------------------------------------ mappings
static def mappingsStart(mapper) {
    return ''''''<?xml version="1.0" encoding="UTF-8"?>
<!DOCTYPE mapper PUBLIC "-//mybatis.org//DTD Mapper 3.0//EN" "http://mybatis.org/dtd/mybatis-3-mapper.dtd">
<mapper namespace="'''''' + mapper + ''''''">
''''''
}

// ------------------------------------------------------------------------ mappings
static def mappingsEnd() {
    return ''''''</mapper>''''''
}

// ------------------------------------------------------------------------ selectById
static def selectById(tableName, fields, baseResultMap, base_Column_List) {
    return ''''''
    <select id="selectById" parameterType="java.lang.Integer" resultMap="'''''' + baseResultMap + ''''''">
        select
        <include refid="'''''' + base_Column_List + ''''''"/>
        from '''''' + tableName + ''''''
        where id = #{id}
    </select>''''''
}

// ------------------------------------------------------------------------ insert
static def insert(tableName, fields, parameterType) {

    return ''''''
    <insert id="insert" parameterType="'''''' + parameterType + ''''''">
        insert into '''''' + tableName + ''''''
        <trim prefix="(" suffix=")" suffixOverrides=",">
            '''''' + testNotNullStr(fields) + ''''''
        </trim>
        <trim prefix="values (" suffix=")" suffixOverrides=",">
            '''''' + testNotNullStrSet(fields) + ''''''
        </trim>
    </insert>
''''''

}
// ------------------------------------------------------------------------ update
static def update(tableName, fields, parameterType) {

    return ''''''
    <update id="update" parameterType="'''''' + parameterType + ''''''">
        update '''''' + tableName + ''''''
        <set>
            '''''' + testNotNullStrWhere(fields) + ''''''
        </set>
        where id = #{id}
    </update>''''''
}

// ------------------------------------------------------------------------ deleteById
static def deleteById(tableName, fields) {

    return ''''''
    <delete id="deleteById" parameterType="java.lang.Integer">
        delete
        from '''''' + tableName + ''''''
        where id = #{id}
    </delete>''''''
}

// ------------------------------------------------------------------------ delete
static def delete(tableName, fields, parameterType) {

    return ''''''
    <delete id="delete" parameterType="'''''' + parameterType + ''''''">
        delete from '''''' + tableName + ''''''
        where 1 = 1
        '''''' + testNotNullStrWhere(fields) + ''''''
    </delete>''''''
}

// ------------------------------------------------------------------------ selectList
static def selectList(tableName, fields, parameterType, base_Column_List, baseResultMap) {

    return ''''''
    <select id="selectList" parameterType="'''''' + parameterType + ''''''" resultMap="'''''' + baseResultMap + ''''''">
        select
        <include refid="'''''' + base_Column_List + ''''''"/>
                from '''''' + tableName + ''''''
        where 1 = 1
        '''''' + testNotNullStrWhere(fields) + ''''''
        order by id desc
    </select>''''''
}

// ------------------------------------------------------------------------ sql
static def sql(fields, base_Column_List) {
    def str = ''''''\t<sql id="'''''' + base_Column_List + ''''''">
        @inner@
    </sql> ''''''

    def inner = ''''
    fields.each() {
        inner += (''\t\t'' + it.sqlFieldName + '',\n'')
    }

    return str.replace("@inner@", inner.substring(0, inner.length() - 2))

}

static def testNotNullStrWhere(fields) {
    def inner = ''''
    fields.each {
        inner += ''''''
        <if test="'''''' + it.name + '''''' != null">
            and '''''' + it.sqlFieldName + '''''' = #{'''''' + it.name + ''''''}
        </if>\n''''''
    }

    return inner
}

static def testNotNullStrSet(fields) {
    def inner = ''''
    fields.each {
        inner += ''''''
        <if test="'''''' + it.name + '''''' != null">
            #{'''''' + it.name + ''''''},
        </if>\n''''''
    }

    return inner
}

static def testNotNullStr(fields) {
    def inner1 = ''''
    fields.each {
        inner1 += ''''''
        <if test = "'''''' + it.name + '''''' != null" >
        \t'''''' + it.sqlFieldName + '''''',
        </if>\n''''''
    }

    return inner1
}
jpa 的 Repository
import com.intellij.database.model.DasTable
import com.intellij.database.model.ObjectKind
import com.intellij.database.util.Case

packageName = "com.gx.dao;"
packageEntityName = "com.gx.entity"

FILES.chooseDirectoryAndSave("Choose directory", "Choose where to store generated files") { dir ->
    SELECTION.filter { it instanceof DasTable && it.getKind() == ObjectKind.TABLE }.each { generate(it, dir) }
}

def generate(table, dir) {
    def entityName = javaName(table.getName(), true)
    def className = entityName + "Repository"
    new File(dir, className + ".java").withPrintWriter { out -> generate(out, table, className, entityName) }
}

def generate(out, table, className, entityName) {
    out.println "package $packageName"
    out.println ""
    out.println "import org.springframework.stereotype.Repository;"
    out.println "import org.springframework.data.jpa.repository.JpaRepository;"
    out.println "import org.springframework.data.jpa.repository.JpaSpecificationExecutor;"
    out.println ""
    out.println "import $packageEntityName.$entityName;"
    out.println ""
    out.println "@Repository"
    out.println "public interface $className extends JpaRepository<$entityName, Long>, JpaSpecificationExecutor<$entityName> {"
    out.println ""
    out.println "}"
}

def javaName(str, capitalize) {
    def s = str.split(/(?<=[^\p{IsLetter}])/).collect { Case.LOWER.apply(it).capitalize() }
            .join("").replaceAll(/[^\p{javaJavaIdentifierPart}]/, "_").replaceAll(/_/, "")
    capitalize || s.length() == 1 ? s : Case.LOWER.apply(s[0]) + s[1..-1]
}

IDEA 利用 mybatis-generator 自动生成 dao 和 mapper
pom.xml 配置
 1 <properties>
 2         <java.version>1.8</java.version>
 3         <mybatis-generator-core.version>1.3.7</mybatis-generator-core.version>
 4         <mysql-connector-java.version>5.1.46</mysql-connector-java.version>
 5         <druid-spring-boot-starter.version>1.1.9</druid-spring-boot-starter.version>
 6         <mybatis-spring-boot-starter.version>1.3.2</mybatis-spring-boot-starter.version>
 7     </properties>
 8
 9     <dependencies>
10         <dependency>
11             <groupId>org.springframework.boot</groupId>
12             <artifactId>spring-boot-starter-web</artifactId>
13         </dependency>
14
15         <dependency>
16             <groupId>org.springframework.boot</groupId>
17             <artifactId>spring-boot-starter-test</artifactId>
18             <scope>test</scope>
19             <exclusions>
20                 <exclusion>
21                     <groupId>org.junit.vintage</groupId>
22                     <artifactId>junit-vintage-engine</artifactId>
23                 </exclusion>
24             </exclusions>
25         </dependency>
26         <!--自动生成dao层代码时用到-->
27         <dependency>
28             <groupId>org.mybatis.generator</groupId>
29             <artifactId>mybatis-generator-core</artifactId>
30             <version>${mybatis-generator-core.version}</version>
31         </dependency>
32
33         <dependency>
34             <groupId>mysql</groupId>
35             <artifactId>mysql-connector-java</artifactId>
36             <version>${mysql-connector-java.version}</version>
37         </dependency>
38         <dependency>
39             <groupId>org.mybatis.spring.boot</groupId>
40             <artifactId>mybatis-spring-boot-starter</artifactId>
41             <version>${mybatis-spring-boot-starter.version}</version>
42         </dependency>
43         <dependency>
44             <groupId>com.alibaba</groupId>
45             <artifactId>druid-spring-boot-starter</artifactId>
46             <version>${druid-spring-boot-starter.version}</version>
47         </dependency>
48
49         <dependency>
50             <groupId>org.springframework.boot</groupId>
51             <artifactId>spring-boot-starter-aop</artifactId>
52         </dependency>
53
54     </dependencies>
55
56     <build>
57         <plugins>
58             <plugin>
59                 <groupId>org.springframework.boot</groupId>
60                 <artifactId>spring-boot-maven-plugin</artifactId>
61             </plugin>
62             <plugin>
63                 <groupId>org.mybatis.generator</groupId>
64                 <artifactId>mybatis-generator-maven-plugin</artifactId>
65                 <version>1.3.7</version>
66                 <configuration>
67                     <configurationFile>src/main/resources/generatorConfig.xml</configurationFile>
68                     <overwrite>true</overwrite>
69                 </configuration>
70
71                 <dependencies>
72                     <dependency>
73                         <groupId>mysql</groupId>
74                         <artifactId>mysql-connector-java</artifactId>
75                         <version>${mysql-connector-java.version}</version>
76                     </dependency>
77                 </dependencies>
78             </plugin>
79         </plugins>
80     </build>
generatorConfig.xml
<!DOCTYPE generatorConfiguration PUBLIC
        "-//mybatis.org//DTD MyBatis Generator Configuration 1.0//EN"
        "http://mybatis.org/dtd/mybatis-generator-config_1_0.dtd">

<generatorConfiguration>

    <context id="MySql" defaultModelType="flat">


        <plugin type="org.mybatis.generator.plugins.MapperAnnotationPlugin"></plugin>
        <plugin type="org.mybatis.generator.plugins.FluentBuilderMethodsPlugin"></plugin>
        <!--  <plugin type="org.mybatis.generator.plugins.RenameExampleClassPlugin">
              <property name="searchString" value="Example"/>
              <property name="replaceString" value="Condition"/>
          </plugin>-->
        <jdbcConnection driverClass="com.mysql.jdbc.Driver" connectionURL="jdbc:mysql://{IP}:{端口}/{数据库名称}"
                        userId="{用户名}" password="{密码}"/>

        <javaModelGenerator targetPackage="com.***.dao.entity" targetProject="src/main/java">
        </javaModelGenerator>

        <sqlMapGenerator targetPackage="mapper" targetProject="src/main/resources"></sqlMapGenerator>

        <javaClientGenerator targetPackage="com.***.dao" targetProject="src/main/java"
                             type="XMLMAPPER"></javaClientGenerator>

        <table tableName="{表名称}">
            <generatedKey column="id" sqlStatement="JDBC" identity="true"/>
        </table>
    </context>

</generatorConfiguration>
点击 MavenProjects 找到项目下的 Plugins,展开找到 mybatis-generator, 展开找到 mybatis-generator:generate, 双击运行

idea 集成 MyBatis Generator 插件,自动生成 dao,model,sql map 文件
1. 集成到开发环境中
以 maven 管理的功能来举例,只需要将插件添加到 pom.xml 文件中即可。(注意此处是以 plugin 的方式,放在 <plugins></plugins> 中间即可)
<plugin>
    <groupId>org.mybatis.generator</groupId>
    <artifactId>mybatis-generator-maven-plugin</artifactId>
    <version>1.3.2</version>
</plugin>
2. 编写配置文件 generatorConfig.xml
注意:在 idea 开发环境下,此文件需要放在 resource 根目录下,mybatis generator 默认加载此目录的配置文件
<?xml version="1.0" encoding="UTF-8"?>
<!DOCTYPE generatorConfiguration
        PUBLIC "-//mybatis.org//DTD MyBatis Generator Configuration 1.0//EN"
        "http://mybatis.org/dtd/mybatis-generator-config_1_0.dtd">

<generatorConfiguration>
    <!--数据库驱动jar -->
    <classPathEntry
        location="D:\.m2\repository\mysql\mysql-connector-java\5.1.33\mysql-connector-java-5.1.33.jar" />

    <context id="Tables" targetRuntime="MyBatis3">
        <!--去除注释 -->
        <commentGenerator>
            <property name="suppressAllComments" value="true" />
        </commentGenerator>

        <!--数据库连接 -->
        <jdbcConnection driverClass="com.mysql.jdbc.Driver"
            connectionURL="jdbc:mysql://129.1.18.18:3306/ssm_demo" userId="root"
            password="root">
        </jdbcConnection>
        <!--默认false Java type resolver will always use java.math.BigDecimal if
            the database column is of type DECIMAL or NUMERIC. -->
        <javaTypeResolver>
            <property name="forceBigDecimals" value="false" />
        </javaTypeResolver>

        <!--生成实体类 指定包名 以及生成的地址 (可以自定义地址,但是路径不存在不会自动创建 使用Maven生成在target目录下,会自动创建) -->
        <javaModelGenerator targetPackage="model"
            targetProject="F:\lhl\ssm\src\main\java">
            <property name="enableSubPackages" value="true" />
            <property name="trimStrings" value="true" />
        </javaModelGenerator>
        <!--生成SQLMAP文件 -->
        <sqlMapGenerator targetPackage="mapper"
            targetProject="F:\lhl\ssm\src\main\resources">
            <property name="enableSubPackages" value="false" />
        </sqlMapGenerator>
        <!--生成Dao文件 可以配置 type="XMLMAPPER"生成xml的dao实现 context id="DB2Tables" 修改targetRuntime="MyBatis3" -->
        <javaClientGenerator type="XMLMAPPER"
            targetPackage="dao"
            targetProject="F:\lhl\ssm\src\main\java">
            <property name="enableSubPackages" value="false" />
        </javaClientGenerator>

        <!--对应数据库表 mysql可以加入主键自增 字段命名 忽略某字段等 -->
        <table tableName="user_test" domainObjectName="UserTest"
            enableCountByExample="false" enableUpdateByExample="false"
            enableDeleteByExample="false" enableSelectByExample="false"
            selectByExampleQueryId="false" />
    </context>
</generatorConfiguration>
最后只需在 plugins 中找到 mybatis-generator plugin 即可,双击运行或右击 运行都可。
关于【mybatis】根据model自动生成 mapper service dao 层的工具类和mybatis怎么自动生成mapper的介绍已经告一段落,感谢您的耐心阅读,如果想了解更多关于eclipse maven 插件 自动生成 mybatis dao、mapper 、pojo、idea + groovy + mybatis 自动生成 Dao、mappings 和 实体类、IDEA 利用 mybatis-generator 自动生成 dao 和 mapper、idea 集成 MyBatis Generator 插件,自动生成 dao,model,sql map 文件的相关信息,请在本站寻找。
本文将为您提供关于web_uploader上传图片,官方的直接使用是不行的-java版本的详细介绍,我们还将为您解释webuploader上传文件夹的相关知识,同时,我们还将为您提供关于ajaxFileUpload.js 无刷新上传图片,支持多个参数同时上传、angular1 使用webuploader上传文件、java web中的servlet3 upload上传文件实践Upload File、javascript - webuploader上传文件组件上传图片时如何带参数给php?的实用信息。
本文目录一览:- web_uploader上传图片,官方的直接使用是不行的-java版本(webuploader上传文件夹)
- ajaxFileUpload.js 无刷新上传图片,支持多个参数同时上传
- angular1 使用webuploader上传文件
- java web中的servlet3 upload上传文件实践Upload File
- javascript - webuploader上传文件组件上传图片时如何带参数给php?
")
web_uploader上传图片,官方的直接使用是不行的-java版本(webuploader上传文件夹)
百度这个web_uploader上传插件说实话坑很多,网上找的大部分资料直接在本地运行都有各种各样的小问题,最后参照官方文档,终于写出了可用的代码,不要直接复制官方的代码,里面有些东西没有,需要自己去写的。
下面的这种方式是可以多图直接上传到后台并且回显的
    <#--以下组件用于图片上传-->
    <#--引入web uploader插件-->
    <link rel="stylesheet"  type="text/css" href="${request.contextPath}/webuploader/webuploader.css"/>
    <script type="text/javascript" src="${request.contextPath}/webuploader/webuploader.min.js"></script>
    <#--引入bootstrap-->
    <link href="${request.contextPath}/bootstrap/bootstrap.min.css"/>
    <script type="text/javascript" src="${request.contextPath}/bootstrap/bootstrap.min.js"></script>

    <meta http-equiv="Content-Type" content="text/html; charset=UTF-8"/>


    <script type="text/javascript">

        jQuery(function(){
            // 初始化Web Uploader
            var uploader = WebUploader.create({

                // 选完文件后,是否自动上传。
                auto: true,

                // swf文件路径
                swf:"${request.contextPath}/webuploader/Uploader.swf",
                // 文件接收服务端。
                server:"${request.contextPath}/user/gravatarUpload.do",

                // 选择文件的按钮。可选。
                // 内部根据当前运行是创建,可能是input元素,也可能是flash.
                pick: ''#filePicker'',

                // 只允许选择图片文件。
                accept: {
                    title: ''Images'',
                    extensions: ''gif,jpg,jpeg,bmp,png'',
                    mimeTypes: ''image/*''
                }
            });

            // 当有文件添加进来的时候
            uploader.on( ''fileQueued'', function( file ) {
                var $li = $(
                                ''<div id="'' + file.id + ''">'' +
                                ''<img>'' +
                                ''<div>'' + file.name + ''</div>'' +
                                ''</div>''
                        ),
                        $img = $li.find(''img'');


                $list = $(''#fileList'');
                ratio = window.devicePixelRatio || 1,
                // 缩略图大小
                thumbnailWidth = 100 * ratio;
                thumbnailHeight = 100 * ratio;

                // $list为容器jQuery实例
                $list.append( $li );

                // 创建缩略图
                // 如果为非图片文件,可以不用调用此方法。
                // thumbnailWidth x thumbnailHeight 为 100 x 100
                uploader.makeThumb( file, function( error, src ) {
                    if ( error ) {
                        $img.replaceWith(''<span>不能预览</span>'');
                        return;
                    }

                    $img.attr( ''src'', src );
                }, thumbnailWidth, thumbnailHeight );
            });

            // 文件上传过程中创建进度条实时显示。
            uploader.on( ''uploadProgress'', function( file, percentage ) {
                var $li = $( ''#''+file.id ),
                        $percent = $li.find(''.progress span'');

                // 避免重复创建
                if ( !$percent.length ) {
                    $percent = $(''<p><span></span></p>'')
                            .appendTo( $li )
                            .find(''span'');
                }

                $percent.css( ''width'', percentage * 100 + ''%'' );
            });

            // 文件上传成功,给item添加成功class, 用样式标记上传成功。
            uploader.on( ''uploadSuccess'', function( file ) {
                $( ''#''+file.id ).addClass(''upload-state-done'');
            });

            // 文件上传失败,显示上传出错。
            uploader.on( ''uploadError'', function( file ) {
                var $li = $( ''#''+file.id ),
                        $error = $li.find(''div.error'');

                // 避免重复创建
                if ( !$error.length ) {
                    $error = $(''<div></div>'').appendTo( $li );
                }

                $error.text(''上传失败'');
            });

            // 完成上传完了,成功或者失败,先删除进度条。
            uploader.on( ''uploadComplete'', function( file ) {
                $( ''#''+file.id ).find(''.progress'').remove();
            });


        });


    </script>


    <title>修改用户</title>

</head>


<body>


<div>

    <table>
        <tr>
            <td>头像</td>
            <td>
                <!--dom结构部分-->
                <div id="uploader-demo">
                    <!--用来存放item-->
                    <div id="fileList"></div>
                    <div id="filePicker">选择图片</div>
                </div>
            </td>
        </tr>

ajaxFileUpload.js 无刷新上传图片,支持多个参数同时上传
在页面动态创建 form 表单和 ifram 贞,设定 form 表单提交的目标为 ifram 贞,
将文件域和要 post 的参数动态写入 form 表单中,然后提交 from 表单。
通过 window.attachEvent 向 ifram 贞的 onload 事件中注册监听事件响应回调函数。
1.html 部分

[html]
<input name="imgfile1" id="imgfile1"size="38" type="file" />
<div id="imgContainer1"></div>

2.调用部分
[javascript]
function uploadImg(imgfileId,imgcontainerId) {
  $.ajaxFileUpload({
    fileElementId: imgfileId,url: '/UploadImage',dataType: 'json',data: { id: 'aaa',name: 'bbb' },beforeSend: function (XMLHttpRequest) {
      //("loading");
    },success: function (data,textStatus) {
      var img = "<img src='' width='300' height='300' />";
      $("#" + imgcontainerId).append(img);
    },error: function (XMLHttpRequest,textStatus,errorThrown) {
      var img = "图片上传失败!";
      $("#" + imgcontainerId).append(img);
      var msg = "服务器出错,错误内容:" + XMLHttpRequest.responseText;
      $.messager.showWin({ msg: msg,title: '错误提示',color: 'red' });
    },complete: function (XMLHttpRequest,textStatus) {
      //("loaded");
    }
  });
}

3.ajaxFileUpload.js 全部代码
[javascript]
/*
  131108-xxj-ajaxFileUpload.js 无刷新上传图片 jquery 插件,支持 ie6-ie10
  依赖:jquery-1.6.1.min.js
  主方法:ajaxFileUpload 接受 json 对象参数
  参数说明:
  fileElementId:必选,上传文件域ID
  url:必选,发送请求的URL字符串
  fileFilter:可选,限定上传文件的格式(.jpg,.bmp,.gif,.png)
  fileSize:可选,0 为无限制(IE浏览器不兼容)
  data:可选,将和文件域一同post的参数(json对象)
  其它:$.ajax 的参数均为可选参数
  注:如遇到‘无法访问’的脚本错误提示则需要在响应流中加一段脚块一同输出:<script ...>document.domain = 'xxx.com';</script>
*/
jQuery.extend({
  //创建 iframe 元素,接受提交及响应
  createUploadIframe: function(id,uri) {
    //create frame
    var frameId = 'jUploadFrame' + id;


    if (window.ActiveXObject) {
      //fix ie9 and ie 10-------------
      if (jQuery.browser.version == "9.0" || jQuery.browser.version == "10.0") {
        var io = document.createElement('iframe');
        io.id = frameId;
        io.name = frameId;
      } else if (jQuery.browser.version == "6.0" || jQuery.browser.version == "7.0" || jQuery.browser.version == "8.0") {
        var io = document.createElement('<iframe id="' + frameId + '" name="' + frameId + '" />');
        if (typeof uri == 'boolean') {
          io.src = 'javascript:false';
        } else if (typeof uri == 'string') {
          io.src = uri;
        }
      }
    } else {
      var io = document.createElement('iframe');
      io.id = frameId;
      io.name = frameId;
    }
    io.style.position = 'absolute';
    io.style.top = '-1000px';
    io.style.left = '-1000px';


    document.body.appendChild(io);


    return io;
  },//创建 from 元素,用于提交的表单
  createUploadForm: function(id,fileElementId,postData) {
    //create form<span>   </span>
    var formId = 'jUploadForm' + id;
    var fileId = 'jUploadFile' + id;
    var form = $('<form  action="" method="POST" name="' + formId + '" id="' + formId + '" enctype="multipart/form-data"></form>');
    var oldElement = $('#' + fileElementId);
    var newElement = $(oldElement).clone();


    $(oldElement).attr('id',fileId);
    $(oldElement).before(newElement);
    $(oldElement).appendTo(form);
    //添加自定义参数
    if (postData) {
      //递归遍历JSON所有键值


      function recurjson(json) {
        for (var i in json) {
          //alert(i+"="+json[i])
          $("<input name='" + i + "' id='" + i + "' value='" + json[i] + "' />").appendTo(form);
          if (typeof json[i] == "object") {
            recurjson(json[i]);
          }
        }
      }


      recurjson(postData);
    }
    //set attributes
    $(form).css('position','absolute');
    $(form).css('top','-1200px');
    $(form).css('left','-1200px');
    $(form).appendTo('body');
    return form;
  },//上传文件
  //s 参数:json对象
  ajaxFileUpload: function(s) {
    s = jQuery.extend({fileFilter:"",fileSize:0},jQuery.ajaxSettings,s);
    //文件筛选
    var fielName = $('#' + s.fileElementId).val();
    var extention = fielName.substring(fielName.lastIndexOf(".") + 1).toLowerCase();
    if (s.fileFilter && s.fileFilter.indexOf(extention) < 0) {
      alert("仅支持 (" + s.fileFilter + ") 为后缀名的文件!");
      return;
    }
    //文件大小限制
    if (s.fileSize > 0) {
      var fs = 0;
      try {
        if (window.ActiveXObject) {
          //IE浏览器
          var image = new Image();
          image.dynsrc = fielName;
          fs = image.fileSize;
        } else {
          fs = $('#' + s.fileElementId)[0].files[0].size;
        }
      } catch(e) {
      }
      if (fs > s.fileSize) {
        alert("当前文件大小 (" + fs + ") 超过允许的限制值 (" + s.fileSize +")!");
        return;
      }
    }
    var id = new Date().getTime();
    //创建 form 表单元素
    var form = jQuery.createUploadForm(id,s.fileElementId,s.data);
    //创建 iframe 贞元素
    var io = jQuery.createUploadIframe(id,s.secureuri);
    var frameId = 'jUploadFrame' + id;
    var formId = 'jUploadForm' + id;
    //监测是否有新的请求
    if (s.global && !jQuery.active++) {
      jQuery.event.trigger("ajaxStart"); //触发 AJAX 请求开始时执行函数。Ajax 事件。
    }
    var requestDone = false;
    //创建请求对象
    var xml = {};
    if (s.global)
      jQuery.event.trigger("ajaxSend",[xml,s]); //触发 AJAX 请求发送前事件
    //上载完成的回调函数
    var uploadCallback = function(isTimeout) {
      var io = document.getElementById(frameId);
      try {
        //存在跨域脚本访问问题,如遇到‘无法访问’提示则需要在响应流中加一段脚块:<script ...>document.domain = 'xxx.com';</script>
        if (io.contentwindow) { //兼容各个浏览器,可取得子窗口的 window 对象
          xml.responseText = io.contentwindow.document.body ? io.contentwindow.document.body.innerHTML : null;
          xml.responseXML = io.contentwindow.document.XMLDocument ? io.contentwindow.document.XMLDocument : io.contentwindow.document;


        } else if (io.contentDocument) { //contentDocument Firefox 支持,> ie8 的ie支持。可取得子窗口的 document 对象。
          xml.responseText = io.contentDocument.document.body ? io.contentDocument.document.body.innerHTML : null;
          xml.responseXML = io.contentDocument.document.XMLDocument ? io.contentDocument.document.XMLDocument : io.contentDocument.document;
        }
      } catch(e) {
        jQuery.handleErrorExt(s,xml,null,e);
      }
      if (xml || isTimeout == "timeout") {
        requestDone = true;
        var status;
        try {
          status = isTimeout != "timeout" ? "success" : "error";
          // Make sure that the request was successful or notmodified
          if (status != "error") {
            //处理数据(运行XML通过httpData不管回调)
            var data = jQuery.uploadHttpData(xml,s.dataType);
            // If a local callback was specified,fire it and pass it the data
            if (s.success)
              s.success(data,status);


            // Fire the global callback
            if (s.global)
              jQuery.event.trigger("ajaxSuccess",s]);
          } else
            jQuery.handleErrorExt(s,status);
        } catch(e) {
          status = "error";
          jQuery.handleErrorExt(s,status,e);
        }


        // The request was completed
        if (s.global)
          jQuery.event.trigger("ajaxComplete",s]);


        // Handle the global AJAX counter
        if (s.global && !--jQuery.active)
          jQuery.event.trigger("ajaxStop");


        // Process result
        if (s.complete)
          s.complete(xml,status);


        jQuery(io).unbind();


        setTimeout(function() {
          try {
            $(io).remove();
            $(form).remove();
          } catch(e) {
            jQuery.handleErrorExt(s,e);
          }


        },100);


        xml = null;


      }
    };
    //超时检查,s.timeout 毫秒后调用 uploadCallback 回调函数提示请求超时
    if (s.timeout > 0) {
      setTimeout(function() {
        // Check to see if the request is still happening
        if (!requestDone) uploadCallback("timeout");
      },s.timeout);
    }
    try {
      //设置动态 form 表单的提交参数
      // var io = $('#' + frameId);
      var form = $('#' + formId);
      $(form).attr('action',s.url);
      $(form).attr('method','POST');
      $(form).attr('target',frameId);
      if (form.encoding) {
        form.encoding = 'multipart/form-data';
      } else {
        form.enctype = 'multipart/form-data';
      }
      $(form).submit();


    } catch(e) {
      jQuery.handleErrorExt(s,e);
    }
    //向动态表单的页面加载事件中注册回调函数
    if (window.attachEvent) {
      document.getElementById(frameId).attachEvent('onload',uploadCallback);
    } else {
      document.getElementById(frameId).addEventListener('load',uploadCallback,false);
    }
    return {
      abort: function() {
      }
    };


  },//上传文件
  uploadHttpData: function(r,type) {
    //alert("type=" + type + ";uploadHttpData" + JSON.stringify(r))
    var data = !type;
    data = type == "xml" || data ? r.responseXML : r.responseText;
    // If the type is "script",eval it in global context
    if (type == "script")
      jQuery.globalEval(data);
    // Get the JavaScript object,if JSON is used.
    if (type == "json")
      eval("data = " + data);
    // evaluate scripts within html
    if (type == "html")
      jQuery("<div>").html(data).evalScripts();
    //alert($('param',data).each(function(){alert($(this).attr('value'));}));
    return data;
  },handleErrorExt: function(s,xhr,e) {
    // If a local callback was specified,fire it
    if (s.error) {
      s.error.call(s.context || s,e);
    }


    // Fire the global callback
    if (s.global) {
      (s.context ? jQuery(s.context) : jQuery.event).trigger("ajaxError",[xhr,s,e]);
    }
  }
}); 
angular1 使用webuploader上传文件
开发项目使用中插件配置为main.js


require.config({
    paths : {
        "jquery" : "lib/jquery-1.10.2.min",
        "angular" : "lib/angular/angular.min",
        "angularResource" : "lib/angular/angular-resource",
        "uiRoute" : "lib/ui-router/angular-ui-router.min",
        "angularSanitize" : "lib/angular/angular-sanitize.min",
        "angularCookies" : "lib/angular/angular-cookies",
        "angularLocale" : "lib/angular/i18n/angular-locale_zh-cn",
        "bootstrapUI" : "lib/angular/angularUI/ng-bootstrap/ui-bootstrap-tpls-0.12.1.min",
        "bootstrapJs" : "lib/bootstrap.min",
        "datetimepicker" : "lib/datetimepicker/js/bootstrap-datetimepicker.min",
        "datetimepickerCn" : "lib/datetimepicker/js/locales/bootstrap-datetimepicker.zh-CN",
        "jquery.zclip" : "lib/zclip/jquery.zclip.min",
        "jqueryUI" : "lib/jqueryui/jquery-ui-1.10.3.custom.min",
        "jqueryUITouchPunch" : "lib/jquery-ui-touch-punch/jquery.ui.touch-punch.min",
        "uislider" : "lib/uislider/slider",
        "dragscrollable" : "lib/dragscrollable/dragscrollable.min",
        "moment" : "lib/moment/moment",
        "websocket" : "lib/websocket",
        "md5" : "lib/md5/md5",
        "des" : "lib/crypto/tripledes",
        "crypto": "lib/crypto/core",
        "ecb" : "lib/crypto/mode-ecb",
        "lodash" : "lib/lodash/lodash.min",
        "postal" : "lib/postal/postal.min",
        "jcrop" : "lib/jcrop/jquery.Jcrop.min",
        "ngTable" : "lib/table/ng-table",
        "ueditor" : "lib/ueditor/ueditor.all",
        "ueditor.config" : "lib/ueditor/ueditor.config",
        "angularUEditor": "lib/angular-ueditor/angular-ueditor.min",
        "spin": "lib/spin.js/spin.min",
        "caret" : "lib/caret/jquery.caret",
        "pdfobject" : "lib/pdfobject/pdfobject",
        "webuploader": "lib/webuploader/webuploader.html5only",
        "IndexedDBShim": "lib/IndexedDBShim/IndexedDBShim",
        "jqueryIndexeddb": "lib/jquery-indexeddb/jquery.indexeddb",
        "uiSortable":"lib/ui-sortable/sortable",
        "xeditable":"lib/xeditable/xeditable",
        "qrcode" : "lib/jquery-qrcode/jquery.qrcode.min"
    },
    shim : {
        "angular" : {
            "deps" : ["jquery"],
            "exports" : "angular"
        },
        "angularLocale" : ["angular"],
        "uiRoute" : ["angular"],
        "angularResource" : ["angular"],
        "angularSanitize" : ["angular"],
        "angularCookies" : ["angular"],
        "bootstrapUI" : ["angular"],
        "bootstrapJs" : ["jquery"],
        "datetimepicker": ["jquery"],
        "datetimepickerCn": ["datetimepicker"],
        "jqueryUI": ["jquery"],
        "jqueryUITouchPunch": ["jqueryUI"],
        "uislider": ["angular", "jqueryUI", "jqueryUITouchPunch"],
        "moment": {"exports" : "moment"},
        ''websocket'': {''exports'' : ''YGWebSocket''},
        ''ecb'':[''des''],
        ''jcrop'': [''jquery''],
        ''ngTable'' : ["angular"],
        ''ueditor'': [''ueditor.config''],
        ''angularUEditor'': ["ueditor"],
        ''webuploader'': [''jquery''],
        ''jqueryIndexeddb'': [''jquery'', ''IndexedDBShim''],
        ''uiSortable'':["angular","jqueryUI"],
        ''dragscrollable'': [''jquery''],
        ''xeditable'' : [''angular'']
    },
    priority: [
        "jquery",
        "angular"
    ]
});

require(["app"], function (app) {
    $(document).ready(function() {
        angular.bootstrap(document, [app.name]);
    });
});"webuploader": "lib/webuploader/webuploader.html5only",是插件在项目中的地址。
1.编写一个directives —— Upload.js
define([
    ''app'',
    ''jquery'',
    ''webuploader'',
    ''filters/byte''
], function (app, $, WebUploader) {
    ''use strict'';

    var deps = [ ''BaseService'' ];

    function directive(BaseService) {
        return {
            scope: {
                uploadUrl: ''@fcUpload'',
                multiple: ''@?'',
                label: ''@?'',
                dndInfo: ''@?'',
                accept: ''@?'',
                uploaderOption: ''=?''
            },
            templateUrl: ''views/common/upload/Upload.html'',
            replace: true,
            link: function link($scope, elem) {

                $scope.files = [];
                $scope.progressStylies = {};

                $scope.uploadUrl = BaseService.restfulUrl + $scope.uploadUrl;
                var uploader = init($scope, elem);

                $scope.$on(''$destroy'', function scopeDestroy() {
                    uploader.destroy();
                });

                $scope.remove = function remove(file, index) {
                    doRemove($scope, uploader, file, index);
                };
            }
        };
    }

    function doRemove($scope, uploader, file, index) {
        $scope.files.splice(index, 1);
        $scope.progressStylies[file.id] = null;
        uploader.removeFile(file, true);
    }

    function init($scope, elem) {
        var btn = elem.find(''.js-btn-pick'');
        var dndContainer = elem.find(''.js-dnd-container'');

     //上传类型限制保存对象
        var typelist = ["doc","docx","xls","xlsx","ppt","pptx","pdf"];

        var option = getOption($scope, btn, dndContainer);


        var uploader = WebUploader.create(option);

        // material design 的样式设置有些古怪, 需要是`btn btn-` 开头的才会应用到一些样式, 所以这里把默认的webuploader-pick 放到后面去.
        var $realBtn = btn.find(''.webuploader-pick'').removeClass(''webuploader-pick'').addClass(''btn btn-info webuploader-pick'');
        setTimeout(function() {
            // 由于有个 + 号的符号在前面, 导致默认的计算宽度的处理有些偏小, 这里重新计算一下
            $realBtn.next().width($realBtn.outerWidth());
        }, 1000);

        if ($scope.dndInfo) {
            elem.find(''.js-dnd-info'').text($scope.dndInfo);
        } else if (option.accept && option.accept.title) {
            elem.find(''.js-dnd-info'').text(''或将'' + option.accept.title + '' 文件拖到虚线框内'');
        }

        function tryRemainSingleFile() {
            if (!option.pick.multiple) {
                // 单选的, 直接把之前的文件清掉
                for (var i = $scope.files.length - 1; i >= 0; i--) {
                    doRemove($scope, uploader, $scope.files[i], i)
                }
            }
        }

        // 当有文件被添加进队列的时候
        uploader.on(''fileQueued'', function fileQueued(file) {
        	//进行上传类型判断
        	if(typelist.indexOf(file.ext) != -1 && file.size <= 52428800)
            {
        		tryRemainSingleFile();

                $scope.files.push(file);
                $scope.$bus.publish({
                    channel: ''upload'',
                    topic: ''fileQueued'',
                    data: file
                });
                $scope.$apply();
            }else{
            	if(file.size > 52428800)
            	{
            		alert("选择的格式文件超出限定大小");
            	}
            	else{
            		alert("请选择正确的格式文件");
            	}
            }
        });

        // 当有文件被移出队列的时候
        uploader.on(''fileDequeued'', function fileDequeued(file) {
            $scope.$bus.publish({
                channel: ''upload'',
                topic: ''fileDequeued'',
                data: file
            });
        });

        uploader.on(''error'', function error(type) {
            $scope.$bus.publish({
                channel: ''upload'',
                topic: ''error'',
                data: type
            });
        });

        // 文件上传过程中创建进度条实时显示。
        uploader.on(''uploadProgress'', function uploadProgress(file, percentage) {
            $scope.progressStylies[file.id] = $scope.progressStylies[file.id] || {};
            $scope.progressStylies[file.id].width = percentage * 100 + ''%'';
            $scope.$apply();
        });

        uploader.on(''uploadSuccess'', function uploadSuccess(file, response) {
            $scope.progressStylies[file.id].width = ''100%'';
            $scope.$bus.publish({
                channel: ''upload'',
                topic: ''uploadSuccess'',
                data: {
                    file: file,
                    response: response
                }
            });
            $scope.$apply();
        });

        uploader.on(''uploadError'', function uploadError(file, reason) {
            $scope.progressStylies[file.id].width = ''0%'';
            $scope.$bus.publish({
                channel: ''upload'',
                topic: ''uploadError'',
                data: {
                    file: file,
                    reason: reason
                }
            });
            $scope.$apply();
        });

        uploader.on(''uploadFinished'', function uploadFinished() {
            $scope.$bus.publish({
                channel: ''upload'',
                topic: ''uploadFinished'',
                data: {}
            });
        });

        $scope.$bus.subscribe({
            channel: ''upload'',
            topic: ''start'',
            callback: function startUpload() {
                uploader.upload();
            }
        });

        $scope.$bus.subscribe({
            channel: ''upload'',
            topic: ''stop'',
            callback: function stopUpload() {
                uploader.stop();
            }
        });

        return uploader;
    }

    function getOption($scope, btn, dnd) {
        var option = {
            // swf文件路径
            swf: ''bower_components/fex-webuploader/dist/Uploader.swf'',

            // 文件接收服务端。
            server: $scope.uploadUrl,
            // 选择文件的按钮。可选。
            // 内部根据当前运行是创建,可能是input元素,也可能是flash.
            pick: {
                id: btn,
                multiple: $scope.multiple == null || $scope.multiple === ''true'',
                innerHTML: $scope.label || ''<span></span> 选择文件''
            },
            dnd: dnd,
            thumb: false,
            compress: false
        };
        if ($scope.accept) {
        	option.accept = {
                	title: ''Files'',
                	extensions: ''jpg,jpeg,png,pdf'',
                	mimeTypes: ''image/jpg,image/jpeg,image/png,application/pdf''
                };
        }

        if ($scope.accept === "Files") {
            option = $.extend({}, $scope.uploaderOption, option);
        }
        return option;
    }

    directive.$inject = deps;
    return app.lazy.directive(''fcUpload'', directive);
});

<div class="upload-container">
<!--用来存放文件信息-->
<div ng-if="files.length > 0" class="js-uploader-list">
<table class="table table-striped">
<tr ng-repeat="file in files track by file.id"
ng-class="{ success: file.getStatus() === ''complete'', danger: file.getStatus() === ''error'', warning: file.getStatus() === ''interrupt'' }">
<td class="hide"></td>
<td class="col-md-5 text-left">{{ file.name }}</td>
<td class="col-md-2 text-left">{{ file.size | byte }}</td>
<td class="col-md-5">
<div ng-class="{ active: file.getStatus() === ''progress'' }" class="progress progress-striped">
<div class="progress-bar" ng-style="progressStylies[file.id]"></div>
</div>
</td>
<td class="cs-btn-cell"><a href ng-click="remove(file, $index)" class="close">×</a></td>
</tr>
</table>
</div>
<div class="upload-dnd-container js-dnd-container">
<div class="js-btn-pick">选择文件</div>
<div class="upload-dnd-info js-dnd-info">或将文件拖到虚线框内</div>
</div>
</div>2.控制器导入directives


define(["app",
        "bootstrapJs",
        "services/BaseService",
        "services/TipsService",
        ''directives/ImageCrop'',
        ''directives/alicebot/LearnSearchPicker'',
        ''directives/Upload''
],function (app) {

    var deps = ["$scope", "$state", "$stateParams", "AlicebotResource", "TipsService"];

    function controller($scope, $state, $stateParams, AlicebotResource, TipsService) {

        $scope.selectMenuId = $stateParams.selectMenuId;
        $scope.docList = [];
        var files = {};
        $scope.attachLength = 0;

        $scope.uploaderOption = {
            fileSingleSizeLimit: 50 * 1024 * 1024
        };


        function saveAttachs() {
            $scope.$bus.publish({
                channel: ''upload'',
                topic: ''start'',
                data: null
            });
        }

        $scope.$bus.subscribe({
            channel: ''upload'',
            topic: ''fileQueued'',
            callback: function fileQueued(file) {
                files[file.id] = file;

                $scope.attachLength++;
                if (!$scope.$$phase) {
                    $scope.$apply();
                }
            }
        });

        $scope.$bus.subscribe({
            channel: ''upload'',
            topic: ''fileDequeued'',
            callback: function fileDequeued(file) {
                delete files[file.id];

                $scope.attachLength--;
                if (!$scope.$$phase) {
                    $scope.$apply();
                }
            }
        });

        $scope.$bus.subscribe({
            channel: ''upload'',
            topic: ''error'',
            callback: function error(type) {
                if (type === ''F_EXCEED_SIZE'') {
                    TipsService.show(''请选择50M以下的文件!'');
                }
            }
        });

        $scope.$bus.subscribe({
            channel: ''upload'',
            topic: ''uploadError'',
            callback: function uploadError(file, reason) {
                var fileName = file.name;
                TipsService.show(fileName+''上传失败!'');
            }
        });

        $scope.$bus.subscribe({
            channel: ''upload'',
            topic: ''uploadSuccess'',
            callback: function uploadSuccess(data) {
                if(data.response._raw !=undefined){
                    files[data.file.id].attachId = data.response._raw;
                }
            }
        });

        $scope.$bus.subscribe({
            channel: ''upload'',
            topic: ''uploadFinished'',
            callback: function uploadFinished() {
                //上传成功 将信息保存到数据库
                _.forOwn(files, function eachFile(value) {

                    if(value.attachId !=undefined){
                        $scope.docList.push(value.attachId);
                        AlicebotResource.docsUpdate($scope.selectMenuId,value.attachId).success(function(data){
                             if(!data){
                                 TipsService.show(value.name+"上传失败");
                             }
                             if(_.size(files) == $scope.docList.length){
                                    $scope.cancel();
                             }
                        });
                    }
                });
            }
        });

        /**
         * 删除附件资料
         */
        $scope.removeAttach = function removeAttach(file) {
            _.remove($scope.message.attachments, function removeCond(vo) {
                return vo.attachId === file.attachId;
            });
            _.remove($scope.message.attachments, function removeCond(attachId) {
                return attachId === file.attachId;
            });
        };

        $scope.save = function(){
            saveAttachs();
        }
        $scope.cancel= function(){
            $state.go(''home.docmanagement'');
        }


    }

    controller.$inject = deps;
    return app.lazy.controller("DocUploadController", controller);
});

<style>
.col-md-2,.col-md-3,.col-md-4,.col-md-5,.col-md-6,.col-md-8,.col-md-10,.col-md-12{padding-left: 0;}
</style>
<div>
<div class="clearfix col-m-l marginLeft0">
<div class="form col-md-8 paddingLeft0">
<div class="form-group">
<label>文档资料</label>
<div ng-if="message.attachments.length > 0">
<table class="table table-striped" ng-class="{ marginBottom0: attachLength > 0 }">
<tr ng-repeat="file in message.attachments track by file.attachId">
<td class="hide"></td>
<td class="col-md-5 text-left"><a ng-href="restful/fileUploadController/downFile?fileId={{ file.attachId }}">{{ file.attachName }}</a></td>
<td class="col-md-2 text-left">{{ file.attachSize | byte }}</td>
<td class="col-md-5"></td>
<td class="cs-btn-cell"><a href ng-click="removeAttach(file)" class="close">×</a></td>
</tr>
</table>
</div>
<div class="col-sm-12 thumbnail">
<div data-tabset class="tab-content" style="margin-top: 10px">
<div data-tab data-heading="上传附件" style="cursor: pointer;">
<div fc-upload="ccalice/docsUpload" uploader-option="uploaderOption" dnd-info="拖放到这里上传附件(每个文件大小50M以下)"></div>
</div>
</div>
</div>
</div>
<div class="form-group text-right">
<button data-ng-click="save()" class="btn btn-primary">保存</button>
<button data-ng-click="cancel()" class="btn btn-default">返回</button>
</div>
</div>
</div>
</div>

java web中的servlet3 upload上传文件实践Upload File
这篇文章主要介绍了servlet3 upload上传文件实践,非常不错,具有参考借鉴价值,需要的朋友可以参考下
Servlet 3.0之前的版本中,文件上传是个挺让人头疼的问题,虽然有第三方框架来实现,但使用也还是比较麻烦,在Servlet 3.0中,这些问题将不复存在,Servlet 3.0对文件上传提供了直接支持,配合Servlet 3.0中基于Annotations的配置,大大简化上传件的操作。
一、javax.servlet.http中Part接口
public interface Part
要上传文件必须使用multipart/form-data作为request body。
版本:
Servlet 3.1 - Apache Tomcat 8.0.33
二、方法概述
方法
描述
void delete()
删除磁盘上关于此part对象的缓存文件
java.lang.String getContentType()
获取浏览器传递过来的ContentType
java.lang.String getHeader(java.lang.String name)
获取浏览器传递过来的特定的header,参数是header的名字
java.util.Collection getHeaderNames()
获取传递给这个part的所有header的名字
java.util.Collection getHeaders(java.lang.String name)
获取该name对应的所有的value
java.io.InputStream getInputStream()
获取InputStream对象,可以用于获取上传的文件的内容
java.lang.String getName()
获取对应于此part的multipart表单的名字
long getSize()
获取此part的大小,如果是上传文件的话,表示上传的文件大小
java.lang.String getSubmittedFileName()
如果此part表示上传文件的话,返回上传的文件的名字
void write(java.lang.String fileName)
一个比较方便的方法,将上传的文件写入磁盘中
三、@MultipartConfig注解
用于处理文件上传的servlet必须使用@MultipartConfig注解,@MultipartConfig注解有4个属性。
属性
类型
概述
fileSizeThreshold
int
文件大小阀值,当文件大小大于此值时,文件将被写入磁盘
location
String
服务器端目录,服务器把客户端上传的文件默认存入此目录下
maxFileSize
long
允许上传的文件的最大大小,默认是-1,表示没有限制
maxRequestSize
long
限制该multipart/form-data请求的最大数据量,默认是-1,表示没有限制
四、处理文件上传的servlet
//此处的@MultipartConfig注解给出了文件存放的地址和允许上传的文件最大值 @MultipartConfig(location="F:/", maxFileSize = 1024*1024*20) @WebServlet(name="UploadFileTest", urlPatterns="/upload") public class UploadFileTest extends HttpServlet{ private static final long serialVersionUID = 1L; //使用了commons-logging和log4j来处理日志 private static Log log = LogFactory.getLog(UploadFileTest.class); //获取注解中设置的值 private static MultipartConfig config = UploadFileTest.class.getAnnotation(MultipartConfig.class); public UploadFiletest() { // Todo Auto-generated constructor stub } public void doPost(HttpServletRequest request, HttpServletResponse response) throws servletexception, IOException{ request.setCharacterEncoding("UTF-8"); Part part = null; try{ part = request.getPart("file");//获取part用于处理上传的文件 }catch(IllegalStateException ise){ //上传的单个文件超出maxFileSize或者上传的总的数据量超出maxRequestSize时会抛出此异常 if(config.maxRequestSize() == -1L)//如果注解中没设置此项,那就是单个文件超出限制 log.error("单个文件超限"); else if(config.maxFileSize() == -1L)//如果注解中没有设置单个文件最大限制,那就是总数据量超限。 log.error("总数据量超限"); else log.error("Error"); } if(part == null) return; String fileName = part.getSubmittedFileName();//获得上传的文件名,没有判断用户没有选择文件直接提交的情况,没有判断上传文件失败的情况 log.info("contentType : " + part.getContentType()); log.info("fileName : " + fileName); log.info("fileSize : " + part.getSize()); log.info("header names :"); for(String headerName : part.getHeaderNames()) log.info(headerName + " : " + part.getHeader(headerName)); //为了避免文件重名,将时间组合到了文件名中。实际项目中可以考虑使用用户主键或者生成一个唯一的ID来组合文件名。 String saveName = System.currentTimeMillis() + fileName; part.write(saveName);//将上传的文件保存到磁盘,默认是注解中location的相对地址,也可以传入一个绝对路径 response.setContentType("text/html;charset=UTF-8"); PrintWriter out = response.getWriter(); String docType = ""-//w3c//dtd html 4.0 " + "transitional//en">n"; out.println(docType + "n" + "Upload Filen" + "n" + "
Upload File
n" + "上传文件" + fileName+ "成功," + "可以到项目目录的F:\下查看,保存的文件名是:"+ saveName+"
n" + ""); } }五、前端html页面
Upload File
选择要上传的文件:
servlet使用了注解的方式注册,所以不再需要使用web.xml文件。新建一个web工程,就使用这两个文件就可以部署到tomcat了,要访问的url是http://localhost:8080/UploadFileTest/UploadFile.html
总结
以上所述是小编给大家介绍的servlet3 upload上传文件实践,希望对大家有所帮助,如果大家有任何疑问请给我留言,小编会及时回复大家的。在此也非常感谢大家对小编网站的支持!

javascript - webuploader上传文件组件上传图片时如何带参数给php?
yii中使用webuploader上传图片。因为没有csrftoken,yii报了bad request的错误。
如何才能在webuploader中向服务器提交csrftoken (csrftoken可以获取到)?
报错信息

回复内容:
yii中使用webuploader上传图片。因为没有csrftoken,yii报了bad request的错误。
如何才能在webuploader中向服务器提交csrftoken (csrftoken可以获取到)?
报错信息
formData:{
立即学习“PHP免费学习笔记(深入)”;
_token:''{{csrf_token()}}''}
我们今天的关于web_uploader上传图片,官方的直接使用是不行的-java版本和webuploader上传文件夹的分享已经告一段落,感谢您的关注,如果您想了解更多关于ajaxFileUpload.js 无刷新上传图片,支持多个参数同时上传、angular1 使用webuploader上传文件、java web中的servlet3 upload上传文件实践Upload File、javascript - webuploader上传文件组件上传图片时如何带参数给php?的相关信息,请在本站查询。
本文标签:


