在本文中,我们将带你了解如何通过Postman中的API请求进行分页在这篇文章中,我们将为您详细介绍如何通过Postman中的API请求进行分页的方方面面,并解答怎么用postman请求接口常见的疑惑
在本文中,我们将带你了解如何通过Postman中的API请求进行分页在这篇文章中,我们将为您详细介绍如何通过Postman中的API请求进行分页的方方面面,并解答怎么用postman请求接口常见的疑惑,同时我们还将给您一些技巧,以帮助您实现更有效的(POST) 的 POSTMAN API 请求不起作用、@RequestMapping,@GetMapping ,@PostMapping,@PutMapping,@DeleteMapping 请求的用法(推荐)、Apipost-Helper:IDEA 中的类 postman 工具、ApiPost/PostMan中生成流水号。
本文目录一览:- 如何通过Postman中的API请求进行分页(怎么用postman请求接口)
- (POST) 的 POSTMAN API 请求不起作用
- @RequestMapping,@GetMapping ,@PostMapping,@PutMapping,@DeleteMapping 请求的用法(推荐)
- Apipost-Helper:IDEA 中的类 postman 工具
- ApiPost/PostMan中生成流水号
")
如何通过Postman中的API请求进行分页(怎么用postman请求接口)
在不了解或不了解API的任何知识的情况下,并且不知道您熟悉哪种语言的情况下,我建议您编写一个小脚本,该脚本可能像while循环那样简单,它将等待结果并添加将它们保存到要保存的阵列中。当API没有返回更多结果时,您就知道要停止循环,然后可以将数组保存到JSON文档中。
例如,使用Node.js,您可以执行以下操作:
const fs = require('fs').promises;

let results = true;
let AllResults = [];

try {
  do {
      let result = await https://api-url // call api

      if (result.length > 0) AllResults.push(result)
      else results = false
  } while (!!results);

  await fs.writeFile('filename.txt',AllResults);
} catch (err) {
  errorHandler(err)
}
这只是快速编写的示例,但希望可以为您提供可能的解决方案
,不幸的是,orders api仍然是V2 api,因此它没有V3 api返回的元对象来提供此信息。
您可以从/ orders / count端点中找到订单总数,但这可能不是必须的,我只需增加page参数,直到得到204 No Content响应(里面没有订单)
 的 POSTMAN API 请求不起作用")
(POST) 的 POSTMAN API 请求不起作用
如何解决(POST) 的 POSTMAN API 请求不起作用?
我是 node.js 的新手,遇到了一些错误。我试图在 Postman 上发送一个 POST 请求,但它给了我空白,里面没有数据。而且我检查了我的数据是否有效然后我得到了,我发送的数据是有效的。有人可以推荐我吗?
这是我的索引文件(index.js):
   const express = require("express");
   const app = express();
   const dotenv = require("dotenv");
   const mongoose = require("mongoose");

   //Import Routes
   const authRoute = require("./routes/auth");
   const postRoute = require("./routes/posts");

   dotenv.config();

   //connect to DB
   mongoose.connect(
     process.env.DB_CONNECT,{ useNewUrlParser: true,useUnifiedTopology: true,useCreateIndex: true },() => console.log("connected to DB!!")
   );

   //Middleware
   app.use(express.json());
   //Route Middlewares
   app.use("/api/user",authRoute);
   app.use("/api/posts",postRoute);

   //PORT NUMBER
   const port = process.env.PORT || 8080; // default port to listen

   // start the Express server
   app.listen(port,() => {
     console.log(`server started at http://localhost:${port}`);
   });
这是我的身份验证文件(auth.js):
const router = require("express").Router();
const User = require("../model/User");
const jwt = require("jsonwebtoken");
const bcrypt = require("bcryptjs");
const { registerValidation,loginValidation } = require("../validation");

//REGISTER
router.post("/register",async (req,res) => {
  console.log("register");
  //Lets validate a data before we make a user
  const { error } = registerValidation(req.body);
  if (error) return res.status(400).send(error.details[0].message);

  //Checking if the user is already in the database
  const emailExist = await User.findOne({ email: req.body.email });
  if (emailExist) return res.status(400).send("Email Already Exists");

  //HASH THE PASSWORD
  const salt = await bcrypt.genSalt(10);
  const hashedPassword = await bcrypt.hash(req.body.password,salt);

  //Create a New User
  const user = new User({
    name: req.body.name,email: req.body.email,password: hashedPassword,});

  try {
    const savedUser = await user.save();
    res.send({ user: user._id });
  } catch (err) {
    res.status(400).send(err);
  }
});

//LOGIN
router.post("/login",res) => {
  //Lets validate a data before we make a user
  const { error } = loginValidation(req.body);
  if (error) return res.status(400).send(error.details[0].message);

  //Checking if the email exists in the database
  const user = await User.findOne({ email: req.body.email });
  if (!user) return res.status(400).send("Email is Not Found");

  //Check if password is correct
  const validPass = await bcrypt.compare(req.body.password,user.password);
  if (!validPass) return res.status(400).send("Invalid Password");

  //Create  and assign a Token
  const token = jwt.sign({ _id: user._id },process.env.TOKEN_SECRET);
  res.header("auth-token",token).send(token);
});

module.exports = router;
如您所见:

我无法通过 POST 请求发送数据和获取数据,数据库也已连接。
解决方法
试试console.log(req.body)。
如果您的 req.body 为空,那么您需要在中间件(index.js 文件)中添加一个包 body-parser。
const bodyParser = require(''body-parser'');
app.use(bodyParser.urlencoded({ extended: true }));
")
@RequestMapping,@GetMapping ,@PostMapping,@PutMapping,@DeleteMapping 请求的用法(推荐)

转:
@RequestMapping,@GetMapping ,@PostMapping,@PutMapping,@DeleteMapping 请求的用法(推荐)

学习目标
1、一周掌握 JAVA 入门到进阶知识
2、掌握基础 C#l 窗体知识
3、手把手教你 vbs 脚本制作
4、强大的 IDEA 编程利器
5、经典少见的 面试题目技巧
@GetMapping ,@PostMapping,@PutMapping,@DeleteMapping 请求的用法
- 学习目标
- 前言
- @PostMapping
- @DeleteMapping
- @PutMapping
- @GetMapping
- @RequestMapping
- 总结
前言

希望:2012 新的一年,想要的都拥有,得不到的都释怀!
@PostMapping
如图所示:
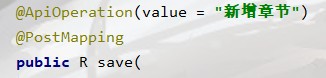
增加应该使用 POST
@DeleteMapping
如图所示:

删除应该使用 DELETE
@PutMapping
如图所示:

修改应该使用 PUT
@GetMapping
如图所示:

查询应该使用 GET
@RequestMapping
如图所示:
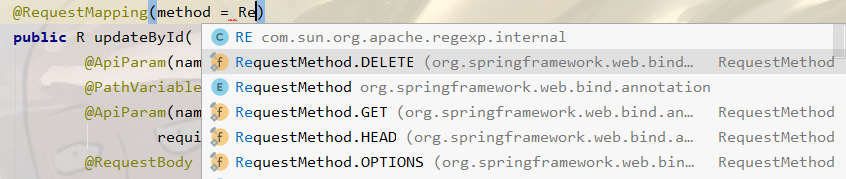
@GetMapping是一个组合注解 是@RequestMapping(method = RequestMethod.GET)的缩写
@DeleteMapping是一个组合注解 是@RequestMapping(method = RequestMethod.DELETE)的缩写
@PutMapping是一个组合注解 是@RequestMapping(method = RequestMethod.PUT)的缩写
@PostMapping是一个组合注解 是@RequestMapping(method = RequestMethod.POST)的缩写
总结
通过上面的介绍,我们应该学会了怎么用上述的注解了。
转:
@RequestMapping,@GetMapping ,@PostMapping,@PutMapping,@DeleteMapping 请求的用法(推荐)
--Posted from Rpc

Apipost-Helper:IDEA 中的类 postman 工具
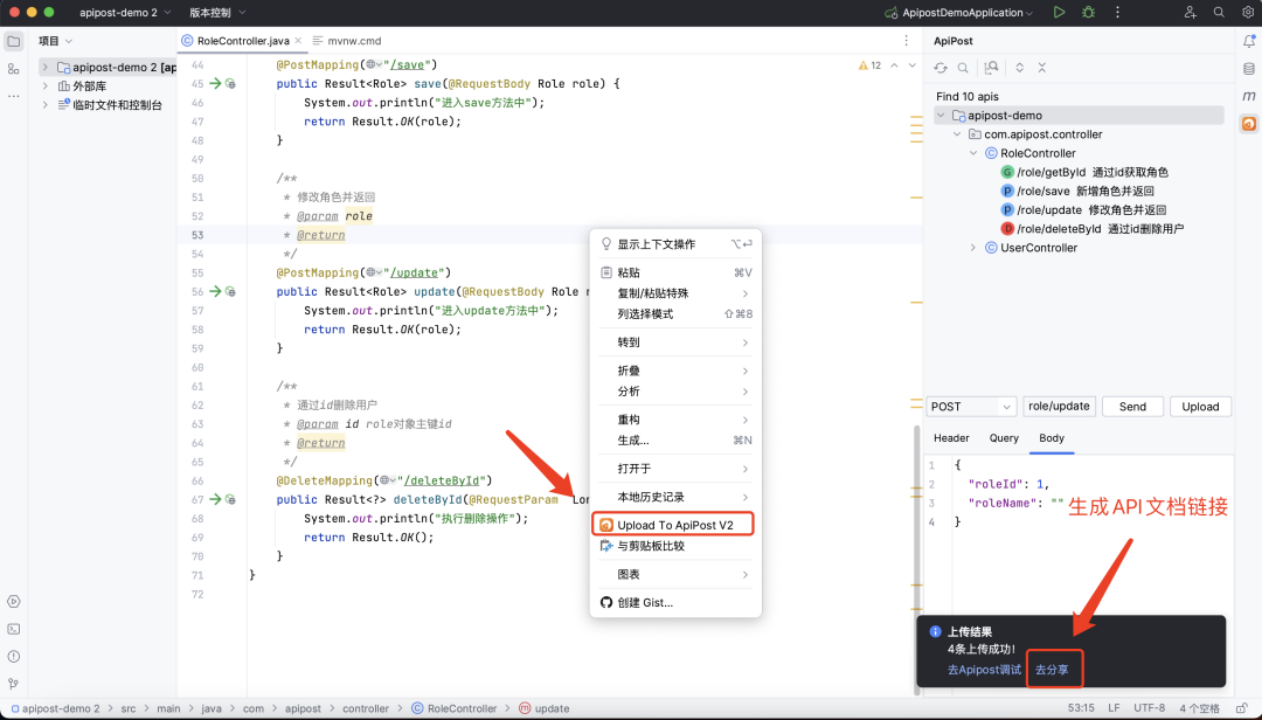
今天给大家推荐一款 IDEA 插件:Apipost-Helper-2.0,写完代码 IDEA 内一键生成 API 文档,无需安装、打开任何其他软件;写完代码 IDEA 内一键调试,无需安装、打开任何其他软件;生成 API 目录树,双击即可快速定位 API 定义的代码… 非常好用!主要包含以下功能:
1、无侵入生成 API 文档
编写完代码后,只需右键 upload 同步接口即可快速将源码中包含的 API 以及注解自动生成 API 文档,并生成可以访问的链接。无需任何额外操作。
2、快速调式(类似 Postman)
编写完代码后,点击右侧图标,可以进行快速调试

3、根据 API 搜索对应源码
该插件也支持通过双击或者右键 API 目录树,快速定位对应源码。这对于源码量很大时,寻找对应 method 非常有用。
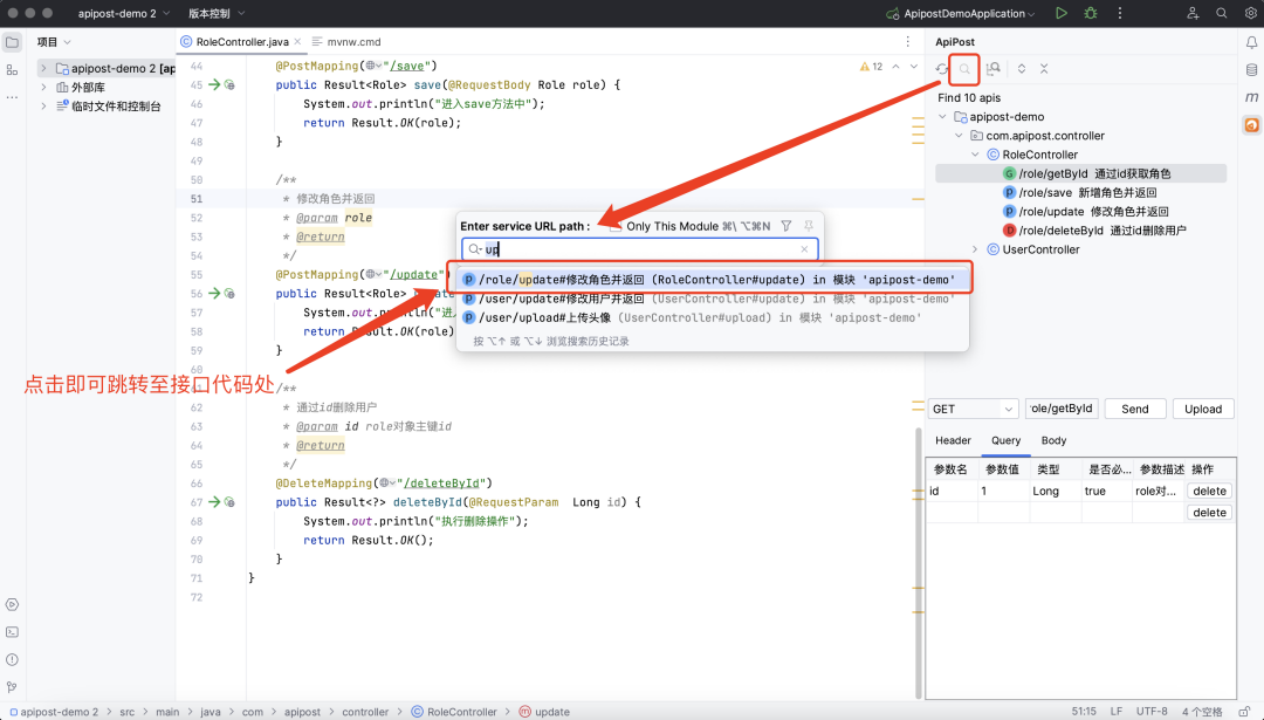
4、根据源码 method 跳转到对应 API 树
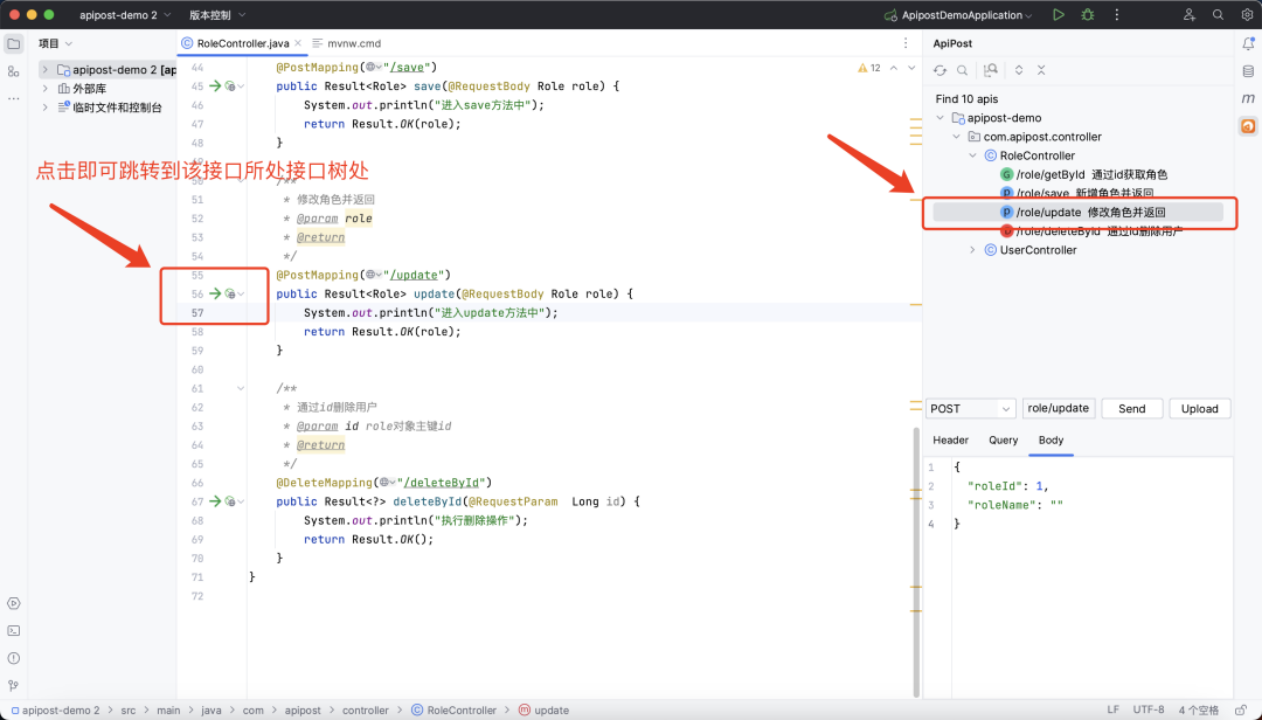
插件同样支持通过源码 method 跳转到对应 API 树。比如可以通过点击图中 icon,快速的找到右侧树中对应的 API,并进行调试。

ApiPost/PostMan中生成流水号
- 计算当前年月日时分秒
- 计算随机数
- 拼接前缀
var myDate = new Date();

var year = myDate.getFullYear();

var month = myDate.getMonth() + 1;

var date = myDate.getDate();

var hours = myDate.getHours() + 1;

var min = myDate.getMinutes();

var seconds = myDate.getSeconds();

hours = hours < 10 ? "0" + hours : hours;

min = min < 10 ? "0" + min : min;

seconds = seconds < 10 ? "0" + seconds : seconds;

var date = year + "" + month + date + hours + min + seconds;

function GetRandomNum(Min, Max) {
    var Range = Max - Min;
    var Rand = Math.random();
    return (Min + Math.round(Rand * Range));
}
var num = GetRandomNum(100000, 999999);
// 把参数设置成全局变量
apt.globals.set("appNo", "CAS" + date + num);
- 在Body/Query窗口中获取参数
{ "appNo": "{{appNo}}" }
今天关于如何通过Postman中的API请求进行分页和怎么用postman请求接口的讲解已经结束,谢谢您的阅读,如果想了解更多关于(POST) 的 POSTMAN API 请求不起作用、@RequestMapping,@GetMapping ,@PostMapping,@PutMapping,@DeleteMapping 请求的用法(推荐)、Apipost-Helper:IDEA 中的类 postman 工具、ApiPost/PostMan中生成流水号的相关知识,请在本站搜索。
本文标签:


