在本文中,我们将详细介绍SpringBootYaml配置以获取字符串列表的各个方面,并为您提供关于springboot读取yaml的相关解答,同时,我们也将为您带来关于(三)SpringBoot-YA
在本文中,我们将详细介绍Spring Boot Yaml配置以获取字符串列表的各个方面,并为您提供关于springboot读取yaml的相关解答,同时,我们也将为您带来关于(三) SpringBoot-YAML配置小结、1.springBoot_配置_yaml文件值获取、Spring Boot 的 Yaml 配置高级用法、Spring Boot 获取 yaml 配置文件信息的有用知识。
本文目录一览:- Spring Boot Yaml配置以获取字符串列表(springboot读取yaml)
- (三) SpringBoot-YAML配置小结
- 1.springBoot_配置_yaml文件值获取
- Spring Boot 的 Yaml 配置高级用法
- Spring Boot 获取 yaml 配置文件信息
")
Spring Boot Yaml配置以获取字符串列表(springboot读取yaml)
我正在尝试从application.yml文件加载字符串数组。这是配置:
ignore: filenames: - .DS_Store - .hg这是课程:
@Value("${ignore.filenames}")private List<String> igonoredFileNames = new ArrayList<>();同一类中还有其他配置也可以加载。我的yaml文件中没有标签。我仍然得到以下异常:
Caused by: java.lang.IllegalArgumentException: Could not resolve placeholder ''ignore.filenames'' in string value "${ignore.filenames}"答案1
小编典典我的 猜测 是,@Value不能应对“复杂”类型。您可以使用以下prop类:
@Component@ConfigurationProperties(''ignore'')class IgnoreSettings { List<String> filenames}请注意: 此代码是 Groovy的 - 不是Java -保持示例短!有关如何采用的提示,请参见注释。
参见完整示例https://github.com/christoph-frick/so-springboot-yaml-string-
list
 SpringBoot-YAML配置小结")
(三) SpringBoot-YAML配置小结

这是第三篇,关于YAML配置文件的小结篇,同样有兴趣的朋友可以去了解一下前两篇,感谢大家支持哈
(一) SpringBoot起飞之路-HelloWorld
(二) SpringBoot起飞之路-入门原理分析
说明:
- 太忙啦,同时全放到一起,后来感觉移动端篇幅太长,阅读体验太差了,就打算分成几篇来发
- 才疏学浅,就会点浅薄的知识,大家权当一篇工具文来看啦,不喜勿愤哈 ~
(一) SpringBoot配置文件类型
在前一篇的入门原理讲解中,我们简单有提到过关于自动配置的一些说明,我们演示的时候,仅仅在 srcmainresources 下的 application.properties 中写入 server.port=9090 就可以非常便捷的修改端口号
也就是说,SpringBoot是基于约定的,很多值都是默认存在的,如果想要进行一定的修改,我们就需要使用 application.properties或者application.yml(application.yaml)进行配置
properties,我们相对还是熟悉的,在过去 Spring 中的开发我们还算是经常用
这一篇主要讲解 yaml 这一类型
(二) yaml 简介
维基百科贴的简介
YAML是"YAML Ain''t a Markup Language"(YAML不是一种标记语言)的递归缩写。在开发的这种语言时,YAML 的意思其实是:"Yet Another Markup Language"(仍是一种标记语言),但为了强调这种语言以数据做为中心,而不是以标记语言为重点,而用反向缩略语重命名。
维基百科贴的功能介绍
YAM的语法和其他高级语言类似,并且可以简单表达清单、散列表,标量等数据形态,它使用空白符号缩进和大量依赖外观的特色,特别适合用来表达或编辑数据结构、各种配置文件、倾印调试内容、文件大。尽管它比较适合用来表达层次结构式的数据结构,不过也有精致的语法可以表示关系性的数据其让人最容易上手的特色是巧妙避开各种封闭符号,如:引号、各种括号等,这些符号在嵌套结构时会变得复杂而难以辨认
我们可以先看一个例子:
- XML 配置
<server>
    <port>9090<port>
</server>- Properties 配置
server.port=9090- Yaml 配置
server:
  prot: 9090
从这么简单的例子来看,起码相较于 XML,Properties 和 Yaml 还是相对简洁的,如果涉及到一些复杂List 等等,XML 更是一种梦魇
所以,简单的概括一下:YAML语言文件,它以.yml作为后缀,因为相比较原来的 XML(主要) 或者 Properties ,语法简洁,可读性更好,由于其以数据为中心而非标记语言的特点,所以适合作为开发项目中的配置文件
(三) 基础语法
(1) 语法要求
- value 与冒号之间的空格不能省略,例如 key: value ,'':'' 后面可是有空格的
- 缩进表示层级关系,左对齐的一列数据为同一层级
- 缩进不能用 Tab,只能用空空格
- 语法中大小写是敏感的
(2) 配置普通数据
普通数据在这里值得是:数字,布尔值,字符串 等
语法:
key: value示例:
name: ideal- 普通数据的值直接写在冒号(加空格)后面,通常字符串也不需要加单双引号
- “ ” 双引号会将转义字符,例如 “n” 当做换行符返回
- '' '' 单引号不会解析转义,''n'' 会被当作字符串返回
(3) 配置对象数据、Map数据
语法:
- 基本写法
key:
  key1: value1
key2: value2- 行内写法
key: {key1: value1,key2: value2}示例:
user:
  name: Steven
  age:20
  address: beijing
user: {name:Steven,age: 20,address: beijing} 说明:key1 前面空格个数是没有限定的,虽然默认是两格,但是只要是相同缩进,就代表是同一级别,用默认即可,仅此说明
(4) 配置数组、List、Set 数据
这里用 - 代表一个元素,注意 - 和 value1 等之间存在一个空格
语法:
- 基本写法
key:
  - value1
- value2- 行内写法
key: [value1,value2]示例:
province:
  - guangdong
  - hebei
  - sichuan
province: [guangdong,hebei,sichuan]补充:当集合中元素为对象的时候,示例如下
user:
  - name: zhangsan
    age: 20
    address: beijing
  - name: lisi
    age: 28
    address: shanghai
  - name: wangwu
    age: 26
    address: shenzhen
(四) 配置文件与配置类的属性映射
(1) @Value映射
在Spring中,我们已经介绍过 @Value 注解,我们可以通过 @Value 注解将配置文件中的值映射到一个Spring管理的Bean的字段上
先创建一个简单的 User 类用来演示,就这么三个成员
@Component
public class User {
    private String name;
    private Integer age;
    private String address;
    ......补充 get、toString方法(set可以不写)
}
测试都是统一的
@Controller
public class UserController {
    @Autowired
    User user;

    @RequestMapping("/testUser")
    @ResponseBody
    public String testUser(){
       return user.toString();
    }
}
现在我们分三种演示一下
A:直接赋值
@Value("Tom")
private String name;

@Value("20")
private Integer age;

@Value("北京")
private String address;
B:Properties
application.properties
user1.name=Jack
user1.age=30
user1.address=北京
User
@Value("${user1.name}")
private String name;

@Value("${user1.age}")
private Integer age;

@Value("${user1.address}")
private String address;
C:Yaml
application.yml
user1:
  name: Steven
  age: 20
  address: 北京
User
@Value("${user1.name}")
private String name;

@Value("${user1.age}")
private Integer age;

@Value("${user1.address}")
private String address;
看一下 yaml 的测试结果

D:说明
① 配置优先级问题
properties、yaml、yml,这三种配置文件,如果同时都配置的话,其实三个文件中的配置信息都会生效,但是存在加载优先级问题,后加载的会覆盖先加载的文件,所当三个文件中有配置信息冲突时,虽然加载顺序是yml>yaml>properties,但你看到的实际上是最后出现的,所以优先级是:properties>yaml>yml,
② user 命名问题
上面 @Value("${user1.name}") 我全用了 user1,是因为如果 Windows 下 user.name,会获取到当前 Windows 用户的用户名
③ application
记得要在 application.properties 或者 application.yaml 或者 application.yml 中写,因为默认是去找这几个配置文件的,如果配置文件命名不对的话,是找不到的,当然后面会有办法解决
④ Properties 乱码问题
如果以前没有设置的话,中文肯定是会乱码的,下面补充一下设置的方法
将下面的勾选上,然后设置 Properties 编码为 UTF-8

(2) @ConfigurationProperties映射
看下的实体类中,使用了这个注解 @ConfigurationProperties(prefix="配置文件中的key的前缀"),它可以将配置文件中的配置自动与实体进行映射
注意:可能会提示一些错误,一般是没有影响的,解决方案放在文章下面,如果无影响,先做就可以了
A:配置实体类
@Value 如果成员比较多的也挺麻烦的,介绍一种更加方便的,这种以后会常用到,所以重写一个复杂一点的实体,演示的全面一些
注意:要使用 @ConfigurationProperties 来实现,就要给其成员添加 set 方法,而前面使用 @Value注解 则不需要也可以
@Component
@ConfigurationProperties(prefix = "student")
public class Student {

    private String name;
    private Integer age;
    private Date birthday;
    private Boolean graduate;
    private Map<String, Integer> score;
    private List<String> subject;
    private User u;
    ......补充 get set toString 方法
}
Student 类中引用的 User 类
@Component
public class User {
    private String name;
    private Integer age;
    private String address;
    ......补充 get set toString方法
}
B:yaml 配置
student:
  name: Steven
  age: 20
  birthday: 2020/01/01
  graduate: false
  score: {math: 90, english: 88}
  subject:
    - 高数
    - 大英
    - 大物
  u:
    name: Jack
    age: 30
    address: 北京
(3) 加载指定properties配置文件
补充一个关于加载指定properties配置文件的知识点
Spring默认使用 yml 中的配置,但有时候要用传统的xml或properties配置,顺便演示,正好引出一下,如果想要调用一个自定义的 properties 该怎么办?
用 @PropertySource 这个注解就可以了
@Component
@PropertySource(value = "classpath:user.properties")
@ConfigurationProperties(prefix = "usertest")
public class User {
    private String name;
    private Integer age;
    private String address;
    ......补充 get set toString方法
}
user.properties
usertest.name=Jack
usertest.age=30
usertest.address=北京
(五) 问题解决方案
1、Spring Boot Configuration Annotation Processor not found in classpath错误
IDEA 提示,springboot配置注解处理器没有找到,也就会给我们地址,让我们去看文档,但是有的文档不一定打得开,大家可以自己去官网找一找
先来看一下官网的说明
Generating Your Own Metadata by Using the Annotation ProcessorYou can easily generate your own configuration metadata file from items annotated with
@ConfigurationPropertiesby using thespring-boot-configuration-processorjar. The jar includes a Java annotation processor which is invoked as your project is compiled. To use the processor, include a dependency onspring-boot-configuration-processor.With Maven the dependency should be declared as optional, as shown in the following example:
所以添加注解就可以了
<dependency>
    <groupId>org.springframework.boot</groupId>
    <artifactId>spring-boot-configuration-processor</artifactId>
    <optional>true</optional>
</dependency>
2、Re-run Spring Boot Configuration Annotation Processor to update generated metadata
一般加好依赖,就会弹出这个吗,这个问题可以忽略,不影响代码执行,应该只是一个提醒,提醒你进行必要的重启或者重新编译,我也没找到完美处理这个问题的方法,实在不顺眼也可以关闭 IDEA 的提示:
- Setting 下搜索 Spring,找到 SpringBoot 取消勾选 show notification panel
(六) 疑惑占楼
对于,spring-boot-configuration-processor,网络上有的说法认为是用来引入@PropertySource的, 也有一种说法说是用来使 @ConfigurationProperties 生效的
@Component
@PropertySource(value = "classpath:user.properties")
@ConfigurationProperties(prefix = "usertest")
public class User {
    private String name;
    private Integer age;
    private String address;
    ......补充 get set toString方法
}
不过测试一下,不引入 spring-boot-configuration-processor 也能使用这两个注解,一直也没怎么去仔细考虑,都忽略了,如果了解的朋友,可以留言交流一下,以后有了合适的解释我重新更新一下,在此占楼
(七) 结尾
如果文章中有什么不足,欢迎大家留言交流,感谢朋友们的支持!
如果能帮到你的话,那就来关注我吧!如果您更喜欢微信文章的阅读方式,可以关注我的公众号
在这里的我们素不相识,却都在为了自己的梦而努力 ❤一个坚持推送原创开发技术文章的公众号:理想二旬不止


1.springBoot_配置_yaml文件值获取
前言: 此文章为对springBoot源码学习的一个记录,参考视频
1.简单的创建一个springBoot的项目
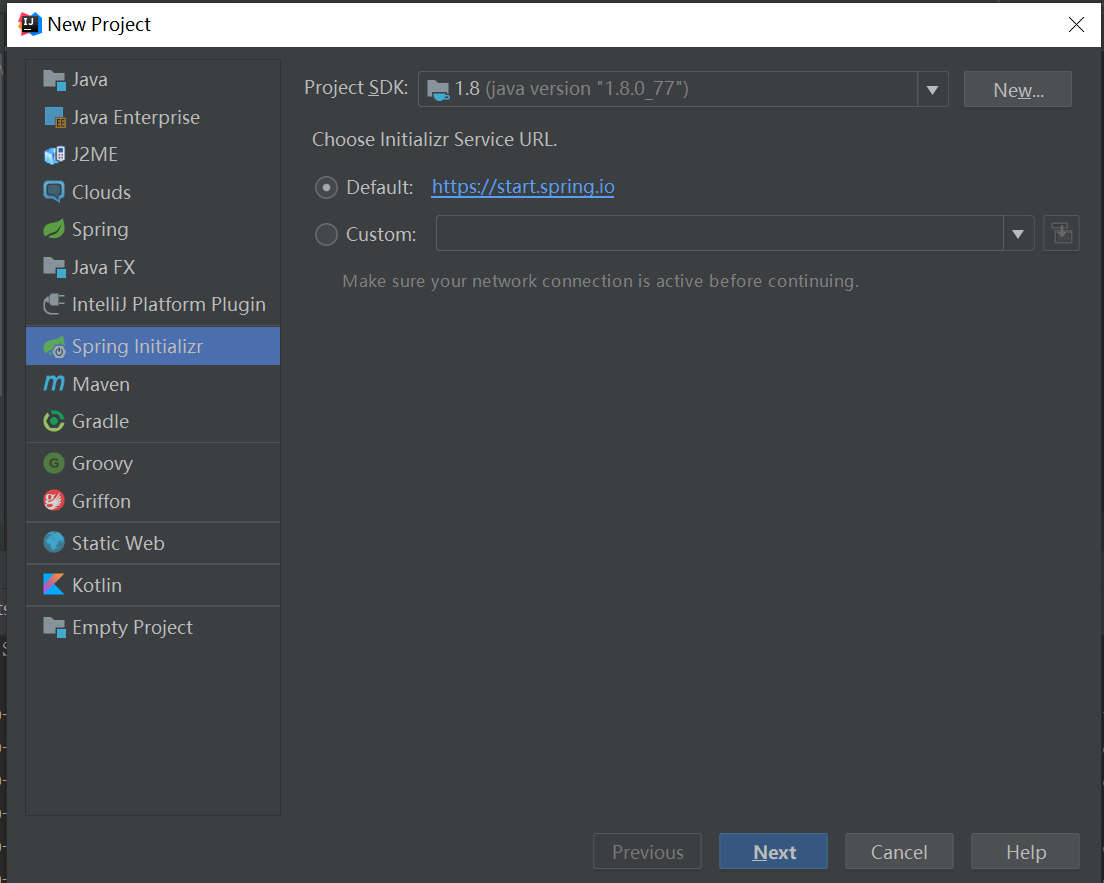
创建项目的具体步骤,自行搜索。
2.创建一个实体类
package com.lara.bean;

import lombok.Data;
import org.springframework.boot.context.properties.ConfigurationProperties;
import org.springframework.stereotype.Component;

import java.util.Date;
import java.util.List;
import java.util.Map;

/**
 * @author lara
 * @date 2020/3/1 12:50
 */
@Component
@ConfigurationProperties(prefix = "person")
@Data
public class Person {
    private String lastName;
    private Integer age;
    private Boolean boss;
    private Date birth;
    private Map<String, Object> maps;
    private List<Object> lists;
    private Dog dog;
}
上述代码使用到了
- @Data注解,这是lombok的一个注解,使用此注解会自动为类的属性生成setter、getter、equals、hashCode、toString等方法。 在idea中使用lombok需要安装一下lombok的插件

同时在项目中添加如下依赖:
        <dependency>
            <groupId>org.projectlombok</groupId>
            <artifactId>lombok</artifactId>
            <version>1.16.20</version>
            <scope>provided</scope>
        </dependency>
- @ConfigurationProperties:将配置文件中相关属性的值映射到这个组件中,一般为了指明使用那些属性,会指明prifex的值。此注解一般搭配使用@EnableAutoConfiguration注解。意思就是使@ConfigurationProperties注解生效
- @Component 因为@ConfigurationProperties是容器中的功能,因此需要将person组件添加到容器中
3.在启动类中添加@EnableAutoConfiguration
package com.lara;

import org.springframework.boot.SpringApplication;
import org.springframework.boot.autoconfigure.EnableAutoConfiguration;
import org.springframework.boot.autoconfigure.SpringBootApplication;

/**
 * @author lara
 * @date 2020/2/22 16:40
 */

@SpringBootApplication
@EnableAutoConfiguration
public class HelloWorldApplication {

    public static void main(String[] args) {
        SpringApplication.run(HelloWorldApplication.class, args);
    }
}
4.yaml配置文件添加属性的值

5.测试类测试
import com.lara.HelloWorldApplication;
import com.lara.bean.Person;
import org.junit.Test;
import org.junit.runner.RunWith;
import org.springframework.beans.factory.annotation.Autowired;
import org.springframework.boot.test.context.SpringBootTest;
import org.springframework.test.context.junit4.SpringRunner;

/**
 * @author lara
 * @date 2020/3/1 12:55
 */

@RunWith(SpringRunner.class)
@SpringBootTest(classes = HelloWorldApplication.class)
public class HelloWorldApplicationTest {

    @Autowired
    Person person;

    @Test
    public void contextLoads(){
        System.out.println(person);
    }
}

6.总结
- 使用yaml文件的值给一个对象赋值,需要在对象上使用@ConfigurationProperties
- 此对象必须已经注入到容器中
- 要使@ConfigurationProperties注解生效,还必须在启动类上搭配使用@@EnableAutoConfiguration

Spring Boot 的 Yaml 配置高级用法
枚举
不知道你有没有发现,Spring Boot 是天然支持枚举方式注入类的。
private TimeUnit timeUnit = TimeUnit.MINUTES;类实例
有些特殊场景中我们希望能通过配置的方式自定义去初始化Bean,比如:线程池。但在初始化 Bean 的时候需要对配置的 Class 对象初始化。
public static class ExecutorSetting {
     private Class<? extends RejectedExecutionHandler> executionHandler = ThreadPoolExecutor.AbortPolicy.class;
}
Class 对象初始化实现,参考: org.apache.ibatis.logging.LogFactory.java
private static void setImplementation(Class<? extends Log> implClass) {
    try {
      Constructor<? extends Log> candidate = implClass.getConstructor(String.class);
      Log log = candidate.newInstance(LogFactory.class.getName());
      if (log.isDebugEnabled()) {
        log.debug("Logging initialized using ''" + implClass + "'' adapter.");
      }
      logConstructor = candidate;
    } catch (Throwable t) {
      throw new LogException("Error setting Log implementation.  Cause: " + t, t);
    }
}
Spring Boot 获取 yaml 配置文件信息
Spring boot 项目启动过程中:
org.springframework.boot.SpringApplication#prepareEnvironment
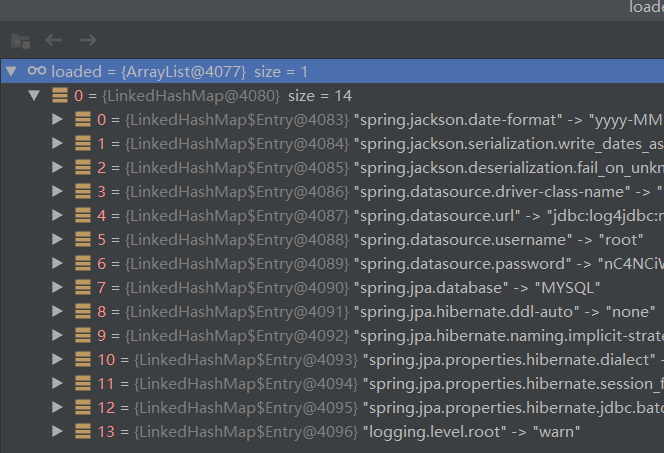
当程序步入 listeners.environmentPrepared (environment); 这里后,就会读取配置文件中信息。
private ConfigurableEnvironment prepareEnvironment(SpringApplicationRunListeners listeners,
            ApplicationArguments applicationArguments) {
        // Create and configure the environment
        ConfigurableEnvironment environment = getOrCreateEnvironment();
        configureEnvironment(environment, applicationArguments.getSourceArgs());
        listeners.environmentPrepared(environment);
        bindToSpringApplication(environment);
        if (!this.isCustomEnvironment) {
            environment = new EnvironmentConverter(getClassLoader()).convertEnvironmentIfNecessary(environment,
                    deduceEnvironmentClass());
        }
        ConfigurationPropertySources.attach(environment);
        return environment;
    }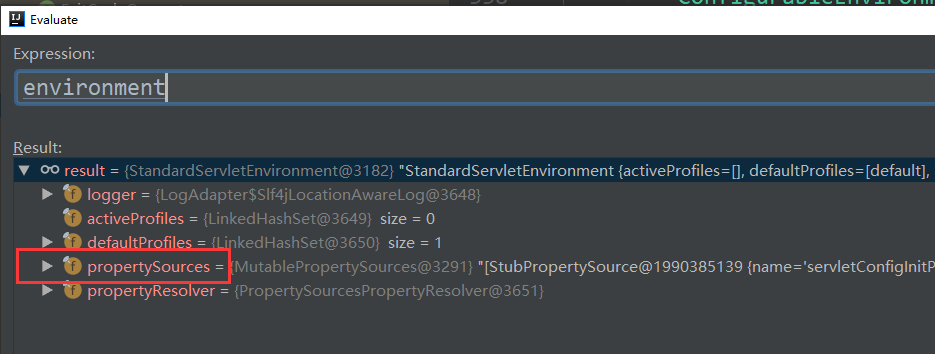

这句代码不好调试 listeners.environmentPrepared (environment);
但可以换一种方式,找到上图中的这个类:org.springframework.boot.env.OriginTrackedMapPropertySource
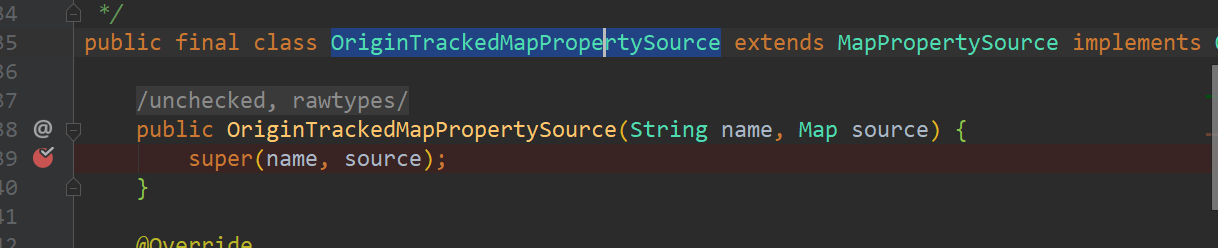
在断点处打上断点,就可以看到系统是如何运行的:下面是堆栈信息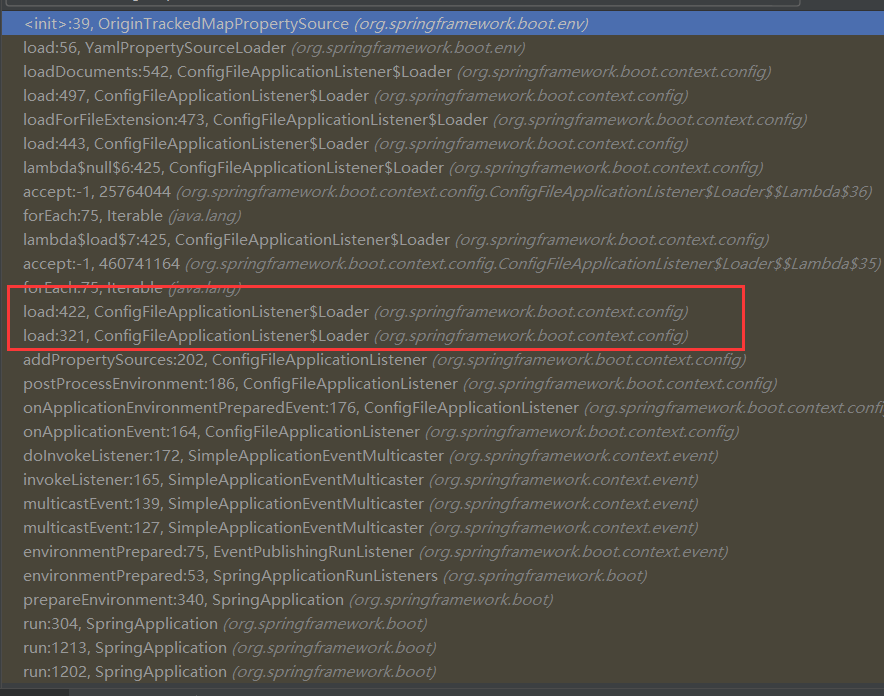
在堆栈信息中,可以看到这个类:org.springframework.boot.context.config.ConfigFileApplicationListener
这个类里面的包含一些配置信息:
private static final String DEFAULT_PROPERTIES = "defaultProperties";

    // Note the order is from least to most specific (last one wins)
    private static final String DEFAULT_SEARCH_LOCATIONS = "classpath:/,classpath:/config/,file:./,file:./config/";

    private static final String DEFAULT_NAMES = "application";

    private static final Set<String> NO_SEARCH_NAMES = Collections.singleton(null);

    private static final Bindable<String[]> STRING_ARRAY = Bindable.of(String[].class);

    /**
     * The "active profiles" property name.
     */
    public static final String ACTIVE_PROFILES_PROPERTY = "spring.profiles.active";

    /**
     * The "includes profiles" property name.
     */
    public static final String INCLUDE_PROFILES_PROPERTY = "spring.profiles.include";

    /**
     * The "config name" property name.
     */
    public static final String CONFIG_NAME_PROPERTY = "spring.config.name";

    /**
     * The "config location" property name.
     */
    public static final String CONFIG_LOCATION_PROPERTY = "spring.config.location";
一个 properties. 一个 yaml 配置 sourceloader
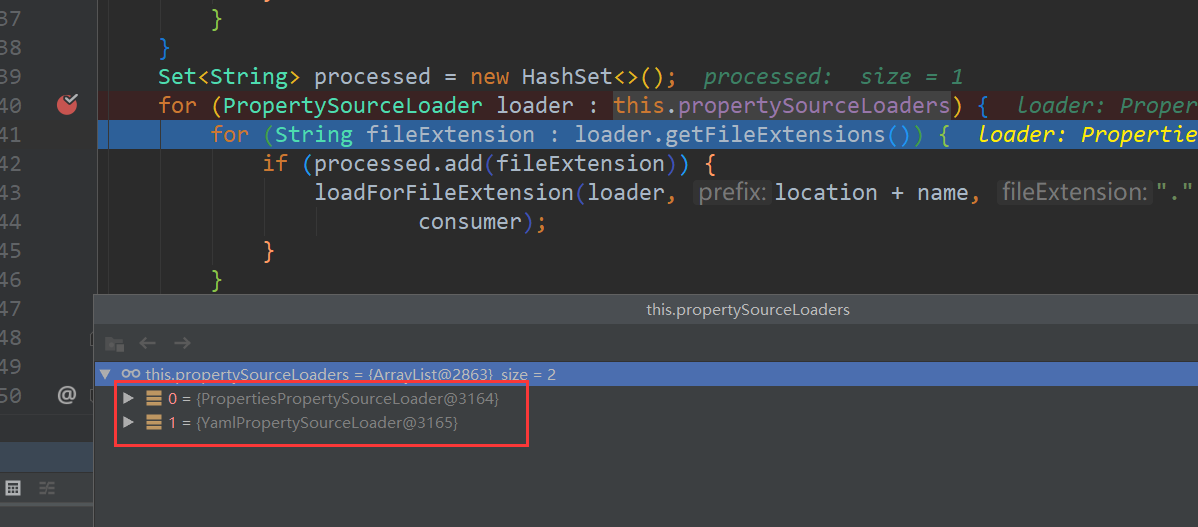
加载 yaml 文件的类是 YamlPropertySourceLoader
public class YamlPropertySourceLoader implements PropertySourceLoader {

    @Override
    public String[] getFileExtensions() {
        return new String[] { "yml", "yaml" };
    }

    @Override
    public List<PropertySource<?>> load(String name, Resource resource) throws IOException {
        if (!ClassUtils.isPresent("org.yaml.snakeyaml.Yaml", null)) {
            throw new IllegalStateException(
                    "Attempted to load " + name + " but snakeyaml was not found on the classpath");
        }
        List<Map<String, Object>> loaded = new OriginTrackedYamlLoader(resource).load();
        if (loaded.isEmpty()) {
            return Collections.emptyList();
        }
        List<PropertySource<?>> propertySources = new ArrayList<>(loaded.size());
        for (int i = 0; i < loaded.size(); i++) {
            String documentNumber = (loaded.size() != 1) ? " (document #" + i + ")" : "";
            propertySources.add(new OriginTrackedMapPropertySource(name + documentNumber, loaded.get(i)));
        }
        return propertySources;
    }

}
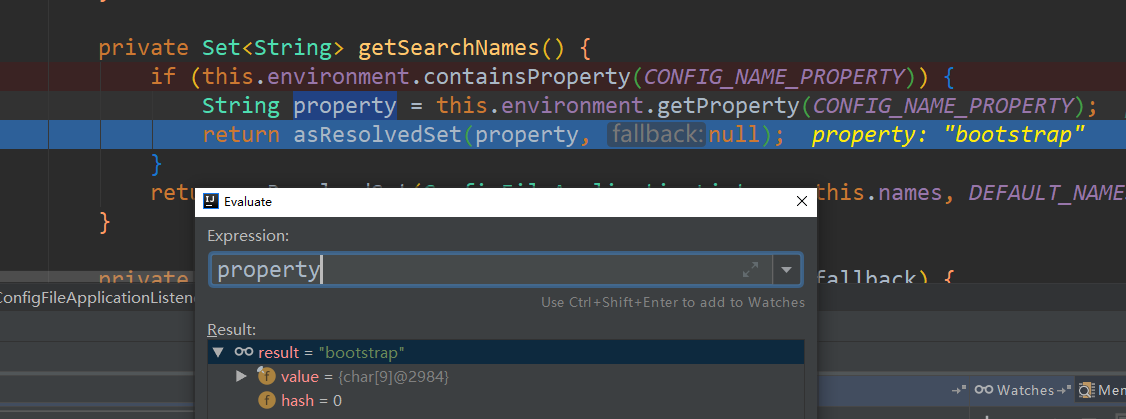
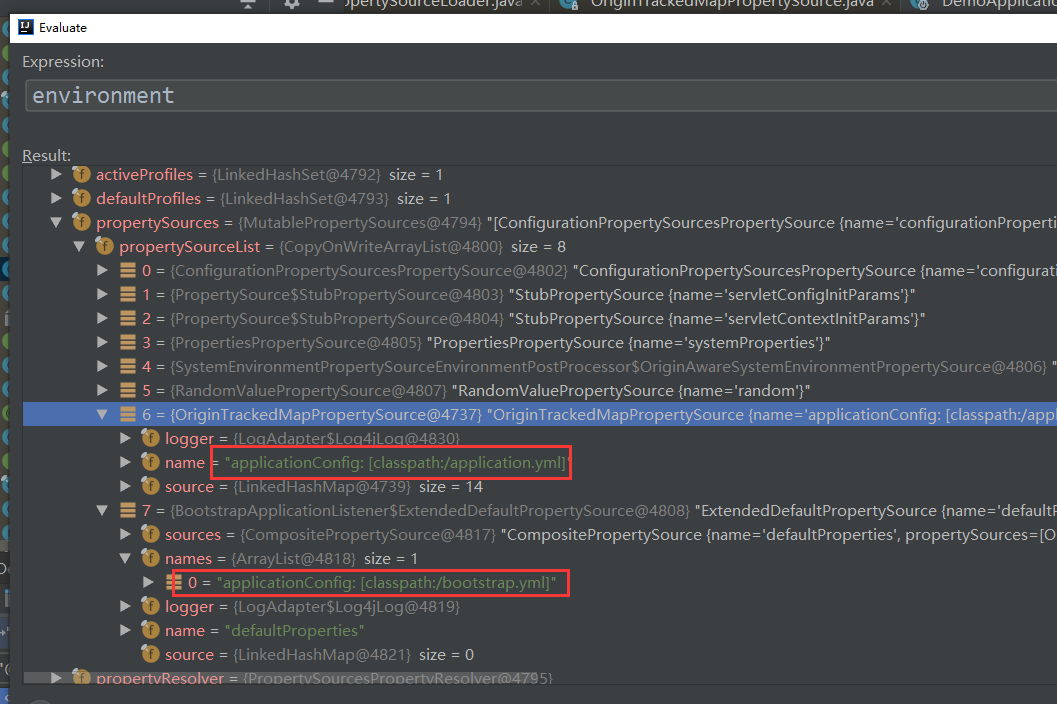
注如果是云环境,则首先加载的是 bootstrap.yml, environment 也是 StandardEnvironment, 非 servlet 环境。这是和 Spring boot 有很大的不同,加载完成后,再嵌套一 StandardServletEnvironment.
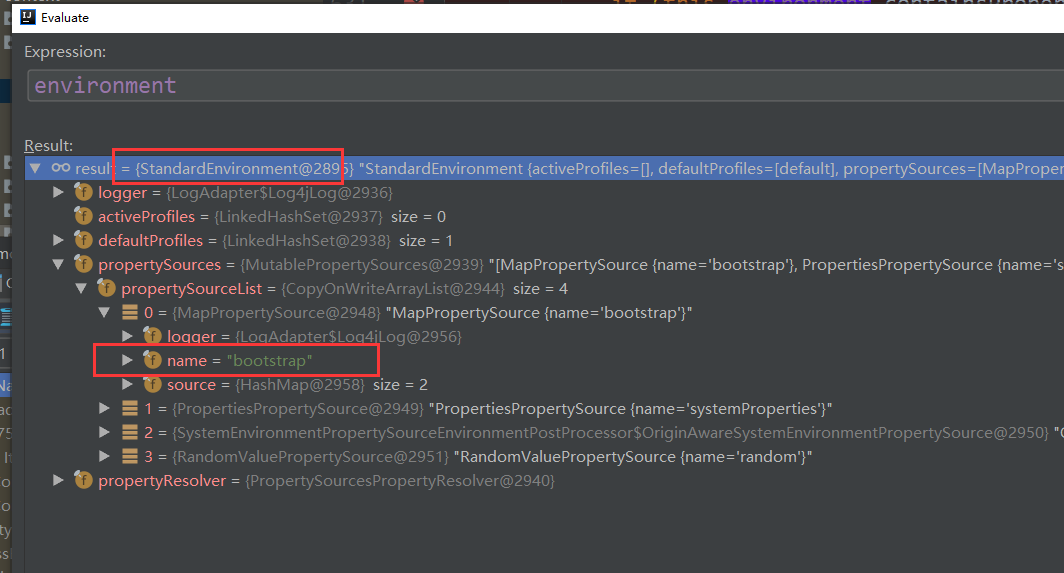
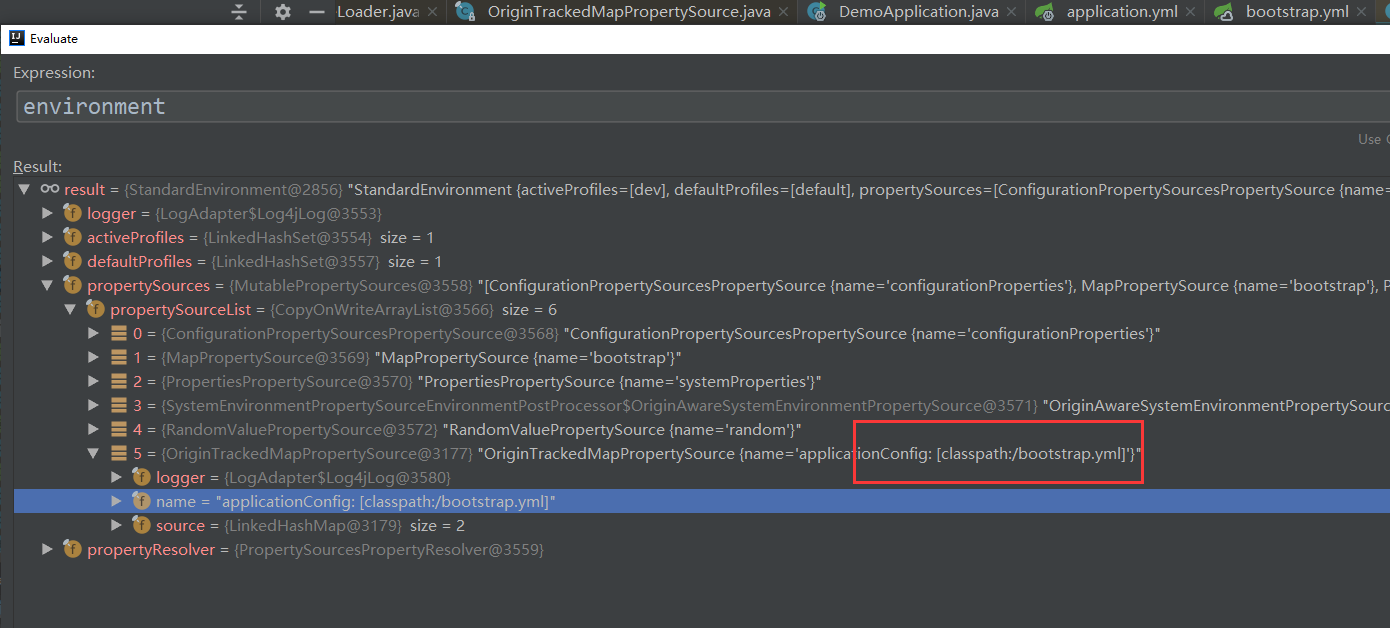
加载完成后,再嵌套一 StandardServletEnvironment.
关于Spring Boot Yaml配置以获取字符串列表和springboot读取yaml的介绍现已完结,谢谢您的耐心阅读,如果想了解更多关于(三) SpringBoot-YAML配置小结、1.springBoot_配置_yaml文件值获取、Spring Boot 的 Yaml 配置高级用法、Spring Boot 获取 yaml 配置文件信息的相关知识,请在本站寻找。
本文标签:


