此处将为大家介绍关于nuster基于HAProxy的高性能HTTP缓存服务器和RESTfulNoSQL缓存服务的详细内容,此外,我们还将为您介绍关于CentOS高性能缓存服务器Squid架构配置、go
此处将为大家介绍关于nuster 基于 HAProxy 的高性能 HTTP 缓存服务器和 RESTful NoSQL 缓存服务的详细内容,此外,我们还将为您介绍关于CentOS高性能缓存服务器Squid架构配置、golang 实现分布式缓存笔记(一)基于 http 的缓存服务、Go语言基于HTTP的内存缓存服务的实现、HTTP缓存服务器 -- Varnish 2.0.4 版本发布的有用信息。
本文目录一览:- nuster 基于 HAProxy 的高性能 HTTP 缓存服务器和 RESTful NoSQL 缓存服务
- CentOS高性能缓存服务器Squid架构配置
- golang 实现分布式缓存笔记(一)基于 http 的缓存服务
- Go语言基于HTTP的内存缓存服务的实现
- HTTP缓存服务器 -- Varnish 2.0.4 版本发布

nuster 基于 HAProxy 的高性能 HTTP 缓存服务器和 RESTful NoSQL 缓存服务
nuster 介绍
nuster
Wiki | English | 中文 | 日本語
基于HAProxy的高性能HTTP缓存服务器和RESTful Nosql缓存服务器。
中文版更新可能不及时,最新版请参照英文版README.md
目录
介绍
性能
入门指南
使用方法
指令
Cache
管理
开启关闭
生存时间
清除
统计
NoSQL
Set
Get
Delete
FAQ
介绍
nuster是一个基于HAProxy的高性能HTTP缓存服务器和RESTful Nosql缓存服务器,完全兼容HAProxy,并且利用HAProxy的ACL功能来提供非常细致的缓存规则。
特性
HTTP/TCP负载均衡器
nuster可以作为HTTP/TCP负载均衡器使用。
继承了HAProxy的所有特性,完全兼容HAProxy
负载均衡
前端后端HTTPS
HTTP压缩
HTTP重写重定向
HTTP信息增删改
HTTP2
监控
粘性
访问控制
内容切换
HTTP缓存服务器
nuster也可以用作类似Varnish或者Nginx那样的HTTP缓存服务器,来缓存动态或者静态的HTTP资源。
HAProxy的所有特性(HTTPS, HTTP/2, ACL, etc)
非常快
强大的动态缓存功能
基于HTTP method, URI, path, query, header, cookies, etc
基于HTTP request or response contents, etc
基于environment variables, server state, etc
基于SSL version, SNI, etc
基于connection rate, number, byte, etc
缓存管理
缓存清除
缓存统计信息
缓存生存时间
RESTful Nosql缓存服务器
nuster也可以用作RESTful Nosql缓存服务器, 用HTTP POST/GET/DELETE 来 添加/取得/删除 Key/Value.
可以像Memcached或者Redis那样放在应用和数据库之间作为内部KV缓存使用,也可以放在用户和应用之间作为面向用户的Nosql使用。
支持header, cookie等等,所以可以将不同的用户数据存到相同的路劲。
HAProxy的所有特性(HTTPS, HTTP/2, ACL, etc)
有条件的缓存
内部KV缓存
面向用户缓存
支持任何类型的数据
支持所有编程语言,不需要特定的库,只需HTTP支持
性能
非常快, 单进程模式下是Nginx的3倍,多进程下Nginx的2倍,varnish的3倍。
详见benchmark
入门指南
下载
生产环境的话从Download下载最新稳定版,其他情况可以git clone。
编译
make TARGET=linux2628 USE_LUA=1 LUA_INC=/usr/include/lua5.3 USE_OPENSSL=1 USE_PCRE=1 USE_ZLIB=1
make install PREFIX=/usr/local/nuster
添加USE_PTHREAD_PSHARED=1使用pthread
如果不需要可以删除USE_LUA=1 LUA_INC=/usr/include/lua5.3 USE_OPENSSL=1 USE_PCRE=1 USE_ZLIB=1
具体可以参考HAProxy
README。
配置文件
准备一个配置文件: nuster.cfg
global
    nuster cache on data-size 100m uri /_nuster
    nuster nosql on data-size 200m
defaults
    mode http
frontend fe
    bind *:8080
    #bind *:4433 ssl crt example.com.pem alpn h2,http/1.1
    use_backend be2 if { path_beg /_kv/ }
    default_backend be1
backend be1
    nuster cache on
    nuster rule img ttl 1d if { path_beg /img/ }
    nuster rule api ttl 30s if { path /api/some/api }
    server s1 127.0.0.1:8081
    server s2 127.0.0.1:8082
backend be2
    nuster nosql on
    nuster rule r1 ttl 3600
nuster监听8080端口,接受HTTP请求。 /_kv/开头的请求分配到backend be2, 可以发送HTTP
POST/GET/DELETE到/_kv/any_key 来 添加/取得/删除 Key/Value. 其他的请求都被分配到backend
be1, 并且会被转发到服务器s1 or s2. 其中/img/*请求会被缓存1天,而/api/some/api会被缓存30秒。
启动
/usr/local/nuster/sbin/nuster -f nuster.cfg
Docker
docker pull nuster/nuster
docker run -d -v /path/to/nuster.cfg:/etc/nuster/nuster.cfg:ro -p 8080:8080 nuster/nuster
使用方法
nuster基于HAProxy, 支持所有的HAProxy指令。
基本
配置文件里有四个基本的sections: global, defaults, frontend and backend。
global
定义全局指令
需要定义nuster cache on or nuster nosql on,否则cache和nosql无法使用
defaults
定义frontend, backend的默认参数
可以在frontend or backend section重新定义
frontend
定义监听端口等等面向用户的设置
bankend
定义后端服务器等等设置
需要设置nuster cache on or nuster nosql on, 否则该backend没有nosql或者nosql功能
需要设置nuster rule
可以定义多个frontend or backend . 如果定义了nuster cache|nosql off或者没有nuster cache|nosql on|off, nuster就是一个HAProxy。
无法在listen里定义nuster。
具体参考/doc下的HAProxy文档, 或者在线HAProxy文档
As TCP loader balancer
frontend MysqL-lb
   bind *:3306
   mode tcp
   default_backend MysqL-cluster
backend MysqL-cluster
   balance roundrobin
   mode tcp
   server s1 10.0.0.101:3306
   server s2 10.0.0.102:3306
   server s3 10.0.0.103:3306
As HTTP/HTTPS loader balancer
frontend web-lb
   bind *:80
   #bind *:443 ssl crt XXX.pem
   mode http
   default_backend apps
backend apps
   balance roundrobin
   mode http
   server s1 10.0.0.101:8080
   server s2 10.0.0.102:8080
   server s3 10.0.0.103:8080
   #server s4 10.0.0.101:8443 ssl verify none
As HTTP cache server
global
    nuster cache on data-size 200m
frontend fe
    bind *:8080
    default_backend be
backend be
    nuster cache on
    nuster rule all
    server s1 127.0.0.1:8081
As RESTful Nosql cache server
global
    nuster nosql on data-size 200m
frontend fe
    bind *:8080
    default_backend be
backend be
    nuster nosql on
    nuster rule r1 ttl 3600
指令
global: nuster cache|nosql
Syntax:
nuster cache on|off [data-size size] [dict-size size] [purge-method method]
[uri uri]
nuster nosql on|off [data-size size] [dict-size size]
default: none
context: global
控制是否开启cache或者nosql。
会分配一块data-size + dict-size的共享内存来存储HTTP头,数据,key等等,临时数据从系统内存池分配。
如果没有足够内存,新的请求不会被缓存直到有内存被释放。
data-size
和dict-size一起决定内存块的大小。
可以使用m, M, g 和 G. 默认是1MB,同时也是最小值。
dict-size
决定hash table的大小.
可以使用m, M, g 和 G. 默认是1MB,同时也是最小值。
这个决定hash table buckets的大小,并非key的大小,key存在共享内存中。
dict-size(bucket数) 不等于 key数. 就算key的数量超过了dict-
size,只要整个共享内存有空间,新的key仍然可以被添加。
不过如果key数超过dict-size(bucket数)性能也许会下降. dict-size可以设为大概的最大key数乘以8。
将来版本会删除dict-size, 像第一版本那样自动伸缩
purge-method [cache only]
自定义PURGE用的HTTP method,最大14个字符,默认是 PURGE.
uri [cache only]
定义并开启cache manager/stats API
nuster cache on uri /_my/_unique/_/_cache/_uri
cache manager/stats默认是关闭的. 如果开启了,主义开启访问控制(see
FAQ).
具体请参考缓存管理 和
缓存统计.
proxy: nuster cache|nosql
Syntax:
nuster cache [on|off]
nuster nosql [on|off]
default: on
context: backend
决定是否在这个backend开启cache/nosql。 如果这个section有filter,记得放在最后。
nuster rule
Syntax: nuster rule name [key KEY] [ttl TTL] [code CODE] [if|unless
condition]
default: none
context: backend
定义cache/nosql的生效条件,需要定义至少一个rule。
nuster cache on

# cache request `/asdf` for 30 seconds
nuster rule asdf ttl 30 if { path /asdf }

# cache if the request path begins with /img/
nuster rule img if { path_beg /img/ }

# cache if the response header `cache` is `yes`
acl resHdrCache res.hdr(cache) yes
nuster rule r1 if resHdrCache
可以定义多个rule,按定义顺序先后匹配。
acl pathA path /a.html
nuster cache on
nuster rule all ttl 3600
nuster rule path01 ttl 60 if pathA
rule path01永远不会被匹配。
name
定义rule的name。
在cache manager API中使用, 不必唯一但是建议不同的rule用不同的name,否则相同name的rule视作一样。
key KEY
定义cache/nosql的key, 由下列关键字加.组成
method: http method, GET/POST…
scheme: http or https
host: the host in the request
uri: first slash to end of the url
path: the URL path of the request
delimiter: ‘?’ if query exists otherwise empty
query: the whole query string of the request
header_NAME: the value of header NAME
cookie_NAME: the value of cookie NAME
param_NAME: the value of query NAME
body: the body of the request
CACHE的默认key是 method.scheme.host.uri, Nosql的默认key是 GET.scheme.host.uri.
Example
GET http://www.example.com/q?name=X&type=Y

http header:
GET /q?name=X&type=Y HTTP/1.1
Host: www.example.com
ASDF: Z
Cookie: logged_in=yes; user=nuster;
生成:
method: GET
scheme: http
host: www.example.com
uri: /q?name=X&type=Y
path: /q
delimiter: ?
query: name=X&type=Y
header_ASDF: Z
cookie_user: nuster
param_type: Y
body: (empty)
默认key产生GET.http.www.example.com./q?name=X&type=Y., 而key
method.scheme.host.path.header_ASDF.cookie_user.param_type 则生成
GET.http.www.example.com./q.Z.nuster.Y..
相同key的请求则会直接返回cache给客户端。
ttl TTL
设置缓存生存时间,过期后缓存会被删除。 可以使用 d, h, m and s。默认0秒. 如果不希望失效则设为0
code CODE1,CODE2…
默认只缓存200的响应,如果需要缓存其他的则可以添加,all会缓存任何状态码。
cache-rule only200
cache-rule 200and404 code 200,404
cache-rule all code all
if|unless condition
定义ACL条件 详见HAProxy
configuration的
7. Using ACLs and fetching samples
Cache
nuster也可以用作类似Varnish或者Nginx那样的HTTP缓存服务器,来缓存动态或者静态的HTTP资源。 出了HAProxy的SSL, HTTP,
HTTP2, 重写重定向,增删改Header等等,还提供了下面的功能。
缓存管理
缓存可以通过uri定义一个endpoint并发送HTTP请求来进行管理。
定义并且开启
nuster cache on uri /nuster/cache
基本用法
curl -X POST -H X: Y http://127.0.0.1/nuster/cache
记得进行访问控制
缓存开启关闭
rule可以通过manager uri动态开启关闭,关闭的rule不会再进行匹配。
_ headers_
| header | value | description |
|---|---|---|
| state | enable | enable rule |
| disable | disable rule | |
| name | rule NAME | the rule to be enabled/disabled |
| proxy NAME | all rules belong to proxy NAME | |
| * | all rules |
相同name的rule都会被开启关闭。
_ Examples_
关闭rule r1
curl -X POST -H name: r1 -H state: disable http://127.0.0.1/nuster/cache
关闭backend app1b的所有rule
curl -X POST -H name: app1b -H state: disable http://127.0.0.1/nuster/cache
开启所有的rule
curl -X POST -H name: * -H state: enable http://127.0.0.1/nuster/cache
缓存生存时间
更改缓存TTL,只会影响后续的新缓存,不会影响已经存在的缓存。
_ headers_
| header | value | description |
|---|---|---|
| ttl | new TTL | see `ttl` in `nuster rule` |
| name | rule NAME | the rule to be changed |
| proxy NAME | all rules belong to proxy NAME | |
| * | all rules |
_ Examples_
curl -X POST -H name: r1 -H ttl: 0 http://127.0.0.1/nuster/cache
curl -X POST -H name: r2 -H ttl: 2h http://127.0.0.1/nuster/cache
同时设置state和ttl
同时设置state和ttl
curl -X POST -H name: r1 -H ttl: 0 -H state: enabled http://127.0.0.1/nuster/cache
缓存清除
There are several ways to purge cache by making HTTP PURGE requests to the
manager uri defined by uri.
You can define customized http method using purge-method MYPURGE other than
the default PURGE in case you need to forward PURGE to backend servers.
删除一个特定URL
curl -XPURGE https://127.0.0.1/imgs/test.jpg
生成key GET.scheme.host.uri, 并删除那个key。
默认key 包含Host, 如果缓存时用了http://example.com/test 而在localhost删除是需要Host
header:
curl -XPURGE -H Host: example.com http://127.0.0.1/test
通过name删除
可以通过带上name header来 PURGE
_ headers_
| header | value | description |
|---|---|---|
| name | nuster rule NAME | caches belong to rule ${NAME} will be purged |
| proxy NAME | caches belong to proxy ${NAME} | |
| * | all caches |
_ Examples_
# 删除所有缓存
curl -X PURGE -H name: * http://127.0.0.1/nuster/cache
# 删除backend applb的所有缓存
curl -X PURGE -H name: app1b http://127.0.0.1/nuster/cache
# 删除所有rule r1生成的缓存
curl -X PURGE -H name: r1 http://127.0.0.1/nuster/cache
通过host删除
通过带上x-hostheader来删除所有属于这个host的缓存。
_ headers_
| header | value | description |
|---|---|---|
| x-host | HOST | the ${HOST} |
_ Examples_
curl -X PURGE -H x-host: 127.0.0.1:8080 http://127.0.0.1/nuster/cache
通过path删除
默认情况下,query部分也包含在key中,所以相同的path不同的query会产生不同的缓存。
比如nuster rule imgs if { path_beg /imgs/ }, 然后请求
curl https://127.0.0.1/imgs/test.jpg?w=120&h=120
curl https://127.0.0.1/imgs/test.jpg?w=180&h=180
会生成两个缓存,因为query不一样。
如果要删除这些缓存,可以
_ 如果知道所有的query,那么可以一个一个删除_
curl -XPURGE https://127.0.0.1/imgs/test.jpg?w=120&h=120
curl -XPURGE https://127.0.0.1/imgs/test.jpg?w=180&h=180
大多数情况下不知道所有的query
_ 如果query部分不重要,则可以从key里面删除query_
定义nuster rule imgs key method.scheme.host.path if { path_beg /imgs },
这样的话只会生成一个缓存,那么就可以不用query删除缓存
curl -XPURGE https://127.0.0.1/imgs/test.jpg
大多数情况需要query
_ 通过rule name删除_
curl -X PURGE -H name: imgs http://127.0.0.1/nuster/cache
但是如果rule被定义成了 nuster rule static if { path_beg /imgs/ /css/ },则无法只删除imgs
因此,可以通过path删除
_ headers_
| header | value | description |
|---|---|---|
| path | PATH | caches with ${PATH} will be purged |
| x-host | HOST | and host is ${HOST} |
_ Examples_
# 删除所有path是/imgs/test.jpg的缓存
curl -X PURGE -H path: /imgs/test.jpg http://127.0.0.1/nuster/cache
# 删除所有path是/imgs/test.jpg 并且host是127.0.0.1:8080的缓存
curl -X PURGE -H path: /imgs/test.jpg -H x-host: 127.0.0.1:8080 http://127.0.0.1/nuster/cache
通过正则删除
也可以通过正则删除,所有匹配正则的缓存将被删除。
_ headers_
| header | value | description |
|---|---|---|
| regex | REGEX | caches which path match with ${REGEX} will be purged |
| x-host | HOST | and host is ${HOST} |
_ Examples_
# 删除所有 /imgs 开头 .jpg结尾的缓存
curl -X PURGE -H regex: ^/imgs/.*\.jpg$ http://127.0.0.1/nuster/cache
#delete all caches which path starts with /imgs and ends with .jpg and belongs to 127.0.0.1:8080
curl -X PURGE -H regex: ^/imgs/.*\.jpg$ -H 127.0.0.1:8080 http://127.0.0.1/nuster/cache
PURGE 注意事项
开启访问控制
如果有多个header,按照name, path & host, path, regex & host, regex, host的顺序处理
curl -XPURGE -H name: rule1 -H path: /imgs/a.jpg: purge by name
如果有重复的header,处理第一个
curl -XPURGE -H name: rule1 -H name: rule2: purge by rule1
regex 不是 glob
比如 /imgs下的.jpg文件是^/imgs/.*\.jpg$ 而不是 /imgs/*.jpg
缓存统计
可以通过GET uri定义的endpoint来获取缓存统计信息。
Eanble and define the endpoint
nuster cache on uri /nuster/cache
Usage
curl http://127.0.0.1/nuster/cache
Output
used_mem: http缓存使用的内存,不包括overhead
req_total: 开启了cache的所有的backend的总请求数,不包含那些没有cache的backend的请求数
req_hit: cache击中数
req_fetch: 从后端取得数量
req_abort: 中断的请求
Nosql
nuster也可以用作RESTful Nosql缓存服务器, 用HTTP POST/GET/DELETE 来 添加/取得/删除 Key/Value.
基本操作
Set
curl -v -X POST -d value1 http://127.0.0.1:8080/key1
curl -v -X POST --data-binary @icon.jpg http://127.0.0.1:8080/imgs/icon.jpg
Get
curl -v http://127.0.0.1:8080/key1
Delete
curl -v -X DELETE http://127.0.0.1:8080/key1
Response
Check status code.
200 OK
POST/GET: 成功
DELETE: 总是
400 Bad request
空值
不正确的acl, rules, etc
404 Not Found
POST: rule tests失败
GET: not found
405 Method Not Allowed
其他的methods
500 Internal Server Error
发生未知错误
507 Insufficient Storage
超过data-size
分用户的data
通过在key里加入header, cookie等等,可以将不同的用户数据存到相同的路劲。
nuster rule r1 key method.scheme.host.uri.header_userId if { path /mypoint }
nuster rule r2 key method.scheme.host.uri.cookie_sessionId if { path /mydata }
Set
curl -v -X POST -d 333 -H userId: 1000 http://127.0.0.1:8080/mypoint
curl -v -X POST -d 555 -H userId: 1001 http://127.0.0.1:8080/mypoint

curl -v -X POST -d userA data --cookie sessionId: ijsf023xe http://127.0.0.1:8080/mydata
curl -v -X POST -d userB data --cookie sessionId: rosre329x http://127.0.0.1:8080/mydata
Get
curl -v http://127.0.0.1:8080/mypoint
< 404 Not Found

curl -v -H userId: 1000 http://127.0.0.1:8080/mypoint
< 200 OK
333

curl -v --cookie sessionId: ijsf023xe http://127.0.0.1:8080/mydata
< 200 OK
userA data
客户端
支持任何支持HTTP的客户端,库: curl, postman, python requests, go net/http, etc.
FAQ
如何调试?
在global添加debug, 或者带-d启动haproxy
缓存相关的调试信息以[CACHE]开头
如何缓存POST请求?
添加option http-buffer-request
如果自定义了key的话需要使用body关键字
请求body可能不完整,详见HAProxy
configuration
的 option http-buffer-request 小节
另外可以为post请求单独设置一个后端
如何做访问控制?
类似
acl network_allowed src 127.0.0.1
acl purge_method method PURGE
http-request deny if purge_method !network_allowed
如何开启HTTP2?
bind :443 ssl crt pub.pem alpn h2,http/1.1
Example
global
    nuster cache on data-size 100m
    nuster nosql on data-size 100m
    #daemon
    ## to debug cache
    #debug
defaults
    retries 3
    option redispatch
    timeout client  30s
    timeout connect 30s
    timeout server  30s
frontend web1
    bind *:8080
    mode http
    acl pathPost path /search
    use_backend app1a if pathPost
    default_backend app1b
backend app1a
    balance roundrobin
    # mode must be http
    mode http

    # http-buffer-request must be enabled to cache post request
    option http-buffer-request

    acl pathPost path /search

    # enable cache for this proxy
    nuster cache

    # cache /search for 120 seconds. Only works when POST/PUT
    nuster rule rpost key method.scheme.host.uri.body ttl 120 if pathPost

    server s1 10.0.0.10:8080
backend app1b
    balance     roundrobin
    mode http

    nuster cache on

    # cache /a.jpg, not expire
    acl pathA path /a.jpg
    nuster rule r1 ttl 0 if pathA

    # cache /mypage, key contains cookie[userId], so it will be cached per user
    acl pathB path /mypage
    nuster rule r2 key method.scheme.host.path.delimiter.query.cookie_userId ttl 60 if pathB

    # cache /a.html if response''s header[cache] is yes
    http-request set-var(txn.pathC) path
    acl pathC var(txn.pathC) -m str /a.html
    acl resHdrCache1 res.hdr(cache) yes
    nuster rule r3 if pathC resHdrCache1

    # cache /heavy for 100 seconds if be_conn greater than 10
    acl heavypage path /heavy
    acl tooFast be_conn ge 100
    nuster rule heavy ttl 100 if heavypage tooFast

    # cache all if response''s header[asdf] is fdsa
    acl resHdrCache2 res.hdr(asdf)  fdsa
    nuster rule resCache ttl 0 if resHdrCache1

    server s1 10.0.0.10:8080

frontend web2
    bind *:8081
    mode http
    default_backend app2
backend app2
    balance     roundrobin
    mode http

    # disable cache on this proxy
    nuster cache off
    nuster rule all

    server s2 10.0.0.11:8080

frontend nosql_fe
    bind *:9090
    default_backend nosql_be
backend nosql_be
    nuster nosql on
    nuster rule r1 ttl 3600
Conventions
Files with same name: those with .md extension belong to nuster, otherwise HAProxy
Contributing
Join the development
Give Feedback
Report issues
Send pull requests
Spread nuster
License
copyright (C) 2017-2018, Jiang Wenyuan, <
koubunen AT gmail DOT com >
All rights reserved.
Licensed under GPL, the same as HAProxy
HAProxy and other sources license notices: see relevant individual files.
nuster 官网
https://gitee.com/nuster/nuster

CentOS高性能缓存服务器Squid架构配置
前言*随着网站访问人数越来越多,承受的并发和压力也越来越高,这时候我们需要对网站和架构进行优化,今天我们来讨论使用Squid对架构进行优化,缓存网站。网上对squid描述的文章也有成千上万,我这里简单记录一下实践的步骤。
一、实施环境
系统版本:CentOSx86_64 5.8 Squid版本:squid-2.6 Nginx版本:Nginx-1.4.2 二、正式安装
安装之前我们需要对系统进行优化,主要优化系统内核相关参数,仅供参考:
#sysctl.conf config 2014-03-26 net.ipv4.ip_forward = 0 net.ipv4.conf.default.rp_filter = 1 net.ipv4.conf.default.accept_source_route = 0 kernel.sysrq = 0 kernel.core_uses_pid = 1 net.ipv4.tcp_syncookies = 1 kernel.msgmnb = 65536 kernel.msgmax = 65536 kernel.shmmax = 68719476736 kernel.shmall = 4294967296 net.ipv4.tcp_max_tw_buckets = 10000 net.ipv4.tcp_sack = 1 net.ipv4.tcp_window_scaling = 1 net.ipv4.tcp_rmem = 4096 87380 4194304 net.ipv4.tcp_wmem = 4096 16384 4194304 net.core.wmem_default = 8388608 net.core.rmem_default = 8388608 net.core.rmem_max = 16777216 net.core.wmem_max = 16777216 net.core.netdev_max_backlog = 262144 net.core.somaxconn = 262144 net.ipv4.tcp_max_orphans = 3276800 net.ipv4.tcp_max_syn_backlog = 262144 net.ipv4.tcp_timestamps = 0 net.ipv4.tcp_synack_retries = 1 net.ipv4.tcp_syn_retries = 1 net.ipv4.tcp_tw_recycle = 1 net.ipv4.tcp_tw_reuse = 1 net.ipv4.tcp_mem = 94500000 915000000 927000000 net.ipv4.tcp_fin_timeout = 1 net.ipv4.tcp_keepalive_time = 15 net.ipv4.ip_local_port_range = 1024 65535 接下来上自动安装Squid脚本,里面分别配置了两个虚拟主机域名,前端有LVS,LVS均衡后端多组squid集群,根据命中率去调整squid集群的数量,Squid后端均衡Nginx或者Apache。(完整的架构LVS+Keepalived+Squid+Nginx+Resin/Tomcat/PHP+MysqL集群)
简单逻辑图如下:

直接上脚本:
#!/bin/sh #Auto make install squid server #Author wugk 2014-03-26 SQUID_CNF=/etc/squid/squid.conf CACHE_DIR=( /data/cache1 /data/cache2 ) #Install squid shell yuminstall-y squid #config squid.conf cat>>$SQUID_CNF <<EOF #global config squid.conf 2014-03-26 http_port 80 accel vhost vport cache_peer 192.168.149.128 parent 80 0 originserver name=wugk1 cache_peer 192.168.149.129 parent 80 0 originserver name=wugk2 cache_peer_domain wugk1 www.wugk1.com cache_peer_domain wugk2 www.wugk2.com visible_hostname localhost forwarded_for off via off cache_vary on #acl config acl manager proto cache_object acl localhost src 127.0.0.1/32 acl to_localhost dst 127.0.0.0/80.0.0.0/32 acl localnet src 10.0.0.0/8# RFC1918 possible internal network acl localnet src 172.16.0.0/12# RFC1918 possible internal network acl localnet src 192.168.0.0/16# RFC1918 possible internal network acl SSL_ports port 443 acl Safe_ports port 80 8080# http acl Safe_ports port 21# ftp acl Safe_ports port 443# https acl all src 0.0.0.0/0 acl CONNECT method CONNECT http_access allow manager localhost http_access deny manager http_access deny !Safe_ports http_access deny CONNECT !SSL_ports http_access allow localnet http_access allow localhost http_access allow all acl PURGE method PURGE @H_312_301@ http_access allow PURGE localhost http_access deny PURGE #squid config 2014-03-25 cache_dir aufs/data/cache110240 16 256 cache_dir aufs/data/cache210240 16 256 cache_mem 4000 MB maximum_object_size 8 MB maximum_object_size_in_memory 256 KB hierarchy_stoplist cgi-bin ? coredump_dir/var/spool/squid refresh_pattern ^ftp: 1440 20% 10080 refresh_pattern ^gopher: 1440 0% 1440 refresh_pattern -i (/cgi-bin/|\?) 0 0% 0 refresh_pattern \.(jpg|png|gif|mp3|xml|html|htm|css|js) 1440 50% 2880 ignore-reload refresh_pattern . 0 20% 4320 EOF #config cache_dir mkdir-p ${CACHE_DIR[@]} ;chown-R squid:squid ${CACHE_DIR[@]} #restart squid server /etc/init.d/squidrestart if ["$?"=="0"];then echo"The Squid Server Install Successfully !!" else echo"The Squid Server Install Failed !!,Please Check Log......" fi 最后测试,前端LVS截图(注LVS此处不配置了,博客有专门的安装方法)

通过浏览器查看head头,缓存命中情况截图如下:

通过命令squidclient -p80mgr:info |egrep"(Request Hit Ratios|Byte Hit Ratios)"
查看缓存命中率如下:

三、批量清空缓存
使用Shell脚本批量清空squid缓存脚本auto_clean_cache.sh
#!/bin/sh DIR=/data/cache/ Command=/usr/sbin/squidclient if ["$1"=""];then echo"Usage:{$0 "\$1",Example exec $0 forum.PHP}" exit fi grep-r -a $1 ${DIR} | strings |grep"http:"|grep-v"=">list.txt count=`catlist.txt|wc-l` if ["$count"-eq"0"];then echo-e"---------------------------------\nThe $1 cache already update,Please exit ......" exit fi whilereadline do $Command -m PURGE -p 80"$line">>/dev/null if[ $? -eq0 ];then echo-e"----------------------------------\nThe $line cache update successfully!" fi done< list.txt 脚本执行:
[root@node2 ~]# sh auto_clean_cache.sh forum.PHP ---------------------------------- The http://www.wugk2.com/forum.PHP cache update successfully! [root@node2 ~]# 更多squid优化及深入配置后期更新。。
本文出自 “吴光科-专注自动化运维” 博客,请务必保留此出处http://wgkgood.blog.51cto.com/1192594/1384580
基于 http 的缓存服务")
golang 实现分布式缓存笔记(一)基于 http 的缓存服务
[toc]
前言
这个月我想学一下 go 语言,于是决定学习一个 go 实现的缓存服务。
首先本文基于 golang 的 http 包实现一个简单 http 的缓存服务,因为用 golang 自带的 http 包实现一个处理请求的服务端十分便利,我们只需要写一个简单的 map 保存数据,写一个 http 的 handler 处理请求即可,你不需要考虑任何复杂的并发问题,因为 golang 的 http 服务框架会帮你处理好底层的一切。
cache
缓存服务接口
本文实现的简单缓存具备三种基本接口 : SET GET DEL 分别通过 http 协议的 PUT、GET、DELETE、操作进行。
put
PUT /cache/<key>
content
<value>
GET
GET /cache/<key>
content
<value>
DELETE
DELETE /cache/<key>
cache 包实现
本缓存服务里面通过一个 cache 包实现缓存功能。 cache包接口定义:
package cache

type Cache interface {
	Set(string, []byte) error
	Get(string) ([]byte, error)
	Del(string) error
	GetStat() Stat
}
cache 接口实现 Cache 结构很简单,一张 map,另加一把锁保护即可.
package cache

import "sync"

type SimpleCache struct {
	c     map[string][]byte
	mutex sync.RWMutex
	Stat
}

func (c *SimpleCache) Set(k string, v []byte) error {
	c.mutex.Lock()
	defer c.mutex.Unlock()
	tmp, exist := c.c[k]
	if exist {
		c.del(k, tmp)
	}
	c.c[k] = v
	c.add(k, v)
	return nil
}

func (c *SimpleCache) Get(k string) ([]byte, error) {
	c.mutex.RLock()
	defer c.mutex.RUnlock()
	return c.c[k], nil
}

func (c *SimpleCache) Del(k string) error {
	c.mutex.Lock()
	defer c.mutex.Unlock()
	v, exist := c.c[k]
	if exist {
		delete(c.c, k)
		c.del(k, v)
	}
	return nil
}

func (c *SimpleCache) GetStat() Stat {
	return c.Stat
}

func newInMemoryCache() *SimpleCache {
	return &SimpleCache{make(map[string][]byte), sync.RWMutex{}, Stat{}}
}
cache 包测试:
package main

import (
	"./cache"
  "fmt"
)

func main() {
	c := cache.New("inmemory")

  k, v := "sola", []byte{''a'',''i'',''l'',''u'',''m'',''i'',''y'',''a''}

  c.Set(k, v)

  tmp, _ := c.Get(k)
  fmt.Println("key: ", k, " value: ", tmp)

  c.Del(k)

  tmp, _ = c.Get(k)
  fmt.Println("key: ", k, " value: ", tmp)

}
sola@sola:~/Coder/GitHub/go-cache/http-cache/server$ go run main.go
2019/02/10 00:07:15 inmemory ready to serve
key:  sola  value:  [97 105 108 117 109 105 121 97]
sola@sola:~/Coder/GitHub/go-cache/http-cache/server$ go run main.go
2019/02/10 00:07:28 inmemory ready to serve
key:  sola  value:  [97 105 108 117 109 105 121 97]
key:  sola  value:  []
golang http 包使用介绍
Golang 自带的 http 包已经实现了 htpp 客户端和服务端,我们可以利用它更为快速的开发 http 服务。本章仅介绍一下 http 包服务端的使用。
Golang 中处理 HTTP 请求主要跟两个东西相关:ServeMux 和 Handler。
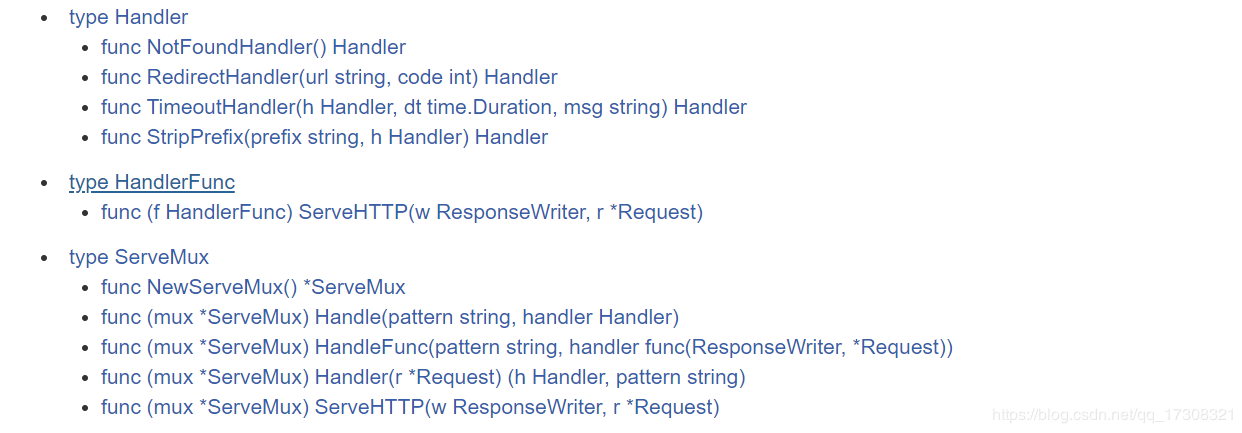
ServrMux 本质上是一个 HTTP 请求路由器(或者叫多路复用器,Multiplexor)。它把收到的请求与一组预先定义的 URL 路径列表做对比,然后在匹配到路径的时候调用关联的处理器(Handler)。
处理器(Handler)负责输出 HTTP 响应的头和正文。任何满足了 http.Handler 接口的对象都可作为一个处理器。通俗的说,对象只要有个如下签名的 ServeHTTP 方法即可:
ServeHTTP(http.ResponseWriter, *http.Request)
Golang 的 HTTP 包自带了几个函数用作常用处理器,比如 NotFoundHandler 和 RedirectHandler。 NotFoundHandler 返回一个简单的请求处理器,该处理器会对每个请求都回复 "404 page not found"。 RedirectHandler 返回一个请求处理器,该处理器会对每个请求都使用状态码 code 重定向到网址 url。
接着,我们来看两个简单的样例:
hello.go
package main

import (
    "io"
    "log"
    "net/http"
)

func HelloGoServer(w http.ResponseWriter, req *http.Request) {
    io.WriteString(w, "Hello, this is a GoServer")
}

func main() {
    http.HandleFunc("/", HelloGoServer)
    err := http.ListenAndServe(":9090", nil)
    if err != nil {
        log.Fatal("ListenAndServer ", err)
    }
}
浏览器看看我们的 hello 程序: 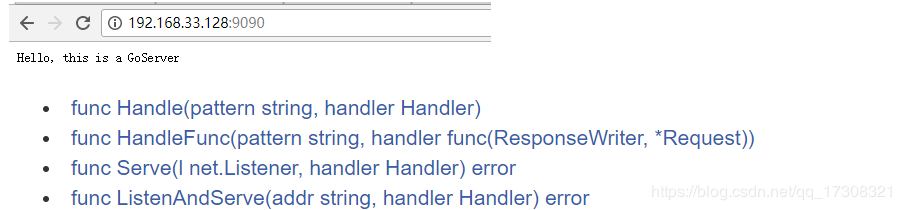 1、 http.HandleFunc ("/", HelloGoServer) http 提供的外部方法 HandleFunc 实际也是调用 ServeMux 的内部方法,只是它使用的是 http 包默认的 ServeMux,注册一个处理器函数 handler (
HelloGoServer) 和对应的模式 pattern (/)(注册到 DefaultServeMux)。ServeMux 的文档解释了模式的匹配机制。
2、http.ListenAndServe (":9090", nil) ListenAndServe 同字面意思监听并服务。这里是监听 9090 端口,它其实也是一个外部方法,调用内部 Server 类型的 ListenAndServe。
Redirect.go
package main

import (
  "log"
  "net/http"
)

func main() {
  mux := http.NewServeMux()

  rh := http.RedirectHandler("http://www.baidu.com", 307)
  mux.Handle("/foo", rh)

  log.Println("Listening...")
  http.ListenAndServe(":3000", mux)
}
1、这个样例中我们没用默认的 ServeMux,而是通过 http.NewServeMux 函数来创建一个空的 ServeMux。 2、http.RedirectHandler 函数创建了一个重定向处理器,这个处理器会对收到的所有请求,都执行 307 重定向操作到 http://www.baidu.com。 3、ServeMux.Handle 函数将处理器注册到新创建的 ServeMux,所以它在 URL 路径 /foo 上收到所有的请求都交给这个处理器。 4、最后通过 http.ListenAndServe 函数启动服务处理请求,通过传递刚才创建的 ServeMux 来为请求去匹配对应处理器。
键入后你会跳转到百度。

http-cache-server 实现
最后来实现我们的 cache-server cache 已经有了,我们只需要写一个 http 的 Handler 来分别处理 GET,PUT,DELETE 请求即可。
上面提过任何满足了 http.Handler 接口的对象即 ServeHTTP(http.ResponseWriter, *http.Request) 都可作为一个处理器,那么我们先来看看这个接口的参数.
ResponseWriter 接口被 HTTP 处理器用于构造 HTTP 回复。
type ResponseWriter interface {
    // Header返回一个Header类型值,该值会被WriteHeader方法发送。
    // 在调用WriteHeader或Write方法后再改变该对象是没有意义的。
    Header() Header
    // WriteHeader该方法发送HTTP回复的头域和状态码。
    // 如果没有被显式调用,第一次调用Write时会触发隐式调用WriteHeader(http.StatusOK)
    // WriterHeader的显式调用主要用于发送错误码。
    WriteHeader(int)
    // Write向连接中写入作为HTTP的一部分回复的数据。
    // 如果被调用时还未调用WriteHeader,本方法会先调用WriteHeader(http.StatusOK)
    // 如果Header中没有"Content-Type"键,
    // 本方法会使用包函数DetectContentType检查数据的前512字节,将返回值作为该键的值。
    Write([]byte) (int, error)
}
Request 类型代表一个服务端接受到的或者客户端发送出去的 HTTP 请求。Request 各字段的意义和用途在服务端和客户端是不同的。
type Request struct {
    // Method指定HTTP方法(GET、POST、PUT等)。对客户端,""代表GET。
    Method string
    // URL在服务端表示被请求的URI,在客户端表示要访问的URL。
    //
    // 在服务端,URL字段是解析请求行的URI(保存在RequestURI字段)得到的,
    // 对大多数请求来说,除了Path和RawQuery之外的字段都是空字符串。
    // (参见RFC 2616, Section 5.1.2)
    //
    // 在客户端,URL的Host字段指定了要连接的服务器,
    // 而Request的Host字段(可选地)指定要发送的HTTP请求的Host头的值。
    URL *url.URL
    // 接收到的请求的协议版本。本包生产的Request总是使用HTTP/1.1
    Proto      string // "HTTP/1.0"
    ProtoMajor int    // 1
    ProtoMinor int    // 0
    // Header字段用来表示HTTP请求的头域。如果头域(多行键值对格式)为:
    //	accept-encoding: gzip, deflate
    //	Accept-Language: en-us
    //	Connection: keep-alive
    // 则:
    //	Header = map[string][]string{
    //		"Accept-Encoding": {"gzip, deflate"},
    //		"Accept-Language": {"en-us"},
    //		"Connection": {"keep-alive"},
    //	}
    // HTTP规定头域的键名(头名)是大小写敏感的,请求的解析器通过规范化头域的键名来实现这点。
    // 在客户端的请求,可能会被自动添加或重写Header中的特定的头,参见Request.Write方法。
    Header Header
    // Body是请求的主体。
    //
    // 在客户端,如果Body是nil表示该请求没有主体买入GET请求。
    // Client的Transport字段会负责调用Body的Close方法。
    //
    // 在服务端,Body字段总是非nil的;但在没有主体时,读取Body会立刻返回EOF。
    // Server会关闭请求的主体,ServeHTTP处理器不需要关闭Body字段。
    Body io.ReadCloser
    // ContentLength记录相关内容的长度。
    // 如果为-1,表示长度未知,如果>=0,表示可以从Body字段读取ContentLength字节数据。
    // 在客户端,如果Body非nil而该字段为0,表示不知道Body的长度。
    ContentLength int64
    // TransferEncoding按从最外到最里的顺序列出传输编码,空切片表示"identity"编码。
    // 本字段一般会被忽略。当发送或接受请求时,会自动添加或移除"chunked"传输编码。
    TransferEncoding []string
    // Close在服务端指定是否在回复请求后关闭连接,在客户端指定是否在发送请求后关闭连接。
    Close bool
    // 在服务端,Host指定URL会在其上寻找资源的主机。
    // 根据RFC 2616,该值可以是Host头的值,或者URL自身提供的主机名。
    // Host的格式可以是"host:port"。
    //
    // 在客户端,请求的Host字段(可选地)用来重写请求的Host头。
    // 如过该字段为"",Request.Write方法会使用URL字段的Host。
    Host string
    // Form是解析好的表单数据,包括URL字段的query参数和POST或PUT的表单数据。
    // 本字段只有在调用ParseForm后才有效。在客户端,会忽略请求中的本字段而使用Body替代。
    Form url.Values
    // PostForm是解析好的POST或PUT的表单数据。
    // 本字段只有在调用ParseForm后才有效。在客户端,会忽略请求中的本字段而使用Body替代。
    PostForm url.Values
    // MultipartForm是解析好的多部件表单,包括上传的文件。
    // 本字段只有在调用ParseMultipartForm后才有效。
    // 在客户端,会忽略请求中的本字段而使用Body替代。
    MultipartForm *multipart.Form
    // Trailer指定了会在请求主体之后发送的额外的头域。
    //
    // 在服务端,Trailer字段必须初始化为只有trailer键,所有键都对应nil值。
    // (客户端会声明哪些trailer会发送)
    // 在处理器从Body读取时,不能使用本字段。
    // 在从Body的读取返回EOF后,Trailer字段会被更新完毕并包含非nil的值。
    // (如果客户端发送了这些键值对),此时才可以访问本字段。
    //
    // 在客户端,Trail必须初始化为一个包含将要发送的键值对的映射。(值可以是nil或其终值)
    // ContentLength字段必须是0或-1,以启用"chunked"传输编码发送请求。
    // 在开始发送请求后,Trailer可以在读取请求主体期间被修改,
    // 一旦请求主体返回EOF,调用者就不可再修改Trailer。
    //
    // 很少有HTTP客户端、服务端或代理支持HTTP trailer。
    Trailer Header
    // RemoteAddr允许HTTP服务器和其他软件记录该请求的来源地址,一般用于日志。
    // 本字段不是ReadRequest函数填写的,也没有定义格式。
    // 本包的HTTP服务器会在调用处理器之前设置RemoteAddr为"IP:port"格式的地址。
    // 客户端会忽略请求中的RemoteAddr字段。
    RemoteAddr string
    // RequestURI是被客户端发送到服务端的请求的请求行中未修改的请求URI
    // (参见RFC 2616, Section 5.1)
    // 一般应使用URI字段,在客户端设置请求的本字段会导致错误。
    RequestURI string
    // TLS字段允许HTTP服务器和其他软件记录接收到该请求的TLS连接的信息
    // 本字段不是ReadRequest函数填写的。
    // 对启用了TLS的连接,本包的HTTP服务器会在调用处理器之前设置TLS字段,否则将设TLS为nil。
    // 客户端会忽略请求中的TLS字段。
    TLS *tls.ConnectionState
}
golang 请求及应答中涉及到的常量.
golang中的HTTP状态码
const (
    StatusContinue           = 100
    StatusSwitchingProtocols = 101
    StatusOK                   = 200
    StatusCreated              = 201
    StatusAccepted             = 202
    StatusNonAuthoritativeInfo = 203
    StatusNoContent            = 204
    StatusResetContent         = 205
    StatusPartialContent       = 206
    StatusMultipleChoices   = 300
    StatusMovedPermanently  = 301
    StatusFound             = 302
    StatusSeeOther          = 303
    StatusNotModified       = 304
    StatusUseProxy          = 305
    StatusTemporaryRedirect = 307
    StatusBadRequest                   = 400
    StatusUnauthorized                 = 401
    StatusPaymentRequired              = 402
    StatusForbidden                    = 403
    StatusNotFound                     = 404
    StatusMethodNotAllowed             = 405
    StatusNotAcceptable                = 406
    StatusProxyAuthRequired            = 407
    StatusRequestTimeout               = 408
    StatusConflict                     = 409
    StatusGone                         = 410
    StatusLengthRequired               = 411
    StatusPreconditionFailed           = 412
    StatusRequestEntityTooLarge        = 413
    StatusRequestURITooLong            = 414
    StatusUnsupportedMediaType         = 415
    StatusRequestedRangeNotSatisfiable = 416
    StatusExpectationFailed            = 417
    StatusTeapot                       = 418
    StatusInternalServerError     = 500
    StatusNotImplemented          = 501
    StatusBadGateway              = 502
    StatusServiceUnavailable      = 503
    StatusGatewayTimeout          = 504
    StatusHTTPVersionNotSupported = 505
)
golang 中的HTTP行为常量定义
  5 package http
  6
  7 // Common HTTP methods.
  8 //
  9 // Unless otherwise noted, these are defined in RFC 7231 section 4.3.
 10 const (
 11     MethodGet     = "GET"
 12     MethodHead    = "HEAD"
 13     MethodPost    = "POST"
 14     MethodPut     = "PUT"
 15     MethodPatch   = "PATCH" // RFC 5789
 16     MethodDelete  = "DELETE"
 17     MethodConnect = "CONNECT"
 18     MethodOptions = "OPTIONS"
 19     MethodTrace   = "TRACE"
 20 )
cacheHandler
到这里所有用到的 http 包中结构都已经说明了,开始写 main 包, 我们定义一个 cacheHandler 类型,用我们的 inMemoryCache 接口初始化它,并实现他的 ServeHTTP 方法。 最后将 cacheHandler 类型的 CacheHandler 方法注册到 http 包默认的 ServeMux 路由,绑定端口 26316,启动服务。
package main

import (
  "./cache"
  "io/ioutil"
  "net/http"
  "log"
  "strings"
)

type cacheHandler struct {
  cache.Cache
}

func (h *cacheHandler) CacheHandler(w http.ResponseWriter, r *http.Request) {
  log.Println("url ", r.URL, " Method ", r.Method)

  //Split Get Key
  key := strings.Split(r.URL.EscapedPath(), "/")[2]

  if len(key) == 0 {
    w.WriteHeader(http.StatusBadRequest)
    return
  }

  m := r.Method

  if m == http.MethodPut {
    h.HandlePut(key, w, r)
    return
  } else if m == http.MethodGet {
    h.HandleGet(key, w, r)
    return
  } else if m == http.MethodDelete {
    h.HandleDelete(key, w, r)
    return
  }

  w.WriteHeader(http.StatusMethodNotAllowed)
}


func (h *cacheHandler) HandlePut(k string, w http.ResponseWriter, r *http.Request){
  b, _ := ioutil.ReadAll(r.Body)

  if len(b) != 0 {
    e := h.Set(k, b)
    if e != nil {
      log.Println(e)
      w.WriteHeader(http.StatusInternalServerError)
    } else {
      w.Write([]byte("successful"))
    }
  }
}

func (h *cacheHandler) HandleGet(k string, w http.ResponseWriter, r *http.Request){
  b, e := h.Get(k)

  if e != nil {
    log.Println(e)
    w.WriteHeader(http.StatusInternalServerError)
    return
  }

  if len(b) == 0 {
    w.WriteHeader(http.StatusNotFound)
    return
  }

  w.Write(b)

}

func (h *cacheHandler) HandleDelete(k string, w http.ResponseWriter, r *http.Request){
  e := h.Del(k)

  if e != nil {
    log.Println(e)
    w.WriteHeader(http.StatusInternalServerError)
  } else {
    w.Write([]byte("successful"))
  }

}

func main() {
  c := cache.New("inmemory")
  h := cacheHandler{c}
  http.HandleFunc("/cache/", h.CacheHandler)
  http.ListenAndServe(":26316", nil)

}
程序测试
使用postman测试put 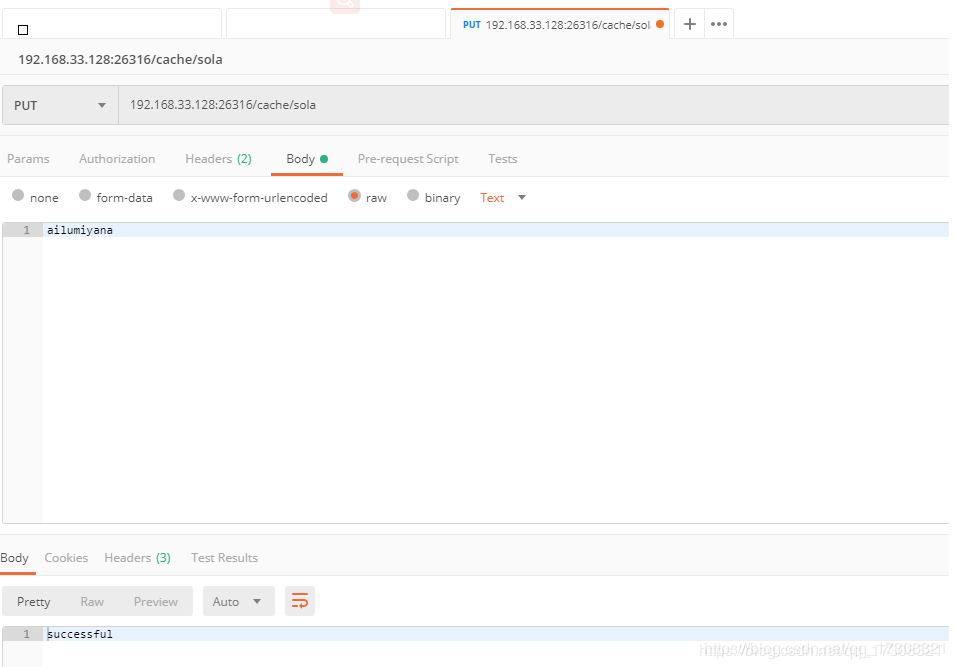
浏览器直接测试Get 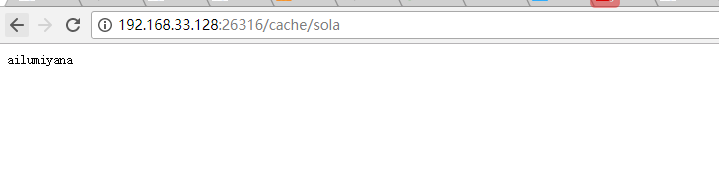
使用postman测试Delete 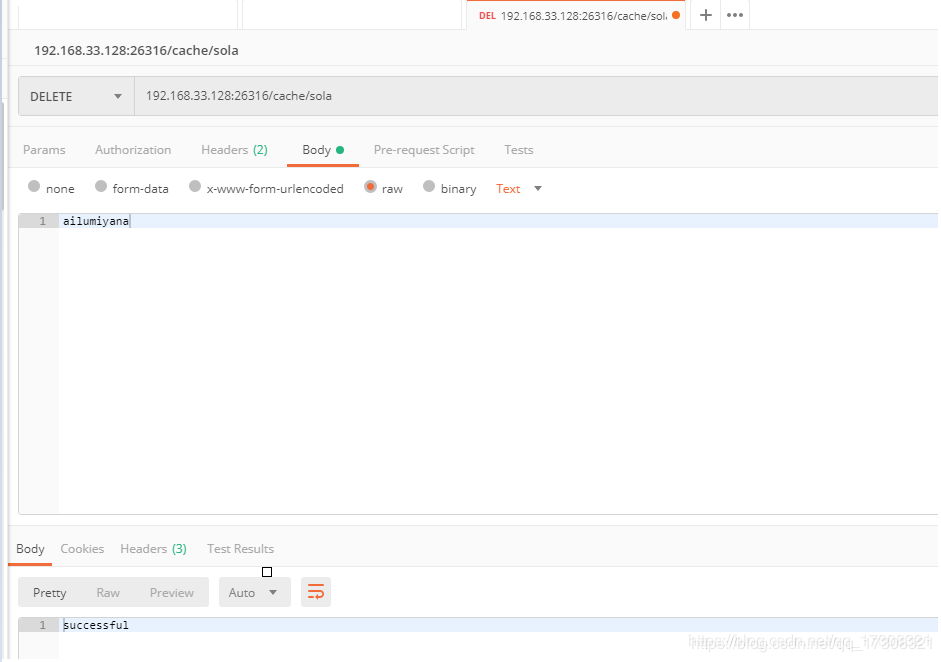
再次Get会返回404 
与 redis 的比较
缓存功能的服务已经实现了,那么它的性能怎样呢,键值对缓存服务中比较有名的是 redis,我们和它做下比较。 redis 是一款 in memory 数据结构存储,可以被用作数据库、缓存及消息中间件。支持包括字符串、散列、列表及集合在内的多种数据结构、支持范围查询、具备内建的复制功能、lua 脚本、LRU 缓存淘汰策略、事务处理及两种不同的磁盘持久化方案(RDB 和 AOF)还能建立 redis 集群提供高可用性能。
redis 的 RDB 持久化方案会在指定时间点将内存数据集快照存入磁盘。RDB 开始工作时,会自己 fork 出一个持久化进程,此时原服务进程的一切内存数据相当于保存了一份快照、然后持久化进程将它的内存压缩并写入磁盘。
redis 的 AOF 方案则是将服务接受到的所有写操作记入磁盘上的日志文件、将日志文件的格式和 redis 协议保持一致且只允许添加。
RDB 方案对性能的影响比 AOF 小,因为它不占用原服务进程的磁盘 IO、RDB 的缺点在于系统死机时丢失的数据比 AOF 要多,因为它只保留得到数据到上一次持久化进程运行的那个时间点,而 AOF 可以一直记录到系统死机之前的最后一次写操作的数据。
本篇实现的是一个简单的内存缓存,不包含持久化方案,也不会保存进磁盘,一旦服务器重启所有数据就会丢失。 性能方面只有 redis 的 1/4,主要原因在于 REST 协议的解析上,REST 基于 HTTP,HTTP 基于 TCP,而 redis 是直接建立在 TCP 上的。
下一篇文章会实现一个基于 TCP 的缓存协议规范。本系列笔记最终实现的缓存会是使用 HTTP/REST 协议和 TCP 混合的接口规范,其中 HTTP/REST 只用于各种管理功能。
本文源码 :https://github.com/BethlyRoseDaisley/go-cache-server/tree/master/http-cache/server
参考资料:
Go net/http 包
Go 中文标准库
分布式缓存 - 原理、架构及 Go 语言实现 ----- 胡世杰

Go语言基于HTTP的内存缓存服务的实现
所有的缓存数据都存储在服务器的内存中,因此重启服务器会导致数据丢失,基于HTTP通信会将使开发变得简单,但性能不会太好
缓存服务接口
本程序采用REST接口,支持设置(Set)、获取(Get)和删除(Del)这3个基本操作,同时还支持对缓存服务状态进行查询。Set操作是将一对键值对设置到服务器中,通过HTTP的PUT方法进行,Get操作用于查询某个键并获取其值,通过HTTP的GET方法进行,Del操作用于从缓存中删除某个键,通过HTTP的DELETE方法进行,同时用户可以查询缓存服务器缓存了多少键值对,占据了多少字节
创建一个cache包,编写缓存服务的主要逻辑
先定义了一个Cache接口类型,包含了要实现的4个方法(设置、获取、删除和状态查询)
package cache
type Cache interface {
	Set(string, []byte) error
	Get(string) ([]byte, error)
	Del(string) error
	GetStat() Stat
}
缓存服务实现
综上所述,这个缓存服务实现起来还是比较容易的,使用Go语言内置的map存储键值,使用http库来处理HTTP请求,实现REST接口
定义状态信息
定义了一个Stat结构体,表示缓存服务状态:
type Stat struct {
	Count     int64
	KeySize   int64
	ValueSize int64
}
Count表示缓存目前保存的键值对数量,KeySize和ValueSize分别表示键和值所占的总字节数
实现两个方法,用来更新Stat信息:
func (s *Stat) add(k string, v []byte) {
	s.Count += 1
	s.KeySize += int64(len(k))
	s.ValueSize += int64(len(v))
}
func (s *Stat) del(k string, v []byte) {
	s.Count -= 1
	s.KeySize -= int64(len(k))
	s.ValueSize -= int64(len(v))
}
缓存增加键值数据时,调用add函数,更新缓存状态信息,对应地,删除数据时就调用del,保持状态信息的正确
实现Cache接口
下面定义一个New函数,创建并返回一个Cache接口:
func New(typ string) Cache {
	var c Cache
	if typ == "inmemory" {
		c = newInMemoryCache()
	}
	if c == nil {
		panic("unknown cache type " + typ)
	}
	log.Println(typ, "ready to serve")
	return c
}
该函数会接收一个string类型的参数,这个参数指定了要创建的Cache接口的具体结构类型,这里考虑到以后可能不限于内存缓存,有扩展的可能。如果typ是"inmemory"代表是内存缓存,就调用newInMemoryCache,并返回
如下定义了inMemoryCache结构和对应New函数:
type inMemoryCache struct {
	c     map[string][]byte
	mutex sync.RWMutex
	Stat
}

func newInMemoryCache() *inMemoryCache {
	return &inMemoryCache{
		make(map[string][]byte),
		sync.RWMutex{}, Stat{}}
}
这个结构中包含了存储数据的map,和一个读写锁用于并发控制,还有一个Stat匿名字段,用来记录缓存状态
下面一一实现所定义的接口方法:
func (c *inMemoryCache) Set(k string, v []byte) error {
	c.mutex.Lock()
	defer c.mutex.Unlock()
	tmp, exist := c.c[k]
	if exist {
		c.del(k, tmp)
	}
	c.c[k] = v
	c.add(k, v)
	return nil
}

func (c *inMemoryCache) Get(k string) ([]byte, error) {
	c.mutex.RLock()
	defer c.mutex.RLock()
	return c.c[k], nil
}

func (c *inMemoryCache) Del(k string) error {
	c.mutex.Lock()
	defer c.mutex.Unlock()
	v, exist := c.c[k]
	if exist {
		delete(c.c, k)
		c.del(k, v)
	}
	return nil
}

func (c *inMemoryCache) GetStat() Stat {
	return c.Stat
}
Set函数的作用是设置键值到map中,这要在上锁的情况下进行,首先判断map中是否已有此键,之后用新值覆盖,过程中要更新状态信息
Get函数的作用是获取指定键对应的值,使用读锁即可
Del同样须要互斥,先判断map中是否有指定的键,如果有则删除,并更新状态信息
实现HTTP服务
接下来实现HTTP服务,基于Go语言的标准HTTP包来实现,在目录下创建一个http包
先定义Server相关结构、监听函数和New函数:
type Server struct {
	cache.Cache
}

func (s *Server) Listen() error {
	http.Handle("/cache/", s.cacheHandler())
	http.Handle("/status", s.statusHandler())
	err := http.ListenAndServe(":9090", nil)
	if err != nil {
		log.Println(err)
		return err
	}
	return nil
}

func New(c cache.Cache) *Server {
	return &Server{c}
}
Server结构体内嵌了cache.Cache接口,这意味着http.Server也要实现对应接口,为Server定义了一个Listen方法,其中会调用http.Handle函数,会注册两个Handler分别用来处理/cache/和status这两个http协议的端点
Server.cacheHandler和http.statusHandler返回一个http.Handler接口,用于处理HTTP请求,相关实现如下:
要实现http.Handler接口就要实现ServeHTTP方法,是真正处理HTTP请求的逻辑,该方法使用switch-case对请求方式进行分支处理,处理PUT、GET、DELETE请求,其他都丢弃
package http

import (
	"io/ioutil"
	"log"
	"net/http"
	"strings"
)

type cacheHandler struct {
	*Server
}

func (h *cacheHandler) ServeHTTP(w http.ResponseWriter, r *http.Request) {
	key := strings.Split(r.URL.EscapedPath(), "/")[2]
	if len(key) == 0 {
		w.WriteHeader(http.StatusBadRequest)
		return
	}
	switch r.Method {
	case http.MethodPut:
		b, _ := ioutil.ReadAll(r.Body)
		if len(b) != 0 {
			e := h.Set(key, b)
			if e != nil {
				log.Println(e)
				w.WriteHeader(http.StatusInternalServerError)
			}
		}
		return
	case http.MethodGet:
		b, e := h.Get(key)
		if e != nil {
			log.Println(e)
			w.WriteHeader(http.StatusInternalServerError)
			return
		}
		if len(b) == 0 {
			w.WriteHeader(http.StatusNotFound)
			return
		}
		w.Write(b)
		return
	case http.MethodDelete:
		e := h.Del(key)
		if e != nil {
			log.Println(e)
			w.WriteHeader(http.StatusInternalServerError)
		}
		return
	default:
		w.WriteHeader(http.StatusMethodNotAllowed)
	}
}

func (s *Server) cacheHandler() http.Handler {
	return &cacheHandler{s}
}
同理,statusHandler实现如下:
package http

import (
	"encoding/json"
	"log"
	"net/http"
)

type statusHandler struct {
	*Server
}

func (h *statusHandler) ServeHTTP(w http.ResponseWriter, r *http.Request) {
	if r.Method != http.MethodGet {
		w.WriteHeader(http.StatusMethodNotAllowed)
		return
	}
	b, e := json.Marshal(h.GetStat())
	if e != nil {
		log.Println(e)
		w.WriteHeader(http.StatusInternalServerError)
		return
	}
	w.Write(b)
}

func (s *Server) statusHandler() http.Handler {
	return &statusHandler{s}
}
该方法只处理GET请求,调用GetStat方法得到缓存状态信息,将其序列化为JSON数据后写回
测试运行
编写一个main.main,作为程序的入口:
package main
import (
	"cache/cache"
	"cache/http"
	"log"
)

func main() {
	c := cache.New("inmemory")
	s := http.New(c)
	err := s.Listen()
	if err != nil {
		log.Fatalln(err)
	}
}
发起PUT请求,增加数据:
$ curl -v localhost:9090/cache/key -XPUT -d value
*   Trying 127.0.0.1:9090...
* TCP_NODELAY set
* Connected to localhost (127.0.0.1) port 9090 (#0)
> PUT /cache/key HTTP/1.1
> Host: localhost:9090
> User-Agent: curl/7.68.0
> Accept: */*
> Content-Length: 5
> Content-Type: application/x-www-form-urlencoded
>
* upload completely sent off: 5 out of 5 bytes
* Mark bundle as not supporting multiuse
< HTTP/1.1 200 OK
< Date: Thu, 25 Aug 2022 03:19:47 GMT
< Content-Length: 0
<
* Connection #0 to host localhost left intact
查看状态信息:
$ curl localhost:9090/status
{"Count":1,"KeySize":3,"ValueSize":5}
查询:
$ curl localhost:9090/cache/key
value
到此这篇关于Go语言基于HTTP的内存缓存服务的文章就介绍到这了,更多相关Go内存缓存服务内容请搜索以前的文章或继续浏览下面的相关文章希望大家以后多多支持!
- 使用Go实现健壮的内存型缓存的方法

HTTP缓存服务器 -- Varnish 2.0.4 版本发布
Varnish 2.0.4 发布了,该版本包含了不少的改变,主要包括:
- Serve graced objects if the backend is unhealthy.
- 修正了在 Solaris, MacOS X/Darwin and NetBSD下的可移植性问题
- 文档更新
- VCL 增加两个配置项:server.hostname 和 server.identity
- 修正了当文件描述符用尽时导致长期等待的问题
- Add support for processing binary objects with ESI.
下载地址:http://sourceforge.net/project/showfiles.php?group_id=155816
今天关于nuster 基于 HAProxy 的高性能 HTTP 缓存服务器和 RESTful NoSQL 缓存服务的讲解已经结束,谢谢您的阅读,如果想了解更多关于CentOS高性能缓存服务器Squid架构配置、golang 实现分布式缓存笔记(一)基于 http 的缓存服务、Go语言基于HTTP的内存缓存服务的实现、HTTP缓存服务器 -- Varnish 2.0.4 版本发布的相关知识,请在本站搜索。
本文标签:


