在本文中,我们将给您介绍关于[Angular]ngx-formly(AKAangular-formlyforAngularlatestversion)的详细内容,此外,我们还将为您提供关于Angula
在本文中,我们将给您介绍关于[Angular] ngx-formly (AKA angular-formly for Angular latest version)的详细内容,此外,我们还将为您提供关于Angular 11:- 找不到模块:错误:无法解析'../../../../node_modules/@angular/forms/forms'、Angular 2 ngFor vs Angular 1 ng-repeat、Angular 2 – Forms – 通过NgForm对象设置NgForm .submitted为true、Angular form 学习笔记:Angular 两种实现 form 的方式的知识。
本文目录一览:- [Angular] ngx-formly (AKA angular-formly for Angular latest version)
- Angular 11:- 找不到模块:错误:无法解析'../../../../node_modules/@angular/forms/forms'
- Angular 2 ngFor vs Angular 1 ng-repeat
- Angular 2 – Forms – 通过NgForm对象设置NgForm .submitted为true
- Angular form 学习笔记:Angular 两种实现 form 的方式
![[Angular] ngx-formly (AKA angular-formly for Angular latest version)](http://www.gvkun.com/zb_users/upload/2025/02/c0e0f6ae-d397-4306-a6d8-67e68209c7331738810878411.jpg "[Angular] ngx-formly (AKA angular-formly for Angular latest version)")
[Angular] ngx-formly (AKA angular-formly for Angular latest version)
In our dynamic forms lessons we obviously didn’t account for all the various edge cases you might come across. Therefore if you need a more complex setup you might want to take a look at ngx-formly. Formly has been a very popular library even in AngularJS 1.x for rendering dynamic forms.
Ngx-formly is the Angular (2+) counterpart for doing this job. In this lesson we’ll quickly give it a look at how to transform our custom dynamic form rendering to use ngx-formly. For more use cases definitely check out the official ngx-formly repository on GitHub.
Add module to the root:
import {NgModule} from ''@angular/core'';
import {ReactiveFormsModule} from ''@angular/forms'';
import {FormlyModule} from ''@ngx-formly/core'';
import {FormlyBootstrapModule} from ''@ngx-formly/bootstrap'';

// for material2 import `FormlyMaterialModule`:
// import {FormlyMaterialModule} from ''@ngx-formly/material'';

@NgModule({
  imports: [
    ...,
    ReactiveFormsModule,
    FormlyModule.forRoot(),
    FormlyBootstrapModule,

    // for material2 use:
    // FormlyMaterialModule
  ],
})
export class AppModule {}
One difference from angular-formly with ngx-formly is the validation:
import { Validators } from ''@angular/forms'';
import { Component } from ''@angular/core'';
import { FormlyFieldConfig } from ''@ngx-formly/core'';

@Component({
  selector: ''app-root'',
  template: `
    <h1>Dynamic reactive forms in Angular</h1>
    <app-dynamic-form [data]="person" [formDataObj]="personFields"></app-dynamic-form>
  `
})
export class AppComponent {
  person = {
    firstname: ''Juri'',
    age: 32,
    gender: ''M''
  };

  personFields = <FormlyFieldConfig>[
    {
      key: ''firstname'',
      type: ''input'',
      templateOptions: {
        label: ''Firstname''
      },
      validators: {
        validation: Validators.required
      },
      validation: {
        messages: {
          required: ''You need to provide a value''
        }
      }
    },
    {
      key: ''age'',
      type: ''input'',
      templateOptions: {
        label: ''Age'',
        type: ''number''
      },
      validators: {
        validation: Validators.min(18)
      },
      validation: {
        messages: {
          min: ''You need to specify a value greater or equal to 18''
        }
      }
    },
    {
      key: ''gender'',
      type: ''radio'',
      templateOptions: {
        label: ''Gender'',
        options: [{ value: ''Male'', key: ''M'' }, { value: ''Female'', key: ''F'' }]
      }
    }
  ];
}
More infromation to check out.

Angular 11:- 找不到模块:错误:无法解析'../../../../node_modules/@angular/forms/forms'
如何解决Angular 11:- 找不到模块:错误:无法解析''../../../../node_modules/@angular/forms/forms''?
我正在尝试使用 angular 11 中的表单,但出现以下错误- 错误:./src/app/components/register/register.component.ts 找不到模块:错误:无法解析“C:\Users\Ram Chaurasiya\Desktop\Projects\MyRealtimeProjects\onlineLearningPortal\”中的“../../../../node_modules/@angular/forms/forms” src\app\components\register''
解决方法
请在 register.component.ts 中检查您的导入 它应该仅来自“@angular/forms”

Angular 2 ngFor vs Angular 1 ng-repeat
一直想写关于 Angular 1.x 与 Angular 2.x (Angular 4.x 已发布) 区别的文章,方便 Angular 1.x 的用户快速的过渡到 Angular 2.x。在浏览文章的时候,发现 Todd Motto 大神,已经写了相关的系列文章。英文好的同学,建议直接阅读 From ng-repeat in Angular 1.x to ngFor in Angular 2 原文哈,因为我并不打算完整地翻译。废话不多说,接下来我们开始进入正题。
目录
-
Angular 1.x
Using ng-repeat
Using $index and track by
-
Angular 2.x
Using ngFor
Using index and trackBy
Angular 1.x
Using ng-repeat
在使用 ng-repeat 指令之前,我们需要组件相关的控制器中设置添加初始数据,具体如下:
const app = {
  controller() {
    this.groceries = [{
      id: 0, label: ''Butter''
    },{
      id: 1, label: ''Apples''
    },{
      id: 2, label: ''Paprika''
    },{
      id: 3, label: ''Potatoes''
    },{
      id: 4, label: ''Oatmeal''
    },{
      id: 5, label: ''Spaghetti''
    },{
      id: 6, label: ''Pears''
    },{
      id: 7, label: ''Bacon''
    }];
  }
};

angular
  .module(''app'')
  .component(''app'', app);
接下来我们在组件模板中,使用 ng-repeat 指令显示我们上面定义的数据:
const app = {
  template: `
    <div>
      Grocery selected: {{ $ctrl.selectedGrocery.label }}
      <ul>
        <li ng-repeat="grocery in $ctrl.groceries">
          <a href="" ng-click="$ctrl.selectGrocery(grocery);">
            {{ grocery.label }}
          </a>
        </li>
      </ul>
    </div>
  `,
  ...
};
Using $index and track by
$index 表示数组中每一项的索引值,除了 $index 之外,ng-repeat 还导出$first、$last、$even 和 $odd 等属性,详细信息可以查看 - ngRepeat官方文档。接下来,我们先来看一下 $index 示例:
const app = {
  template: `
    ...
        <li ng-repeat="grocery in $ctrl.groceries">
          <a href="" ng-click="$ctrl.selectGrocery(grocery);">
            {{ grocery.label }} {{ $index }}
          </a>
        </li>
    ...
  `,
  ...
};
在设置 ng-repeat 初始数据时,你可能已经注意到了, this.groceries 数组中的每一项都有一个唯一的 id 属性,基于这个唯一的属性,我们可以通过 ng-repeat 指令提供的 track by 表达式,进行页面性能优化,防止 Angular 重新渲染整个列表。即不是每次销毁和重建列表相关的 DOM 树,而是重新渲染那些需要更新的 DOM 元素。
const app = {
  template: `
    ...
        <li ng-repeat="grocery in $ctrl.groceries track by grocery.id">
          <a href="" ng-click="$ctrl.selectGrocery(grocery);">
            {{ grocery.label }} {{ $index }}
          </a>
        </li>
    ...
  `,
  ...
};
此外 track by 也支持函数表达式:
const app = {
  template: `
    ...
        <li ng-repeat="grocery in $ctrl.groceries track by trackByGrocery(grocery)">
          <a href="" ng-click="$ctrl.selectGrocery(grocery);">
            {{ grocery.label }} {{ $index }}
          </a>
        </li>
    ...
  `,
  ...
};
Angular 2.x
Angular 2.x 中不存在 ng-repeat 指令,取而代之的是 ngFor 指令。它们的语法非常相似,但需要注意的一点在遍历集合是,Angular 2 使用 of 代替了 in 。
Using ngFor
interface Grocery {
  id: number;
  label: string;
}

export default class AppComponent {
  public groceries: Grocery[];
  public selectedGrocery: Grocery;

  constructor() {
    this.groceries = [{
      id: 0, label: ''Butter''
    },{
      id: 1, label: ''Apples''
    },{
      id: 2, label: ''Paprika''
    },{
      id: 3, label: ''Potatoes''
    },{
      id: 4, label: ''Oatmeal''
    },{
      id: 5, label: ''Spaghetti''
    },{
      id: 6, label: ''Pears''
    },{
      id: 7, label: ''Bacon''
    }];
    this.selectGrocery(this.groceries[0]);
  }
  selectGrocery(grocery: Grocery) {
    this.selectedGrocery = grocery;
  }
}
设置好初始化数据,接下来我们来使用 ngFor 指令,需要注意的是在模板中,我们需要使用 let 关键字创建局部作用域,具体示例如下:
import { Component } from ''@angular/core'';

interface Grocery {
  id: number;
  label: string;
}

@Component({
  selector: ''exe-app'',
  template: `
    <div>
      Grocery selected: {{ selectedGrocery.label }}
      <ul>
        <li *ngFor="let grocery of groceries;">
          <a href="#" (click)="selectGrocery(grocery);">
            {{ grocery.label }}
          </a>
        </li>
      </ul>
    </div>
  `
})
export class AppComponent {
  public groceries: Grocery[];
  public selectedGrocery: Grocery;

  constructor() {
    this.groceries = [{
      id: 0, label: ''Butter''
    },{
      id: 1, label: ''Apples''
    },{
      id: 2, label: ''Paprika''
    },{
      id: 3, label: ''Potatoes''
    },{
      id: 4, label: ''Oatmeal''
    },{
      id: 5, label: ''Spaghetti''
    },{
      id: 6, label: ''Pears''
    },{
      id: 7, label: ''Bacon''
    }];
    this.selectGrocery(this.groceries[0]);
  }
  selectGrocery(grocery: Grocery) {
    this.selectedGrocery = grocery;
  }
}
细心的读者,可能会注意到模板中 *ngFor 语法,ngFor 指令前面的 * 号是语法糖,表示使用 <template> 元素。详细内容,我们会在 "我有话说" 章节介绍。
Using index and trackBy
在 Angular 1.x 中我们可以直接 $index 访问到列表项的索引值,但在 Angular 2 中,我们使用 index 之前,我们必须先把它赋值给其它变量,具体示例如下:
@Component({
  selector: ''exe-app'',
  template: `
    <div>
      Grocery selected: {{ selectedGrocery.label }}
      <ul>
        <li *ngFor="let grocery of groceries; let i = index;">
          <a href="#" (click)="selectGrocery(grocery);">
            {{ grocery.label }} {{ i }}
          </a>
        </li>
      </ul>
    </div>
  `
})
export default class AppComponent {...}
介绍完 ngFor 中的 index 用法,接下来我们来看一下 trackBy 用法。在 Angular 2 中不支持 Angular 1.x 中的 track by x 如:track by grocery.id 语法, trackBy 只支持函数。我们来看一下具体示例:
@Component({
  selector: ''exe-app'',
  template: `
    <div>
      Grocery selected: {{ selectedGrocery.label }}
      <ul>
        <li *ngFor="let grocery of groceries; let i = index; trackBy: trackByGrocery;">
          <a href="#" (click)="selectGrocery(grocery);">
            {{ grocery.label }} {{ i }}
          </a>
        </li>
      </ul>
    </div>
  `
})
export default class AppComponent {
  ...
  trackByGrocery: (index: number, grocery: Grocery): number => grocery.id;
  ...
}
完整示例如下:
import { Component } from ''@angular/core'';

interface Grocery {
  id: number;
  label: string;
}

@Component({
  selector: ''exe-app'',
  template: `
    <div>
      Grocery selected: {{ selectedGrocery.label }}
      <ul>
        <li *ngFor="let grocery of groceries; let i = index; trackBy: trackByGrocery;">
          <a href="#" (click)="selectGrocery(grocery);">
            {{ grocery.label }} {{ i }}
          </a>
        </li>
      </ul>
    </div>
  `
})
export class AppComponent {
  public groceries: Grocery[];
  public selectedGrocery: Grocery;

  constructor() {
    this.groceries = [{
      id: 0, label: ''Butter''
    }, {
      id: 1, label: ''Apples''
    }, {
      id: 2, label: ''Paprika''
    }, {
      id: 3, label: ''Potatoes''
    }, {
      id: 4, label: ''Oatmeal''
    }, {
      id: 5, label: ''Spaghetti''
    }, {
      id: 6, label: ''Pears''
    }, {
      id: 7, label: ''Bacon''
    }];
    this.selectGrocery(this.groceries[0]);
  }

  selectGrocery(grocery: Grocery) {
    this.selectedGrocery = grocery;
  }

  trackByGrocery(index: number, grocery: Grocery): number {
    return grocery.id
  }
}
我有话说
1.Angular 2 指令有几种分类?
在 Angular 2 指令分为三类:
组件(Component directive):用于构建UI组件,继承于 Directive 类
属性指令(Attribute directive): 用于改变组件的外观或行为
结构指令(Structural directive): 用于动态添加或删除DOM元素来改变DOM布局
详细内容请参考 - Angular 2 Directive
2.Angular 2 中的模板语法有哪一些?
Angular 2 中没有 Angular 1.x ng-click 、ng-bind、ng-show 等指令,取而代之的是新的模板语法。
2.1 属性绑定:
<show-title [title]="title"></show-title>2.2 事件绑定:
<a href="#" (click)="selectGrocery(grocery);">
    {{ grocery.label }} {{ i }}
</a>
详细内容请参考 - Angular 2 template syntax & common directives

Angular 2 – Forms – 通过NgForm对象设置NgForm .submitted为true
我如何通过NgForm对象在2中执行此操作?我不想使用模板,aka(ngSubmit)=“”.
我尝试过< formname> .ngSubmit.emit(),但它没有将.submitted设置为true.
解决方法
因此,即使您不使用ngSubmit,如果用户单击表单中的提交按钮,表单仍将被“提交”.
您可以使用onSubmit方法手动将表单提交标志设置为true,例如通过按钮
<button type="button" (click)="theForm.onSubmit($event)">Submit</button>
..但是根据我使用Angular表单的经验,需要手动设置它是非常不寻常的(ngForm指令和ngSubmit事件发射器应该是管理表单所需的全部).你有什么理由需要这个吗?

Angular form 学习笔记:Angular 两种实现 form 的方式
https://angular.io/guide/forms-overview
Angular 提供了两种通过 form 来处理用户输入的方式:
- reactive form
- template-driven form
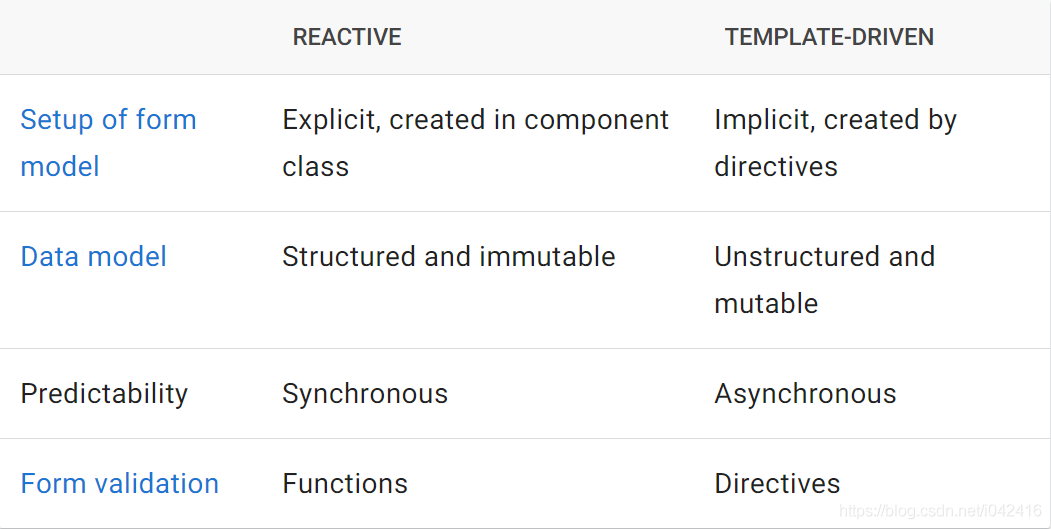
Angular provides two different approaches to handling user input through forms: reactive and template-driven. Both capture user input events from the view, validate the user input, create a form model and data model to update, and provide a way to track changes.
两种方式各有优缺点。
Reactive forms provide direct, explicit access to the underlying forms object model.
Reactive forms 提供了直接显式访问底层 form 对象模型的可能性。
Compared to template-driven forms, they are more robust: they’re more scalable, reusable, and testable. If forms are a key part of your application, or you’re already using reactive patterns for building your application, use reactive forms.
同模板驱动的 form 方式比较,响应式 form 更加健壮,重用性和可测试性更佳。如果 form 已经是已开发出的应用的核心部分了,或者当前已经开发的应用已经使用了响应式编程范式,则推荐使用 reactive forms.
Template-driven forms rely on directives in the template to create and manipulate the underlying object model.
Template driven forms 依赖模板里的指令,来创建和控制底层的对象模型。
They are useful for adding a simple form to an app, such as an email list signup form.
用于为应用添加简单的 form 支持,比如邮件注册表单。
They’re easy to add to an app, but they don’t scale as well as reactive forms.
template-driven form 很容易被添加到应用里,但是可扩展性不如 reactive forms.
If you have very basic form requirements and logic that can be managed solely in the template, template-driven forms could be a good fit.
如果应用仅仅有非常简单的 form 需求,可以仅仅通过模板就能够 handle,则使用 template-driven 的 form 就足矣。
两种方式的实现差异
scalability:跨组件间的 Component 共享。
Reactive forms require less setup for testing, and testing does not require deep understanding of change detection to properly test form updates and validation.
Reactive forms 在测试环境的 setup 和对 Angular change detection 的理解透彻程度这一块,都要优于 template driven form.
Template-driven forms focus on simple scenarios and are not as reusable. They abstract away the underlying form API, and provide only asynchronous access to the form data model.
Template driven form 只能处理简单的 form 需求,并且没法重用。Template driven form 是底层 form API 的抽象,只提供了针对 form 数据模型的异步访问方式。
FormControl tracks the value and validation status of an individual form control.
-
FormControl 跟踪单个 form 控件的值和 validation 状态。
-
FormGroup: 跟踪一组 form 控件的值和 validation 状态。
-
ControlValueAccessor creates a bridge between Angular FormControl instances and native DOM elements.
FormControl 实例和 native DOM 之间沟通的桥梁。
With reactive forms, you define the form model directly in the component class. The [formControl] directive links the explicitly created FormControl instance to a specific form element in the view, using an internal value accessor.
Reactive forms 里,在 Component class 里直接定义 form model.
The [formControl] directive links the explicitly created FormControl instance to a specific form element in the view, using an internal value accessor.
formControl 的 directive,formControl,将其他地方显式创建的 form control 实例,关联到视图里某个特定的 form element (注意,不是指 form) 上去。指令 formControl 的这种关联,通过一个内部的 value accessor 完成。
本文同步分享在 博客 “汪子熙”(CSDN)。
如有侵权,请联系 support@oschina.cn 删除。
本文参与 “OSC 源创计划”,欢迎正在阅读的你也加入,一起分享。
今天关于[Angular] ngx-formly (AKA angular-formly for Angular latest version)的分享就到这里,希望大家有所收获,若想了解更多关于Angular 11:- 找不到模块:错误:无法解析'../../../../node_modules/@angular/forms/forms'、Angular 2 ngFor vs Angular 1 ng-repeat、Angular 2 – Forms – 通过NgForm对象设置NgForm .submitted为true、Angular form 学习笔记:Angular 两种实现 form 的方式等相关知识,可以在本站进行查询。
本文标签:


