在本文中,您将会了解到关于如何在HTML5视频上设置缩略图?的新资讯,同时我们还将为您解释html5设置视频大小的相关在本文中,我们将带你探索如何在HTML5视频上设置缩略图?的奥秘,分析html5设
在本文中,您将会了解到关于如何在 HTML5 视频上设置缩略图?的新资讯,同时我们还将为您解释html5设置视频大小的相关在本文中,我们将带你探索如何在 HTML5 视频上设置缩略图?的奥秘,分析html5设置视频大小的特点,并给出一些关于ACDSee怎么设置缩略图的边框尺寸、android – 如何在ListView中显示带有文本的视频缩略图?、Android:如何在ImageView中显示视频缩略图?、C# 视频上传之 HTML+JS 实现视频上传显示进度条的实用技巧。
本文目录一览:- 如何在 HTML5 视频上设置缩略图?(html5设置视频大小)
- ACDSee怎么设置缩略图的边框尺寸
- android – 如何在ListView中显示带有文本的视频缩略图?
- Android:如何在ImageView中显示视频缩略图?
- C# 视频上传之 HTML+JS 实现视频上传显示进度条
")
如何在 HTML5 视频上设置缩略图?(html5设置视频大小)
有没有办法在 HTML5 视频上设置缩略图?我想在玩之前看一些照片。我的代码如下所示:
<video width="470" height="255" controls> <source src="video.mp4" type="video/mp4"> <source src="video.ogg" type="video/ogg"> <source src="video.webm" type="video/webm"> <object data="video.mp4" width="470" height="255"> <embed src="video.swf" width="470" height="255"> </object></video>谢谢!
答案1
小编典典添加poster="placeholder.png"到视频标签。
<video width="470" height="255" poster="placeholder.png" controls> <source src="video.mp4" type="video/mp4"> <source src="video.ogg" type="video/ogg"> <source src="video.webm" type="video/webm"> <object data="video.mp4" width="470" height="255"> <embed src="video.swf" width="470" height="255"> </object></video>那样有用吗?

ACDSee怎么设置缩略图的边框尺寸
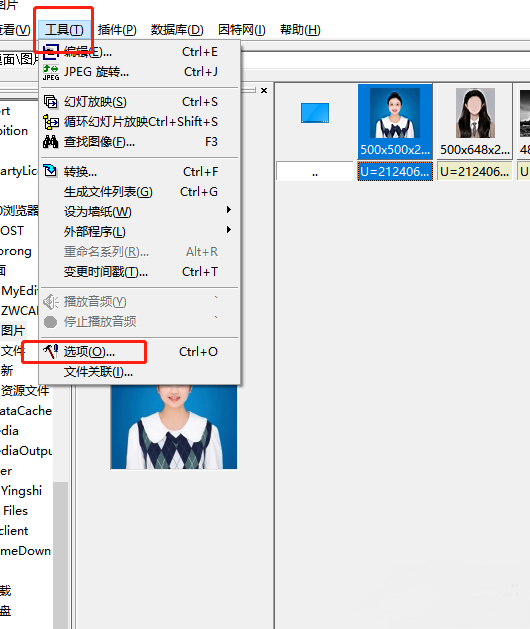
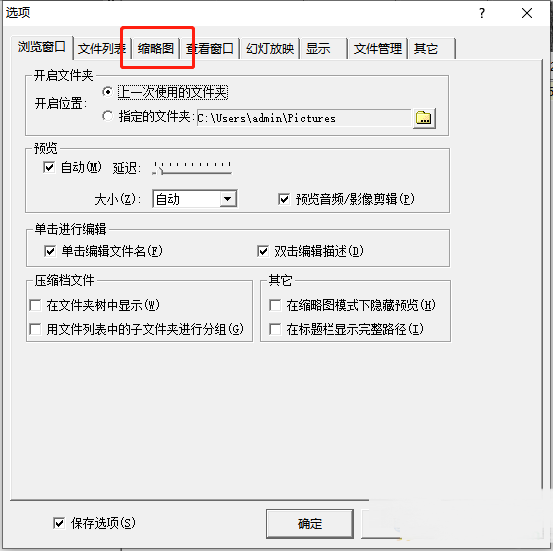
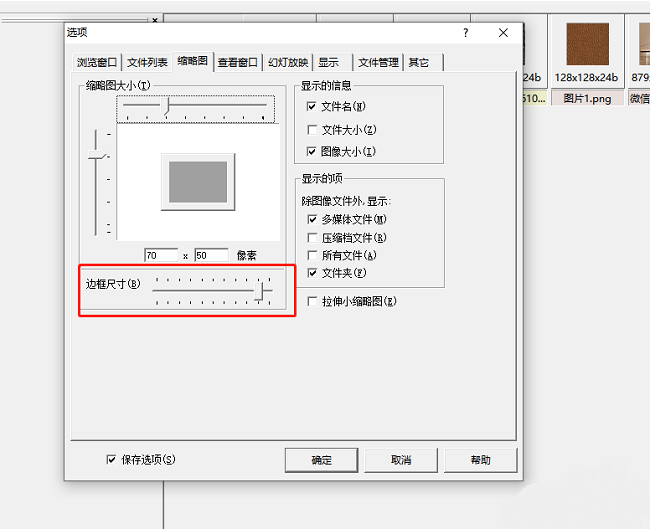
acdsee是一款专业的图像编辑管理软件,能够批量管理、编辑、转化图片,支持多种格式的图片。那么有小伙伴知道acdsee怎么设置缩略图的边框尺寸吗,下面小编就给大家详细介绍一下acdsee设置缩略图的边框尺寸的方法,大家感兴趣的话可以来看一看。设置方法: 1、双击打开软件,点击上方菜单栏中的"工具",接着点击下方列表中的"选项"。
以上就是ACDSee怎么设置缩略图的边框尺寸的详细内容,更多请关注php中文网其它相关文章!

android – 如何在ListView中显示带有文本的视频缩略图?
在ListView行中显示带有文本的视频缩略图的最佳方法是什么?
我想在SD卡上显示文件夹中的视频.
还需要锁定应用程序的文件夹.
每个视频都有描述和持续时间.
解决方法:
检查this blog post给出了一个例子.

Android:如何在ImageView中显示视频缩略图?
此代码适用于拍摄图像并显示图像.视频也会被录制并保存到手机中,但不会显示在ImageView中.有关如何修改我的代码以使视频出现在ImageView中的任何建议?
除了:RESULT_LOAD_VID部分之外,一切似乎都能正常工作,它应该将选定或录制的视频显示到ImageView.
我收到的错误是:“Skimagedecoder :: Factory返回null”
据我所知,这意味着无论出于何种原因,所选/录制的视频位置都没有传递到RESULT_LOAD_VID部分.
任何帮助表示赞赏.
这是我目前的代码:
public class Media extends AppCompatActivity{

    private static int RESULT_LOAD_IMG = 1;
    private static int RESULT_LOAD_VID = 1;
    String imgDecodableString;
    private String selectedImagePath = "";
    private static final int CAPTURE_VIDEO_ACTIVITY_REQUEST_CODE = 200;
    final private int CAPTURE_IMAGE = 2;
    private Uri fileUri;
    private ImageView mImageView;
    Toolbar toolbar;
    private String imgPath;

    @Override
    public boolean onCreateOptionsMenu(Menu menu) {
        MenuInflater inflater = getMenuInflater();
        inflater.inflate(R.menu.toolbarmedia,menu);
        return true;
    }

    @Override
    public boolean onoptionsItemSelected(MenuItem item) {
        switch (item.getItemId()) {
            case R.id.camera:
                AlertDialog.Builder builder = new AlertDialog.Builder(Media.this);
                // builder.setTitle("Choose Image Source");
                builder.setItems(new CharSequence[] { "Take a Photo","Choose from gallery" },new DialogInterface.OnClickListener() {

                            @Override
                            public void onClick(DialogInterface dialog,int which) {
                                switch (which) {
                                    case 0:
                                        Intent intent1 = new Intent(MediaStore.ACTION_IMAGE_CAPTURE);
                                        intent1.putExtra(MediaStore.EXTRA_OUTPUT,setimageUri());
                                        startActivityForResult(intent1,CAPTURE_IMAGE);
                                        break;
                                    case 1:
                                        // Create intent to Open Image applications like gallery,Google Photos
                                        Intent galleryIntent = new Intent(Intent.ACTION_PICK,android.provider.MediaStore.Images.Media.EXTERNAL_CONTENT_URI);
                                        startActivityForResult(galleryIntent,RESULT_LOAD_IMG);
                                        break;
                                    default:
                                        break;
                                }
                            }
                        });
                builder.show();
                return true;

            case R.id.video:

                AlertDialog.Builder builder2 = new AlertDialog.Builder(Media.this);
                // builder.setTitle("Choose Image Source");
                builder2.setItems(new CharSequence[]{"Take a Video","Select Video from Phone"},int which) {
                                switch (which) {
                                    case 0:
                                        //create new Intent
                                        Intent intent_video = new Intent(MediaStore.ACTION_VIDEO_CAPTURE);

                                        fileUri = getoutputMediaFileUri(MEDIA_TYPE_VIDEO);  // create a file to save the video
                                        intent_video.putExtra(MediaStore.EXTRA_OUTPUT,fileUri);  // set the image file name

                                        intent_video.putExtra(MediaStore.EXTRA_VIDEO_QUALITY,1); // set the video image quality to high
                                        // start the Video Capture Intent
                                        startActivityForResult(intent_video,CAPTURE_VIDEO_ACTIVITY_REQUEST_CODE);
                                        break;
                                    case 1:
                                        // Create intent to Open Image applications like gallery,android.provider.MediaStore.Video.Media.EXTERNAL_CONTENT_URI);
                                        startActivityForResult(galleryIntent,RESULT_LOAD_VID);
                                        break;
                                    default:
                                        break;
                                }
                            }
                        });
                builder2.show();
                return true;

            case R.id.mic:

                return true;

            default:
                // If we got here,the user''s action was not recognized.
                // Invoke the superclass to handle it.
                return super.onoptionsItemSelected(item);

        }
    }

    @Override
    public void onCreate(Bundle savedInstanceState) {
        super.onCreate(savedInstanceState);
        setContentView(R.layout.activity_media);
        toolbar = (Toolbar)findViewById(R.id.toolbar);
        setSupportActionBar(toolbar);

        mImageView = (ImageView) findViewById(R.id.media_display);
    }

    @Override
    protected void onActivityResult(int requestCode,int resultCode,Intent data) {
        super.onActivityResult(requestCode,resultCode,data);
        try {
            // When an Image is picked
            if (requestCode == RESULT_LOAD_IMG && resultCode == RESULT_OK && null != data) {
                // Get the Image from data

                Uri selectedImage = data.getData();
                String[] filePathColumn = {MediaStore.Images.Media.DATA};

                // Get the cursor
                Cursor cursor = getContentResolver().query(selectedImage,filePathColumn,null,null);
                // Move to first row
                cursor.movetoFirst();

                int columnIndex = cursor.getColumnIndex(filePathColumn[0]);
                imgDecodableString = cursor.getString(columnIndex);
                cursor.close();
                ImageView imgView = (ImageView) findViewById(R.id.media_display);
                // Set the Image in ImageView after decoding the String
                imgView.setimageBitmap(BitmapFactory.decodeFile(imgDecodableString));

            } else if (requestCode == CAPTURE_IMAGE) {
                selectedImagePath = getimagePath();
                System.out.println("path" + selectedImagePath);
                mImageView.setimageBitmap(decodeStream(selectedImagePath));
            } else if(requestCode == RESULT_LOAD_VID && resultCode == RESULT_OK  && null != data){
                // Get the Image from data
                Uri selectedVideo = data.getData();
                String[] filePathColumn = {MediaStore.Video.Media.DATA};
                 //Get the cursor
               Cursor cursor = getContentResolver().query(selectedVideo,null);
                // Move to first row
               cursor.movetoFirst();
                int columnIndex = cursor.getColumnIndex(filePathColumn[0]);
                imgDecodableString = cursor.getString(columnIndex);
                cursor.close();
                ImageView vidView = (ImageView) findViewById(R.id.media_display);
                // Set the Image in ImageView after decoding the String
               vidView.setimageBitmap(BitmapFactory.decodeFile(imgDecodableString));
            }else if (requestCode == CAPTURE_VIDEO_ACTIVITY_REQUEST_CODE) {
                if (resultCode == RESULT_OK) {
                    // Video captured and saved to fileUri specified in the Intent
                    Toast.makeText(this,"Video Saved to Phone",Toast.LENGTH_LONG).show();
                } else if (resultCode == RESULT_CANCELED) {
                    // User cancelled the video capture
                } else {

                    // Video capture Failed,advise user
                    Toast.makeText(this,"Video capture Failed.",Toast.LENGTH_LONG).show();
                    super.onActivityResult(requestCode,data);
                }
            }
        } catch (Exception e) {
            Toast.makeText(this,"Something went wrong",Toast.LENGTH_LONG)
                    .show();
        }
    }

    public static final int MEDIA_TYPE_IMAGE = 1;
    public static final int MEDIA_TYPE_VIDEO = 2;

    /** Create a file Uri for saving an image or video */
    private static Uri getoutputMediaFileUri(int type){
        return Uri.fromFile(getoutputMediaFile(type));
    }

    /** Create a File for saving an image or video */
    private static File getoutputMediaFile(int type){
        // To be safe,you should check that the SDCard is mounted
        // using Environment.getExternalStorageState() before doing this.

        File mediaStorageDir = new File(Environment.getExternalStoragePublicDirectory(
                Environment.DIRECTORY_PICTURES),"MyCameraApp");
        // This location works best if you want the created images to be shared
        // between applications and persist after your app has been uninstalled.

        // Create the storage directory if it does not exist
        if (! mediaStorageDir.exists()){
            if (! mediaStorageDir.mkdirs()){
                Log.d("MyCameraApp","Failed to create directory");
                return null;
            }
        }

        // Create a media file name
        String timeStamp = new SimpleDateFormat("yyyyMMdd_HHmmss").format(new Date());
        File mediaFile;
        if (type == MEDIA_TYPE_IMAGE){
            mediaFile = new File(mediaStorageDir.getPath() + File.separator +
                    "IMG_"+ timeStamp + ".jpg");
        } else if(type == MEDIA_TYPE_VIDEO) {
            mediaFile = new File(mediaStorageDir.getPath() + File.separator +
                    "VID_"+ timeStamp + ".mp4");
        } else {
            return null;
        }

        return mediaFile;
    }

    public Uri setimageUri() {

       File file = new File(Environment.getExternalStorageDirectory(),"image" + new     Date().getTime() + ".png");
        Uri imguri = Uri.fromFile(file);
       this.imgPath = file.getAbsolutePath();
       return imguri;
   }


    public String getimagePath() {
        return imgPath;
    }

    public Bitmap decodeStream(String path) {
        try {
            // Decode image size
            BitmapFactory.Options o = new BitmapFactory.Options();
            o.inJustDecodeBounds = true;
            BitmapFactory.decodeFile(path,o);
            // The new size we want to scale to
            final int required_SIZE = 70;

            // Find the correct scale value. It should be the power of
            // 2.
            int scale = 1;
            while (o.outWidth / scale / 2 >= required_SIZE
                    && o.outHeight / scale / 2 >= required_SIZE)
                scale *= 2;

            // Decode with inSampleSize
            BitmapFactory.Options o2 = new BitmapFactory.Options();
            o2.inSampleSize = scale;
            return BitmapFactory.decodeFile(path,o2);
        } catch (Throwable e) {
            e.printstacktrace();
        }
        return null;
    }

}
解决方法
public Bitmap createVideoThumbNail(String path){
    return ThumbnailUtils.createVideoThumbnail(path,MediaStore.Video.Thumbnails.MICRO_KIND);
}
并在图像视图中使用它,如: –
ivVideoThumbnail.setimageBitmap(createVideoThumbNail(videoPath));

C# 视频上传之 HTML+JS 实现视频上传显示进度条
原文地址:https://www.cnblogs.com/zhangyongl/p/8312881.html
原文博主的后台是 PHP 写的,本片将使用 C# 实现后台代码,html+js 和原文基本一致。
css 样式代码
<style>
        #userscore_import_style li {
            padding-bottom: 10px;
        }

        #content {
            border: 1px solid saddlebrown;
            padding: 16px;
            border-radius: 2px
        }

        .list {
            top: 15px;
            width: 140px;
            height: 40px;
            border: 1px solid #0082E6;
            display: inline-block;
            border-radius: 2px;
            position: relative;
            line-height: 40px;
        }

        #file {
            position: absolute;
            opacity: 0;
            color: white;
            width: 100%;
            height: 100%;
            z-index: 100;
        }
        #fileedi {
            position: absolute;
            opacity: 0;
            color: white;
            width: 100%;
            height: 100%;
            z-index: 100;
        }

        .list span {
            display: inline-block;
            text-align: center;
            width: 100%;
            line-height: 40px;
            position: absolute;
            color: #0082E6;
        }

        video {
            margin-top: 8px;
            border-radius: 4px;
        }

        ._p {
            margin: 14px;
        }

            ._p input {
                display: inline-block;
                width: 70%;
                margin-left: 6px;
            }

            ._p span {
                font-size: 15px;
            }
    </style>
html 代码
<div class="video_add" id="video_add_style" style="display:none;margin:20px;">
        <p class="_p"><span>视频标题</span>:<input id="title" type="text" class="form-control" placeholder="请输入视频名称"></p>
        <p class="_p">
            <span>选择视频: </span>
            <!--文件选择按钮-->
            <a class="list" href="javascript:;">
                <input id="file" type="file" name="myfile" onchange="UpladFile();" /><span>选择视频</span>
            </a>
            <!--上传速度显示-->
            <span id="time"></span>
        </p>
        <!--显示消失-->
        <ul class="el-upload-list el-upload-list--text" style="display:  none;">
            <li tabindex="0" class="el-upload-list__item is-success">
                <a class="el-upload-list__item-name">
                    <i class="el-icon-document"></i><span id="videoName">food.jpeg</span>
                </a>
                <label class="el-upload-list__item-status-label">
                    <i class="el-icon-upload-success el-icon-circle-check"></i>
                </label>
                <i class="fa fa-remove" onclick="del();" style="cursor:pointer">取消</i>
                <i class="el-icon-close-tip"></i>
            </li>
        </ul>
        <!--进度条-->
        <div class="el-progress el-progress--line" style="display: none;">
            <div class="el-progress-bar">
                <div class="el-progress-bar__outer" style="height: 6px;">
                    <div class="el-progress-bar__inner" style="width: 0%; height:5px;background-color:#0082E6">
                    </div>
                </div>
            </div>
            <div class="el-progress__text" style="font-size: 14.4px;">0%</div>
        </div>
        <p class="_p"><span>上传视频</span>:<button class="btn btn-primary" type="button" onclick="sub();">上传</button></p>

        <!--预览框-->
        <div class="preview">

        </div>
    </div>
js 代码
<script type="text/javascript">
    var xhr;//异步请求对象
    var ot; //时间
    var oloaded;//大小
    //上传文件方法
    function UpladFile() {
        var fileObj = document.getElementById("file").files[0]; // js 获取文件对象
        if (fileObj.name) {
            $(".el-upload-list").css("display", "block");
            $(".el-upload-list li").css("border", "1px solid #20a0ff");
            $("#videoName").text(fileObj.name);
        } else {
            alert("请选择文件");
        }
    }
    /*点击取消*/
    function del() {
        $("#file").val(''''); $("#videoNameEdit").val('''');
        $(".el-upload-list").css("display", "none");
    }
    /*点击提交*/
    function sub() {
        var fileObj = document.getElementById("file").files[0]; // js 获取文件对象
        if (fileObj == undefined || fileObj == "") {
            alert("请选择文件");
            return false;
        };
        var title = $.trim($("#title").val());
        if (title == '''') {
            alert("请填写视频标题");
            return false;
        }
        var url = "/Home/UploadVideo"; // 接收上传文件的后台地址
        var form = new FormData(); // FormData 对象
        form.append("mf", fileObj); // 文件对象
        form.append("title", title); // 标题
        xhr = new XMLHttpRequest(); // XMLHttpRequest 对象
        xhr.open("post", url, true); //post方式,url为服务器请求地址,true 该参数规定请求是否异步处理。
        xhr.onload = uploadComplete; //请求完成
        xhr.onerror = uploadFailed; //请求失败
        xhr.upload.onprogress = progressFunction; //【上传进度调用方法实现】
        xhr.upload.onloadstart = function () { //上传开始执行方法
            ot = new Date().getTime(); //设置上传开始时间
            oloaded = 0; //设置上传开始时,以上传的文件大小为0
        };
        xhr.send(form); //开始上传,发送form数据
    }

    //上传进度实现方法,上传过程中会频繁调用该方法
    function progressFunction(evt) {
        // event.total是需要传输的总字节,event.loaded是已经传输的字节。如果event.lengthComputable不为真,则event.total等于0
        if (evt.lengthComputable) {
            $(".el-progress--line").css("display", "block");
            /*进度条显示进度*/
            $(".el-progress-bar__inner").css("width", Math.round(evt.loaded / evt.total * 100) + "%");
            $(".el-progress__text").html(Math.round(evt.loaded / evt.total * 100) + "%");
        }

        var time = document.getElementById("time");
        var nt = new Date().getTime(); //获取当前时间
        var pertime = (nt - ot) / 1000; //计算出上次调用该方法时到现在的时间差,单位为s
        ot = new Date().getTime(); //重新赋值时间,用于下次计算

        var perload = evt.loaded - oloaded; //计算该分段上传的文件大小,单位b
        oloaded = evt.loaded; //重新赋值已上传文件大小,用以下次计算

        //上传速度计算
        var speed = perload / pertime; //单位b/s
        var bspeed = speed;
        var units = ''b/s''; //单位名称
        if (speed / 1024 > 1) {
            speed = speed / 1024;
            units = ''k/s'';
        }
        if (speed / 1024 > 1) {
            speed = speed / 1024;
            units = ''M/s'';
        }
        speed = speed.toFixed(1);
        //剩余时间
        var resttime = ((evt.total - evt.loaded) / bspeed).toFixed(1);
        time.innerHTML = ''上传速度:'' + speed + units + '',剩余时间:'' + resttime + ''s'';
        if (bspeed == 0)
            time.innerHTML = ''上传已取消'';
    }
    //上传成功响应
    function uploadComplete(evt) {
        var data = jQuery.parseJSON(evt.target.responseText);
        //服务断接收完文件返回的结果  注意返回的字符串要去掉双引号
        if (data.code > 0) {
            //var str =  evt.target.responseText;
            alert("上传成功!");
            parent.location.reload();
        } else {

            alert(data.message);
        }
    }
    //上传失败
    function uploadFailed(evt) {
        alert("上传失败!");
    }
</script>
后台在 MVC 中以 C# 实现
[HttpPost]
        public ActionResult UploadVideo()
        {
            var httpRequest = HttpContext.Request;
            var vName = httpRequest.Form["title"];
            var vfile = httpRequest.Files.Get(0);
            string src = "";
            string gb_img_scr = "";
            int resultCode = 0;
            //判断文件是否为空
            if (vfile != null)
            {
                var nowDta = DateTime.Now.ToString("yyyy-MM-dd");
                //获取文件类型
                string fileExtension = System.IO.Path.GetExtension(vfile.FileName);
                var fullname = System.IO.Path.GetFileNameWithoutExtension(vfile.FileName);
                //自定义文件名(文件名称+唯一标识符+后缀)
                string fileName = fullname + Guid.NewGuid().ToString("N") + fileExtension;
                //判断是否存在需要的目录,不存在则创建
                var SavePath = "/upload/video/" + nowDta;
                if (!Directory.Exists(Server.MapPath(SavePath)))
                { Directory.CreateDirectory(Server.MapPath(SavePath)); }
                //拼接保存文件的详细路径
                string filePath = Server.MapPath(SavePath + "//") + fileName;
                //若扩展名不为空则判断文件是否是指定视频类型
                if (fileExtension != null)
                {
                    if ("(.mp4)|(.avi)|(.flv)|(.rmvb)|(.wmv)".Contains(fileExtension))
                    {
                        //保存文件
                        vfile.SaveAs(filePath);
                        //拼接返回的Img标签
                        src = SavePath + "/" + fileName;
                        //获取视频第一帧当做视频背景图:
                        gb_img_scr = PicFromVideo.GetPicFromVideo(src, "160*240", "1");
                        resultCode = 1;
                    }
                    else
                    {
                        src = "不是视频格式!";
                        resultCode = -1;
                    }
                }
                else
                { src = "上传失败!"; resultCode = -2; }
            }
            else
            { src = "没有找到该文件!"; resultCode = -3; }
            if (resultCode == 1)
            {
                resultCode = adultvideoBll.add(vName, src, gb_img_scr);//向数据库中添加一条数据
            }
            return Json(new { code = resultCode, message = src });
        }
今天的关于如何在 HTML5 视频上设置缩略图?和html5设置视频大小的分享已经结束,谢谢您的关注,如果想了解更多关于ACDSee怎么设置缩略图的边框尺寸、android – 如何在ListView中显示带有文本的视频缩略图?、Android:如何在ImageView中显示视频缩略图?、C# 视频上传之 HTML+JS 实现视频上传显示进度条的相关知识,请在本站进行查询。
本文标签:


