对于想了解centos7安装mysql5.5和安装mariadb的正确命令的读者,本文将提供新的信息,我们将详细介绍centos7.6安装mariadb,并且为您提供关于179.centos7安装ma
对于想了解centos 7安装mysql5.5和安装 mariadb 的正确命令的读者,本文将提供新的信息,我们将详细介绍centos7.6安装mariadb,并且为您提供关于179. centos7 安装mariadb 或 mysql 卸载、CentOS 6.5系统卸载MySQL并安装MariaDB的方法、Centos 7 yum install mysql 安装mariadb 后无法启动、centos 7 卸载 mariadb 的正确命令的有价值信息。
本文目录一览:- centos 7安装mysql5.5和安装 mariadb 的正确命令(centos7.6安装mariadb)
- 179. centos7 安装mariadb 或 mysql 卸载
- CentOS 6.5系统卸载MySQL并安装MariaDB的方法
- Centos 7 yum install mysql 安装mariadb 后无法启动
- centos 7 卸载 mariadb 的正确命令
")
centos 7安装mysql5.5和安装 mariadb 的正确命令(centos7.6安装mariadb)
以前的Linux系统中数据库大部分是MysqL,不过自从被sun收购之后,就没用集成在centos这些开源Linux系统中了,那么如果想用的话就需要自己安装了,首先centos7 已经不支持MysqL,因为收费了你懂得,所以内部集成了mariadb,而安装MysqL的话会和mariadb的文件冲突,所以需要先卸载掉mariadb,以下为卸载mariadb,安装MysqL的步骤。
#列出所有被安装的rpm package
rpm -qa | grep mariadb
#卸载
rpm -e mariadb-libs-5.5.37-1.el7_0.x86_64
错误:依赖检测失败:
libMysqLclient.so.18()(64bit) 被 (已安裝) postfix-2:2.10.1-6.el7.x86_64 需要
libMysqLclient.so.18(libMysqLclient_18)(64bit) 被 (已安裝) postfix-2:2.10.1-6.el7.x86_64 需要
#强制卸载,因为没有--nodePS
rpm -e --nodeps mariadb-libs-5.5.37-1.el7_0.x86_64
#安装MysqL5.5.39的rpm包
rpm -ivh /home/liwei/MysqL-server-5.5.39-2.el6.x86_64.rpm
rpm -ivh /home/liwei/MysqL-client-5.5.39-2.el6.x86_64.rpm
#拷贝配置文件
cp /usr/share/MysqL/my-medium.cnf /etc/my.cnf,改名为my.cnf作为MysqL配置文件。
#修改响应的配置文件
vim/etc/my.cnf
#把MysqL的data拷贝到制定的目录
mv /var/lib/MysqL /home/MysqL/data/
还要注意目录的属主和权限。
MysqL启动后报:ERROR! The server quit without updating PID file错误的问题解决
1、权限不够:chown -R MysqL:MysqL /home/MysqL/data” “chmod -R 755 /home/MysqL/data
2、centos7的selinux问题:打开/etc/selinux/config,把SELINUX=enforcing改为SELINUX
centos7 安装 mariadb 的正确命令
使用的是linode的centos7系统,安装MysqL发现已经默认的是mariadb。
但是不管是使用linode官网说明还是百度搜索到的的根本安装方法无法安装成功。
总是提示这一句:
ERROR 2002 (HY000): Can't connect to local Mysql serverthrough socket '/var/lib/MysqL/MysqL.sock' (2)
最后通过google 搜索 install mariadb on centos 7得到了安装的关键一步。
现在安装成功,特此备注一下整个安装过程:
[PHP] view plaincopy在CODE上查看代码片派生到我的代码片
MysqL:[root@localhost ~]# yum -y install mariadb*
Loaded plugins: fastestmirror
Loading mirror speeds from cached hostfile
* base: mirrors.linode.com
* extras: mirrors.linode.com
* updates: mirrors.linode.com
Resolving Dependencies
--> Running transaction check
---> Package mariadb.x86_64 1:5.5.37-1.el7_0 will be installed
---> Package mariadb-bench.x86_64 1:5.5.37-1.el7_0 will be installed
---> Package mariadb-devel.x86_64 1:5.5.37-1.el7_0 will be installed
---> Package mariadb-embedded.x86_64 1:5.5.37-1.el7_0 will be installed
---> Package mariadb-embedded-devel.x86_64 1:5.5.37-1.el7_0 will be installed
---> Package mariadb-libs.x86_64 1:5.5.37-1.el7_0 will be installed
---> Package mariadb-server.x86_64 1:5.5.37-1.el7_0 will be installed
--> Processing Dependency: perl-dbd-mysql for package: 1:mariadb-server-5.5.37-1.el7_0.x86_64
---> Package mariadb-test.x86_64 1:5.5.37-1.el7_0 will be installed
---> Package perl-dbd-mysql.x86_64 0:4.023-5.el7 will be installed
--> Finished Dependency Resolution
Dependencies Resolved
==========================================================================================================
Package Arch Version Repository Size
Installing:
mariadb x86_64 1:5.5.37-1.el7_0 updates 8.9 M
mariadb-bench x86_64 1:5.5.37-1.el7_0 updates 385 k
mariadb-devel x86_64 1:5.5.37-1.el7_0 updates 744 k
mariadb-embedded x86_64 1:5.5.37-1.el7_0 updates 3.6 M
mariadb-embedded-devel x86_64 1:5.5.37-1.el7_0 updates 7.4 M
mariadb-libs x86_64 1:5.5.37-1.el7_0 updates 752 k
mariadb-server x86_64 1:5.5.37-1.el7_0 updates 11 M
mariadb-test x86_64 1:5.5.37-1.el7_0 updates 7.9 M
Installing for dependencies:
perl-dbd-mysql x86_64 4.023-5.el7 base 140 k
Transaction Summary
Install 8 Packages (+1 Dependent package)
Total download size: 40 M
Installed size: 279 M
Downloading packages:
(1/9): mariadb-bench-5.5.37-1.el7_0.x86_64.rpm | 385 kB 00:00:00
(2/9): mariadb-devel-5.5.37-1.el7_0.x86_64.rpm | 744 kB 00:00:00
(3/9): mariadb-embedded-5.5.37-1.el7_0.x86_64.rpm | 3.6 MB 00:00:00
(4/9): mariadb-5.5.37-1.el7_0.x86_64.rpm | 8.9 MB 00:00:00
(5/9): mariadb-libs-5.5.37-1.el7_0.x86_64.rpm | 752 kB 00:00:00
(6/9): mariadb-server-5.5.37-1.el7_0.x86_64.rpm | 11 MB 00:00:00
(7/9): mariadb-embedded-devel-5.5.37-1.el7_0.x86_64.rpm | 7.4 MB 00:00:00
(8/9): mariadb-test-5.5.37-1.el7_0.x86_64.rpm | 7.9 MB 00:00:00
(9/9): perl-dbd-mysql-4.023-5.el7.x86_64.rpm | 140 kB 00:00:00
----------------------------------------------------------------------------------------------------------
Total 36 MB/s | 40 MB 00:00:01
Running transaction check
Running transaction test
Transaction test succeeded
Running transaction
Installing : 1:mariadb-libs-5.5.37-1.el7_0.x86_64 1/9
Installing : 1:mariadb-5.5.37-1.el7_0.x86_64 2/9
Installing : perl-dbd-mysql-4.023-5.el7.x86_64 3/9
Installing : 1:mariadb-server-5.5.37-1.el7_0.x86_64 4/9
Installing : 1:mariadb-devel-5.5.37-1.el7_0.x86_64 5/9
Installing : 1:mariadb-embedded-5.5.37-1.el7_0.x86_64 6/9
Installing : 1:mariadb-embedded-devel-5.5.37-1.el7_0.x86_64 7/9
Installing : 1:mariadb-test-5.5.37-1.el7_0.x86_64 8/9
Installing : 1:mariadb-bench-5.5.37-1.el7_0.x86_64 9/9
Verifying : 1:mariadb-test-5.5.37-1.el7_0.x86_64 1/9
Verifying : 1:mariadb-embedded-devel-5.5.37-1.el7_0.x86_64 2/9
Verifying : 1:mariadb-embedded-5.5.37-1.el7_0.x86_64 3/9
Verifying : 1:mariadb-libs-5.5.37-1.el7_0.x86_64 4/9
Verifying : 1:mariadb-bench-5.5.37-1.el7_0.x86_64 5/9
Verifying : 1:mariadb-5.5.37-1.el7_0.x86_64 6/9
Verifying : 1:mariadb-server-5.5.37-1.el7_0.x86_64 7/9
Verifying : perl-dbd-mysql-4.023-5.el7.x86_64 8/9
Verifying : 1:mariadb-devel-5.5.37-1.el7_0.x86_64 9/9
Installed:
mariadb.x86_64 1:5.5.37-1.el7_0 mariadb-bench.x86_64 1:5.5.37-1.el7_0
mariadb-devel.x86_64 1:5.5.37-1.el7_0 mariadb-embedded.x86_64 1:5.5.37-1.el7_0
mariadb-embedded-devel.x86_64 1:5.5.37-1.el7_0 mariadb-libs.x86_64 1:5.5.37-1.el7_0
mariadb-server.x86_64 1:5.5.37-1.el7_0 mariadb-test.x86_64 1:5.5.37-1.el7_0
Dependency Installed:
perl-dbd-mysql.x86_64 0:4.023-5.el7
Complete!
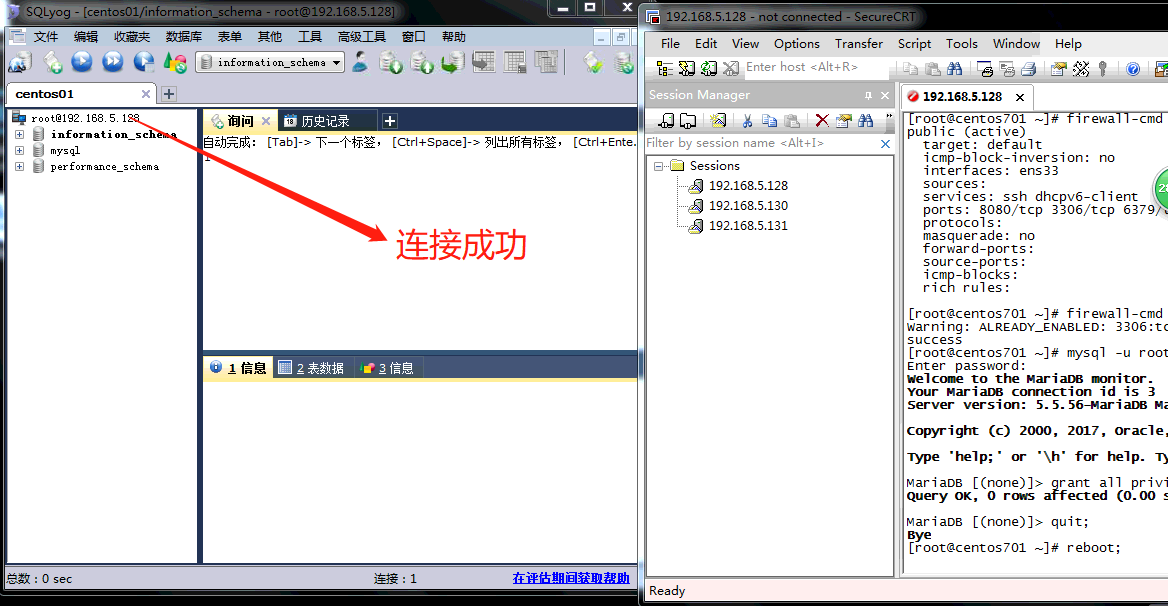
[root@localhost ~]# systemctl start mariadb.service
[root@localhost ~]# systemctl enable mariadb.service
ln -s '/usr/lib/systemd/system/mariadb.service' '/etc/systemd/system/multi-user.target.wants/mariadb.servi
ce'
[root@localhost ~]# MysqL
Welcome to the MariaDB monitor. Commands end with ; or \g.
Your MariaDB connection id is 2
Server version: 5.5.37-MariaDB MariaDB Server
copyright (c) 2000,2014,Oracle,Monty Program Ab and others.
Type 'help;' or '\h' for help. Type '\c' to clear the current input statement.
MariaDB [(none)]> logout
-> exit
->
-> ;
ERROR 1064 (42000): You have an error in your sql Syntax; check the manual that corresponds to your MariaD
B server version for the right Syntax to use near 'logout
exit' at line 1
MariaDB [(none)]> exit
Bye
Your MariaDB connection id is 3
MariaDB [(none)]> show databases;
+--------------------+
| Database |
| information_schema |
| MysqL |
| performance_schema |
| test |
4 rows in set (0.00 sec)
MariaDB [(none)]> use test
Database changed
MariaDB [test]> show tables;
Empty set (0.00 sec)
MariaDB [test]> exit
[root@localhost ~]# MysqL_secure_installation
/usr/bin/MysqL_secure_installation: line 379: find_MysqL_client: command not found
NOTE: RUNNING ALL PARTS OF THIS SCRIPT IS RECOMMENDED FOR ALL MariaDB
SERVERS IN PRODUCTION USE! PLEASE READ EACH STEP CAREFULLY!
In order to log into MariaDB to secure it,we'll need the current
password for the root user. If you've just installed MariaDB,and
you haven't set the root password yet,the password will be blank,
so you should just press enter here.
ERROR 1045 (28000): Access denied for user 'root'@'localhost' (using password: YES)
Enter current password for root (enter for none):
OK,successfully used password,moving on...
Setting the root password ensures that nobody can log into the MariaDB
root user without the proper authorisation.
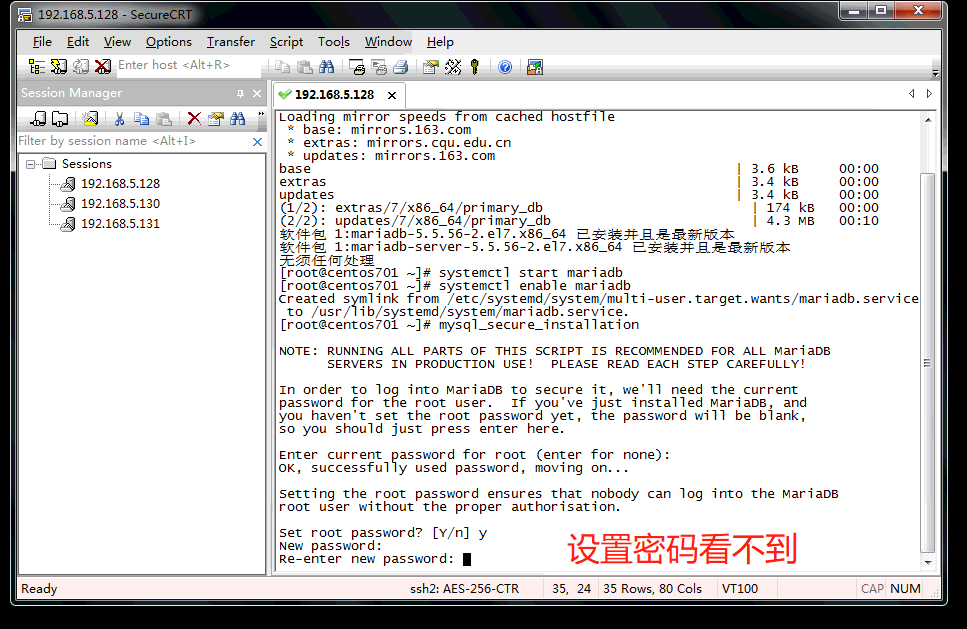
Set root password? [Y/n] y
New password:
Re-enter new password:
Password updated successfully!
Reloading privilege tables..
... Success!
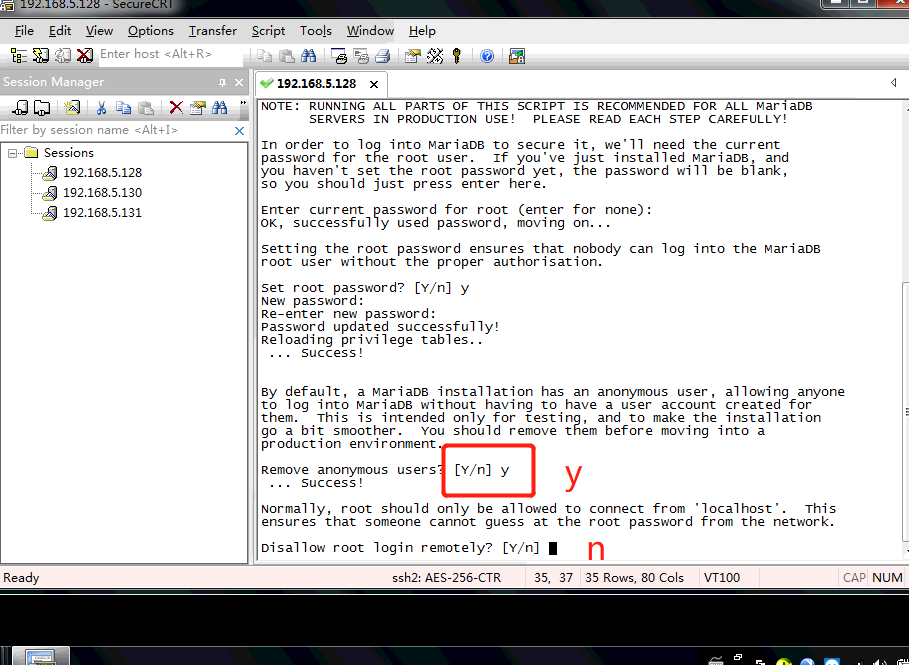
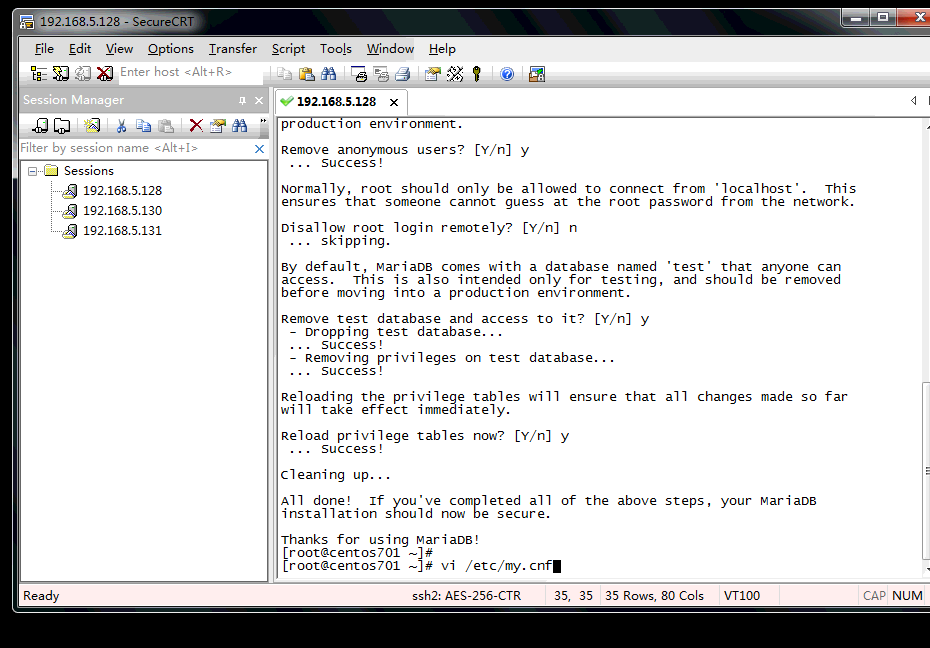
By default,a MariaDB installation has an anonymous user,allowing anyone
to log into MariaDB without having to have a user account created for
them. This is intended only for testing,and to make the installation
go a bit smoother. You should remove them before moving into a
production environment.
Remove anonymous users? [Y/n] y
normally,root should only be allowed to connect from 'localhost'. This
ensures that someone cannot guess at the root password from the network.
disallow root login remotely? [Y/n] y
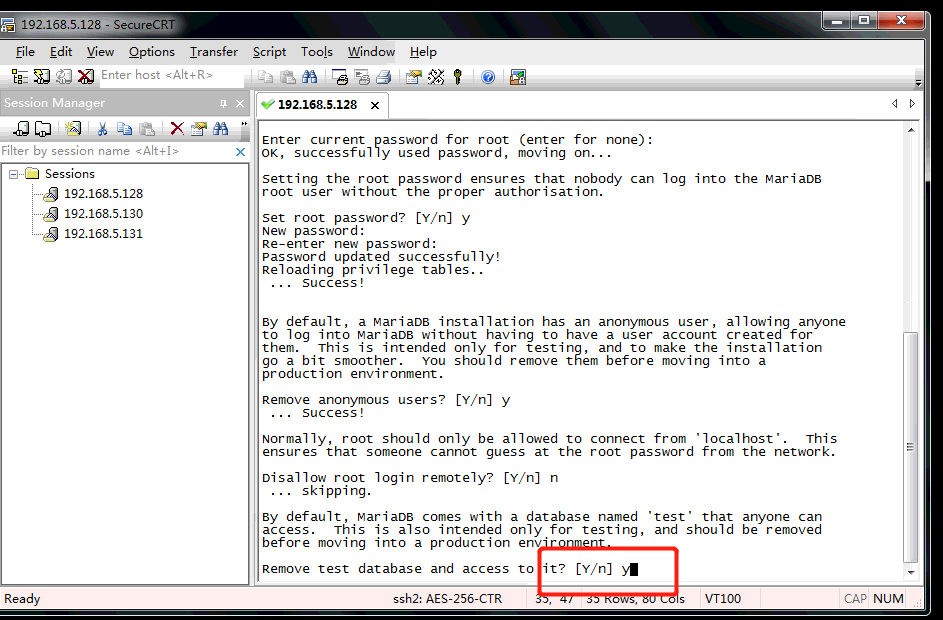
access. This is also intended only for testing,and should be removed
before moving into a production environment.
Remove test database and access to it? [Y/n] y
- Dropping test database...
- Removing privileges on test database...
Reloading the privilege tables will ensure that all changes made so far
will take effect immediately.
Reload privilege tables Now? [Y/n] y
Cleaning up...
All done! If you've completed all of the above steps,your MariaDB
installation should Now be secure.
Thanks for using MariaDB!
[root@localhost ~]# MysqL -uroot -p
Enter password:
Your MariaDB connection id is 15
| zbPHP.com |
MariaDB [(none)]>

179. centos7 安装mariadb 或 mysql 卸载
0.卸载mysql
https://blog.csdn.net/wuwang0823/article/details/80171579
1. centos7 中安装mariadb
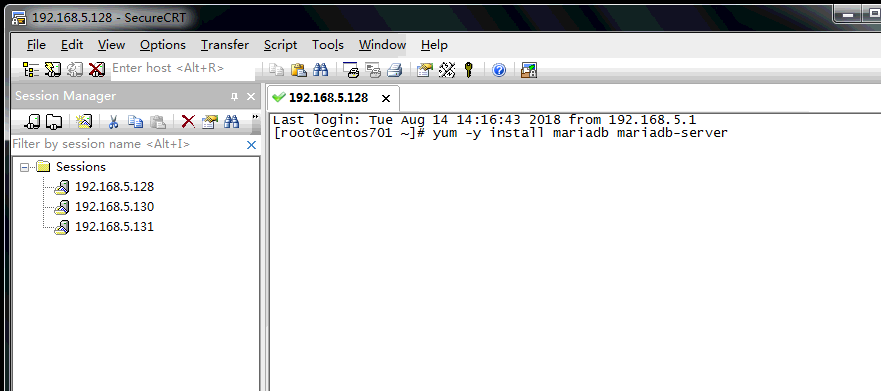
1.1 执行安装
centos7 自带了mariadb
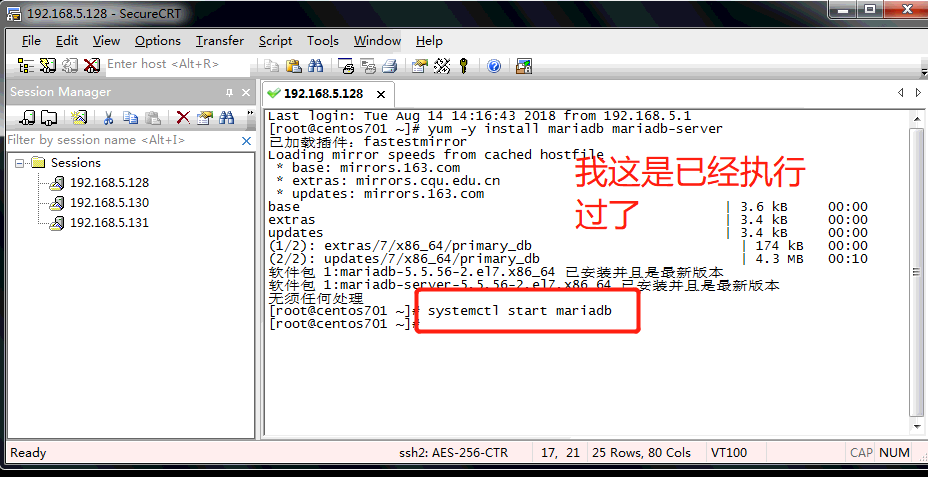
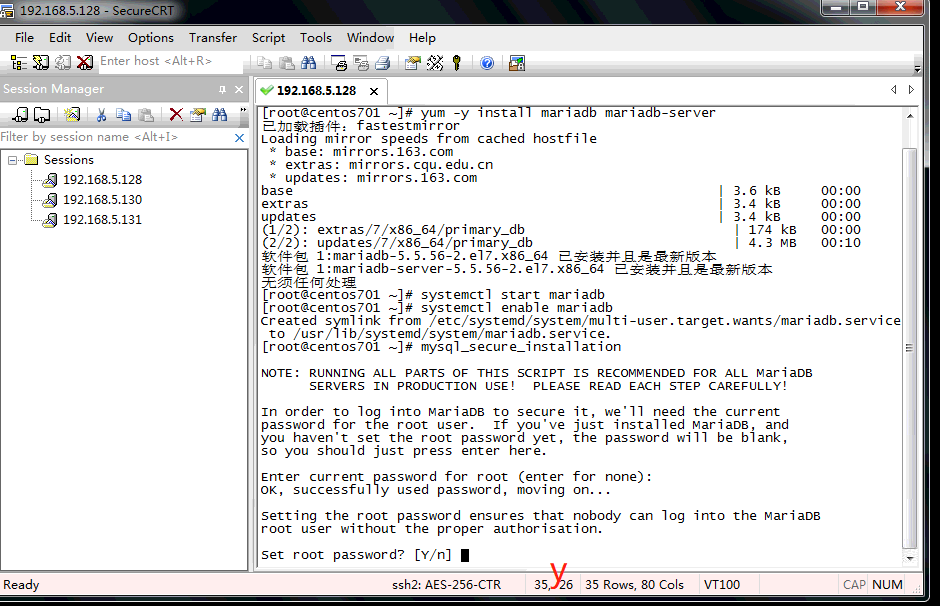
yum -y install mariadb mariadb-server
1.2 启动mariadb
systemctl start mariadb
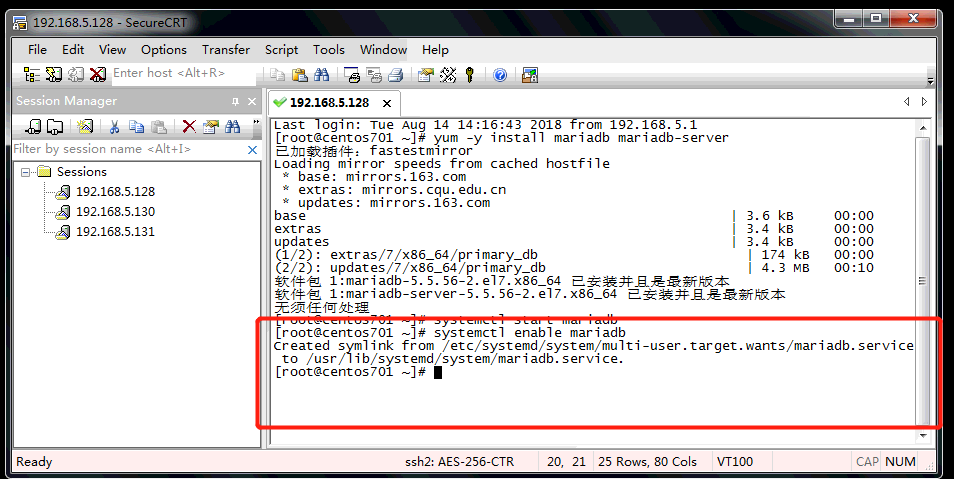
1.3 设置开机启动
systemctl enable mariadb
1.4 MariaDB的相关简单配置
mysql_secure_installation
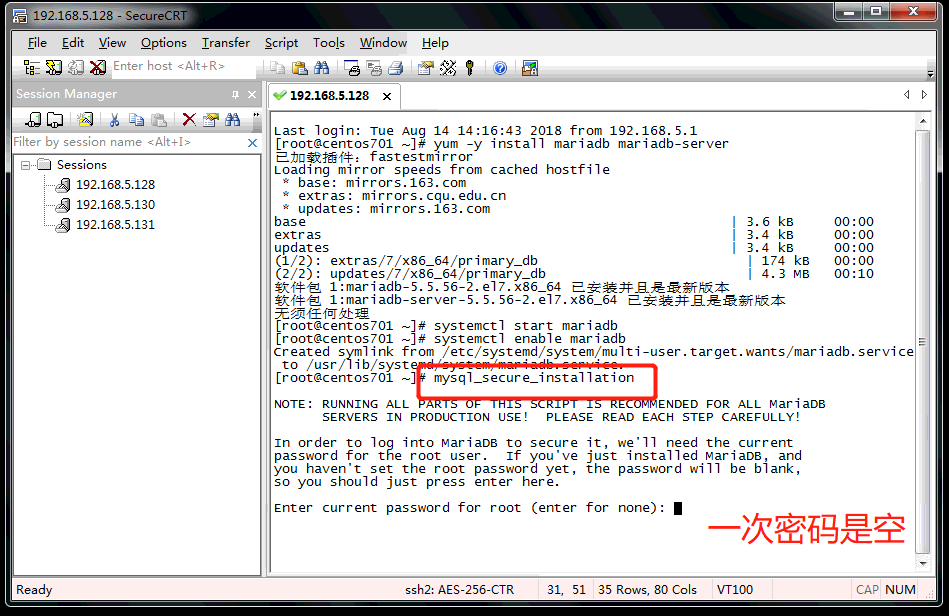
Remove anonymous users? [Y/n] <– 是否删除匿名用户,回车 按y
Disallow root login remotely? [Y/n] <–是否禁止root远程登录,回车, 按n
Remove test database and access to it? [Y/n] <– 是否删除test数据库,回车 按y
Reload privilege tables now? [Y/n] <– 是否重新加载权限表,回车 按 y

1.5 配置MariaDB的字符集
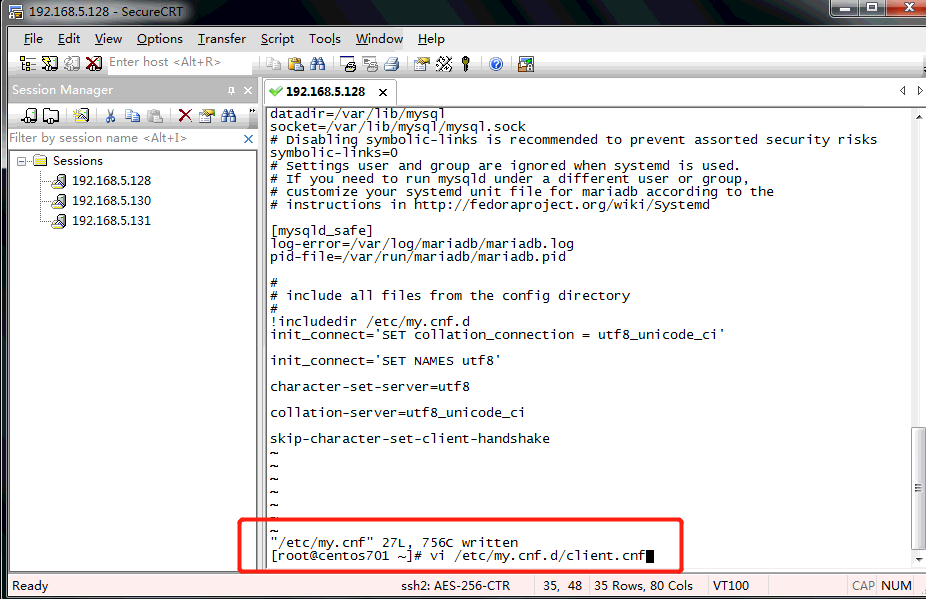
vi /etc/my.cnf
将下面这段内容加入
| init_connect=''SET collation_connection = utf8_unicode_ci'' init_connect=''SET NAMES utf8'' character-set-server=utf8 collation-server=utf8_unicode_ci skip-character-set-client-handshake |
在[client]中添加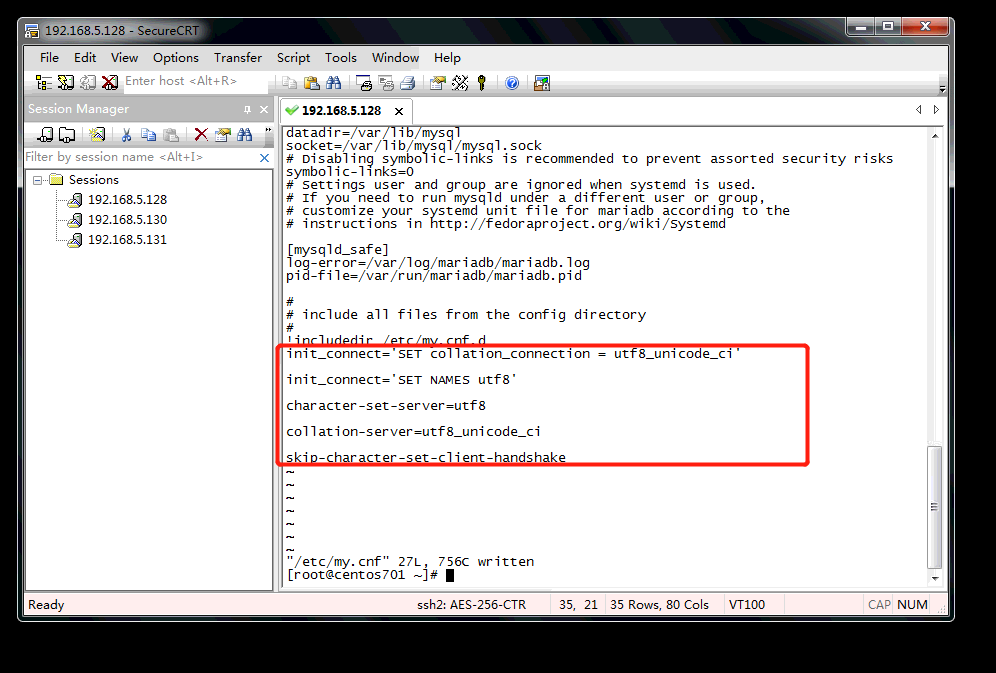
vi /etc/my.cnf.d/client.cnf
default-character-set=utf8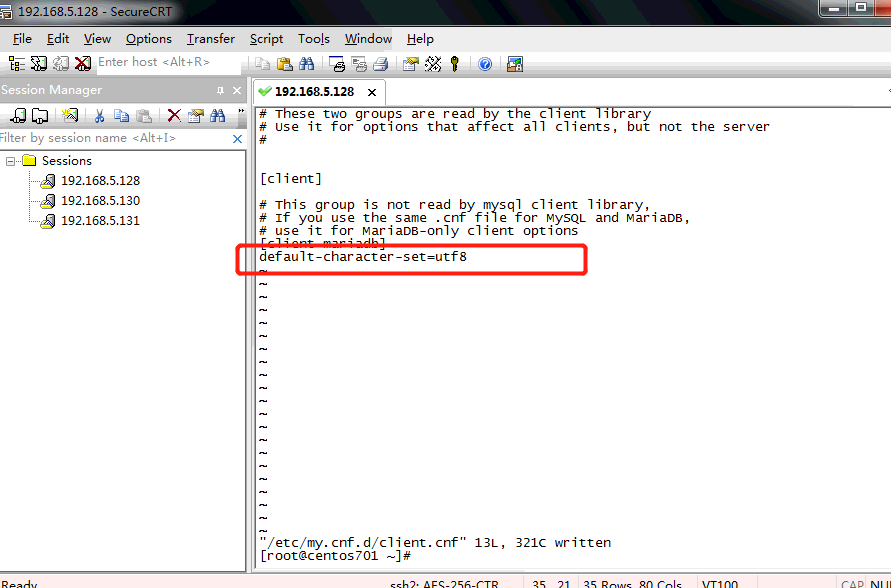
在[mysql]中添加
vi /etc/my.cnf.d/mysql-clients.cnf
default-character-set=utf8
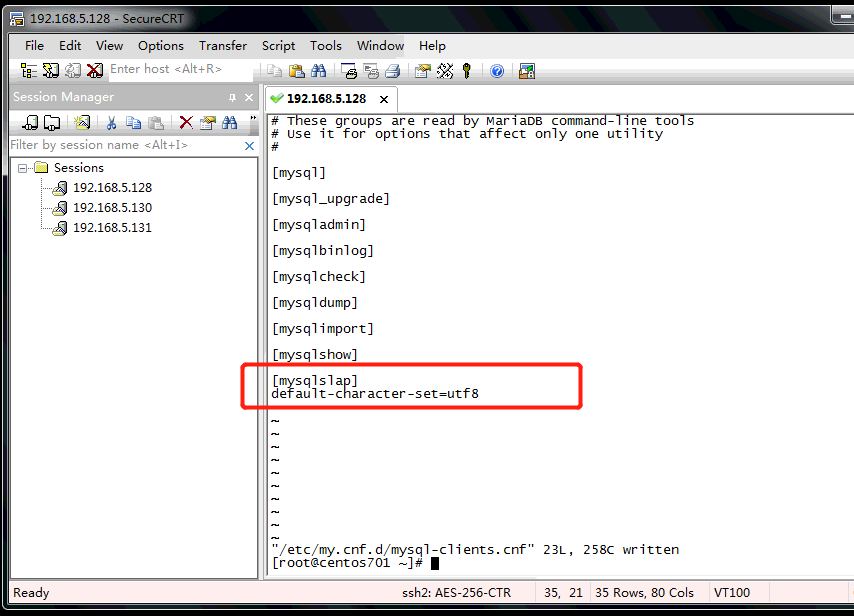
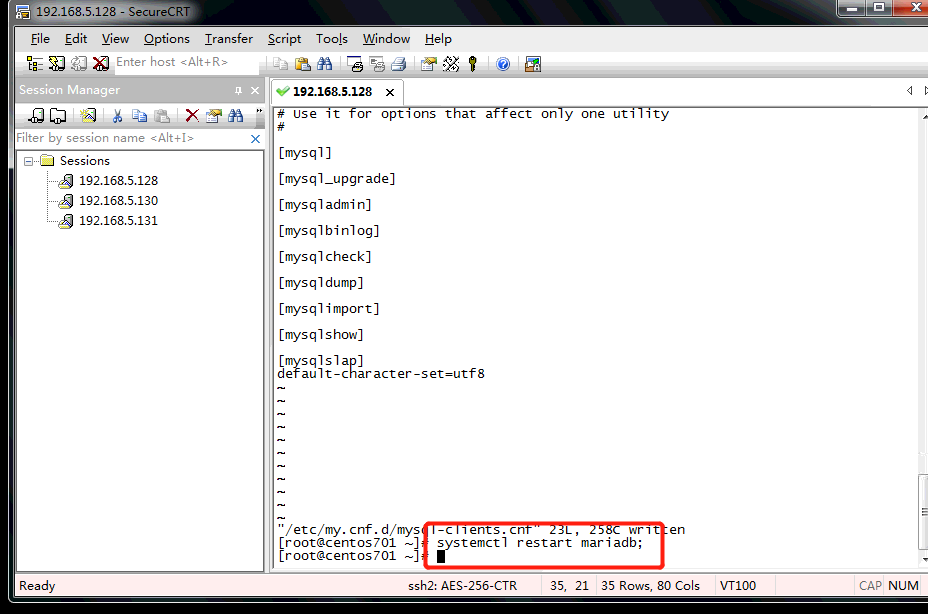
全部配置完成,重启mariadb
systemctl restart mariadb;
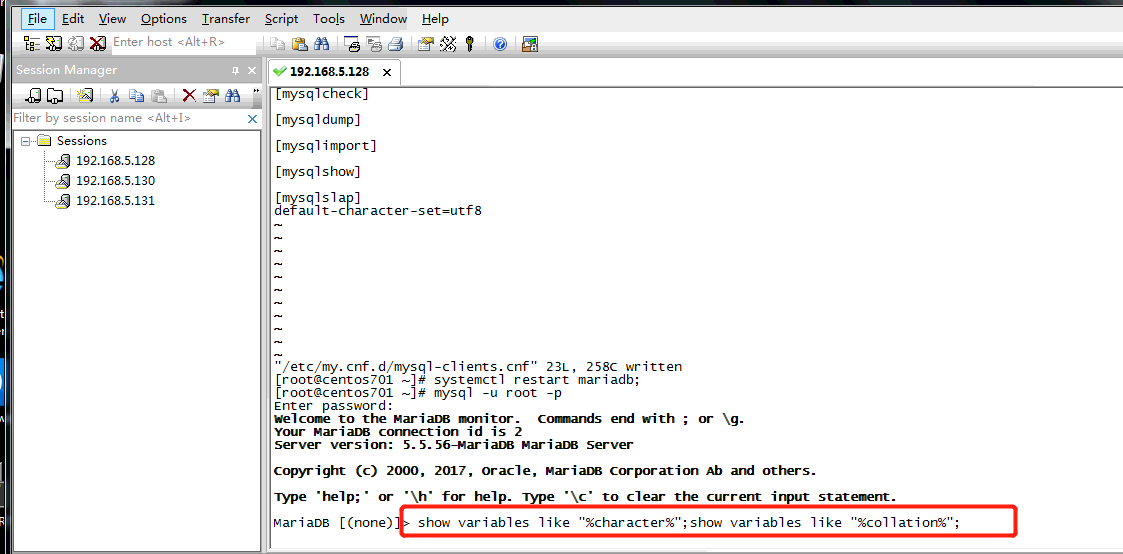
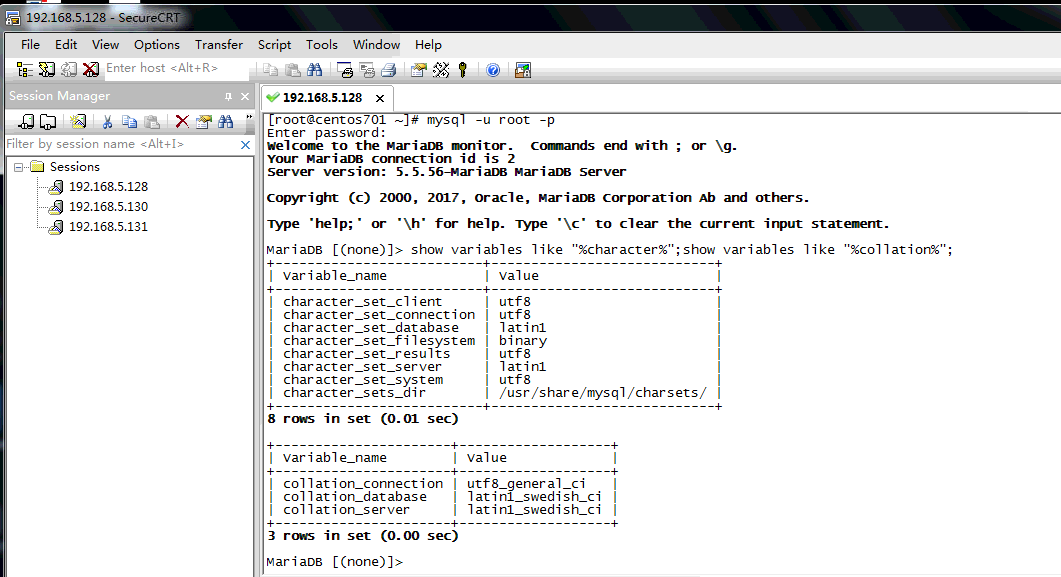
登陆之后进入MariaDB查看字符集
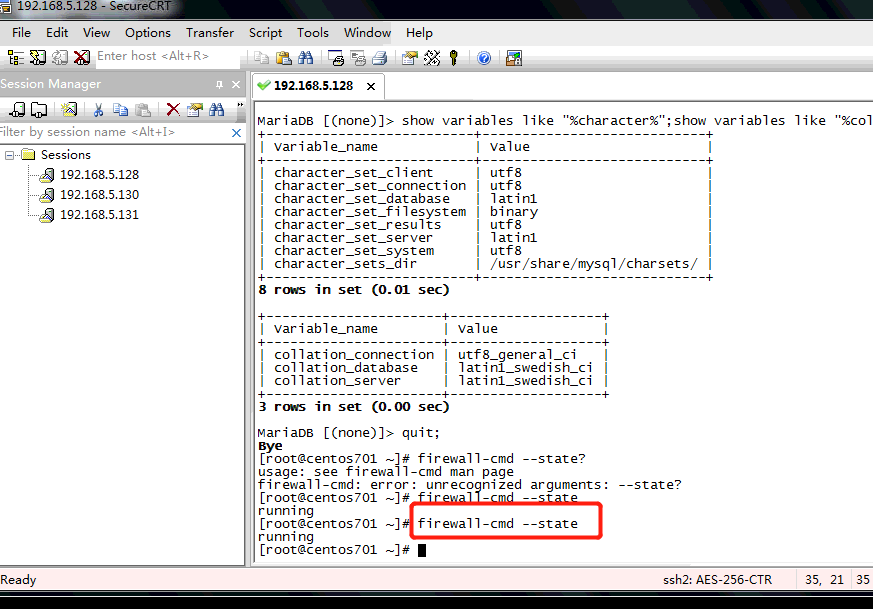
show variables like "%character%";show variables like "%collation%";
1.6 设置防火墙
1.6.1 查看防火墙状态
在任意位置执行下面的命令
firewall-cmd --state
1.6.2 立即开启防火墙
systemctl start firewalld.service
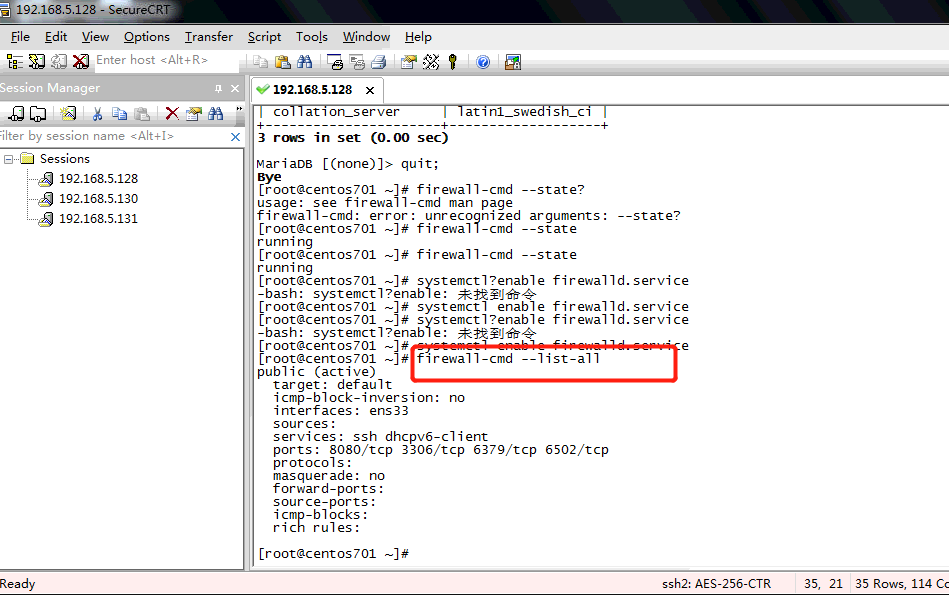
1.6.3 开启开机启动防火墙
systemctl enable firewalld.service

1.6.4 查看开启的端口
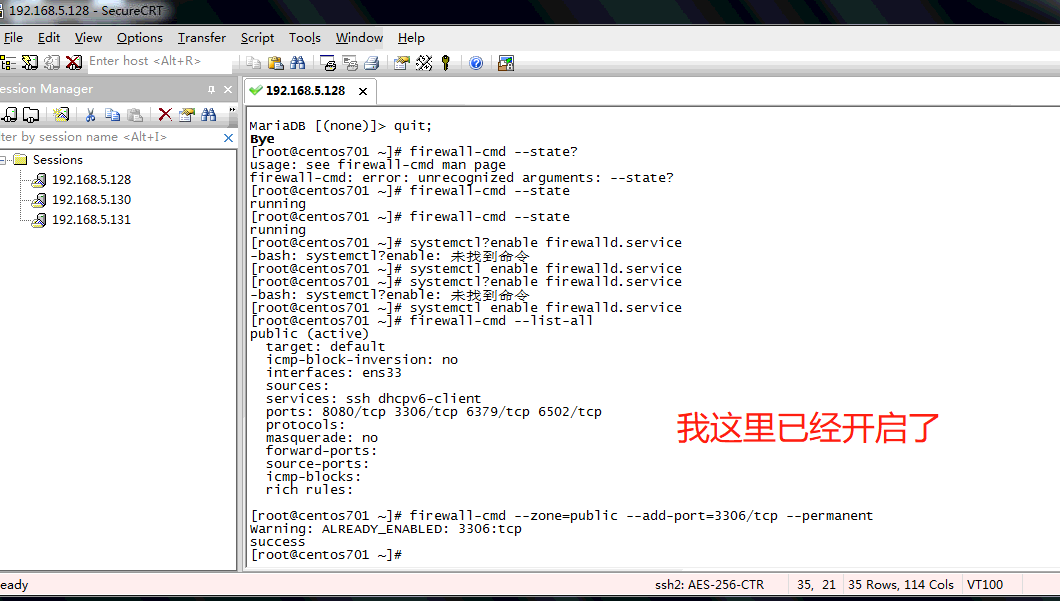
firewall-cmd --list-all
1.6.5 开启需要的端口
firewall-cmd --zone=public --add-port=3306/tcp --permanent
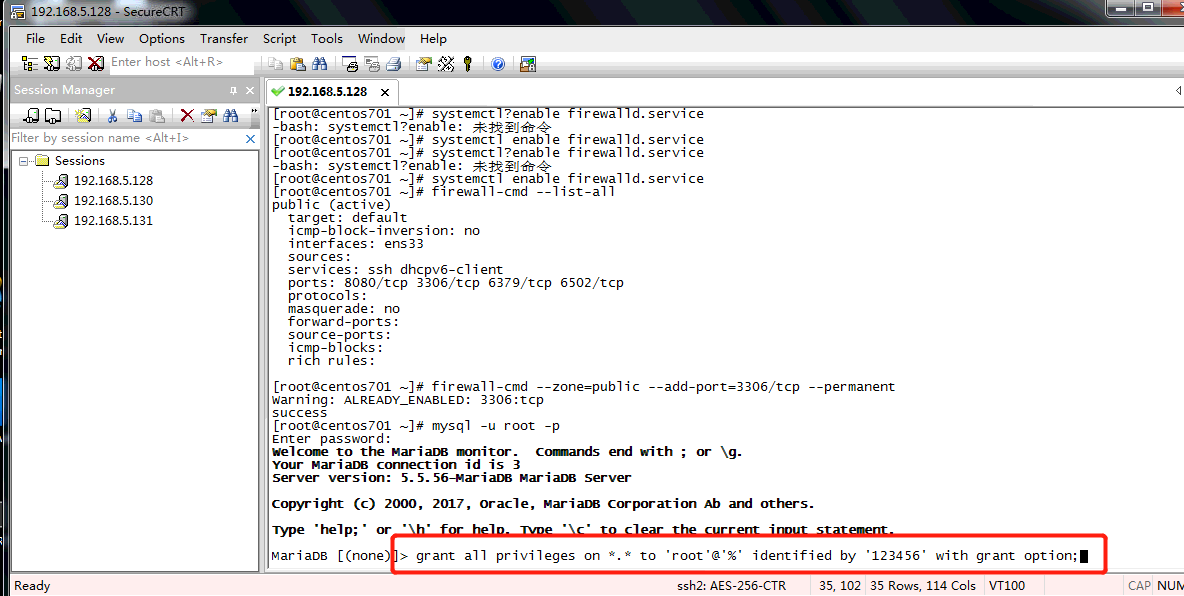
1.7 外界连接授权
登录成功后执行
grant all privileges on *.* to ''root''@''%'' identified by ''123456'' with grant option;

1.8 测试外界连接
完成
2. centos 8安装 mysql
参考: https://www.cnblogs.com/luohanguo/p/9045391.html
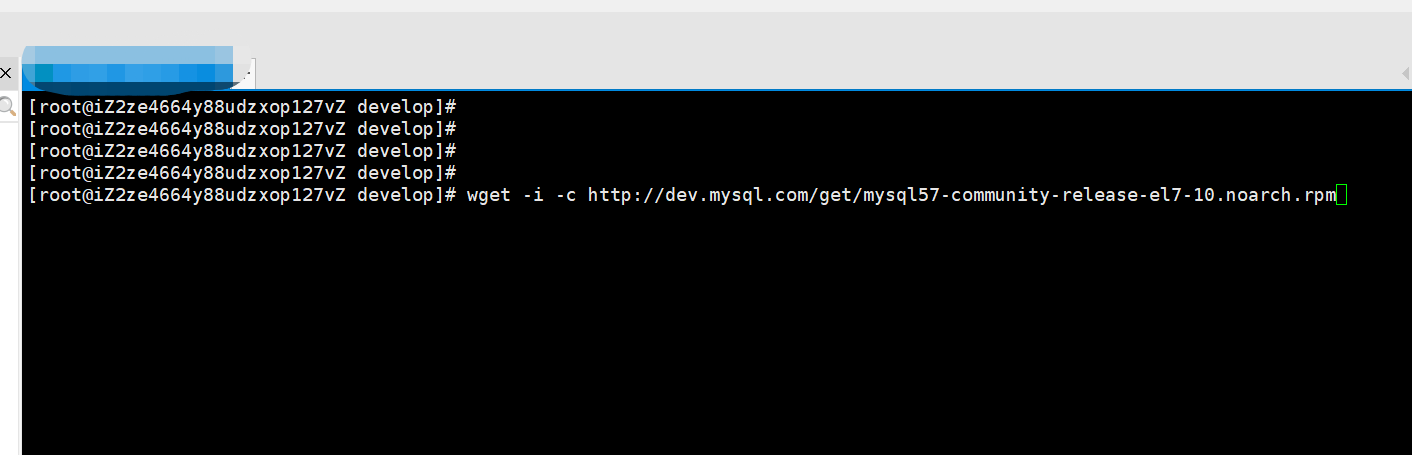
2.1 下载并安装MySQL官方的 Yum Repository
wget -i -c http://dev.mysql.com/get/mysql57-community-release-el7-10.noarch.rpm
yum -y install mysql57-community-release-el7-10.noarch.rpm

出现问题:
解决方案:https://blog.csdn.net/weixin_45616519/article/details/105765719
yum module disable mysql
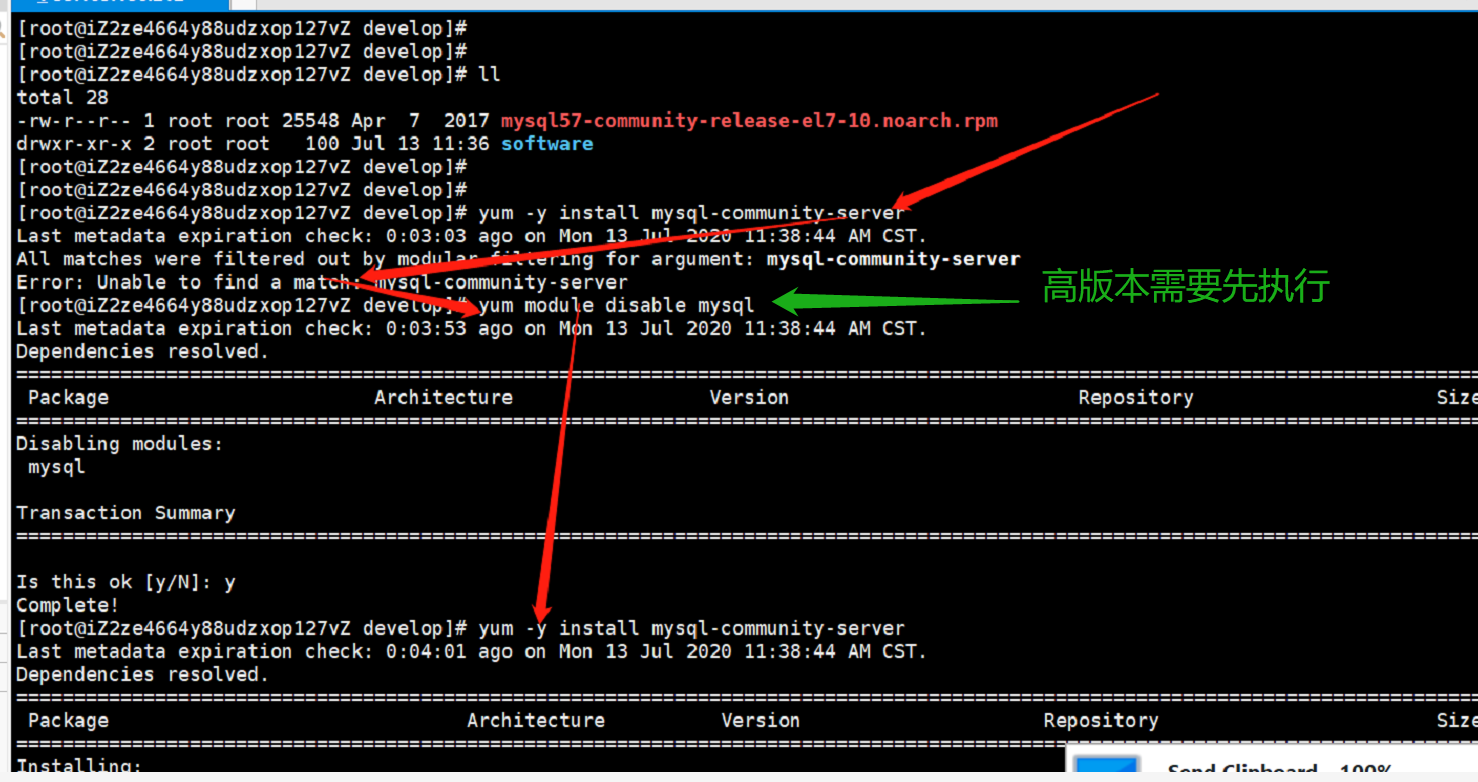
yum -y install mysql-community-server
2.2 MySQL数据库设置
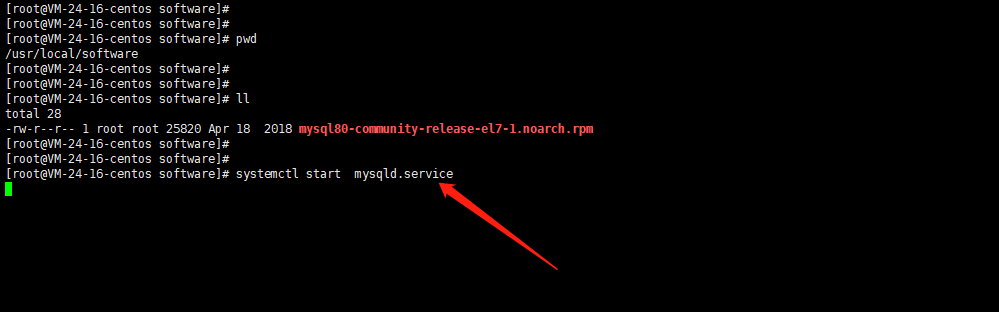
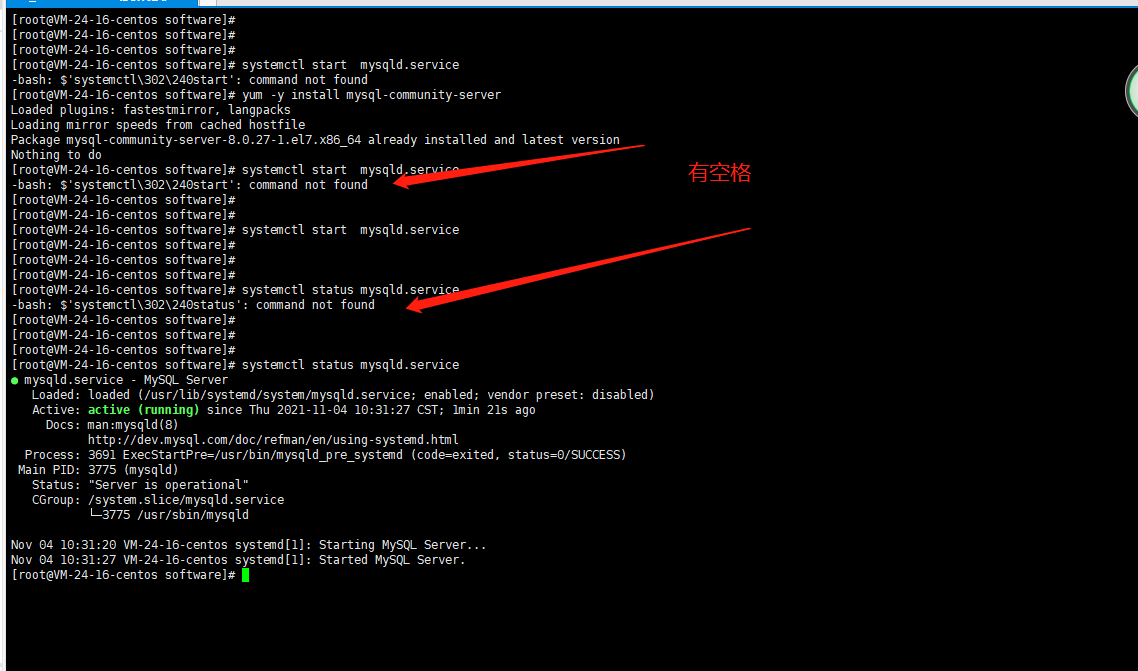
首先启动MySQL
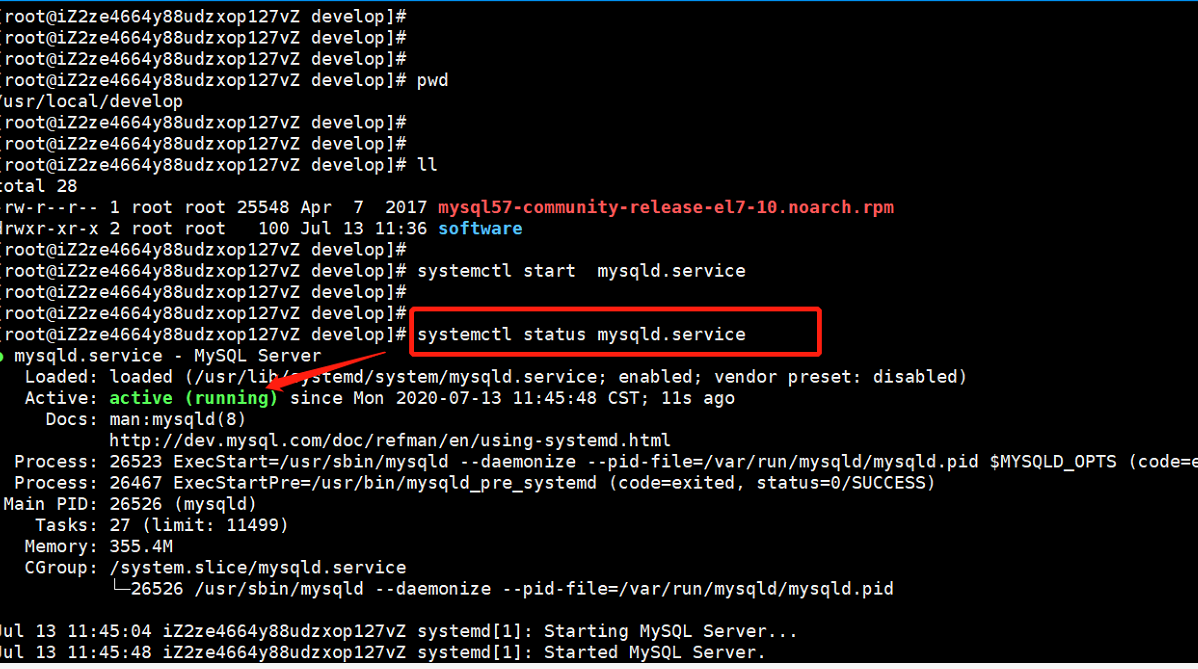
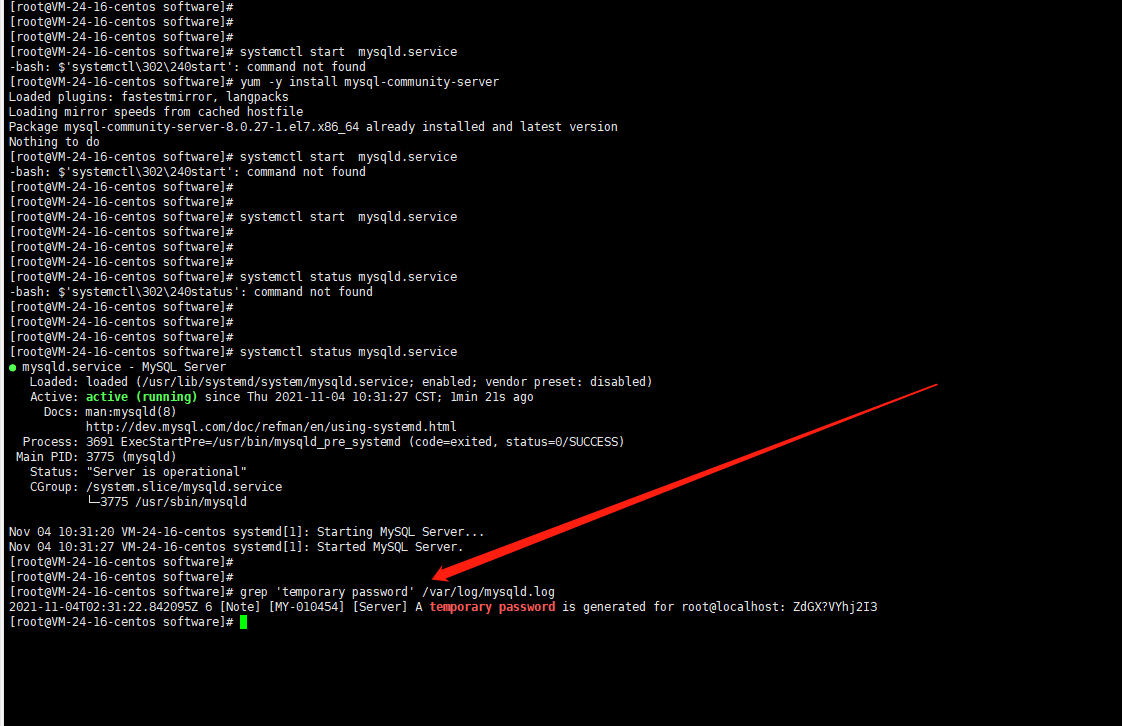
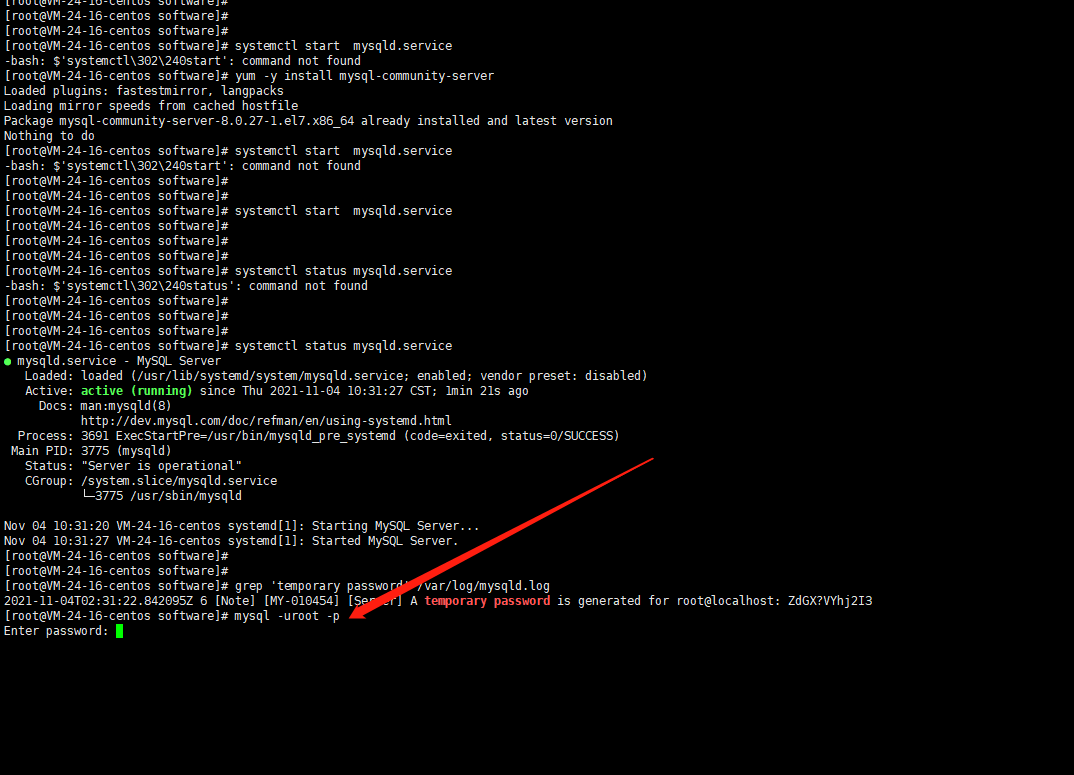
systemctl start mysqld.service
查看MySQL运行状态,运行状态如图:
systemctl status mysqld.service
如下命令进入数据库:
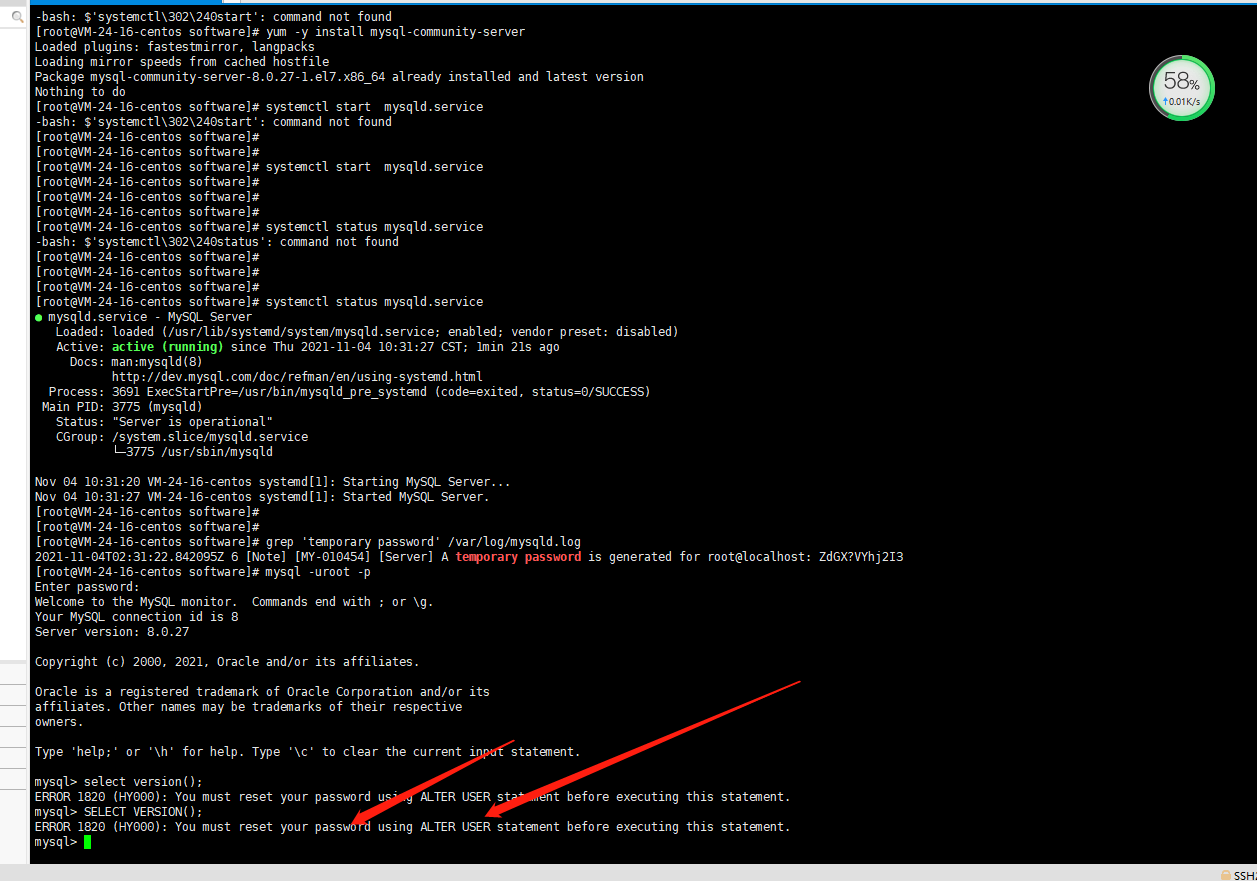
mysql -uroot -p
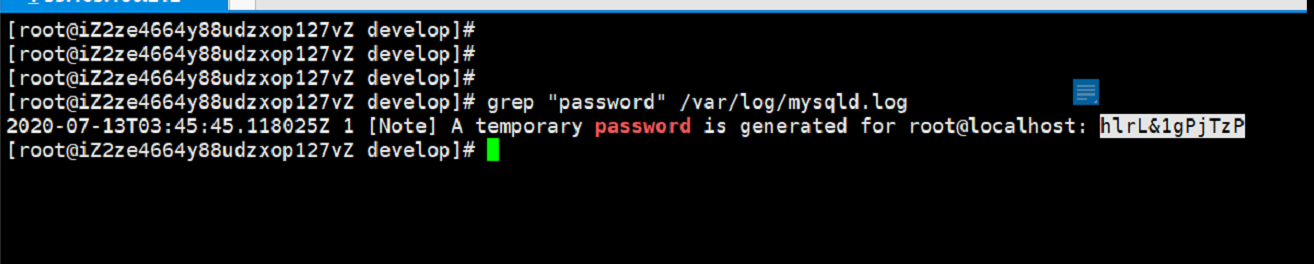
grep "password" /var/log/mysqld.log
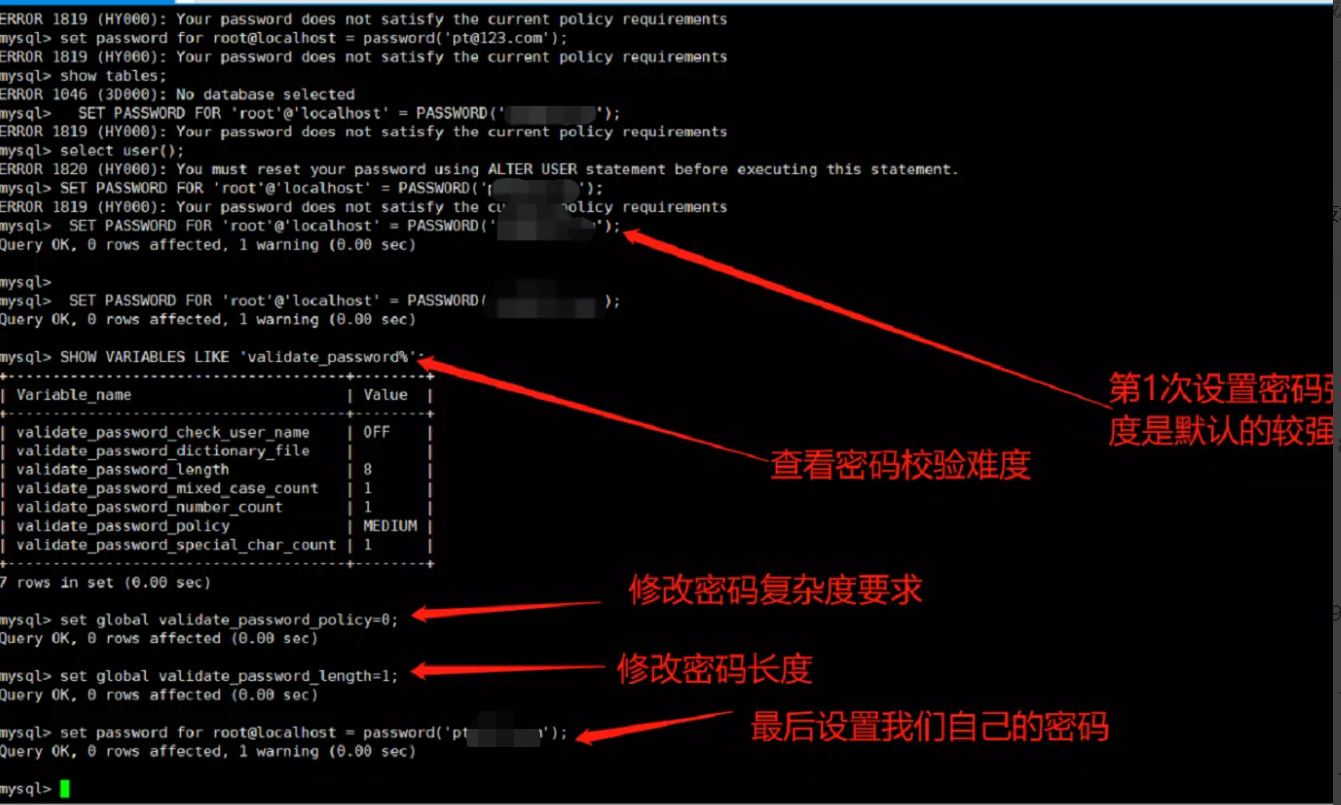
ALTER USER ''root''@''localhost'' IDENTIFIED BY ''new password'';
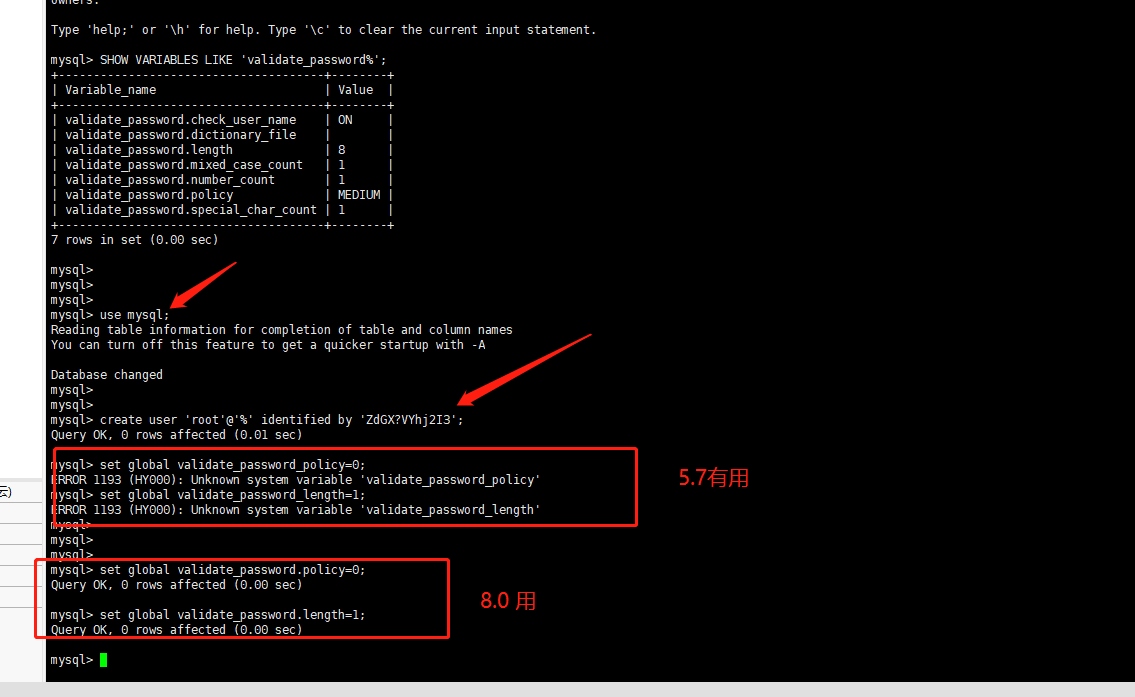
SHOW VARIABLES LIKE ''validate_password%'';
set global validate_password_policy=0;
set global validate_password_length=1;
mysql 8 请参考 :https://blog.csdn.net/weixin_44425934/article/details/109047655
2.3 授权:登录mysql
grant all privileges on *.* to ''root''@''%'' identified by ''123456'' with grant option;
刷新:
flush privileges;
mysql8.0授权
https://blog.csdn.net/qq_34416331/article/details/104198487
2.4 mysql 8.0 在线安装
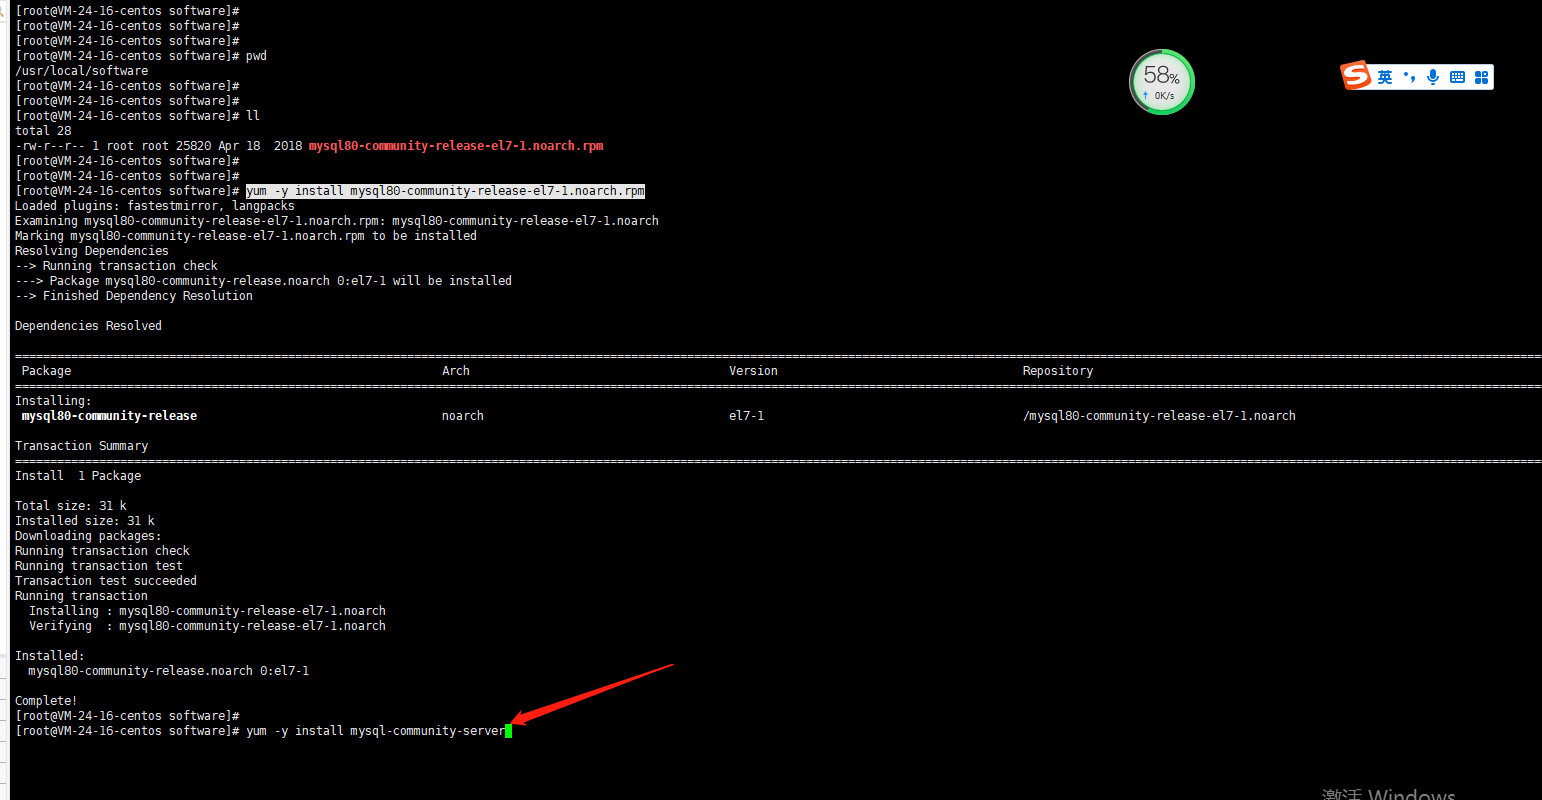
wget -i -c http://dev.mysql.com/get/mysql80-community-release-el7-1.noarch.rpm
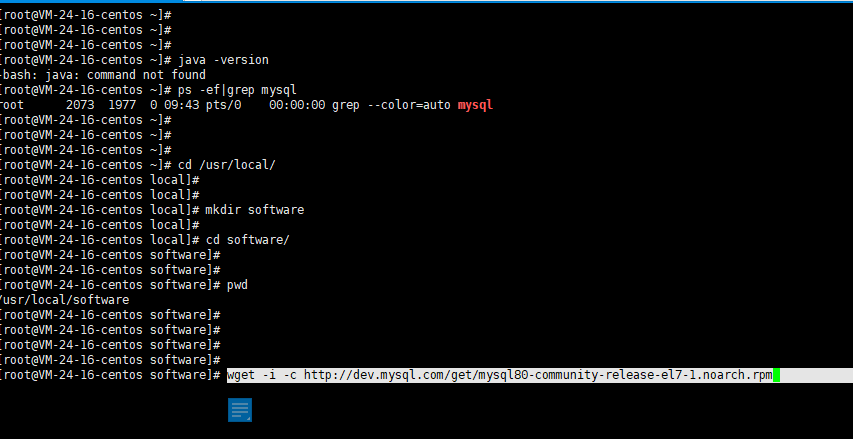
yum -y install mysql80-community-release-el7-1.noarch.rpm
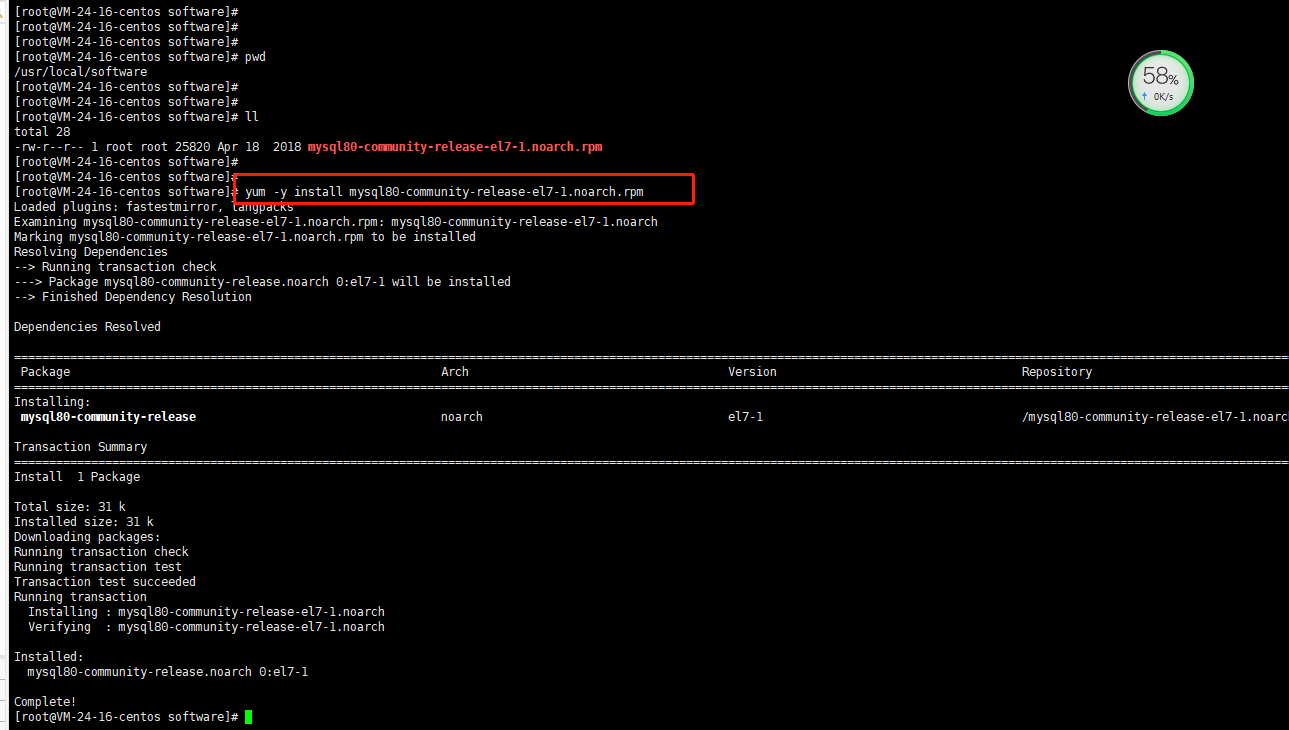
yum -y install mysql-community-server
systemctl start mysqld.service
错误情景
systemctl status mysqld.service

查看临时密码: grep ''temporary password'' /var/log/mysqld.log
无临时密码处理方案
rm -rf /var/lib/mysql
systemctl restart mysqld
grep ''temporary password'' /var/log/mysqld.log
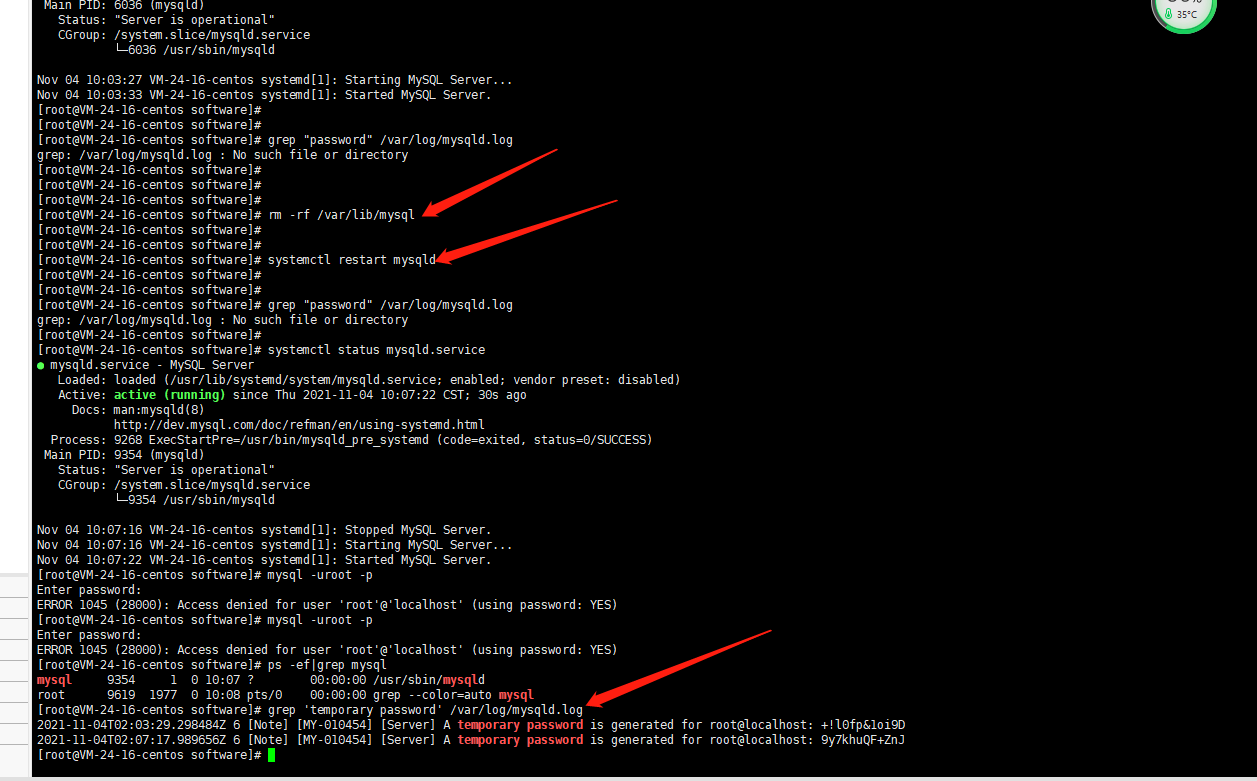
内部登录
修改密码:
参考:https://blog.csdn.net/qq_34416331/article/details/104198487

CentOS 6.5系统卸载MySQL并安装MariaDB的方法
CentOS 6.5系统卸载MysqL并安装MariaDB的方法
关闭目前的MysqL服务 #/etc/init.d/MysqLd stop
确保已正常关闭 #ps -ef | grep MysqL
查询MysqL的安装情况: #rpm -qa | grep MysqL
将列出来的删除。 #rpm -e MysqL-server.x86_64
这里有些朋友可能会出错,形如: [root@centos-dev halc]# rpm -e MysqL-libs-5.1.69-1.el6_4.i686 error: Failed dependencies: libMysqLclient.so.16 is needed by (installed) postfix-2:2.6.6-2.2.el6_1.i686 libMysqLclient.so.16(libMysqLclient_16) is needed by (installed) postfix-2:2.6.6-2.2.el6_1.i686 MysqL-libs is needed by (installed) postfix-2:2.6.6-2.2.el6_1.i686
用这个就好了 #rpm -e --nodeps MysqL-libs-5.1.69-1.el6_4.i686
之后就能安装MariaDB了。
yum安装MariaDB的方法,去MariaDB的官网上,那里有详细说明

Centos 7 yum install mysql 安装mariadb 后无法启动
yum install MysqL 显示 MysqL 安装完成,但service MysqL status,service MysqL start 均提示失败,数据库也无法登陆。 [root@ansible flask_sqlalchemy]# service MysqL status Redirecting to /bin/systemctl status MysqL.service ● MysqL.service Loaded: not-found (Reason: No such file or directory) Active: inactive (dead) [root@ansible flask_sqlalchemy]# service MysqL start Redirecting to /bin/systemctl start MysqL.service Failed to start MysqL.service: Unit MysqL.service Failed to load: No such file or directory. [root@ansible flask_sqlalchemy]# MysqL -u root ERROR 2002 (HY000): Can't connect to local MysqL server through socket '/var/lib/MysqL/MysqL.sock' (2) 解决方法:
yum install mariadb-server -y
systemctl start mariadb.service
systemctl enable mariadb.service
MysqL 参考:http://www.centoscn.com/CentosBug/softbug/2016/0115/6660.html 数据库可以登陆,但是service MysqL 仍然提示上述错误,原因还需进一步分析。

centos 7 卸载 mariadb 的正确命令
#列出所有被安装的rpm package
rpm -qa | grep mariadb
#卸载
rpm -e mariadb-libs-5.5.37-1.el7_0.x86_64
错误:依赖检测失败:
libMysqLclient.so.18()(64bit) 被 (已安裝) postfix-2:2.10.1-6.el7.x86_64 需要
libMysqLclient.so.18(libMysqLclient_18)(64bit) 被 (已安裝) postfix-2:2.10.1-6.el7.x86_64 需要
#强制卸载,因为没有--nodeps
rpm -e --nodeps mariadb-libs-5.5.37-1.el7_0.x86_64
关于centos 7安装mysql5.5和安装 mariadb 的正确命令和centos7.6安装mariadb的问题我们已经讲解完毕,感谢您的阅读,如果还想了解更多关于179. centos7 安装mariadb 或 mysql 卸载、CentOS 6.5系统卸载MySQL并安装MariaDB的方法、Centos 7 yum install mysql 安装mariadb 后无法启动、centos 7 卸载 mariadb 的正确命令等相关内容,可以在本站寻找。
本文标签:


