本文将介绍AndroiStudio之LinearLayout的详细情况,。我们将通过案例分析、数据研究等多种方式,帮助您更全面地了解这个主题,同时也将涉及一些关于:java.lang.ClassCas
本文将介绍Androi Studio 之 LinearLayout的详细情况,。我们将通过案例分析、数据研究等多种方式,帮助您更全面地了解这个主题,同时也将涉及一些关于:java.lang.ClassCastException: android.widget.LinearLayout$LayoutParams cannot be cast to androi...、Android LayoutInflater初始化RelativeLayout和LinearLayout的问题。、android LinearLayout、Android linearLayout 之 layout_weight 揭秘的知识。
本文目录一览:- Androi Studio 之 LinearLayout
- :java.lang.ClassCastException: android.widget.LinearLayout$LayoutParams cannot be cast to androi...
- Android LayoutInflater初始化RelativeLayout和LinearLayout的问题。
- android LinearLayout
- Android linearLayout 之 layout_weight 揭秘

Androi Studio 之 LinearLayout
LinearLayout
•常用属性

•注意事项
当 android:orientation="vertical" 时, 只有水平方向的设置才起作用,垂直方向的设置不起作用
- android:layout_gravity="left"
- android:layout_gravity="right"
- android:layout_gravity="center_horizontal"
当 android:orientation="horizontal" 时, 只有垂直方向的设置才起作用,水平方向的设置不起作用
- 即: top , bottom , center_vertical 是生效的
Weight(转载)
•概念
Indicates how much of the extra space in the LinearLayout is allocated to the view associated with these LayoutParams. Specify 0 if the view should not be stretched. Otherwise the extra pixels will be pro-rated among all views whose weight is greater than 0.说明:
- 指示LinearLayout中多少额外空间分配给与这些LayoutParams关联的视图
- 如果视图不应被拉伸,请指定0
- 否则,额外空间将在权重大于0的所有视图中按比例分配。
剩余布局大小(额外空间) = 父布局大小 - 子布局大小之和;
•详解
1.额外空间,指的是剩余空闲空间, 额外空间将在权重大于0的所有视图中按比例分配。
如下,总权重为1+1=2;
第一个控件是比第二个控件占的空间小的,即w(12345)+1/2空闲空间< w(123456)+1/2控件;
<LinearLayout
  android:orientation="horizontal">
  <TextView
      android:layout_width="wrap_content"
      android:layout_height="wrap_height"
      android:layout_weight="1"
      android:text="12345"/>

  <TextView
      android:layout_width="wrap_content"
      android:layout_height="wrap_height"
      android:layout_weight="1"
      android:text="123456"/>
</LinearLayout>
如果我们让控件的宽度定义为layout_width="0dp" ,这样比如2个控件的 layout_weight="1" 就可以各自50%平分整个空间了;
因为:0 + 1/2空闲空间 = 0 + 1/2空闲空间。
2.默认layout_weight为0,所以如果这么写:
<LinearLayout
    android:orientation="horizontal">

    <TextView
        android:layout_width="40dp"
        android:layout_height="match_parent"
        android:background="#000" />

    <Button
        android:layout_width="0dp"
        android:layout_height="match_parent"
        android:layout_weight="1"/>

    <TextView
        android:layout_width="40dp"
        android:layout_height="match_parent"
        android:background="#888" />

</LinearLayout>
则总权重为1,即Button占了所有剩余空闲空间,无论它在哪个位置。
3.在排列方向上设置了match_parent, 如下,权重为2,1,2
    <LinearLayout
        android:layout_width="match_parent"
        android:layout_height="match_parent"
        android:orientation="horizontal">
        <Button
            android:layout_width="match_parent"
            android:layout_height="wrap_content"
            android:text="1"
            android:layout_weight="2"/>
        <Button
            android:layout_width="match_parent"
            android:layout_height="wrap_content"
            android:text="2"
            android:layout_weight="1"/>
        <Button
            android:layout_width="match_parent"
            android:layout_height="wrap_content"
            android:text="3"
            android:layout_weight="2"/>
运行结果如下:
分析:
- 因为设置的都是match_parent,所以如果没有设置权重,三个Button只会显示第一个,其他会被覆盖
- 但是设置了权重后, 我们就按三个 Button 给定的 width=match_parent 计算剩余空间
- 剩余空间=1个match_parent空间-3个match_parent空间= -2个match_parent空间(负2)
- 所以
- Button1所占空间 = 1个match_parent空间+(-2个match_parent空间)*2/5 = 1/5个match_parent空间
- Button2所占空间 = 1个match_parent空间+(-2个match_parent空间)*1/5 = 3/5个match_parent空间
- Button3所占空间 = 1个match_parent空间+(-2个match_parent空间)*2/5 = 1/5个match_parent空间
所以在统一设置match_parent时,会有这么一个特性,权重越大,空间越小。
而且在某个控件权重刚好为另外的所有控件权重之和时,这个控件会消失。
如权重变为1,2,3;
    <LinearLayout
        android:layout_width="match_parent"
        android:layout_height="match_parent"
        android:orientation="horizontal">
        <Button
            android:layout_width="match_parent"
            android:layout_height="wrap_content"
            android:text="1"
            android:layout_weight="2"/>
        <Button
            android:layout_width="match_parent"
            android:layout_height="wrap_content"
            android:text="2"
            android:layout_weight="1"/>
        <Button
            android:layout_width="match_parent"
            android:layout_height="wrap_content"
            android:text="3"
            android:layout_weight="2"/>
运行结果如下:
同样的算法:
- Button1所占空间 = 1个match_parent空间+(-2个match_parent空间)*1/6 = 2/3个match_parent空间
- Button2所占空间 = 1个match_parent空间+(-2个match_parent空间)*2/6 = 1/3个match_parent空间
- Button3所占空间 = 1个match_parent空间+(-2个match_parent空间)*3/6 = 0个match_parent空间
本次内容转载自:Android-0.Android Studio布局中layout_weight用法


divider(转载)
•为LinearLayout设置分割线
很多界面开发中都会设置一些下划线,或者分割线,从而使得界面更加整洁美观,比如下面的酷狗 音乐的注册页面:
对于这种线,我们通常的做法有两种:
- 直接在布局中添加一个view,这个view的作用仅仅是显示出一条线,代码也很简单:
- 这个是水平方向上的黑线,当然你也可以改成其他颜色,或者使用图片
- 使用LinearLayout的一个divider属性
- 1)divider : 设置作为分割线的图片
2)showDividers : 设置分割线的位置
- none(无)
- beginning(开始)
- end(结束)
- middle(每两个组件间)
- 3)dividerPadding : 设置分割线的 Padding
本次内容转载自:LinearLayout(线性布局)


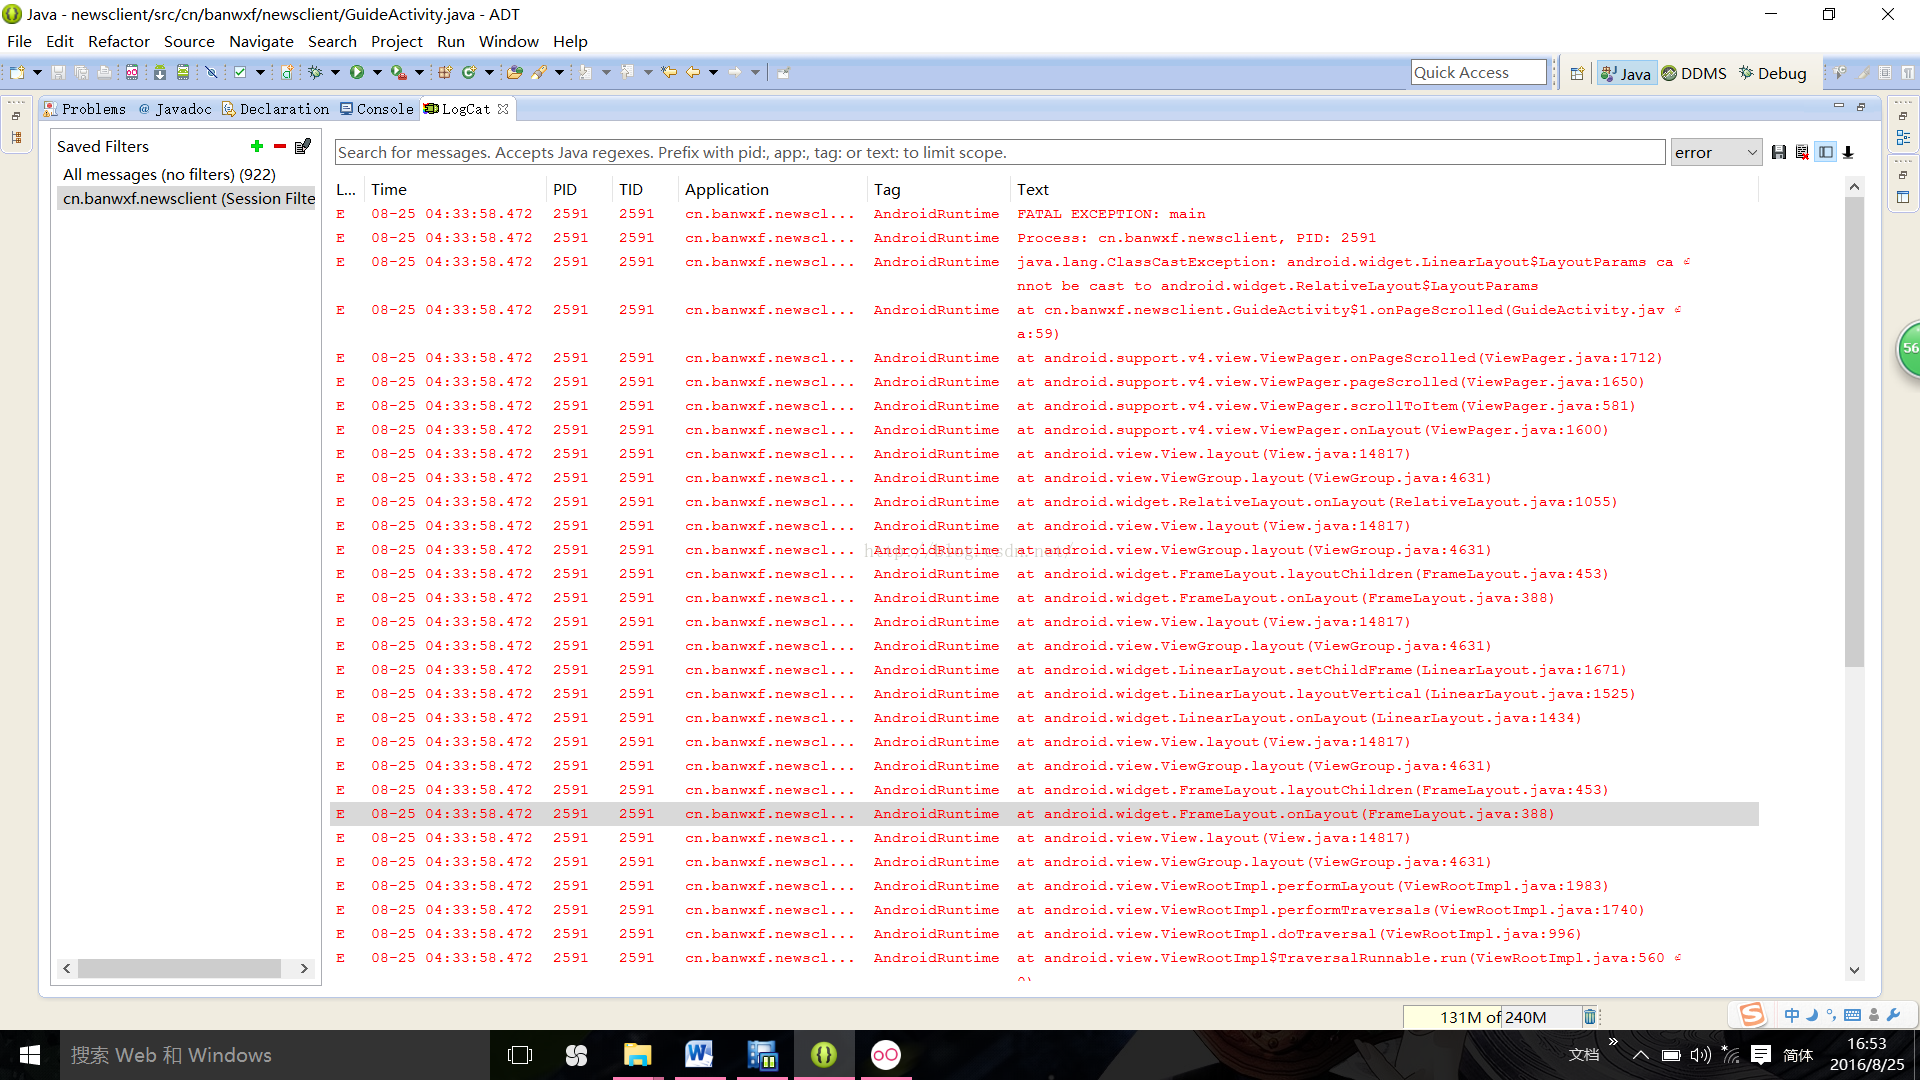
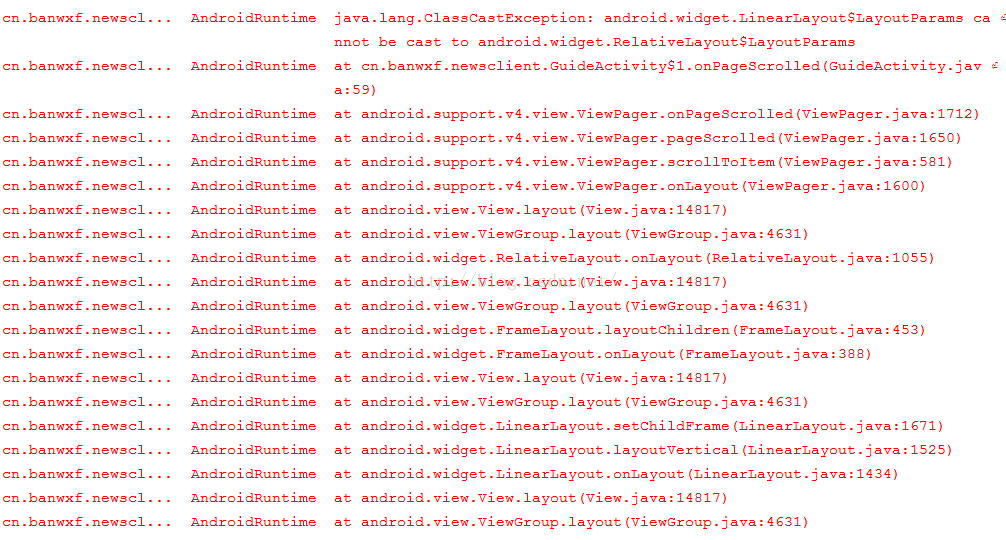
:java.lang.ClassCastException: android.widget.LinearLayout$LayoutParams cannot be cast to androi...
:java.lang.ClassCastException: android.widget.LinearLayout$LayoutParams cannot be cast to android.widget.RelativeLayout$LayoutParams
这个错首先说明:类型转化异常
解决方法:
一、详细检查是否将某种组件强制转换为另一种类型
二、本地声明类型是否与布局文件中的一致
三、获取的布局参数的父类和布局文件不一致
总之,要细心将布局文件类型与activity中的一致。

Android LayoutInflater初始化RelativeLayout和LinearLayout的问题。
我自定义一个MyListView extends ListView, 在自定义的MyListView的构造函数里使用LayoutInflater初始化一个布局为RelativeLayout布局,然后获取这个RelativeLayout布局的宽和高时报错,使用LinearLayout就能够正常获取。
不知道这是什么情况。
MainActivity.java:
package com.fyfeng.listviewtest;

import android.app.Activity;
import android.os.Bundle;

public class MainActivity extends Activity {

	@Override
	protected void onCreate(Bundle savedInstanceState) {
		super.onCreate(savedInstanceState);
		setContentView(R.layout.activity_main);

	}

}
主配置文件activity_main.xml:
<RelativeLayout xmlns:android="http://schemas.android.com/apk/res/android"
    xmlns:tools="http://schemas.android.com/tools"
    android:layout_width="fill_parent"
    android:layout_height="fill_parent"
    android:background="#FFD700"
    android:paddingBottom="@dimen/activity_vertical_margin"
    android:paddingLeft="@dimen/activity_horizontal_margin"
    android:paddingRight="@dimen/activity_horizontal_margin"
    android:paddingTop="@dimen/activity_vertical_margin"
    tools:context=".MainActivity" >

    <com.fyfeng.listviewtest.MyListView
        android:id="@+id/listview"
        android:layout_width="fill_parent"
        android:layout_height="fill_parent" >
    </com.fyfeng.listviewtest.MyListView>

</RelativeLayout>
自定义的MyListView extends ListView
package com.fyfeng.listviewtest;

import android.content.Context;
import android.util.AttributeSet;
import android.util.Log;
import android.view.LayoutInflater;
import android.view.View;
import android.view.ViewGroup;
import android.widget.ListView;

public class MyListView extends ListView {

	private static final String tag = MyListView.class.getSimpleName();

	private int mHeaderWidth;
	private int mHeaderHeight;

	public MyListView(Context context) {
		super(context);
		this.init();
	}

	public MyListView(Context context, AttributeSet attrs, int defStyle) {
		super(context, attrs, defStyle);
		this.init();
	}

	public MyListView(Context context, AttributeSet attrs) {
		super(context, attrs);
		this.init();
	}

	private void init() {
		LayoutInflater lif = (LayoutInflater) this.getContext().getSystemService(Context.LAYOUT_INFLATER_SERVICE);
		View header = lif.inflate(R.layout.header, null);

		this.addHeaderView(header);

		measureView(header);
		mHeaderWidth = header.getMeasuredWidth();
		mHeaderHeight = header.getMeasuredHeight();
		Log.d(tag, "header width = " + mHeaderWidth + ", height = " + mHeaderHeight);

	}

	// 计算headView的width及height值
	private void measureView(View child) {

		ViewGroup.LayoutParams p = child.getLayoutParams();

		if (p == null) {
			p = new ViewGroup.LayoutParams(ViewGroup.LayoutParams.FILL_PARENT, ViewGroup.LayoutParams.WRAP_CONTENT);
		}

		int childWidthSpec = ViewGroup.getChildMeasureSpec(0, 0 + 0, p.width);
		int lpHeight = p.height;
		int childHeightSpec;

		if (lpHeight > 0) {
			childHeightSpec = MeasureSpec.makeMeasureSpec(lpHeight, MeasureSpec.EXACTLY);
		} else {
			childHeightSpec = MeasureSpec.makeMeasureSpec(0, MeasureSpec.UNSPECIFIED);
		}

		child.measure(childWidthSpec, childHeightSpec);
	}
}
private void measureView(View child) ;这个方法是直接从osc客户端源码里拷贝过来的。
ListView的headerView配置header.xml:
<?xml version="1.0" encoding="utf-8"?>
<RelativeLayout xmlns:android="http://schemas.android.com/apk/res/android"
    android:layout_width="fill_parent"
    android:layout_height="fill_parent" >

    <TextView
        android:layout_width="wrap_content"
        android:layout_height="wrap_content"
        android:text="@string/hello_world"
        />

</RelativeLayout>
初始化完这个header布局后,调用measureView(View child)方法就会报空指针异常:
08-13 23:27:37.007: D/AndroidRuntime(1337): Shutting down VM
08-13 23:27:37.007: W/dalvikvm(1337): threadid=3: thread exiting with uncaught exception (group=0x4001aa28)
08-13 23:27:37.007: E/AndroidRuntime(1337): Uncaught handler: thread main exiting due to uncaught exception
08-13 23:27:37.017: E/AndroidRuntime(1337): java.lang.RuntimeException: Unable to start activity ComponentInfo{com.fyfeng.listviewtest/com.fyfeng.listviewtest.MainActivity}: android.view.InflateException: Binary XML file line #12: Error inflating class java.lang.reflect.Constructor
08-13 23:27:37.017: E/AndroidRuntime(1337): at android.app.ActivityThread.performLaunchActivity(ActivityThread.java:2401)
08-13 23:27:37.017: E/AndroidRuntime(1337): at android.app.ActivityThread.handleLaunchActivity(ActivityThread.java:2417)
08-13 23:27:37.017: E/AndroidRuntime(1337): at android.app.ActivityThread.access$2100(ActivityThread.java:116)
08-13 23:27:37.017: E/AndroidRuntime(1337): at android.app.ActivityThread$H.handleMessage(ActivityThread.java:1794)
08-13 23:27:37.017: E/AndroidRuntime(1337): at android.os.Handler.dispatchMessage(Handler.java:99)
08-13 23:27:37.017: E/AndroidRuntime(1337): at android.os.Looper.loop(Looper.java:123)
08-13 23:27:37.017: E/AndroidRuntime(1337): at android.app.ActivityThread.main(ActivityThread.java:4203)
08-13 23:27:37.017: E/AndroidRuntime(1337): at java.lang.reflect.Method.invokeNative(Native Method)
08-13 23:27:37.017: E/AndroidRuntime(1337): at java.lang.reflect.Method.invoke(Method.java:521)
08-13 23:27:37.017: E/AndroidRuntime(1337): at com.android.internal.os.ZygoteInit$MethodAndArgsCaller.run(ZygoteInit.java:791)
08-13 23:27:37.017: E/AndroidRuntime(1337): at com.android.internal.os.ZygoteInit.main(ZygoteInit.java:549)
08-13 23:27:37.017: E/AndroidRuntime(1337): at dalvik.system.NativeStart.main(Native Method)
08-13 23:27:37.017: E/AndroidRuntime(1337): Caused by: android.view.InflateException: Binary XML file line #12: Error inflating class java.lang.reflect.Constructor
08-13 23:27:37.017: E/AndroidRuntime(1337): at android.view.LayoutInflater.createView(LayoutInflater.java:512)
08-13 23:27:37.017: E/AndroidRuntime(1337): at android.view.LayoutInflater.createViewFromTag(LayoutInflater.java:564)
08-13 23:27:37.017: E/AndroidRuntime(1337): at android.view.LayoutInflater.rInflate(LayoutInflater.java:617)
08-13 23:27:37.017: E/AndroidRuntime(1337): at android.view.LayoutInflater.inflate(LayoutInflater.java:407)
08-13 23:27:37.017: E/AndroidRuntime(1337): at android.view.LayoutInflater.inflate(LayoutInflater.java:320)
08-13 23:27:37.017: E/AndroidRuntime(1337): at android.view.LayoutInflater.inflate(LayoutInflater.java:276)
08-13 23:27:37.017: E/AndroidRuntime(1337): at com.android.internal.policy.impl.PhoneWindow.setContentView(PhoneWindow.java:313)
08-13 23:27:37.017: E/AndroidRuntime(1337): at android.app.Activity.setContentView(Activity.java:1620)
08-13 23:27:37.017: E/AndroidRuntime(1337): at com.fyfeng.listviewtest.MainActivity.onCreate(MainActivity.java:20)
08-13 23:27:37.017: E/AndroidRuntime(1337): at android.app.Instrumentation.callActivityOnCreate(Instrumentation.java:1123)
08-13 23:27:37.017: E/AndroidRuntime(1337): at android.app.ActivityThread.performLaunchActivity(ActivityThread.java:2364)
08-13 23:27:37.017: E/AndroidRuntime(1337): ... 11 more
08-13 23:27:37.017: E/AndroidRuntime(1337): Caused by: java.lang.reflect.InvocationTargetException
08-13 23:27:37.017: E/AndroidRuntime(1337): at com.fyfeng.listviewtest.MyListView.<init>(MyListView.java:30)
08-13 23:27:37.017: E/AndroidRuntime(1337): at java.lang.reflect.Constructor.constructNative(Native Method)
08-13 23:27:37.017: E/AndroidRuntime(1337): at java.lang.reflect.Constructor.newInstance(Constructor.java:446)
08-13 23:27:37.017: E/AndroidRuntime(1337): at android.view.LayoutInflater.createView(LayoutInflater.java:499)
08-13 23:27:37.017: E/AndroidRuntime(1337): ... 21 more
08-13 23:27:37.017: E/AndroidRuntime(1337): Caused by: java.lang.NullPointerException
08-13 23:27:37.017: E/AndroidRuntime(1337): at android.widget.RelativeLayout.onMeasure(RelativeLayout.java:427)
08-13 23:27:37.017: E/AndroidRuntime(1337): at android.view.View.measure(View.java:7703)
08-13 23:27:37.017: E/AndroidRuntime(1337): at com.fyfeng.listviewtest.MyListView.measureView(MyListView.java:65)
08-13 23:27:37.017: E/AndroidRuntime(1337): at com.fyfeng.listviewtest.MyListView.init(MyListView.java:39)
08-13 23:27:37.017: E/AndroidRuntime(1337): ... 25 more
08-13 23:27:37.027: I/dalvikvm(1337): threadid=7: reacting to signal 3
08-13 23:27:37.027: E/dalvikvm(1337): Unable to open stack trace file ''/data/anr/traces.txt'': Permission denied
如果把header.xml中的RelativeLayout改为LinearLayout一切正常,能够获取宽和高。
谁遇到这种问题?有解的赐教一下。

android LinearLayout
LinearLayout 是线性布局控件,它包含的子控件将以横向或竖向的方式排列,按照相对位置来排列所有的 widgets 或者其他的 containers, 超过边界时,某些控件将缺失或消失。因此一个垂直列表的每一行只会有一个 widget 或者是 container,而不管他们有多宽,而一个水平列表将会只有一个行高(高度为最高子控件的高度加上边框高度)。LinearLayout 保持其所包含的 widget 或者是 container 之间的间隔以及互相对齐(相对一个控件的右对齐、中间对齐或者左对齐)。
xml属性

android:baselineAligned;//是否允许用户调整它内容的基线。

android:baselineAlignedChildIndex;//当一个线性布局与另一个布局是按基线对齐的一部分,它可以指定其内容的基线对齐方式。

android:gravity;//指定如何在该对象中放置此对象的内容(x/y坐标值)。

android:orientation:设置它内容的对其方向(横向/竖向)。<?xml version="1.0" encoding="utf-8"?>
<LinearLayout
xmlns:android="http://schemas.android.com/apk/res/android"
android:orientation="vertical"
android:layout_width="fill_parent"
android:layout_height="fill_parent"
android:gravity="center_horizontal">
<!--
android:orientation="vertical" 表示竖直方式对齐
android:orientation="horizontal"表示水平方式对齐
android:layout_width="fill_parent"定义当前视图在屏幕上 可以消费的宽度,fill_parent即填充整个屏幕。
android:layout_height="wrap_content":随着文字栏位的不同
而改变这个视图的宽度或者高度。有点自动设置框度或者高度的意思
layout_weight 用于给一个线性布局中的诸多视图的重要度赋值。
所有的视图都有一个layout_weight值,默认为零,意思是需要显示
多大的视图就占据多大的屏幕空 间。若赋一个高于零的值,则将父视
图中的可用空间分割,分割大小具体取决于每一个视图的
layout_weight 值以及该值在当前屏幕布局的整体
layout_weight值和在其它视图屏幕布 局的layout_weight值中所占的比率而定。
举个例子:比如说我们在 水平方向上有一个文本标签和两个文本编辑元素。
该文本标签并无指定layout_weight值,所以它将占据需要提供的最少空间。
如果两个文本编辑元素每一个的layout_weight值都设置为1,则两者平分
在父视图布局剩余的宽度(因为我们声明这两者的重要度相等)。如果两个
文本编辑元素其中第一个的layout_weight值设置为1,而第二个的设置为2,
则剩余空间的三分之二分给第一个,三分之一分给第二个(数值越小,重要 度越高)。
-->
<TextView
android:layout_width="wrap_content"
android:layout_height="wrap_content"
android:text="BB"
/>
<TextView
android:layout_width="wrap_content"
android:layout_height="wrap_content"
android:text="BB"
/>
</LinearLayout>需要注意的是 LinearLayout 布局不会换行:当组件排到容器尽头时,其余的组件将不会被显示。
先明确几个概念的区别:
padding margin 都是边距的含义,关键问题得明白是什么相对什么的边距.
padding 是控件的内容相对控件的边缘的边距.
margin 是控件边缘相对父空间的边距.

android:gravity 属性是对该 view 内容的限定.比如一个 button 上面的 text. 你可以设置该 text 在 view 的靠左,靠右等位置.该属性就干了这个.
android:layout_gravity 是用来设置该 view 中的子 view 相对于父 view 的位置.比如一个 button 在 linearlayout 里,你想把该 button 放在靠左,靠右等位置就可以在 linearlayout 中通过该属性设置.
二:属性效果:
<?xml version="1.0" encoding="utf-8"?>
<LinearLayout android:id="@+id/custom_titlebar"
xmlns:android="http://schemas.android.com/apk/res/android"
android:orientation="horizontal"
android:layout_width="fill_parent"
android:layout_height="wrap_content">
<Button
    android:id="@+id/imageViewLoginState"
	android:layout_width="fill_parent"
	android:layout_height="fill_parent"
	android:layout_weight="1"
	android:text="1">
    </Button>
<Button
    android:id="@+id/imageViewLoginState1"
	android:layout_width="fill_parent"
	android:layout_height="fill_parent"
	android:layout_weight="2"
	android:text="2"
	>
</Button>
</LinearLayout> 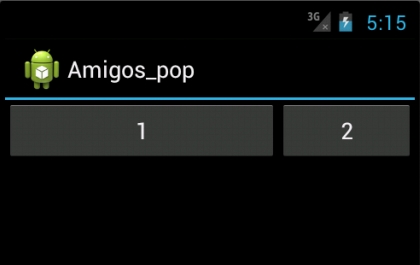
二:接下来看一下 android:layout_width 属性:
这里测试的是垂直布局 android:orientation="vertical",所以针对组件的 android:layout_height 属性;如果测试的水平布局,则需针对组件的 android:layout_width 属性。
1. android:layout_height="fill_parent"
设置 :TextView_one 属性 android:layout_weight="1"
TextView_Two 属性 android:layout_weight="3"
效果:

接下来我们只是设置一下 1. android:layout_height="wrap_content",其他属性不变
运行效果:


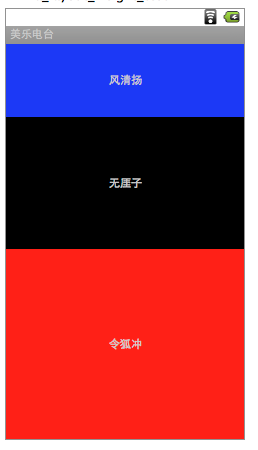
Android linearLayout 之 layout_weight 揭秘
<?xml version="1.0" encoding="utf-8"?>
<LinearLayout xmlns:android="http://schemas.android.com/apk/res/android"
              android:layout_width="fill_parent"
              android:layout_height="fill_parent"
              android:orientation="vertical"
              android:layout_gravity="center">
    <TextView android:layout_width="fill_parent"
              android:layout_height="wrap_content"
              android:text="风清扬"
              android:gravity="center"
              android:layout_weight="1.0"
              android:background="@color/blue"/>
    <TextView android:layout_width="fill_parent"
              android:layout_height="wrap_content"
              android:text="无厓子"
              android:gravity="center"
              android:layout_weight="2.0"/>
    <TextView android:layout_width="fill_parent"
              android:layout_height="wrap_content"
              android:text="令狐冲"
              android:gravity="center"
              android:layout_weight="3.0"
              android:background="@color/red"/>
</LinearLayout>
结果如下图:
关于Androi Studio 之 LinearLayout的问题就给大家分享到这里,感谢你花时间阅读本站内容,更多关于:java.lang.ClassCastException: android.widget.LinearLayout$LayoutParams cannot be cast to androi...、Android LayoutInflater初始化RelativeLayout和LinearLayout的问题。、android LinearLayout、Android linearLayout 之 layout_weight 揭秘等相关知识的信息别忘了在本站进行查找喔。
本文标签:


![[转帖]Ubuntu 安装 Wine方法(ubuntu如何安装wine)](https://www.gvkun.com/zb_users/cache/thumbs/4c83df0e2303284d68480d1b1378581d-180-120-1.jpg)

