在本文中,我们将为您详细介绍Centos7中修改sshd端口的相关知识,并且为您解答关于centos7.3修改ssh端口的疑问,此外,我们还会提供一些关于CentOs6.5设置使用私钥登录关闭ssh的
在本文中,我们将为您详细介绍Centos7 中修改sshd端口的相关知识,并且为您解答关于centos7.3修改ssh端口的疑问,此外,我们还会提供一些关于CentOs 6.5设置使用私钥登录关闭ssh的密码登录修改ssh默认端口、centos 7 修改 sshd | 禁止 root 登录及 sshd 端口脚本定义、centos 7 修改sshd | 禁止 root登录及sshd端口脚本定义、centos 7 修改ssh登录端口的有用信息。
本文目录一览:- Centos7 中修改sshd端口(centos7.3修改ssh端口)
- CentOs 6.5设置使用私钥登录关闭ssh的密码登录修改ssh默认端口
- centos 7 修改 sshd | 禁止 root 登录及 sshd 端口脚本定义
- centos 7 修改sshd | 禁止 root登录及sshd端口脚本定义
- centos 7 修改ssh登录端口
")
Centos7 中修改sshd端口(centos7.3修改ssh端口)
日常工作中为了安全起见我们经常修改ssh默认端口 默认都为22
首先向centos5/6 一样 进去sshd服务的配置文件
-
vi /etc/ssh/sshd_config
找到#Port 22 去掉# 把22改成你想要的 我改成Port 2000 然后保存
2.重启sshd服务
systemctl restart sshd.service
3.semanage port -a -t ssh_port_t -p tcp 3333
将2000端口添加到SELinux
systemctl status sshd.service 可查看sshd 服务端口状态
4. 关闭selinux 服务
在远程主机测试 telnet [ip] [port]即可
ssh test@192.168.100.100 -p 2000
test@192.168.100.100's password:
输入密码即可访问

CentOs 6.5设置使用私钥登录关闭ssh的密码登录修改ssh默认端口
使用SecureCRT工具创建RSA公钥和私钥
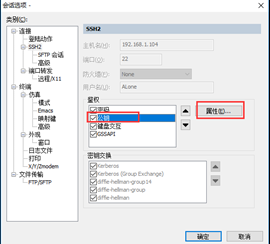
【选项】=》【会话选项】

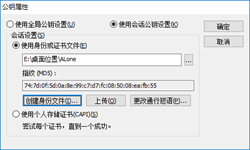
然后在弹出对话框中选择【公钥】然后点击【属性】:
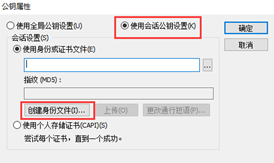
在弹出窗口中选中【使用会话公钥设置】,点击【创建身份文件】按钮:
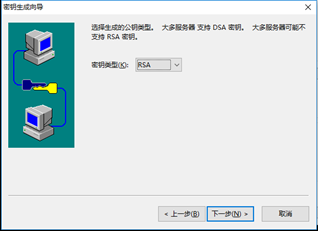
然后下面是进行密钥设置向导,按照如图设置,然后点击下一步:

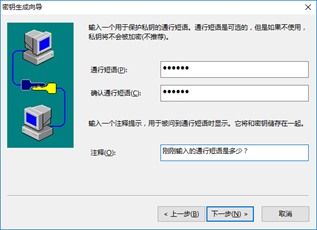
关于这里的【通行短语】和【注释】可以不同填写,但是如果【通行短语】设置了的话,那么需要记住,因为第一次登录会被使用到:

这里选择公钥和私钥文件的保存路径

下面是提示是否需要上传密钥信息,这里我们选择【否】,我们自己手工上传:
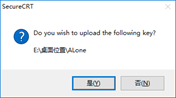
然后我们点击确定按钮:
上传公钥
#下面的做法是在用户的用户目录中建立一个.ssh(前面用了.表示是隐藏目录)目录,在目录中添加一个authorized_keys文件,将刚刚生成的.pub后缀的文件内容粘贴到authorized_keys文件中。设置这个authorized_keys文件的权限设置成600,而将.ssh的目录权限设置成700。
[root@localhost ~]# cd /home/ALone
[root@localhost ALone]# mkdir .ssh
[root@localhost ALone]# chmod 700 .ssh
[root@localhost ALone]# cd .ssh
[root@localhost .ssh]# vim authorized_keys
[root@localhost .ssh]# chmod 600 authorized_keys
[root@localhost .ssh]# ls -ld ../.ssh authorized_keys
-rw-------. 1 root root  381 Dec 24 09:53 authorized_keys
drwx------. 2 root root 4096 Dec 24 09:53 ../.ssh
#这里我们需要将公钥和.ssh目录的所有者和所属组设置成ALone,否则就会出现无法连接的情况
[root@localhost .ssh]# chgrp ALone authorized_keys ../.ssh
[root@localhost .ssh]# chown ALone authorized_keys ../.ssh
[root@localhost .ssh]# ls -ld ../.ssh authorized_keys
-rw-------. 1 ALone ALone  381 Dec 24 09:26 authorized_keys
drwx------. 2 ALone ALone 4096 Dec 24 09:26 ../.ssh
设置允许使用密钥登录
[root@localhost .ssh]# vim /etc/ssh/sshd_config
#来到47行将下面三行内容前面的井号去掉
#RSAAuthentication yes
#PubkeyAuthentication yes
#AuthorizedKeysFile .ssh/authorized_keys
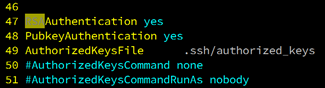
对于这个位置,原本是注释掉了,发现如果没有将注释去掉还是可以使用密钥登录的,但是如果将上面的注释去掉并且将yes修改成no,那么就不能密钥登录了。登录的时候会得到下面内容:

设置禁止通过密码登录ssh
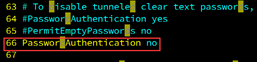
#禁止掉密码登录,编辑vim /etc/ssh/sshd_config文件来到66行,将PasswordAuthentication中的yes设置成no:
修改ssh的默认连接端口
#修改SSH的默认连接端口,编辑vim /etc/ssh/sshd_config文件来到13行,将Port前面的井号去掉,然后将后面的22修改成自己想要的端口号:

#接着我们需要将这个端口加入iptables中
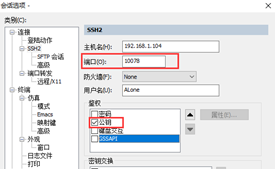
[root@localhost .ssh]# iptables -I INPUT -p tcp --dport 10078 -j ACCEPT禁止root用户远程登录
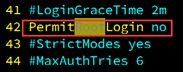
编辑vim /etc/ssh/sshd_config文件,来到45行中将PermitRootLogin一行注释去掉,并且将yes修改成no,这里发现如果PermitRootLogin值没有明确设置成no(就是注释掉或者没有注释掉而值设置成yes)都是允许root用户登录的。
在对于上面/etc/ssh/sshd_config文件的修改后需要保存文件,然后平滑重启ssh服务
[root@localhost .ssh]# /etc/init.d/sshd reload

centos 7 修改 sshd | 禁止 root 登录及 sshd 端口脚本定义
1. 新建用户 wwweee000
[root@localhost ~]# useradd wwweee000
[root@localhost ~]# passwd wwweee000
Changing password for user wwweee000.
New password:
BAD PASSWORD: The password is a palindrome
Retype new password:
passwd: all authentication tokens updated successfully.2.#Port 22字段删掉,将22改为其他不被使用的端口,服务器端口最大可以开到65536.//注意Port是大写的"P"
[root@localhost ~]# cat -n /etc/ssh/sshd_config|grep "Port *"
    17  #Port 22
   100  #GatewayPorts no
[root@localhost ~]# cat /etc/ssh/sshd_config|grep -n "Port *"
17:#Port 22
100:#GatewayPorts no
[root@localhost ~]# awk "/Port */" /etc/ssh/sshd_config
#Port 22
#GatewayPorts no
上面还是不能满足输出结果:我们只要 Port 22 的答案.
[root@localhost ~]# cat /etc/ssh/sshd_config|grep -n "Port\ "
17:#Port 22
[root@localhost ~]# cat -n /etc/ssh/sshd_config|grep "Port\ "
    17  #Port 22
[root@localhost ~]# cat /etc/ssh/sshd_config|grep -n "Port\ "
17:#Port 22
[root@localhost ~]# awk "/Port\ /" /etc/ssh/sshd_config
#Port 22
[root@localhost ~]# sed -i "17s/#Port 22/Port 22/g" /etc/ssh/sshd_config
[root@localhost ~]# awk "/Port\ /" /etc/ssh/sshd_config
Port 22
-n 显示行号;\ 反斜杠实质定义
3. 不使用 vi/vim 进行修改 Port 22 为 4096
[root@localhost ~]# sed -i "17s/Port 22/Port 4096/g" /etc/ssh/sshd_config
[root@localhost ~]# cat /etc/ssh/sshd_config|grep "Port\ "
Port 4096
4. 修改 #PermitRootLogin yes 为 PermitRootLogin no
[root@localhost ~]# cat -n /etc/ssh/sshd_config|grep "PermitRootLogin"
    49  #PermitRootLogin yes
   104  # the setting of "PermitRootLogin without-password".
[root@localhost ~]# sed -i "49s/#PermitRootLogin yes/PermitRootLogin no/g" /etc/ssh/sshd_config
[root@localhost ~]# cat -n /etc/ssh/sshd_config|grep "PermitRootLogin no"
    49  PermitRootLogin no
5. 重启 sshd 服务
[root@localhost ~]# systemctl restart sshd.service6. 使用 wwweee000 用户登录变化
[wwweee000@localhost ~]$user 普通用户不能编辑 /etc/ssh/sshd_config,需要切换 root 才能编辑,切换 root 命令 : su
7.root 进行运行,编写 shell 脚本。// 脚本通用 centos 7 (主要:sshd_config 端口号定义输入对 root 登录禁止)
#!/bin/bash
sshd_Port=`cat /etc/ssh/sshd_config|grep "Port\ "`
echo "  当前sshd端口:$sshd_Port"
read -ep "  请输入sshd服务的连接端口Port (1-65536);
  请确保其他端口冲突和防火墙端口开放业务:" sshd_Port_read
echo "  你输入的端口号:$sshd_Port_read"
sed -i "s/$sshd_Port/Port $sshd_Port_read/g" /etc/ssh/sshd_config
echo "  已经设置端口为:`cat /etc/ssh/sshd_config|grep "Port\ "`"
sed -i "s/#PermitRootLogin yes/PermitRootLogin no/g" /etc/ssh/sshd_config
systemctl restart sshd.service
exit 0
运行测试(可循环使用)本次防火墙关闭 / 生产服务器都是关闭防火墙的
[root@localhost wwweee000]# firewall-cmd --state
not running
[root@localhost ~]# sh sshd_config_Port.sh
当前sshd端口:Port 22
请输入sshd服务的连接端口Port (1-65536)
请确保其他端口冲突和防火墙端口开放业务:4096
你输入的端口号:4096
已经设置端口为:Port 4096
centos 7 修改sshd | 禁止 root登录及sshd端口脚本定义
1.新建用户wwweee000
[root@localhost ~]# useradd wwweee000
[root@localhost ~]# passwd wwweee000
Changing password for user wwweee000.
New password:
BAD PASSWORD: The password is a palindrome
Retype new password:
passwd: all authentication tokens updated successfully.
2.#Port 22字段删掉,将22改为其他不被使用的端口,服务器端口最大可以开到65536.//注意Port是大写的"P"
[root@localhost ~]# cat -n /etc/ssh/sshd_config|grep "Port *"
  17 #Port 22
  100 #GatewayPorts no
[root@localhost ~]# cat /etc/ssh/sshd_config|grep -n "Port *"
17:#Port 22
100:#GatewayPorts no
[root@localhost ~]# awk "/Port */" /etc/ssh/sshd_config
#Port 22
#GatewayPorts no
上面还是不能满足输出结果:我们只要Port 22的答案.
[root@localhost ~]# cat /etc/ssh/sshd_config|grep -n "Port\ "
17:#Port 22
[root@localhost ~]# cat -n /etc/ssh/sshd_config|grep "Port\ "
  17 #Port 22
[root@localhost ~]# cat /etc/ssh/sshd_config|grep -n "Port\ "
17:#Port 22
[root@localhost ~]# awk "/Port\ /" /etc/ssh/sshd_config
#Port 22
[root@localhost ~]# sed -i "17s/#Port 22/Port 22/g" /etc/ssh/sshd_config
[root@localhost ~]# awk "/Port\ /" /etc/ssh/sshd_config
Port 22
-n显示行号;\反斜杠实质定义
3.不使用vi/vim进行修改Port 22 为 4096
[root@localhost ~]# sed -i "17s/Port 22/Port 4096/g" /etc/ssh/sshd_config
[root@localhost ~]# cat /etc/ssh/sshd_config|grep "Port\ "
Port 4096
4.修改 #PermitRootLogin yes 为 PermitRootLogin no
[root@localhost ~]# cat -n /etc/ssh/sshd_config|grep "PermitRootLogin"
  49 #PermitRootLogin yes
  104 # the setting of "PermitRootLogin without-password".
[root@localhost ~]# sed -i "49s/#PermitRootLogin yes/PermitRootLogin no/g" /etc/ssh/sshd_config
[root@localhost ~]# cat -n /etc/ssh/sshd_config|grep "PermitRootLogin no"
  49 PermitRootLogin no
5.重启sshd服务
[root@localhost ~]# systemctl restart sshd.service
6.使用 wwweee000 用户登录变化
[wwweee000@localhost ~]$
user普通用户不能编辑/etc/ssh/sshd_config,需要切换root才能编辑,切换root命令 : su
7.root进行运行,编写shell脚本。//脚本通用centos 7 (主要:sshd_config端口号定义输入对root登录禁止)
#!/bin/bash
sshd_Port=`cat /etc/ssh/sshd_config|grep "Port\ "`
echo "  当前sshd端口:$sshd_Port"
read -ep "  请输入sshd服务的连接端口Port (1-65536);
  请确保其他端口冲突和防火墙端口开放业务:" sshd_Port_read
echo "  你输入的端口号:$sshd_Port_read"
sed -i "s/$sshd_Port/Port $sshd_Port_read/g" /etc/ssh/sshd_config
echo "  已经设置端口为:`cat /etc/ssh/sshd_config|grep "Port\ "`"
sed -i "s/#PermitRootLogin yes/PermitRootLogin no/g" /etc/ssh/sshd_config
systemctl restart sshd.service
exit 0
运行测试(可循环使用)本次防火墙关闭/生产服务器都是关闭防火墙的
[root@localhost wwweee000]# firewall-cmd --state
not running
[root@localhost ~]# sh sshd_config_Port.sh
  当前sshd端口:Port 22
  请输入sshd服务的连接端口Port (1-65536)
  请确保其他端口冲突和防火墙端口开放业务:4096
  你输入的端口号:4096
  已经设置端口为:Port 4096
总结
以上所述是小编给大家介绍的centos 7 修改sshd | 禁止 root登录及sshd端口脚本定义,希望对大家有所帮助,如果大家有任何疑问请给我留言,小编会及时回复大家的。在此也非常感谢大家对网站的支持!
如果你觉得本文对你有帮助,欢迎转载,烦请注明出处,谢谢!
- centos7 设置grub密码及单用户登录实例代码
- Centos7下用户登录失败N次后锁定用户禁止登陆的方法
- CentOS7如何修改SSH登录端口
- Redhat 7/CentOS 7 SSH 免密登录的方法
- CentOS 7 sshd 链接被拒绝问题解决办法

centos 7 修改ssh登录端口
2018-10-11
切换到iptables首先应该关掉默认的firewalld,然后安装iptables服务
1、关闭firewall:
service firewalld stop
systemctl disable firewalld.service #禁止firewall开机启动
2、安装iptables防火墙
yum install iptables-services -y#安装3、编辑iptables防火墙配置
vi /etc/sysconfig/iptables #编辑防火墙配置文件下边是一个完整的配置文件:
Firewall configuration written by system-config-firewall

Manual customization of this file is not recommended.

*filter

:INPUT ACCEPT [0:0]

:FORWARD ACCEPT [0:0]

:OUTPUT ACCEPT [0:0]

-A INPUT -m state --state ESTABLISHED,RELATED -j ACCEPT

-A INPUT -p icmp -j ACCEPT

-A INPUT -i lo -j ACCEPT

-A INPUT -m state --state NEW -m tcp -p tcp --dport 10999 -j ACCEPT (10999是修改的ssh端口)-A INPUT -j REJECT --reject-with icmp-host-prohibited

-A FORWARD -j REJECT --reject-with icmp-host-prohibited

COMMIT
:wq! #保存退出
service iptables start #开启
systemctl enable iptables.service #设置防火墙开机启动
4、修改ssh默认端口
vi /etc/ssh/sshd_config

Port 10999 #将注释打开,并且将默认的端口22修改为需要的端口号
#AddressFamily any
#ListenAddress 0.0.0.0
#ListenAddress ::
重启ssh服务
systemctl restart sshd完成之后即可使用修改之后的端口登录服务器
关于Centos7 中修改sshd端口和centos7.3修改ssh端口的介绍现已完结,谢谢您的耐心阅读,如果想了解更多关于CentOs 6.5设置使用私钥登录关闭ssh的密码登录修改ssh默认端口、centos 7 修改 sshd | 禁止 root 登录及 sshd 端口脚本定义、centos 7 修改sshd | 禁止 root登录及sshd端口脚本定义、centos 7 修改ssh登录端口的相关知识,请在本站寻找。
本文标签:


