想了解CentOS7使用rsync实现数据备份的新动态吗?本文将为您提供详细的信息,我们还将为您解答关于centos7rsync配置的相关问题,此外,我们还将为您介绍关于3.0rsync数据备份、Ce
想了解CentOS 7使用rsync实现数据备份的新动态吗?本文将为您提供详细的信息,我们还将为您解答关于centos7 rsync配置的相关问题,此外,我们还将为您介绍关于3.0 rsync数据备份、CentOS 6.3 Rsync客户端与Win2003 cwRsyncServer服务端实现数据同步、CentOS 6.3 Rsync服务端与Debian 6.0.5 Rsync客户端实现数据同步、CentOS 6.5 Rsync+sersync 实现数据实时同步备份的新知识。
本文目录一览:- CentOS 7使用rsync实现数据备份(centos7 rsync配置)
- 3.0 rsync数据备份
- CentOS 6.3 Rsync客户端与Win2003 cwRsyncServer服务端实现数据同步
- CentOS 6.3 Rsync服务端与Debian 6.0.5 Rsync客户端实现数据同步
- CentOS 6.5 Rsync+sersync 实现数据实时同步备份
")
CentOS 7使用rsync实现数据备份(centos7 rsync配置)
一、rsync是什么
在开始正式学习 rsync 之前,我们先来回答这个问题:rsync 是什么。
rsync(remote synchronize)是 Liunx/Unix 下的一个远程数据同步工具。它可通过 LAN/WAN 快速同步多台主机间的文件和目录,并适当利用 rsync 算法(差分编码)以减少数据的传输。rsync 算法并不是每一次都整份传输,而是只传输两个文件的不同部分,因此其传输速度相当快。除此之外,rsync 可拷贝、显示目录属性,以及拷贝文件,并可选择性的压缩以及递归拷贝。
二、rsync优点
rsync有以下几个优点: >* 可以镜像保存整个目录树和文件系统。 * 可以很容易做到保持原来文件的权限、时间、软硬连接等。 * 无需特殊权限即可安装。 * 拥有优化的流程和比较高的文件传输效率。 * 可以使用shell(rsh、ssh)方式来传输文件。 * 支持匿名运行。
与 scp 相比,rsync 传输速度绝对远远超过 scp 的传输速度。
我们在局域网中经常用 rsync 和 scp 传输大量 MysqL 数据库文件,发现 rsync 传输文件速度至少要比 scp 快 20 倍以上。
所以如果需要在 Liunx/Unix 服务器之间互传海量数据时,建议选择 rsync 进行传输。
三、运行模式(服务器)
rsync 有两种常用的认证方式,一种是 rsync-daemon 方式,另外一种是 ssh 方式(类似于 scp)。在平时使用过程,我们使用最多的是 rsync-daemon 方式。
这种模式是基于 C/S 模式的,在这种模式下,rsync 在后台启用了一个守护进程,这个守护进程在 rsync 服务器永久运行,用于接收请求传输文件,因此,客户端既可以把文件推送( push )给守护进程,也可以向守护进程拉取( pull )文件。rsync 的服务器模式非常适合为异地的中心备份服务器或数据异地存储库来使用。
案例介绍: 我们使用 pull 模式,我们有多个应用的服务器作为服务端,备份服务器作为客户端,备份服务器向每个应用服务器拉取需要备份的数据,放到相应的目录下面。
四、安装配置 rsync
1、安装 rsync
为了简便,我们这里直接使用 yum 进行安装即可。
yum install rsync -y
2、配置 rsync 服务端(应用服务器)
我们有一台云盘的服务器,IP为 10.0.2.15,我们在这台服务器上面进行服务端的配置,我们需要备份的路径为 /data/nextcloud,首先进行配置文件的设定,配置的详细解释在文中最后有介绍,我们设置的如下:
# cat /etc/rsyncd.conf

uid = root
gid = root
use chroot = yes
max connections = 10
pid file = /var/run/rsyncd.pid
log file = /var/log/rsync.log
transfer logging = yes
timeout = 900
ignore nonreadable = yes
dont compress = *.gz *.tgz *.zip *.z *.Z *.rpm *.deb *.bz2

[nextcloud]
path = /data/nextcloud
comment = pan.wzlinux.com
read only = yes
write only = no
hosts allow = 10.0.2.30
list = no
ignore errors
auth users = backup
secrets file = /etc/rsyncd.pass
增加密码认证文件:
# cat /etc/rsyncd.pass

backup:123456     #具有拉取数据的账号密码
chmod 600 /etc/rsyncd.pass
启动服务器:
systemctl start rsyncd.service
3、配置 rsync 客户端(备份服务器)
配置密码认证文件,这里只需配置密码即可,账号我们会在命令里面指定:
# cat /etc/rsyncd.pass
123456

# chmod 600 /etc/rsyncd.pass
4、进行数据拉取测试
我们在备份服务器上面同样安装 rsync,然后进行如下指令进行数据拉取:
rsync -vzrtopg --delete --progress --password-file=/etc/rsyncd.pass backup@10.0.2.15::nextcloud /data/10.0.2.15/nextcloud
>* v是“--verbose”显示详细输出模式 * z是“--compress”压缩模式 * r是“--recursive”以子目录递归模式 * t是“--times“用来保持文件信息时间 * o是”--owner“用来保持文件的属主信息 * p是”--perms“用来保持文件权限 * g是”--group“用来保持文件的属组 * --progress:用来显示数据镜像同步的过程 * --delete:指定以rsync服务器为基准进行数据镜像同步,也就是要保持rsync服务器端目录与客户端目录的完全一致 * --exclude:用于排除不需要文件传输的类型 * /date/10.0.2.15/nextcloud:用户指定备份文件在客户端机器上的存放路径
5、客户端添加定时任务
# crontab -l

# 10.0.2.15 backup
00 01 * * * root /usr/bin/rsync -vzrtopg --delete --progress --password-file=/etc/rsyncd.pass backup@10.0.2.15::nextcloud /data/10.0.2.15/nextcloud
6、CentOS 6启动方法
CentOS 6 服务模式的启动方法可以参照命令rsync --daemon --help查进行查看,我们使用如下:
rsync --daemon --config=/etc/rsyncd.conf &
附录:配置文件
以下是配置文件的一些参数讲解:
>pid file = /var/run/rsyncd.pid #进程 pid 文件所在位置 port = 873 #指定监听端口,默认是873,可以自己指定 address = 10.0.2.15 #服务器监听的IP地址,可省略 uid = root #守护进程所属的uid,默认是nobody,可能会碰到文件或目录权限问题,此处偷懒用的 root gid = root #守护进程的gid #chroot,即改变程序执行时所参考的根目录位置,在传输文件之前,服务器守护程序在将chroot 到文件系统中的目录中 #这样做的好处是可能保护系统被安装漏洞侵袭的可能。缺点是需要超级用户权限。另外对符号链接文件,将会排除在外 #也就是说,你在 rsync服务器上,如果有符号链接,你在备份服务器上运行客户端的同步数据时, #只会把符号链接名同步下来,并不会同步符号链接的内容 use chroot = yes read only = yes #只读选择,只让客户端从服务器上读取文件 write only = no #只写选择,只让客户端到服务器上写入 #允许访问的IP,可以指定单个IP,也可以指定整个网段,能提高安全性。 #格式是 ip 与 ip 之间、ip 和网段之间、网段和网段之间要用空格隔开; hosts allow = 192.168.1.0/255.255.255.0 10.0.1.0/255.255.255.0 max connections = 5 #客户端最多连接数 log file = /var/log/rsync.log #rsync 服务器的日志; transfer logging = yes #记录传输文件的日志 log format = %t %a %m %f %b #日志格式 syslog facility = local3 #日志级别 #通过该选项可以覆盖客户指定的IP超时时间。可以确保rsync服务器不会永远等待一个崩溃的客户端。 #超时单位为秒钟,0表示没有超时定义,这也是默认值。对于匿名rsync服务器来说,一个理想的数字是600。 timeout = 300 #模块定义 #主要是定义服务器哪个目录要被同步。 #每个模块都要以[name]形式。这个名字就是在 rsync 客户端看到的名字。 #但是服务器真正同步的数据是通过 path 指定的。可以依次创建多个模块。 #每个模块要指定认证用户、密码文件,但排除并不是必须的。 [nextcloud] #模块名,以下配置都属于此模块 path = /data/nextcloud #文件目录所在位置 list = no #当查看服务器上提供了哪些目录时是否列出来,no比较安全 ignore errors #忽略I/O错误 #指定由空格或逗号分隔的用户名列表,只有这些用户才允许连接该模块。这里的用户和系统用户没有任何关系,是 rsyncd.secrets 中的用户名! #如果"auth users"被设置,那么客户端发出对该模块的连接请求以后会被rsync请求challenged进行验证身份。 #这里使用的 challenge/response 认证协议。 #用户的名和密码以明文方式存放在"secrets file"选项指定的文件中。默认情况下无需密码就可以连接模块(也就是匿名方式)。 auth users = backup secrets file = /etc/rsyncd.pass #密码文件
参考文档:

3.0 rsync数据备份
#rsync -av 192.168.11.190: /tmp/1.txt   /tmp/
#rsync -av /tmp/1.txt   192.168.11.190:/tmp/
#rsync -av 192.168.11.190::aminglinux/123/1.txt    /tmp/
#rsync -av /tmp/1.txt   192.168.11.190::aminglinux/123/
CentOS 6.3 Rsync客户端与Win2003 cwRsyncServer服务端实现数据同步
说明:
1、cwRsyncServer服务端
系统:Windows Server 2003
IP地址:192.168.21.134
数据存放目录:D:\osyunwei
2、Rsync客户端
系统:CentOS 6.3
IP地址:192.168.21.132
同步的目录:/osyunwei
实现目的:
Rsync客户端每天凌晨3:00自动同步cwRsyncServer服务端D:\osyunwei目录中的数到/osyunwei目录
一、cwRsyncServer服务端配置
附件:
cwRsyncServer下载地址:
https://www.jb51.net/softs/55933.html
解压cwRsyncServer_4.0.3_Installer.zip,双击cwRsyncServer_4.0.3_Installer.exe

Next
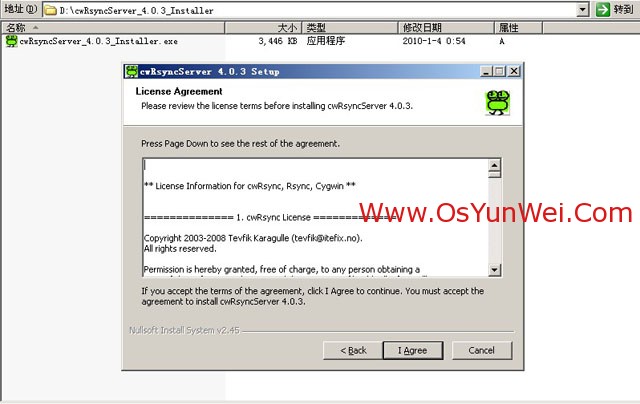
I Agre(同意)

安装路径,默认即可
Next

Service account:SvcCWRSYNC (新建的一个系统账户)
Type password:密码
Confirm password:密码
备注:系统会自动创建一个账户:SvcCWRSYNC来运行cwRsyncServer服务端程序
以上信息默认即可
Install (安装)

Close(关闭),安装完成
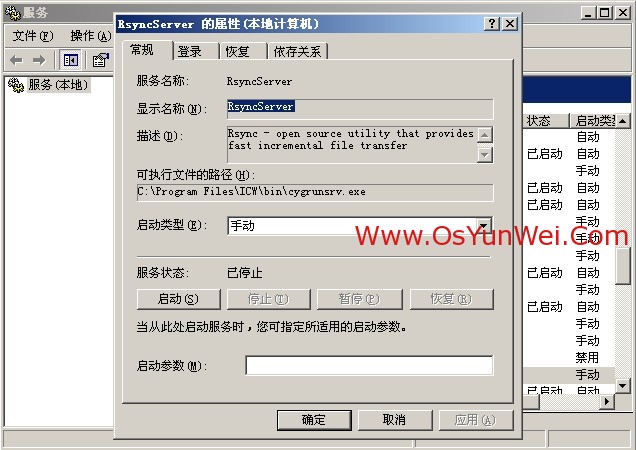
开始-设置-控制面板-管理工具-服务
找到RsyncSever选项,双击打开
启动类型:自动
点“启动”

应用-确定

打开D盘,右键单击osyunwei文件夹,选择属性,切换到安全选项,点添加
输入:SvcCWRSYNC
确定

允许所有权限
应用,确定
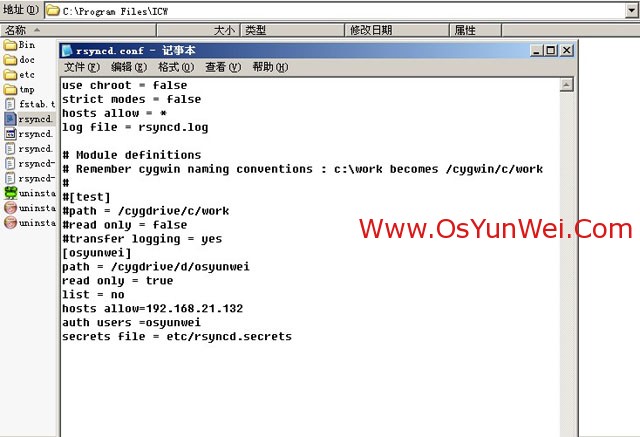
打开C:\Program Files\ICW目录
用记事本打开rsyncd.conf,修改添加以下内容(修改之前先备份文件为rsyncd.confbak)
use chroot = false
strict modes = false
hosts allow = *
log file = rsyncd.log
# Module definitions
# Remember cygwin naming conventions : c:\work becomes /cygwin/c/work
#
#[test]
#path = /cygdrive/c/work
#read only = false
#transfer logging = yes
[osyunwei]
path = /cygdrive/d/osyunwei
read only = true #客户端只读
list = no #不允许列出文件
hosts allow=192.168.21.132 #允许连接IP,多个IP中间用英文状态下逗号隔,不限制IP填写 *即可
auth users =osyunwei #允许连接的用户名
secrets file = etc/rsyncd.secrets #存放用户名密码的认证文件路径
修好完成之后,保存退出
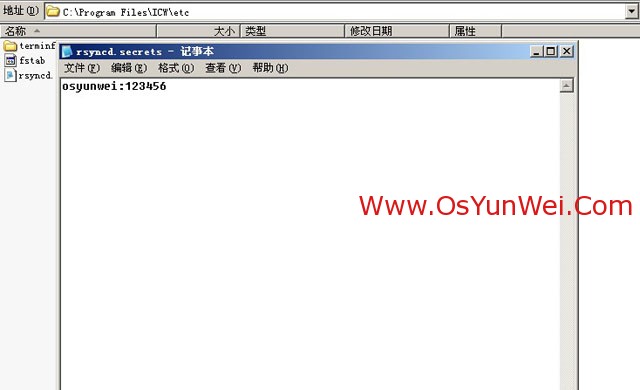
在C:\Program Files\ICW\etc目录下面新建rsyncd.secrets文件
用记事本打开,输入以下内容
osyunwei:123456 #用户名:密码
最后保存退出
cwRsyncServer服务端安装设置完成
二、Rsync客户端配置
1、关闭SELINUX
vi /etc/selinux/config
#SELINUX=enforcing #注释掉
#SELINUXTYPE=targeted #注释掉
SELINUX=disabled #增加
:wq #保存,退出
shutdown -r now #重启系统
2、开启防火墙tcp 873端口(Rsync默认端口,Rsync作为客户端是不需要开启防火墙端口的,这里开启,方便以后扩展作为服务端)
vi /etc/sysconfig/iptables #编辑防火墙配置文件
-A INPUT -m state --state NEW -m tcp -p tcp --dport 873 -j ACCEPT
:wq! #保存,退出
/etc/init.d/iptables restart #最后重启防火墙使配置生效
3、安装Rsync客户端软件
yum install rsync xinetd #安装,如下图所示,输入y安装

vi /etc/xinetd.d/rsync #编辑配置文件,设置开机启动rsync
把disable = yes 修改为
disable = no
:wq! #保存,退出
/etc/init.d/xinetd start #启动(CentOS中,Rsync是以xinetd来管理的)
4、测试Rsync客户端是否与cwRsyncServer服务端通信成功(cwRsyncServer服务端防火墙需要开启tcp 873端口)
yum install telnet #安装telnet测试工具
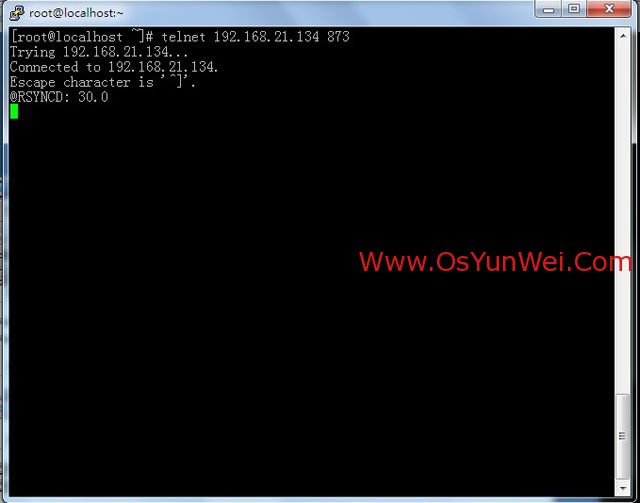
telnet 192.168.21.134 873 #输入命令后回车,如下图所示,表示通信成功
Rsync客户端安装设置完成
三、设置Rsync客户端与cwRsyncServer服务端同步数据(以下操作在Rsync客户端进行)
1、测试数据同步
在终端命令行输入
rsync -vzrtopg --port=873 --progress --delete

提示输入密码:123456
注意:此处的密码为cwRsyncServer服务端C:\Program Files\ICW\etc\rsyncd.secrets文件配置的密码
回车之后,图下图所示,表示数据同步成功


cd /osyunwei #进入数据同步目录
ls #显示文件信息
可以看到数据已经存在了
2、添加计划任务,每天自动执行数据同步脚本
vi /etc/passwd.txt #配置文件,添加以下内容
123456 #密码
:wq! #保存退出
chmod 600 /etc/passwd.txt #设置文件权限,只设置文件所有者具有读取、写入权限即可
cd /home
vi osyunweibak.sh #编辑,添加以下内容
#!/bin/sh
rsync -vzrtopg --port=873 --progress --delete
:wq! #保存,退出
chmod +x /home/osyunweibak.sh #添加脚本直接权限
yum install vixie-cron #安装计划任务,某些系统上可能没有预装
vi /etc/crontab #编辑,在最后添加以下内容
0 3 * * * root /home/osyunweibak.sh 表示每天凌晨3点执行备份
:wq! #保存,退出
chkconfig crond on #设为开机启动
service crond start #启动
/etc/rc.d/init.d/crond restart #重启
设置完成之后,
每天凌晨3点,Rsync客户端会自动同步cwRsyncServer服务端D:\osyunwei目录数据到自己的/osyunwei目录中
至此,CentOS 6.3 Rsync客户端与Windows Server 2003 cwRsyncServer服务端实现数据同步设设置完成
- CentOS6.5平台上rsync服务器安装配置方法简述
- CentOS6.5环境下使用rsync增量同步备份文件的方法
- CentOS Rsync服务端与Windows cwRsync客户端实现数据同步配置方法
- Centos rsync文件同步配置步骤分享
- CentOS5 + rsync 同步2台服务器的文件
- centos下mysql主从同步快速设置步骤分享
- Mysql 主从数据库同步(centos篇)
- CentOS服务器平台搭建mysql主从复制与读写分离的方法
- CentOS6.5系统简单安装与配置Nginx服务器的方法
- CentOS平台实现搭建rsync远程同步服务器的方法

CentOS 6.3 Rsync服务端与Debian 6.0.5 Rsync客户端实现数据同步
说明:
1、Rsync服务端
系统:CentOS 6.3
IP地址:192.168.21.132
数据存放目录:/data/osyunwei
2、Rsync客户端
系统:Debian 6.0.5
IP地址:192.168.21.144
同步的目录:/data/osyunwei
实现目的:
Rsync客户端每天凌晨3:00自动同步Rsync服务端/data/osyunwei目录中的数据到自己的/data/osyunwei目录
一、Rsync服务端配置
1、关闭SELINUX
vi /etc/selinux/config #编辑防火墙配置文件
#SELINUX=enforcing #注释掉
#SELINUXTYPE=targeted #注释掉
SELINUX=disabled #增加
:wq! #保存,关闭
shutdown -r Now #重启系统
2、开启防火墙tcp 873端口(Rsync默认端口)
vi /etc/sysconfig/iptables #编辑防火墙配置文件
-A RH-Firewall-1-INPUT -m state --state NEW -m tcp -p tcp --dport 873 -j ACCEPT
:wq! #保存
/etc/init.d/iptables restart #最后重启防火墙使配置生效
3、安装Rsync服务端软件
yum install rsync xinetd #安装
vi /etc/xinetd.d/rsync #编辑配置文件,设置开机启动rsync
disable = no #修改为
/etc/init.d/xinetd start #启动(CentOS中是以xinetd来管理Rsync服务的)
系统运维 www.osyunwei.com 温馨提醒:qihang01原创内容©版权所有,转载请注明出处及原文链接
4、创建rsyncd.conf配置文件
vi /etc/rsyncd.conf #创建配置文件,添加以下代码
log file = /var/log/rsyncd.log #日志文件位置,启动rsync后自动产生这个文件,无需提前创建
[osyunwei] #自定义名称
path = /data/osyunwei #Rsync服务端数据目录路径
comment = osyunwei #模块名称与[osyunwei]自定义名称相同
uid = root #设置rsync运行权限为root
gid = root #设置rsync运行权限为root
port=873 #默认端口
read only =yes #设置Rsync服务端文件为只读
auth users = osyunweibakuser #执行数据同步的用户名,可以设置多个,用英文状态下逗号隔开
secrets file = /etc/rsync.pass #用户认证配置文件,里面保存用户名称和密码,后面会创建这个文件
hosts allow = 192.168.21.144 #允许进行数据同步的客户端IP地址,可以设置多个,用英文状态下逗号隔开
hosts deny = 192.168.21.254 #禁止数据同步的客户端IP地址,可以设置多个,用英文状态下逗号隔开
list = yes #显示Rsync服务端资源列表
:wq! #保存,退出
5、创建用户认证文件
vi /etc/rsync.pass #配置文件,添加以下内容
osyunweibakuser:123456 #格式,用户名:密码,可以设置多个,每行一个用户名:密码
:wq! #保存,退出
6、设置文件权限
chmod 600 /etc/rsyncd.conf #设置文件所有者读取、写入权限
chmod 600 /etc/rsync.pass #设置文件所有者读取、写入权限
7、启动rsync
/etc/init.d/xinetd start #启动
service xinetd stop #停止
service xinetd restart #重新启动
二、Rsync客户端安装
1、开启防火墙tcp 873端口(Rsync客户端不需要开启873端口,这里开启是为了方便以后作为Rsync服务端)
说明:Debian默认安装是没有开启任何防火墙的
为了服务器的安全,建议大家安装启用防火墙设置,这里推荐使用iptables防火墙
whereis iptables #查看系统是否安装防火墙
iptables: /sbin/iptables /usr/share/iptables /usr/share/man/man8/iptables.8.gz #表示已经安装iptables防火墙
apt-get install iptables #如果默认没有安装,请运行此命令安装防火墙
iptables -L #查看防火墙配置信息,显示如下:
#####################################################
Chain INPUT (policy ACCEPT)
target prot opt source destination
Chain FORWARD (policy ACCEPT)
target prot opt source destination
Chain OUTPUT (policy ACCEPT)
target prot opt source destination
#####################################################
nano /etc/iptables.default.rules #设置防火墙规则,添加以下内容
###############################################################################
*filter
# Allows all loopback (lo0) traffic and drop all traffic to 127/8 that doesn't use lo0
-A INPUT -i lo -j ACCEPT
# Accepts all established inbound connections
-A INPUT -m state --state ESTABLISHED,RELATED -j ACCEPT
# Allows all outbound traffic
# You Could modify this to only allow certain traffic
-A OUTPUT -j ACCEPT
# Allows HTTP and MysqLconnections from anywhere (the normal ports for websites)
-A INPUT -p tcp --dport 80 -j ACCEPT
-A INPUT -p tcp --dport 3306 -j ACCEPT
-A INPUT -p tcp --dport 873 -j ACCEPT
# Allows SSH connections for script kiddies
# THE -dport NUMBER IS THE SAME ONE YOU SET UP IN THE SSHD_CONfig FILE
-A INPUT -p tcp -m state --state NEW --dport 22 -j ACCEPT
# Now you should read up on iptables rules and consider whether ssh access
# for everyone is really desired. Most likely you will only allow access from certain IPs.
# Allow ping
-A INPUT -p icmp -m icmp --icmp-type 8 -j ACCEPT
# log iptables denied calls (access via 'dmesg' command)
-A INPUT -m limit --limit 5/min -j LOG --log-prefix "iptables denied: " --log-level 7
# Reject all other inbound - default deny unless explicitly allowed policy:
-A INPUT -j REJECT
-A FORWARD -j REJECT
COMMIT
###############################################################################
ctrl+o #保存
ctrl+x #退出
备注:873是Rsync端口
iptables-restore < /etc/iptables.default.rules #使防火墙规则生效
nano /etc/network/if-pre-up.d/iptables #创建文件,添加以下内容,使防火墙开机启动
#!/bin/bash
/sbin/iptables-restore </etc/iptables.default.rules
ctrl+o #保存
ctrl+x #退出
chmod +x /etc/network/if-pre-up.d/iptables #添加执行权限
2、安装Rsync客户端软件
whereis rsync #查看系统是否已安装rsync,出现下面的提示,说明已经安装
rsync: /usr/bin/rsync /usr/share/man/man1/rsync.1.gz
apt-get install rsync #如果没有安装,请执行这行命令来安装rsync
nano /etc/default/rsync #编辑配置文件
RSYNC_ENABLE=true #把false改为true,设置开机启动rsync
ctrl+o #保存
ctrl+x #退出
/etc/init.d/rsync start #启动
service rsync stop #停止
service rsync restart #重新启动
3、测试Rsync客户端是否与Rsync服务端通信成功
apt-get install telnet #安装telnet工具
telnet 192.168.21.132 873 #输入命令后回车,如下图所示,表示通信成功
三、设置Rsync客户端与Rsync服务端同步数据(以下操作在Rsync客户端进行)
1、测试数据同步,在终端命令行输入
rsync -vzrtopg --port=873 --progress --delete osyunweibakuser@192.168.21.132::osyunwei /data/osyunwei
提示输入密码:123456
注意:此处的密码为Rsync服务端/etc/rsync.pass文件配置的密码
回车之后,图下图所示,表示数据同步成功
系统运维 www.osyunwei.com 温馨提醒:qihang01原创内容©版权所有,转载请注明出处及原文链接
cd /data/osyunwei #进入数据同步目录
ls #显示文件信息
可以看到数据已经存在了
2、添加计划任务,每天自动执行数据同步脚本
nano /etc/passwd.txt #配置文件,添加以下内容
123456 #密码
ctrl+o #保存
ctrl+x #退出
chmod 600 /etc/passwd.txt #设置文件权限,只设置文件所有者具有读取、写入权限即可
cd /home
nano osyunweibak.sh #编辑,添加以下内容
#!/bin/sh
rsync -vzrtopg --port=873 --progress --delete osyunweibakuser@192.168.21.132::osyunwei /data/osyunwei --password-file=/etc/passwd.txt
ctrl+o #保存
ctrl+x #退出
chmod +x /home/osyunweibak.sh #添加脚本直接权限
3、添加计划任务
系统运维 www.osyunwei.com 温馨提醒:qihang01原创内容©版权所有,转载请注明出处及原文链接
修改/etc/crontab
nano /etc/crontab #在下面添加
0 3 * * * root /home/osyunweibak.sh #表示每天凌晨3点执行备份
ctrl+o #保存
ctrl+x #退出
6、重新启动crond使设置生效
service cron stop #停止
service cron start #启动
/etc/init.d/cron restart #重启
chkconfig cron on #设为开机启动,先要安装chkconfig(apt-get install chkconfig)
至此,CentOS 6.3 Rsync服务端与Debian 6.0.5 Rsync客户端实现数据同步完成

CentOS 6.5 Rsync+sersync 实现数据实时同步备份
为什么要用rsync+sersync架构
Rsync+sersync
(1):sersync可以记录下被监听目录中发生变化的(包括增加、删除、修改)具体某一个文件或某一个目录的名字;
(2):rsync在同步的时候,只同步发生变化的这个文件或者这个目录(每次发生变化的数据相对整个同步目录数据来说是很小的,rsync在遍历查找比对文件时,速度很快),因此,效率很高。
小结:当同步的目录数据量不大时,建议使用Rsync+Inotify-tools;当数据量很大(几百G甚至1T以上)、文件很多时,建议使用Rsync+sersync。
说明
操作系统:CentOS 6.5
源服务器:121.41.28.253
目标服务器:121.41.48.242,121.41.48.233
目的:把源服务器上/var/www/synctest目录实时同步到目标服务器的/var/www/synctest下
具体操作
第一部分:在两台目标服务器121.41.48.242和121.41.48.233执行的操作
一、在目标服务器安装rsync服务端
1、关闭SELINUX
编辑防火墙配置文件:
[root@iZ23tvhxkkjZ /]# vi /etc/selinux/config用 # 注释掉下面两行代码:
#SELINUX=enforcing
#SELINUXTYPE=targeted
增加下面一行代码:
SELINUX=disabled
保存退出
wq!运行命令行,立即生效:
[root@iZ23tvhxkkjZ /]# setenforce 0
2、开启防火墙tcp 873端口(rsync默认端口)
编辑防火墙配置文件:
[root@iZ23tvhxkkjZ /]# vi /etc/sysconfig/iptables
添加下列行到开启22端口的后面:
-A INPUT -m state --state NEW -m tcp -p tcp --dport 873 -j ACCEPT
保存,退出:
wq!
重启防火墙使配置生效:
[root@iZ23tvhxkkjZ /]# /etc/init.d/iptables restart
3、安装rsync服务端软件
安装rsync,CentOS6.5自带rsync,运行下列命令行,确保rsync安装,同时安装rsync工具xinetd
[root@iZ23tvhxkkjZ /]# yum install rsync xinetd
编辑配置文件,设置开机启动 rsync
[root@iZ23tvhxkkjZ /]# vi /etc/xinetd.d/rsync
修改disable的值为no:
disable = no
保存,退出:
wq!
启动xinetd(CentOS中是以xinetd来管理Rsync服务的)
[root@iZ23tvhxkkjZ /]# /etc/init.d/xinetd start4、创建rsyncd.conf配置文件
创建配置文件:
[root@iZ23tvhxkkjZ /]# vi /etc/rsyncd.conf添加以下代码
log file = /var/log/rsyncd.log
pidfile = /var/run/rsyncd.pid
lock file = /var/run/rsync.lock
secrets file = /etc/rsyncd.passwd
motd file = /etc/rsyncd.motd

[synctest]
path = /var/www/synctest/
comment = synctest
uid = root
gid = root
port=873
use chroot = no
read only = no
list = no
max connections = 200
timeout = 600
auth users = root
hosts allow = 121.41.28.253
hosts deny = 121.41.28.254
5.创建用户认证文件
配置文件
[root@iZ23tvhxkkjZ /]# vi /etc/rsyncd.passwd添加以下内容(原服务器的用户名和密码)
root:123456格式 用户名:密码 可以设置多个,每行一个 用户名:密码 对
保存退出
:wq!6.设置文件权限
设置文件所有者读取、写入权限
[root@iZ23tvhxkkjZ etc]# chmod 600 /etc/rsyncd.conf
[root@iZ23tvhxkkjZ etc]# chmod 600 /etc/rsyncd.passwd
7.启动rsync
启动
[root@iZ23tvhxkkjZ etc]# /etc/init.d/xinetd start参考指令
停止:service xinetd stop
启动:service xinetd restart
[目标服务安装完成 另外一台目标服务器也同样的方法]
第二部分:在源服务器上121.41.28.253操作
以下部分在源服务器(发布服务器)上进行操作
一、安装rsync客户端
1、关闭selinux
编辑防火墙配置文件
[root@iZ23i2txh8jZ /]# vi /etc/selinux/config用#注释掉下面两行代码:
#SELINUX=enforcing
#SELINUXTYPE=targeted
增加下面一行代码
SELINUX=disabled保存 退出
:wq!运行命令,立即生效
[root@iZ23i2txh8jZ /]# setenforce 02、开启防火墙tcp873端口
配置防火墙
[root@iZ23i2txh8jZ /]# vi /etc/sysconfig/iptables

-A INPUT -m state --state NEW -m tcp -p tcp --dport 873 -j ACCEPT
保存,退出 重启防火墙
:wq!
[root@iZ23i2txh8jZ /]# /etc/init.d/iptables restart
3.安装rsync centos6.5自带rsync 运行下列命令后 确保rsync安装 同时安装rsync工具xinetd
[root@iZ23i2txh8jZ /]# yum install rsync xinetd编辑配置文件,设置开机启动rsync
[root@iZ23i2txh8jZ /]# vi /etc/xinetd.d/rsync
disable = no
wq!
启动xinetd(centos中是以xinet来管理rsync服务的)
[root@iZ23i2txh8jZ /]# /etc/init.d/xinetd start4.创建认证密码文件
编辑文件
[root@iZ23i2txh8jZ /]# vi /etc/rsyncd.passwd添加以下内容作为密码
123456
保存退出
:wq!
设置文件权限,只设置文件所有者具有读取、写入权限
[root@iZ23i2txh8jZ /]# chmod 600 /etc/rsyncd.passwd5.测试源服务器到两台服务器之间的数据同步
在源服务器上创建测试文件夹
[root@iZ23i2txh8jZ www]# mkdir /var/www/synctest
[root@iZ23i2txh8jZ www]# mkdir /var/www/synctest/test
在源服务器上运行下面命令
rsync -avH --port=873 --progress --delete /var/www/synctest/ root@121.41.48.242::synctest --password-file=/etc/rsyncd.passwd运行完成后,分别在两台目标服务器上查看,在/var/www/synctest目录下有test文件夹,说明数据同步成功。
『以上手动同步功能实现完成。下面内容为使用sersync工具监控目录,完成自动同步』
二、安装sersync工具、实时出发rsync进行同步
1、查看服务器内核是否支持inotify
列出文件目录
[root@iZ23i2txh8jZ /]# ll /proc/sys/fs/inotify出现下面的内容、说明服务器内核支持inotify
-rw-r--r-- 1 root root 0 Dec 25 12:03 max_queued_events
-rw-r--r-- 1 root root 0 Dec 25 15:05 max_user_instances
-rw-r--r-- 1 root root 0 Dec 25 12:03 max_user_watches
备注:centos6.5默认支持inotify
2.修改inotify默认参数(inotify默认内核参数值太小)
[root@iZ23i2txh8jZ /]# sysctl -a | grep max_queued_events
fs.inotify.max_queued_events = 327679
[root@iZ23i2txh8jZ /]#
[root@iZ23i2txh8jZ /]# sysctl -a | grep max_user_watches
fs.inotify.max_user_watches = 50000000
fs.epoll.max_user_watches = 1646100
[root@iZ23i2txh8jZ /]#
[root@iZ23i2txh8jZ /]# sysctl -a | grep max_user_instances
fs.inotify.max_user_instances = 128
[root@iZ23i2txh8jZ /]#
修改参数
[root@iZ23i2txh8jZ /]# sysctl -w fs.inotify.max_queued_events="99999999"
[root@iZ23i2txh8jZ /]# sysctl -w fs.inotify.max_user_watches="99999999"
[root@iZ23i2txh8jZ /]# sysctl -w fs.inotify.max_user_instances="65535"
参数说明:
max_queued_events:
inotify队列最大长度,如果值太小,会出现” Event Queue Overflow “错误,导致监控文件不准确
max_user_watches:
要同步的文件包含多少目录,可以用:find /var/www/synctest -type d | wc -l 统计,必须保证max_user_watches值大于统计结果(这里/var/www/synctest为同步文件目录)
max_user_instances:
每个用户创建inotify实例最大值
3、安装sersync
sersync下载地址(不好用):https://sersync.googlecode.com/files/sersync2.5.4_64bit_binary_stable_final.tar.gz
将sersync2.5.4_64bit_binary_stable_final.tar.gz复制到/usr/local/src目录下。
[root@iZ23i2txh8jZ /]# cd /usr/local/src
[root@iZ23i2txh8jZ src]# tar zxvf sersync2.5.4_64bit_binary_stable_final.tar.gz
[root@iZ23i2txh8jZ src]# mv GNU-Linux-x86 /usr/local/sersync
[root@iZ23i2txh8jZ src]# cd /usr/local/sersync
4、配置sersync
[root@iZ23i2txh8jZ sersync]# cp confxml.xml confxml.xml-bak
[root@iZ23i2txh8jZ sersync]# vi confxml.xml
修改代码
<?xml version="1.0" encoding="ISO-8859-1"?>
<head version="2.5">
	<host hostip="localhost" port="8008"></host>
	<debug start="false"/>
	<fileSystem xfs="false"/>
	<filter start="false">
		<exclude expression="(.*)\.svn"></exclude>
		<exclude expression="(.*)\.gz"></exclude>
		<exclude expression="^info/*"></exclude>
		<exclude expression="^static/*"></exclude>
	</filter>
	<inotify>
		<delete start="true"/>
		<createFolder start="true"/>
		<createFile start="false"/>
		<closeWrite start="true"/>
		<moveFrom start="true"/>
		<moveTo start="true"/>
		<attrib start="false"/>
		<modify start="false"/>
	</inotify>

	<sersync>
		<localpath watch="/var/www/synctest">
			<remote ip="121.41.48.242" name="synctest"/>
			<remote ip="121.41.48.233" name="synctest"/>
			<!--<remote ip="192.168.8.40" name="tongbu"/>-->
		</localpath>
		<rsync>
			<commonParams params="-artuz"/>
			<auth start="true" users="root" passwordfile="/etc/rsyncd.passwd"/>
			<userDefinedPort start="false" port="874"/><!-- port=874 -->
			<timeout start="false" time="100"/><!-- timeout=100 -->
			<ssh start="false"/>
		</rsync>
		<failLog path="/tmp/rsync_fail_log.sh" timeToExecute="60"/><!--default every 60mins execute once-->
		<crontab start="true" schedule="600"><!--600mins-->
			<crontabfilter start="false">
				<exclude expression="*.php"></exclude>
				<exclude expression="info/*"></exclude>
			</crontabfilter>
		</crontab>
		<plugin start="false" name="command"/>
	</sersync>

	<plugin name="command">
		<param prefix="/bin/sh" suffix="" ignoreError="true"/> <!--prefix /opt/tongbu/mmm.sh suffix-->
		<filter start="false">
			<include expression="(.*)\.php"/>
			<include expression="(.*)\.sh"/>
		</filter>
	</plugin>

	<plugin name="socket">
		<localpath watch="/opt/tongbu">
			<deshost ip="192.168.138.20" port="8009"/>
		</localpath>
	</plugin>

	<plugin name="refreshCDN">
		<localpath watch="/data0/htdocs/cms.xoyo.com/site/">
			<cdninfo domainname="ccms.chinacache.com" port="80" username="xxxx" passwd="xxxx"/>
			<sendurl base="http://pic.xoyo.com/cms"/>
			<regexurl regex="false" match="cms.xoyo.com/site([/a-zA-Z0-9]*).xoyo.com/images"/>
		</localpath>
	</plugin>
</head>
保存、退出
:wq!参数说明:
localpath watch=”/var/www/synctest”:#源服务器同步目录
121.41.48.242,121.41.48.233:#目标服务器IP地址
name=”synctest”: #目标服务器rsync同步目录模块名称
users=”root”: #目标服务器rsync同步用户名
passwordfile=”/etc/rsyncd.passwd”: #目标服务器rsync同步用户的密码在源服务器的存放路径
remote ip=”121.41.48.242”: #目标服务器ip,每行一个
remote ip=”121.41.48.233”: #目标服务器ip,每行一个
failLog path=”/tmp/rsync_fail_log.sh” #脚本运行失败日志记录
start=”true” #设置为true,每隔600分钟执行一次全盘同步
5、设置sersync监控开机自动执行
编辑
[root@iZ23i2txh8jZ sersync]# vi /etc/rc.d/rc.local
/usr/local/sersync/sersync2 -d -r -o /usr/local/sersync/confxml.xml
:wq!
6、添加脚本监控sersync是否正常运行
[root@iZ23i2txh8jZ crontab]# vi /home/crontab/check_sersync.sh
#!/bin/sh
sersync="/usr/local/sersync/sersync2"
confxml="/usr/local/sersync/confxml.xml"
status=$(ps aux |grep ''sersync2''|grep -v ''grep''|wc -l)
if [ $status -eq 0 ];
then
$sersync -d -r -o $confxml &
else
exit 0;
fi

:wq!
添加脚本执行权限
[root@iZ23i2txh8jZ crontab]# chmod +x /home/crontab/check_sersync.sh编辑
[root@iZ23i2txh8jZ crontab]# vi /etc/crontab
#在最后添加下面一行,每隔5分钟执行一次脚本
*/5 * * * * root /home/crontab/check_sersync.sh > /dev/null 2>&1
重新加载服务
[root@iZ23i2txh8jZ crontab]# service crond reload7、测试
在源服务器上创建文件
mkdir /var/www/synctest/inotify_rsync_ceshi
mkdir /var/www/synctest/inotify_rsync_ceshi_new
继续查看两台目标服务器121.41.48.242,121.41.48.233的/var/www/synctest下是否有inotify_rsync_ceshi_new文件夹
如果以上测试都通过,说明inotify实时触发rsync同步脚本运行正常。
至此,Linux下Rsync+sersync实现数据实时同步完成。
关于CentOS 7使用rsync实现数据备份和centos7 rsync配置的问题就给大家分享到这里,感谢你花时间阅读本站内容,更多关于3.0 rsync数据备份、CentOS 6.3 Rsync客户端与Win2003 cwRsyncServer服务端实现数据同步、CentOS 6.3 Rsync服务端与Debian 6.0.5 Rsync客户端实现数据同步、CentOS 6.5 Rsync+sersync 实现数据实时同步备份等相关知识的信息别忘了在本站进行查找喔。
本文标签:


