针对OAuthImplementationforASP.NETWebAPIusingMicrosoftOwin.这个问题,本篇文章进行了详细的解答,同时本文还将给你拓展(OK)TheImplement
针对OAuth Implementation for ASP.NET Web API using Microsoft Owin.这个问题,本篇文章进行了详细的解答,同时本文还将给你拓展(OK) The Implementation of Improved MPTCP in MANETs - Demo、.net-4.0 – 适用于Windows窗体的Microsoft .NET Framework 4.0 JumpList / TaskbarItemInfo示例、Asp.net web api 中 Microsoft.CodeDom.Providers.DotNetCompilerPlatform 问题、asp.net webapi UseOAuthBearerAuthentication vs UseJwtBearerAuthentication等相关知识,希望可以帮助到你。
本文目录一览:- OAuth Implementation for ASP.NET Web API using Microsoft Owin.
- (OK) The Implementation of Improved MPTCP in MANETs - Demo
- .net-4.0 – 适用于Windows窗体的Microsoft .NET Framework 4.0 JumpList / TaskbarItemInfo示例
- Asp.net web api 中 Microsoft.CodeDom.Providers.DotNetCompilerPlatform 问题
- asp.net webapi UseOAuthBearerAuthentication vs UseJwtBearerAuthentication

OAuth Implementation for ASP.NET Web API using Microsoft Owin.
http://blog.geveo.com/OAuth-Implementation-for-WebAPI2
OAuth is an open standard for token based authentication and authorization on internet. In simple terms OAuth provides a way for applications to gain credentials to other application without directly using user names and passwords in every requests. This is to reduces the chances of user name and passwords getting compromised in the wire and improve the security.
This post explains how to implement the OAuth token based authentication mechanism to your Web API methods.
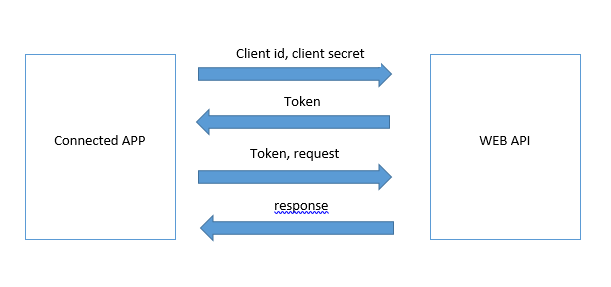
Let’s take an example where several third party connected apps try to connect to a web api with the given client id and client secret. Imagine the scenario where all the connected apps will have background processes to get and post data through the web api and there are no users involved. So in this case it uses client id and client secret to generate a token. The following diagram explains the process.
Now as you have an understanding of what the business requirement is Let’s look into the code how we can implement the token based authentication to the web api solution.
First Create the Web API project through Visual Studio. (File -> New -> Project)
Then we need to install the required packages to the project.
Microsoft.Owin.Security.OAuth
Then we can create our partial startup class as follows.
namespace Demo.WebApi
{

  public partial class Startup
  {

    public static OAuthAuthorizationServerOptions OAuthOptions { get; private set; }

    static Startup()
    {
      OAuthOptions = new OAuthAuthorizationServerOptions
                          {
                            TokenEndpointPath = new PathString("/oauth/token"),
                            Provider = new OAuthAppProvider(),
                            AccessTokenExpireTimeSpan = TimeSpan.FromDays(General.AccessTokenExpiryDays),
                            AllowInsecureHttp = General.UseHttp
                          };

    }

    public void ConfigureAuth(IAppBuilder app)
    {
      app.UseOAuthBearerTokens(OAuthOptions);
    }
  }
}
In the above code Token end point refers to the relative path of your web api which needs to be called to generate the token. In this case it is “oauth/token”
Provider is the custom class that we write with the authentication and token generation logic.
Access Token Expire Time Span refers to the duration we want to keep the token alive. We can define this in the web config file and refer it from there. In the above code General class property reads the web config value.
Allow Insecure Http refers whether we want to restrict the web api to be accessed through secured layer or not.
Then from the main start up class we can call the above ConfigureAuth method as follows.
namespace Demo.WebApi
{
  public partial class Startup
  {
    public void Configuration(IAppBuilder app)
    {
      ConfigureAuth(app);
    }
  }
}
The general class would look like this.
public class General
{
  public static bool UseHttp
  {
    get
    {
      if (ConfigurationManager.AppSettings["UseHttp"] != null)
      {
      return Convert.ToBoolean(ConfigurationManager.AppSettings["UseHttp"]);
      }
      else return false;
    }
  }
}
Next, we will see how to implement the OAuthProvider Class. Basically in that class we can override the methods so that we can define the way we want to generate the token.
The following class implementation represents how to implement the token generation using client id and client secret. (Apart from this we can override the GrantResourceOwnerCredentials() in case we want to use username,password combination for generating the password).
First we need to override the ValidateClientAuthentication method. From this we extract the client id and client secret in the request.
namespace IPG.WebApi.Provider
{
  public partial class OAuthAppProvider : OAuthAuthorizationServerProvider
  {
    public override Task ValidateClientAuthentication(OAuthValidateClientAuthenticationContext context)
    {
      string clientId;
      context.TryGetFormCredentials(out clientId, out clientSecret);
      if (!string.IsNullOrEmpty(clientId))
      {
      context.Validated(clientId);
      }
      else
      {
      context.Validated();
      }
      return base.ValidateClientAuthentication(context);
    }
  }
}
Next we will override GrantClientCredentials method inside the same class. Here we validate the client id and client secret with the DB and create the token. For the token we can add claims as we want. In this case we add the client id only. This claims will be accessible via the context object in the subsequent requests.
public override Task
GrantClientCredentials(OAuthGrantClientCredentialsContext context)
{
  return Task.Factory.StartNew(() =>
  {
    try
    {
      bool isValid = false;
      isValid = true; //This should be the Service/DB call to validate the client id, client secret.
      //ValidateApp(context.ClientId, clientSecret);

      if (isValid)
      {
        var oAuthIdentity = new ClaimsIdentity(context.Options.AuthenticationType);
        oAuthIdentity.AddClaim(new Claim("ClientID", context.ClientId));
        var ticket = new AuthenticationTicket(oAuthIdentity, new AuthenticationProperties());
        context.Validated(ticket);
      }
      else
      {
        context.SetError("Error", tuple.Item2);
        logger.Error(string.Format("GrantResourceOwnerCredentials(){0}Credentials not valid for ClientID : {1}.", Environment.NewLine, context.ClientId));
      }
    }
    catch (Exception)
    {
      context.SetError("Error", "internal server error");
      logger.Error(string.Format("GrantResourceOwnerCredentials(){0}Returned tuple is null for ClientID : {1}.", Environment.NewLine, context.ClientId));
    }
  });
}
Then, we will look at how to authorize the controller actions using this token. It is simple, all you need to do it decorate the action with the [Authorize] tag. This will check token validity before its executes the action method. Following is an example. Create a controller called “PropertyController” and inside that you can define an action as below.
public class PropertyController : ApiController
{
[Authorize]
[HttpGet]
public IHttpActionResult GetProperty(int propertyID)
{
  int clientID = OwinContextExtensions.GetClientID();
  try
  {
    //var result = Service or DB Call(clientID, propertyID)
    return Json(new
    {
      PropertyName = string.Format("Property - {0}", propertyID),
      Success = true
    });
  }
  catch (Exception ex)
  {
    return Content(HttpStatusCode.InternalServerError, ex.Message);
  }
}
}
Here you can extract the claims that you have added to the token. In our example it was only the client id. You can write a separate class for these types of extractions. Following shows that extension class.
public static class OwinContextExtensions
{
  public static int GetClientID()
  {
    int result = 0;
    var claim = CurrentContext.Authentication.User.Claims.FirstOrDefault(c => c.Type == "ClientID");

    if (claim != null)
    {
      result = Convert.ToInt32(claim.Value);
    }
    return result;
  }

  public static IOwinContext CurrentContext
  {
    get
    {
      return HttpContext.Current.GetOwinContext();
    }
  }
}
That’s pretty much it. Now we can test the web api using postman as shown below.
We need to enter the correct url. It should be the “websiteurl/oauth/token”. The relative path should matched with the token end point that we have configured in the oauth options. Once the client id and secret is validated access token is generated as above.
We can use this token in order to call other api methods which we have decorated with [authorize] attribute. In our example we are going to call the GetProperty action in our Property controller using that token. The way to call your action using postman is shown below.
You need to use Authorization tag and as the value (Bearer “token”). This is the token generated in the previous step.
There you go. You have the response. Simple as that. You can write your own controllers and actions and build a complete web api from here onwards.
In my next post I will share how we can integrate swagger and directly call our web api using that without using postman.
实际使用遇到的问题
grant type的问题
错误1
配置好之后,访问http://localhost/Chuck_WebApi/oauth/token
request
GET /Chuck_WebApi/oauth/token HTTP/1.1
Host: localhost
Content-Type: application/x-www-form-urlencoded
cache-control: no-cache
Postman-Token: 548a3363-f40e-41fe-b6ed-0529cb446f6e
response
{
"error": "unsupported_grant_type"
}
错误2
request2
GET /Chuck_WebApi/oauth/token HTTP/1.1
Host: localhost
Content-Type: application/x-www-form-urlencoded
cache-control: no-cache
Postman-Token: db016f42-ff23-437d-a820-d2c6604be2ec
grant_type=passwordusername=adminpassword=passwordundefined=undefined
response2
{
"error": "invalid_grant"
}
尝试切换到client_credentials才能成功访问
request3
GET /Chuck_WebApi/oauth/token HTTP/1.1
Host: localhost
Content-Type: application/x-www-form-urlencoded
cache-control: no-cache
Postman-Token: fd3aee1e-97e0-485a-aebf-21f6ae7099e4
grant_type=client_credentialsusername=adminpassword=passwordundefined=undefined
response3
{
"access_token": "Z8CxAgt-vosdjPG5tKUCZoiw7OyW0kCqz9a-U2tCtU2z_-UxZjhGW8AvzqBYPZomiRa8tegKCvVyRVzI-EWmLUJkkaIgjtsse16pVvGISHKs90EqOZxtKppaJbbMn7bCEJwp4npxa9DnlMbhTiNLviRzFvo5wONCNhB1NvN71b8g3rw8ehBZ6TSfJuTzv8OsCisyUV_QwwKQ_nECs07kYQ",
"token_type": "bearer",
"expires_in": 86399
}
授权
所有的controller默认都需要授权
https://stackoverflow.com/questions/21916870/apply-authorize-attribute-implicitly-to-all-web-api-controllers
Token路径如何触发的
https://stackoverflow.com/questions/23215672/in-web-api-owin-architecture-where-are-requests-to-token-handle
When you create a new Project with Individual Authentication in ASP.NET, the solution is created with an OAuth Provider to handle Authentication Request.
If you look at you solution, you should see a Providers Folder with a class ApplicationOAuthProvider.
This class implement all the logic for authenticate your members in you website. The configuration is set at Startup to allow you to customize the url endpoint through the OAuthOption.
OAuthOptions = new OAuthAuthorizationServerOptions
{
    TokenEndpointPath = new PathString("/Token"),
    Provider = new ApplicationOAuthProvider(PublicClientId),
    AuthorizeEndpointPath = new PathString("/api/Account/ExternalLogin"),
    AccessTokenExpireTimeSpan = TimeSpan.FromDays(14),
    AllowInsecureHttp = true
};
The TokenEndPoint Path properties defined the url which will fired the GrantResourceOwnerCredentials method of the GrandResourceOwnerCredentials.
If you use fiddler to authenticate and use this kind of body
grant_type=password&username=testUserName&password=TestPassword
you should pass in the following method :
public override async Task GrantResourceOwnerCredentials(OAuthGrantResourceOwnerCredentialsContext context)
    {
        var userManager = context.OwinContext.GetUserManager<ApplicationUserManager>();

        ApplicationUser user = await userManager.FindAsync(context.UserName, context.Password);

        if (user == null)
        {
            context.SetError("invalid_grant", "The user name or password is incorrect.");
            return;
        }

        ClaimsIdentity oAuthIdentity = await user.GenerateUserIdentityAsync(userManager,
           OAuthDefaults.AuthenticationType);
        ClaimsIdentity cookiesIdentity = await user.GenerateUserIdentityAsync(userManager,
            CookieAuthenticationDefaults.AuthenticationType);

        AuthenticationProperties properties = CreateProperties(user.UserName);
        AuthenticationTicket ticket = new AuthenticationTicket(oAuthIdentity, properties);
        context.Validated(ticket);
        context.Request.Context.Authentication.SignIn(cookiesIdentity);
    }
where context.UserName and context.Password are set with the data used in the request. After the identity is confirmed (here using Entity Framework and a couple userName, Password in a database), a Bearer token is sent to the caller. This Bearer token could then be used to be authenticated for the other calls.
 The Implementation of Improved MPTCP in MANETs - Demo")
(OK) The Implementation of Improved MPTCP in MANETs - Demo
The 25th IEEE International Conference on Network Protocols (ICNP 2017) -
Demonstrations
http://ieeexplore.ieee.org/document/8117583/
T. Zhang, S. Zhao, Y. Shi, B. Ren, B. Cheng and J. Chen, "The implementation of improved MPTCP in MANETs," 2017 IEEE 25th International Conference on Network Protocols (ICNP), Toronto, ON, Canada, 2017, pp. 1-2.
doi: 10.1109/ICNP.2017.8117583
Abstract—In some special circumstances, e.g. tsunamis, floods, battlefields, earthquakes, etc., communication infrastructures are damaged or non-existent, as well as unmanned aerial vehicle (UAV) cluster. For the communication between people or UAVs, UAVs or mobile smart devices (MSDs) can be used to construct Mobile Ad Hoc Networks (MANETs), and Multipath TCP (MPTCP) can be used to simultaneously transmit in one TCP connection via multiple interfaces of MSDs. However the original MPTCP subpaths creating algorithm can establish multiple subpaths between two adjacent nodes, thus cannot achieve true concurrent data transmission. To solve this issue, we research and improve both the algorithm of adding routing table entries and the algorithm of establishing subpaths to offer more efficient use of multiple subpaths and better network traffic load balancing. The main works are as follows: (1) improve multi-hop routing protocol; (2) run MPTCP on UAVs or MSDs; (3) improve MPTCP subpaths establishment algorithm. The results show that our algorithms have better performance than the original MPTCP in achieving higher data throughput.

.net-4.0 – 适用于Windows窗体的Microsoft .NET Framework 4.0 JumpList / TaskbarItemInfo示例
http://msdn.microsoft.com/en-us/library/system.windows.shell.taskbariteminfo.aspx
我可以看到可以在其示例中为任务栏项设置进度等;但是我在Windows窗体上实现这一点已经非常困难.
在过去的http://code.google.com/p/zscreen/source/browse/trunk/ZScreen/Forms/ZScreenConfigGUI.cs#277中,我成功地使用Windows API Pack实现了JumpList和TaskBarItem进度,但我想摆脱这种依赖关系并改用Microsoft .NET Framework 4.0.
非常感谢您的建议.
谢谢
麦克风
WPF 4 provides a native support for Jump List. Instead,if we use
Windows Forms,we must adopt the Windows API Code Pack,a managed
wrapper that allows to access to the Windows API functions. Available
on NuGet too,it provides all you need to manage Jump Lists within our
Windows Forms Applications.
另一个例子:http://www.codeproject.com/Articles/103913/How-to-Create-a-Custom-Jumplist-with-Custom-Events
It is my understanding that JumpList implementation using Windows API
Code Pack is Now depreciated
它没有被弃用,它也是新的.net 4功能的一部分,但对于WPF.对于winforms,您仍然必须使用上面提到的包.

Asp.net web api 中 Microsoft.CodeDom.Providers.DotNetCompilerPlatform 问题

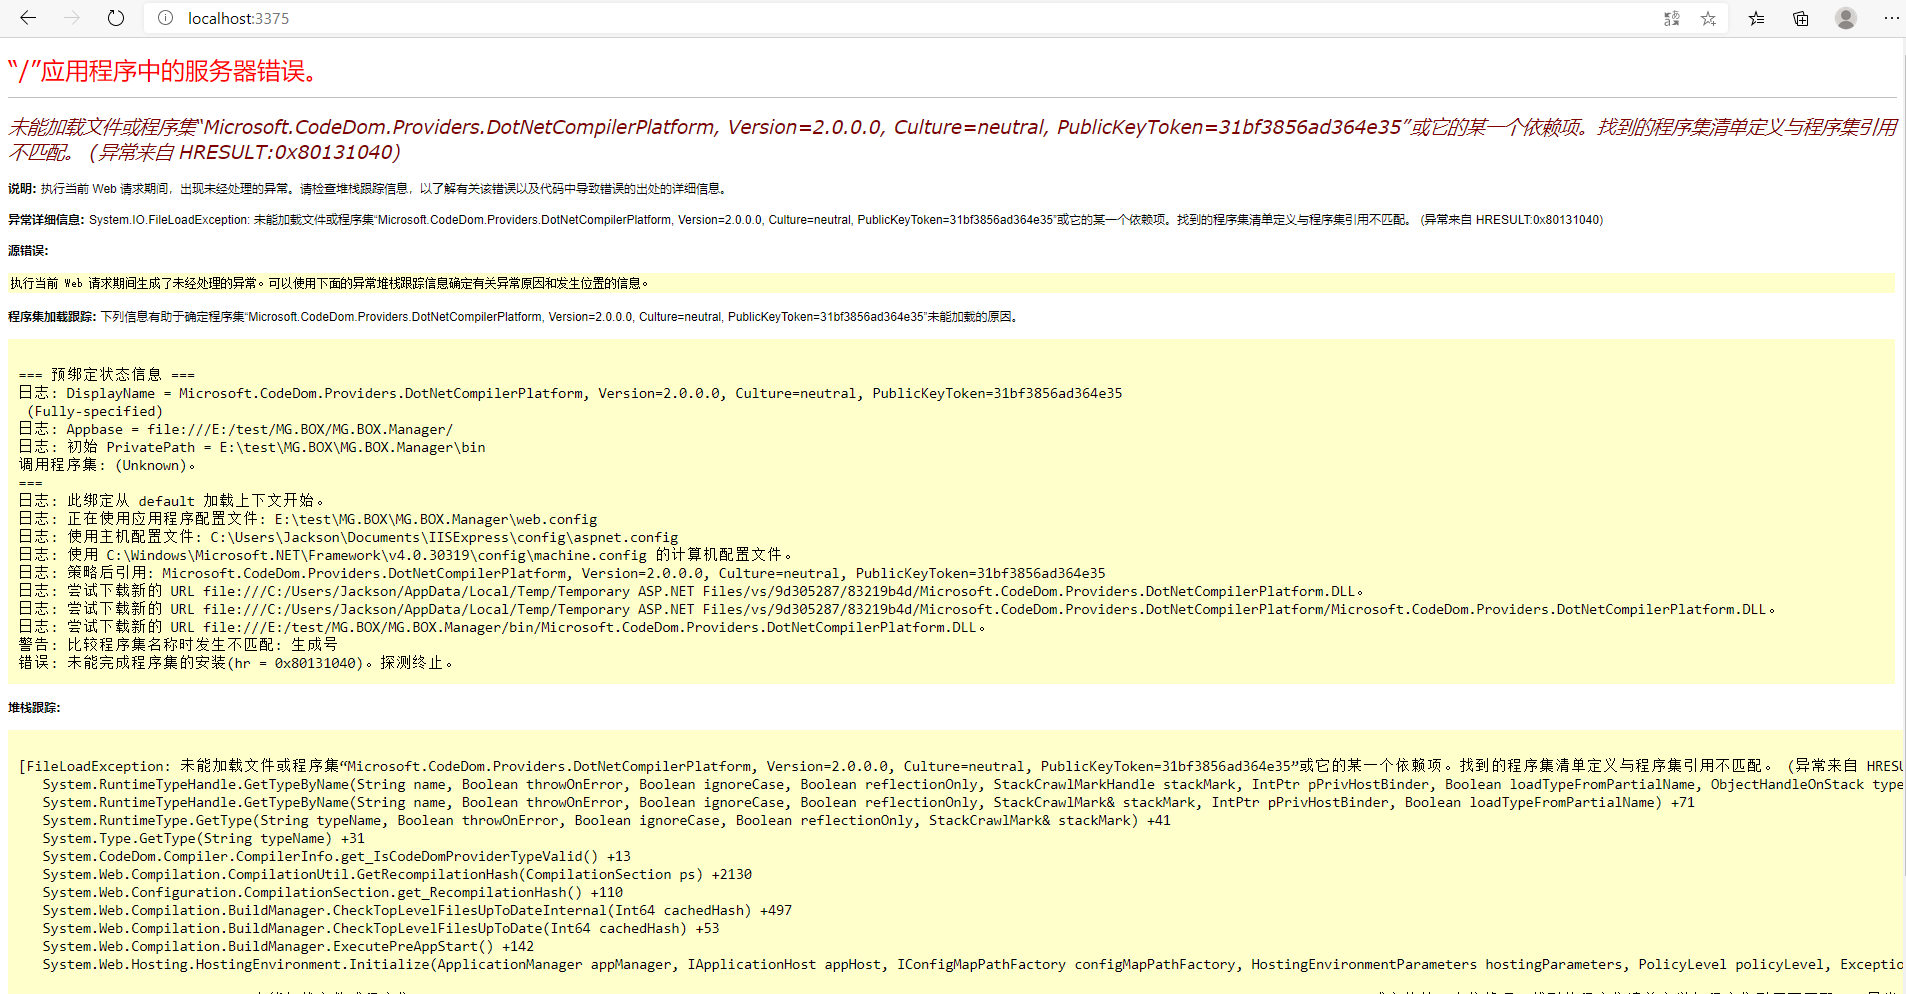
解决方法:
web.config 中的

和 NuGet 中安装的

版本不一致,导致的此问题。

asp.net webapi UseOAuthBearerAuthentication vs UseJwtBearerAuthentication
为什么我应该使用’USEOAuthBearerAuthentication’而不是’UseJwtBearerAuthentication’,反之亦然?
我如何确定哪个选项对我的系统最好?
谢谢,
Szymo
解决方法
当Katana OAuth2授权服务器创建令牌时,使用USEOuthBearerAuthentication中间件.此授权服务器使用专有令牌格式.
UseJwtBearerAuthentication中间件是两者中不错的选择.此中间件使用OpenId Connect规范中指定的令牌格式(JWT).所有外部授权服务器都使用此令牌格式.
谢谢,索玛.
关于OAuth Implementation for ASP.NET Web API using Microsoft Owin.的问题我们已经讲解完毕,感谢您的阅读,如果还想了解更多关于(OK) The Implementation of Improved MPTCP in MANETs - Demo、.net-4.0 – 适用于Windows窗体的Microsoft .NET Framework 4.0 JumpList / TaskbarItemInfo示例、Asp.net web api 中 Microsoft.CodeDom.Providers.DotNetCompilerPlatform 问题、asp.net webapi UseOAuthBearerAuthentication vs UseJwtBearerAuthentication等相关内容,可以在本站寻找。
本文标签:


