在本文中,我们将详细介绍JAVA布局管理器与面板组合代码实例的各个方面,并为您提供关于java布局管理器与面板组合代码实例是什么的相关解答,同时,我们也将为您带来关于Android布局管理器-使用Ta
在本文中,我们将详细介绍JAVA布局管理器与面板组合代码实例的各个方面,并为您提供关于java布局管理器与面板组合代码实例是什么的相关解答,同时,我们也将为您带来关于Android 布局管理器 - 使用 TableLayout 表格布局管理器实现简单的用户登录页面、Android 组合布局管理器的问题、Java (41)_卡片布局管理器、Java eleven常用布局管理器的有用知识。
本文目录一览:- JAVA布局管理器与面板组合代码实例(java布局管理器与面板组合代码实例是什么)
- Android 布局管理器 - 使用 TableLayout 表格布局管理器实现简单的用户登录页面
- Android 组合布局管理器的问题
- Java (41)_卡片布局管理器
- Java eleven常用布局管理器
")
JAVA布局管理器与面板组合代码实例(java布局管理器与面板组合代码实例是什么)
这篇文章主要介绍了JAVA布局管理器与面板组合代码实例,文中通过示例代码介绍的非常详细,对大家的学习或者工作具有一定的参考学习价值,需要的朋友可以参考下
JPanel是面板组件,非顶层容器,一个界面只有可以有一个JFrame窗体组件,但可以有多个Jpanel面板,而JPanel上也可以使用FlowLayout,BorderLayout,GirdLayout等布局管理器,这样可以组合使用达到比较复杂的布局效果。
注意事项
Ⅰ.JPanel是JComponent的子类
Ⅱ.属于容器组件,可以加入别的组件
Ⅲ.默认布局管理器是流式布局(FlowLayout)
/* * 作者:白客C * 时间:2020年03月05日 * 内容:gui窗体 * 步骤: * 1.继承JFrame容器 * 2.定义需要的组件 * 3.创建组件 * 4.设置布局管理器 * 5.添加组件 * 6.对窗体设置 * 7.显示窗体 */ package com.beekc.www; import javax.swing.*; import java.awt.*; //继承JFrame public class Beekc extends JFrame{ //定义组件 JPanel jp1,jp2; JButton jb1,jb2,jb3,jb4,jb5,jb6; public static void main(String[] args){ Beekc beekc = new Beekc(); } public Beekc(){ //创建组件 jp1 = new JPanel(); jp2 = new JPanel(); jb1 = new JButton("葡萄"); jb2 = new JButton("榴莲"); jb3 = new JButton("狗肉"); jb4 = new JButton("龙虾"); jb5 = new JButton("螃蟹"); jb6 = new JButton("鱼翅"); //布局 //添加JPanel jp1.add(jb1); jp1.add(jb2); jp2.add(jb4); jp2.add(jb5); jp2.add(jb6); //添加组件到边界布局BorderLayout this.add(jp1, BorderLayout.norTH); this.add(jb3,BorderLayout.CENTER); this.add(jp2,BorderLayout.soUTH); //窗体设置 this.setTitle("JPanel组件与布局"); this.setSize(300,200); this.setResizable(false); this.setLocation(200,200); this.setDefaultCloSEOperation(JFrame.EXIT_ON_CLOSE); //显示 this.setVisible(true); } }
运行结果

以上就是本文的全部内容,希望对大家的学习有所帮助,也希望大家多多支持小编。

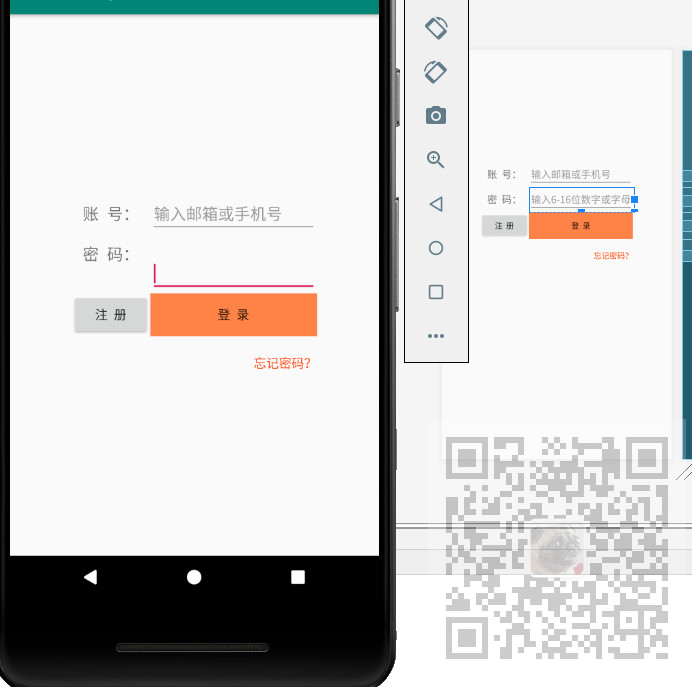
Android 布局管理器 - 使用 TableLayout 表格布局管理器实现简单的用户登录页面
场景
Android 布局管理器 - 使用 FrameLayout 帧布局管理器显示层叠的正方形以及前景照片:
https://blog.csdn.net/BADAO_LIUMANG_QIZHI/article/details/103839149
实现效果如下
注:
博客:
https://blog.csdn.net/badao_liumang_qizhi
关注公众号
霸道的程序猿
获取编程相关电子书、教程推送与免费下载。
实现
将 activity_main.xml 修改为 TableLayout
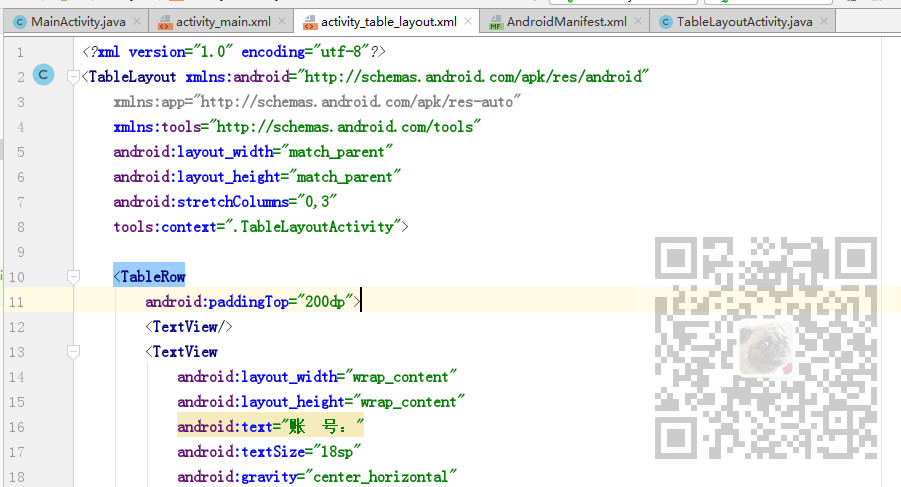
然后使用 <TabelRow> 标签代表添加一行,首行使用
android:paddingTop="200dp">
设置顶部内边距
第一行,添加空的 TextView,再添加一个水平居中的 TextView 和一个 EditText
<TableRow
        android:paddingTop="200dp">
        <TextView/>
        <TextView
            android:layout_width="wrap_content"
            android:layout_height="wrap_content"
            android:text="账  号:"
            android:textSize="18sp"
            android:gravity="center_horizontal"
            />
        <EditText
            android:layout_width="match_parent"
            android:layout_height="wrap_content"
            android:hint="输入邮箱或手机号"
            />
    </TableRow>
第二行,同理,改为密码输入行,不用再设置内顶边距
<TableRow>
        <TextView/>
        <TextView
            android:layout_width="wrap_content"
            android:layout_height="wrap_content"
            android:text="密  码:"
            android:textSize="18sp"
            android:gravity="center_horizontal"
            />
        <EditText
            android:layout_width="match_parent"
            android:layout_height="wrap_content"
            android:hint="输入6-16位数字或字母"
            />
    </TableRow>
第三行添加注册和登录按钮
<TableRow>
        <TextView/>
        <Button
            android:layout_width="wrap_content"
            android:layout_height="wrap_content"
            android:text="注  册"
            />
        <Button
            android:layout_width="match_parent"
            android:layout_height="wrap_content"
            android:text="登  录"
            android:background="#FF8247"
            />
    </TableRow>
第四行,添加忘记密码提示
<TableRow
        android:paddingTop="20dp"
        >
        <TextView/>
        <TextView/>
        <TextView
            android:layout_width="wrap_content"
            android:layout_height="wrap_content"
            android:textColor="#FF4500"
            android:text="忘记密码?"
            android:gravity="right"
            />
        <TextView/>
    </TableRow>
完整示例代码
<?xml version="1.0" encoding="utf-8"?>
<TableLayout xmlns:android="http://schemas.android.com/apk/res/android"
    xmlns:app="http://schemas.android.com/apk/res-auto"
    xmlns:tools="http://schemas.android.com/tools"
    android:layout_width="match_parent"
    android:layout_height="match_parent"
    tools:context=".TableLayoutActivity">

    <TableRow
        android:paddingTop="200dp">
        <TextView/>
        <TextView
            android:layout_width="wrap_content"
            android:layout_height="wrap_content"
            android:text="账  号:"
            android:textSize="18sp"
            android:gravity="center_horizontal"
            />
        <EditText
            android:layout_width="match_parent"
            android:layout_height="wrap_content"
            android:hint="输入邮箱或手机号"
            />
    </TableRow>

    <TableRow>
        <TextView/>
        <TextView
            android:layout_width="wrap_content"
            android:layout_height="wrap_content"
            android:text="密  码:"
            android:textSize="18sp"
            android:gravity="center_horizontal"
            />
        <EditText
            android:layout_width="match_parent"
            android:layout_height="wrap_content"
            android:hint="输入6-16位数字或字母"
            />
    </TableRow>

    <TableRow>
        <TextView/>
        <Button
            android:layout_width="wrap_content"
            android:layout_height="wrap_content"
            android:text="注  册"
            />
        <Button
            android:layout_width="match_parent"
            android:layout_height="wrap_content"
            android:text="登  录"
            android:background="#FF8247"
            />
    </TableRow>

    <TableRow
        android:paddingTop="20dp"
        >
        <TextView/>
        <TextView/>
        <TextView
            android:layout_width="wrap_content"
            android:layout_height="wrap_content"
            android:textColor="#FF4500"
            android:text="忘记密码?"
            android:gravity="right"
            />
        <TextView/>
    </TableRow>

</TableLayout>
Android 组合布局管理器的问题
我是想做一个表格和线性布局的组合布局,表格布局布到第二行就出问题了这是没有加 checkbox 之前的,一切都正常

这是加了 checkbox 之后的,只要 checkbox 的长度增加,上面的文字就会往右走(25 没有动),为什么上面的文字会被挤过去,我明明用表格布局把上下两个分开了啊
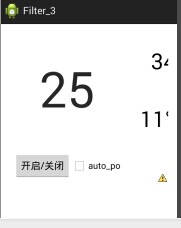
附上我的代码,很短。。找了很久。。真的找不到为什么。。刚学 Android。。谅解..
<!-- first row -->
<TableRow
android:id="@+id/tableRow1"
android:layout_width="fill_parent"
android:layout_weight="2">
<LinearLayout
android:id="@+id/linearLayout1"
android:orientation="horizontal"
android:layout_width="170dp"
android:layout_height="fill_parent">
<TextView
android:id="@+id/pm_value"
android:layout_width="match_parent"
android:layout_height="match_parent"
android:gravity="center"
android:text="@string/PM" />
</LinearLayout>
<LinearLayout
android:id="@+id/Temp_Humi"
android:orientation="vertical"
android:layout_height="fill_parent"
android:layout_width="140dp">
<TextView
android:id="@+id/Temp"
android:text="@string/humi"
android:gravity="center"
android:layout_height="wrap_content"
android:layout_weight="1"
android:layout_width="fill_parent"/>
<TextView
android:id="@+id/Humi"
android:layout_weight="1"
android:layout_width="fill_parent"
android:layout_height="wrap_content"
android:gravity="center"
android:text="@string/temp" />
</LinearLayout>
</TableRow>
<!-- second row -->
<TableRow
android:id="@+id/tableRow2"
android:layout_width="fill_parent"
android:layout_height="wrap_content"
android:layout_weight="1">
<LinearLayout
android:id="@+id/linearLayout2"
android:layout_width="wrap_content"
android:layout_height="wrap_content"
android:layout_weight="1"
android:orientation="horizontal"
android:padding="8dp" >
<Button
android:id="@+id/power_btn"
android:layout_width="wrap_content"
android:layout_height="fill_parent"
android:text="@string/pow_btn" />
<CheckBox
android:id="@+id/auto_pow"
android:layout_width="wrap_content"
android:layout_height="fill_parent"
android:text="auto_po"
</LinearLayout>
</TableRow>
_卡片布局管理器")
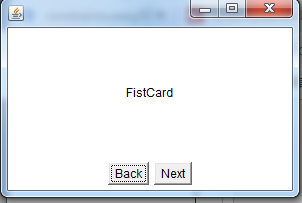
Java (41)_卡片布局管理器
package MYSQK.example01;
import java.awt.*;
import java.awt.event.ActionEvent;
import java.awt.event.ActionListener;
import java.awt.event.WindowAdapter;
import java.awt.event.WindowEvent;

/**
 * 卡片布局管理器
 */
class Layout extends Frame implements ActionListener {
    CardLayout cardLayout = new CardLayout();//定义卡片布局管理器
    Panel cardPanel = new Panel();//定义面板放卡片
    Panel controlPanel = new Panel();//定义面板放置按钮
    Button preButton;//按钮声明
    Button nextButton;

    public  Layout(){
        this.setSize(300,200);//设置窗体大小
        cardPanel.setLayout(cardLayout);//设置布局为卡管理器 把cardPanel,而不是当前窗体!!!this
        cardPanel.add(new Label("FistCard",Label.CENTER));
        cardPanel.add(new Label("SecondCard",Label.CENTER));
        cardPanel.add(new Label("ThirdCard",Label.CENTER));

        nextButton = new Button("Next");
        preButton = new Button("Back");

        controlPanel.add(preButton);
        controlPanel.add(nextButton);

        this.add(cardPanel,BorderLayout.CENTER);
        this.add(controlPanel,BorderLayout.SOUTH);

        //为按钮添加事件监听器
        nextButton.addActionListener(this);
        preButton.addActionListener(this);

        this.addWindowListener(new WindowAdapter() {
            public void  windowClosing(WindowEvent e){
                Layout.this.dispose();
            }
        });

        this.setVisible(true);

    }
     @Override
    public  void actionPerformed(ActionEvent e){
        // 如果用户点击向后按钮
         if(e.getSource()==nextButton){
             cardLayout.next(cardPanel);
         }
         if(e.getSource()==preButton){
             cardLayout.previous(cardPanel);
         }
    }
}
public class example01 {
  public  static  void  main(String[] args){
       Layout layout = new Layout();
  }
}

Java eleven常用布局管理器
1、绝对布局管理器
硬性指定组件在容器中的位置和大小
使用绝对布局的步骤:
Container.setLayout(null);// 取消布局管理器
Component.setBounds();//设置组件的大小位置
package Eleven;
import javax.swing.JFrame;
import java.awt.Container;
import javax.swing.JButton;
import javax.swing.WindowConstants;
public class AbsoluteLayout extends JFrame {
public AbsoluteLayout(){
setTitle("本窗体使用绝对布局");
getContentPane().setLayout(null);
setBounds(0,0,200,200);
/*JFrame窗体类包含一个容器类,所有放置在窗体上的组件其实都是放置在这个容器类中的,通过
* getContentPane()方法获取*/
Container container = getContentPane();
JButton b1 = new JButton("按钮1");
JButton b2 = new JButton("按钮2");
//void java.awt.Component.setBounds(int x, int y, int width, int height)
b1.setBounds(60, 70, 100, 20);
b2.setBounds(10, 30, 80, 30);
container.add(b1);
container.add(b2);
setVisible(true);
setDefaultCloseOperation(WindowConstants.EXIT_ON_CLOSE);//退出程序,关闭按钮
}
public static void main(String[] args){
new AbsoluteLayout();
}
}
2、流布局管理器FlowLayout
像流一样按指定方向摆放组件,直到占据了这一行的所有空间再往下移一行。
package Eleven;

import javax.swing.JFrame;

import javax.swing.WindowConstants;

import java.awt.Container;

import java.awt.FlowLayout;

import javax.swing.JButton;

public class FlowLayoutPosition extends JFrame{
 public FlowLayoutPosition(){
  setTitle("FlowLayout");
  Container container = getContentPane();
  /*Flow layouts are typically used to arrange buttons in a panel.
   * It arranges buttons horizontally until no more buttons fit on
  * the same line. The line alignment is determined by the align property. The possible values are:
  LEFT
  RIGHT
  CENTER
  LEADING
  TRAILING
   */
  /*
   * public FlowLayout(int alignment,int horizGap,int vertGap)
   * alignment:FlowLayout.LEFT(单行中左对齐)/FlaoLayout.CENTER/FlowLayout.RIGHT
   * horizGap/vertGap:以像素为单位指定组件之间的水平和垂直间隔*/
  //Container javax.swing.JFrame.getContentPane()获取窗体的组件容器
  getContentPane().setLayout(new FlowLayout(FlowLayout.LEFT,10,10));
  for(int i = 0;i < 10;i++){
   //Component java.awt.Container.add(Component comp)
   container.add(new JButton("Button"+i));
  }
  setSize(300,200);//设置窗体大小
  setVisible(true);
  setDefaultCloseOperation(WindowConstants.EXIT_ON_CLOSE);//设置窗体关闭方式
 }
 public static void main(String[] args){
  new FlowLayoutPosition();
 }
}
3、网格布局管理器GridLayout
网格布局中每个组件大小都相同,单元格数由行数列数决定
public GridLayout(int rows,int colums);
public GridLayout(int rows,int colums,int horizGap,int vertGap); //horizGap,vertGap组件之间的间距
package Eleven;
import javax.swing.JFrame;
import javax.swing.WindowConstants;
import java.awt.GridLayout;
import javax.swing.JButton;
public class GridLayoutPosition extends JFrame{
public GridLayoutPosition(){
/*public GridLayout(int rows,int columns,int horizGap,int vertGap)
* 行数、列数可以有一个为0,表示这一行、列可以排列任意多组件*/
final GridLayout gridLayout = new GridLayout(0,3,2,2);
getContentPane().setLayout(gridLayout);
setTitle("GridLayout");
final JButton button1 = new JButton();
button1.setText("B1");
getContentPane().add(button1);
final JButton button2 = new JButton();
button2.setText("B2");
getContentPane().add(button2);
final JButton button3 = new JButton();
button3.setText("B3");
getContentPane().add(button3);
final JButton button4 = new JButton();
button4.setText("B4");
getContentPane().add(button4);
final JButton button5 = new JButton();
button5.setText("B5");
getContentPane().add(button5);
final JButton button6 = new JButton();
button6.setText("B6");
getContentPane().add(button6);
setSize(253,189);
setVisible(true);
setDefaultCloseOperation(WindowConstants.EXIT_ON_CLOSE);
}
public static void main(String [] args){
new GridLayoutPosition();
}
}
今天关于JAVA布局管理器与面板组合代码实例和java布局管理器与面板组合代码实例是什么的讲解已经结束,谢谢您的阅读,如果想了解更多关于Android 布局管理器 - 使用 TableLayout 表格布局管理器实现简单的用户登录页面、Android 组合布局管理器的问题、Java (41)_卡片布局管理器、Java eleven常用布局管理器的相关知识,请在本站搜索。
本文标签:


