本篇文章给大家谈谈Djangocms从Textplugin移除href属性,以及django删除的知识点,同时本文还将给你拓展android–Cordova-plugin-fcm:找不到名字’FCMP
本篇文章给大家谈谈Django cms从Textplugin移除href属性,以及django删除的知识点,同时本文还将给你拓展android – Cordova-plugin-fcm:找不到名字’FCMPlugin’、android-MissingPluginException(未在渠道plugins.flutter.io/google_sign_in上找到方法init的实现)、Angular routerLink指令的href属性生成逻辑、Announcing the Updated NGINX and NGINX Plus Plug‑In for New Relic (Version 2)等相关知识,希望对各位有所帮助,不要忘了收藏本站喔。
本文目录一览:- Django cms从Textplugin移除href属性(django删除)
- android – Cordova-plugin-fcm:找不到名字’FCMPlugin’
- android-MissingPluginException(未在渠道plugins.flutter.io/google_sign_in上找到方法init的实现)
- Angular routerLink指令的href属性生成逻辑
- Announcing the Updated NGINX and NGINX Plus Plug‑In for New Relic (Version 2)
")
Django cms从Textplugin移除href属性(django删除)
这是设计使然,可防止跨站点脚本攻击(XSS)。如果您将javascript绑定到元素,则可以使用#字符并在on click函数中返回false。
点击我!

android – Cordova-plugin-fcm:找不到名字’FCMPlugin’
我正在尝试通过cordova-fcm-plugin使用我的Ionic 2应用程序进行FCM推送通知.
我已经按照每个教程进行操作,当我从firebase控制台发送推送时,它工作正常,但我想在我的应用程序中使用其功能和有效负载做一些事情,但是当我尝试使用插件中的任何方法时,我得到a在Visual Studio上找不到名称“FCMPlugin”错误:
The error
我一直在寻找如何正确使用它并且没有找到任何东西,只是这个问题:The Question
那么实现和使用插件的正确方法是什么?有模块吗?我可以用’离子原生’来称它吗?我必须从某个地方导入它?只需使用index.html中的插件.js文件链接?或者这个错误是普通的,在仿真/构建中它会正常工作吗?
感谢:D
PS:我没有尝试构建它或模仿它看看会发生什么,现在就去做.
编辑
好的,所以这是一个错误,不会让我构建我的应用程序. Rly现在需要知道如何使用插件.
解决方法:
您必须在导入后声明FCMPlugin变量:
import { Foo}  from  '../pages/foo/foo';
import { Bar } from  '../pages/bar/bar';
declare var FCMPlugin: any; // <---- this is the magic line
")
android-MissingPluginException(未在渠道plugins.flutter.io/google_sign_in上找到方法init的实现)
使用Flutter的Google登录名
但是当我使用此语句登录用户时看到以下消息
_googleSignIn.signIn();
E/Flutter ( 6491): MissingPluginException(No implementation found for
method init on channel plugins.Flutter.io/google_sign_in)
我验证了以下步骤:
GoogleSignInPlugin.registerWith(registry.registrarFor("io.Flutter.plugins.googlesignin.GoogleSignInPlugin")); // is present

GeneratedpluginRegistrant.registerWith(this); // in MainActivity.Java
用户经常报告此错误吗?不知道如何进行.我正在执行大多数文档所说的操作,但没有用.
我看到的其他怪异行为是,第一次运行Flutter运行时,它卡在了googleSignIn.SignIn()上.
仅在执行热重载(通过键入“ r”)之后,我才会看到上述错误消息:
E/Flutter (12326): MissingPluginException(No implementation found for
method init on channel plugins.Flutter.io/google_sign_in)
问题:在Flutter应用程序上是否可以进行基本身份验证?我只需要某种基本的身份验证,以便我的服务器可以知道它正在向哪个用户提供数据.
解决方法:
跑
清理干净并完全重新启动IDE和应用程序.这将解决它.

Angular routerLink指令的href属性生成逻辑
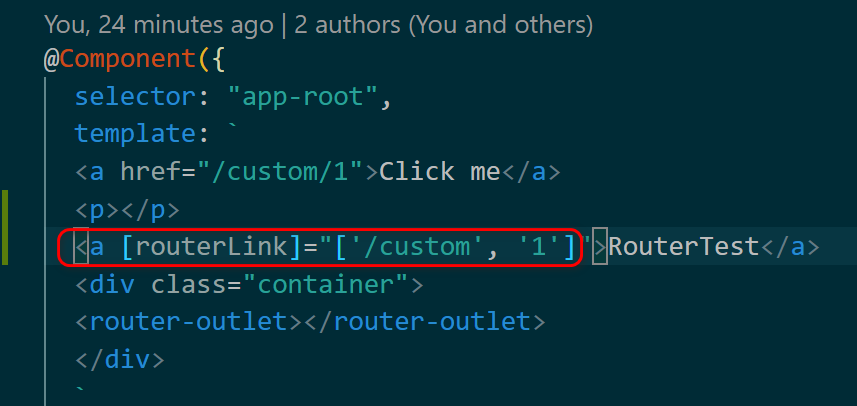
一个例子:
运行时,触发change detection,调用refreshView方法:
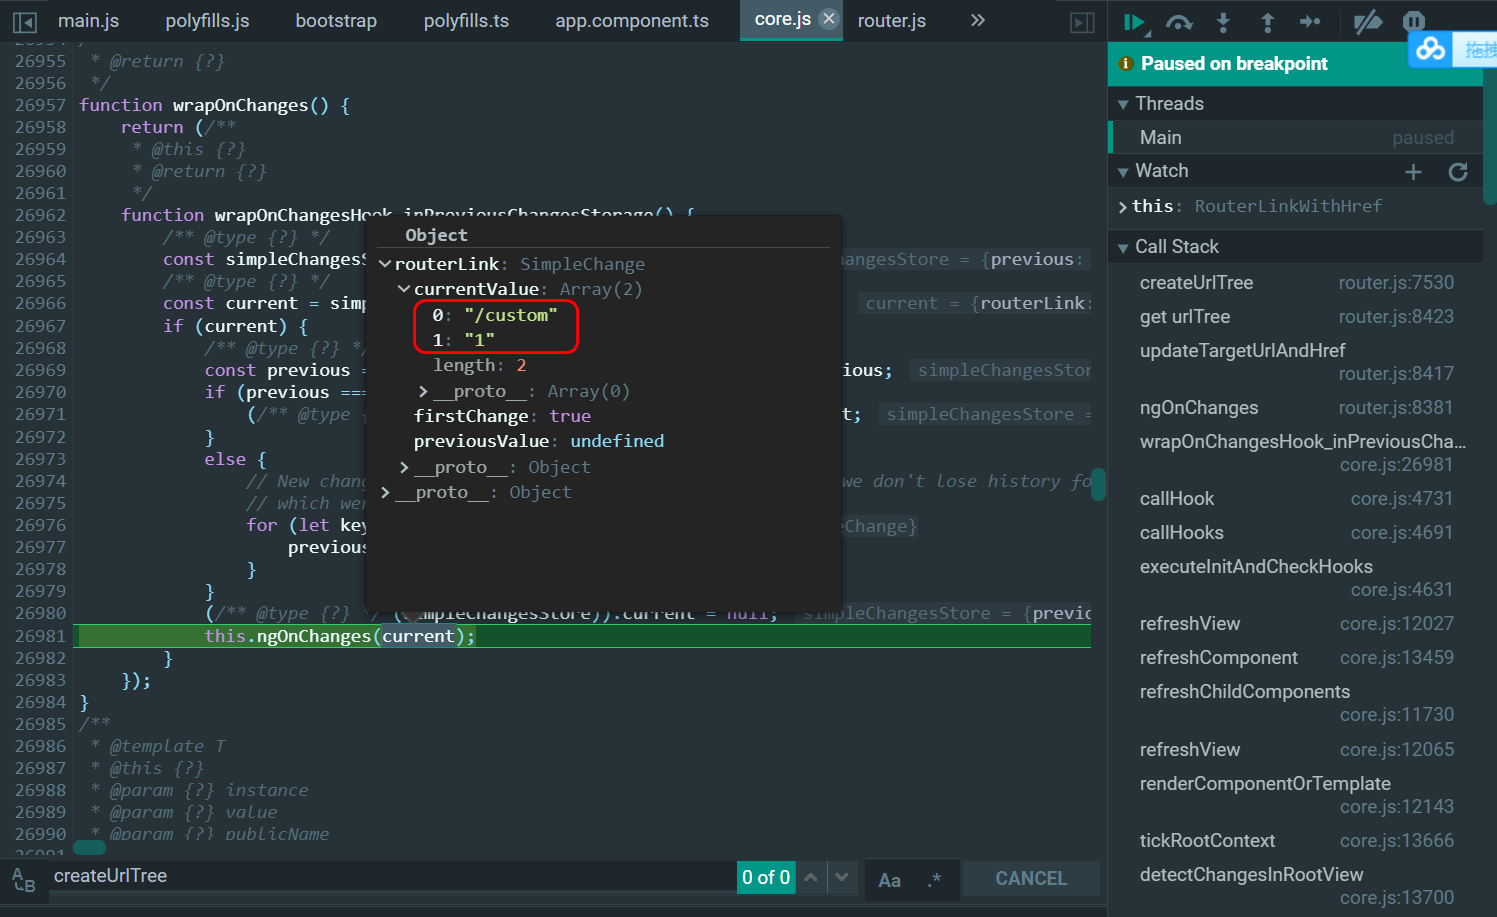
RouterLinkWithHref这个class实现了ngOnChanges hook方法:
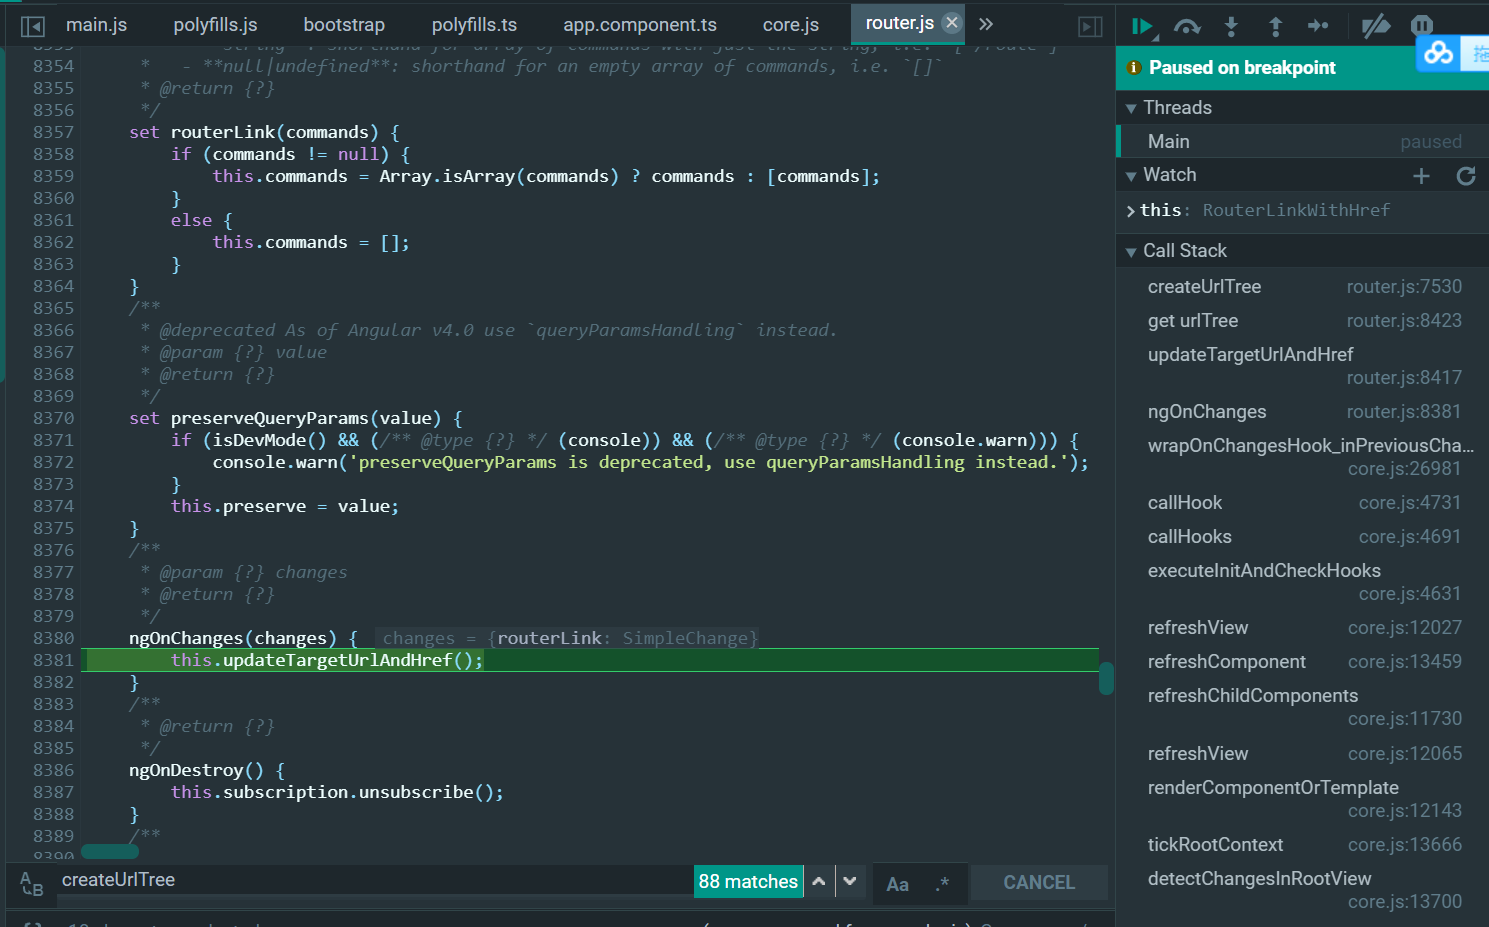
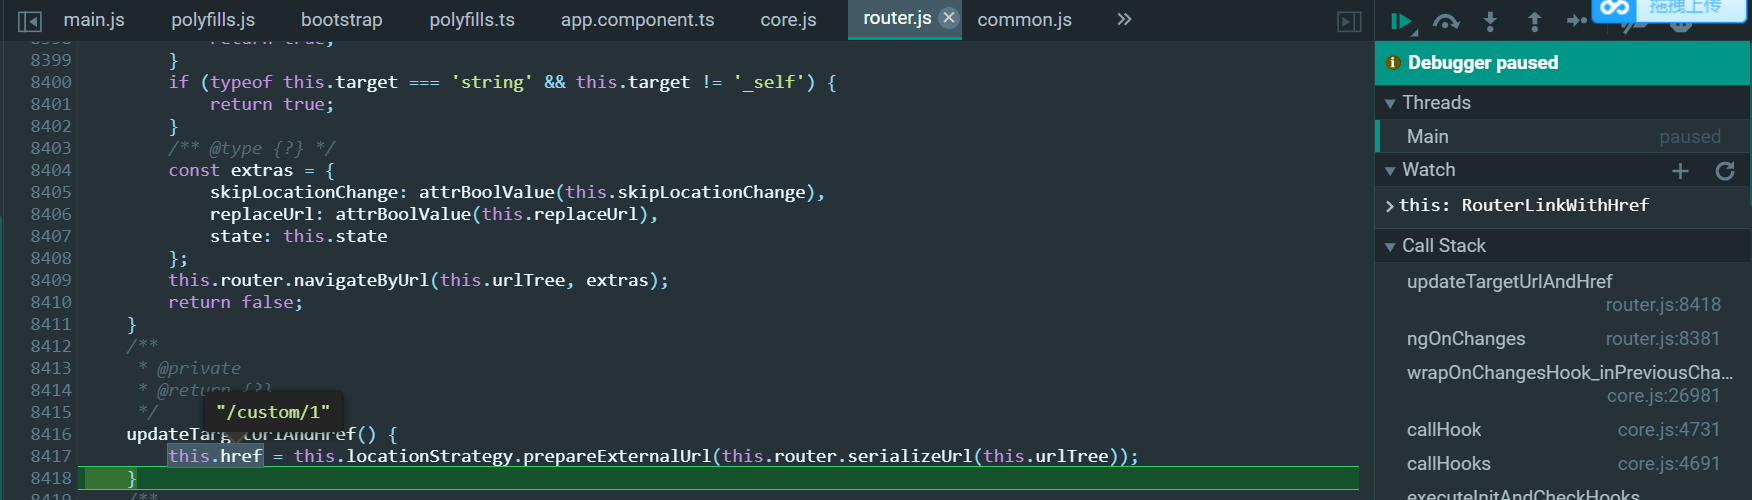
在updateTargetUrlAndHref方法里,生成href:
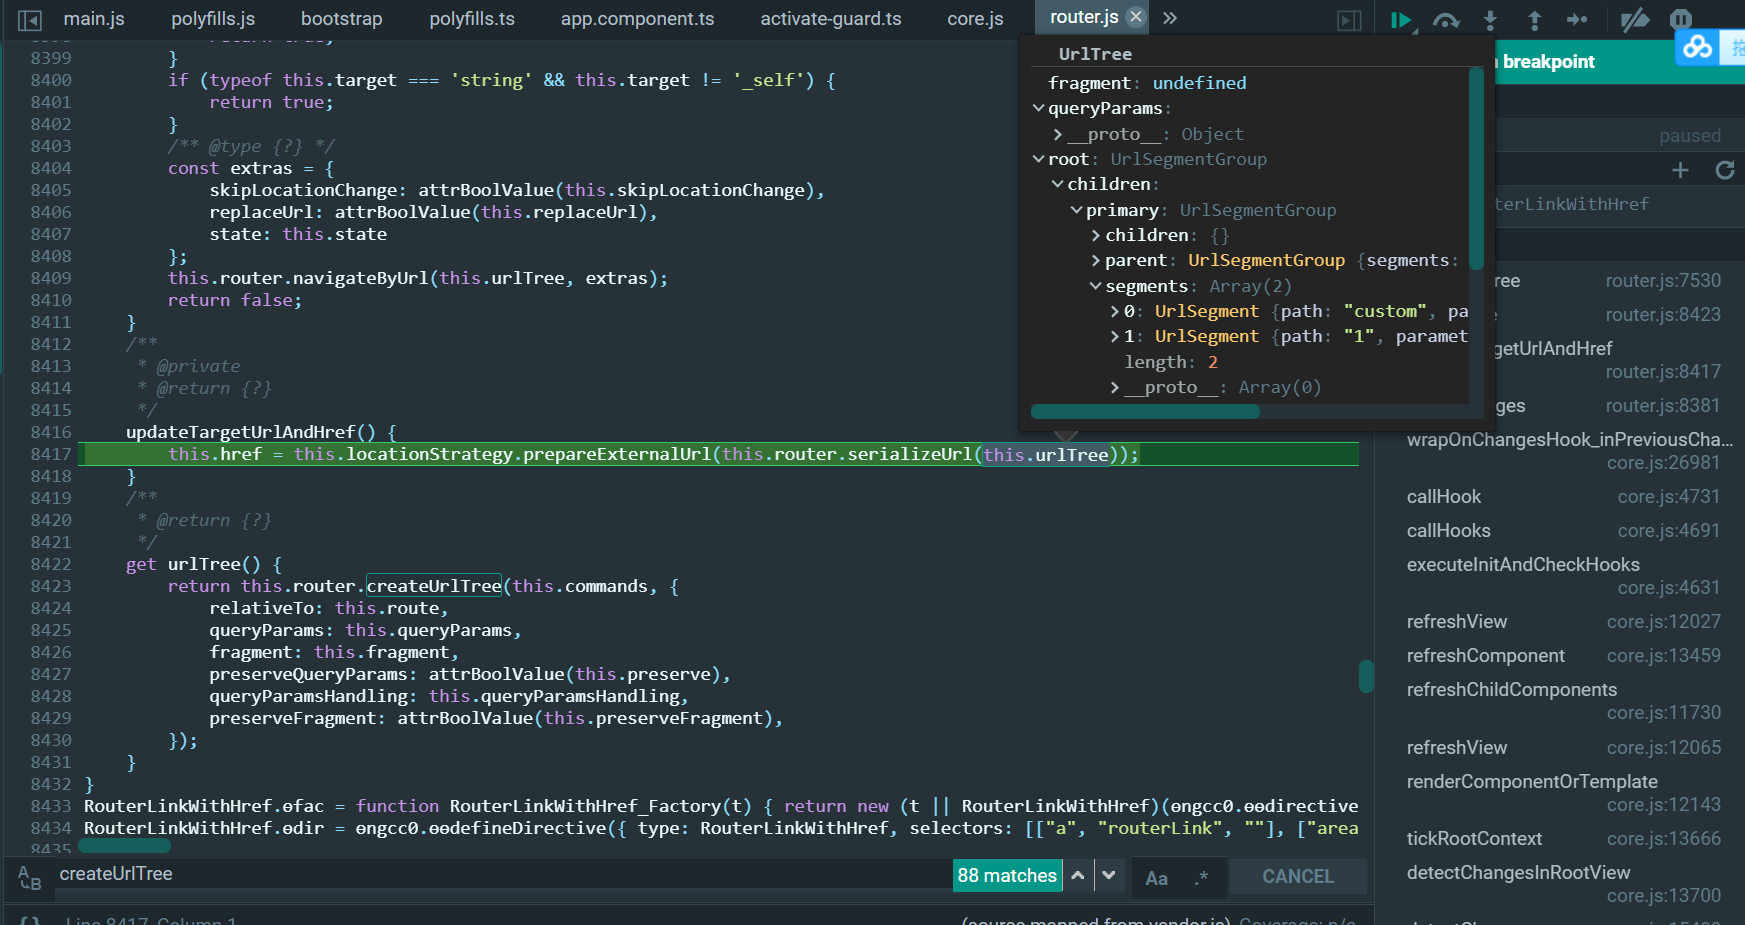
this.commands就是我们传入到routerLink Directive里的输入:
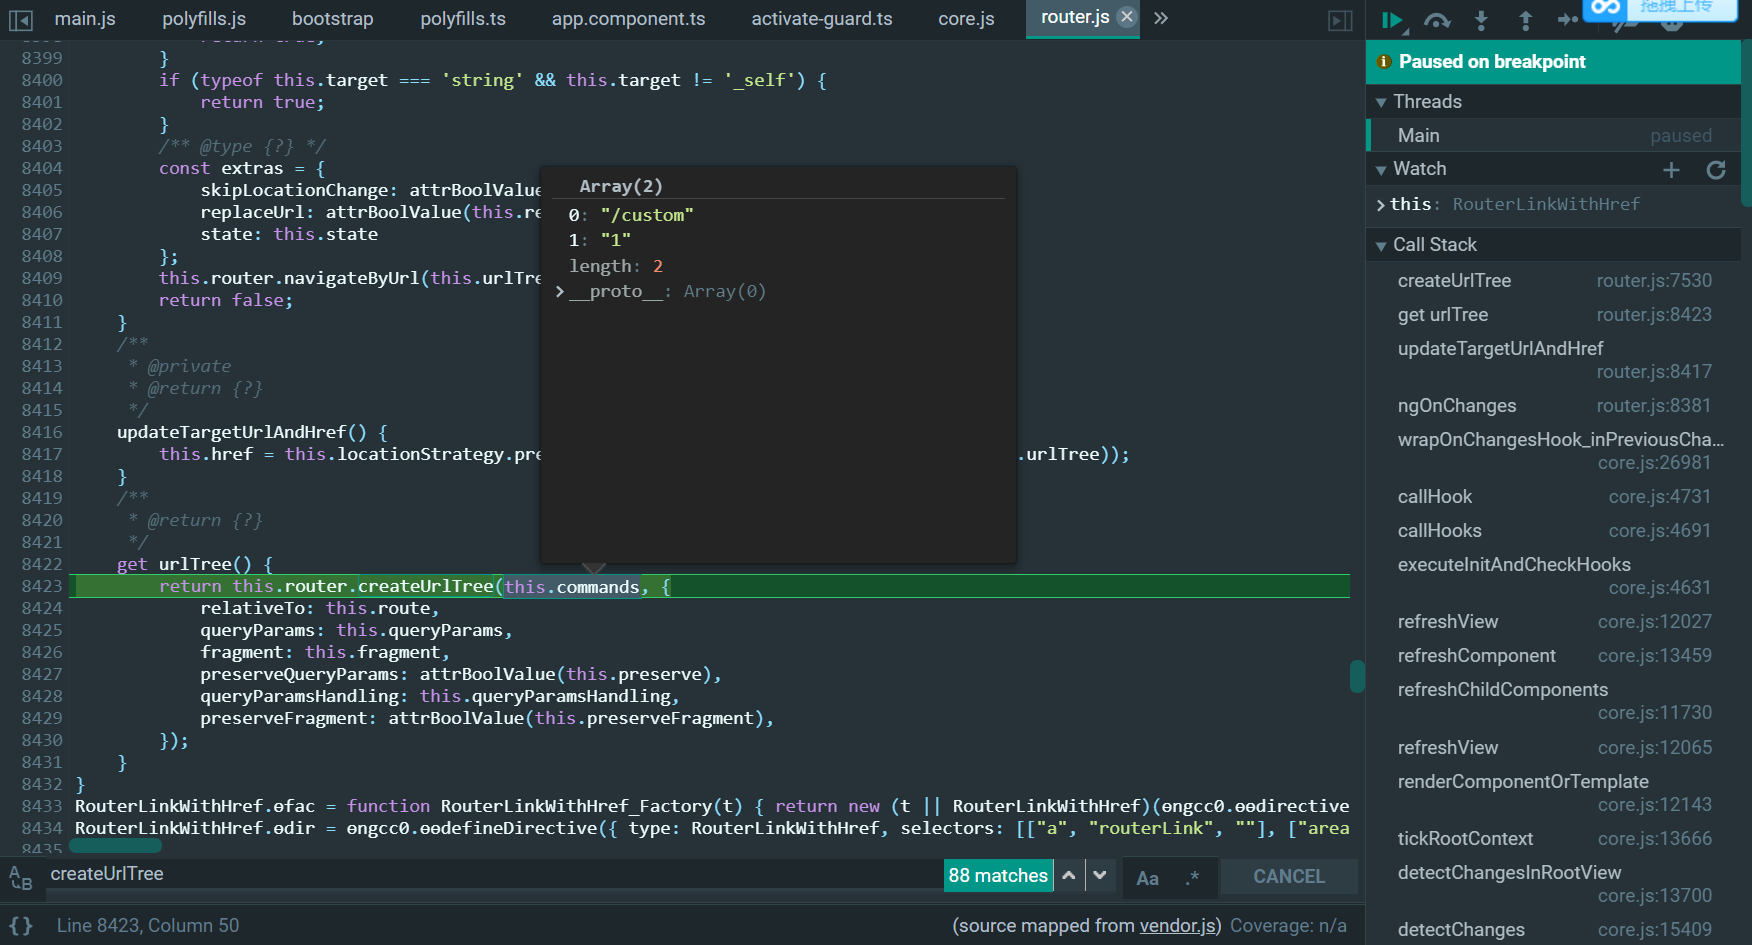
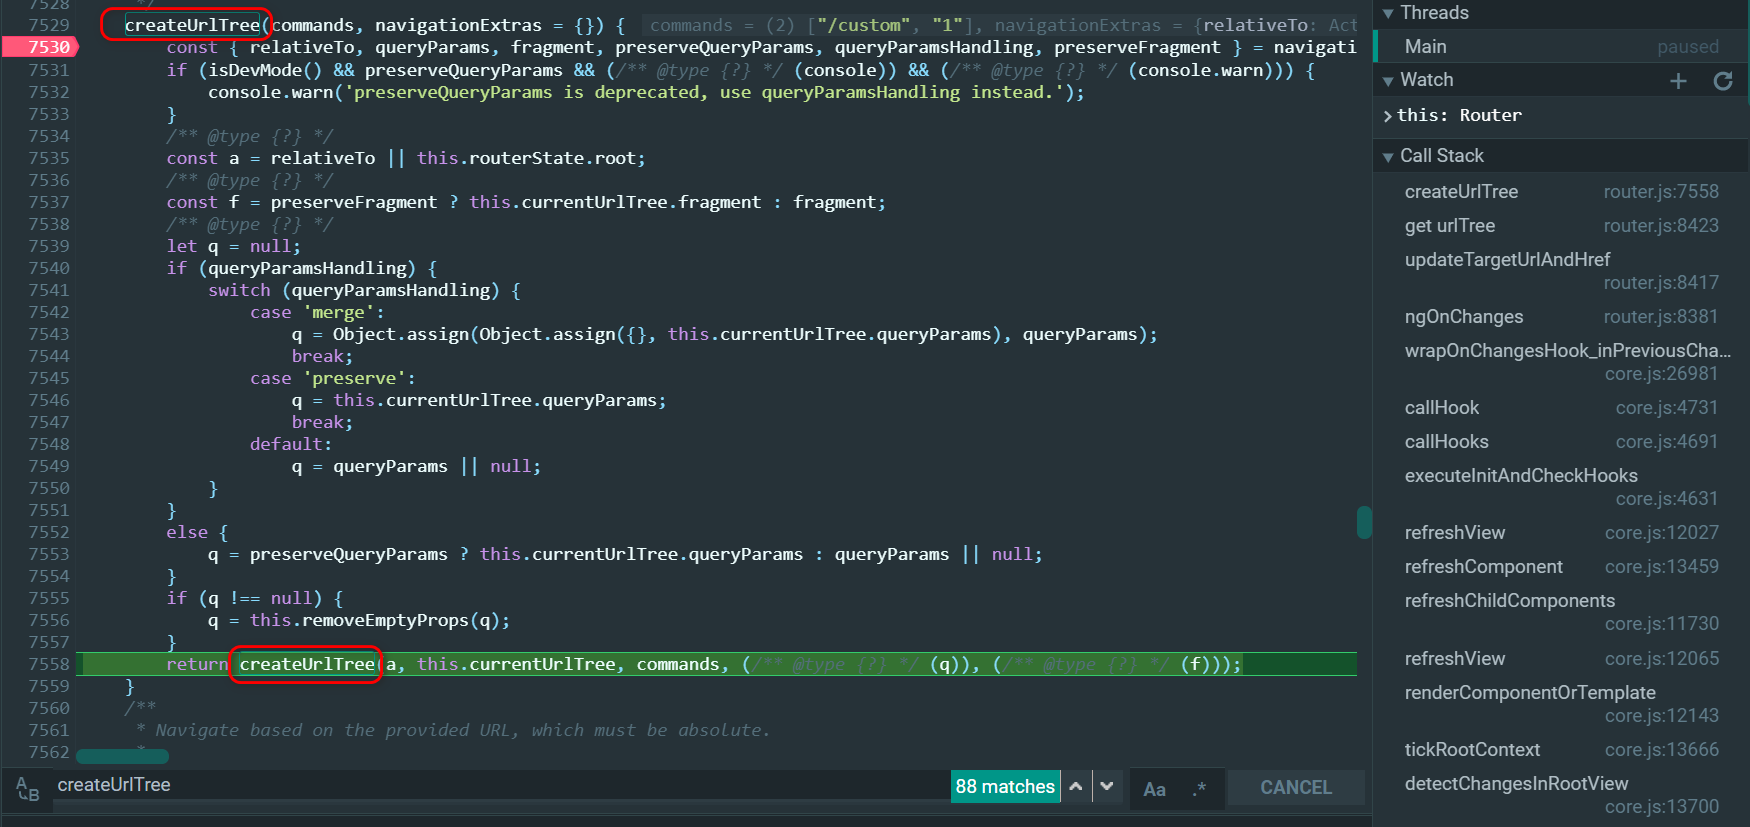
createUrlTree:
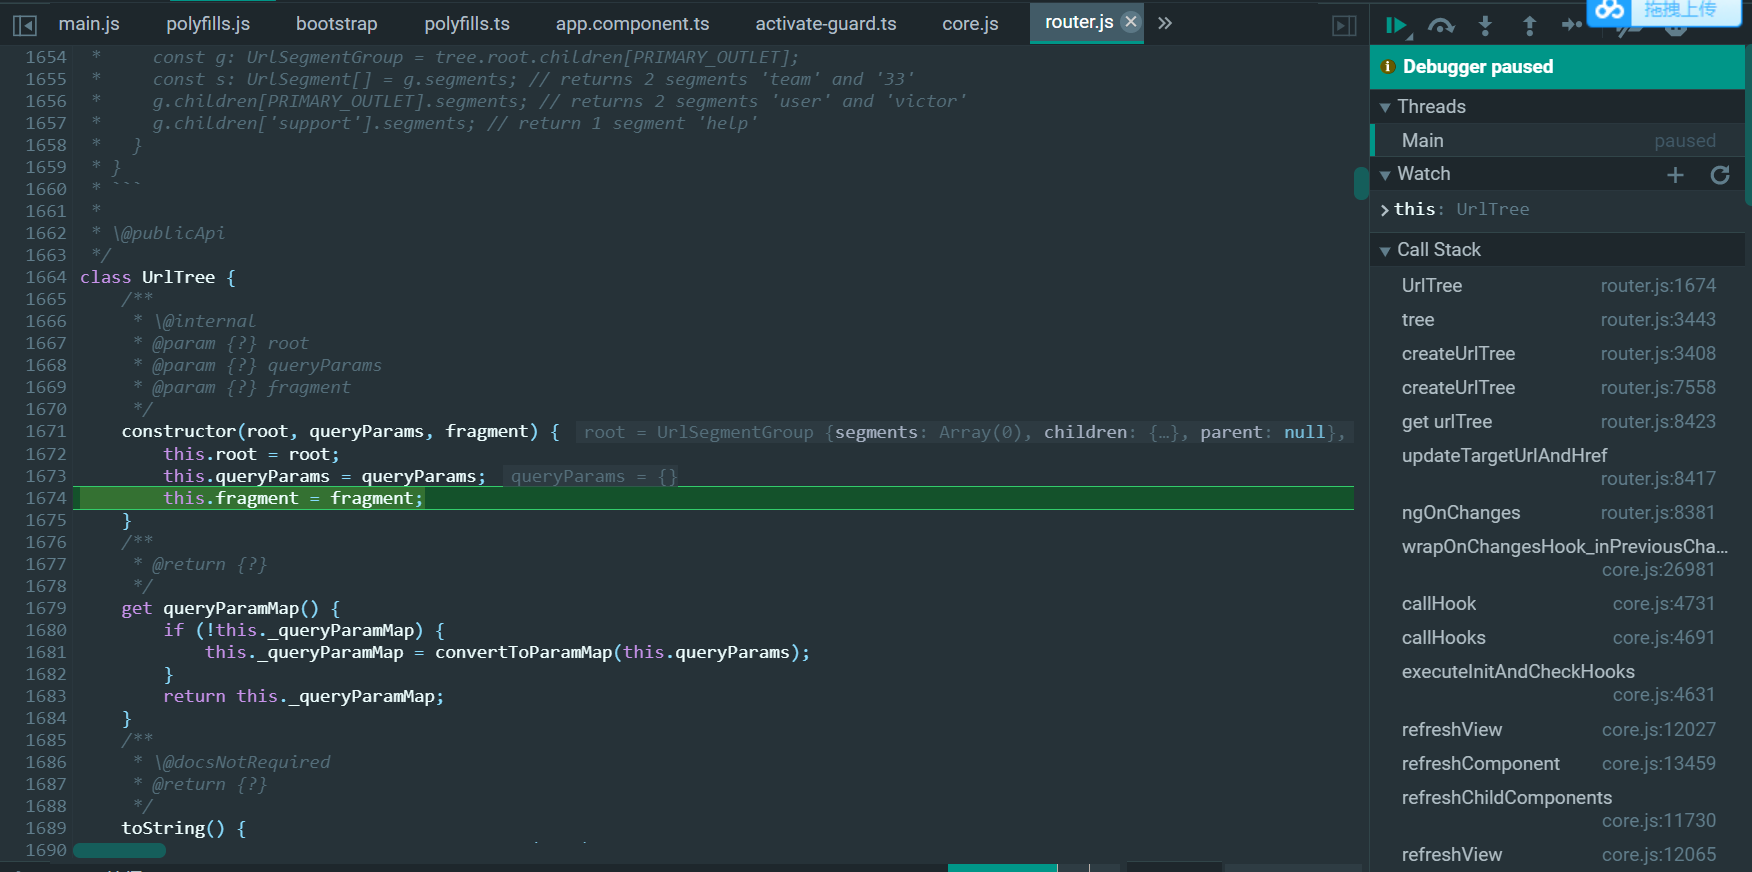
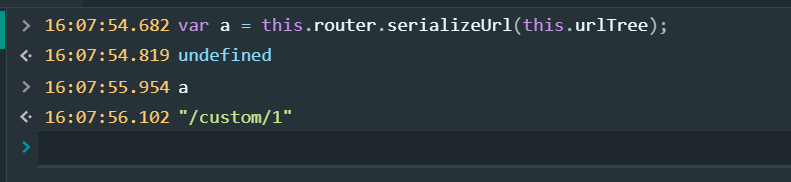
将JavaScript对象this.urlTree, 序列化成字符串url:
更多Jerry的原创文章,尽在:“汪子熙”:

本文同步分享在 博客“汪子熙”(CSDN)。
如有侵权,请联系 support@oschina.cn 删除。
本文参与“OSC源创计划”,欢迎正在阅读的你也加入,一起分享。
")
Announcing the Updated NGINX and NGINX Plus Plug‑In for New Relic (Version 2)
In March, 2013 we released the first version of the “nginx web server” plug‑in for New Relic monitoring of the open source NGINX software and NGINX Plus. Since then, we’ve received lots of interest from users – we greatly appreciate it! The plug‑in continues to be one of the most popular New Relic plug‑ins, in spite of the few things that (we believe!) could be improved. If you don’t already have a New Relic account, sign up as a NewRelic “Friend with benefits”.
We selected Ruby as the base language for the original plug‑in, because the New Relic platform itself is written in Ruby, the API was not yet published, and many things were changing quickly.
Later, after the launch of the New Relic platform, we continued to work on adding a number of improvements based on users’ feedback and our own vision of how to improve the overall usability of the NGINX monitoring plug‑in, and realized the need for further changes.
What’s New?
Today, we are pleased to announce a major update of the NGINX plug‑in for New Relic, version 2.0, which includes the following changes:
- The plug‑in is rewritten in Python. You no longer need to install Ruby.
- The plug‑in is finally packaged. There are prebuilt packages for RHEL/CentOS‑based and Debian/Ubuntu‑based systems. An included init script enables you to easily set up autostart of the plug‑in.
-
There are two new sections in the live activity monitoring dashboard, for NGINX Plus customers:
- Servers – Additional summary counters for virtual servers whose
serverconfiguration block includes thestatus_zonedirective - Cache – Cumulative stats for all configured caches
- Servers – Additional summary counters for virtual servers whose
- Verbose logging is enabled by default.
Installation
Download the plug‑in and installation instructions.
Configuring the Plug‑In
The configuration file for the NGINX plug‑in is /etc/nginx-nr-agent/nginx-nr-agent.ini. The minimal configuration includes:
-
Your New Relic license key in the
newrelic_license_keystatement in theglobalsection. -
At least one
sourcesection. The name of the section is used in log entries only, and can contain almost any character string you want. Two parameters are required:name– NGINX instance name in the New Relic UI.url– Full URL to the corresponding instance. The plug‑in accepts source data in the format generated when thestub_statusdirective is included in the configuration of NGINX or NGINX Plus. It also supports the JSON‑formatted output generated when thestatusdirective is included in an NGINX Plus configuration.
You can include the optional http_user and http_pass statements to set HTTP basic authentication credentials in cases where the corresponding location is protected by the NGINX auth_basic directive.
The default log file is /var/log/nginx-nr-agent.log.
Running the Plug‑In
You can manage the plug‑in with an init script. Run the service nginx-nr-agent command with the start, stop, or status argument to start, stop, or display the status of the plug‑in, respectively.
When started from an init script, the plug‑in daemon runs as the nobody user.
You can start the plug‑in directly by running /usr/bin/nginx-nr-agent.py, with the following optional parameters:
-c,--config– Path to configuration file-p,--pidfile> – Path to PID file-f,--foreground– Do not detach from terminal (useful for debugging)
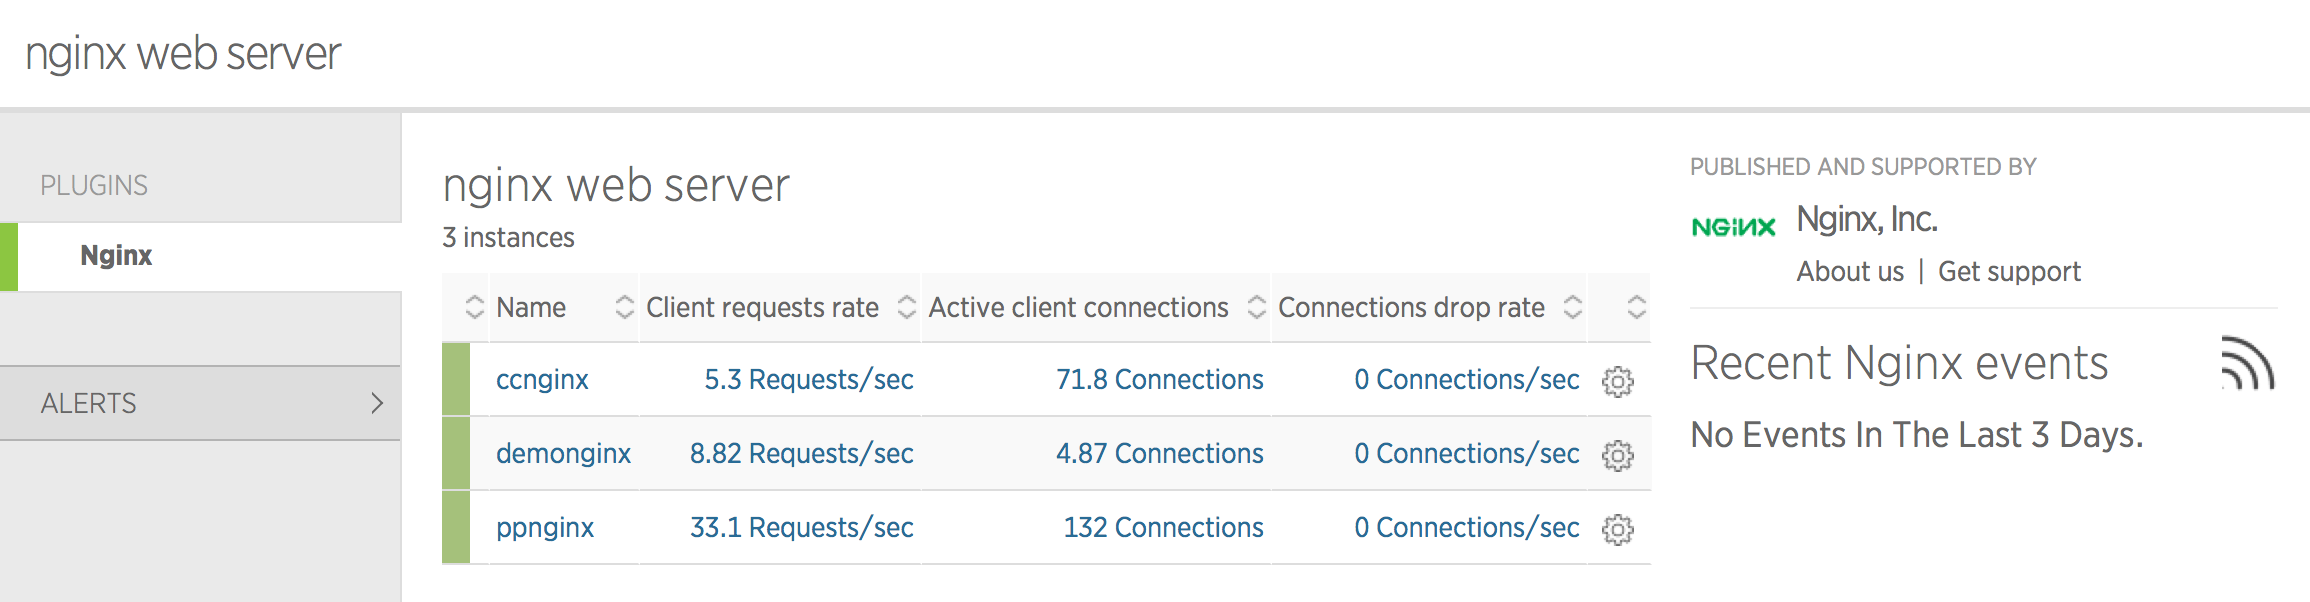
If everything is working as expected, the plug‑in appears as a tab in the New Relic UI:
Dashboard Examples
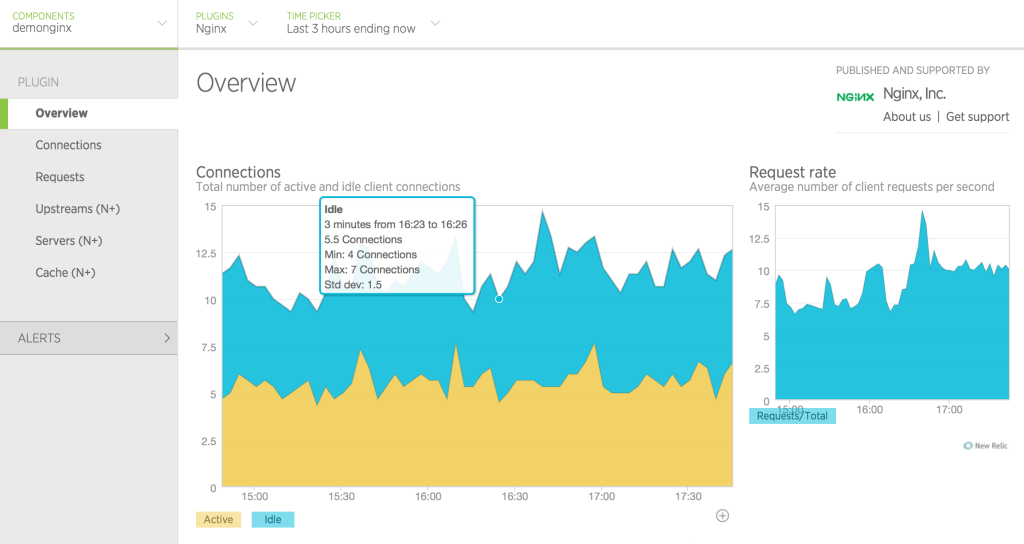
Overview
The Overview tab displays the most basic metrics for the whole instance: number of active and idle connections, and request rate.
Connections
The Connections tab displays various metrics about client connections.

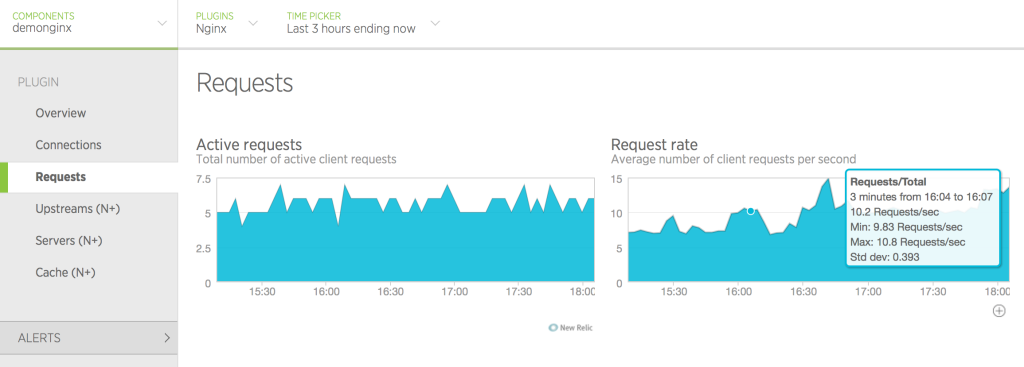
Requests
The Requests tab displays the number of requests currently being processed and the overall request rate.
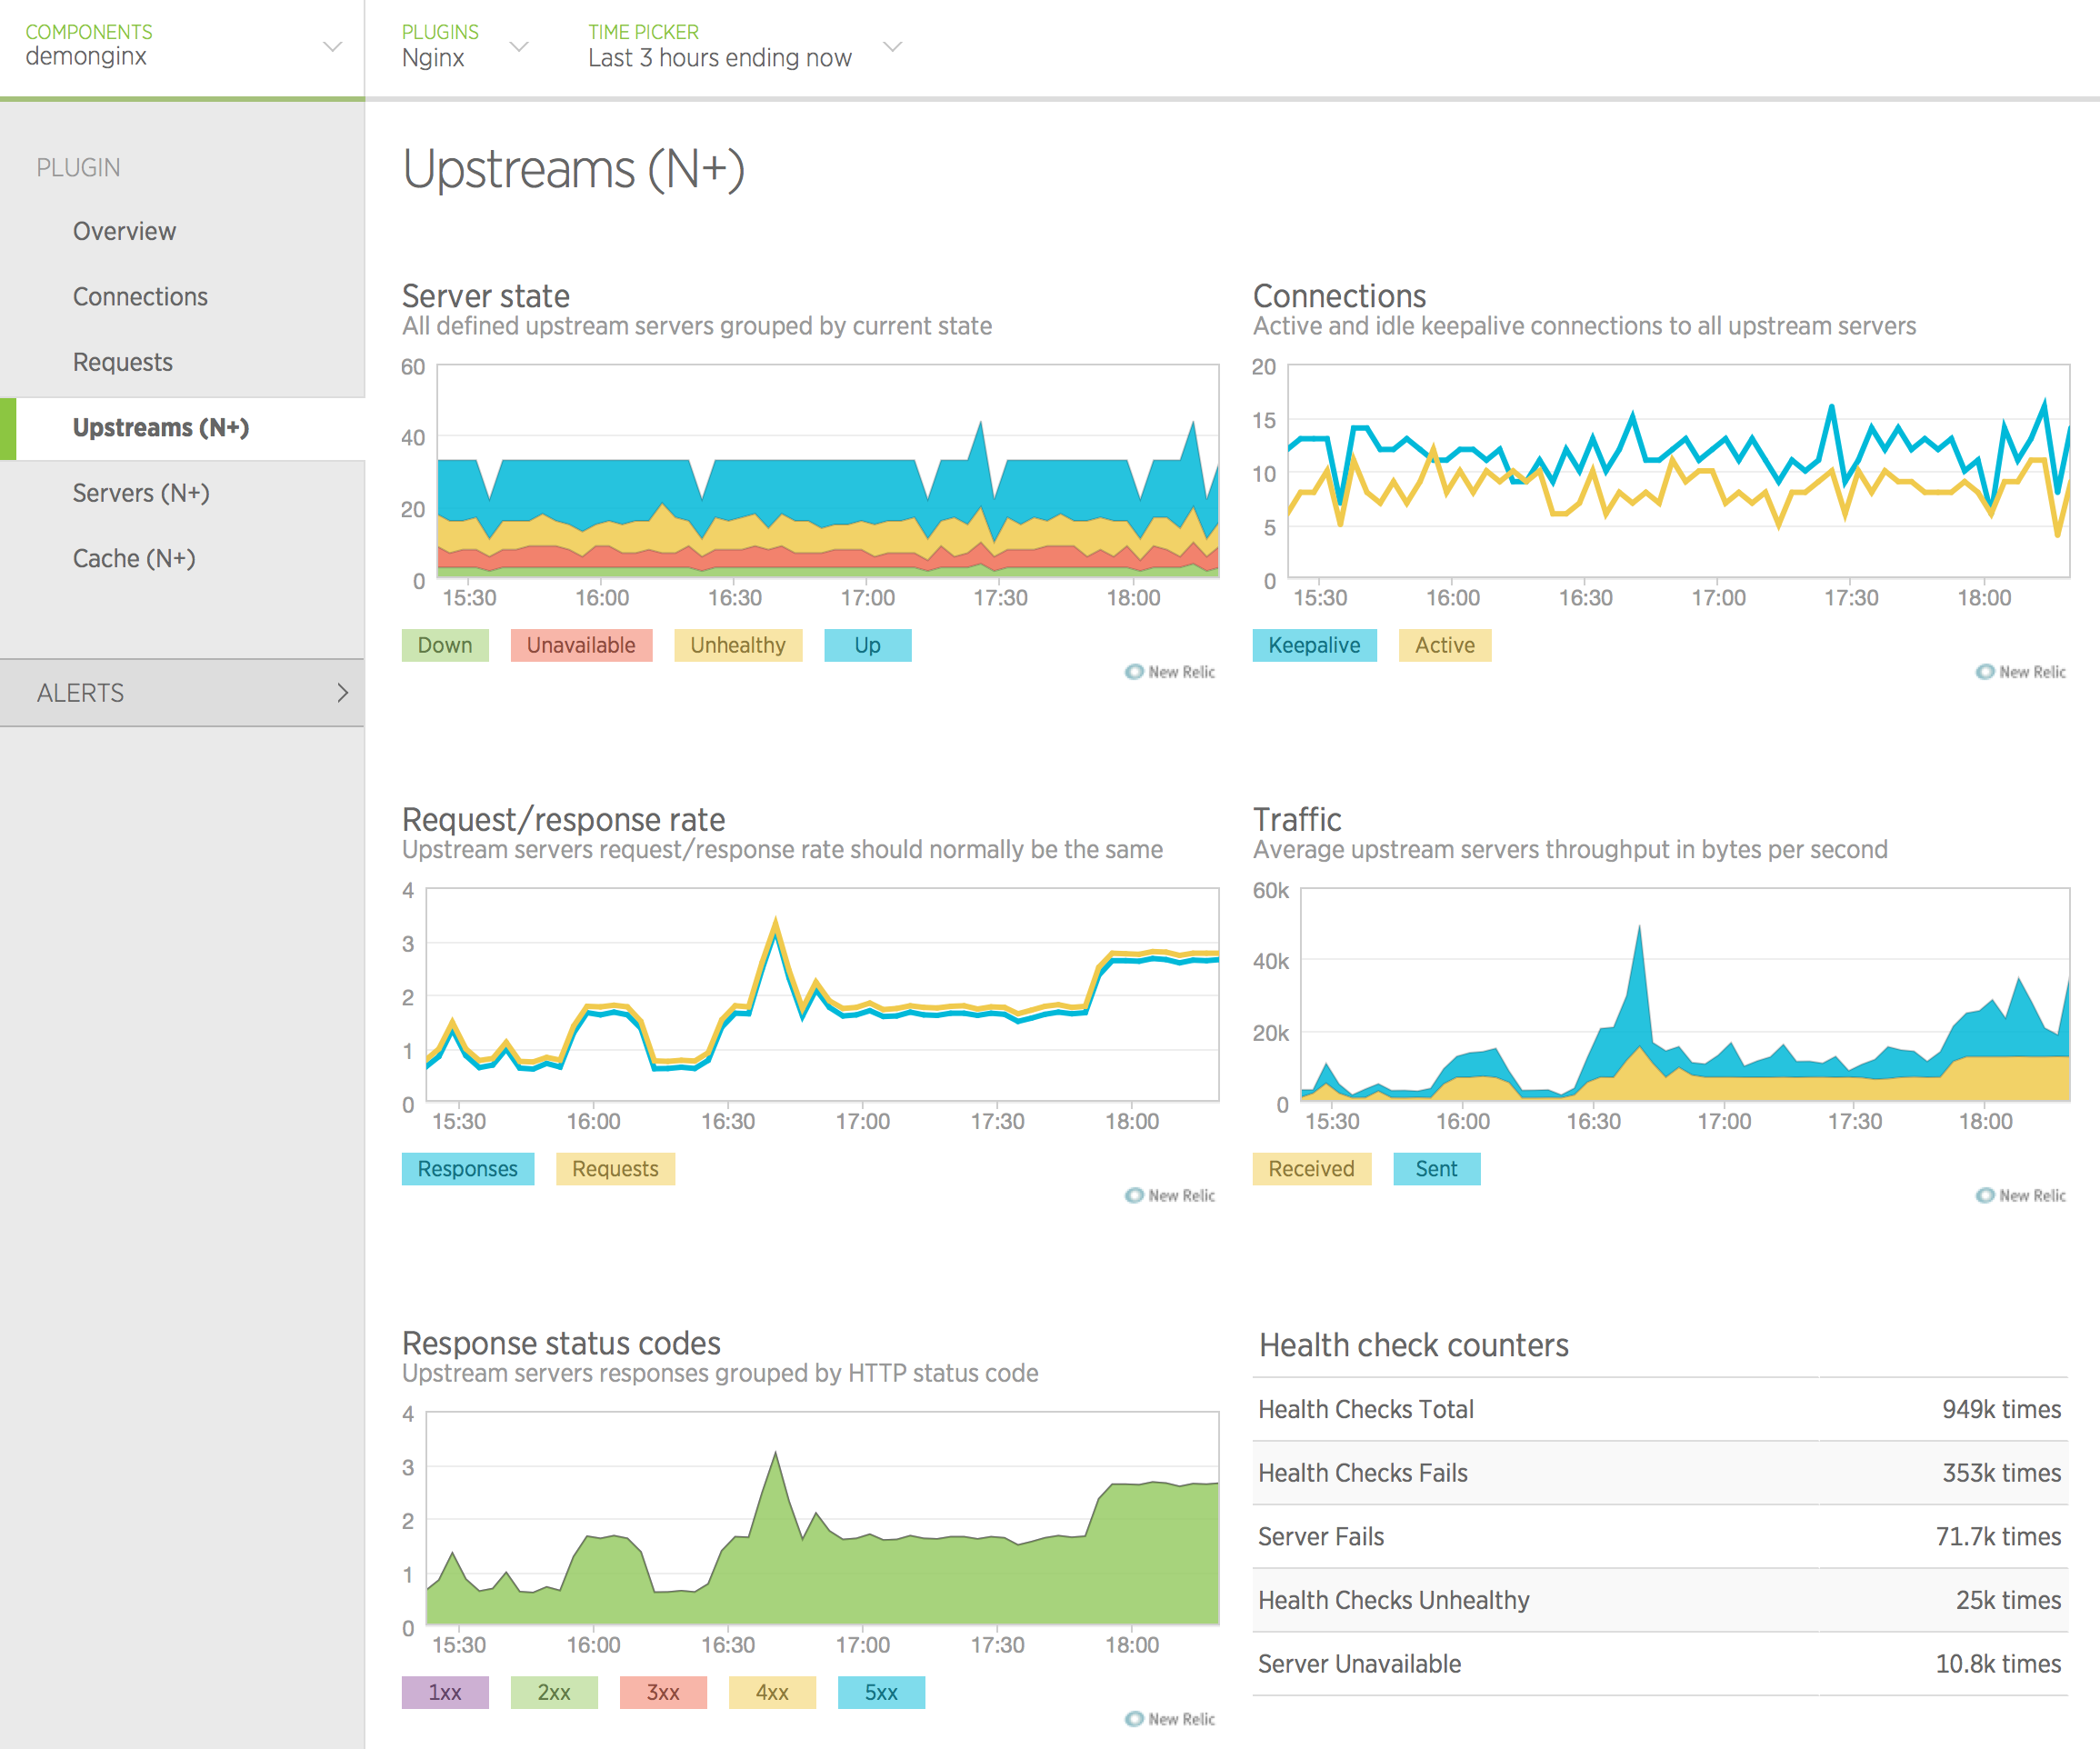
Upstreams (NGINX Plus only)
The Upstreams tab displays detailed statistics about all configured upstream groups.
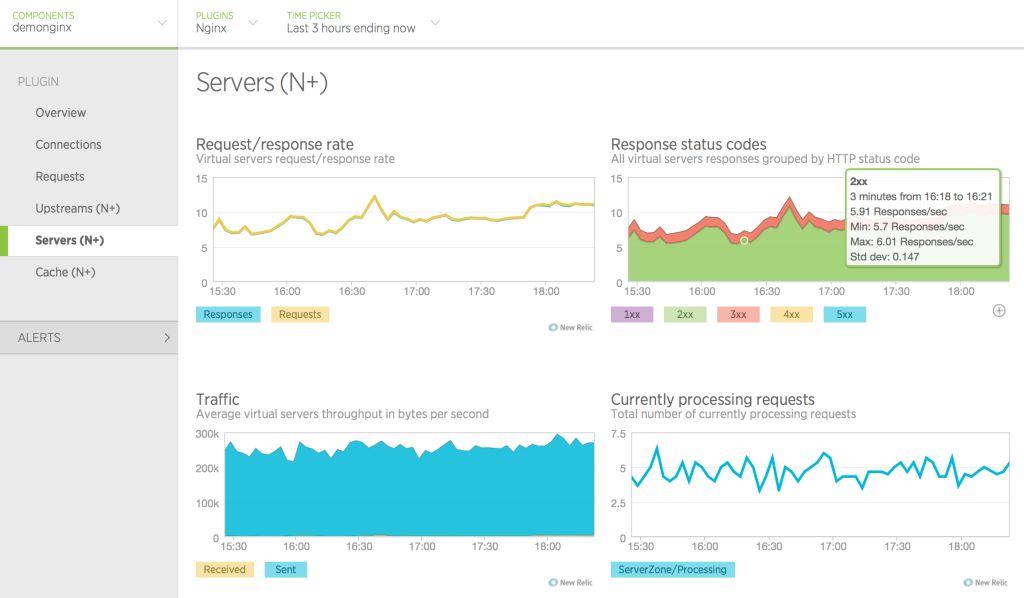
Servers (NGINX Plus only)
The Servers tab displays detailed statistics about all configured virtual server zones.
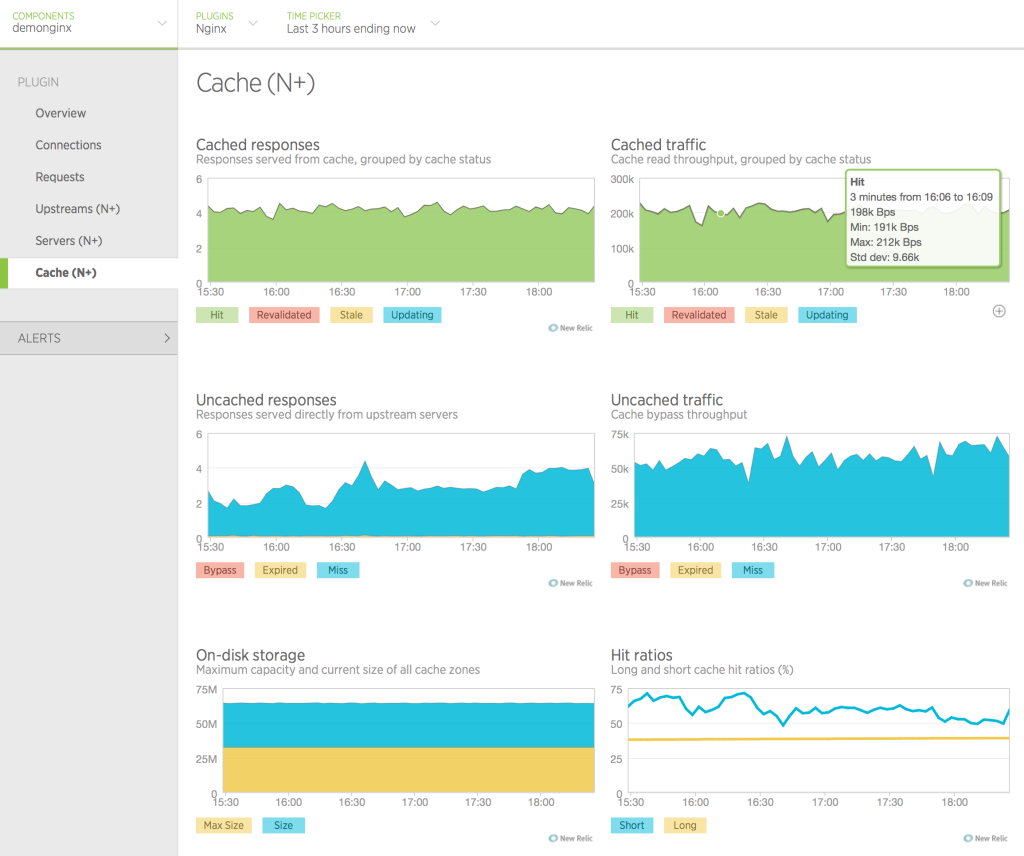
Cache (NGINX Plus only)
The Cache tab displays summary statistics for all configured caches.
What’s Next?
We plan to extend the plug‑in’s functionality with additional metrics for both NGINX and NGINX Plus, and your feedback is very important to us. Ideas, thoughts, questions? Let us know by commenting on this post.
Thanks for using NGINX and NGINX Plus!
To try NGINX Plus, start your free 30-day trial today or contact us.
关于Django cms从Textplugin移除href属性和django删除的介绍已经告一段落,感谢您的耐心阅读,如果想了解更多关于android – Cordova-plugin-fcm:找不到名字’FCMPlugin’、android-MissingPluginException(未在渠道plugins.flutter.io/google_sign_in上找到方法init的实现)、Angular routerLink指令的href属性生成逻辑、Announcing the Updated NGINX and NGINX Plus Plug‑In for New Relic (Version 2)的相关信息,请在本站寻找。
本文标签:


