对于小程序自定义tabbar以vantweapp为例感兴趣的读者,本文将提供您所需要的所有信息,我们将详细讲解小程序自定义tabbar凸起,并且为您提供关于FlutterAppBar自定义顶部导航按钮
对于小程序自定义 tabbar 以vant weapp为例感兴趣的读者,本文将提供您所需要的所有信息,我们将详细讲解小程序自定义tabbar凸起,并且为您提供关于Flutter AppBar 自定义顶部导航按钮 图标、颜色 以及 TabBar 定义顶部 Tab 切换、uni-app 自定义tabBar、uni-app 自定义凸出的tabbar、UNI-APP项目模板《自定义TabBar》《上传图片》《全局自定义loading》等功能 主要适配 微信小程序、APP、H5。的宝贵知识。
本文目录一览:- 小程序自定义 tabbar 以vant weapp为例(小程序自定义tabbar凸起)
- Flutter AppBar 自定义顶部导航按钮 图标、颜色 以及 TabBar 定义顶部 Tab 切换
- uni-app 自定义tabBar
- uni-app 自定义凸出的tabbar
- UNI-APP项目模板《自定义TabBar》《上传图片》《全局自定义loading》等功能 主要适配 微信小程序、APP、H5。
")
小程序自定义 tabbar 以vant weapp为例(小程序自定义tabbar凸起)
1.首先建立 custom-tab-bar 文件夹 包含 index.js index.json index.wxml
// index.js文件
Component({
    data: {
    active:
0,
    list: [
      {
        "url": "/pages/index/index",
        "icon": "wap-home-o",
        "text": "首页"
      },
      {
        "url": "/pages/index/prize",
        "icon": "orders-o",
        "text": "奖品"
      },
      {
        "url": "/pages/index/exchange",
        "icon": "points",
        "text": "兑换"
      },
      {
        "url": "/pages/index/my",
        "icon": "user-circle-o",
        "text": "我的"
      }
    ]
    },
    methods: {
     onChange(e) {
        console.log(e,''e'')
        this.setData({ active: e.detail });
        wx.switchTab({
          url: this.data.list[e.detail].url
        });
     },
     init() {
         const page = getCurrentPages().pop();
         this.setData({
           active: this.data.list.findIndex(item => item.url === `/${page.route}`)
         });
        }
     }
});
index.json文件
{
    "component": true,
    "usingComponents": {
        "van-tabbar": "@vant/weapp/tabbar/index",
      "van-tabbar-item": "@vant/weapp/tabbar-item/index",
    "van-icon": "@vant/weapp/icon/index"
    }
}
index.wxml文件
<van-tabbar active="{{ active }}" bind:change="onChange">
  <van-tabbar-item wx:for="{{ list }}" wx:key="index" icon="{{ item.icon }}">{{
    item.text
  }}</van-tabbar-item>
</van-tabbar> /**
* 生命周期函数--监听页面显示 在每个tabbar页面onshow 调用即可;
*/
onShow: function () {
console.log(''个人中心'')
this.getTabBar().init();
},app.json文件
{
  "pages": [
    "pages/index/index",
    "pages/index/prize",
    "pages/index/exchange",
    "pages/index/my"
  ],
  "window": {
    "backgroundTextStyle": "light",
    "navigationBarBackgroundColor": "#fff",
    "navigationBarTitleText": "WeChat",
    "navigationBarTextStyle": "black"
  },
  "usingComponents": {

  },
  "tabBar": {
    "custom": true,
    "color": "#000000",
    "selectedColor": "#000000",
    "backgroundColor": "#000000",
    "list": [
      {
        "pagePath": "pages/index/index",
        "text": "首页"
      },
      {
        "pagePath": "pages/index/prize",
        "text": "奖品"
      },
      {
        "pagePath": "pages/index/exchange",
        "text": "兑换"
      },
      {
        "pagePath": "pages/index/my",
        "text": "我的"
      }
    ]
  },
  "sitemapLocation": "sitemap.json"
}

Flutter AppBar 自定义顶部导航按钮 图标、颜色 以及 TabBar 定义顶部 Tab 切换
Flutter AppBar 自定义顶部按钮图 标、颜色
|
属性 |
描述 |
|
leading |
在标题前面显示的一个控件,在首页通常显示应用 的 logo;在其他界面通常显示为返回按钮 |
|
title |
标题,通常显示为当前界面的标题文字,可以放组 件 |
|
actions |
通常使用 IconButton 来表示,可以放按钮组 |
|
bottom |
通常放 tabBar,标题下面显示一个 Tab 导航栏 |
|
backgroundColor |
导航背景颜色 |
|
iconTheme |
图标样式 |
|
textTheme |
文字样式 |
|
centerTitle |
标题是否居中显示 |
import ''package:flutter/material.dart'';

class AppBarDemoPage extends StatelessWidget {
  const AppBarDemoPage({Key key}) : super(key: key);

  @override
  Widget build(BuildContext context) {
    return Scaffold(
      appBar: AppBar(
        title:Text("AppBarDemoPage"),
        // backgroundColor: Colors.red,
        centerTitle:true,
        leading: IconButton(
          icon: Icon(Icons.menu),
          onPressed: (){
            print(''menu'');
          },
        ),
        actions: <Widget>[
          IconButton(
            icon: Icon(Icons.search),
            onPressed: (){
              print(''search'');
            },
          ),
          IconButton(
            icon: Icon(Icons.settings),
            onPressed: (){
              print(''settings'');
            },
          )
        ],

      ),
      body: Text(''内容''),
    );
  }
}
Flutter AppBar 中自定义 TabBar 实 现顶部 Tab 切换
TabBar 常见属性:
|
属性 |
描述 |
|
tabs |
显示的标签内容,一般使用 Tab 对象,也可以是其他 的 Widget |
|
controller |
TabController 对象 |
|
isScrollable |
是否可滚动 |
|
indicatorColor |
指示器颜色 |
|
indicatorWeight |
指示器高度 |
|
indicatorPadding |
底部指示器的 Padding |
|
indicator |
指示器 decoration,例如边框等 |
|
indicatorSize |
指示器大小计算方式,TabBarIndicatorSize.label 跟文 字等宽,TabBarIndicatorSize.tab 跟每个 tab 等宽 |
|
labelColor |
选中 label 颜色 |
|
labelStyle |
选中 label 的 Style |
|
labelPadding |
每个 label 的 padding 值 |
|
unselectedLabelColor |
未选中 label 颜色 |
|
unselectedLabelStyle |
未选中 label 的 Style |
import ''package:flutter/material.dart'';

class AppBarDemoPage extends StatelessWidget {
  const AppBarDemoPage({Key key}) : super(key: key);

  @override
  Widget build(BuildContext context) {
    return DefaultTabController(
      length:2 ,
      child: Scaffold(
          appBar: AppBar(
            title:Text("AppBarDemoPage"),
            // backgroundColor: Colors.red,
            centerTitle:true,

            bottom: TabBar(
              tabs: <Widget>[
                Tab(text: "热门"),
                Tab(text: "推荐")
              ],
            ),


          ),
          body: TabBarView(
            children: <Widget>[
              ListView(
                children: <Widget>[
                  ListTile(
                    title:Text("第一个tab")
                  ),
                  ListTile(
                    title:Text("第一个tab")
                  ),
                  ListTile(
                    title:Text("第一个tab")
                  )
                ],
              ),
               ListView(
                children: <Widget>[
                  ListTile(
                    title:Text("第二个tab")
                  ),
                  ListTile(
                    title:Text("第二个tab")
                  ),
                  ListTile(
                    title:Text("第二个tab")
                  )
                ],
              )
            ],
          ),
        ),
    );
  }
}
import ''package:flutter/material.dart'';
class CategoryPage extends StatefulWidget {
CategoryPage({Key key}) : super(key: key);
_CategoryPageState createState() => _CategoryPageState();
}
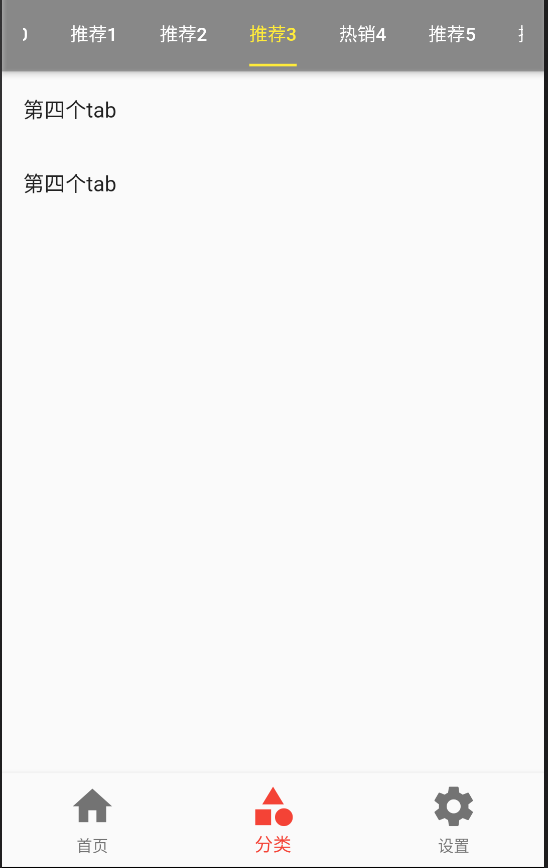
class _CategoryPageState extends State<CategoryPage> {
@override
Widget build(BuildContext context) {
return DefaultTabController(
length: 4,
child: Scaffold(
appBar: AppBar(
backgroundColor: Colors.black26,
title: Row(
mainAxisAlignment: MainAxisAlignment.center,
children: <Widget>[
Expanded(
child:TabBar(
indicatorColor:Colors.blue,
labelColor:Colors.blue,
unselectedLabelColor: Colors.white,
indicatorSize:TabBarIndicatorSize.label ,
tabs: <Widget>[
Tab(text: "热销"),
Tab(text: "推荐"),
Tab(text: "热门"),
Tab(text: "视频")
],
) ,
)
],
),
),
body:TabBarView(
children: <Widget>[
ListView(
children: <Widget>[
ListTile(
title:Text("第一个tab")
),
ListTile(
title:Text("第一个tab")
),
ListTile(
title:Text("第一个tab")
)
],
),
ListView(
children: <Widget>[
ListTile(
title:Text("第二个tab")
),
ListTile(
title:Text("第二个tab")
),
ListTile(
title:Text("第二个tab")
)
],
),
ListView(
children: <Widget>[
ListTile(
title:Text("第3个tab")
),
ListTile(
title:Text("第3个tab")
),
ListTile(
title:Text("第一个tab")
)
],
),
ListView(
children: <Widget>[
ListTile(
title:Text("第4个tab")
),
ListTile(
title:Text("第二个tab")
),
ListTile(
title:Text("第二个tab")
)
],
)
],
)
),
);
}
}Flutter AppBar 中自定义 TabBar 实 现 Tabs 的另一种方法--TabController
import ''package:flutter/material.dart'';

class TabBarControllerPage extends StatefulWidget {
  TabBarControllerPage({Key key}) : super(key: key);

  _TabBarControllerPageState createState() => _TabBarControllerPageState();
}

class _TabBarControllerPageState extends State<TabBarControllerPage> with SingleTickerProviderStateMixin {

  TabController _tabController;

  @override
  void dispose() {   //生命周期函数
    // TODO: implement dispose
    super.dispose();
    _tabController.dispose();
  }

  @override
  void initState() {   //生命周期函数
    // TODO: implement initState
    super.initState();
    _tabController=new TabController(
      vsync: this,
      length: 2
    );
    //可以监听一些方法
    // _tabController.addListener((){

    //   print(_tabController.index);
    // });
  }


  @override
  Widget build(BuildContext context) {
    return Scaffold(
      appBar: AppBar(
        title: Text("TabBarControllerPage"),
        bottom: TabBar(
          controller: this._tabController,  //注意
          tabs: <Widget>[
            Tab(text:"热销"),
            Tab(text:"推荐"),
          ],
        ),
      ),
      body: TabBarView(
        controller: this._tabController,  //注意
        children: <Widget>[
          Center(child: Text("热销")),
          Center(child: Text("推荐"))

        ],
      ),
    );
  }
}

uni-app 自定义tabBar
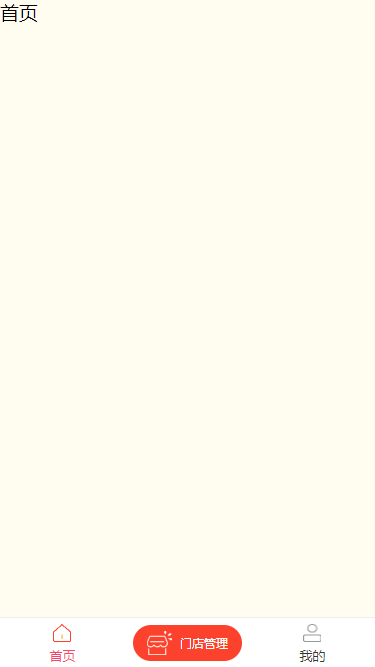
uni-app框架原生的tabbar虽然流畅度非常好,但是配置并不支持中间图标自定义样式设置,这个时候就需要自己去写一个自定义的底部tabbar。
如图所示式样
完成的自定义tabbar展示效果如下:
入口 index.vue(引入页面组件)
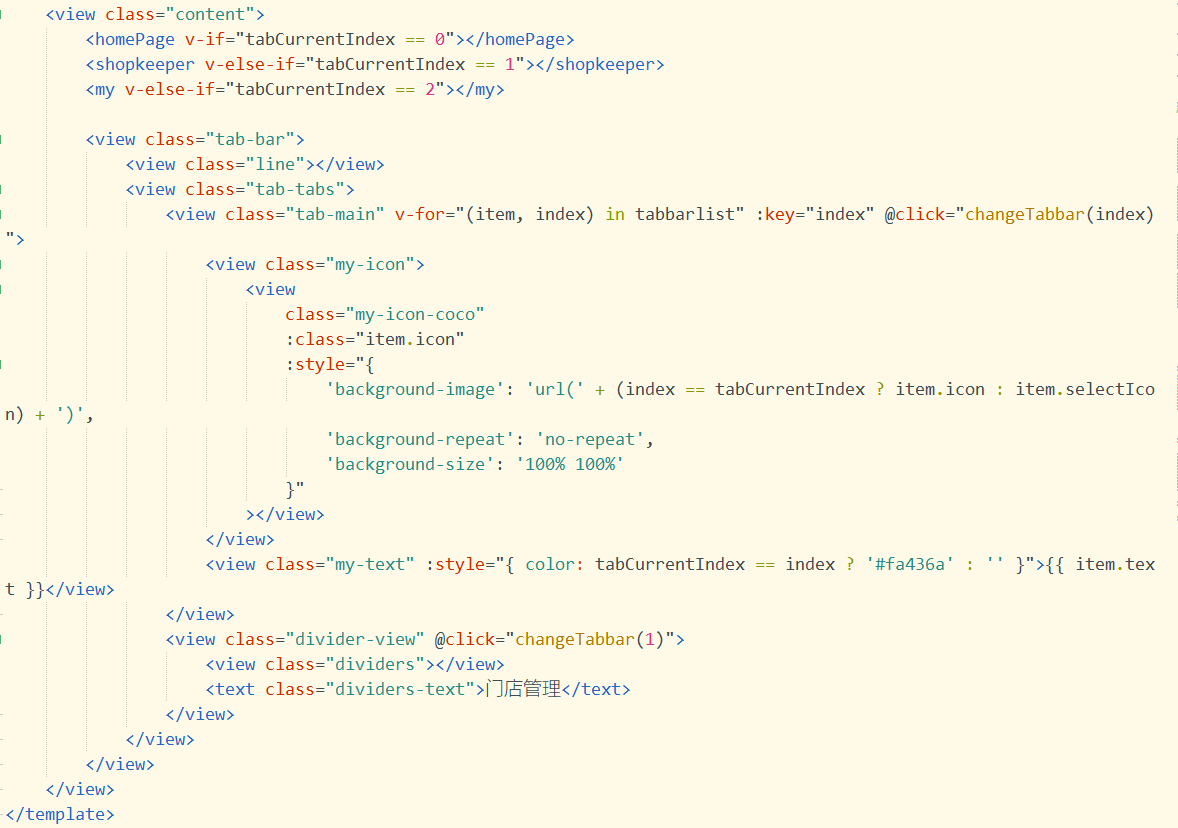
底部tabbar的切换及数据来源
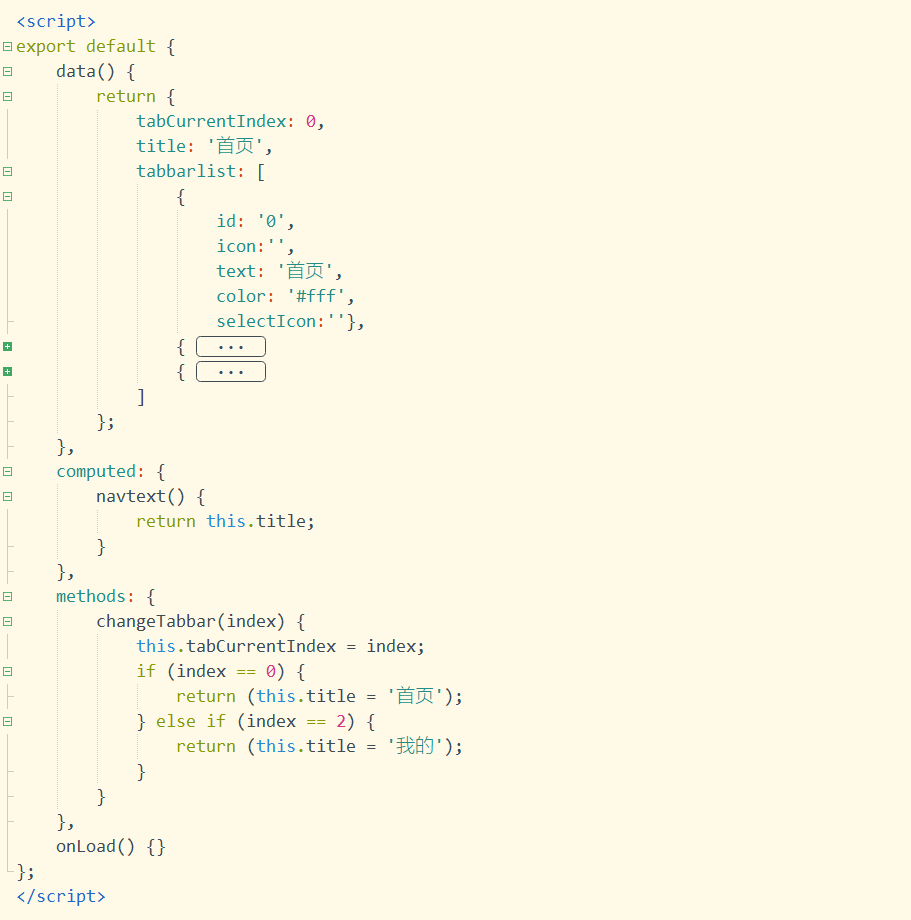
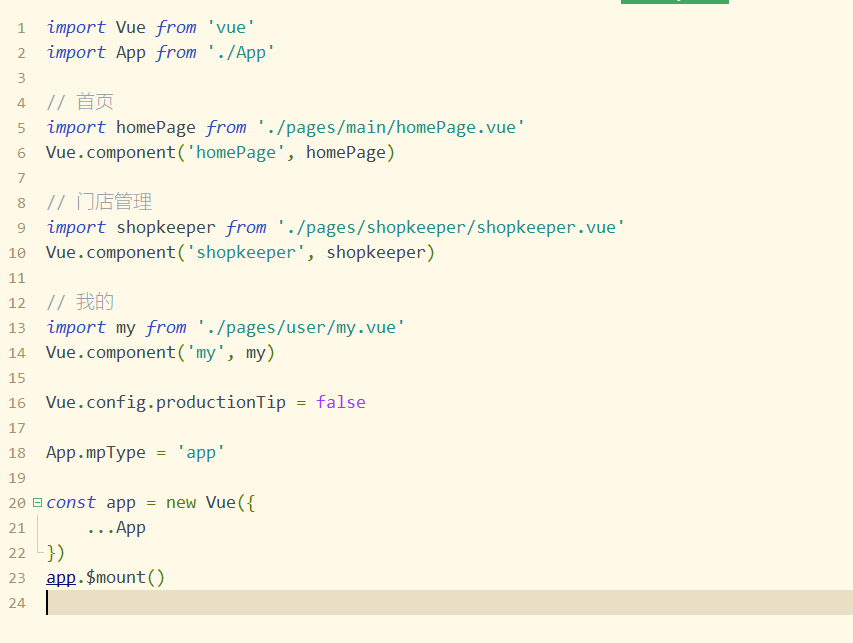
配置全局组件(main.js)
项目地址:tabBar

uni-app 自定义凸出的tabbar
tabbar.vue

<template>
    <view>
        <viewv-for="(item,index) in TabBarList" :key="index" @tap="navigatorTo(item.url)">
            <!-- 判断是否有点击,如果没有就不是激活样式,点击就是激活的样式 -->
            <imagev-if="item.type == 0" :src="current == index ? item.selectIcon : item.icon" mode="widthFix"></image>
            <!-- 设置一个状态值(type),判断加号是否展示 -->
            <imagev-if="item.type == 1" src="../../static/add.png" mode="widthFix"></image>
            <view>{{item.name}}</view>
        </view>
    </view>
</template>

<script>
    export default {
        props: {
            current: {
                type: Number,
                default: 0 //默认第一个页面tabbar激活
            }
        },
        data() {
            return {
                TabBarList: [{
                        type: 0,
                        icon: ''../../static/home.png'',
                        selectIcon: ''../../static/home-active.png'',
                        name: ''首页'',
                        url: ''../index/index''
                    },
                    {
                        type: 0,
                        icon: ''../../static/bagtab.png'',
                        selectIcon: ''../../static/bagtab-active.png'',
                        name: ''供需'',
                        url: ''../demand/demand''
                    },
                    {
                        type: 1,
                        icon: ''../../static/add.png'',
                        selectIcon: ''../../static/add.png'',
                        name: ''发布供需'',
                        url: ''../edit/edit''
                    },
                    {
                        type: 0,
                        icon: ''../../static/company.png'',
                        selectIcon: ''../../static/company-active.png'',
                        name: ''企业'',
                        url: ''../company/company''
                    },
                    {
                        type: 0,
                        icon: ''../../static/person.png'',
                        selectIcon: ''../../static/person-active.png'',
                        name: ''我的'',
                        url: ''../personal/personal''
                    },
                ]
            }
        },
        methods: {
            navigatorTo(e) {
                uni.redirectTo({
                    url: e,
                });
            }
        }
    }
</script>

<style scoped>
.TabBar {
    position: fixed;
    bottom: 0;
    height: 80upx;
    background-color: #fff;
    width: 100%;
    display: flex;
    justify-content: space-around;
    align-items: center;
}
.tab {
    display: flex;
    flex-direction: column;
    align-items: center;
}
.imgsize {
    width: 40upx;
    height: 40upx;
}
.addimgsize {
    width: 70upx;
    height: 70upx;
    margin-top: -30upx;
}
.text {
    font-size: 12px;
}
</style>
需要使用到tabbar的组件里,给tabbar组件传值,设置点击时的激活样式
<template>
    <view>
        第二个页面
        <tabbar :current="1"></tabbar>
    </view>
</template>

<script>
    import tabbar from ''../component/tabbar.vue''
    export default {
        data() {
            return {

            }
        },
        components: {
            tabbar
        },
        methods: {

        }
    }
</script>

<style>

</style>
UNI-APP项目模板《自定义TabBar》《上传图片》《全局自定义loading》等功能 主要适配 微信小程序、APP、H5。
介绍 3.0
项目重写了~~基于uni-app,colorUI,封装了《自定义TabBar》《上传图片》《全局自定义loading》等功能 主要适配 微信小程序、APP、H5。
新版特点
- 加入了 colorUI 开发起来更顺手更快。
- 融合了七牛云存储+阿里OSS存储
- 优化了TabBar
uni-app插件市场:https://ext.dcloud.net.cn/plu...
Github 地址:https://github.com/gek6/fr-un...
H5在线示例 H5在线示例

全局自定义loading
// 已在 main.js 注册全局组件,在每个页面中 添加<cu-loading>即可 页面中添加即可,其他组件无需添加。(页面就是在pages.json 中注册了的)

<cu-loading></cu-loading>
// 具体
// 是否显示 半透明背景
// 是否点击 半透明背景 关闭loading
// 在 /components/loading/loading.vue 中自行修改
自定义TabBar
- 这次做成了引入外部配置文件 uni-setting.json 请求在 App.vue 中的 onLaunch 里 H5注意需要服务端允许跨域
- 几乎所有配置及数据 也在 vuex中统一管理 /store/index.js
- 注意:tabbar 所能切换的页面 必须以组件的形式 已经加载进 home.vue(根页面)。
- 详见 示例代码
上传图片
- 普通上传文件直接通过 官方的API 上传到业务服务器 ,我就没写。
- 上传至七牛云存储 (支持 微信小程序 APP H5 其他未测,未兼容 ),上传至七牛云均采用base64上传。
-
上传至阿里OSS (阿里OSS不支持直接上传base64)
- H5上传 是通过服务端 STS签名 然后客户端使用 ali-oss库 进行上传。
- 其他端 为 客户端直接自己签名,通过uni.uploadFile(OBJECT)直接上传,因为H5 客户端代码会直接暴露,所以H5采用服务端签名。
主题色
- 项目用到颜色的地方全部使用 vuex 中的 配置数据。
- 开发时候就得注意写法 麻烦是麻烦了一些 不过如果有一键切换主题色的需求可以试试
非专业写文档,凑合看。
有帮助的话Github给个star 地址:https://github.com/gek6/fr-un...
有疑问联系 QQ 113276952 mail:thamiti@163.com;yb.lane.thamiti@gmail.com
今天的关于小程序自定义 tabbar 以vant weapp为例和小程序自定义tabbar凸起的分享已经结束,谢谢您的关注,如果想了解更多关于Flutter AppBar 自定义顶部导航按钮 图标、颜色 以及 TabBar 定义顶部 Tab 切换、uni-app 自定义tabBar、uni-app 自定义凸出的tabbar、UNI-APP项目模板《自定义TabBar》《上传图片》《全局自定义loading》等功能 主要适配 微信小程序、APP、H5。的相关知识,请在本站进行查询。
本文标签:


