对于React-Native学习--第三方底部Tabreact-native-tab-navigator感兴趣的读者,本文将会是一篇不错的选择,我们将详细介绍reactnative第三方组件,并为您提
对于React-Native学习--第三方 底部Tab react-native-tab-navigator感兴趣的读者,本文将会是一篇不错的选择,我们将详细介绍react native 第三方组件,并为您提供关于React Native Navigation V5 Stack、BottomTab 和 Drawer Navigation、React Native Paper Provider 和 React Navigation NavigationContainer 在 React Native Web 中导致错误、React Native TabNavigator 设置Tab切换、React Native 之 createBottomTabNavigator,createMaterialTopTabNavigator的有用信息。
本文目录一览:- React-Native学习--第三方 底部Tab react-native-tab-navigator(react native 第三方组件)
- React Native Navigation V5 Stack、BottomTab 和 Drawer Navigation
- React Native Paper Provider 和 React Navigation NavigationContainer 在 React Native Web 中导致错误
- React Native TabNavigator 设置Tab切换
- React Native 之 createBottomTabNavigator,createMaterialTopTabNavigator
")
React-Native学习--第三方 底部Tab react-native-tab-navigator(react native 第三方组件)
1.下载
npm install react-native-tab-navigator –save下载
2. 导入
import TabNavigator from 'react-native-tab-navigator'3. 完整代码
import React,{Component} from 'react';
import {
    StyleSheet,View,Image
} from 'react-native';
import TabNavigator from 'react-native-tab-navigator'
import PosRN from '../index.ios'
import mine from './mine'
import Cart from './cart'

export default class Main extends Component {

    constructor(props){
        super(props)
        this.state={
            selectedTab:'首页',}
    }


    render() {
        return (
            <View style={styles.container} >
                <TabNavigator>
                    <TabNavigator.Item
                        selected={this.state.selectedTab === '首页'}
                        title="首页"
                        titleStyle={styles.tabText}
                        selectedTitleStyle={styles.selectedTabText}
                        renderIcon={() => <Image style={styles.icon} source={require("../images/ic_home_normal.png")} />}
                        renderSelectedIcon={() => <Image style={styles.icon} source={require("../images/ic_home_checked.png")} />}
                        onPress={() => this.setState({ selectedTab: '首页' })}>
                        <PosRN/>
                    </TabNavigator.Item>
                    <TabNavigator.Item
                        selected={this.state.selectedTab === '购物车'}
                        title="购物车"
                        titleStyle={styles.tabText}
                        selectedTitleStyle={styles.selectedTabText}
                        renderIcon={() => <Image style={styles.icon} source={require("../images/ic_cart_normal.png")} />}
                        renderSelectedIcon={() => <Image style={styles.icon} source={require("../images/ic_cart_checked.png")} />}
                        onPress={() => this.setState({ selectedTab: '购物车' })}>
                        <Cart />
                    </TabNavigator.Item>
                    <TabNavigator.Item
                        selected={this.state.selectedTab === '我的'}
                        title="我的"
                        titleStyle={styles.tabText}
                        selectedTitleStyle={styles.selectedTabText}
                        renderIcon={() => <Image style={styles.icon} source={require("../images/ic_user_normal.png")} />}
                        renderSelectedIcon={() => <Image style={styles.icon} source={require("../images/ic_user_checked.png")} />}
                        onPress={() => this.setState({ selectedTab: '我的' })}>
                        <mine />
                    </TabNavigator.Item>
                </TabNavigator>
            </View>
        );
    }
}

let styles = StyleSheet.create({
    container: {
        flex: 1
    },tabText: {
        color: "#000000",fontSize: 13
    },selectedTabText: {
        color: "#999999",icon: {
        width: 20,height: 20
    }
});
React Native Navigation V5 Stack、BottomTab 和 Drawer Navigation
如何解决React Native Navigation V5 Stack、BottomTab 和 Drawer Navigation?
我在我的项目中使用了底部、堆栈和抽屉导航。
我需要导航到事件页面而不添加到底部导航器。
我的问题:
如果我需要将一个组件导航到另一个组件而不将组件添加到底部导航器,这里给出了两个文件的代码 如果需要导航到事件页面,如果我在 Component 我可以导航到 Events Compnents。但它也在底部选项卡导航器中显示我不希望底部导航器中的这个组件。
App.js
import ''react-native-gesture-handler'';
    import { StatusBar } from ''expo-status-bar'';
    import React from ''react'';
    import { StyleSheet,Text,View } from ''react-native'';
    import { NavigationContainer } from ''@react-navigation/native'';
    import { createDrawerNavigator } from ''@react-navigation/drawer'';
    import {DrawerContent} from ''./Screens/DrawerContent'';
    import {Events} from ''./Screens/Events''
    import MainTabScreen from ''./Screens/Bottomtab''

    const Drawer = createDrawerNavigator();


    export default function App() {
      return (
        <NavigationContainer>
          <Drawer.Navigator drawerContent={props => <DrawerContent {...props} />}>
            <Drawer.Screen name="Home" component={MainTabScreen} />
          </Drawer.Navigator>
        </NavigationContainer>
      );
    }

    const styles = StyleSheet.create({
      container: {
        flex: 1,backgroundColor: ''#fff'',alignItems: ''center'',justifyContent: ''center'',},});```

    BottomTab Screen.js

        enter code here

    ```
    import React from "react";
    import { createStackNavigator } from "@react-navigation/stack";
    import Icon from "react-native-vector-icons/Ionicons";
    import { createMaterialBottomTabNavigator } from "@react-navigation/material-bottom-tabs";

    import Home from "./HomeScreen";
    import About from "./AboutUs";
    import Contact from "./ContactUs";
    import Test from "./Test";
    import Events from "./Events";

    const HomeStack = createStackNavigator();
    const AboutStack = createStackNavigator();
    const ContactStack = createStackNavigator();
    const TestStack = createStackNavigator();
    const Eventsstack = createStackNavigator();

    const Tab = createMaterialBottomTabNavigator();

    const MainTabScreen = () => (
      <Tab.Navigator
        initialRouteName="Home"
        activeColor="#fff"
        //   style={{ backgroundColor: ''tomato'' }}
      >
        <Tab.Screen
          name="Home"
          component={HomeStackScreen}
          options={{
            tabBarLabel: "Home",tabBarColor: "#009387",tabBarIcon: ({ color }) => (
              <Icon name="ios-home" color={color} size={26} />
            ),}}
        />
        <Tab.Screen
          name="ContactUs"
          component={ContactStackScreen}
          options={{
            tabBarLabel: "Notifications",tabBarColor: "#1f65ff",tabBarIcon: ({ color }) => (
              <Icon name="ios-notifications" color={color} size={26} />
            ),}}
        />
        <Tab.Screen
          name="About"
          component={AboutStackScreen}
          options={{
            tabBarLabel: "Profile",tabBarColor: "#694fad",tabBarIcon: ({ color }) => (
              <Icon name="ios-person" color={color} size={26} />
            ),}}
        />
        <Tab.Screen
          name="Test"
          component={TestStackScreen}
          options={{
            tabBarLabel: "Search",tabBarColor: "#d02860",tabBarIcon: ({ color }) => (
              <Icon name="ios-aperture" color={color} size={26} />
            ),}}
        />

        {/* <Tab.Screen
          name="Events"
          component={EventsstackScreen}
          options={{
            tabBarLabel: "Search",}}
        /> */}
      </Tab.Navigator>
    );
    export default MainTabScreen;

    const HomeStackScreen = ({ navigation }) => (
      <HomeStack.Navigator
        screenoptions={{
          headerStyle: {
            backgroundColor: "#009387",headerTintColor: "#fff",headerTitleStyle: {
            fontWeight: "bold",}}
      >
        <HomeStack.Screen
          name="Home"
          component={Home}
          options={{
            title: "Home",headerLeft: () => (
              <Icon.Button
                name="ios-menu"
                size={25}
                backgroundColor="#009387"
                onPress={() => navigation.openDrawer()}
              ></Icon.Button>
            ),}}
        />
      </HomeStack.Navigator>
    );

    const ContactStackScreen = ({ navigation }) => (
      <ContactStack.Navigator
        screenoptions={{
          headerStyle: {
            backgroundColor: "#1f65ff",}}
      >
        <ContactStack.Screen
          name="ContactUs"
          component={Contact}
          options={{
            title: "ContactUs",headerLeft: () => (
              <Icon.Button
                name="ios-menu"
                size={25}
                backgroundColor="#1f65ff"
                onPress={() => navigation.openDrawer()}
              ></Icon.Button>
            ),}}
        />
      </ContactStack.Navigator>
    );
    const AboutStackScreen = ({ navigation }) => (
      <AboutStack.Navigator
        screenoptions={{
          headerStyle: {
            backgroundColor: "#694fad",}}
      >
        <AboutStack.Screen
          name="About"
          component={About}
          options={{
            title: "AboutUs",headerLeft: () => (
              <Icon.Button
                name="ios-menu"
                size={25}
                backgroundColor="#694fad"
                onPress={() => navigation.openDrawer()}
              ></Icon.Button>
            ),}}
        />
      </AboutStack.Navigator>
    );
    const TestStackScreen = ({ navigation }) => (
      <TestStack.Navigator
        screenoptions={{
          headerStyle: {
            backgroundColor: "#d02860",}}
      >
        <TestStack.Screen
          name="Test"
          component={Test}
          options={{
            title: "Test",headerLeft: () => (
              <Icon.Button
                name="ios-menu"
                size={25}
                backgroundColor="#d02860"
                onPress={() => navigation.openDrawer()}
              ></Icon.Button>
            ),}}
        />
      </TestStack.Navigator>
    );
    const EventsstackScreen = ({ navigation }) => (
      <Eventsstack.Navigator screenoptions={{
          headerStyle: {
            backgroundColor: "#d02860",}}
      >
        <Eventsstack.Screen
          name="Events"
          component={Events}
          options={{
            title: "Events",}}
        />
      </Eventsstack.Navigator>
    );
这里给出了两个文件的代码如果需要导航到事件页面,如果我在
我需要调用 EventsstackScreen 而不添加到
解决方法
暂无找到可以解决该程序问题的有效方法,小编努力寻找整理中!
如果你已经找到好的解决方法,欢迎将解决方案带上本链接一起发送给小编。
小编邮箱:dio#foxmail.com (将#修改为@)

React Native Paper Provider 和 React Navigation NavigationContainer 在 React Native Web 中导致错误
如何解决React Native Paper Provider 和 React Navigation NavigationContainer 在 React Native Web 中导致错误?
我是 React-native 和 React-native-web 的初学者。我目前正在处理一个使用 React-Native-paper 和 @react-navigation/native 库的现有项目。我正在尝试使用现有代码/项目作为 Web 应用程序运行。但是当我在 App.js 中使用以下代码时,我在运行 Web 应用程序的控制台中收到一个错误:
import React from ''react'';
import {Provider} from ''react-native-paper'';
import {NavigationContainer} from ''@react-navigation/native'';

export const App = props => {
    return (
        <NavigationContainer>
            <Provider>
                <Navigator />
            </Provider>
        </NavigationContainer>
    );
};
我得到的错误是:
Warning: Detected multiple renderers concurrently rendering the same context provider. This is currently unsupported.
    at AppContainer (webpack://web_tester/./node_modules/react-native-web/dist/exports/AppRegistry/AppContainer.js?:22:24)

react-dom.development.js:14906 Uncaught Error: Invalid hook call. Hooks can only be called inside of the body of a function component. This Could happen for one of the following reasons:
1. You might have mismatching versions of React and the renderer (such as React DOM)
2. You might be breaking the Rules of Hooks
3. You might have more than one copy of React in the same app
See https://reactjs.org/link/invalid-hook-call for tips about how to debug and fix this problem.
    at Object.throwInvalidHookError (VM231 react-dom.development.js:14906)
    at Object.useContext (VM227 react.development.js:1504)
    at eval (VM252 index.js:83)
    at renderWithHooks (VM231 react-dom.development.js:14985)
    at updateForwardRef (VM231 react-dom.development.js:17044)
    at beginWork (VM231 react-dom.development.js:19098)
    at HTMLUnkNownElement.callCallback (VM231 react-dom.development.js:3945)
    at Object.invokeGuardedCallbackDev (VM231 react-dom.development.js:3994)
    at invokeGuardedCallback (VM231 react-dom.development.js:4056)
    at beginWork$1 (VM231 react-dom.development.js:23959)
我创建了一个包含错误的简单 git repository。请看一下。
任何其他方面的见解都会有所帮助。并提前致谢。
解决方法
尝试将 react-native-paper 提供程序放在外面。我的应用使用以下代码使用 react-native 和 react-native-web 工作正常。
我已经通过 Expo which is the recommended way 设置了 react-native-web:引用自 react-native-web 文档:“通常建议您使用 Expo。”
<PaperProvider theme={theme} settings={settings}>
  <NavigationContainer>
    <RootStackScreens />
  </NavigationContainer>
</PaperProvider>

React Native TabNavigator 设置Tab切换
主要代码如下:
const resetActionTab = NavigationActions.navigate({routeName: 'Tab',action: NavigationActions.navigate({ routeName: 'Home'})
});
this.props.navigation.dispatch(resetActionTab);

React Native 之 createBottomTabNavigator,createMaterialTopTabNavigator
icon第三方库
yarn add react-native-vector-icons
react-native link react-native-vector-icons
在上次的代码中添加:
AppNavigators.js


import React from ''react''; //只要在页面中使用了基础组件 都需要导入这句话 不然会报错
import {Button,Platform} from ''react-native'';
import { createStackNavigator,createAppContainer,createBottomTabNavigator,createMaterialTopTabNavigator } from ''react-navigation'';
import HomePage from ''../pages/HomePage'';
import Page1 from ''../pages/Page1'';
import Page2 from ''../pages/Page2'';
import Page3 from ''../pages/Page3'';
import Page4 from ''../pages/Page4'';
import Page5 from ''../pages/Page5'';
import Ionicons from ''react-native-vector-icons/Ionicons''

const AppTopNavigator=createMaterialTopTabNavigator(
  {
  Page1:{
     screen:Page1,
     navigationOptions:{
       tabBarLabel: ''All''
     }
  },
  Page2:{
     screen:Page2,
     navigationOptions:{
       tabBarLabel: ''iOS''
     }
  },
  Page3:{
     screen:Page3,
     navigationOptions:{
       tabBarLabel: ''Android''
     }
  },
  Page4:{
     screen:Page4,
     navigationOptions:{
       tabBarLabel: ''React-Native''
     }
  },
},
  {
  tabBarOptions:{
    tabStyle:{mindWidth: 50},
    upperCaseLabel:false,//是否使标签大写 默认true
    scrollEndabled:true,//是否支持选项卡滚动 默认false
    style:{
      backgroundColor:''#678''//TabBar背景色
    },
    indicatorStyle:{
      height:2,
      backgroundColor:''white''
    },//标签指示器样式
    labelStyle:{
      fontSize:13,
      marginTop:6,
      marginBottom:6
    },// 文字的样式


  }
}
);


const AppBottomNavigator=createBottomTabNavigator(
  {
    Page1:{
       screen:Page1,
       navigationOptions:{
         tabBarLabel: ''最热'',
         tabBarIcon:({tintColor,focused})=>(<Ionicons
            name={''ios-home''}
            size={26}
            style={{color:tintColor}}
         />)
       }
    },
    Page2:{
       screen:Page2,
       navigationOptions:{
         tabBarLabel: ''趋势'',
         tabBarIcon:({tintColor,focused})=>(<Ionicons
            name={''ios-appstore''} // 全部小写
            size={26}
            style={{color:tintColor}}
         />)
       }
    },
    Page3:{
       screen:Page3,
       navigationOptions:{
         tabBarLabel: ''收藏'',
         tabBarIcon:({tintColor,focused})=>(<Ionicons
            name={''ios-people''}
            size={26}
            style={{color:tintColor}}
         />)
       }
    },
    Page4:{
       screen:Page4,
       navigationOptions:{
         tabBarLabel: ''我的'',
         tabBarIcon:({tintColor,focused})=>(<Ionicons
            name={''ios-aperture''}
            size={26}
            style={{color:tintColor}}
         />)
       }
    },
  },
  {
    tabBarOptions:{
      activeTintColor: Platform.OS === ''ios'' ? ''#e91e63'' : ''#fff'',
    }
  }
);


const AppStackNavigator = createStackNavigator({
    HomePage: {
        screen: HomePage
    },
    Page1: {
        screen: Page1,
        navigationOptions: ({navigation}) => ({
            title: `${navigation.state.params.name}页面名`//动态设置navigationOptions
        })
    },
    Page2: {
        screen: Page2,
        navigationOptions: {//在这里定义每个页面的导航属性,静态配置
            title: "This is Page2.",
        }
    },
    Page3: {
        screen: Page3,
        navigationOptions: (props) => {//在这里定义每个页面的导航属性,动态配置
            const {navigation} = props;
            const {state, setParams} = navigation;
            const {params} = state;
            return {
                title: params.title ? params.title : ''This is Page3'',
                headerRight: (
                    <Button
                        title={params.mode === ''edit'' ? ''保存'' : ''编辑''}
                        onPress={()=>{setParams({mode: params.mode === ''edit'' ? '''' : ''edit''})}
                            }
                    />
                ),
            }
        }
    },

    Bottom:{
      screen:AppBottomNavigator,
      navigationOptions:{
        title:''BottomNavigator''
      }
    },

    Top:{
      screen:AppTopNavigator,
      navigationOptions:{
        title:''TopNavigator''
      }
    }

},
 {
    defaultNavigationOptions: {
        // header: null,// 可以通过将header设为null 来禁用StackNavigator的Navigation Bar
    }
  }
);

const App = createAppContainer(AppStackNavigator)
export default AppHomePage.js


/**
* Sample React Native App
* https://github.com/facebook/react-native
*
* @format
* @flow
*/
import React, {Fragment,Component} from ''react'';
import {
StyleSheet,
View,
Text,
Button,
} from ''react-native'';
type Props = {};
export default class HomePage extends Component<Props> {
//修改Back按钮
static navigationOptions={
title:''Home'',
headerBackTitle:''返回哈哈''
}
render(){
const {navigation}=this.props;
return (
<View style={styles.container}>
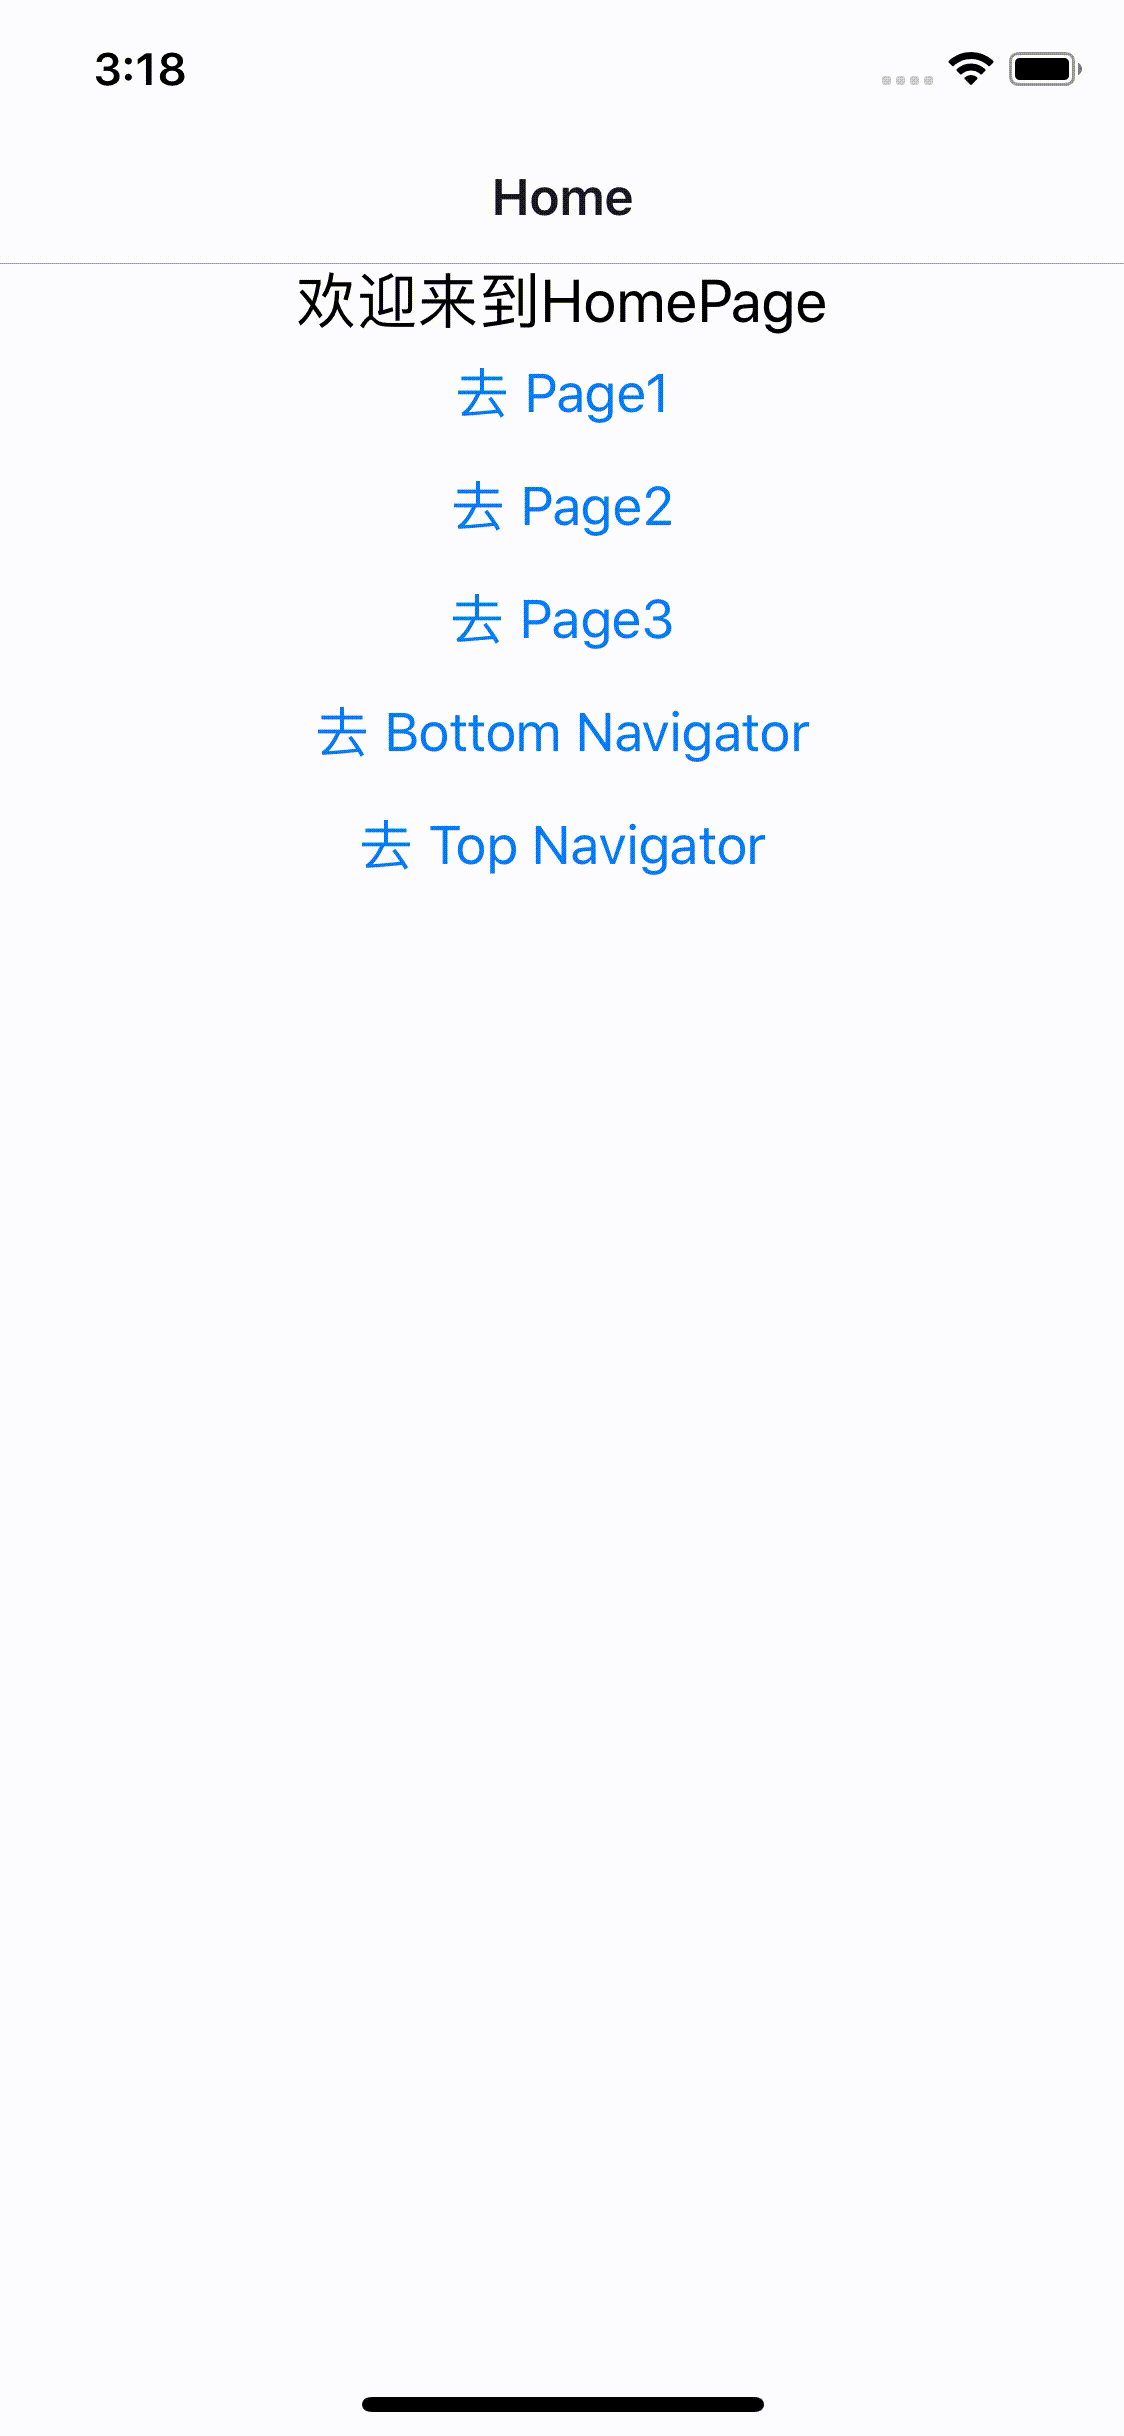
<Text style={styles.welcome}>欢迎来到HomePage</Text>
<Button
title={''去 Page1''}
onPress={()=>{
navigation.navigate(''Page1'',{name:''动态的''});
}}
/>
<Button
title={''去 Page2''}
onPress={()=>{
navigation.navigate(''Page2'');
}}
/>
<Button
title={''去 Page3''}
onPress={()=>{
navigation.navigate(''Page3'',{name:''Dev iOS''});
}}
/>
<Button
title={''去 Bottom Navigator''}
onPress={()=>{
navigation.navigate(''Bottom'');
}}
/>
<Button
title={''去 Top Navigator''}
onPress={()=>{
navigation.navigate(''Top'');
}}
/>
</View>
);
}
}
const styles=StyleSheet.create({
container:{
flex:1,
},
welcome:{
fontSize:20,
textAlign: ''center'',
}
});效果图
https://zamarrowski.github.io/react-ionicons/ 图标网址
https://reactnavigation.org/docs/en/tab-based-navigation.html 导航栏指导文档
--------------------------分界线--------------------------
如果AppNavigators.js做如下配置,那么每个Page都能拥有底部切换Bar了
import React from ''react''; //只要在页面中使用了基础组件 都需要导入这句话 不然会报错
import {Button} from ''react-native'';
import { createStackNavigator,createAppContainer,createBottomTabNavigator } from ''react-navigation'';
import HomePage from ''../pages/HomePage'';
import Page1 from ''../pages/Page1'';
import Page2 from ''../pages/Page2'';
import Page3 from ''../pages/Page3'';
import Page4 from ''../pages/Page4'';
import Page5 from ''../pages/Page5'';
import Ionicons from ''react-native-vector-icons/Ionicons''


const AppBottomNavigator=createBottomTabNavigator({
  Page1:{
       screen:Page1,
       navigationOptions:{
         tabBarLabel: ''最热'',
         tabBarIcon:({tintColor,focused})=>(<Ionicons
            name={''ios-home''}
            size={26}
            style={{color:tintColor}}
         />)
       }
    },
    Page2:{
       screen:Page2,
       navigationOptions:{
         tabBarLabel: ''趋势'',
         tabBarIcon:({tintColor,focused})=>(<Ionicons
            name={''ios-appstore''} // 全部小写
            size={26}
            style={{color:tintColor}}
         />)
       }
    },
}

);

//HomePage Page1 Page2 这些是页面名,到时候导航器就接收这个参数进行界面跳转
const AppStackNavigator = createStackNavigator({
    HomePage: {
        screen: HomePage
    },
    Page1: {
        screen: AppBottomNavigator,
        navigationOptions: ({navigation}) => ({
            title: `${navigation.state.params.name}页面名`//动态设置navigationOptions
        })
    },
    Page2: {
        screen: AppBottomNavigator,
        navigationOptions: {//在这里定义每个页面的导航属性,静态配置
            title: "This is Page2.",
        }
    },
    Page3: {
        screen: Page3,
        navigationOptions: (props) => {//在这里定义每个页面的导航属性,动态配置
            const {navigation} = props;
            const {state, setParams} = navigation;
            const {params} = state;
            return {
                title: params.title ? params.title : ''This is Page3'',
                headerRight: (
                    <Button
                        title={params.mode === ''edit'' ? ''保存'' : ''编辑''}
                        onPress={()=>{setParams({mode: params.mode === ''edit'' ? '''' : ''edit''})}
                            }
                    />
                ),
            }
        }
    },
    Bottom:{
      screen:AppBottomNavigator,
      navigationOptions:{
        title:''BottomNavigator''
      }
    },

}, {
    defaultNavigationOptions: {
        // header: null,// 可以通过将header设为null 来禁用StackNavigator的Navigation Bar
    }
});


const App = createAppContainer(AppStackNavigator)
export default App 
关于React-Native学习--第三方 底部Tab react-native-tab-navigator和react native 第三方组件的介绍已经告一段落,感谢您的耐心阅读,如果想了解更多关于React Native Navigation V5 Stack、BottomTab 和 Drawer Navigation、React Native Paper Provider 和 React Navigation NavigationContainer 在 React Native Web 中导致错误、React Native TabNavigator 设置Tab切换、React Native 之 createBottomTabNavigator,createMaterialTopTabNavigator的相关信息,请在本站寻找。
本文标签:


