最近很多小伙伴都在问框架篇:React+React-Router+antd+nodejs+express框架开发运用和nodejs做前后端server这两个问题,那么本篇文章就来给大家详细解答一下,同
最近很多小伙伴都在问框架篇: React + React-Router + antd + nodejs + express框架开发运用和nodejs做前后端server这两个问题,那么本篇文章就来给大家详细解答一下,同时本文还将给你拓展Centos 编译安装nodejs&express框架教程、CentOS安装运行NodeJS框架Express、node.js – Node-PerfectAPI vs Restify.js vs ExpressJS vs Node-APIServer [已关闭]、node.js – nodejs / express-stream stdout立即向客户端发送等相关知识,下面开始了哦!
本文目录一览:- 框架篇: React + React-Router + antd + nodejs + express框架开发运用(nodejs做前后端server)
- Centos 编译安装nodejs&express框架教程
- CentOS安装运行NodeJS框架Express
- node.js – Node-PerfectAPI vs Restify.js vs ExpressJS vs Node-APIServer [已关闭]
- node.js – nodejs / express-stream stdout立即向客户端发送
")
框架篇: React + React-Router + antd + nodejs + express框架开发运用(nodejs做前后端server)
前提:在我们的上一章里,我们搭建了对应的框架,这章我们来讲怎么运用。
如何开发
首先,我们需要更改后端nodejs的服务端口,因为默认情况下后端nodejs服务与前端nodejs服务用的端口都是3000。
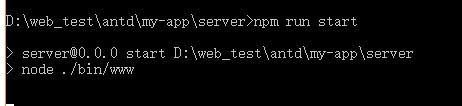
1:打开src\server\bin\www.js文件
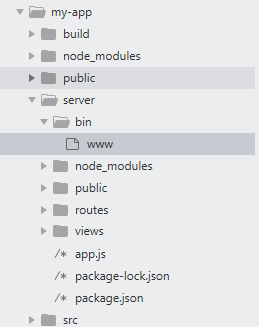
2:将其更改为4000端口,之后cmd窗口执行npm run start

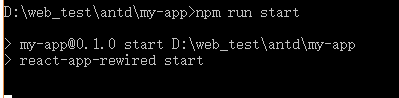
3:启动web服务,在my-app这层执行语句npm run start,执行完以后前端若想发送http请求,则将请求端口改为4000就成啦。
React-Router运用
该篇React-Router运用为举例,详细用法自己根据项目更改即可。
1:首先让我们先执行以下语句,下载React-Router对应模块
npm install react-router --save-dev
npm install react-router-dom --save-dev
2:更改src\index.js文件
//src\index.js

import React from ''react''
import ReactDOM from ''react-dom'';
import { HashRouter, Route, Switch } from ''react-router-dom''

import Test from ''./view/index''
import App from ''./view/app''

const SliderComponent = () => (
  <Switch>
    <Route exact path=''/'' component={App} />
    <Route path="/Test" component={Test}/>
  </Switch>
)

ReactDOM.render((
  <HashRouter >
    <SliderComponent />
  </HashRouter>
), document.getElementById(''root''));
3:新建view目录,并添加app.js,index.js
//src\view\app.js

import React, { Component } from ''react'';
import { Button } from ''antd'';
import ''../App.css'';

class App extends Component {

    handleClick(){
        window.location.href = "/#/Test"
    }

  render() {
    return (
      <div className="App">
        <Button type="primary" onClick={this.handleClick}>Button11</Button>
      </div>
    );
  }
}

export default App;//src\view\index.js
import React, { Component } from ''react'';
import { Button } from ''antd'';
import ''../App.css'';
class App extends Component {
handleClick(){
window.location.href = "/"
}
render() {
return (
<div className="App">
<Button type="primary" onClick={this.handleClick}>Button22</Button>
</div>
);
}
}
export default App;
4:添加完以后,我们进网页查看,输入http://localhost:3000/#/

5:点击按钮,我们发现跳转成功了

6:此时,我们将现有代码打包拷贝,确认代码在正式环境中也可用


7:第六步如果出错,请看这一步。这里我们先来讲一个中间件:connect-history-api-fallback,它用于SPA的页面索引,专门处理索引页面代理请求。在现有的SPA程序中,我们通常是只存在有一个html文件的,它就是index.html。当我们用JS语句跳转页面时,因为找不到对应路径的html文件,通常会爆出404的错误。
这个中间件解决了一些问题。 具体来说,它会将请求的位置更改为您指定的索引(默认为/index.html)。那么就让我们来用吧,我们在src\server\app.js里添加如下代码
//......

const history = require(''connect-history-api-fallback'');
app.use(history(
  {
    htmlAcceptHeaders: [''text/html'', ''application/xhtml+xml'']
  }
));
之后我们再次回到web页面,发现这次跳转router成功了。

Centos 编译安装nodejs&express框架教程
一. 下载nodejs 版本
|
1 |
wget http://nodejs.org/dist/v0.10.28/node-v0.10.28.tar.gz |
二. 编译安装
|
1 2 3 4 5 6 |
|
设置环境变量
|
1 2 3 4 |
|
三. 安装express
|
1 2 |
|

CentOS安装运行NodeJS框架Express
安装依赖包
yum -y install gcc make gcc-c++ openssl-devel wget
下载/解压NodeJs
wget http://nodejs.org/dist/v0.12.7/node-v0.12.7.tar.gz
tar -zvxf node-v0.12.7.tar.gz
编译及安装,逐行执行
cd node-v0.
./configure
make install
验证是否安装配置成功:
node -v
显示版本号,说明NodeJS安装成功,如图:

安装Express开发框架
npm install express -g
创建Express项目命名为demo1
express demo1
进入项目目录并安装项目依赖组件
cd demo1
npm install
在demo1的目录里启动项目
node start
最后通过浏览器访问服务器3000端口,页面显示,

到此全部安装成功!
![node.js – Node-PerfectAPI vs Restify.js vs ExpressJS vs Node-APIServer [已关闭]](http://www.gvkun.com/zb_users/upload/2025/03/96d5d8cc-f452-4027-a705-982bade39eb41740898836812.jpg "node.js – Node-PerfectAPI vs Restify.js vs ExpressJS vs Node-APIServer [已关闭]")
node.js – Node-PerfectAPI vs Restify.js vs ExpressJS vs Node-APIServer [已关闭]
有人可以详细阐述每个框架的差异和优点/缺点。
为什么选择Express / NodeJS与其他框架来创建API?
解决方法
perfectapi的重点是使开发人员从开始到生产就绪变得简单。它比node-restify更抽象。它的影响在于您的API设计灵活性较低,但与此同时,您应该能够以更少的专业知识获得更快的生产准备。
两者重组和perfectapi具有可比性能。
这个答案中的链接是强调每个解决方案的好处的页面。

node.js – nodejs / express-stream stdout立即向客户端发送
到目前为止我试过这个:
app.get('/path',function(req,res) {
   ...
   spw.stdout.on('data',function (data) {
      var str = data.toString();
      res.write(str + "\n");
   });
   ...
}
然后:
...
spw.stdout.pipe(res);
...
在这两种情况下,浏览器会等待10个ping完成,然后打印结果作为一个整体.我想让他们一个接一个,怎么做呢?
(客户端只是调用… / path和console.logs的结果)
编辑:虽然我确实相信websockets是必须实现的,但我只是想知道是否有其他的方法.我看到几个混乱的SO answers和博客帖子(在this帖子,第一步OP流的日志到浏览器),这没有帮助,所以我决定去赏心悦目.
解决方法
var cp = require("child_process"),express = require("express"),app = express();

app.configure(function(){
    app.use(express.static(__dirname));
});


app.get('/msg',res){
    res.writeHead(200,{ "Content-Type": "text/event-stream","Cache-control": "no-cache" });

    var spw = cp.spawn('ping',['-c','100','127.0.0.1']),str = "";

    spw.stdout.on('data',function (data) {
        str += data.toString();

        // just so we can see the server is doing something
        console.log("data");

        // Flush out line by line.
        var lines = str.split("\n");
        for(var i in lines) {
            if(i == lines.length - 1) {
                str = lines[i];
            } else{
                // Note: The double-newline is *required*
                res.write('data: ' + lines[i] + "\n\n");
            }
        }
    });

    spw.on('close',function (code) {
        res.end(str);
    });

    spw.stderr.on('data',function (data) {
        res.end('stderr: ' + data);
    });
});

app.listen(4000);
客户端HTML:
<!DOCTYPE Html>
<html>
<body>
   <ul id="eventlist"> </ul>

   <script>
    var eventList = document.getElementById("eventlist");
    var evtSource = new EventSource("http://localhost:4000/msg");

    var newElement = document.createElement("li");
    newElement.innerHTML = "Messages:";
    eventList.appendChild(newElement);


    evtSource.onmessage = function(e) {
        console.log("received event");
        console.log(e);
        var newElement = document.createElement("li");

        newElement.innerHTML = "message: " + e.data;
        eventList.appendChild(newElement);
    };

    evtSource.onerror = function(e) {
        console.log("EventSource Failed.");
    };

    console.log(evtSource);

    </script>

</body>
</html>
运行节点index.js并将浏览器指向http:// localhost:4000 / client.html.请注意,自从我运行OS X以来,我不得不使用“-c”选项而不是“-n”.
今天关于框架篇: React + React-Router + antd + nodejs + express框架开发运用和nodejs做前后端server的介绍到此结束,谢谢您的阅读,有关Centos 编译安装nodejs&express框架教程、CentOS安装运行NodeJS框架Express、node.js – Node-PerfectAPI vs Restify.js vs ExpressJS vs Node-APIServer [已关闭]、node.js – nodejs / express-stream stdout立即向客户端发送等更多相关知识的信息可以在本站进行查询。
本文标签:


