想了解SpringSecurity做前后端分离,咱就别做页面跳转了!统统JSON交互的新动态吗?本文将为您提供详细的信息,我们还将为您解答关于springsecurity前后端分离登录的相关问题,此外
想了解Spring Security 做前后端分离,咱就别做页面跳转了!统统 JSON 交互的新动态吗?本文将为您提供详细的信息,我们还将为您解答关于spring security前后端分离登录的相关问题,此外,我们还将为您介绍关于maku-boot v2.0 重大更新,基于 SpringSecurity 5.7 实现的前后端分离架构、Spring Boot Security JWT 整合实现前后端分离认证示例、Spring Security 前后端分离登录,非法请求直接返回 JSON、Spring Security 简单教程以及实现完全前后端分离的新知识。
本文目录一览:- Spring Security 做前后端分离,咱就别做页面跳转了!统统 JSON 交互(spring security前后端分离登录)
- maku-boot v2.0 重大更新,基于 SpringSecurity 5.7 实现的前后端分离架构
- Spring Boot Security JWT 整合实现前后端分离认证示例
- Spring Security 前后端分离登录,非法请求直接返回 JSON
- Spring Security 简单教程以及实现完全前后端分离
")
Spring Security 做前后端分离,咱就别做页面跳转了!统统 JSON 交互(spring security前后端分离登录)
今日干货

公众号后台回复 ssm,免费获取松哥纯手敲的 SSM 框架学习干货。
-
挖一个大坑,Spring Security 开搞! -
松哥手把手带你入门 Spring Security,别再问密码怎么解密了 -
手把手教你定制 Spring Security 中的表单登录
视频看完了,如果小伙伴们觉得松哥的视频风格还能接受,也可以看看松哥自制的 Spring Boot + Vue 系列视频教程
以下是视频笔记。
前两天有个小伙伴在微信上问松哥,这前后端分离开发后,认证这一块到底是使用传统的 session 还是使用像 JWT 这样的 token 来解决呢?
这确实代表了两种不同的方向。
传统的通过 session 来记录用户认证信息的方式我们可以理解为这是一种有状态登录,而 JWT 则代表了一种无状态登录。可能有小伙伴对这个概念还不太熟悉,我这里就先来科普一下有状态登录和无状态登录。
1. 无状态登录
1.1 什么是有状态
有状态服务,即服务端需要记录每次会话的客户端信息,从而识别客户端身份,根据用户身份进行请求的处理,典型的设计如 Tomcat 中的 Session。例如登录:用户登录后,我们把用户的信息保存在服务端 session 中,并且给用户一个 cookie 值,记录对应的 session,然后下次请求,用户携带 cookie 值来(这一步有浏览器自动完成),我们就能识别到对应 session,从而找到用户的信息。这种方式目前来看最方便,但是也有一些缺陷,如下:
-
服务端保存大量数据,增加服务端压力 -
服务端保存用户状态,不支持集群化部署
1.2 什么是无状态
微服务集群中的每个服务,对外提供的都使用 RESTful 风格的接口。而 RESTful 风格的一个最重要的规范就是:服务的无状态性,即:
-
服务端不保存任何客户端请求者信息 -
客户端的每次请求必须具备自描述信息,通过这些信息识别客户端身份
那么这种无状态性有哪些好处呢?
-
客户端请求不依赖服务端的信息,多次请求不需要必须访问到同一台服务器 -
服务端的集群和状态对客户端透明 -
服务端可以任意的迁移和伸缩(可以方便的进行集群化部署) -
减小服务端存储压力
1.3 如何实现无状态
无状态登录的流程:
-
首先客户端发送账户名/密码到服务端进行认证 -
认证通过后,服务端将用户信息加密并且编码成一个 token,返回给客户端 -
以后客户端每次发送请求,都需要携带认证的 token -
服务端对客户端发送来的 token 进行解密,判断是否有效,并且获取用户登录信息
1.4 各自优缺点
使用 session 最大的优点在于方便。你不用做过多的处理,一切都是默认的即可。松哥本系列前面几篇文章我们也都是基于 session 来讲的。
但是使用 session 有另外一个致命的问题就是如果你的前端是 Android、iOS、小程序等,这些 App 天然的就没有 cookie,如果非要用 session,就需要这些工程师在各自的设备上做适配,一般是模拟 cookie,从这个角度来说,在移动 App 遍地开花的今天,我们单纯的依赖 session 来做安全管理,似乎也不是特别理想。
这个时候 JWT 这样的无状态登录就展示出自己的优势了,这些登录方式所依赖的 token 你可以通过普通参数传递,也可以通过请求头传递,怎么样都行,具有很强的灵活性。
不过话说回来,如果你的前后端分离只是网页+服务端,其实没必要上无状态登录,基于 session 来做就可以了,省事又方便。
好了,说了这么多,本文我还是先来和大家说说基于 session 的认证,关于 JWT 的登录以后我会和大家细说,如果小伙伴们等不及,也可以先看看松哥之前发的关于 JWT 的教程:Spring Security 结合 Jwt 实现无状态登录。
2. 登录交互
在上篇文章中,松哥和大家捋了常见的登录参数配置问题,对于登录成功和登录失败,我们还遗留了一个回调函数没有讲,这篇文章就来和大家细聊一下。
2.1 前后端分离的数据交互
在前后端分离这样的开发架构下,前后端的交互都是通过 JSON 来进行,无论登录成功还是失败,都不会有什么服务端跳转或者客户端跳转之类。
登录成功了,服务端就返回一段登录成功的提示 JSON 给前端,前端收到之后,该跳转该展示,由前端自己决定,就和后端没有关系了。
登录失败了,服务端就返回一段登录失败的提示 JSON 给前端,前端收到之后,该跳转该展示,由前端自己决定,也和后端没有关系了。
首先把这样的思路确定了,基于这样的思路,我们来看一下登录配置。
2.2 登录成功
之前我们配置登录成功的处理是通过如下两个方法来配置的:
-
defaultSuccessUrl -
successForwardUrl
这两个都是配置跳转地址的,适用于前后端不分的开发。除了这两个方法之外,还有一个必杀技,那就是 successHandler。
successHandler 的功能十分强大,甚至已经囊括了 defaultSuccessUrl 和 successForwardUrl 的功能。我们来看一下:
.successHandler((req, resp, authentication) -> {
    Object principal = authentication.getPrincipal();
    resp.setContentType("application/json;charset=utf-8");
    PrintWriter out = resp.getWriter();
    out.write(new ObjectMapper().writeValueAsString(principal));
    out.flush();
    out.close();
})
successHandler 方法的参数是一个 AuthenticationSuccessHandler 对象,这个对象中我们要实现的方法是 onAuthenticationSuccess。
onAuthenticationSuccess 方法有三个参数,分别是:
-
HttpServletRequest -
HttpServletResponse -
Authentication
有了前两个参数,我们就可以在这里随心所欲的返回数据了。利用 HttpServletRequest 我们可以做服务端跳转,利用 HttpServletResponse 我们可以做客户端跳转,当然,也可以返回 JSON 数据。
第三个 Authentication 参数则保存了我们刚刚登录成功的用户信息。
配置完成后,我们再去登录,就可以看到登录成功的用户信息通过 JSON 返回到前端了,如下:
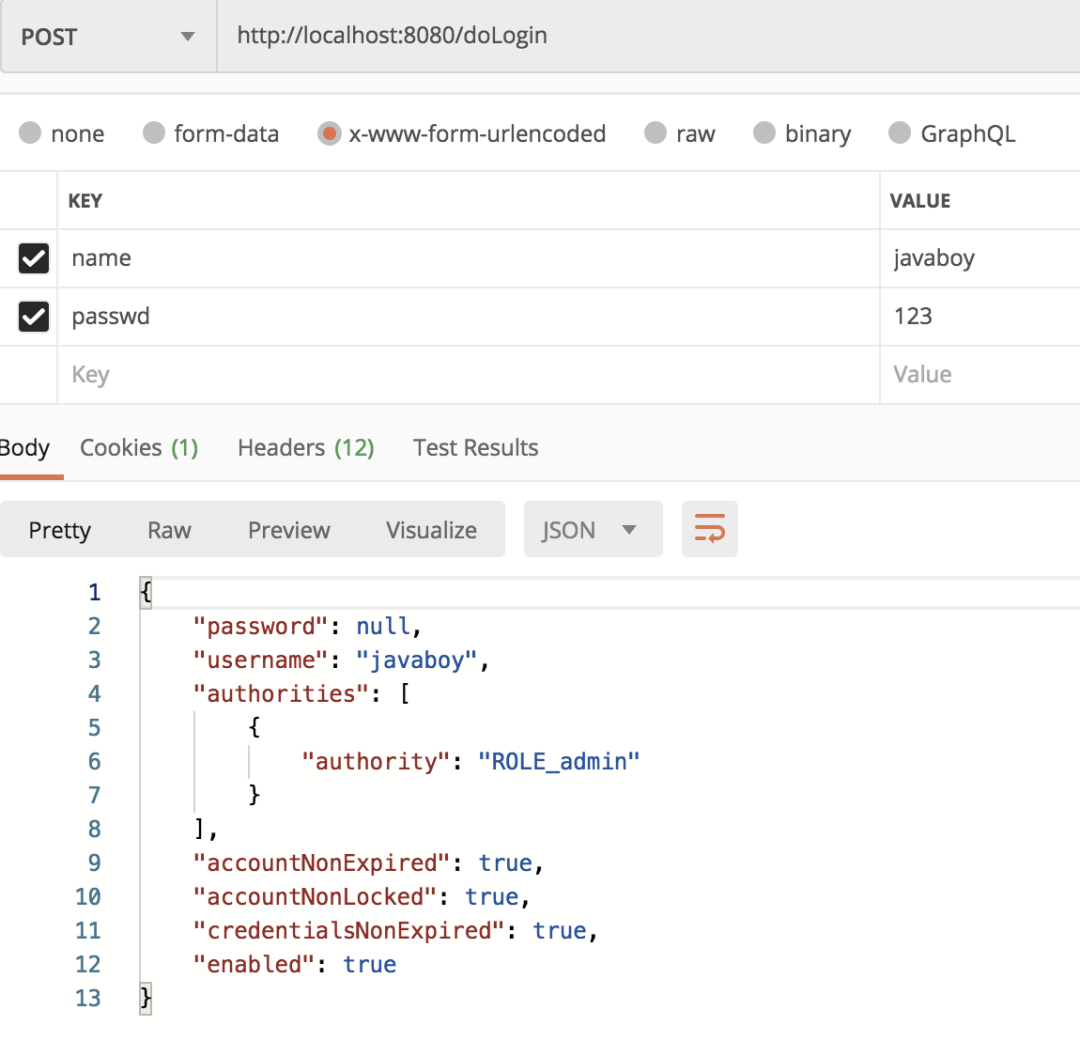
当然用户的密码已经被擦除掉了。擦除密码的问题,松哥之前和大家分享过,大家可以参考这篇文章:手把手带你捋一遍 Spring Security 登录流程
2.3 登录失败
登录失败也有一个类似的回调,如下:
.failureHandler((req, resp, e) -> {
    resp.setContentType("application/json;charset=utf-8");
    PrintWriter out = resp.getWriter();
    out.write(e.getMessage());
    out.flush();
    out.close();
})
失败的回调也是三个参数,前两个就不用说了,第三个是一个 Exception,对于登录失败,会有不同的原因,Exception 中则保存了登录失败的原因,我们可以将之通过 JSON 返回到前端。
当然大家也看到,在微人事中,我还挨个去识别了一下异常的类型,根据不同的异常类型,我们可以给用户一个更加明确的提示:
resp.setContentType("application/json;charset=utf-8");
PrintWriter out = resp.getWriter();
RespBean respBean = RespBean.error(e.getMessage());
if (e instanceof LockedException) {
    respBean.setMsg("账户被锁定,请联系管理员!");
} else if (e instanceof CredentialsExpiredException) {
    respBean.setMsg("密码过期,请联系管理员!");
} else if (e instanceof AccountExpiredException) {
    respBean.setMsg("账户过期,请联系管理员!");
} else if (e instanceof DisabledException) {
    respBean.setMsg("账户被禁用,请联系管理员!");
} else if (e instanceof BadCredentialsException) {
    respBean.setMsg("用户名或者密码输入错误,请重新输入!");
}
out.write(new ObjectMapper().writeValueAsString(respBean));
out.flush();
out.close();
这里有一个需要注意的点。
我们知道,当用户登录时,用户名或者密码输入错误,我们一般只给一个模糊的提示,即「用户名或者密码输入错误,请重新输入」,而不会给一个明确的诸如“用户名输入错误”或“密码输入错误”这样精确的提示,但是对于很多不懂行的新手小伙伴,他可能就会给一个明确的错误提示,这会给系统带来风险。
但是使用了 Spring Security 这样的安全管理框架之后,即使你是一个新手,也不会犯这样的错误。
在 Spring Security 中,用户名查找失败对应的异常是:
-
UsernameNotFoundException
密码匹配失败对应的异常是:
-
BadCredentialsException
但是我们在登录失败的回调中,却总是看不到 UsernameNotFoundException 异常,无论用户名还是密码输入错误,抛出的异常都是 BadCredentialsException。
这是为什么呢?松哥在之前的文章手把手带你捋一遍 Spring Security 登录流程中介绍过,在登录中有一个关键的步骤,就是去加载用户数据,我们再来把这个方法拎出来看一下(部分):
public Authentication authenticate(Authentication authentication)
		throws AuthenticationException {
	try {
		user = retrieveUser(username,
				(UsernamePasswordAuthenticationToken) authentication);
	}
	catch (UsernameNotFoundException notFound) {
		logger.debug("User ''" + username + "'' not found");
		if (hideUserNotFoundExceptions) {
			throw new BadCredentialsException(messages.getMessage(
					"AbstractUserDetailsAuthenticationProvider.badCredentials",
					"Bad credentials"));
		}
		else {
			throw notFound;
		}
	}
}
从这段代码中,我们看出,在查找用户时,如果抛出了 UsernameNotFoundException,这个异常会被捕获,捕获之后,如果 hideUserNotFoundExceptions 属性的值为 true,就抛出一个 BadCredentialsException。相当于将 UsernameNotFoundException 异常隐藏了,而默认情况下,hideUserNotFoundExceptions 的值就为 true。
看到这里大家就明白了为什么无论用户还是密码写错,你收到的都是 BadCredentialsException 异常。
一般来说这个配置是不需要修改的,如果你一定要区别出来 UsernameNotFoundException 和 BadCredentialsException,我这里给大家提供三种思路:
-
自己定义 DaoAuthenticationProvider 代替系统默认的,在定义时将 hideUserNotFoundExceptions 属性设置为 false。 -
当用户名查找失败时,不抛出 UsernameNotFoundException 异常,而是抛出一个自定义异常,这样自定义异常就不会被隐藏,进而在登录失败的回调中根据自定义异常信息给前端用户一个提示。 -
当用户名查找失败时,直接抛出 BadCredentialsException,但是异常信息为 “用户名不存在”。
三种思路仅供小伙伴们参考,除非情况特殊,一般不用修改这一块的默认行为。
官方这样做的好处是什么呢?很明显可以强迫开发者给一个模糊的异常提示,这样即使是不懂行的新手,也不会将系统置于危险之中。
好了,这样配置完成后,无论是登录成功还是失败,后端都将只返回 JSON 给前端了。
3. 未认证处理方案
那未认证又怎么办呢?
有小伙伴说,那还不简单,没有认证就访问数据,直接重定向到登录页面就行了,这没错,系统默认的行为也是这样。
但是在前后端分离中,这个逻辑明显是有问题的,如果用户没有登录就访问一个需要认证后才能访问的页面,这个时候,我们不应该让用户重定向到登录页面,而是给用户一个尚未登录的提示,前端收到提示之后,再自行决定页面跳转。
要解决这个问题,就涉及到 Spring Security 中的一个接口 AuthenticationEntryPoint ,该接口有一个实现类:LoginUrlAuthenticationEntryPoint ,该类中有一个方法 commence,如下:
/**
 * Performs the redirect (or forward) to the login form URL.
 */
public void commence(HttpServletRequest request, HttpServletResponse response,
		AuthenticationException authException) {
	String redirectUrl = null;
	if (useForward) {
		if (forceHttps && "http".equals(request.getScheme())) {
			redirectUrl = buildHttpsRedirectUrlForRequest(request);
		}
		if (redirectUrl == null) {
			String loginForm = determineUrlToUseForThisRequest(request, response,
					authException);
			if (logger.isDebugEnabled()) {
				logger.debug("Server side forward to: " + loginForm);
			}
			RequestDispatcher dispatcher = request.getRequestDispatcher(loginForm);
			dispatcher.forward(request, response);
			return;
		}
	}
	else {
		redirectUrl = buildRedirectUrlToLoginPage(request, response, authException);
	}
	redirectStrategy.sendRedirect(request, response, redirectUrl);
}
首先我们从这个方法的注释中就可以看出,这个方法是用来决定到底是要重定向还是要 forward,通过 Debug 追踪,我们发现默认情况下 useForward 的值为 false,所以请求走进了重定向。
那么我们解决问题的思路很简单,直接重写这个方法,在方法中返回 JSON 即可,不再做重定向操作,具体配置如下:
.csrf().disable().exceptionHandling()
.authenticationEntryPoint((req, resp, authException) -> {
            resp.setContentType("application/json;charset=utf-8");
            PrintWriter out = resp.getWriter();
            out.write("尚未登录,请先登录");
            out.flush();
            out.close();
        }
);
在 Spring Security 的配置中加上自定义的 AuthenticationEntryPoint 处理方法,该方法中直接返回相应的 JSON 提示即可。这样,如果用户再去直接访问一个需要认证之后才可以访问的请求,就不会发生重定向操作了,服务端会直接给浏览器一个 JSON 提示,浏览器收到 JSON 之后,该干嘛干嘛。
4. 注销登录
最后我们再来看看注销登录的处理方案。
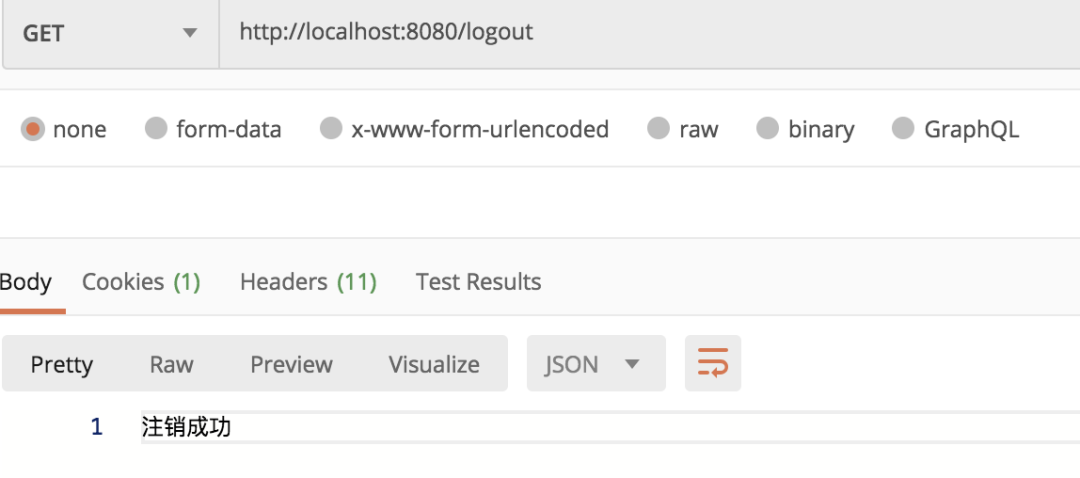
注销登录我们前面说过,按照前面的配置,注销登录之后,系统自动跳转到登录页面,这也是不合适的,如果是前后端分离项目,注销登录成功后返回 JSON 即可,配置如下:
.and()
.logout()
.logoutUrl("/logout")
.logoutSuccessHandler((req, resp, authentication) -> {
    resp.setContentType("application/json;charset=utf-8");
    PrintWriter out = resp.getWriter();
    out.write("注销成功");
    out.flush();
    out.close();
})
.permitAll()
.and()
这样,注销成功之后,前端收到的也是 JSON 了:
好了,本文就和小伙伴们介绍下前后端分离中常见的 JSON 交互问题,「小伙伴们如果觉得文章有帮助,记得点一下在看哦。」
精彩文章推荐:
喜欢就点个"在看"呗^_^
本文分享自微信公众号 - 江南一点雨(a_javaboy)。
如有侵权,请联系 support@oschina.cn 删除。
本文参与“OSC源创计划”,欢迎正在阅读的你也加入,一起分享。

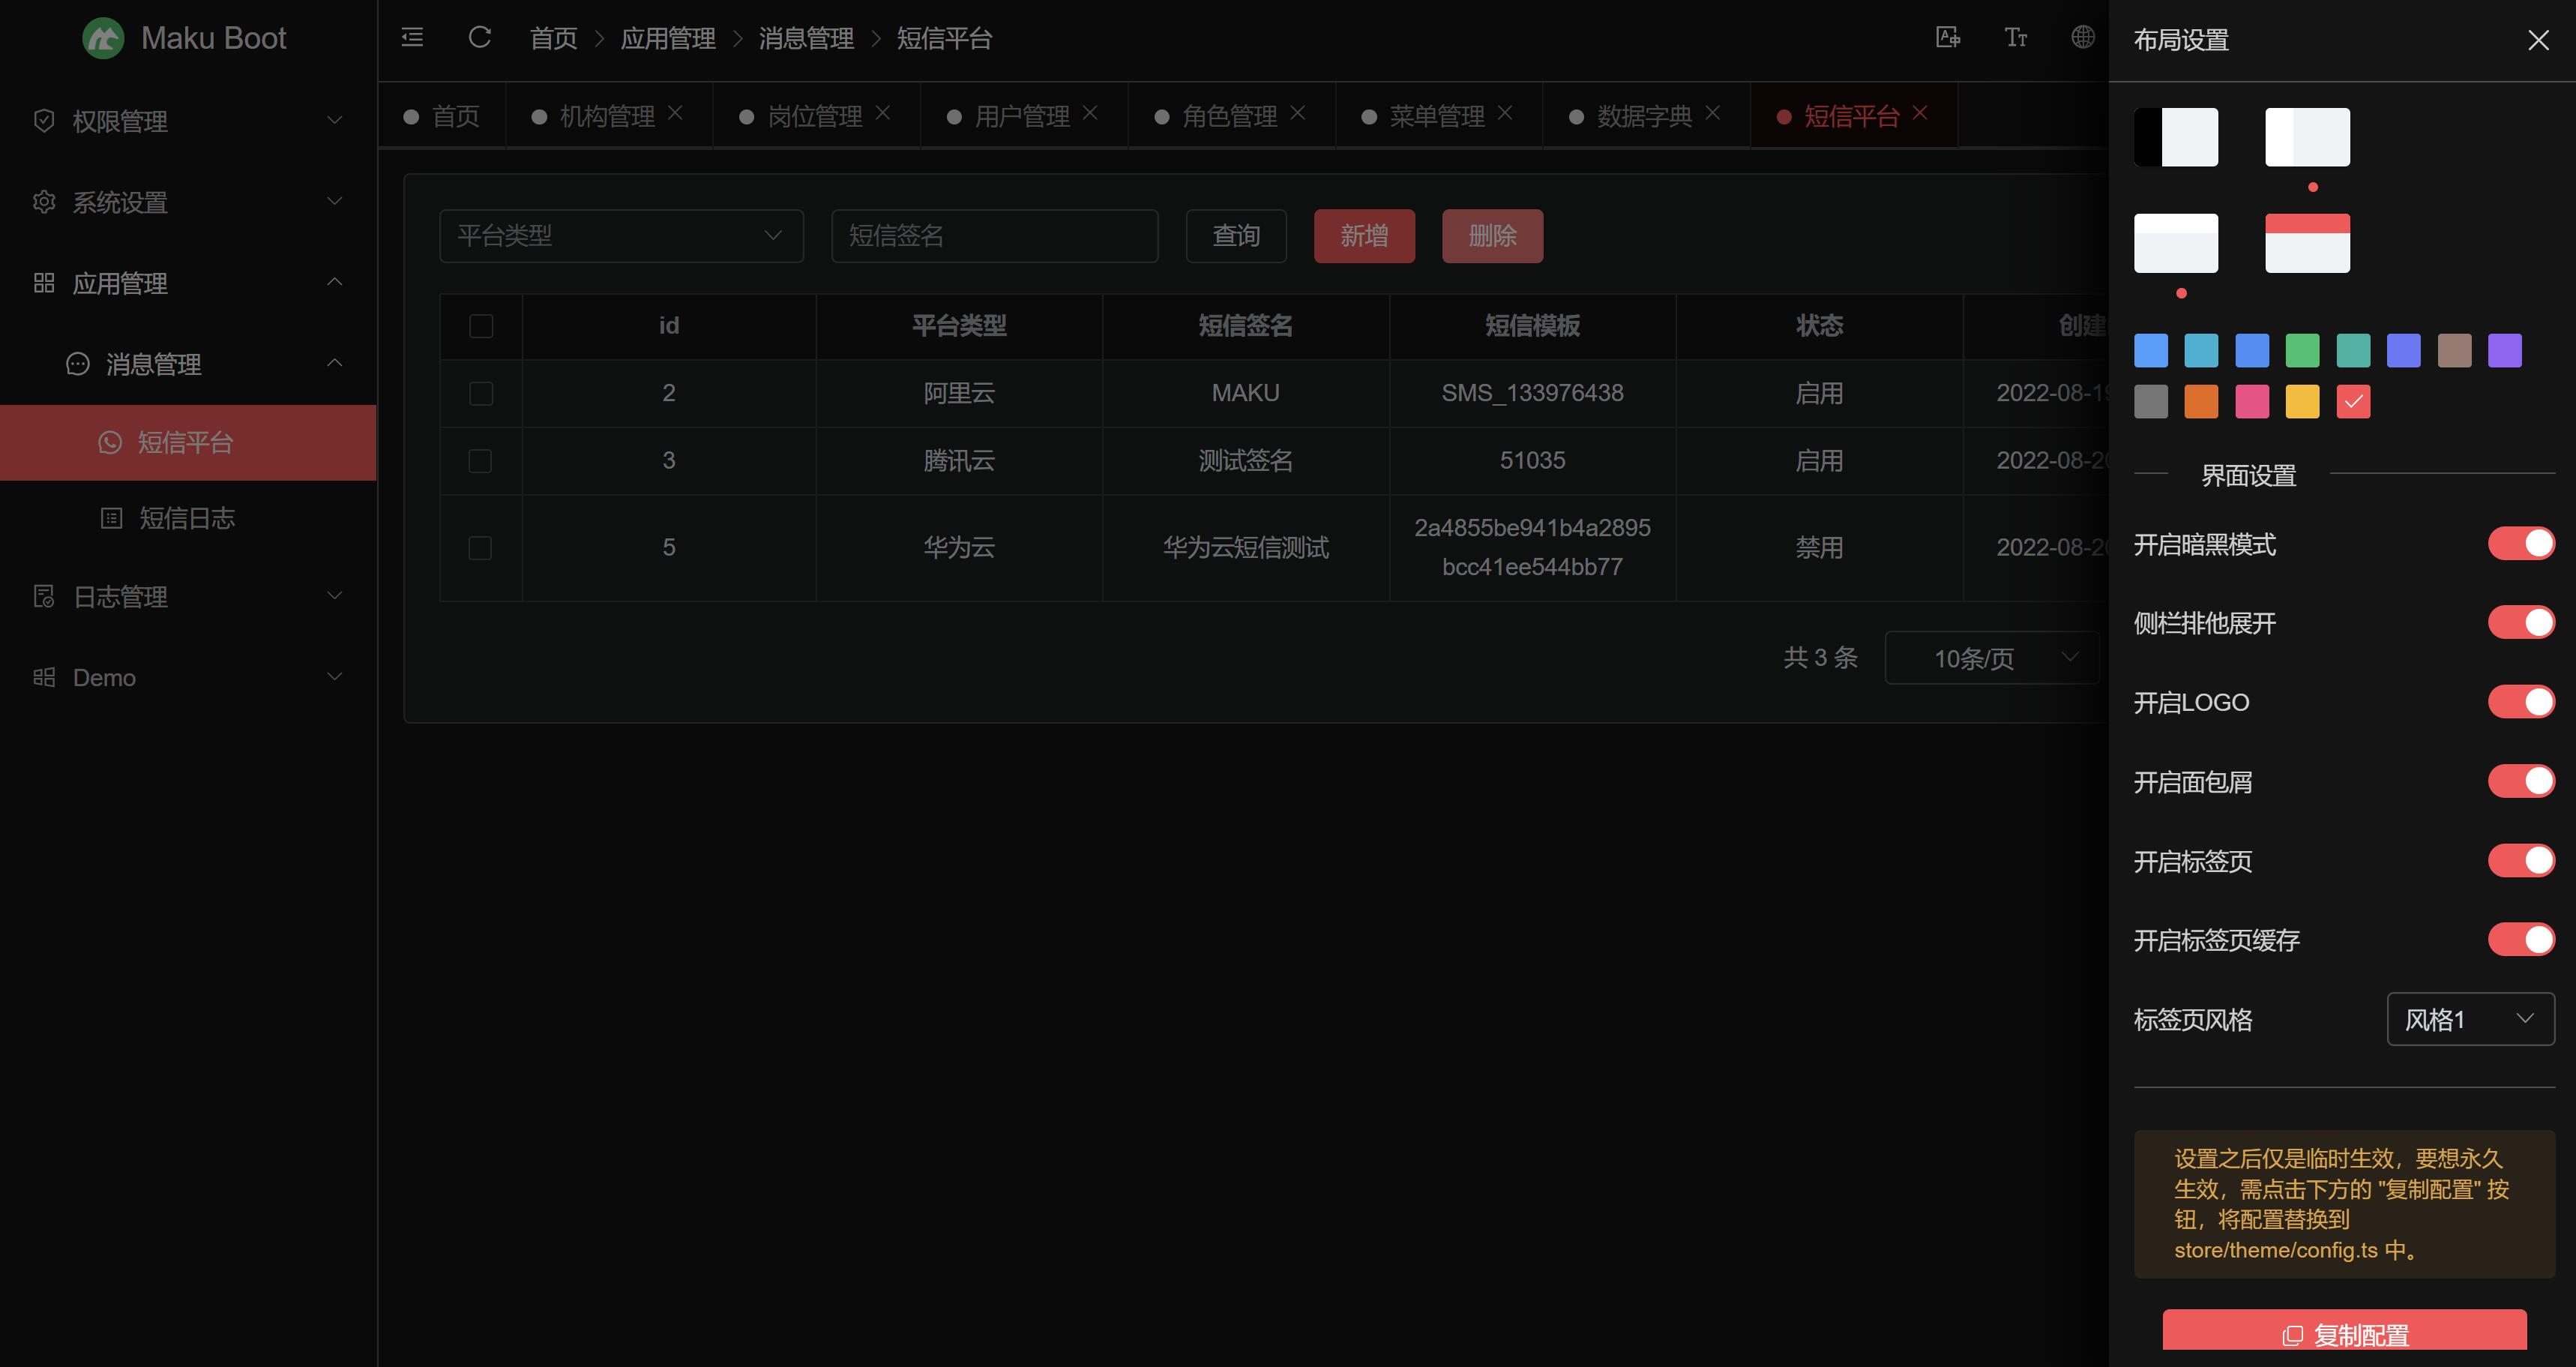
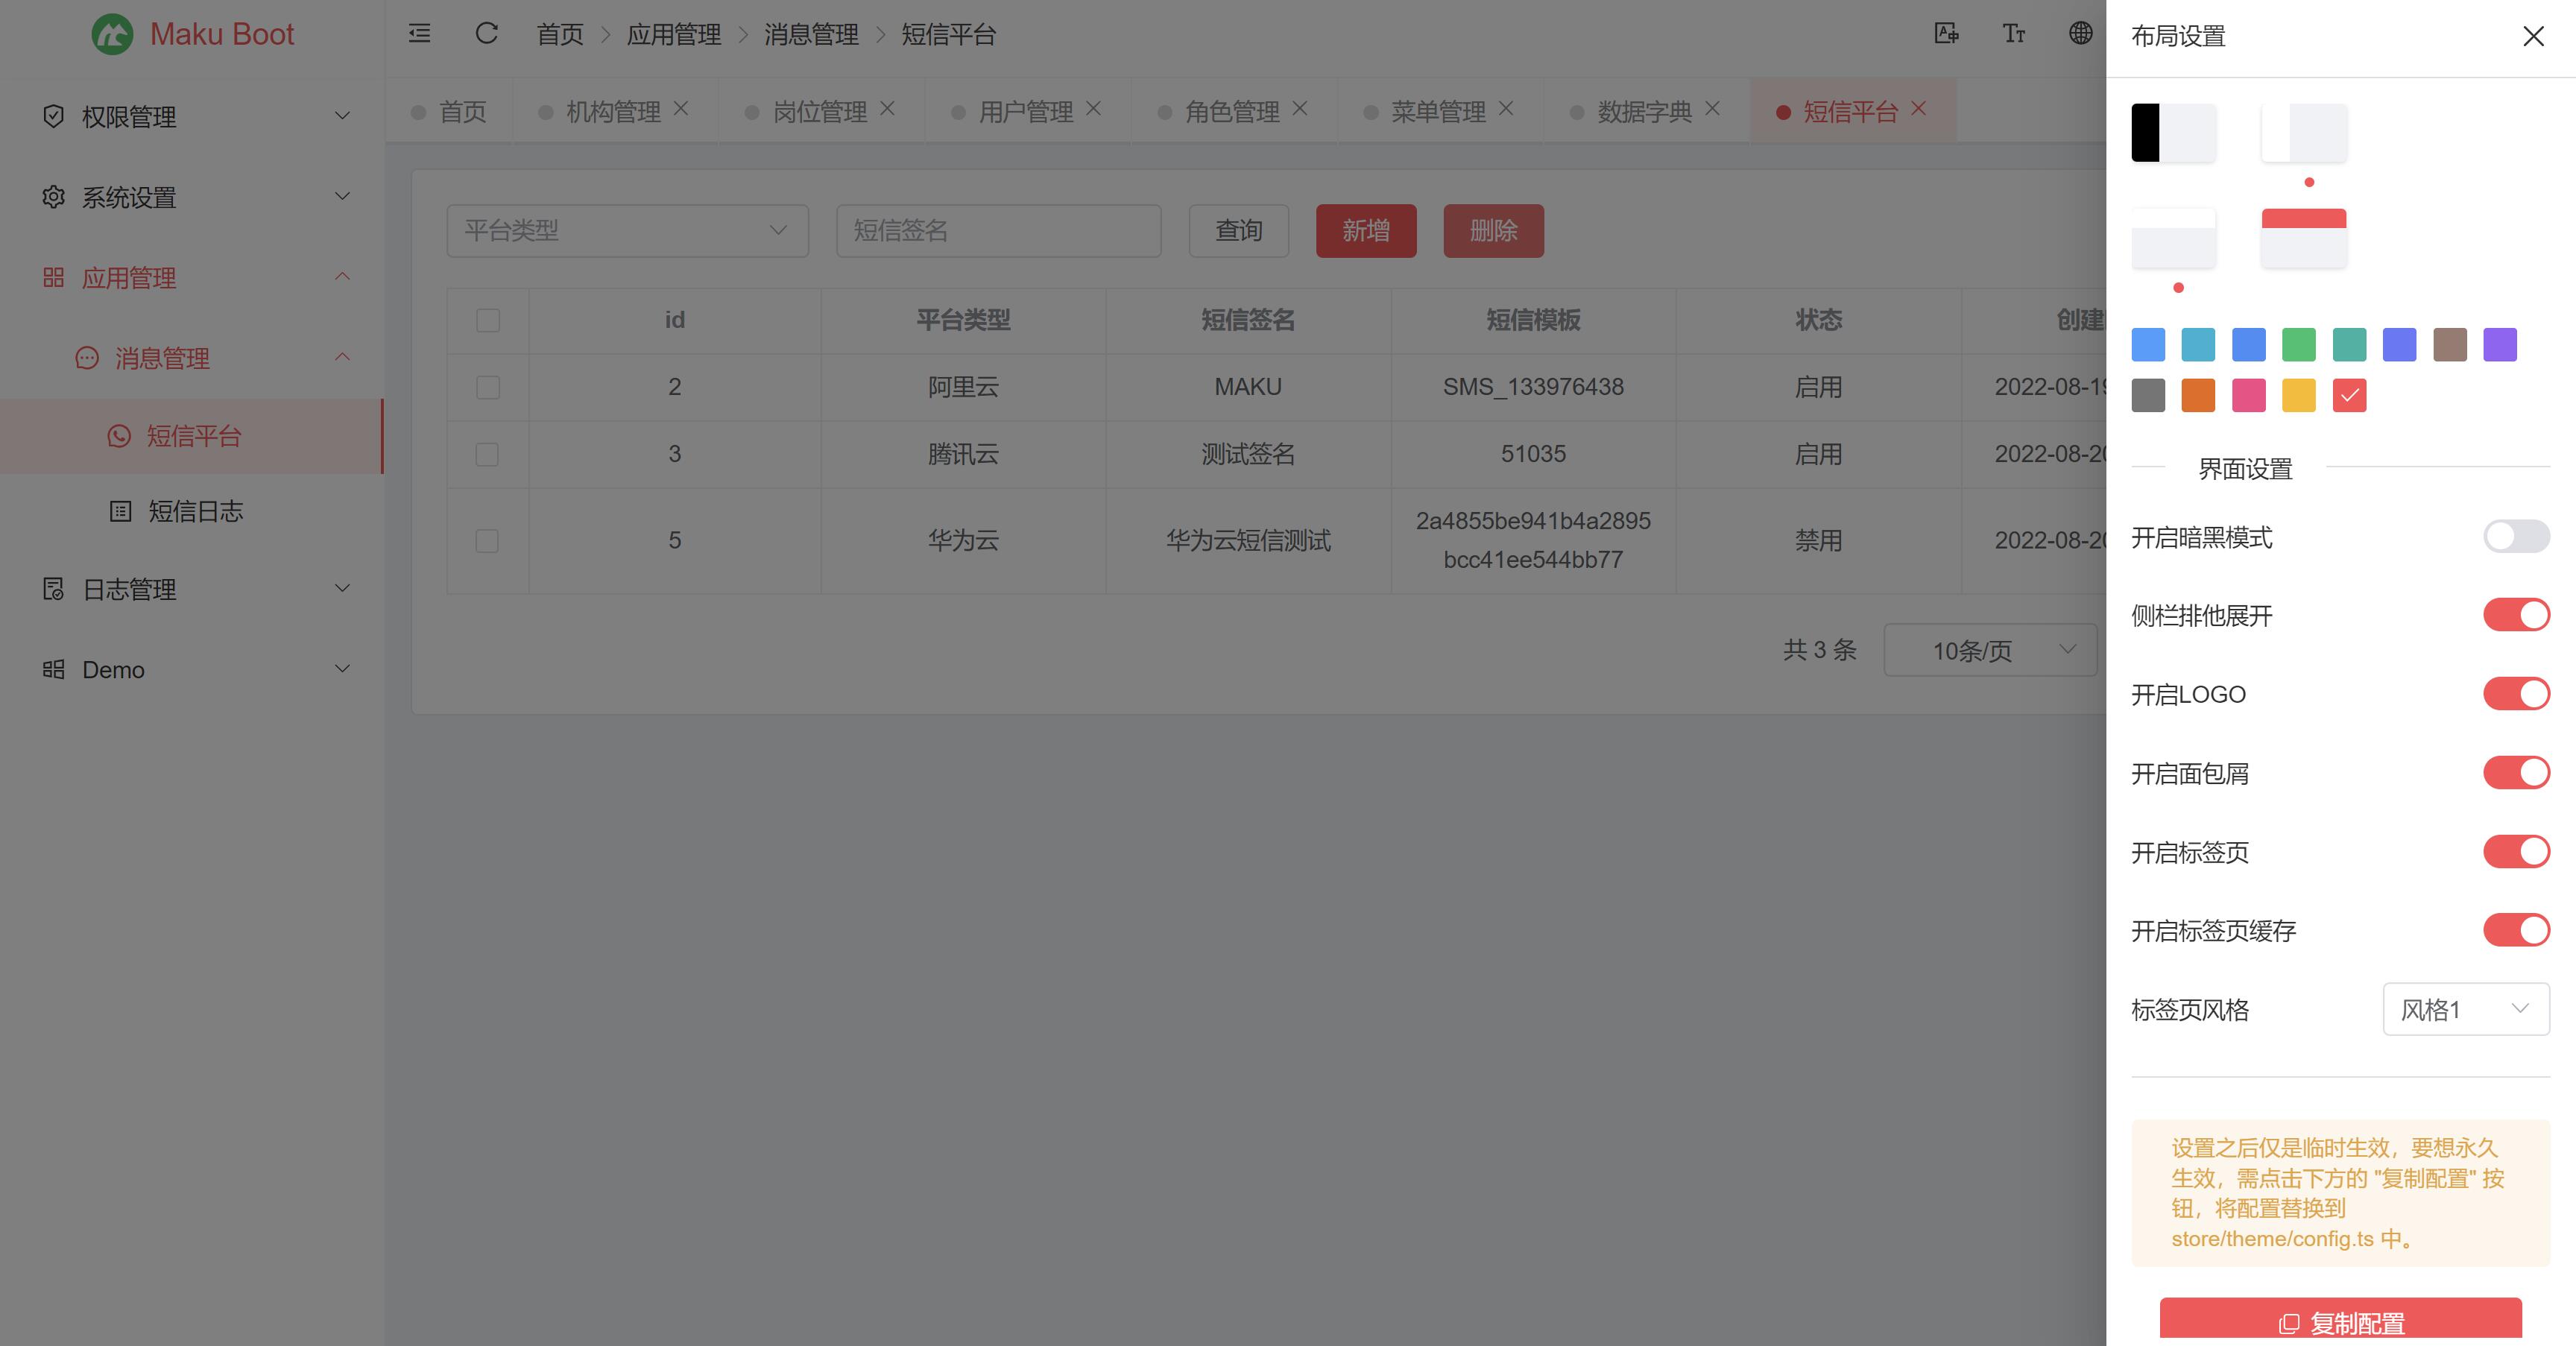
maku-boot v2.0 重大更新,基于 SpringSecurity 5.7 实现的前后端分离架构
介绍
- maku-boot 是采用 SpringBoot、SpringSecurity、Mybatis-Plus 等框架,开发的一套 SpringBoot 快速开发平台,使用门槛极低,且采用 MIT 开源协议,完全免费开源,可免费用于商业项目等场景。
- 采用组件模式,扩展不同的业务功能,可以很方便的实现各种业务需求,且不会导致系统臃肿,若想使用某个组件,按需引入即可,反之亦然。
- 开发文档:https://maku.net/docs/maku-boot
- 演示环境:https://demo.maku.net/maku-boot
项目名称
我们成立项目之初,就想好了愿景:【让开发更简单】,帮助开发者快速开发项目,所以采用 fast 开头命名,如:fast-boot、fast-admin等等,后来我们发现这个名称没有含义,如:fastboot一般指设备快速启动的意思,且也不能申请商标,对后期推广也不利,经过一番思考,最终决定以 maku 开头,这样识别度高很多,也不会造成混淆。再次感谢大伙对 MAKU 的支持,为成为国内最好用的快速开发平台,我们一直在努力!
更新日志
- 从2.0开始,由原来的项目名【fast-boot】变更为【maku-boot】,感谢支持
- 重构安全模块,采用springsecurity5.7+token技术,实现前后端分离架构
- 移除oauth2.0认证,oauth2.0不太适合做站内登录
- 新增手机短信登录,现支持账号和短信登录
- 新增登录日志功能,方便查看登录用户
- 优化账号密码登录逻辑
- 升级element-plus到2.2.15
前端工程
- Gitee 仓库:https://gitee.com/makunet/maku-admin
- Github 仓库:https://github.com/makunet/maku-admin
后端工程
- Gitee 仓库:https://gitee.com/makunet/maku-boot
- Github 仓库:https://github.com/makunet/maku-boot
代码生成器
- Gitee 仓库:https://gitee.com/makunet/maku-generator
- Github 仓库:https://github.com/makunet/maku-generator
交流和反馈
- 官方社区:https://maku.net
- 技术解答、交流、反馈、建议等,请移步到官方社区,我们会及时回复,也方便今后的小伙伴寻找答案,感谢理解!
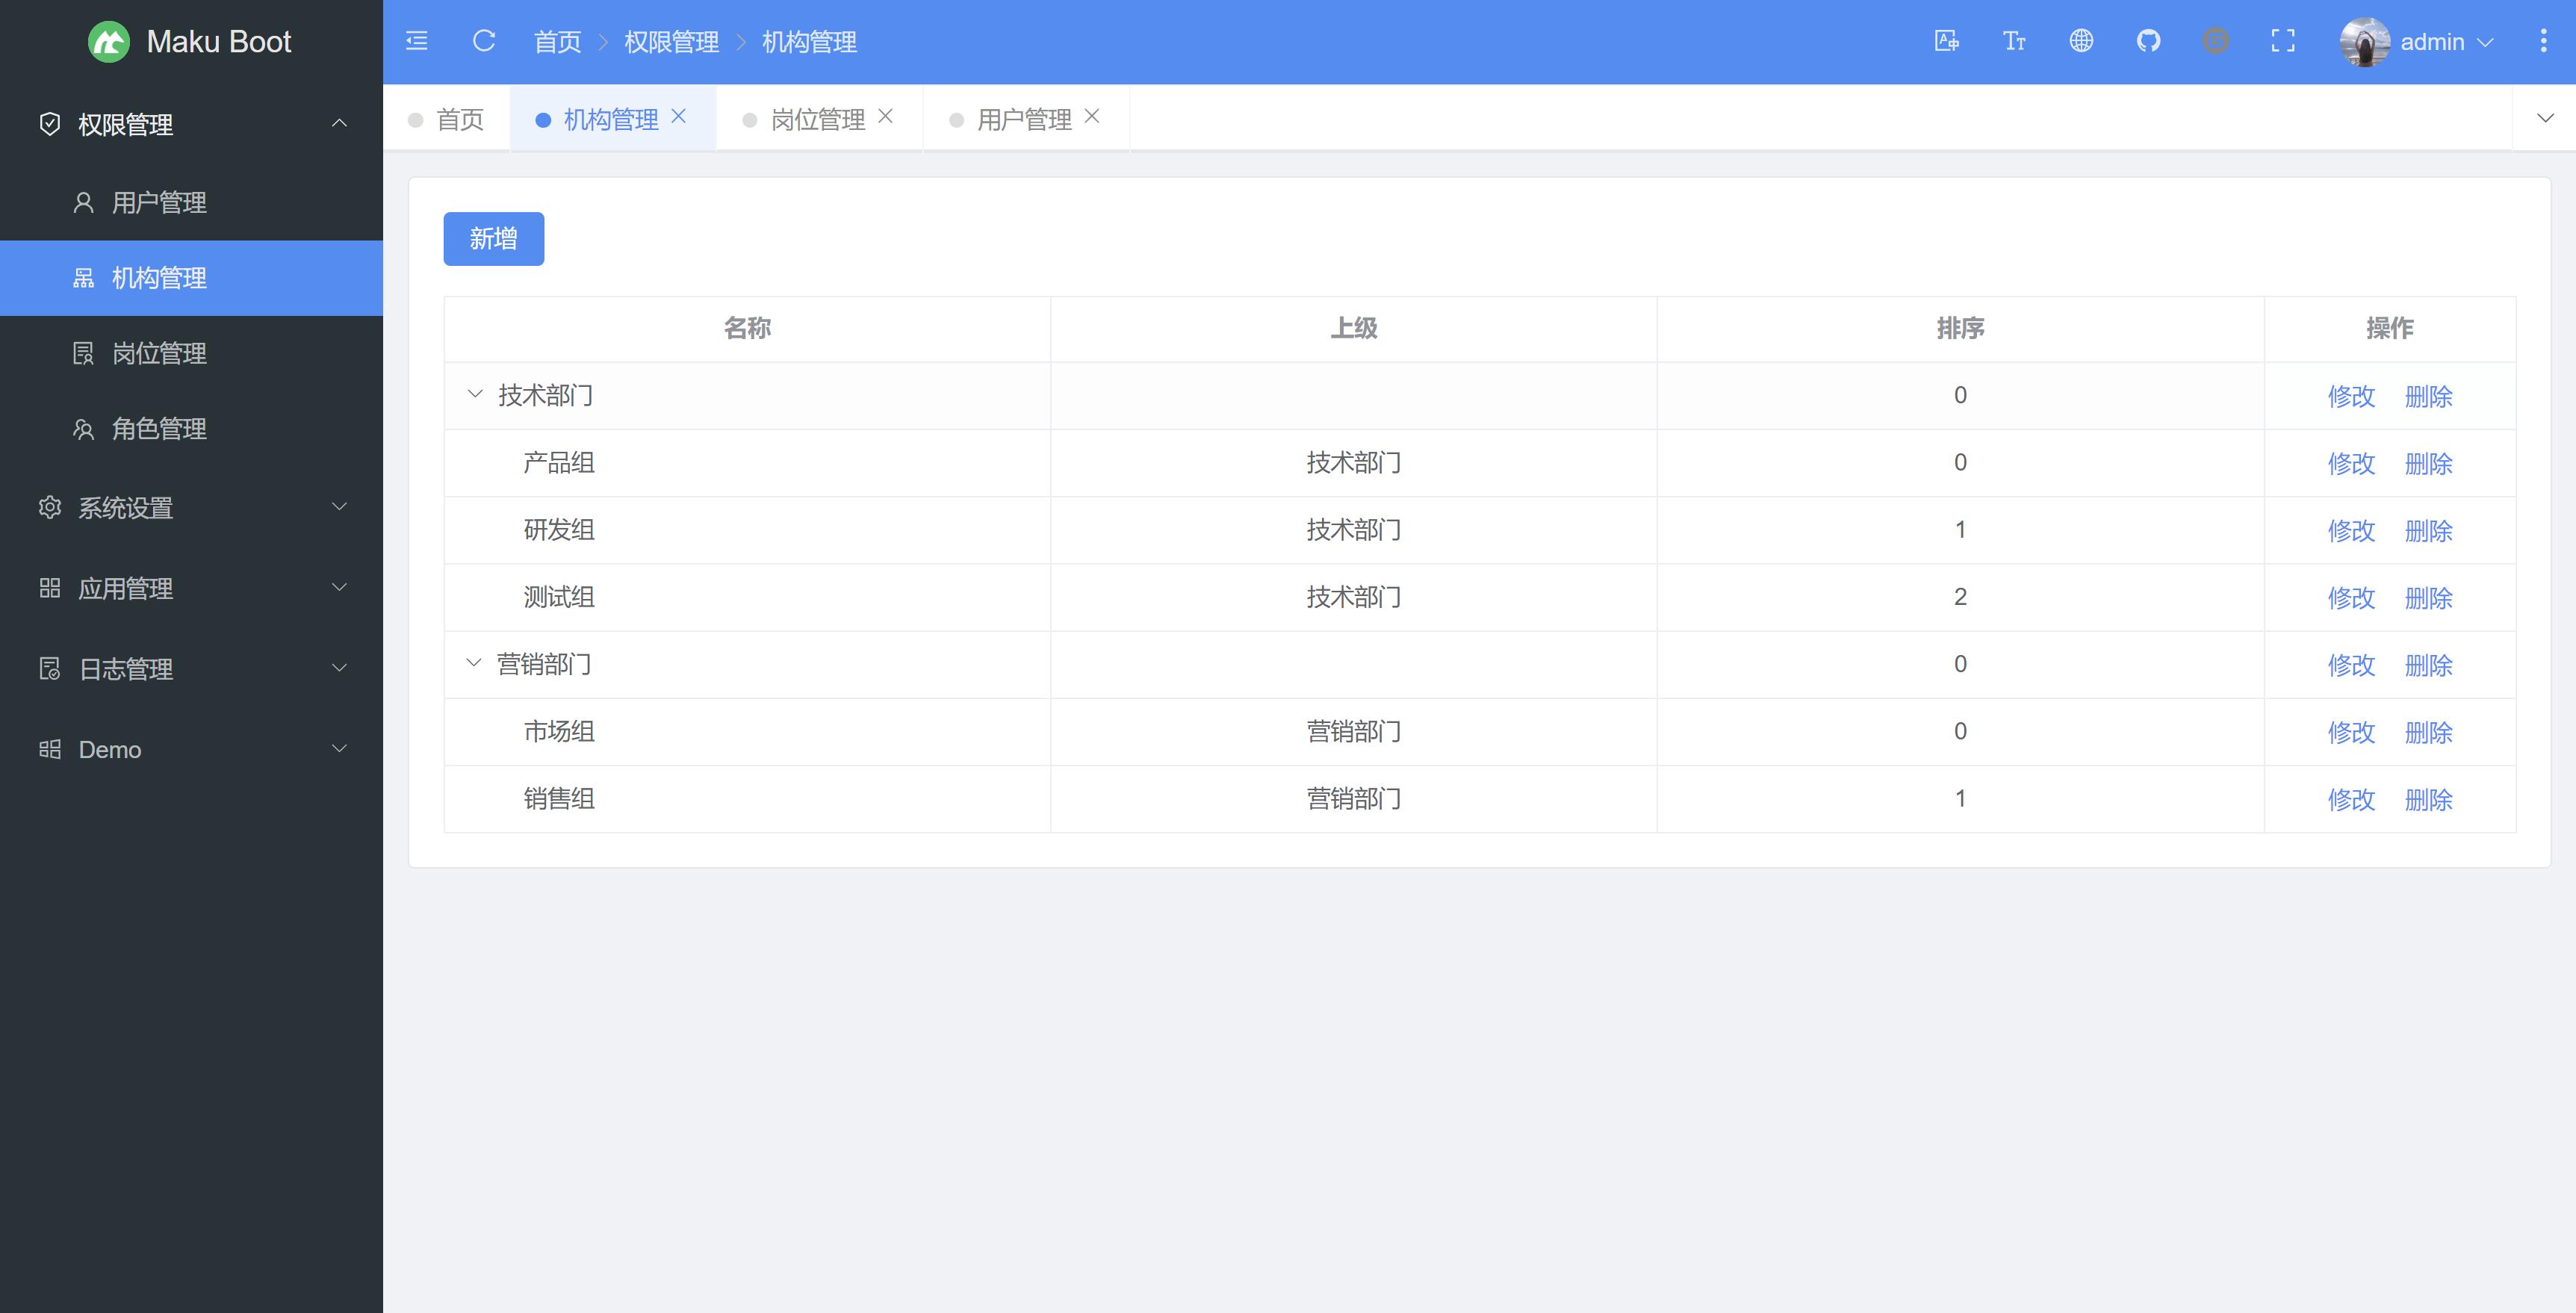
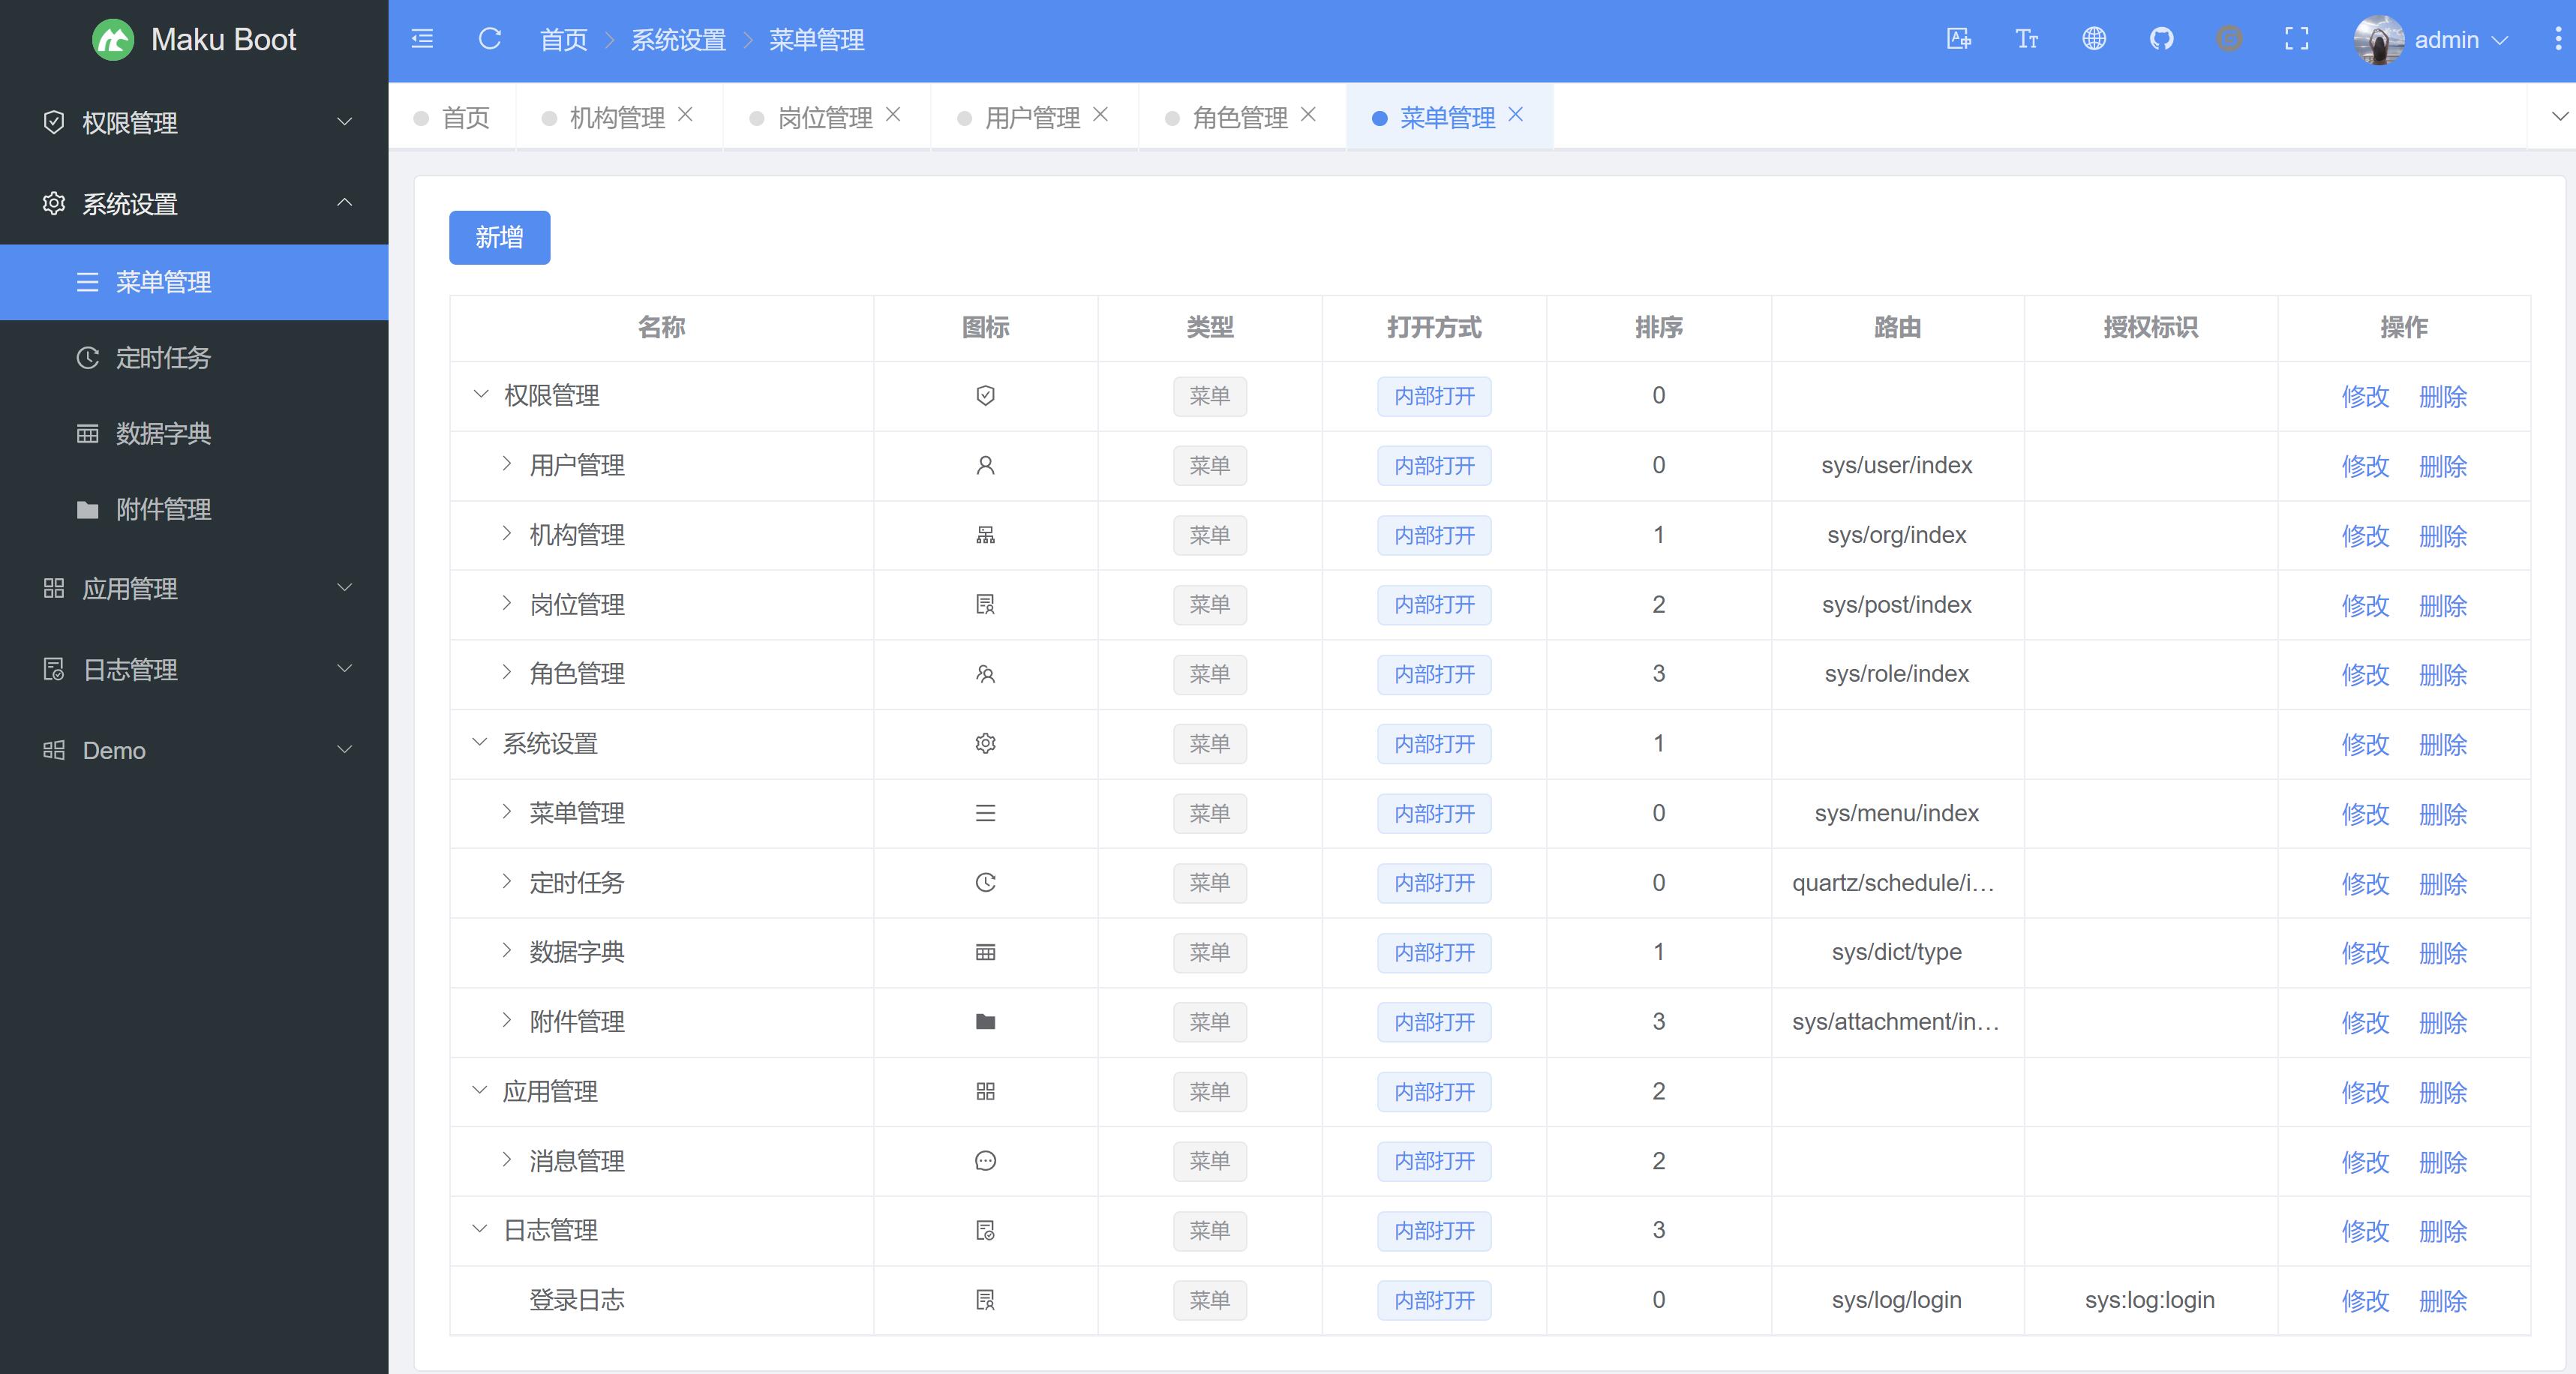
效果图

Spring Boot Security JWT 整合实现前后端分离认证示例
前面两章节我们介绍了 Spring Boot Security 快速入门 和 Spring Boot JWT 快速入门,本章节使用 JWT 和 Spring Boot Security 构件一个前后端分离的认证系统。本章代码实例来自于 Spring Boot Security + JWT Hello World Example。
本章节没有采用 thymeleaf,直接采用纯 html 与 rest api 来实现。
- spring boot security
- jsonwebtoken
- jquery 1.11 +
几个逻辑
在编写代码前,我们应该搞清楚几个逻辑
-
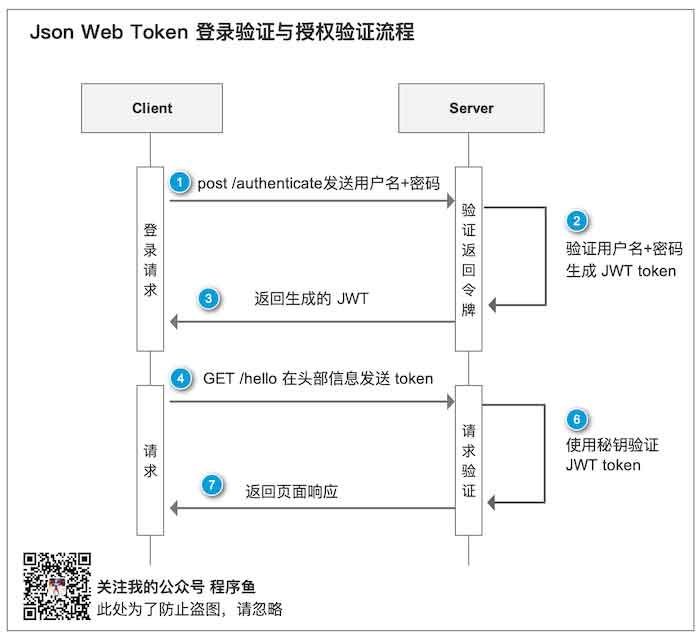
JWT 认证逻辑是什么?
JWT认证逻辑见图1,JWT就是向每个请求发送带有 token 的字符串,服务端每次都对每个请求进行拦截认证的过程,成功则放行,失败则抛出异常。
图1
-
JWT 不是认证吗,什么还要 Spring Security
JWT 作为一种 client-server 即客户端到服务端的认证,是无状态的,但在服务端我们需要有状态的判断,那么就要用到 shiro 或者 spring security 来进行安全管理状态管理。
-
JWT 什么时候需要单独认证,什么时候需要 Spring Security 一起认证
只要 client 发起请求,我们都需要对 Jwt token 进行认证。在 server 侧,当我们需要进行授权的时候,则需要检测是否授权,需要用到 spring security 认证。
-
JWT 认证有效,Spring Security 认证无效 会出现这种情况吗
这种情况,则会 在Spring Security 重新登录授权。
-
本章的业务逻辑
图2、图3 显示了本章的逻辑
图2 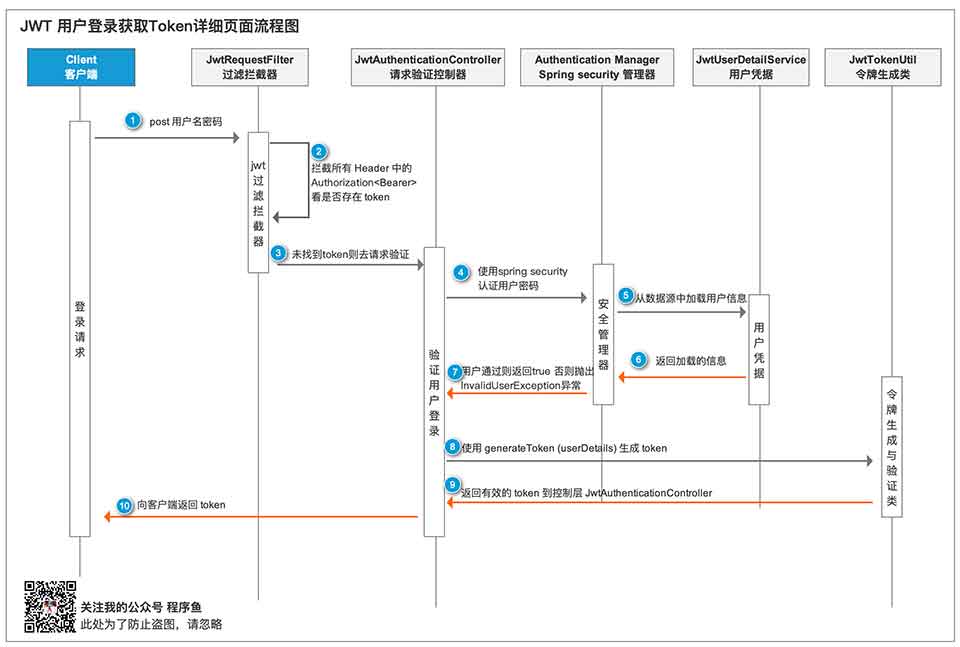
图3 
本项目源码下载
1 新建 Spring Boot Maven 示例工程项目
- File > New > Project,如下图选择
Spring Initializr然后点击 【Next】下一步 - 填写
GroupId(包名)、Artifact(项目名) 即可。点击 下一步 groupId=com.fishpro
artifactId=securityjwt - 选择依赖
Spring Web Starter前面打钩。 - 项目名设置为
spring-boot-study-securityjwt.
2 依赖引入 Pom.xml
本文引入了
- Spring Boot Security
- jsonwebtoken
<?xml version="1.0" encoding="UTF-8"?>
<project xmlns="http://maven.apache.org/POM/4.0.0" xmlns:xsi="http://www.w3.org/2001/XMLSchema-instance"
         xsi:schemaLocation="http://maven.apache.org/POM/4.0.0 http://maven.apache.org/xsd/maven-4.0.0.xsd">
    <modelVersion>4.0.0</modelVersion>
    <parent>
        <groupId>org.springframework.boot</groupId>
        <artifactId>spring-boot-starter-parent</artifactId>
        <version>2.1.6.RELEASE</version>
        <relativePath/> <!-- lookup parent from repository -->
    </parent>
    <groupId>com.fishpro</groupId>
    <artifactId>securityjwt</artifactId>
    <version>0.0.1-SNAPSHOT</version>
    <name>securityjwt</name>
    <description>Demo project for Spring Boot</description>

    <properties>
        <java.version>1.8</java.version>
    </properties>

    <dependencies>
        <dependency>
            <groupId>org.springframework.boot</groupId>
            <artifactId>spring-boot-starter-security</artifactId>
        </dependency>
        <dependency>
            <groupId>org.springframework.boot</groupId>
            <artifactId>spring-boot-starter-web</artifactId>
        </dependency>
        <dependency>
            <groupId>io.jsonwebtoken</groupId>
            <artifactId>jjwt</artifactId>
            <version>0.9.1</version>
        </dependency>

        <dependency>
            <groupId>org.springframework.boot</groupId>
            <artifactId>spring-boot-starter-test</artifactId>
            <scope>test</scope>
        </dependency>
        <dependency>
            <groupId>org.springframework.security</groupId>
            <artifactId>spring-security-test</artifactId>
            <scope>test</scope>
        </dependency>
    </dependencies>

    <build>
        <plugins>
            <plugin>
                <groupId>org.springframework.boot</groupId>
                <artifactId>spring-boot-maven-plugin</artifactId>
            </plugin>
        </plugins>
    </build>

</project>
3 配置文件 application
配置了端口和 jwt 的秘钥
server:
  port: 8086
jwt:
 #jwt 的秘钥
  secret: javainuse
4 建立一个正常的 HelloController
package com.fishpro.securityjwt.controller;

import org.springframework.web.bind.annotation.RequestMapping;
import org.springframework.web.bind.annotation.RestController;

@RestController
public class HelloWorldController {

    @RequestMapping({ "/hello" })
    public String firstPage() {
        return "Hello World";
    }

}
此时,访问 localhost:8086/hello 是正常显示,因为此时没有权限要求
5 建立 Jwt 请求与返回实体
5.1 JwtRequest 请求类
package com.fishpro.securityjwt.dto;

import java.io.Serializable;

public class JwtRequest implements Serializable {

    private static final long serialVersionUID = 5926468583005150707L;

    private String username;
    private String password;

    //need default constructor for JSON Parsing
    public JwtRequest()
    {

    }

    public JwtRequest(String username, String password) {
        this.setUsername(username);
        this.setPassword(password);
    }

    public String getUsername() {
        return this.username;
    }

    public void setUsername(String username) {
        this.username = username;
    }

    public String getPassword() {
        return this.password;
    }

    public void setPassword(String password) {
        this.password = password;
    }
}
5.2 JwtResponse 返回类
package com.fishpro.securityjwt.dto;

import java.io.Serializable;

public class JwtResponse implements Serializable {

    private static final long serialVersionUID = -8091879091924046844L;
    private final String jwttoken;

    public JwtResponse(String jwttoken) {
        this.jwttoken = jwttoken;
    }

    public String getToken() {
        return this.jwttoken;
    }
}
5.3 JwtUtil 操作类
package com.fishpro.securityjwt.util;

import io.jsonwebtoken.Claims;
import io.jsonwebtoken.Jwts;
import io.jsonwebtoken.SignatureAlgorithm;
import org.springframework.beans.factory.annotation.Value;
import org.springframework.security.core.userdetails.UserDetails;
import org.springframework.stereotype.Component;

import java.io.Serializable;
import java.util.Date;
import java.util.HashMap;
import java.util.Map;
import java.util.function.Function;

/**
 * jwt 库
 * */
@Component
public class JwtTokenUtil implements Serializable {

    private static final long serialVersionUID = -2550185165626007488L;

    public static final long JWT_TOKEN_VALIDITY = 5 * 60 * 60;

    @Value("${jwt.secret}")
    private String secret;

    //retrieve username from jwt token
    public String getUsernameFromToken(String token) {
        return getClaimFromToken(token, Claims::getSubject);
    }

    //retrieve expiration date from jwt token
    public Date getExpirationDateFromToken(String token) {
        return getClaimFromToken(token, Claims::getExpiration);
    }

    public <T> T getClaimFromToken(String token, Function<Claims, T> claimsResolver) {
        final Claims claims = getAllClaimsFromToken(token);
        return claimsResolver.apply(claims);
    }
    //for retrieveing any information from token we will need the secret key
    private Claims getAllClaimsFromToken(String token) {
        return Jwts.parser().setSigningKey(secret).parseClaimsJws(token).getBody();
    }

    //check if the token has expired
    private Boolean isTokenExpired(String token) {
        final Date expiration = getExpirationDateFromToken(token);
        return expiration.before(new Date());
    }

    //generate token for user
    public String generateToken(UserDetails userDetails) {
        Map<String, Object> claims = new HashMap<>();
        return doGenerateToken(claims, userDetails.getUsername());
    }

    //while creating the token -
    //1. Define  claims of the token, like Issuer, Expiration, Subject, and the ID
    //2. Sign the JWT using the HS512 algorithm and secret key.
    //3. According to JWS Compact Serialization(https://tools.ietf.org/html/draft-ietf-jose-json-web-signature-41#section-3.1)
    //   compaction of the JWT to a URL-safe string
    private String doGenerateToken(Map<String, Object> claims, String subject) {

        return Jwts.builder().setClaims(claims).setSubject(subject).setIssuedAt(new Date(System.currentTimeMillis()))
                .setExpiration(new Date(System.currentTimeMillis() + JWT_TOKEN_VALIDITY * 1000))
                .signWith(SignatureAlgorithm.HS512, secret).compact();
    }

    //validate token
    public Boolean validateToken(String token, UserDetails userDetails) {
        final String username = getUsernameFromToken(token);
        return (username.equals(userDetails.getUsername()) && !isTokenExpired(token));
    }
}
5.4 JwtUserDetailsService
package com.fishpro.securityjwt.config;

import org.springframework.security.core.userdetails.User;
import org.springframework.security.core.userdetails.UserDetails;
import org.springframework.security.core.userdetails.UserDetailsService;
import org.springframework.security.core.userdetails.UsernameNotFoundException;
import org.springframework.security.provisioning.InMemoryUserDetailsManager;
import org.springframework.stereotype.Service;

import java.util.ArrayList;

@Service
public class JwtUserDetailsService implements UserDetailsService {

    @Override
    public UserDetails loadUserByUsername(String username) throws UsernameNotFoundException {
        if ("javainuse".equals(username)) {
            return new User("javainuse", "$2a$10$slYQmyNdGzTn7ZLBXBChFOC9f6kFjAqPhccnP6DxlWXx2lPk1C3G6",
                    new ArrayList<>());
        } else {
            throw new UsernameNotFoundException("User not found with username: " + username);
        }
    }
}
6 重新定义 AuthenticationEntryPoint 页面未授权统一返回
用来解决匿名用户访问无权限资源时的异常
package com.fishpro.securityjwt.config;

import org.springframework.security.core.AuthenticationException;
import org.springframework.security.web.AuthenticationEntryPoint;
import org.springframework.stereotype.Component;

import javax.servlet.http.HttpServletRequest;
import javax.servlet.http.HttpServletResponse;
import java.io.IOException;
import java.io.Serializable;

/**
 * AuthenticationEntryPoint 用来解决匿名用户访问无权限资源时的异常
 * AccessDeineHandler 用来解决认证过的用户访问无权限资源时的异常
 * */
@Component
public class JwtAuthenticationEntryPoint implements AuthenticationEntryPoint, Serializable {

    private static final long serialVersionUID = -7858869558953243875L;

    //当出错的时候 发送 Unauthorized
    @Override
    public void commence(HttpServletRequest request, HttpServletResponse response,
                         AuthenticationException authException) throws IOException {

        response.sendError(HttpServletResponse.SC_UNAUTHORIZED, "Unauthorized");
    }
}
7 JwtRequestFilter 过滤器用于验证 Jwt
package com.fishpro.securityjwt.config;

import com.fishpro.securityjwt.util.JwtTokenUtil;
import io.jsonwebtoken.ExpiredJwtException;
import org.springframework.beans.factory.annotation.Autowired;
import org.springframework.security.authentication.UsernamePasswordAuthenticationToken;
import org.springframework.security.core.context.SecurityContextHolder;
import org.springframework.security.core.userdetails.UserDetails;
import org.springframework.security.core.userdetails.UserDetailsService;
import org.springframework.security.web.authentication.WebAuthenticationDetailsSource;
import org.springframework.stereotype.Component;
import org.springframework.web.filter.OncePerRequestFilter;

import javax.servlet.FilterChain;
import javax.servlet.ServletException;
import javax.servlet.http.HttpServletRequest;
import javax.servlet.http.HttpServletResponse;
import java.io.IOException;

/**
 * 过滤器 用于 Spring Boot Security
 * OncePerRequestFilter 一次请求只通过一次filter,而不需要重复执行
 * */
@Component
public class JwtRequestFilter extends OncePerRequestFilter {

    @Autowired
    private JwtUserDetailsService jwtUserDetailsService;

    @Autowired
    private JwtTokenUtil jwtTokenUtil;

    @Override
    protected void doFilterInternal(HttpServletRequest request, HttpServletResponse response, FilterChain chain)
            throws ServletException, IOException {

        final String requestTokenHeader = request.getHeader("Authorization");

        String username = null;
        String jwtToken = null;
        // JWT Token 获取请求头部的 Bearer
        // only the Token
        if (requestTokenHeader != null && requestTokenHeader.startsWith("Bearer ")) {
            jwtToken = requestTokenHeader.substring(7);
            try {
                username = jwtTokenUtil.getUsernameFromToken(jwtToken);
            } catch (IllegalArgumentException e) {
                System.out.println("Unable to get JWT Token");
            } catch (ExpiredJwtException e) {
                System.out.println("JWT Token has expired");
            }
        } else {
            logger.warn("JWT Token does not begin with Bearer String");
        }

        // 验证
        if (username != null && SecurityContextHolder.getContext().getAuthentication() == null) {

            UserDetails userDetails = this.jwtUserDetailsService.loadUserByUsername(username);

            // JWT 验证通过 使用Spring Security 管理
            if (jwtTokenUtil.validateToken(jwtToken, userDetails)) {

                UsernamePasswordAuthenticationToken usernamePasswordAuthenticationToken = new UsernamePasswordAuthenticationToken(
                        userDetails, null, userDetails.getAuthorities());
                usernamePasswordAuthenticationToken
                        .setDetails(new WebAuthenticationDetailsSource().buildDetails(request));
                // After setting the Authentication in the context, we specify
                // that the current user is authenticated. So it passes the
                // Spring Security Configurations successfully.
                SecurityContextHolder.getContext().setAuthentication(usernamePasswordAuthenticationToken);
            }
        }
        chain.doFilter(request, response);
    }

}
8 定义用于验证 Jwt Token 的路由
package com.fishpro.securityjwt.config;

import com.fishpro.securityjwt.dto.JwtRequest;
import com.fishpro.securityjwt.dto.JwtResponse;
import com.fishpro.securityjwt.util.JwtTokenUtil;
import org.springframework.beans.factory.annotation.Autowired;
import org.springframework.http.ResponseEntity;
import org.springframework.security.authentication.AuthenticationManager;
import org.springframework.security.authentication.BadCredentialsException;
import org.springframework.security.authentication.DisabledException;
import org.springframework.security.authentication.UsernamePasswordAuthenticationToken;
import org.springframework.security.core.userdetails.UserDetails;
import org.springframework.security.core.userdetails.UserDetailsService;
import org.springframework.web.bind.annotation.*;

/**
 * 用于验证 jwt 返回客户端 jwt(json web token)
 * */
@RestController
@CrossOrigin
public class JwtAuthenticationController {

    @Autowired
    private AuthenticationManager authenticationManager;

    @Autowired
    private JwtTokenUtil jwtTokenUtil;

    @Autowired
    private JwtUserDetailsService userDetailsService;

    /**
     * 获取 客户端来的 username password 使用秘钥加密成 json web token
     * */
    @RequestMapping(value = "/authenticate", method = RequestMethod.POST)
    public ResponseEntity<?> createAuthenticationToken(@RequestBody JwtRequest authenticationRequest) throws Exception {

        authenticate(authenticationRequest.getUsername(), authenticationRequest.getPassword());

        final UserDetails userDetails = userDetailsService
                .loadUserByUsername(authenticationRequest.getUsername());

        final String token = jwtTokenUtil.generateToken(userDetails);

        return ResponseEntity.ok(new JwtResponse(token));
    }

    /**
     *  获取 客户端来的 username password 使用秘钥加密成 json web token
     * */
    private void authenticate(String username, String password) throws Exception {
        try {
            authenticationManager.authenticate(new UsernamePasswordAuthenticationToken(username, password));
        } catch (DisabledException e) {
            throw new Exception("USER_DISABLED", e);
        } catch (BadCredentialsException e) {
            throw new Exception("INVALID_CREDENTIALS", e);
        }
    }
}
9 定义 WebSecurityConfig
@Configuration
@EnableWebSecurity
@EnableGlobalMethodSecurity(prePostEnabled = true)
public class WebSecurityConfig extends WebSecurityConfigurerAdapter {

    @Autowired
    private JwtAuthenticationEntryPoint jwtAuthenticationEntryPoint;

    @Autowired
    private UserDetailsService jwtUserDetailsService;

    @Autowired
    private JwtRequestFilter jwtRequestFilter;

    @Autowired
    public void configureGlobal(AuthenticationManagerBuilder auth) throws Exception {
        // configure AuthenticationManager so that it knows from where to load
        // user for matching credentials
        // Use BCryptPasswordEncoder
        auth.userDetailsService(jwtUserDetailsService).passwordEncoder(passwordEncoder());
    }

    @Bean
    public PasswordEncoder passwordEncoder() {
        return new BCryptPasswordEncoder();
    }

    @Bean
    @Override
    public AuthenticationManager authenticationManagerBean() throws Exception {
        return super.authenticationManagerBean();
    }

    @Override
    protected void configure(HttpSecurity httpSecurity) throws Exception {
        // 本示例不需要使用CSRF
        httpSecurity.csrf().disable()
                // 认证页面不需要权限
                .authorizeRequests().antMatchers("/authenticate").permitAll().
                //其他页面
                        anyRequest().authenticated().and().
                //登录页面 模拟客户端
                formLogin().loginPage("/login.html").permitAll().and().
                // store user''s state.
                 exceptionHandling().authenticationEntryPoint(jwtAuthenticationEntryPoint).and().sessionManagement()
                //不使用session
                .sessionCreationPolicy(SessionCreationPolicy.STATELESS);

        //验证请求是否正确
        httpSecurity.addFilterBefore(jwtRequestFilter, UsernamePasswordAuthenticationFilter.class);
    }
}
10 login.html 模拟客户端
注意这里使用 ajax 的时候务必填写参数 contentType: "application/json;charset=UTF-8"
<!DOCTYPE html>
<html lang="en">
<head>
    <meta charset="UTF-8">
    <title>使用 jwt 登录页面</title>
</head>
<body>
<div>
    <input id="userName" name="userName" value="">
</div>
<div>
    <input id="password" name="password" value="">
</div>
<div>
    <input type="button" id="btnSave"  value="登录">
</div>
<script src="https://cdn.bootcss.com/jquery/1.11.3/jquery.js"></script>
<script>
    $(function() {
        $("#btnSave").click(function () {
            var username=$("#userName").val();
            var password=$("#password").val();
            $.ajax({
                cache: true,
                type: "POST",
                url: "/authenticate",
                contentType: "application/json;charset=UTF-8",
                data:JSON.stringify({"username":username ,"password" : password}),
                dataType: "json",
                async: false,
                error: function (request) {
                    console.log("Connection error");
                },
                success: function (data) {
                    //save token
                    localStorage.setItem("token",data.token);


                }
            });
        });
    });
</script>
</body>
</html>
本项目源码下载

Spring Security 前后端分离登录,非法请求直接返回 JSON
hello 各位小伙伴,国庆节终于过完啦,松哥也回来啦,今天开始咱们继续发干货!
关于 Spring Security,松哥之前发过多篇文章和大家聊聊这个安全框架的使用:
不过,今天要和小伙伴们聊一聊 Spring Security 中的另外一个问题,那就是在 Spring Security 中未获认证的请求默认会重定向到登录页,但是在前后端分离的登录中,这个默认行为则显得非常不合适,今天我们主要来看看如何实现未获认证的请求直接返回 JSON ,而不是重定向到登录页面。
前置知识
这里关于 Spring Security 的基本用法我就不再赘述了,如果小伙伴们不了解,可以参考上面的 6 篇文章。
大家知道,在自定义 Spring Security 配置的时候,有这样几个属性:
@Override
protected void configure(HttpSecurity http) throws Exception {
    http.authorizeRequests()
            .anyRequest().authenticated()
            .formLogin()
            .loginProcessingUrl("/doLogin")
            .loginPage("/login")
            //其他配置
            .permitAll()
            .and()
            .csrf().disable();
}
这里有两个比较重要的属性:
- loginProcessingUrl:这个表示配置处理登录请求的接口地址,例如你是表单登录,那么 form 表单中 action 的值就是这里填的值。
- loginPage:这个表示登录页的地址,例如当你访问一个需要登录后才能访问的资源时,系统就会自动给你通过重定向跳转到这个页面上来。
这种配置在前后端不分的登录中是没有问题的,在前后端分离的登录中,这种配置就有问题了。我举个简单的例子,例如我想访问 /hello 接口,但是这个接口需要登录之后才能访问,我现在没有登录就直接去访问这个接口了,那么系统会给我返回 302,让我去登录页面,在前后端分离中,我的后端一般是没有登录页面的,就是一个提示 JSON,例如下面这样:
@GetMapping("/login")
public RespBean login() {
    return RespBean.error("尚未登录,请登录!");
}
> 完整代码大家可以参考我的微人事项目。
也就是说,当我没有登录直接去访问 /hello 这个接口的时候,我会看到上面这段 JSON 字符串。在前后端分离开发中,这个看起来没问题(后端不再做页面跳转,无论发生什么都是返回 JSON)。但是问题就出在这里,系统默认的跳转是一个重定向,就是说当你访问 /hello 的时候,服务端会给浏览器返回 302,同时响应头中有一个 Location 字段,它的值为 http://localhost:8081/login ,也就是告诉浏览器你去访问 http://localhost:8081/login 地址吧。浏览器收到指令之后,就会直接去访问 http://localhost:8081/login 地址,如果此时是开发环境并且请求还是 Ajax 请求,就会发生跨域。因为前后端分离开发中,前端我们一般在 NodeJS 上启动,然后前端的所有请求通过 NodeJS 做请求转发,现在服务端直接把请求地址告诉浏览器了,浏览器就会直接去访问 http://localhost:8081/login 了,而不会做请求转发了,因此就发生了跨域问题。
解决方案
很明显,上面的问题我们不能用跨域的思路来解决,虽然这种方式看起来也能解决问题,但不是最佳方案。
如果我们的 Spring Security 在用户未获认证的时候去请求一个需要认证后才能请求的数据,此时不给用户重定向,而是直接就返回一个 JSON,告诉用户这个请求需要认证之后才能发起,就不会有上面的事情了。
这里就涉及到 Spring Security 中的一个接口 AuthenticationEntryPoint ,该接口有一个实现类:LoginUrlAuthenticationEntryPoint ,该类中有一个方法 commence,如下:
/**
 * Performs the redirect (or forward) to the login form URL.
 */
public void commence(HttpServletRequest request, HttpServletResponse response,
		AuthenticationException authException) {
	String redirectUrl = null;
	if (useForward) {
		if (forceHttps && "http".equals(request.getScheme())) {
			redirectUrl = buildHttpsRedirectUrlForRequest(request);
		}
		if (redirectUrl == null) {
			String loginForm = determineUrlToUseForThisRequest(request, response,
					authException);
			if (logger.isDebugEnabled()) {
				logger.debug("Server side forward to: " + loginForm);
			}
			RequestDispatcher dispatcher = request.getRequestDispatcher(loginForm);
			dispatcher.forward(request, response);
			return;
		}
	}
	else {
		redirectUrl = buildRedirectUrlToLoginPage(request, response, authException);
	}
	redirectStrategy.sendRedirect(request, response, redirectUrl);
}
首先我们从这个方法的注释中就可以看出,这个方法是用来决定到底是要重定向还是要 forward,通过 Debug 追踪,我们发现默认情况下 useForward 的值为 false,所以请求走进了重定向。
那么我们解决问题的思路很简单,直接重写这个方法,在方法中返回 JSON 即可,不再做重定向操作,具体配置如下:
@Override
protected void configure(HttpSecurity http) throws Exception {
    http.authorizeRequests()
            .anyRequest().authenticated()
            .formLogin()
            .loginProcessingUrl("/doLogin")
            .loginPage("/login")
            //其他配置
            .permitAll()
            .and()
            .csrf().disable().exceptionHandling()
                .authenticationEntryPoint(new AuthenticationEntryPoint() {
            @Override
            public void commence(HttpServletRequest req, HttpServletResponse resp, AuthenticationException authException) throws IOException, ServletException {
                resp.setContentType("application/json;charset=utf-8");
                PrintWriter out = resp.getWriter();
                RespBean respBean = RespBean.error("访问失败!");
                if (authException instanceof InsufficientAuthenticationException) {
                    respBean.setMsg("请求失败,请联系管理员!");
                }
                out.write(new ObjectMapper().writeValueAsString(respBean));
                out.flush();
                out.close();
            }
        });
}
在 Spring Security 的配置中加上自定义的 AuthenticationEntryPoint 处理方法,该方法中直接返回相应的 JSON 提示即可。这样,如果用户再去直接访问一个需要认证之后才可以访问的请求,就不会发生重定向操作了,服务端会直接给浏览器一个 JSON 提示,浏览器收到 JSON 之后,该干嘛干嘛。
结语
好了,一个小小的重定向问题和小伙伴们分享下,不知道大家有没有看懂呢?这也是我最近在重构微人事的时候遇到的问题。预计 11 月份,微人事的 Spring Boot 版本会升级到目前最新版,请小伙伴们留意哦。
本文案例我已上传到 GitHub :https://github.com/lenve/javaboy-code-samples

Spring Security 简单教程以及实现完全前后端分离
点击上方 Java后端,选择 设为星标
来自:ming-question
链接:cnblogs.com/ming-question/p/11165775.html
Spring Security是spring家的一个安全框架,入门简单。对比shiro,它自带登录页面,自动完成登录操作。权限过滤时支持http方法过滤。
在新手入门使用时,只需要简单的配置,即可实现登录以及权限的管理,无需自己写功能逻辑代码。
但是对于现在大部分前后端分离的web程序,尤其是前端普遍使用ajax请求时,spring security自带的登录系统就有一些不满足需求了。
因为spring security有自己默认的登录页,自己默认的登录控制器。而登录成功或失败,都会返回一个302跳转。登录成功跳转到主页,失败跳转到登录页。如果未认证直接访问也会跳转到登录页。但是如果前端使用ajax请求,ajax是无法处理302请求的。前后端分离web中,规范是使用json交互。我们希望登录成功或者失败都会返回一个json。况且spring security自带的登录页太丑了,我们还是需要使用自己的。
Spring Security一般简单使用
web的安全控制一般分为两个部分,一个是认证,一个是授权。
认证管理
就是认证是否为合法用户,简单的说是登录。一般为匹对用户名和密码,即认证成功。
在spring security认证中,我们需要注意的是:哪个类表示用户?哪个属性表示用户名?哪个属性表示密码?怎么通过用户名取到对应的用户?密码的验证方式是什么?
只要告诉spring security这几个东西,基本上就可以了。
import org.springframework.context.annotation.Configuration;import org.springframework.security.config.annotation.web.configuration.EnableWebSecurity;import org.springframework.security.config.annotation.web.configuration.WebSecurityConfigurerAdapter;
@Configuration@EnableWebSecuritypublic class SecurityConfig extends WebSecurityConfigurerAdapter {
}
事实上只要继承WebSecurityConfigurerAdapter ,spring security就已经启用了,当你访问资源时,它就会跳转到它自己默认的登录页。但是这还不行,
当用户点击登录时,
1.它会拿到用户输入的用户名密码;
2.根据用户名通过UserDetailsService 的 loadUserByUsername(username)方法获得一个用户对象;
3.获得一个UserDetails 对象,获得内部的成员属性password;
4.通过PasswordEncoder 的 matchs(s1, s2) 方法对比用户的输入的密码和第3步的密码;
5.匹配成功;
所以我们要实现这三个接口的三个方法:
1.实现UserDetailsService ,可以选择同时实现用户的正常业务方法和UserDetailsService ;
例如:UserServiceImpl implement IUserService,UserDetailsService {}
2.实现UserDetails ,一般使用用户的实体类实现此接口。
其中有getUsername(), getPassword(), getAuthorities()为获取用户名,密码,权限。可根据个人情况实现。
3.实现PasswordEncoder ,spring security 提供了多个该接口的实现类,可百度和查看源码理解,也可以自己写。
三个实现类的配置如下:
@Configuration@EnableWebSecuritypublic class SecurityConfig extends WebSecurityConfigurerAdapter {
@Autowired private UserDetailsService userDetailsService;
@Override protected void configure(AuthenticationManagerBuilder auth) throws Exception { auth.userDetailsService(userDetailsService) .passwordEncoder(NoOpPasswordEncoder.getInstance()); }}
其中Userdetails 为UserDetailsService 中 loadUserByUsername() 方法的返回值类型。
到目前为止,就可以完成简单认证了。而授权管理,到现在,是默认的:所有资源都只有‘认证’权限,所有用户也只有‘认证’权限。即,经过认证就可以访问所有资源。
以上,就是spring security的简易应用。可以实现一个稍微完整的安全控制。非常简单。
授权管理
授权管理,是在已认证的前提下。用户在认证后,根据用户的不同权限,开放不同的资源。
根据RBAC设计,用户有多个角色,角色有多个权限。(真正控制资源的是权限,角色只是一个权限列表,方便使用。)
每个用户都有一个权限列表,授权管理,就是权限和资源的映射。在编程中,写好对应关系。然后当用户请求资源时,查询用户是否有资源对应的权限决定是否通过。
权限写在数据库,配置文件或其他任何地方。只要调用loadUserByUsername()时返回的UserDetails对象中的getAuthorities()方法能获取到。
所以无论用户的权限写在哪里,只要getAuthorities()能得到就可以了。
举例:
授权管理映射:add==/api/add,query==/api/query;
数据库中存储了用户权限:query;
那么该用户就只能访问/api/query,而不能访问/api/add。
授权管理配置如下:
@Configuration@EnableWebSecuritypublic class SecurityConfig extends WebSecurityConfigurerAdapter {
@Autowired private UserDetailsService userDetailsService;
@Override protected void configure(AuthenticationManagerBuilder auth) throws Exception { auth.userDetailsService(userDetailsService) .passwordEncoder(NoOpPasswordEncoder.getInstance()); }
@Override protected void configure(HttpSecurity http) throws Exception { http.authorizeRequests() .antMatchers(HttpMethod.POST, "/api/data").hasAuthority("add") .antMatchers(HttpMethod.GET, "/api/data").hasAuthority("query") .antMatchers("/home").hasAuthority("base"); }}
解决思想:修改302状态码,修改为401,403或者200和json数据。
@Componentpublic class LoginSuccessHandler implements AuthenticationSuccessHandler {
@Override public void onAuthenticationSuccess(HttpServletRequest httpServletRequest, HttpServletResponse httpServletResponse, Authentication authentication) throws IOException, ServletException { httpServletResponse.setStatus(HttpStatus.OK.value()); }}
@EnableWebSecuritypublic class SecurityConfig extends WebSecurityConfigurerAdapter {
@Qualifier("userService") @Autowired private UserDetailsService userDetailsService;
@Autowired private LoginSuccessHandler loginSuccessHandler;
@Autowired private LoginFailureHandler loginFailureHandler;
@Autowired private MyLogoutHandler logoutHandler;
@Override protected void configure(AuthenticationManagerBuilder auth) throws Exception { auth.userDetailsService(userDetailsService) .passwordEncoder(NoOpPasswordEncoder.getInstance()); }
@Override protected void configure(HttpSecurity http) throws Exception { http .formLogin() .loginProcessingUrl("/login") // 登录成功 .successHandler(loginSuccessHandler) // 登录失败 .failureHandler(loginFailureHandler).permitAll() .and() // 注销成功 .logout().logoutSuccessHandler(logoutHandler) .and() // 未登录请求资源 .exceptionHandling().authenticationEntryPoint(new Http403ForbiddenEntryPoint()) .and() .authorizeRequests() .antMatchers(HttpMethod.POST, "/api/data").hasAuthority("add") .antMatchers(HttpMethod.GET, "/api/data").hasAuthority("query") .antMatchers("/home").hasAuthority("base"); }}
学Java,请关注公众号:Java后端


