在本文中,我们将详细介绍java–使用spring3安全性在jsp页面中访问我的自定义用户对象的各个方面,并为您提供关于springboot配置jsp访问的相关解答,同时,我们也将为您带来关于4.Sp
在本文中,我们将详细介绍java – 使用spring 3安全性在jsp页面中访问我的自定义用户对象的各个方面,并为您提供关于springboot配置jsp访问的相关解答,同时,我们也将为您带来关于4. Spring Boot 中 Spring Security 自定义用户认证、angularjs – 如何在我的自定义回调中访问我的角度$scope?、idea使用SpringMVC无法访问jsp页面、java – Spring安全性在尝试注销时返回302的有用知识。
本文目录一览:- java – 使用spring 3安全性在jsp页面中访问我的自定义用户对象(springboot配置jsp访问)
- 4. Spring Boot 中 Spring Security 自定义用户认证
- angularjs – 如何在我的自定义回调中访问我的角度$scope?
- idea使用SpringMVC无法访问jsp页面
- java – Spring安全性在尝试注销时返回302
")
java – 使用spring 3安全性在jsp页面中访问我的自定义用户对象(springboot配置jsp访问)
我已经实现了UserDetailsService,它返回一个MyUser实例(实现了UserDetails)
public MyUser loadUserByUsername(String arg0)
现在我想在我的JSP页面中访问MyUser上的自定义getter / fields,到目前为止我得到了这个:
${pageContext.request.userPrincipal.name}
但这只允许访问Principal对象.如何访问MyUser对象?
<%@ taglib prefix="sec" uri="http://www.springframework.org/security/tags" %>
...
irstname" />
如果principal实际上是MyUser的一个实例,那么“firstname”可以是我的任何自定义getter和setter

4. Spring Boot 中 Spring Security 自定义用户认证
自定义认证过程
自定义认证的过程需要实现 Spring Security 提供的 UserDetailService 接口,该接口只有一个抽象方法 loadUserByUsername,源码如下:
public interface UserDetailsService {
    UserDetails loadUserByUsername(String username) throws UsernameNotFoundException;
}
loadUserByUsername 方法返回一个 UserDetail 对象,该对象也是一个接口,包含一些用于描述用户信息的方法,源码如下:
public interface UserDetails extends Serializable {

    Collection<? extends GrantedAuthority> getAuthorities();

    String getPassword();

    String getUsername();

    boolean isAccountNonExpired();

    boolean isAccountNonLocked();

    boolean isCredentialsNonExpired();

    boolean isEnabled();
}
这些方法的含义如下:
-
getAuthorities获取用户包含的权限,返回权限集合,权限是一个继承了GrantedAuthority的对象; -
getPassword和getUsername用于获取密码和用户名; -
isAccountNonExpired方法返回 boolean 类型,用于判断账户是否未过期,未过期返回 true 反之返回 false; -
isAccountNonLocked方法用于判断账户是否未锁定; -
isCredentialsNonExpired用于判断用户凭证是否没过期,即密码是否未过期; -
isEnabled方法用于判断用户是否可用。
实际中我们可以自定义 UserDetails 接口的实现类,也可以直接使用 Spring Security 提供的 UserDetails 接口实现类 org.springframework.security.core.userdetails.User。
说了那么多,下面我们来开始实现 UserDetailService 接口的 loadUserByUsername 方法。
首先创建一个 MyUser 对象,用于存放模拟的用户数据(实际中一般从数据库获取,这里为了方便直接模拟):
public class MyUser implements Serializable {
    private static final long serialVersionUID = 3497935890426858541L;

    private String userName;

    private String password;

    private boolean accountNonExpired = true;

    private boolean accountNonLocked= true;

    private boolean credentialsNonExpired= true;

    private boolean enabled= true;

    // get,set略
}
接着创建 MyUserDetailService 实现 UserDetailService:
@Configuration
public class UserDetailService implements UserDetailsService {

    @Autowired
    private PasswordEncoder passwordEncoder;

    @Override
    public UserDetails loadUserByUsername(String username) throws UsernameNotFoundException {
        // 模拟一个用户,替代数据库获取逻辑
        MyUser user = new MyUser();
        user.setUserName(username);
        user.setPassword(this.passwordEncoder.encode("123456"));
        // 输出加密后的密码
        System.out.println(user.getPassword());

        return new User(username, user.getPassword(), user.isEnabled(),
                user.isAccountNonExpired(), user.isCredentialsNonExpired(),
                user.isAccountNonLocked(), AuthorityUtils.commaSeparatedStringToAuthorityList("admin"));
    }
}
这里我们使用了 org.springframework.security.core.userdetails.User 类包含 7 个参数的构造器,其还包含一个三个参数的构造器 User(String username, String password,Collection<? extends GrantedAuthority> authorities),由于权限参数不能为空,所以这里先使用 AuthorityUtils.commaSeparatedStringToAuthorityList 方法模拟一个 admin 的权限,该方法可以将逗号分隔的字符串转换为权限集合。
此外我们还注入了 PasswordEncoder 对象,该对象用于密码加密,注入前需要手动配置。我们在 BrowserSecurityConfig 中配置它:
@Configuration
public class BrowserSecurityConfig extends WebSecurityConfigurerAdapter {

    @Bean
    public PasswordEncoder passwordEncoder() {
        return new BCryptPasswordEncoder();
    }
    ...
}
PasswordEncoder 是一个密码加密接口,而 BCryptPasswordEncoder 是 Spring Security 提供的一个实现方法,我们也可以自己实现 PasswordEncoder。不过 Spring Security 实现的 BCryptPasswordEncoder 已经足够强大,它对相同的密码进行加密后可以生成不同的结果。
这时候重启项目,访问 http://localhost:8080/login,便可以使用任意用户名以及 123456 作为密码登录系统。我们多次进行登录操作,可以看到控制台输出的加密后的密码如下:

可以看到,BCryptPasswordEncoder 对相同的密码生成的结果每次都是不一样的。
替换默认登录页
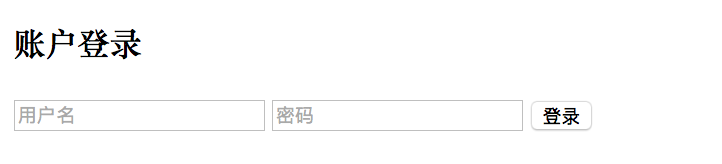
默认的登录页面过于简陋,我们可以自己定义一个登录页面。为了方便起见,我们直接在 src/main/resources/resources 目录下定义一个 login.html(不需要 Controller 跳转):
<!DOCTYPE html>
<html>
<head>
    <meta charset="UTF-8">
    <title>登录</title>
</head>
<body>
    <form class="login-page" action="/login" method="post">
        <div class="form">
            <h3>账户登录</h3>
            <input type="text" placeholder="用户名" name="username" required="required" />
            <input type="password" placeholder="密码" name="password" required="required" />
            <button type="submit">登录</button>
        </div>
    </form>
</body>
</html>
要怎么做才能让 Spring Security 跳转到我们自己定义的登录页面呢?很简单,只需要在 BrowserSecurityConfig 的 configure 中添加一些配置:
@Override
protected void configure(HttpSecurity http) throws Exception {
    http.formLogin() // 表单登录
            // http.httpBasic() // HTTP Basic
            .loginPage("/login.html")
            .loginProcessingUrl("/login")
            .and()
            .authorizeRequests() // 授权配置
            .antMatchers("/login.html").permitAll()
            .anyRequest()  // 所有请求
            .authenticated(); // 都需要认证
}上面代码中.loginPage("/login.html") 指定了跳转到登录页面的请求 URL,.loginProcessingUrl("/login") 对应登录页面 form 表单的 action="/login",.antMatchers("/login.html").permitAll() 表示跳转到登录页面的请求不被拦截,否则会进入无限循环。
这时候启动系统,访问 http://localhost:8080/hello,会看到页面已经被重定向到了 http://localhost:8080/login.html:
输入用户名和密码发现页面报错:
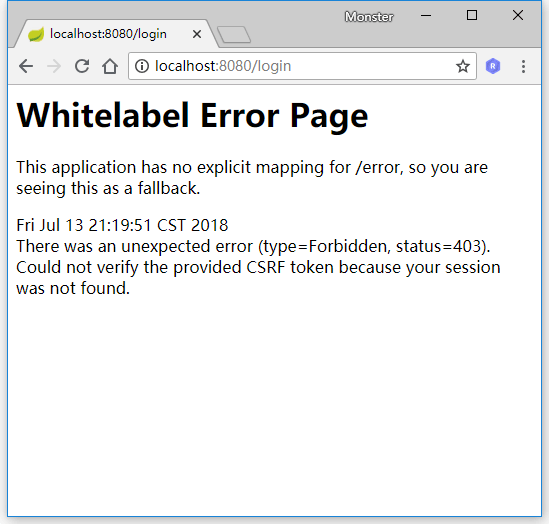
我们先把 CSRF 攻击防御关了,修改 BrowserSecurityConfig 的 configure:
Override
protected void configure(HttpSecurity http) throws Exception {
    http.formLogin() // 表单登录
            // http.httpBasic() // HTTP Basic
            .loginPage("/login.html") // 登录跳转 URL
            .loginProcessingUrl("/login") // 处理表单登录 URL
            .and()
            .authorizeRequests() // 授权配置
            .antMatchers("/login.html").permitAll() // 登录跳转 URL 无需认证
            .anyRequest()  // 所有请求
            .authenticated() // 都需要认证
            .and().csrf().disable();
}
重启项目便可正常登录。
假如现在有这样一个需求:在未登录的情况下,当用户访问 html 资源的时候跳转到登录页,否则返回 JSON 格式数据,状态码为 401。
要实现这个功能我们将 loginPage 的 URL 改为 /authentication/require,并且在 antMatchers 方法中加入该 URL,让其免拦截:
@Override
protected void configure(HttpSecurity http) throws Exception {
    http.formLogin() // 表单登录
            // http.httpBasic() // HTTP Basic
            .loginPage("/authentication/require") // 登录跳转 URL
            .loginProcessingUrl("/login") // 处理表单登录 URL
            .and()
            .authorizeRequests() // 授权配置
            .antMatchers("/authentication/require", "/login.html").permitAll() // 登录跳转 URL 无需认证
            .anyRequest()  // 所有请求
            .authenticated() // 都需要认证
            .and().csrf().disable();
}
然后定义一个控制器 BrowserSecurityController,处理这个请求:
@RestController
public class BrowserSecurityController {
    private RequestCache requestCache = new HttpSessionRequestCache();
    private RedirectStrategy redirectStrategy = new DefaultRedirectStrategy();

    @GetMapping("/authentication/require")
    @ResponseStatus(HttpStatus.UNAUTHORIZED)
    public String requireAuthentication(HttpServletRequest request, HttpServletResponse response) throws IOException {
        SavedRequest savedRequest = requestCache.getRequest(request, response);
        if (savedRequest != null) {
            String targetUrl = savedRequest.getRedirectUrl();
            if (StringUtils.endsWithIgnoreCase(targetUrl, ".html")) {
                redirectStrategy.sendRedirect(request, response, "/login.html");
            }
        }
        return "访问的资源需要身份认证!";
    }
}
其中 HttpSessionRequestCache 为 Spring Security 提供的用于缓存请求的对象,通过调用它的 getRequest 方法可以获取到本次请求的 HTTP 信息。DefaultRedirectStrategy 的 sendRedirect 为 Spring Security 提供的用于处理重定向的方法。
上面代码获取了引发跳转的请求,根据请求是否以.html 为结尾来对应不同的处理方法。如果是以.html 结尾,那么重定向到登录页面,否则返回” 访问的资源需要身份认证!” 信息,并且 HTTP 状态码为 401(HttpStatus.UNAUTHORIZED)。
这样当我们访问 http://localhost:8080/hello 的时候页面便会跳转到 http://localhost:8080/authentication/require,并且输出” 访问的资源需要身份认证!”,当我们访问 http://localhost:8080/hello.html 的时候,页面将会跳转到登录页面。
处理成功和失败
Spring Security 有一套默认的处理登录成功和失败的方法:当用户登录成功时,页面会跳转会引发登录的请求,比如在未登录的情况下访问 http://localhost:8080/hello,页面会跳转到登录页,登录成功后再跳转回来;登录失败时则是跳转到 Spring Security 默认的错误提示页面。下面我们通过一些自定义配置来替换这套默认的处理机制。
自定义登录成功逻辑
要改变默认的处理成功逻辑很简单,只需要实现 org.springframework.security.web.authentication.AuthenticationSuccessHandler 接口的 onAuthenticationSuccess 方法即可:
@Component
public class MyAuthenticationSucessHandler implements AuthenticationSuccessHandler {
    @Autowired
    private ObjectMapper mapper;

    @Override
    public void onAuthenticationSuccess(HttpServletRequest request, HttpServletResponse response,
                                        Authentication authentication) throws IOException, ServletException {
        response.setContentType("application/json;charset=utf-8");
        response.getWriter().write(mapper.writeValueAsString(authentication));
    }
}
其中 Authentication 参数既包含了认证请求的一些信息,比如 IP,请求的 SessionId 等,也包含了用户信息,即前面提到的 User 对象。通过上面这个配置,用户登录成功后页面将打印出 Authentication 对象的信息。
要使这个配置生效,我们还的在 BrowserSecurityConfig 的 configure 中配置它:
@Configuration
public class BrowserSecurityConfig extends WebSecurityConfigurerAdapter {
    @Autowired
    private MyAuthenticationSucessHandler authenticationSucessHandler;

    @Bean
    public PasswordEncoder passwordEncoder() {
        return new BCryptPasswordEncoder();
    }

    @Override
    protected void configure(HttpSecurity http) throws Exception {
        http.formLogin() // 表单登录
                // http.httpBasic() // HTTP Basic
                .loginPage("/authentication/require") // 登录跳转 URL
                .loginProcessingUrl("/login") // 处理表单登录 URL
                .successHandler(authenticationSucessHandler) // 处理登录成功
                .and()
                .authorizeRequests() // 授权配置
                .antMatchers("/authentication/require", "/login.html").permitAll() // 登录跳转 URL 无需认证
                .anyRequest()  // 所有请求
                .authenticated() // 都需要认证
                .and().csrf().disable();
    }
}
我们将 MyAuthenticationSucessHandler 注入进来,并通过 successHandler 方法进行配置。
这时候重启项目登录后页面将会输出如下 JSON 信息:
{
	"authorities": [{
		"authority": "admin"
	}],
	"details": {
		"remoteAddress": "127.0.0.1",
		"sessionId": "2131709E2D8F89FEBC3DB7A62B76B243"
	},
	"authenticated": true,
	"principal": {
		"password": null,
		"username": "111",
		"authorities": [{
			"authority": "admin"
		}],
		"accountNonExpired": true,
		"accountNonLocked": true,
		"credentialsNonExpired": true,
		"enabled": true
	},
	"credentials": null,
	"name": "111"
}
像 password,credentials 这些敏感信息,Spring Security 已经将其屏蔽。
除此之外,我们也可以在登录成功后做页面的跳转,修改 MyAuthenticationSucessHandler:
@Component
public class MyAuthenticationSucessHandler implements AuthenticationSuccessHandler {
    private RequestCache requestCache = new HttpSessionRequestCache();
    private RedirectStrategy redirectStrategy = new DefaultRedirectStrategy();

    @Override
    public void onAuthenticationSuccess(HttpServletRequest request, HttpServletResponse response,
                                        Authentication authentication) throws IOException {
        SavedRequest savedRequest = requestCache.getRequest(request, response);
        redirectStrategy.sendRedirect(request, response, savedRequest.getRedirectUrl());
    }
}
通过上面配置,登录成功后页面将跳转回引发跳转的页面。如果想指定跳转的页面,比如跳转到 /index,可以将 savedRequest.getRedirectUrl() 修改为 /index:
@Component
public class MyAuthenticationSucessHandler implements AuthenticationSuccessHandler {
    private RedirectStrategy redirectStrategy = new DefaultRedirectStrategy();

    @Override
    public void onAuthenticationSuccess(HttpServletRequest request, HttpServletResponse response,
                                        Authentication authentication) throws IOException {
        redirectStrategy.sendRedirect(request, response, "/index");
    }
}
然后在 TestController 中定义一个处理该请求的方法:
@RestController
public class TestController {
    @GetMapping("index")
    public Object index(){
        return SecurityContextHolder.getContext().getAuthentication();
    }
}
登录成功后,便可以使用 SecurityContextHolder.getContext().getAuthentication() 获取到 Authentication 对象信息。除了通过这种方式获取 Authentication 对象信息外,也可以使用下面这种方式:
@RestController
public class TestController {
    @GetMapping("index")
    public Object index(Authentication authentication) {
        return authentication;
    }
}
重启项目,登录成功后,页面将跳转到 http://localhost:8080/index:

自定义登录失败逻辑
和自定义登录成功处理逻辑类似,自定义登录失败处理逻辑需要实现 org.springframework.security.web.authentication.AuthenticationFailureHandler 的 onAuthenticationFailure 方法:
@Component
public class MyAuthenticationFailureHandler implements AuthenticationFailureHandler {
    @Override
    public void onAuthenticationFailure(HttpServletRequest request, HttpServletResponse response,
                                        AuthenticationException exception) throws IOException {
    }
}
onAuthenticationFailure 方法的 AuthenticationException 参数是一个抽象类,Spring Security 根据登录失败的原因封装了许多对应的实现类,查看 AuthenticationException 的 Hierarchy:
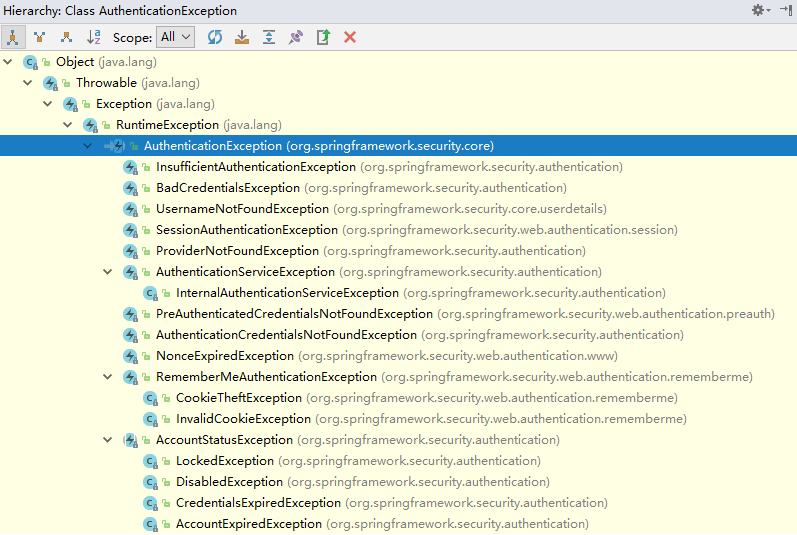
不同的失败原因对应不同的异常,比如用户名或密码错误对应的是 BadCredentialsException,用户不存在对应的是 UsernameNotFoundException,用户被锁定对应的是 LockedException 等。
假如我们需要在登录失败的时候返回失败信息,可以这样处理:
@Component
public class MyAuthenticationFailureHandler implements AuthenticationFailureHandler {

    @Autowired
    private ObjectMapper mapper;

    @Override
    public void onAuthenticationFailure(HttpServletRequest request, HttpServletResponse response,
                                        AuthenticationException exception) throws IOException {
        response.setStatus(HttpStatus.INTERNAL_SERVER_ERROR.value());
        response.setContentType("application/json;charset=utf-8");
        response.getWriter().write(mapper.writeValueAsString(exception.getMessage()));
    }
}
状态码定义为 500(HttpStatus.INTERNAL_SERVER_ERROR.value()),即系统内部异常。
同样的,我们需要在 BrowserSecurityConfig 的 configure 中配置它:
@Configuration
public class BrowserSecurityConfig extends WebSecurityConfigurerAdapter {
    @Autowired
    private MyAuthenticationSucessHandler authenticationSucessHandler;

    @Autowired
    private MyAuthenticationFailureHandler authenticationFailureHandler;

    @Override
    protected void configure(HttpSecurity http) throws Exception {
        http.formLogin() // 表单登录
                // http.httpBasic() // HTTP Basic
                .loginPage("/authentication/require") // 登录跳转 URL
                .loginProcessingUrl("/login") // 处理表单登录 URL
                .successHandler(authenticationSucessHandler) // 处理登录成功
                .failureHandler(authenticationFailureHandler) // 处理登录失败
                .and()
                .authorizeRequests() // 授权配置
                .antMatchers("/authentication/require", "/login.html").permitAll() // 登录跳转 URL 无需认证
                .anyRequest()  // 所有请求
                .authenticated() // 都需要认证
                .and().csrf().disable();
    }
}
重启项目,当输入错误的密码时,页面输出如下:

源码:https://gitee.com/hekang_admin/security-demo1.git

angularjs – 如何在我的自定义回调中访问我的角度$scope?
正在调用回调函数,但我认为这里的 javascript范围显然不对.
function ReportsCtrl($scope) {
    var self = this;
    $scope.analyticsIsReady = false;
    $scope.analyticsInitStatus = '';

    //$scope.originCompositionChart = new Chart__('originCompositionChart',reportsClient.getoriginCompositionData,true,false);
    $scope.originCompositionChart = new Chart__('originCompositionChart',null,false);
    $scope.charts = new Array($scope.originCompositionChart);

    $scope.showIncludedCharts = function () {
    };

    //todo not working
    this.updateAnalyticsInitStatus = function (status) {
        console.log('boom; ' + status);
        $scope.analyticsInitStatus = status;
    };

    //todo not working
    this.handleAnalyticsInitSuccess = function (status) {
        $scope.analyticsInitStatus = 'Initialisation complete';
        $scope.analyticsIsReady = true;
    };

    window.analyticsInitialiserClient = new AnalyticsInitialiserClient__(this.updateAnalyticsInitStatus,this.handleAnalyticsInitSuccess);

}
// Should Now work
this.updateAnalyticsInitStatus = function (status) {
    $scope.$apply(function () {
        console.log('boom; ' + status);
        $scope.analyticsInitStatus = status;
    });
};

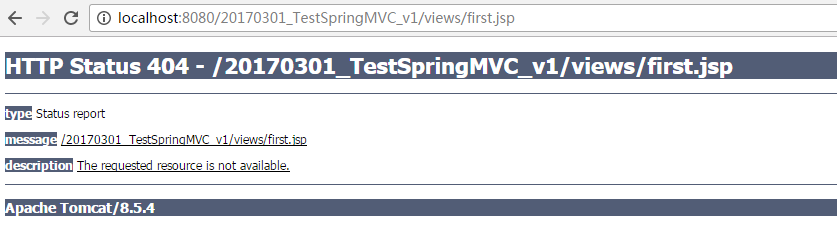
idea使用SpringMVC无法访问jsp页面
初学SpringMVC,按照视频上面写了一个,但是发现我启动之后直接提示404,不论怎么样都找不到jsp的文件,但是通过localhost:8080/项目名/@RequestMapping所命名的可以通过controller来访问jsp
我开始以为是spring会拦截所有的jsp导致的,然后我在web.xml里面把过滤变成了*.do 但是还是不能访问相应的界面
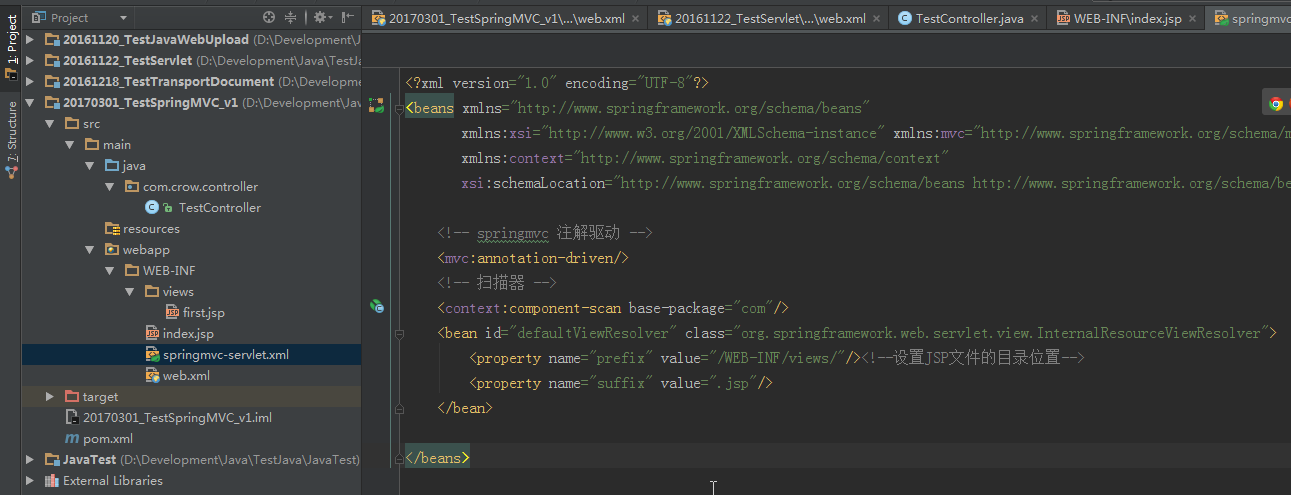
后来我发现idea把输出的所有jsp全都放到WEB-INF里面了,这里面的所有jsp应该是都不能通过地址栏访问的。。但是这是为什么啊?我原先不使用SpringMVC的话就不会将所有的文件都输出到WEB-INF里面。。。这样就直接导致了我没有办法通过地址栏访问jsp。。连首页都不能显示出来了
先谢谢了

java – Spring安全性在尝试注销时返回302
我可以正常登录并且我的身份验证的URL受到保护,但是当我尝试注销时,我会不断获得302 POST响应,然后重定向到我配置的failureUrl(“/ cms / login?error”).
这是我的WebSecurityConfig类
@Configuration
@EnableWebSecurity
public class WebSecurityConfig extends WebSecurityConfigurerAdapter
{
   @Override
   protected void configure(HttpSecurity http) throws Exception
   {
       http
       .authorizeRequests()
           .antMatchers("/*").permitAll()
           .antMatchers("/cms/*").authenticated()
           .antMatchers("/cms/*/*").authenticated()
           .antMatchers("/cms/*/*/*").authenticated().and()
       .formLogin()
           .loginPage("/cms/login")
           .defaultSuccessUrl("/cms/login?success")
           .failureUrl("/cms/login?error")
           .permitAll().and()
       .logout()
           .logoutUrl("/cms/login?logout")
           .logoutSuccessUrl("/cms/login")
           .permitAll();
   }

   @Autowired
   public void configureGlobal(AuthenticationManagerBuilder auth)      throws Exception
   {
       auth.inMemoryAuthentication()
           .withUser("u")
           .password("p")
           .roles("USER");
   }

   @Bean
   public PasswordEncoder passwordEncoder()
   {
       return new BCryptPasswordEncoder();
   }
  }
这是我的登录控制器:
@Slf4j
@Controller
@RequestMapping(value = {"/cms","/cms/login"})
public class CmsLoginController extends CmsBaseController
{
    @RequestMapping
    public ModelAndView handleLogin(HttpServletResponse request,Model model,@RequestParam(value = LOGIN_SUCCESS,required = false) String success,@RequestParam(value = LOGIN_ERROR,required = false) String error,@RequestParam(value = logoUT,required = false) String logout)
    {
        try
        {
            if (success != null)
            {
                setLoggedIn(true);
                request.sendRedirect(XXXXX);
            }

            if (error != null)
            {
                model.addAttribute(LOGIN_ERROR,"Invalid username and password!");
            }

            if (logout != null)
            {
                model.addAttribute(logoUT,"You've been logged out successfully.");
                setLoggedIn(false);
            }

            return new ModelAndView(CMS_CONTEXT + LOGIN_URL);
        }
        catch(Exception e)
        {
            setLoggedIn(false);
            log.error(e.toString(),e);

            return new ModelAndView(ERROR_VIEW_NAME);
        }
    }
}
为了记录,我最初得到的注销功能正常,但我必须介绍一些不幸的破坏它的变化……
有什么想法吗?
谢谢
解决方法
如果您从以前的Spring版本迁移了代码,则很有可能出现问题.
要快速测试,请在配置中添加http.csrf().disable.如果它以这种方式工作,那么转回CSRF保护并以某种方式将CSRF令牌添加到POST注销请求中.
关于java – 使用spring 3安全性在jsp页面中访问我的自定义用户对象和springboot配置jsp访问的问题我们已经讲解完毕,感谢您的阅读,如果还想了解更多关于4. Spring Boot 中 Spring Security 自定义用户认证、angularjs – 如何在我的自定义回调中访问我的角度$scope?、idea使用SpringMVC无法访问jsp页面、java – Spring安全性在尝试注销时返回302等相关内容,可以在本站寻找。
本文标签:


