最近很多小伙伴都在问[转帖]Docker的daemon.json的作用和docker/daemon.json这两个问题,那么本篇文章就来给大家详细解答一下,同时本文还将给你拓展/etc/docker/
最近很多小伙伴都在问[转帖] Docker 的 daemon.json 的作用和docker/daemon.json这两个问题,那么本篇文章就来给大家详细解答一下,同时本文还将给你拓展/etc/docker/daemon.json、Cannot connect to the Docker daemon at tcp://xxx.xx.x.x:2376. Is the docker daemon running?、Cannot connect to the Docker daemon at unix:///var/run/docker.sock. Is the docker daemon running?、Cannot connect to the Docker datemon at tcp://0.0.0.0:2375 is the docker daemon runing?等相关知识,下面开始了哦!
本文目录一览:- [转帖] Docker 的 daemon.json 的作用(docker/daemon.json)
- /etc/docker/daemon.json
- Cannot connect to the Docker daemon at tcp://xxx.xx.x.x:2376. Is the docker daemon running?
- Cannot connect to the Docker daemon at unix:///var/run/docker.sock. Is the docker daemon running?
- Cannot connect to the Docker datemon at tcp://0.0.0.0:2375 is the docker daemon runing?
![[转帖] Docker 的 daemon.json 的作用(docker/daemon.json)](http://www.gvkun.com/zb_users/upload/2025/03/dd7f4b1a-2de6-4d10-8146-8a8d345a44651742459053399.jpg "[转帖] Docker 的 daemon.json 的作用(docker/daemon.json)")
[转帖] Docker 的 daemon.json 的作用(docker/daemon.json)
Docker (十六)-Docker 的 daemon.json 的作用
https://www.cnblogs.com/zhuochong/p/10070434.html

jfrog 培训的时候 说过这个地方 但是也记不太清楚了先转帖一下 再做实验.
docker 安装后默认没有 daemon.json 这个配置文件,需要进行手动创建。配置文件的默认路径:/etc/docker/daemon.json
一般情况,配置文件 daemon.json 中配置的项目参数,在启动参数中同样适用,有些可能不一样(具体可以查看官方文档),但需要注意的一点,配置文件中如果已经有某个配置项,则无法在启动参数中增加,会出现冲突的错误。
如果在 daemon.json 文件中进行配置,需要 docker 版本高于 1.12.6 (在这个版本上不生效,1.13.1 以上是生效的)
参数
daemon.json 文件可配置的参数表,我们在配置的过程中,只需要设置我们需要的参数即可,不必全部写出来。详细参考官网。
官方的配置地址:https://docs.docker.com/engine/reference/commandline/dockerd/#/configuration-reloading。
官方的配置地址:https://docs.docker.com/engine/reference/commandline/dockerd/#options
官方的配置地址:https://docs.docker.com/engine/reference/commandline/dockerd/#/linux-configuration-file
|
1
2
3
4
5
6
7
8
9
10
11
12
13
14
15
16
17
18
19
20
21
22
23
24
25
26
27
28
29
30
31
32
33
34
35
36
37
38
39
40
41
42
43
44
45
46
47
48
49
50
51
52
53
54
55
56
57
58
59
60
61
62
63
64
65
66
67
68
69
70
71
72
73
|
{
"api-cors-header"
:
""
,
"authorization-plugins"
:[],
"bip"
:
""
,
"bridge"
:
""
,
"cgroup-parent"
:
""
,
"cluster-store"
:
""
,
"cluster-store-opts"
:{},
"cluster-advertise"
:
""
,
"debug"
:
true
, #启用debug的模式,启用后,可以看到很多的启动信息。默认
false
"default-gateway"
:
""
,
"default-gateway-v6"
:
""
,
"default-runtime"
:
"runc"
,
"default-ulimits"
:{},
"disable-legacy-registry"
:
false
,
"dns"
: [
"192.168.1.1"
], # 设定容器DNS的地址,在容器的 /etc/resolv.conf文件中可查看。
"dns-opts"
: [], # 容器 /etc/resolv.conf 文件,其他设置
"dns-search"
: [], # 设定容器的搜索域,当设定搜索域为 .example.com 时,在搜索一个名为 host 的 主机时,DNS不仅搜索host,还会搜
索host.example.com 。 注意:如果不设置, Docker 会默认用主机上的 /etc/resolv.conf 来配置容器。
"exec-opts"
: [],
"exec-root"
:
""
,
"fixed-cidr"
:
""
,
"fixed-cidr-v6"
:
""
,
"graph"
:
"/var/lib/docker"
, #已废弃,使用data-root代替,这个主要看docker的版本
"data-root"
:
"/var/lib/docker"
, #Docker运行时使用的根路径,根路径下的内容稍后介绍,默认/
var
/lib/docker
"group"
:
""
, #Unix套接字的属组,仅指/
var
/run/docker.sock
"hosts"
: [], #设置容器hosts
"icc"
:
false
,
"insecure-registries"
: [], #配置docker的私库地址
"ip"
:
"0.0.0.0"
,
"iptables"
:
false
,
"ipv6"
:
false
,
"ip-forward"
:
false
, #默认
true
, 启用 net.ipv4.ip_forward ,进入容器后使用 sysctl -a | grepnet.ipv4.ip_forward 查看
"ip-masq"
:
false
,
"labels"
:[
"nodeName=node-121"
], # docker主机的标签,很实用的功能,例如定义:–label nodeName=host-121
"live-restore"
:
true
,
"log-driver"
:
""
,
"log-level"
:
""
,
"log-opts"
: {},
"max-concurrent-downloads"
:3,
"max-concurrent-uploads"
:5,
"mtu"
: 0,
"oom-score-adjust"
:-500,
"pidfile"
:
""
, #Docker守护进程的PID文件
"raw-logs"
:
false
,
"registry-mirrors"
:[
"xxxx"
], #镜像加速的地址,增加后在 docker info中可查看。
"runtimes"
: {
"runc"
: {
"path"
:
"runc"
},
"custom"
: {
"path"
:
"/usr/local/bin/my-runc-replacement"
,
"runtimeArgs"
: [
"--debug"
]
}
},
"selinux-enabled"
:
false
, #默认
false
,启用selinux支持
"storage-driver"
:
""
,
"storage-opts"
: [],
"swarm-default-advertise-addr"
:
""
,
"tls"
:
true
, #默认
false
, 启动TLS认证开关
"tlscacert"
:
""
, #默认 ~/.docker/ca.pem,通过CA认证过的的certificate文件路径
"tlscert"
:
""
, #默认 ~/.docker/cert.pem ,TLS的certificate文件路径
"tlskey"
:
""
, #默认~/.docker/key.pem,TLS的key文件路径
"tlsverify"
:
true
, #默认
false
,使用TLS并做后台进程与客户端通讯的验证
"userland-proxy"
:
false
,
"userns-remap"
:
""
}
|
上述是官网 docs 提供的一个示例配置,我们可以参考,选择性的配置其中的部分内容。
示例
1、如何配置 registry 私库相关的参数
涉及以下 2 个参数:
|
1
2
3
|
"insecure-registries"
: [], #这个私库的服务地址
"registry-mirrors"
: [], #私库加速器
|
2. 配置示例:
|
1
2
3
4
5
6
7
8
9
10
11
|
# cat /etc/docker/daemon.json
{
"registry-mirrors"
: [
"https://d8b3zdiw.mirror.aliyuncs.com"
],
"insecure-registries"
: [
"https://ower.site.com"
],
}
|
配置与应用
1. 默认没有文件,所以我们需要先创建,进入 /etc/docker 目录下,记得创建的文件所有者是 root(vim 或 touch,记得 chown 修改所有者)
-rw-r--r-- 1 root root 71 Dec 19 17:25daemon.json
2. 在文档中配置想要添加的参数:如,镜像加速器网站,私库网站
|
1
2
3
4
5
6
7
8
9
10
|
# cat /etc/docker/daemon.json
{
"registry-mirrors"
:[
"https://d8b3zdiw.mirror.aliyuncs.com"
],
"insecure-registries"
: [
"https://ower.site.com"
],
}
|
3. 创建并修改完 daemon.json 文件后,需要让这个文件生效
a. 修改完成后 reload 配置文件
sudo systemctl daemon-reload
b. 重启 docker 服务
sudo systemctl restart docker.service
c. 查看状态
sudo systemctl status docker -l
d. 查看服务
sudo docker info
当我们需要对 docker 服务进行调整配置时,不用去修改主文件 docker.service 的参数,通过 daemon.json 配置文件来管理,更为安全、合理。

/etc/docker/daemon.json
/etc/docker/daemon.json
{
  "graph": "/data/docker",
  "storage-driver": "overlay2",
  "insecure-registries": ["registry.access.redhat.com","quay.io","harbor.od.com"],
  "registry-mirrors": ["https://q2gr04ke.mirror.aliyuncs.com"],
  "bip": "172.7.22.1/24",
  "exec-opts": ["native.cgroupdriver=systemd"],
  "live-restore": true
}
上文解释
{
  "graph": "/data/docker",        //docker的工作目录。会自动生成一些文件夹
  "storage-driver": "overlay2",       //存储驱动。使用overlay2
  "insecure-registries": ["registry.access.r示例edhat.com","quay示例.io"],        //不安全的registries。自己的私有仓库也填在里边
  "registry-mirrors": ["https://q2gr04ke.mirror.aliyuncs.com"],     //镜像加速源。这里是阿里的
  "bip": "172.7.22.1/24",       //docker的网络地址
  "exec-opts": ["native.cgroupdriver=systemd"],
  "live-restore": true
}

Cannot connect to the Docker daemon at tcp://xxx.xx.x.x:2376. Is the docker daemon running?
一.问题描述
在用docker部署jenkins实现自动化部署服务时,报错:

二.问题分析:
经前辈讲解得知,需要在Jenkins里面运行docker,而docker分为客户端和服务端,普通的docker命令由客户端操作,但客户端需要连接到服务端,而此时Jenkins是一个单独的容器,可以看做一个单独的系统,它不知道docker是谁,所以需要把docker映射进去了,但是我们映射的只是客户端,所以需要指定它连接到宿主机的服务端。在jenkins配置的docker也是客户端。
三.问题解决:
在运行jenkins时,挂载所需的环境,在用docker-compose运行时,可以直接在docker-compose.yml添加相应的映射环境
 environment:
    DOCKER_HOST: tcp://xx.xx.xx.xx:2376
然后在储存驱动修改映射
{
  "hosts": [
        "tcp://xx.xx.xx.xx:2376",
        "unix:///var/run/docker.sock"
    ]
}
挂载相应文件目录

需要注意的是,上述映射的ip是jenkins所在的ip,因为jenkins是用户

Cannot connect to the Docker daemon at unix:///var/run/docker.sock. Is the docker daemon running?
启动docker报错:
Cannot connect to the Docker daemon at unix:///var/run/docker.sock. Is the docker daemon running?
systemctl status docker
解决方法:
vim /etc/docker/daemon.json
{
 "registry-mirrors": ["https://registry.docker-cn.com"]
}
systemctl restart docker.service
docker正常启动

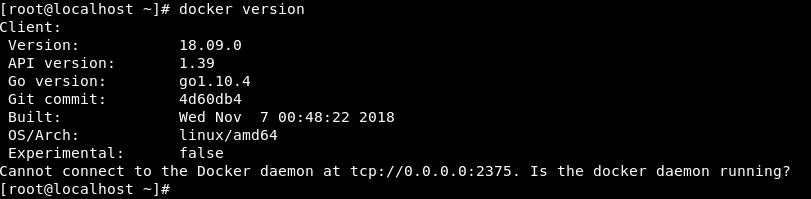
Cannot connect to the Docker datemon at tcp://0.0.0.0:2375 is the docker daemon runing?
一、系统环境:
在Windows 7 64位上,采用Vmware workstation 12安装了CenOS7.5 64位。
二、问题
在CentOS7.5里安装了Docker,启动docker服务,输入docker version,则出现错误信息:
Cannot connect to the Docker datemon at tcp://0.0.0.0:2375 is the docker daemon runing?
三、解决过程
1、配置DOCKER_HOST
sudo vim /etc/profile.d/docker.sh
添加下面内容:
export DOCKER_HOST=tcp://localhost:2375
2、应用
1)、source /etc/profile
2)、source /etc/bashrc
3、配置启动文件
1)、sudo vim /lib/systemd/system/docker.service
2)、修改下面语句
ExecStart=/usr/bin/dockerd -H unix://

修改为:
ExecStart=/usr/bin/dockerd -H tcp://0.0.0.0:2375 -H unix:///var/run/docker.sock -H tcp://0.0.0.0:7654
4、重载配置和重启
1)、sudo systemctl daemon-reload
2)、sudo systemctl restart docker.service
5、查看
docker version
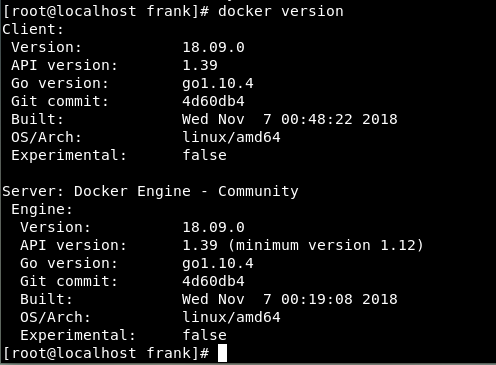
说明已经正常。
今天关于[转帖] Docker 的 daemon.json 的作用和docker/daemon.json的分享就到这里,希望大家有所收获,若想了解更多关于/etc/docker/daemon.json、Cannot connect to the Docker daemon at tcp://xxx.xx.x.x:2376. Is the docker daemon running?、Cannot connect to the Docker daemon at unix:///var/run/docker.sock. Is the docker daemon running?、Cannot connect to the Docker datemon at tcp://0.0.0.0:2375 is the docker daemon runing?等相关知识,可以在本站进行查询。
本文标签:


