如果您对4.springboot返回json数据感兴趣,那么本文将是一篇不错的选择,我们将为您详在本文中,您将会了解到关于4.springboot返回json数据的详细内容,我们还将为您解答sprin
如果您对4.spring boot 返回 json 数据感兴趣,那么本文将是一篇不错的选择,我们将为您详在本文中,您将会了解到关于4.spring boot 返回 json 数据的详细内容,我们还将为您解答spring boot 返回json 对象的相关问题,并且为您提供关于2. Spring Boot返回json数据、5.spring boot 使用 FastJson 解析 JSON 数据、maven中使用springboot返回jsp和json数据、Spring Boot 2.返回JSON格式数据的有价值信息。
本文目录一览:- 4.spring boot 返回 json 数据(spring boot 返回json 对象)
- 2. Spring Boot返回json数据
- 5.spring boot 使用 FastJson 解析 JSON 数据
- maven中使用springboot返回jsp和json数据
- Spring Boot 2.返回JSON格式数据
")
4.spring boot 返回 json 数据(spring boot 返回json 对象)

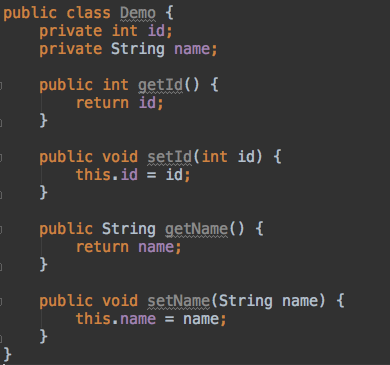
1. 编写实体类 Demo
1.1 创建 Demo 实体类
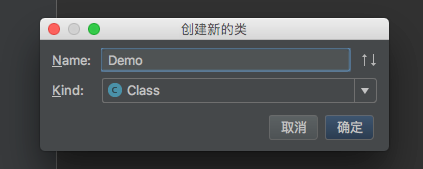
1.2 实体类创建两个属性
2. 编写 getDemo () 方法
    @RequestMapping(value = "/getDemo" ,method = RequestMethod.GET)
    public Demo getDemo(){
        Demo demo = new Demo();
        demo.setId(1);
        demo.setName("您好,spring boot");
        return demo;
    }
3. 测试

总结:spring boot 默认使用 json 解析框架 jackson

2. Spring Boot返回json数据
在做如下操作之前,我们对之前的Hello进行简单的修改,我们新建一个包com.kfit.test.web 然后新建一个类HelloControoler, 然后修改App.java类,主要是的这个类就是一个单纯的启动类。
主要代码如下:
App.java

packagecom.kfit;

importorg.springframework.boot.SpringApplication;

importorg.springframework.boot.autoconfigure.SpringBootApplication;

/**

 * Hello world!

 *

 */

//其中@SpringBootApplication申明让spring boot自动给程序进行必要的配置,等价于以默认属性使用@Configuration,@EnableAutoConfiguration和@ComponentScan

@SpringBootApplication

publicclassApp{

              public static void main(String[] args) {

                 SpringApplication.run(App.class, args);

       }

}
com.kfit.test.web.HelloController:

package com.kfit.test.web;


importorg.springframework.web.bind.annotation.RequestMapping;

importorg.springframework.web.bind.annotation.RestController;


@RestController// 标记为:restful

publicclass HelloController{


       @RequestMapping("/")

         public String hello(){

              return"Helloworld!";

    }

}

运行代码和之前是一样的效果的。


我们在编写接口的时候,时常会有需求返回json数据,那么在spring boot应该怎么操作呢?主要是在class中加入注解@RestController,。

返回JSON之步骤:

       (1)编写一个实体类Demo

   (2)编写DemoController;

   (3)在DemoController加上@RestController和@RequestMapping注解;

   (4)测试

具体代码如下:

com.kfit.test.bean.Demo :

package com.kfit.test.bean;

/**

 * 测试实体类.

 * @author Administrator

 *

 */

publicclass Demo {

       private long id;//主键.

       private String name;//测试名称.

       publiclong getId() {

              returnid;

       }

       publicvoid setId(longid) {

              this.id = id;

       }

       public StringgetName() {

              returnname;

       }

       publicvoid setName(String name) {

              this.name = name;

       }

}
com.kfit.test.web.DemoController:

package com.kfit.test.web;

importorg.springframework.web.bind.annotation.RequestMapping;

importorg.springframework.web.bind.annotation.RestController;

import com.kfit.test.bean.Demo;

/**

 * 测试.

 * @author Administrator

 *

 */

@RestController

@RequestMapping("/demo")

publicclass DemoController{


       /**

        * 返回demo数据:

        * 请求地址:http://127.0.0.1:8080/demo/getDemo

        * @return

        */

       @RequestMapping("/getDemo")

       public Demo getDemo(){

              Demo demo = new Demo();

              demo.setId(1);

              demo.setName("Angel");

              returndemo;

       }

}
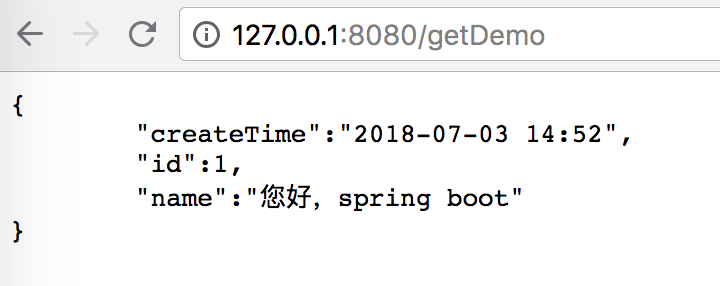
那么在浏览器访问地址:http://127.0.0.1:8080/demo/getDemo返回如下数据:
{

       id: 1,

       name:"Angel"

}
是不是很神奇呢,其实Spring Boot也是引用了JSON解析包Jackson,那么自然我们就可以在Demo对象上使用Jackson提供的json属性的注解,对时间进行格式化,对一些字段进行忽略等等。

5.spring boot 使用 FastJson 解析 JSON 数据
1. 引入 FastJson 依赖包
<dependency>
   <groupId>com.alibaba</groupId>
   <artifactId>fastjson</artifactId>
   <version>1.2.47</version>
</dependency>
2. 在 Application 配置 FastJson
package com.text.textdemo;

import com.alibaba.fastjson.serializer.SerializerFeature;
import com.alibaba.fastjson.support.config.FastJsonConfig;
import com.alibaba.fastjson.support.spring.FastJsonHttpMessageConverter;
import org.springframework.boot.SpringApplication;
import org.springframework.boot.autoconfigure.SpringBootApplication;
import org.springframework.boot.autoconfigure.http.HttpMessageConverters;
import org.springframework.context.annotation.Bean;
import org.springframework.http.MediaType;
import org.springframework.http.converter.HttpMessageConverter;

import java.util.ArrayList;
import java.util.List;

@SpringBootApplication
public class TextDemoApplication {

	public static void main(String[] args) {
		SpringApplication.run(TextDemoApplication.class, args);
	}


	@Bean
	public HttpMessageConverters fastJsonHttpMessageConverters() {
		//1.需要先定义一个Convert 转换消息的对象;
		FastJsonHttpMessageConverter fastConverter = new FastJsonHttpMessageConverter();

		//2.添加fastjson的配置信息,比如:是否要格式化返回就送数据;
		FastJsonConfig fastJsonConfig = new FastJsonConfig();
		fastJsonConfig.setSerializerFeatures(SerializerFeature.PrettyFormat);

		//3.在Convert中添加配置信息;
		fastConverter.setFastJsonConfig(fastJsonConfig);

		//解决中文乱码
		List<MediaType> fastMediaTypes = new ArrayList<>();
		fastMediaTypes.add(MediaType.APPLICATION_JSON_UTF8);
		fastConverter.setSupportedMediaTypes(fastMediaTypes);

		HttpMessageConverter<?> converter = fastConverter;
		return new HttpMessageConverters(converter);
	}
}
3. 编写测试 Demo 实体类
package com.text.textdemo;

import com.alibaba.fastjson.annotation.JSONField;

import java.util.Date;

public class Demo {
    private int id;
    private String name;
    //创建时间    格式化时间
    @JSONField(format = "yyyy-MM-dd HH:mm")
    private Date createTime;

    public int getId() {
        return id;
    }

    public void setId(int id) {
        this.id = id;
    }

    public String getName() {
        return name;
    }

    public void setName(String name) {
        this.name = name;
    }

    public Date getCreateTime() {
        return createTime;
    }

    public void setCreateTime(Date createTime) {
        this.createTime = createTime;
    }
}
4. 编写测试 getDemo 方法
    @RequestMapping(value = "/getDemo" ,method = RequestMethod.GET)
    public Demo getDemo(){
        Demo demo = new Demo();
        demo.setId(1);
        demo.setName("您好,spring boot");
        demo.setCreateTime(new Date());
        return demo;
    }
5. 测试
总结:如果不想返回实体的属性,请在属性什么加上 @JSONField (serialize = false)

maven中使用springboot返回jsp和json数据
参考:http://fhd001.iteye.com/blog/1136428 ; http://blog.csdn.net/lmy86263/article/details/51622522
我在这就只是简要的描述了,我只是测试在springboot中返回jsp和json数据。
项目整体结构如下(由于使用了Springboot,所以不用配置Spring的配置文件):

pom.xml文件内容如下:
<project xmlns="http://maven.apache.org/POM/4.0.0" xmlns:xsi="http://www.w3.org/2001/XMLSchema-instance"
xsi:schemaLocation="http://maven.apache.org/POM/4.0.0 http://maven.apache.org/maven-v4_0_0.xsd">
<modelVersion>4.0.0</modelVersion>
<groupId>com.mjduan</groupId>
<artifactId>learnSpringBootJsp</artifactId>
<packaging>war</packaging>
<version>0.0.1-SNAPSHOT</version>
<name>learnSpringBootJsp Maven Webapp</name>
<url>http://maven.apache.org</url>
<dependencies>
<dependency>
<groupId>junit</groupId>
<artifactId>junit</artifactId>
<version>4.10</version>
<scope>test</scope>
</dependency>
<dependency> <!-- 版本1.1.12引用了spring4.0.9 -->
<groupId>org.springframework.boot</groupId>
<artifactId>spring-boot-starter-web</artifactId>
<version>1.1.12.RELEASE</version>
</dependency>
<dependency>
<groupId>org.apache.tomcat.embed</groupId>
<artifactId>tomcat-embed-jasper</artifactId>
<version>7.0.70</version>
</dependency>
</dependencies>
<build>
<finalName>learnSpringBootJsp</finalName>
</build>
</project>
实体类User如下所示:
public class User {
private int id;
private String name;
private int age;
.........get set方法省略了..........
..............toString()方法省略了.........
}
TeacherController的内容如下:
package com.mjduan.project.controller;
import java.util.ArrayList;
import java.util.HashMap;
import java.util.List;
import java.util.Map;
import org.springframework.boot.SpringApplication;
import org.springframework.boot.autoconfigure.EnableAutoConfiguration;
import org.springframework.stereotype.Controller;
import org.springframework.web.bind.annotation.RequestMapping;
import org.springframework.web.bind.annotation.ResponseBody;
import org.springframework.web.servlet.ModelAndView;
import com.mjduan.project.entity.Student;
import com.mjduan.project.entity.User;
import com.mjduan.project.util.Out;
@Controller
@EnableAutoConfiguration //如果不要这个会报错
@RequestMapping("/TeacherController")
public class TeacherController {
@RequestMapping("/returnJsp")
public ModelAndView returnJsp(ModelAndView modelAndView){
modelAndView.setViewName("/hello.jsp");
modelAndView.addObject("name", "梅梅");
return modelAndView;
}
@RequestMapping("/returnUsers")
@ResponseBody
public Map returnUsers(){
Map<String,Object> map=new HashMap<String, Object>();
User user = new User();
user.setId(102356);
user.setAge(23);
user.setName("约瑟夫");
Student student1 = new Student();
student1.setId(6);
student1.setName("梅梅");
Student student2 = new Student();
student2.setId(5);
student2.setName("代代");
List<Student> list = new ArrayList<Student>(2);
list.add(student1);
list.add(student2);
map.put("user", user);
map.put("student", list);
return map;
}
public static void main(String[] args) {
SpringApplication.run(TeacherController.class, args);
}
}
webapp下的hello.jsp中的内容就不给出了,自己随便写点东西。
之后运行TeacherController,运行方式为Java Application(该类中有main方法),之后会看到如下图所示:

之后在浏览器中输入:http://localhost:8080/TeacherController/returnUsers 就会在网页中显示json数据了。
在浏览器中输入:http://localhost:8080/TeacherController/returnJsp 网页效果就是hello.jsp中定义的效果。
在下是个小白,只是进行上面所述的简单的测试,没有进行更多深入的了解。

Spring Boot 2.返回JSON格式数据
核心是使用RestController关键字
一。返回单个实体类
1.创建实体类
package com.example.helloworld;

public class User {
    private int id;
    private String username;
    private String password;

    public String getPassword() {
        return password;
    }

    public void setPassword(String password) {
        this.password = password;
    }

    public String getUsername() {
        return username;
    }

    public void setUsername(String username) {
        this.username = username;
    }

    public int getId() {
        return id;
    }

    public void setId(int id) {
        this.id = id;
    }
}
2.编写Controller代码
package com.example.helloworld;

import org.springframework.web.bind.annotation.GetMapping;
import org.springframework.web.bind.annotation.RequestMapping;
import org.springframework.web.bind.annotation.RestController;

@RestController
public class HelloWorldController {

    @GetMapping("/helloworld")
    String helloWorld() {
        return "hello world";
    }

    @RequestMapping("getUser")
    public User getUser() {
        User user = new User();
        user.setId(1);
        user.setUsername("hello spring boot");
        user.setPassword("123456");
        return user;
    }
}
测试:

二。返回List
@RequestMapping("getUserList")
    public List<User> getUserList() {
        List<User> userList = new ArrayList<>();
        for (int i = 0; i < 10; i++) {
            User user = new User();
            user.setId(i);
            user.setUsername("hello spring boot" + i);
            user.setPassword("123456");
            userList.add(user);
        }
        return userList;
    }
测试:

三。返回Map
@RequestMapping("getUserMap")
    public Map<String, User> getUserMap() {
        Map<String, User> userMap = new HashMap<>();
        for (int i = 0; i < 5; i++) {
            User user = new User();
            user.setId(i);
            user.setUsername("hello spring boot" + i);
            user.setPassword("123456");
            userMap.put(i + "", user);
        }
        return userMap;
    }
测试:

Over ...
今天关于4.spring boot 返回 json 数据和spring boot 返回json 对象的介绍到此结束,谢谢您的阅读,有关2. Spring Boot返回json数据、5.spring boot 使用 FastJson 解析 JSON 数据、maven中使用springboot返回jsp和json数据、Spring Boot 2.返回JSON格式数据等更多相关知识的信息可以在本站进行查询。
本文标签:


