此处将为大家介绍关于basicbashlearning1的详细内容,此外,我们还将为您介绍关于6bayesianlearning、AtCoderABC129FTakahashi''sBasicsinE
此处将为大家介绍关于basic bash learning 1的详细内容,此外,我们还将为您介绍关于6 bayesian learning、AtCoder ABC 129F Takahashi''s Basics in Education and Learning、Challenge: Machine Learning Basics、Coursera, Deep Learning 1, Neural Networks and Deep Learning - week3, Neural Networks Basics的有用信息。
本文目录一览:- basic bash learning 1
- 6 bayesian learning
- AtCoder ABC 129F Takahashi''s Basics in Education and Learning
- Challenge: Machine Learning Basics
- Coursera, Deep Learning 1, Neural Networks and Deep Learning - week3, Neural Networks Basics

basic bash learning 1
1) a function to check the free memory:
[[email protected] ~]$ function checkmem(){
> echo -n "The amount of free memeory is "
> free |head -2|tail -1|awk ‘{print $4}‘
> }
[[email protected] ~]$ checkmem
The amount of free memeory is 107940
2) using for loop to print the odd number from 1 to 99
for number in {1..99..2}
do
echo $number
done
3) If and case
#!/bin/bash
read X
read Y
if (( $X > $Y )); then
printf "X is greater than Y"
elif (( $X == $Y )); then
printf "X is equal to Y"
else
printf "X is less than Y"
fi

#!/bin/bash
read p
case $p in
Y|y) echo "YES" ;;
N|n) echo "NO" ;;
esac
4. delete the function name from terminal
[[email protected] ~]$ unset -f checkmem
[[email protected] ~]$ checkmem
bash: checkmem: command not found...
[[email protected] ~]$

6 bayesian learning
a quantitive approach 定量的方法
the native bayesina classifier
the sum of squared errors 误差平方和
cross entropy
inductive bias
explict of probablities for hypothese
target function that predict probabilities 预测概率函数
probabilistic prediction 不确定预测
例子分析:
p(h) 为p(cancer) 先验概率 0.008
p(h|D) 为p(cancer|+) 后验概率 0.21
p(cancer|+)>p(cancer) 但是依然没有癌症

AtCoder ABC 129F Takahashi''s Basics in Education and Learning
题目链接:https://atcoder.jp/contests/abc129/tasks/abc129_f
题目大意
给定一个长度为 L ,首项为 A,公差为 B 的等差数列 S,将这 L 个数拼起来,记作 N,求 N % M。
分析
于是有:
如此,通过矩阵快速幂,长度为 k 的一组值很快就被算出来了,然后每一组都分别算一下再加起来即可。
PS:在实际实现过程中组与组之间是可以合并的,并不需要单独算出来每一组的余数,详细实现请看代码。
代码如下


  1 #include <bits/stdc++.h>
  2 using namespace std;
  3
  4 #define INIT() ios::sync_with_stdio(false);cin.tie(0);cout.tie(0);
  5 #define Rep(i,n) for (int i = 0; i < (n); ++i)
  6 #define For(i,s,t) for (int i = (s); i <= (t); ++i)
  7 #define rFor(i,t,s) for (int i = (t); i >= (s); --i)
  8 #define ForLL(i, s, t) for (LL i = LL(s); i <= LL(t); ++i)
  9 #define rForLL(i, t, s) for (LL i = LL(t); i >= LL(s); --i)
 10 #define foreach(i,c) for (__typeof(c.begin()) i = c.begin(); i != c.end(); ++i)
 11 #define rforeach(i,c) for (__typeof(c.rbegin()) i = c.rbegin(); i != c.rend(); ++i)
 12
 13 #define pr(x) cout << #x << " = " << x << "  "
 14 #define prln(x) cout << #x << " = " << x << endl
 15
 16 #define LOWBIT(x) ((x)&(-x))
 17
 18 #define ALL(x) x.begin(),x.end()
 19 #define INS(x) inserter(x,x.begin())
 20 #define UNIQUE(x) x.erase(unique(x.begin(), x.end()), x.end())
 21 #define REMOVE(x, c) x.erase(remove(x.begin(), x.end(), c), x.end()); // 删去 x 中所有 c
 22 #define TOLOWER(x) transform(x.begin(), x.end(), x.begin(),::tolower);
 23 #define TOUPPER(x) transform(x.begin(), x.end(), x.begin(),::toupper);
 24
 25 #define ms0(a) memset(a,0,sizeof(a))
 26 #define msI(a) memset(a,inf,sizeof(a))
 27 #define msM(a) memset(a,-1,sizeof(a))
 28
 29 #define MP make_pair
 30 #define PB push_back
 31 #define ft first
 32 #define sd second
 33
 34 template<typename T1, typename T2>
 35 istream &operator>>(istream &in, pair<T1, T2> &p) {
 36     in >> p.first >> p.second;
 37     return in;
 38 }
 39
 40 template<typename T>
 41 istream &operator>>(istream &in, vector<T> &v) {
 42     for (auto &x: v)
 43         in >> x;
 44     return in;
 45 }
 46
 47 template<typename T1, typename T2>
 48 ostream &operator<<(ostream &out, const std::pair<T1, T2> &p) {
 49     out << "[" << p.first << ", " << p.second << "]" << "\n";
 50     return out;
 51 }
 52
 53 inline int gc(){
 54     static const int BUF = 1e7;
 55     static char buf[BUF], *bg = buf + BUF, *ed = bg;
 56
 57     if(bg == ed) fread(bg = buf, 1, BUF, stdin);
 58     return *bg++;
 59 }
 60
 61 inline int ri(){
 62     int x = 0, f = 1, c = gc();
 63     for(; c<48||c>57; f = c==''-''?-1:f, c=gc());
 64     for(; c>47&&c<58; x = x*10 + c - 48, c=gc());
 65     return x*f;
 66 }
 67
 68 template<class T>
 69 inline string toString(T x) {
 70     ostringstream sout;
 71     sout << x;
 72     return sout.str();
 73 }
 74
 75 inline int toInt(string s) {
 76     int v;
 77     istringstream sin(s);
 78     sin >> v;
 79     return v;
 80 }
 81
 82 //min <= aim <= max
 83 template<typename T>
 84 inline bool BETWEEN(const T aim, const T min, const T max) {
 85     return min <= aim && aim <= max;
 86 }
 87
 88 typedef long long LL;
 89 typedef unsigned long long uLL;
 90 typedef pair< double, double > PDD;
 91 typedef pair< int, int > PII;
 92 typedef pair< int, PII > PIPII;
 93 typedef pair< string, int > PSI;
 94 typedef pair< int, PSI > PIPSI;
 95 typedef set< int > SI;
 96 typedef set< PII > SPII;
 97 typedef vector< int > VI;
 98 typedef vector< double > VD;
 99 typedef vector< VI > VVI;
100 typedef vector< SI > VSI;
101 typedef vector< PII > VPII;
102 typedef map< int, int > MII;
103 typedef map< int, string > MIS;
104 typedef map< int, PII > MIPII;
105 typedef map< PII, int > MPIII;
106 typedef map< string, int > MSI;
107 typedef map< string, string > MSS;
108 typedef map< PII, string > MPIIS;
109 typedef map< PII, PII > MPIIPII;
110 typedef multimap< int, int > MMII;
111 typedef multimap< string, int > MMSI;
112 //typedef unordered_map< int, int > uMII;
113 typedef pair< LL, LL > PLL;
114 typedef vector< LL > VL;
115 typedef vector< VL > VVL;
116 typedef priority_queue< int > PQIMax;
117 typedef priority_queue< int, VI, greater< int > > PQIMin;
118 const double EPS = 1e-8;
119 const LL inf = 0x7fffffff;
120 const LL infLL = 0x7fffffffffffffffLL;
121 LL mod = 1e9 + 7;
122 const int maxN = 1e5 + 7;
123 const LL ONE = 1;
124 const LL evenBits = 0xaaaaaaaaaaaaaaaa;
125 const LL oddBits = 0x5555555555555555;
126
127 struct Matrix{
128     int row, col;
129     LL MOD;
130     VVL mat;
131
132     Matrix(int r, int c, LL p = mod) : row(r), col(c), MOD(p) {
133         mat.assign(r, VL(c, 0));
134     }
135     Matrix(const Matrix &x, LL p = mod) : MOD(p){
136         mat = x.mat;
137         row = x.row;
138         col = x.col;
139     }
140     Matrix(const VVL &A, LL p = mod) : MOD(p){
141         mat = A;
142         row = A.size();
143         col = A[0].size();
144     }
145
146     // x * 单位阵
147     inline void E(int x = 1) {
148         assert(row == col);
149         Rep(i, row) mat[i][i] = x;
150     }
151
152     inline VL& operator[] (int x) {
153         assert(x >= 0 && x < row);
154         return mat[x];
155     }
156
157     inline Matrix operator= (const VVL &x) {
158         row = x.size();
159         col = x[0].size();
160         mat = x;
161         return *this;
162     }
163
164     inline Matrix operator+ (const Matrix &x) {
165         assert(row == x.row && col == x.col);
166         Matrix ret(row, col);
167         Rep(i, row) {
168             Rep(j, col) {
169                 ret.mat[i][j] = mat[i][j] + x.mat[i][j];
170                 ret.mat[i][j] %= MOD;
171             }
172         }
173         return ret;
174     }
175
176     inline Matrix operator* (const Matrix &x) {
177         assert(col == x.row);
178         Matrix ret(row, x.col);
179         Rep(k, x.col) {
180             Rep(i, row) {
181                 if(mat[i][k] == 0) continue;
182                 Rep(j, x.col) {
183                     ret.mat[i][j] += mat[i][k] * x.mat[k][j];
184                     ret.mat[i][j] %= MOD;
185                 }
186             }
187         }
188         return ret;
189     }
190
191     inline Matrix operator*= (const Matrix &x) { return *this = *this * x; }
192     inline Matrix operator+= (const Matrix &x) { return *this = *this + x; }
193
194     inline void print() {
195         Rep(i, row) {
196             Rep(j, col) {
197                 cout << mat[i][j] << " ";
198             }
199             cout << endl;
200         }
201     }
202 };
203
204 // 矩阵快速幂,计算x^y
205 inline Matrix mat_pow_mod(Matrix x, LL y) {
206     Matrix ret(x.row, x.col);
207     ret.E();
208     while(y){
209         if(y & 1) ret *= x;
210         x *= x;
211         y >>= 1;
212     }
213     return ret;
214 }
215
216 LL L, A, B, M, ans;
217
218 // 从数列第 st 项开始,查找区间 [L, R],使得区间内的所有数都小于 bit 大于等于 bit/10。
219 // 有返回 true 没有返回 false
220 LL st = 0, bit = 10, l, r;
221 bool getLR() {
222     if(st >= L || A + st * B >= bit) return false;
223     l = st;
224     r = L - 1;
225
226     while(l < r) {
227         LL mid = (l + r) >> 1;
228         if(A + mid * B < bit) l = mid + 1;
229         else r = mid;
230     }
231
232     if(A + r * B >= bit) --r;
233     l = st;
234     st = r + 1; // 下一个起始位置
235     return true;
236 }
237
238 int main(){
239     //freopen("MyOutput.txt","w",stdout);
240     //freopen("input.txt","r",stdin);
241     INIT();
242     cin >> L >> A >> B >> mod;
243
244     For(i, 1, 18) { // 枚举位数
245         if(getLR()) {
246             Matrix mat(3, 3);
247             mat[0][0] = bit % mod;
248             mat[0][1] = mat[0][2] = mat[1][2] = mat[2][1] = 0;
249             mat[1][0] = mat[1][1] = mat[2][2] = 1;
250             mat[2][1] = B % mod;
251
252             mat = mat_pow_mod(mat, r - l + 1);
253
254             Matrix ret(1, 3);
255             ret[0][0] = ans;
256             ret[0][1] = (A + l * B) % mod;
257             ret[0][2] = 1;
258
259             ret *= mat;
260
261             ans = ret[0][0];
262         }
263         bit *= 10;
264     }
265     cout << ans << endl;
266     return 0;
267 }

Challenge: Machine Learning Basics
1: How Challenges Work
At Dataquest, we''re huge believers in learning through doing and we hope this shows in the learning experience of the missions. While missions focus on introducing concepts, challenges allow you to perform deliberate practice by completing structured problems. You can read more about deliberate practice here and here. Challenges will feel similar to missions but with little instructional material and a larger focus on exercises.
For these challenges, we strongly encourage programming on your own computer so you practice using these tools outside the Dataquest environment. You can also use the Dataquest interface to write and quickly run code to see if you’re on the right track. By default, clicking the check code button runs your code and performs answer checking. You can toggle this behavior so that your code is run and the results are returned, without performing any answer checking. Executing your code without performing answer checking is much quicker and allows you to iterate on your work. When you’re done and ready to check your answer, toggle the behavior so that answer checking is enabled.
If you have questions or run into issues, head over to the Dataquest forums or our Slack community.
2: Data Cleaning
In this challenge, you''ll build on the exploration from the last mission, where we tried to answer the question:
- How do the properties of a car impact it''s fuel efficiency?
We focused the last mission on capturing how the weight of a car affects it''s fuel efficiency by fitting a linear regression model. In this challenge, you''ll explore how the horsepower of a car affects it''s fuel efficiency and practice using scikit-learn to fit the linear regression model.
Unlike the weight column, the horsepower column has some missing values. These values are represented using the ? character. Let''s filter out these rows so we can fit the model. We''ve already read auto-mpg.data into a Dataframe named cars.
Instructions
- Remove all rows where the value for
horsepoweris?and convert thehorsepowercolumn to a float. - Assign the new Dataframe to
filtered_cars.
import pandas as pd
columns = ["mpg", "cylinders", "displacement", "horsepower", "weight", "acceleration", "model year", "origin", "car name"]
cars = pd.read_table("auto-mpg.data", delim_whitespace=True, names=columns)
filtered_cars=cars[cars["horsepower"]!="?"]
filtered_cars["horsepower"]=filtered_cars["horsepower"].astype("float")
3: Data Exploration
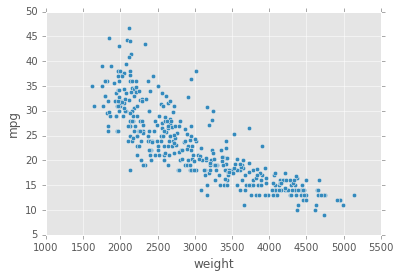
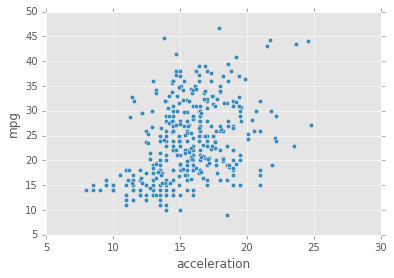
Now that the horsepower values are cleaned, generate a scatter plot that visualizes the relation between the horsepower values and thempg values. Let''s compare this to the scatter plot that visualizes weight against mpg.
Instructions
- Use the Dataframe plot to generate 2 scatter plots, in vertical order:
- On the top plot, generate a scatter plot with the
horsepowercolumn on the x-axis and thempgcolumn on the y-axis. - On the bottom plot, generate a scatter plot with the
weightcolumn on the x-axis and thempgcolumn on the y-xis.
- On the top plot, generate a scatter plot with the
import matplotlib.pyplot as plt
%matplotlib inline
filtered_cars.plot("weight","mpg",kind="scatter")
filtered_cars.plot("acceleration","mpg",kind="scatter")
plt.show()
4: Fitting A Model
While it''s hard to directly compare the plots since the scales for the x axes are very different, there does seem to be some relation between a car''s horsepower and it''s fuel efficiency. Let''s fit a linear regression model using the horsepower values to get a quantitive understanding of the relationship.
Instructions
- Create a new instance of the LinearRegression model and assign it to
lr. - Use the
fitmethod to fit a linear regression model using thehorsepowercolumn as the input. - Use the model to make predictions on the same data the model was trained on (the
horsepowercolumn fromfiltered_cars) and assign the resulting predictions topredictions. - Display the first 5 values in
predictionsand the first 5 values in thempgcolumn fromfiltered_cars.
import sklearn
from sklearn.linear_model import LinearRegression
lr = LinearRegression()
lr.fit(filtered_cars[["horsepower"]], filtered_cars["mpg"])
predictions = lr.predict(filtered_cars[["horsepower"]])
print(predictions[0:5])
print(filtered_cars["mpg"][0:5].values)
Output
[ 19.41604569 13.89148002 16.25915102 16.25915102 17.83759835]
[ 18. 15. 18. 16. 17.]
5: Plotting The Predictions
In the last mission, we plotted the predicted values and the actual values on the same plot to visually understand the model''s effectiveness. Let''s repeat that here for the predictions as well.
Instructions
- Generate 2 scatter plots on the same chart (Matplotlib axes instance):
- One containing the
horsepowervalues on the x-axis against the predicted fuel efficiency values on the y-axis. Usebluefor the color of the dots. - One containing the
horsepowervalues on the x-axis against the actual fuel efficiency values on the y-axis. Useredfor the color of the dots.
- One containing the
import matplotlib.pyplot as plt
%matplotlib inline
plt.scatter(filtered_cars["horsepower"],predictions,c="blue")
plt.scatter(filtered_cars["horsepower"],filtered_cars["mpg"],c="red")
plt.show()

6: Error Metrics
To evaluate how well the model fits the data, you can compute the MSE and RMSE values for the model. Then, you can compare the MSE and RMSE values with those from the model you fit in the last mission. Recall that the model you fit in the previous mission captured the relationship between the weight of a car (weight column) and it''s fuel efficiency (mpg column).
Instructions
- Calculate the MSE of the predicted values and assign to
mse. - Calculate the RMSE of the predicted values and assign to
rmse.
from sklearn.metrics import mean_squared_error
mse = mean_squared_error(filtered_cars["mpg"], predictions)
print(mse)
rmse = mse ** 0.5
print(rmse)
7: Next Steps
The MSE for the model from the last mission was 18.78 while the RMSE was 4.33. Here''s a table comparing the approximate measures for both models:
| Weight | Horsepower | |
|---|---|---|
| MSE | 18.78 | 23.94 |
| RMSE | 4.33 | 4.89 |
If we could only use one input to our model, we should definitely use the weight values to predict the fuel efficiency values because of the lower MSE and RMSE values. There''s a lot more before we can build a reliable, working model to predict fuel efficiency however. In later missions, we''ll learn how to use multiple features to build a more reliable predictive model.

Coursera, Deep Learning 1, Neural Networks and Deep Learning - week3, Neural Networks Basics
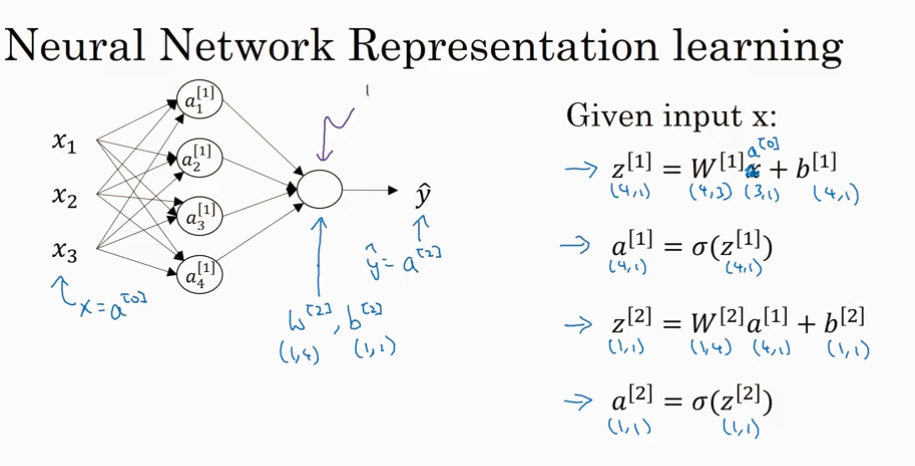
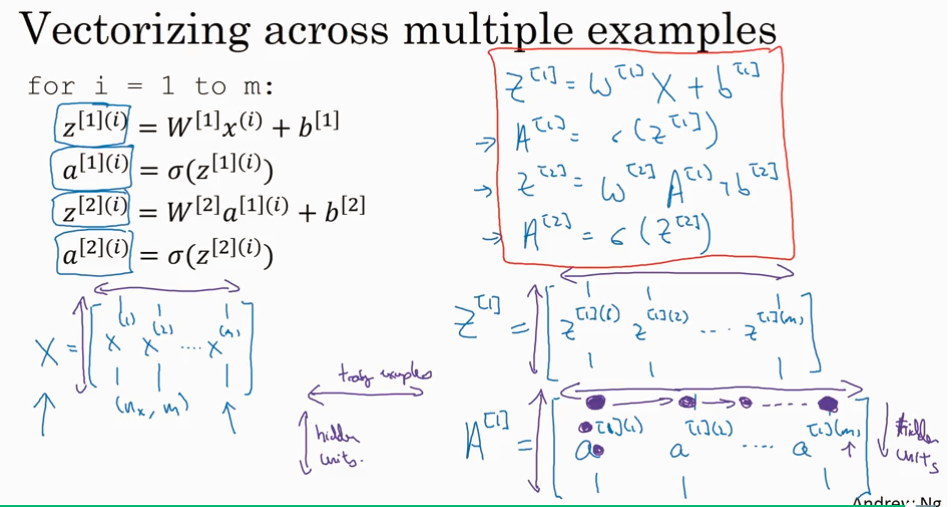
NN representation
这一课主要是讲3层神经网络
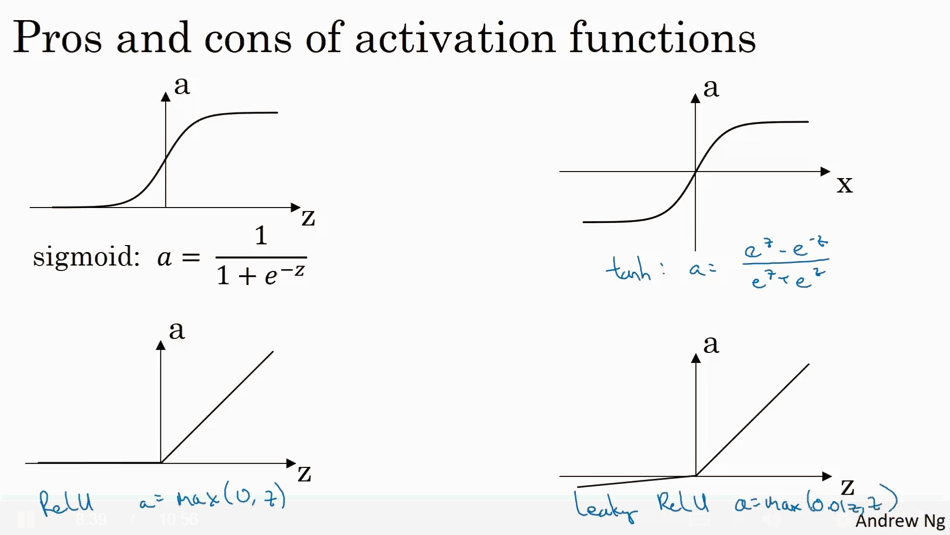
下面是常见的 activation 函数.sigmoid, tanh, ReLU, leaky ReLU.
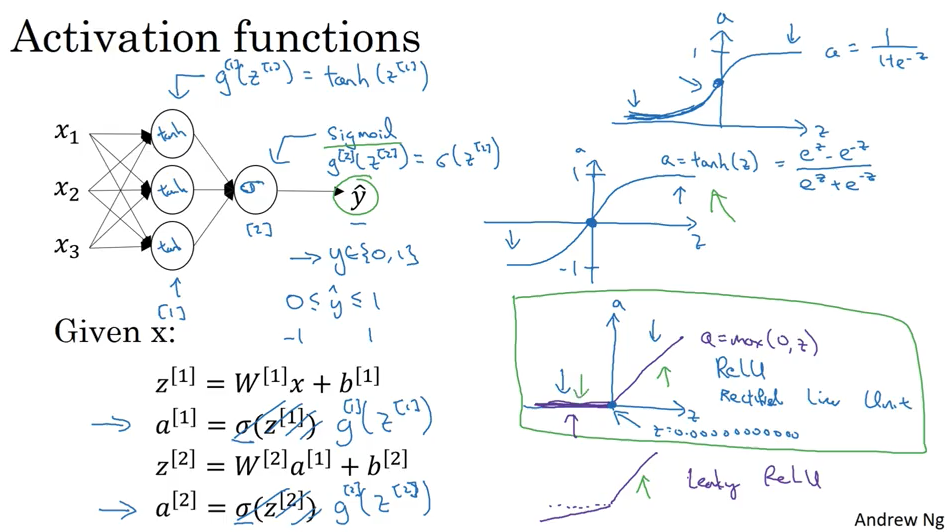
Sigmoid 只用在输出0/1 时候的output layer, 其他情况基本不用,因为tanh 总是比sigmoid 好.
两种 ReLU 使用起来总是要比sigmoid 和 tanh 快。ReLU 是最常用的 activation.
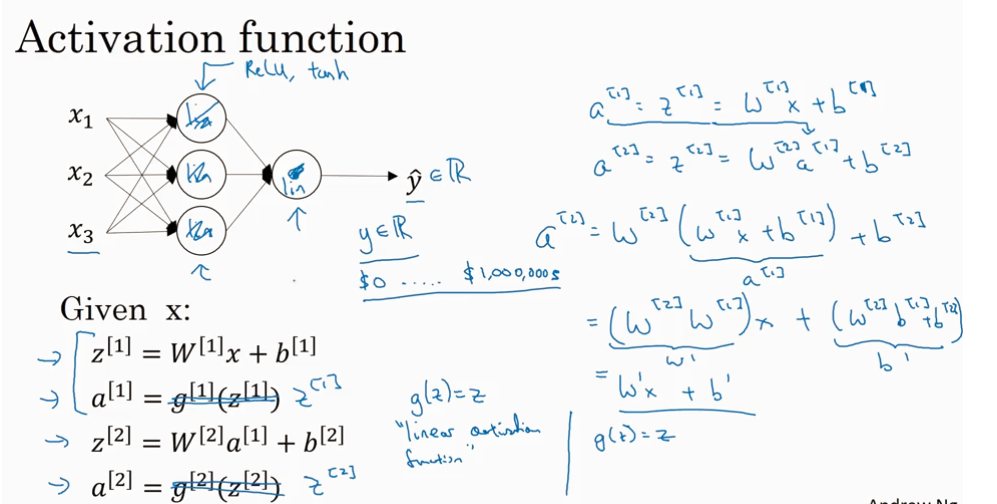
为什么Activation function 要是non-linear的?因为如下图所示如果activation 是linear的,那么最终output 只是 input 的线性函数.
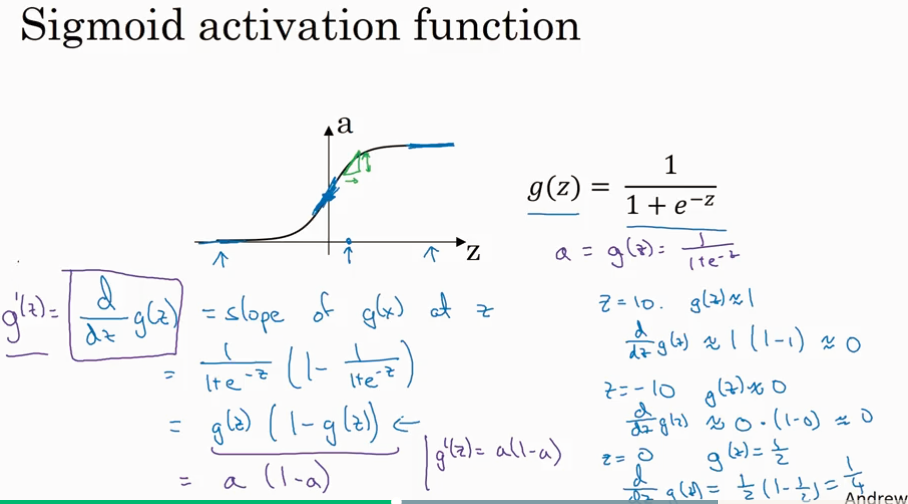
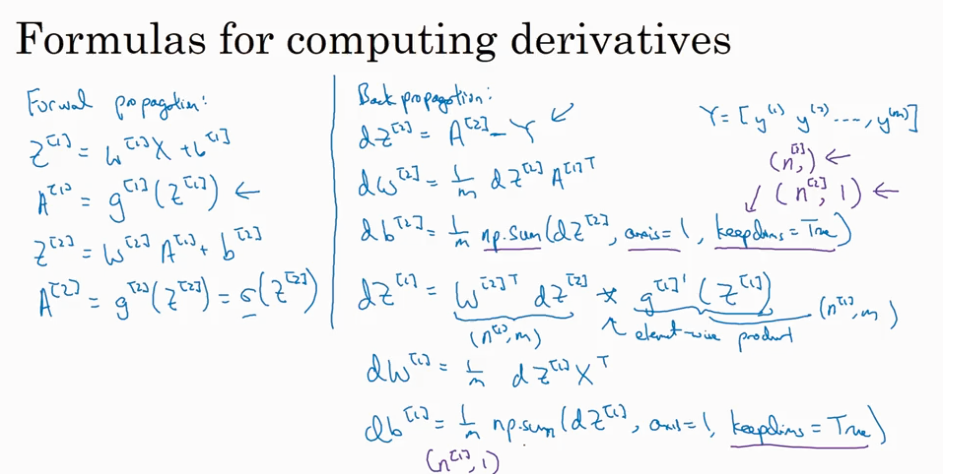
Gradient of activation function


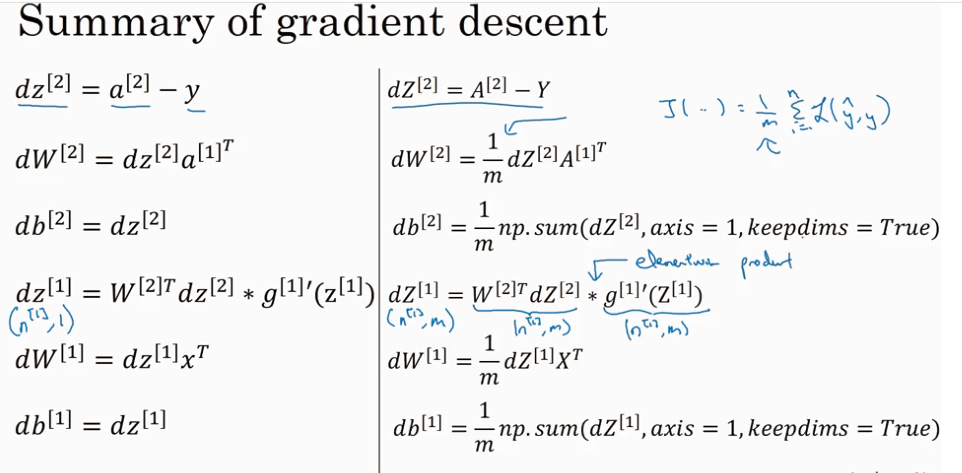
Gredient of 2 layer NN.
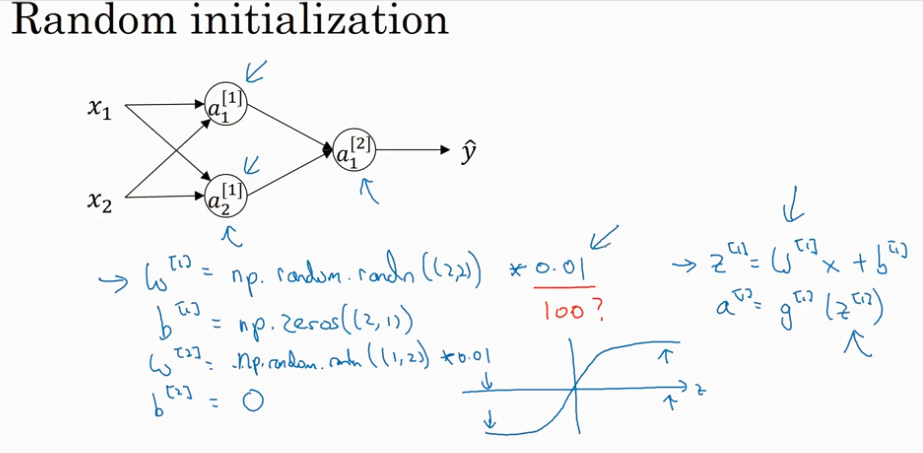
Random initialization
今天的关于basic bash learning 1的分享已经结束,谢谢您的关注,如果想了解更多关于6 bayesian learning、AtCoder ABC 129F Takahashi''s Basics in Education and Learning、Challenge: Machine Learning Basics、Coursera, Deep Learning 1, Neural Networks and Deep Learning - week3, Neural Networks Basics的相关知识,请在本站进行查询。
本文标签:


