如果您想了解如何从NetBeansIDE8和Jenkins重新连接到GitLab上的git存储库?和jenkins和git怎么连接的知识,那么本篇文章将是您的不二之选。我们将深入剖析如何从NetBea
如果您想了解如何从NetBeans IDE 8和Jenkins重新连接到GitLab上的git存储库?和jenkins和git怎么连接的知识,那么本篇文章将是您的不二之选。我们将深入剖析如何从NetBeans IDE 8和Jenkins重新连接到GitLab上的git存储库?的各个方面,并为您解答jenkins和git怎么连接的疑在这篇文章中,我们将为您介绍如何从NetBeans IDE 8和Jenkins重新连接到GitLab上的git存储库?的相关知识,同时也会详细的解释jenkins和git怎么连接的运用方法,并给出实际的案例分析,希望能帮助到您!
本文目录一览:- 如何从NetBeans IDE 8和Jenkins重新连接到GitLab上的git存储库?(jenkins和git怎么连接)
- Bitbucket Server Webhook到Jenkins:错误:Jenkins响应:没有使用存储库的git作业
- Gitlab+Jenkins 学习之路 (一)之 Git 基础
- Gitlab+Jenkins 学习之路(二)之 gitlab 部署
- Gitlab+Jenkins用钩子实现git提交后jenkins自动化构建
")
如何从NetBeans IDE 8和Jenkins重新连接到GitLab上的git存储库?(jenkins和git怎么连接)
我的NetBeans git设置似乎出了点问题。我在Windows 8.1上使用NetBeans IDE
8.0.1,并且在GitLab.com上托管了一个私人git存储库。但是自从GitLab
更新到版本7.3.1以来,我无法从NetBeans连接到git存储库。无论是否获取,拉入或推入,都将得到相同的响应:
_“无法通过https://gitlab.com/ <组名> / < 项目名> .git连接到远程存储库”_(组出于隐私原因,省略了名称和项目名称)
我发现了类似的(较旧的)问题,但我认为这不是同一个问题。我认为我的问题与GitLab社区版7.3.1的发布有关,尽管我看不出是什么原因造成的。
从NetBeans社区的此错误报告中,有人建议单击
“被动模式”
可以解决此问题,但是我不知道在哪里可以找到这种被动模式。在谷歌搜索被动模式下,我认为它与FTP有关,但是我使用https选项而不是ftps选项来连接git存储库,因此我认为这不适用于我的情况(如果我是错误的)。
有关NetBeans社区的另一个错误报告建议,我需要在gitconfig文件中添加以下行:
[http] sslVerify=false我将其添加到项目文件夹中的 .git / config 文件和用户文件夹中的 .gitconfig 文件,但这并不能解决问题。
另外,再次从GitLab.com克隆git存储库并不能解决问题。实际上,当我尝试克隆时,会得到相同的错误响应(如上所述)。
如果我在Windows上使用GitBash,我仍然可以连接到git并执行所有git命令。因此,我现在将使用它,但我也希望能够在NetBeans中使用Git存储库浏览器。
编辑:
我还在运行具有自动生成和测试功能的Jenkins,它也连接到GitLab.com上的同一git存储库。我有一段时间没有检查其日志,但是也无法获取。因此,该问题不仅限于NetBeans,因为Jenkins也受到影响。
这是詹金斯的构建尝试的输出:
Started by user Pieterjan van GastelBuilding in workspace C:\Program Files (x86)\Jenkins\workspace\<project-name> > C:\Program Files (x86)\Git\bin\git.exe rev-parse --is-inside-work-treeFetching changes from the remote Git repository > C:\Program Files (x86)\Git\bin\git.exe config remote.origin.url https://gitlab.com/<group-name>/<project-name>Fetching upstream changes from https://gitlab.com/<group-name>/<project-name> > C:\Program Files (x86)\Git\bin\git.exe --versionFATAL: Failed to fetch from https://gitlab.com/<group-name>/<project-name>hudson.plugins.git.GitException: Failed to fetch from https://gitlab.com/<group-name>/<project-name> at hudson.plugins.git.GitSCM.fetchFrom(GitSCM.java:622) at hudson.plugins.git.GitSCM.retrieveChanges(GitSCM.java:854) at hudson.plugins.git.GitSCM.checkout(GitSCM.java:879) at hudson.model.AbstractProject.checkout(AbstractProject.java:1254) at hudson.model.AbstractBuild$AbstractBuildExecution.defaultCheckout(AbstractBuild.java:624) at jenkins.scm.SCMCheckoutStrategy.checkout(SCMCheckoutStrategy.java:86) at hudson.model.AbstractBuild$AbstractBuildExecution.run(AbstractBuild.java:530) at hudson.model.Run.execute(Run.java:1732) at hudson.model.FreeStyleBuild.run(FreeStyleBuild.java:43) at hudson.model.ResourceController.execute(ResourceController.java:88) at hudson.model.Executor.run(Executor.java:234)Caused by: hudson.plugins.git.GitException: Received fatal alert: handshake_failure at org.jenkinsci.plugins.gitclient.CliGitAPIImpl.checkCredentials(CliGitAPIImpl.java:2115) at org.jenkinsci.plugins.gitclient.CliGitAPIImpl.launchCommandWithCredentials(CliGitAPIImpl.java:1151) at org.jenkinsci.plugins.gitclient.CliGitAPIImpl.access$200(CliGitAPIImpl.java:87) at org.jenkinsci.plugins.gitclient.CliGitAPIImpl$1.execute(CliGitAPIImpl.java:265) at hudson.plugins.git.GitSCM.fetchFrom(GitSCM.java:620) ... 10 more同样,出于隐私原因,省略了组名和项目名。
我想让我的单元测试自动执行,所以很高兴知道确切更改了哪些内容以及如何修复它。
现在,此问题也已作为问题发布到NetBeans.org和GitLab邮件列表中。
答案1
小编典典这个问题很容易解决。
John
Gibson(@jgibson)在GitLabCE问题#624上评论说他遇到了类似的错误。他解释说,“他 发现服务器上所有可用密码至少为256位。标准OracleJava附带的加密对于某些算法限制为128位。在 从Oracle安装了无限强度的加密软件包后,问题就消失了。请注意,无限强度软件包仅在美国合法可用。如果您不在美国,那么我认为OpenJDK可以代替。”
我遵循了他提到的链接,下载了 Java密码学扩展(JCE)无限强度管辖权策略文件7, 并按照下载随附的 自述 文件中的步骤进行操作。
我重新启动了NetBeans,问题已解决。
如下面的SO问题所示,这也适用于Eclipse IDE:“ Gitlab无法打开git-upload-packerror”
我尚未尝试使其与Jenkins一起使用,但我认为它也很容易修复。
我差点忘了,我在GitLab邮件列表上的Achilleas
Pipis找到了这个答案。

Bitbucket Server Webhook到Jenkins:错误:Jenkins响应:没有使用存储库的git作业
我已经在Bitbucket服务器中将Webhook安装到Jenkins for
Bitbucket插件。主要目标是在提交后将触发詹金斯构建。
安装后,我启用了插件:jenkins-url:https:// url / jenkins ssh:ssh @
git ..(在SCM插件jenkins作业中使用了相同的命令)。
詹金斯工作正常(git clone等正常工作),但插件不工作。当我在jenkins webhook插件上单击测试时,它显示了我:
Error: Jenkins response: No git jobs using repository: ssh://git@xx.git t and branches: master网址正确。因此,它用于我的詹金斯工作(和分支主管)。我什至在jenkins作业中从错误中复制了URL作为URL,它仍然能够克隆存储库。我会忘记什么?
编辑:
我发现一些信息,您应该在工作中启用SCM轮询(即使每年进行一次轮询)。仅此插件有效吗?这是正常行为吗?(这似乎解决了我的问题)
答案1
小编典典是的,您必须在Jenkins Job配置的Build Triggers部分中检查Poll_SCM-
我可以确认这一点。我正在做与您相同的事情,这就是我如何使其起作用的方法-您可以在Atlassian网站上找到此类确认
之 Git 基础")
Gitlab+Jenkins 学习之路 (一)之 Git 基础
Gitlab+Jenkins 学习之路 (一)之 Git 基础
-
1、GIT 基础
GIT 是一个分布式版本管理系统,速度快,适合大规模,跨地区多人协同开。SVN 是一个集中式版本管理系统。
(1)GIT 生态
GIT 分布式版本管理系统
Gitlab git 私库解决方案
Github git 公有库解决方案
(2)Git 安装
Centos:
yum install -y git
Ubuntu:
apt-get install git
Windows 安装 git bash
Linux 编译安装
注意不要使用 git 1.8 以下版本,推荐使用 2.7 版本
①编译安装git
[root@linux-node1 ~]# yum install -y epel-release
安装依赖包:
[root@linux-node1 ~]# yum install -y curl-devel expat-devel gettext-devel openssl-devel zlib-devel gcc perl-ExtUtils-MakeMaker
[root@linux-node1 ~]# wget https://github.com/git/git/archive/v2.7.4.zip
[root@linux-node1 ~]# yum install -y unzip
[root@linux-node1 ~]# unzip git-v2.7.4.zip
[root@linux-node1 ~]# cd git-2.7.4
[root@linux-node1 git-2.7.4]# make prefix=/usr/local/git all
[root@linux-node1 git-2.7.4]# make prefix=/usr/local/git install
[root@linux-node1 git-2.7.4]# rm -rf /usr/bin/git
[root@linux-node1 git-2.7.4]# ln -s /usr/local/git/bin/git /usr/bin/git
[root@linux-node1 git-2.7.4]# git --version
git version 2.7.4

②初始化仓库
[root@linux-node1 ~]# mkdir test
[root@linux-node1 ~]# cd test
[root@linux-node1 test]# git init    #将test目录初始化仓库
[root@linux-node1 test]# git config --global user.name"*****"
[root@linux-node1 test]# git config --global user.email *******@qq.com

四个区域:
远程仓库<-->本地仓库<-->暂存区域<-->工作目录

四种状态
Untracked、Unmodified、Modified、Staged
Untracked(工作目录)-->git add -->Staged(暂存区)-->git commit版本-->Unmodified(本地仓库)-->Edit file-->Modified-->Stage the file-->Staged

③常用命令:
git add 加入暂存
git status 查看状态
git status -s 状态概览
git diff 尚未暂存的文件
git diff --staged 暂存区文件
git commit 提交更新
git reset 回滚
git rm 从版本库中移除
git rm --cached README 从暂存区中移除
git mv 相当于mv git rm git add 三个命令

使用演示:
[root@linux-node1 test]# touch index.html    ==>创建文件
[root@linux-node1 test]# vim index.html
[root@linux-node1 test]# git status    ==>此时文件处于工作目录中
位于分支 master

初始提交

未跟踪的文件:
  (使用 "git add <文件>..." 以包含要提交的内容)

    index.html

提交为空,但是存在尚未跟踪的文件(使用 "git add" 建立跟踪)
[root@linux-node1 test]# git add index.html ==>加入代码库
[root@linux-node1 test]# git status        ==>此时文件处于暂存区
位于分支 master

初始提交

要提交的变更:
  (使用 "git rm --cached <文件>..." 以取消暂存)

    新文件:   index.html

[root@linux-node1 test]# git commit -m "first commit"    ==>提交到本地仓库
[master(根提交) c6bc04f] first commit
 1 file changed, 3 insertions(+)
 create mode 100644 index.html
[root@linux-node1 test]# git status
位于分支 master
无文件要提交,干净的工作区
[root@linux-node1 test]# git log
commit c6bc04f90d4ef442e2c4d5bc788b21de239332da    ==>回滚需要的id
Author: ****** <******@qq.com>
Date:   Fri Dec 8 22:37:40 2017 +0800

    first commit

[root@linux-node1 test]# touch pay.html
[root@linux-node1 test]# vim pay.html
[root@linux-node1 test]# git add pay.html
[root@linux-node1 test]# git status
On branch master
Changes to be committed:
  (use "git reset HEAD <file>..." to unstage)

    new file:   pay.html

[root@linux-node1 test]# touch news.html
[root@linux-node1 test]# echo "123" > news.html
[root@linux-node1 test]# git status
On branch master
Changes to be committed:
  (use "git reset HEAD <file>..." to unstage)

    new file:   pay.html

Untracked files:
  (use "git add <file>..." to include in what will be committed)

    news.html

[root@linux-node1 test]# git add news.html
[root@linux-node1 test]# git status
On branch master
Changes to be committed:
  (use "git reset HEAD <file>..." to unstage)

    new file:   news.html
    new file:   pay.html

[root@linux-node1 test]# git rm --cached pay.html    #将pay.html从暂存区移除
rm ''pay.html''
[root@linux-node1 test]# git status
On branch master
Changes to be committed:
  (use "git reset HEAD <file>..." to unstage)

    new file:   news.html

Untracked files:
  (use "git add <file>..." to include in what will be committed)

    pay.html

[root@linux-node1 test]# git commit -m "news"
[master d83603a] news
 1 file changed, 1 insertion(+)
 create mode 100644 news.html
[root@linux-node1 test]# git status
On branch master
Untracked files:
  (use "git add <file>..." to include in what will be committed)

    pay.html

nothing added to commit but untracked files present (use "git add" to track)
[root@linux-node1 test]# git log
commit d83603a56b8926630d31b46898e4b6d69293d946
Author:********
Date:   Fri Dec 8 22:48:37 2017 +0800

    news

commit c6bc04f90d4ef442e2c4d5bc788b21de239332da
Author: *****************
Date:   Fri Dec 8 22:37:40 2017 +0800

    first commit
[root@linux-node1 test]# echo "66666" >> pay.html
[root@linux-node1 test]# git status
On branch master
Untracked files:
  (use "git add <file>..." to include in what will be committed)

    pay.html

nothing added to commit but untracked files present (use "git add" to track)
[root@linux-node1 test]# git add pay.html
[root@linux-node1 test]# git status
On branch master
Changes to be committed:
  (use "git reset HEAD <file>..." to unstage)

    new file:   pay.html

[root@linux-node1 test]# git commit -m "pay modelue"
[master e55a302] pay modelue
 1 file changed, 2 insertions(+)
 create mode 100644 pay.html
[root@linux-node1 test]# git status
On branch master
nothing to commit, working directory clean
[root@linux-node1 test]# git log
commit e55a302e11d967fd25eac1cce8b6c7bed732019b
Author:******************
Date:   Fri Dec 8 22:49:57 2017 +0800

    pay modelue

commit d83603a56b8926630d31b46898e4b6d69293d946
Author: ******************
Date:   Fri Dec 8 22:48:37 2017 +0800

    news

commit c6bc04f90d4ef442e2c4d5bc788b21de239332da
Author: ******************
Date:   Fri Dec 8 22:37:40 2017 +0800

first commit-
2、分支管理
[root@linux-node1 test]# git status
On branch master
nothing to commit, working directory clean

建分支,开发新功能是不能在master分支上开发
[root@linux-node1 test]# git branch about    #创建分支
[root@linux-node1 test]# git status
On branch master
nothing to commit, working directory clean
[root@linux-node1 test]# git checkout about     #切换分支
Switched to branch ''about''
[root@linux-node1 test]# git status
On branch about
nothing to commit, working directory clean
[root@linux-node1 test]# git log    #创建的分支是在master分支当前的状态进行创建的。所以在about分支上也会有master的记录
commit e55a302e11d967fd25eac1cce8b6c7bed732019b
Author: ************
Date:   Fri Dec 8 22:49:57 2017 +0800

    pay modelue

commit d83603a56b8926630d31b46898e4b6d69293d946
Author: ************
Date:   Fri Dec 8 22:48:37 2017 +0800

    news

commit c6bc04f90d4ef442e2c4d5bc788b21de239332da
Author: ************
Date:   Fri Dec 8 22:37:40 2017 +0800

    first commit

[root@linux-node1 test]# git branch
* about
  master
[root@linux-node1 test]# touch about.html
[root@linux-node1 test]# echo "about us" >> about.html
[root@linux-node1 test]# git add .
[root@linux-node1 test]# git commit -m "about"
[about 08b200a] about
 1 file changed, 1 insertion(+)
 create mode 100644 about.html
[root@linux-node1 test]# git log
[root@linux-node1 test]# git checkout master    #切换到master分支
Switched to branch ''master''
[root@linux-node1 test]# git log
[root@linux-node1 test]# git checkout about    #切换到about分支
[root@linux-node1 test]# echo "about2" > about2.html
[root@linux-node1 test]# git add .
[root@linux-node1 test]# git commit -m "about2"
[root@linux-node1 test]# git log
[root@linux-node1 test]# git checkout master
[root@linux-node1 test]# git log
[root@linux-node1 test]# git merged about    #在master分支上合并about分支
[root@linux-node1 test]# git log
[root@linux-node1 test]# git branch test    #创建test分支
[root@linux-node1 test]# git checkout test
[root@linux-node1 test]# touch "test" > test.html
[root@linux-node1 test]# git add .
[root@linux-node1 test]# git commit -m "test"
[root@linux-node1 test]# git checkout master
[root@linux-node1 test]# git branch --merged    #查看已经合并的分支
[root@linux-node1 test]# git branch --no-merged    #查看未合并的分支

分支命令
git branch例出分支
git branch -v
git branch --merged查看哪些分支被合并
git branch --no-merged查看哪些分支未被合并
git branch -d testling删除分支
git checkout切换分支
git merged融合分支
之 gitlab 部署")
Gitlab+Jenkins 学习之路(二)之 gitlab 部署
-
1、安装依赖及 gitlab
[root@linux-node1 ~]# yum install -y curl policycoreutils openssh-server openssh-clients postfix [root@linux-node1 ~]# systemctl start postfix
-
2、安装 gitlab
由于国内网络偏慢,这里使用清华大学的镜像源进行安装gitlab-ce
[root@linux-node1 ~]# cat /etc/yum.repos.d/gitlab-ce.repo
[gitlab-ce]
name=gitlab-ce
baseurl=http://mirrors.tuna.tsinghua.edu.cn/gitlab-ce/yum/el7
repo_gpgcheck=0
gpgcheck=0
enabled=1
gpgkey=
[root@linux-node1 ~]#  yum makecache
[root@linux-node1 ~]#  yum install -y gitlab-ce
-
3、修改配置文件
[root@linux-node1 ~]# vim /etc/gitlab/gitlab.rb
external_url ''http://192.168.56.11''
[root@linux-node1 ~]# gitlab-ctl reconfigure
这一步时间比较长,耐心等待
gitlab常用命令:
关闭gitlab:[root@linux-node1 ~]# gitlab-ctl stop
启动gitlab:[root@linux-node1 ~]# gitlab-ctl start
重启gitlab:[root@linux-node1 ~]# gitlab-ctl restart
重载配置文件: gitlab-ctl reconfigure
可以使用 gitlab-ctl 管理 gitlab,例如查看 gitlab 状态:
[root@linux-node1 ~]# gitlab-ctl status
run: gitaly: (pid 53207) 176s; run: log: (pid 52331) 647s
run: gitlab-monitor: (pid 53233) 174s; run: log: (pid 52406) 620s
run: gitlab-workhorse: (pid 53189) 180s; run: log: (pid 52274) 671s
run: logrotate: (pid 52307) 654s; run: log: (pid 52306) 654s
run: nginx: (pid 53694) 2s; run: log: (pid 52285) 665s
run: node-exporter: (pid 52388) 631s; run: log: (pid 52387) 631s
run: postgres-exporter: (pid 53262) 171s; run: log: (pid 52478) 581s
run: postgresql: (pid 52013) 855s; run: log: (pid 52012) 855s
run: prometheus: (pid 53245) 172s; run: log: (pid 52443) 598s
run: redis: (pid 51951) 867s; run: log: (pid 51950) 867s
run: redis-exporter: (pid 52426) 609s; run: log: (pid 52425) 609s
run: sidekiq: (pid 52256) 677s; run: log: (pid 52255) 677s
run: unicorn: (pid 52218) 683s; run: log: (pid 52217) 683s
提示:gitlab 需要使用到 80 端口,所以得保证 80 端口不被占用
[root@linux-node1 ~]# lsof -i:80
COMMAND   PID   USER   FD   TYPE DEVICE SIZE/OFF NODE NAME
httpd     963 apache    4u  IPv6  56349      0t0  TCP *:http (LISTEN)
httpd    1156 apache    4u  IPv6  56349      0t0  TCP *:http (LISTEN)
httpd    1392 apache    4u  IPv6  56349      0t0  TCP *:http (LISTEN)
httpd    1544 apache    4u  IPv6  56349      0t0  TCP *:http (LISTEN)
httpd   22057   root    4u  IPv6  56349      0t0  TCP *:http (LISTEN)
httpd   22793 apache    4u  IPv6  56349      0t0  TCP *:http (LISTEN)
httpd   23247 apache    4u  IPv6  56349      0t0  TCP *:http (LISTEN)
httpd   23367 apache    4u  IPv6  56349      0t0  TCP *:http (LISTEN)
httpd   26356 apache    4u  IPv6  56349      0t0  TCP *:http (LISTEN)
httpd   64149 apache    4u  IPv6  56349      0t0  TCP *:http (LISTEN)
httpd   64641 apache    4u  IPv6  56349      0t0  TCP *:http (LISTEN)
[root@linux-node1 ~]# systemctl stop httpd
[root@linux-node1 ~]# gitlab-ctl restart
ok: run: gitaly: (pid 55012) 0s
ok: run: gitlab-monitor: (pid 55022) 1s
ok: run: gitlab-workhorse: (pid 55025) 0s
ok: run: logrotate: (pid 55034) 1s
ok: run: nginx: (pid 55036) 0s
ok: run: node-exporter: (pid 55046) 1s
ok: run: postgres-exporter: (pid 55051) 0s
ok: run: postgresql: (pid 55059) 1s
ok: run: prometheus: (pid 55066) 0s
ok: run: redis: (pid 55072) 0s
ok: run: redis-exporter: (pid 55081) 0s
ok: run: sidekiq: (pid 55105) 0s
ok: run: unicorn: (pid 55112) 0s
[root@linux-node1 ~]# lsof -i:80
COMMAND   PID       USER   FD   TYPE  DEVICE SIZE/OFF NODE NAME
nginx   54794       root    8u  IPv4 1562548      0t0  TCP *:http (LISTEN)
nginx   54802 gitlab-www    8u  IPv4 1562548      0t0  TCP *:http (LISTEN)
-
4、浏览器访问登录:


安装完成!

Gitlab+Jenkins用钩子实现git提交后jenkins自动化构建
Gitlab+Jenkins用钩子实现git提交后jenkins自动化构建
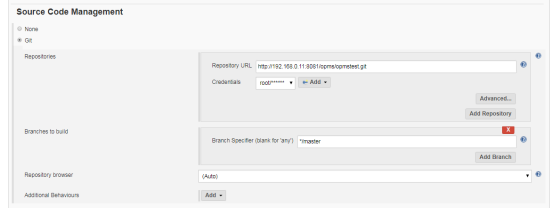
一、Jenkins 进入项目---->Configure
1、设置项目代码从git中拉取
2、设置钩子程序
二、gitlab设置
1、进入项目-->设置
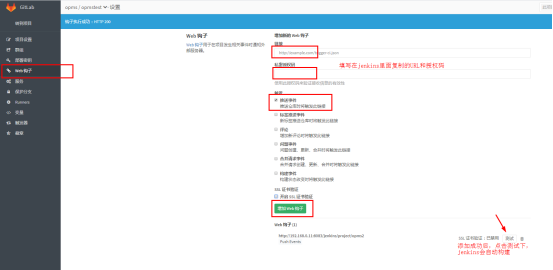
以上两个步骤设置完成就可以了。如果不能触发可能是gitlab hook插件没安装,安装下即可。

今天关于如何从NetBeans IDE 8和Jenkins重新连接到GitLab上的git存储库?和jenkins和git怎么连接的介绍到此结束,谢谢您的阅读,有关Bitbucket Server Webhook到Jenkins:错误:Jenkins响应:没有使用存储库的git作业、Gitlab+Jenkins 学习之路 (一)之 Git 基础、Gitlab+Jenkins 学习之路(二)之 gitlab 部署、Gitlab+Jenkins用钩子实现git提交后jenkins自动化构建等更多相关知识的信息可以在本站进行查询。
本文标签:


