本文的目的是介绍使用属性server.port=0运行spock测试时如何查找SpringBoot容器的端口的详细情况,特别关注springboot从配置中心获取属性文件的相关信息。我们将通过专业的研
本文的目的是介绍使用属性server.port = 0运行spock测试时如何查找Spring Boot容器的端口的详细情况,特别关注springboot从配置中心获取属性文件的相关信息。我们将通过专业的研究、有关数据的分析等多种方式,为您呈现一个全面的了解使用属性server.port = 0运行spock测试时如何查找Spring Boot容器的端口的机会,同时也不会遗漏关于17. Spring Boot 配置嵌入式Servlet容器、4、SpringBoot嵌入式Servlet容器、docker 使用教程4-(Docker创建Java容器运行SpringBoot项目)、docker 部署springboot容器日志处理的知识。
本文目录一览:- 使用属性server.port = 0运行spock测试时如何查找Spring Boot容器的端口(springboot从配置中心获取属性文件)
- 17. Spring Boot 配置嵌入式Servlet容器
- 4、SpringBoot嵌入式Servlet容器
- docker 使用教程4-(Docker创建Java容器运行SpringBoot项目)
- docker 部署springboot容器日志处理
")
使用属性server.port = 0运行spock测试时如何查找Spring Boot容器的端口(springboot从配置中心获取属性文件)
鉴于此条目application.properties:
server.port=0这导致Spring Boot选择一个随机可用端口,并使用spock测试Spring Boot Web应用程序,spock代码如何知道要命中哪个端口?
正常注射是这样的:
@Value("${local.server.port}")int port;不适用于spock。
答案1
小编典典您可以使用以下代码找到端口:
int port = context.embeddedServletContainer.port对于那些对java等效语言感兴趣的人:
int port = ((TomcatEmbeddedServletContainer)((AnnotationConfigEmbeddedWebApplicationContext)context).getEmbeddedServletContainer()).getPort();这是一个可以扩展的抽象类,它包装了Spring Boot应用程序的初始化并确定了端口:
abstract class SpringBootSpecification extends Specification { @Shared @AutoCleanup ConfigurableApplicationContext context int port = context.embeddedServletContainer.port void launch(Class clazz) { Future future = Executors.newSingleThreadExecutor().submit( new Callable() { @Override public ConfigurableApplicationContext call() throws Exception { return (ConfigurableApplicationContext) SpringApplication.run(clazz) } }) context = future.get(20, TimeUnit.SECONDS); }}您可以这样使用:
class MySpecification extends SpringBootSpecification { void setupSpec() { launch(MyLauncher.class) } String getBody(someParam) { ResponseEntity entity = new RestTemplate().getForEntity("http://localhost:${port}/somePath/${someParam}", String.class) return entity.body; }}
17. Spring Boot 配置嵌入式Servlet容器
一、如何定制和修改Servlet容器的相关配置
1、配置文件(ServerProperties);
优先级最高
server.port=8081
server.context‐path=/crud
server.tomcat.uri‐encoding=UTF‐8
//通用的Servlet容器设置
server.xxx
//Tomcat的设置
server.tomcat.xxx
2、java代码
2.1 Spring Boot 1.5.10 版本
@Bean //一定要将这个定制器加入到容器中 嵌入式的Servlet容器定制器
public EmbeddedServletContainerCustomizer embeddedServletContainerCustomizer(){
  return new EmbeddedServletContainerCustomizer() {
    //定制嵌入式的Servlet容器相关的规则
    @Override
    public void customize(ConfigurableEmbeddedServletContainer container) {
      container.setPort(8083);
    }
  };
}
2.2 Spring Boot 2.1.0版本
2.2.1、 方式1 (优先级第二)
import org.springframework.boot.web.server.WebServerFactoryCustomizer;
import org.springframework.boot.web.servlet.server.ConfigurableServletWebServerFactory;
import org.springframework.stereotype.Component;
@Component
public class CustomizationBean implements WebServerFactoryCustomizer<ConfigurableServletWebServerFactory> {
    @Override
    public void customize(ConfigurableServletWebServerFactory server) {
        server.setPort(9000);
    }
}
2.2.2、方式2 (优先级最低)
@Bean
public ConfigurableServletWebServerFactory webServerFactory() {
    TomcatServletWebServerFactory factory = new TomcatServletWebServerFactory();
    factory.setPort(9000);
    // factory.setSessionTimeout(10, TimeUnit.MINUTES);  此方法没找到
    factory.addErrorPages(new ErrorPage(HttpStatus.NOT_FOUND, "/notfound.html"));
    return factory;
}
二、自定义Servlet容器
1、Spring Boot 支持的 Servlet容器类型

2、切换Tomcat容器为jetty容器

<dependency>
    <groupId>org.springframework.boot</groupId>
    <artifactId>spring-boot-starter-web</artifactId>
    <exclusions><!-- 排除掉默认的Tomcat web容器-->
        <exclusion>
            <groupId>org.springframework.boot</groupId>
            <artifactId>spring-boot-starter-tomcat</artifactId>
        </exclusion>
    </exclusions>
</dependency>
<!-- 引入jetty容器。jetty 适合长连接的场景-->
<dependency>
    <groupId>org.springframework.boot</groupId>
    <artifactId>spring-boot-starter-jetty</artifactId><!--  spring-boot-starter-undertow ,不支持JSP-->
</dependency>
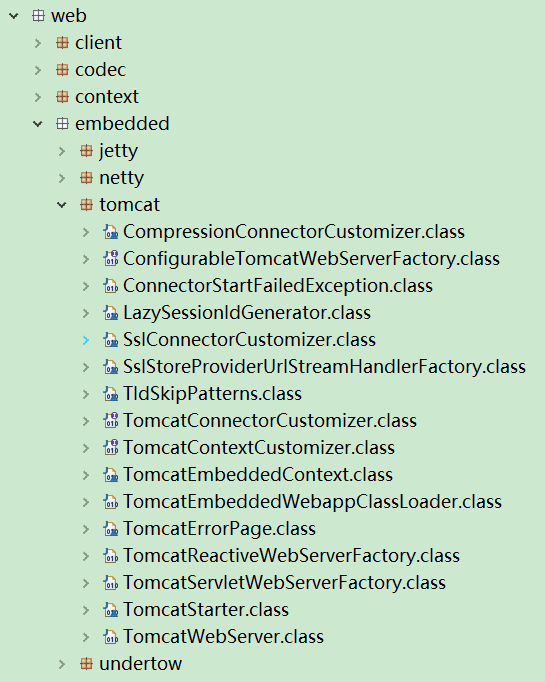
undertow
包下:spring-boot-autoconfigure-2.1.0.RELEASE.jar

三、嵌入式Servlet容器自动配置原理Spring Boot 2.1.0版本示例: (注:1.5.10 和2.1.0版本有很大不同)
Servelt容器的自动配置类
@Configuration
@ConditionalOnWebApplication
@EnableConfigurationProperties(ServerProperties.class)
public class EmbeddedWebServerFactoryCustomizerAutoConfiguration {

    /**
     * Nested configuration if Tomcat is being used.
     */
    @Configuration
    @ConditionalOnClass({ Tomcat.class, UpgradeProtocol.class })
    public static class TomcatWebServerFactoryCustomizerConfiguration {

        @Bean
        public TomcatWebServerFactoryCustomizer tomcatWebServerFactoryCustomizer(
                Environment environment, ServerProperties serverProperties) {
            return new TomcatWebServerFactoryCustomizer(environment, serverProperties);
        }

    }

    /**
     * Nested configuration if Jetty is being used.
     */
    @Configuration
    @ConditionalOnClass({ Server.class, Loader.class, WebAppContext.class })
    public static class JettyWebServerFactoryCustomizerConfiguration {

        @Bean
        public JettyWebServerFactoryCustomizer jettyWebServerFactoryCustomizer(
                Environment environment, ServerProperties serverProperties) {
            return new JettyWebServerFactoryCustomizer(environment, serverProperties);
        }

    }

    /**
     * Nested configuration if Undertow is being used.
     */
    @Configuration
    @ConditionalOnClass({ Undertow.class, SslClientAuthMode.class })
    public static class UndertowWebServerFactoryCustomizerConfiguration {

        @Bean
        public UndertowWebServerFactoryCustomizer undertowWebServerFactoryCustomizer(
                Environment environment, ServerProperties serverProperties) {
            return new UndertowWebServerFactoryCustomizer(environment, serverProperties);
        }

    }

    /**
     * Nested configuration if Netty is being used.
     */
    @Configuration
    @ConditionalOnClass(HttpServer.class)
    public static class NettyWebServerFactoryCustomizerConfiguration {

        @Bean
        public NettyWebServerFactoryCustomizer nettyWebServerFactoryCustomizer(
                Environment environment, ServerProperties serverProperties) {
            return new NettyWebServerFactoryCustomizer(environment, serverProperties);
        }

    }

}
Tomcat 的Server的定制(Jetty、Netty、Undertow 类似)
public class TomcatWebServerFactoryCustomizer implements
        WebServerFactoryCustomizer<ConfigurableTomcatWebServerFactory>, Ordered {

    private final Environment environment;

    private final ServerProperties serverProperties;

    public TomcatWebServerFactoryCustomizer(Environment environment,
            ServerProperties serverProperties) {
        this.environment = environment;
        this.serverProperties = serverProperties;
    }

    @Override
    public int getOrder() {
        return 0;
    }

    @Override
    public void customize(ConfigurableTomcatWebServerFactory factory) {
        ServerProperties properties = this.serverProperties;
        ServerProperties.Tomcat tomcatProperties = properties.getTomcat();
        PropertyMapper propertyMapper = PropertyMapper.get();
        propertyMapper.from(tomcatProperties::getBasedir).whenNonNull()
                .to(factory::setBaseDirectory);
        propertyMapper.from(tomcatProperties::getBackgroundProcessorDelay).whenNonNull()
                .as(Duration::getSeconds).as(Long::intValue)
                .to(factory::setBackgroundProcessorDelay);
        customizeRemoteIpValve(factory);
        propertyMapper.from(tomcatProperties::getMaxThreads).when(this::isPositive)
                .to((maxThreads) -> customizeMaxThreads(factory,
                        tomcatProperties.getMaxThreads()));
        propertyMapper.from(tomcatProperties::getMinSpareThreads).when(this::isPositive)
                .to((minSpareThreads) -> customizeMinThreads(factory, minSpareThreads));
        propertyMapper.from(this::determineMaxHttpHeaderSize).whenNonNull()
                .asInt(DataSize::toBytes).when(this::isPositive)
                .to((maxHttpHeaderSize) -> customizeMaxHttpHeaderSize(factory,
                        maxHttpHeaderSize));
        propertyMapper.from(tomcatProperties::getMaxSwallowSize).whenNonNull()
                .asInt(DataSize::toBytes)
                .to((maxSwallowSize) -> customizeMaxSwallowSize(factory, maxSwallowSize));
        propertyMapper.from(tomcatProperties::getMaxHttpPostSize).asInt(DataSize::toBytes)
                .when((maxHttpPostSize) -> maxHttpPostSize != 0)
                .to((maxHttpPostSize) -> customizeMaxHttpPostSize(factory,
                        maxHttpPostSize));
        propertyMapper.from(tomcatProperties::getAccesslog)
                .when(ServerProperties.Tomcat.Accesslog::isEnabled)
                .to((enabled) -> customizeAccessLog(factory));
        propertyMapper.from(tomcatProperties::getUriEncoding).whenNonNull()
                .to(factory::setUriEncoding);
        propertyMapper.from(properties::getConnectionTimeout).whenNonNull()
                .to((connectionTimeout) -> customizeConnectionTimeout(factory,
                        connectionTimeout));
        propertyMapper.from(tomcatProperties::getMaxConnections).when(this::isPositive)
                .to((maxConnections) -> customizeMaxConnections(factory, maxConnections));
        propertyMapper.from(tomcatProperties::getAcceptCount).when(this::isPositive)
                .to((acceptCount) -> customizeAcceptCount(factory, acceptCount));
        customizeStaticResources(factory);
        customizeErrorReportValve(properties.getError(), factory);
    }
。。。。。。
}
Spring Boot 2.1.0 版本的web容器启动流程 (Spring boot 1.5.10版本类似但不同)
1.Spring boot启动器
@SpringBootApplication
public class SpringBootDemo01Application {

    public static void main(String[] args) {
        SpringApplication.run(SpringBootDemo01Application.class, args);
    }
}
2.run方法启动过程源码分析
public class SpringApplication {
   //在createApplicationContext()中根据类型classforName()加载 不同类型的
    public static final String DEFAULT_CONTEXT_CLASS = "org.springframework.context."
            + "annotation.AnnotationConfigApplicationContext";

    public static final String DEFAULT_SERVLET_WEB_CONTEXT_CLASS = "org.springframework.boot."
            + "web.servlet.context.AnnotationConfigServletWebServerApplicationContext";

    public static final String DEFAULT_REACTIVE_WEB_CONTEXT_CLASS = "org.springframework."
            + "boot.web.reactive.context.AnnotationConfigReactiveWebServerApplicationContext";

   //run1调用run2
    public static ConfigurableApplicationContext run(Class<?> primarySource,String... args) {
        return run(new Class<?>[] { primarySource }, args);
    }
   //run2调用run3
    public static ConfigurableApplicationContext run(Class<?>[] primarySources,String[] args) {
        return new SpringApplication(primarySources).run(args);
    }

   //run3启动Web服务器
    public ConfigurableApplicationContext run(String... args) {
        StopWatch stopWatch = new StopWatch();
        stopWatch.start();
        ConfigurableApplicationContext context = null;
        Collection<SpringBootExceptionReporter> exceptionReporters = new ArrayList<>();
        configureHeadlessProperty();
        SpringApplicationRunListeners listeners = getRunListeners(args);
        listeners.starting();
        try {
            ApplicationArguments applicationArguments = new DefaultApplicationArguments(
                    args);
            ConfigurableEnvironment environment = prepareEnvironment(listeners,
                    applicationArguments);
            configureIgnoreBeanInfo(environment);
            Banner printedBanner = printBanner(environment);
            context = createApplicationContext();
            exceptionReporters = getSpringFactoriesInstances(
                    SpringBootExceptionReporter.class,
                    new Class[] { ConfigurableApplicationContext.class }, context);
            prepareContext(context, environment, listeners, applicationArguments,
                    printedBanner);
            refreshContext(context);
            afterRefresh(context, applicationArguments);
            stopWatch.stop();
            if (this.logStartupInfo) {
                new StartupInfoLogger(this.mainApplicationClass)
                        .logStarted(getApplicationLog(), stopWatch);
            }
            listeners.started(context);
            callRunners(context, applicationArguments);
        }
        catch (Throwable ex) {
            handleRunFailure(context, ex, exceptionReporters, listeners);
            throw new IllegalStateException(ex);
        }

        try {
            listeners.running(context);
        }
        catch (Throwable ex) {
            handleRunFailure(context, ex, exceptionReporters, null);
            throw new IllegalStateException(ex);
        }
        return context;
    }


    protected ConfigurableApplicationContext createApplicationContext() {
        Class<?> contextClass = this.applicationContextClass;
        if (contextClass == null) {
            try {
                switch (this.webApplicationType) {
                case SERVLET:
                    contextClass = Class.forName(DEFAULT_SERVLET_WEB_CONTEXT_CLASS);
                    break;
                case REACTIVE:
                    contextClass = Class.forName(DEFAULT_REACTIVE_WEB_CONTEXT_CLASS);
                    break;
                default:
                    contextClass = Class.forName(DEFAULT_CONTEXT_CLASS);
                }
            }
            catch (ClassNotFoundException ex) {
                throw new IllegalStateException(
                        "Unable create a default ApplicationContext, "
                                + "please specify an ApplicationContextClass",
                        ex);
            }
        }
        return (ConfigurableApplicationContext) BeanUtils.instantiateClass(contextClass);
    }


    private void refreshContext(ConfigurableApplicationContext context) {
        refresh(context);
        if (this.registerShutdownHook) {
            try {
                context.registerShutdownHook();
            }
            catch (AccessControlException ex) {
                // Not allowed in some environments.
            }
        }
    }

    protected void refresh(ApplicationContext applicationContext) {
        Assert.isInstanceOf(AbstractApplicationContext.class, applicationContext);
        ((AbstractApplicationContext) applicationContext).refresh();
    }


}
public abstract class AbstractApplicationContext extends DefaultResourceLoader
        implements ConfigurableApplicationContext {

            @Override
    public void refresh() throws BeansException, IllegalStateException {
        synchronized (this.startupShutdownMonitor) {
            // Prepare this context for refreshing.
            prepareRefresh();

            // Tell the subclass to refresh the internal bean factory.
            ConfigurableListableBeanFactory beanFactory = obtainFreshBeanFactory();

            // Prepare the bean factory for use in this context.
            prepareBeanFactory(beanFactory);

            try {
                // Allows post-processing of the bean factory in context subclasses.
                postProcessBeanFactory(beanFactory);

                // Invoke factory processors registered as beans in the context.
                invokeBeanFactoryPostProcessors(beanFactory);

                // Register bean processors that intercept bean creation.
                registerBeanPostProcessors(beanFactory);

                // Initialize message source for this context.
                initMessageSource();

                // Initialize event multicaster for this context.
                initApplicationEventMulticaster();

                // Initialize other special beans in specific context subclasses.
                onRefresh();

                // Check for listener beans and register them.
                registerListeners();

                // Instantiate all remaining (non-lazy-init) singletons.
                finishBeanFactoryInitialization(beanFactory);

                // Last step: publish corresponding event.
                finishRefresh();
            }

            catch (BeansException ex) {
                if (logger.isWarnEnabled()) {
                    logger.warn("Exception encountered during context initialization - " +
                            "cancelling refresh attempt: " + ex);
                }

                // Destroy already created singletons to avoid dangling resources.
                destroyBeans();

                // Reset ''active'' flag.
                cancelRefresh(ex);

                // Propagate exception to caller.
                throw ex;
            }

            finally {
                // Reset common introspection caches in Spring''s core, since we
                // might not ever need metadata for singleton beans anymore...
                resetCommonCaches();
            }
        }
    }
    protected void onRefresh() throws BeansException {
        // For subclasses: do nothing by default.
    }

}
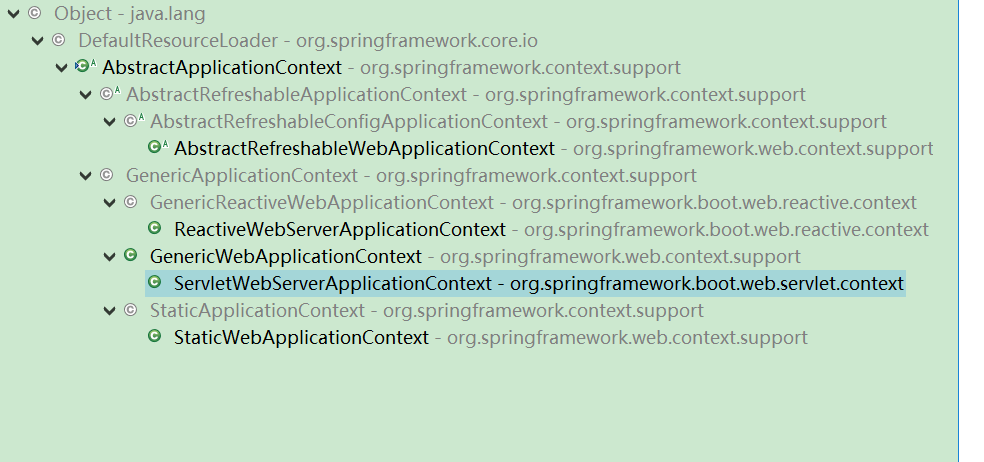
public class ServletWebServerApplicationContext extends GenericWebApplicationContext
implements ConfigurableWebServerApplicationContext {
@Override
protected void onRefresh() {
super.onRefresh();
try {
createWebServer();
}
catch (Throwable ex) {
throw new ApplicationContextException("Unable to start web server", ex);
}
}
private void createWebServer() {
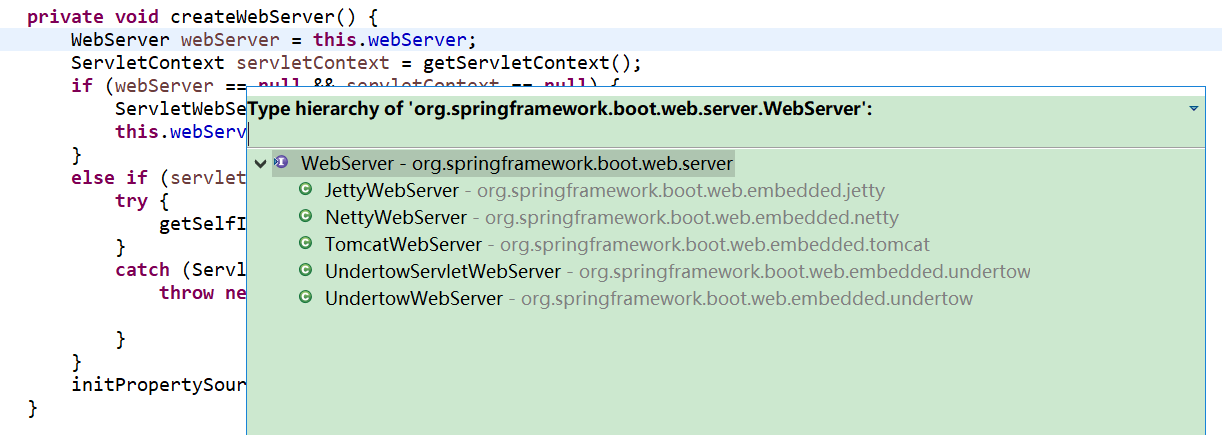
WebServer webServer = this.webServer;
ServletContext servletContext = getServletContext();
if (webServer == null && servletContext == null) {
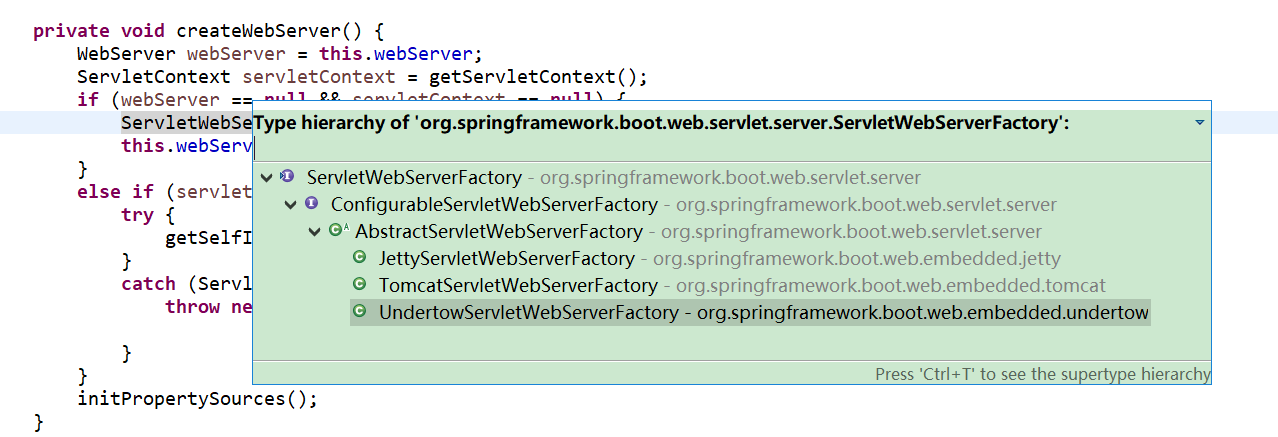
ServletWebServerFactory factory = getWebServerFactory();
this.webServer = factory.getWebServer(getSelfInitializer());
}
else if (servletContext != null) {
try {
getSelfInitializer().onStartup(servletContext);
}
catch (ServletException ex) {
throw new ApplicationContextException("Cannot initialize servlet context",
ex);
}
}
initPropertySources();
}
}
spring-boot-2.1.0.RELEASE.jar

4、SpringBoot嵌入式Servlet容器
1、切换嵌入式Servlet容器
- 默认支持的web服务器webServer:
 Tomcat, Jetty,  Undertow
 ServletWebServerApplicationContext 容器启动寻找ServletWebServerFactory 并引导创建服务器
切换服务器(可以切换四种)
切换的方式:
      <dependency>
          <groupId>org.springframework.boot</groupId>
          <artifactId>spring-boot-starter-web</artifactId>
          <exclusions>
              <exclusion> 排除
                  <groupId>org.springframework.boot</groupId>
                  <artifactId>spring-boot-starter-tomcat</artifactId>
              </exclusion>
          </exclusions>
      </dependency>
      <dependency>  导入
          <groupId>org.springframework.boot</groupId>
          <artifactId>spring-boot-starter-undertow</artifactId>
      </dependency>


2022-07-17 19:34:02.650  INFO 6808 --- [  restartedMain] o.s.b.w.e.undertow.UndertowWebServer     : Undertow started on port(s) 8080 (http)

原理
- SpringBoot应用启动发现当前是Web应用。因为导了web场景包,它里面也导入tomcat
- web应用会创建一个web版的ioc容器,名字叫
ServletWebServerApplicationContext ServletWebServerApplicationContext它在项目一启动的时候寻找ServletWebServerFactory(Servlet 的web服务器工厂---> 这个工厂生产 Servlet 的web服务器)- SpringBoot底层默认有很多的WebServer工厂:
TomcatServletWebServerFactory,JettyServletWebServerFactory,UndertowServletWebServerFactory - 这些web服务器工厂不需要我们配,底层直接会有一个自动配置类
ServletWebServerFactoryAutoConfiguration ServletWebServerFactoryAutoConfiguration导入了ServletWebServerFactoryConfiguration(配置类)ServletWebServerFactoryConfiguration配置类 根据动态判断系统中到底导入了哪个Web服务器的包。(默认是web-starter导入tomcat包),容器中就有TomcatServletWebServerFactoryTomcatServletWebServerFactory创建出Tomcat服务器TomcatWebServer并启动;TomcatWebServer 的构造器拥有初始化方法initialize,这个初始化方法把所有东西准备好,把tomcat调用start方法this.tomcat.start();启动tomcat- 其实内嵌服务器,就是手动把启动服务器的代码调用(前提是tomcat核心jar包存在,才能启动tomcat)
2、定制Servlet容器
- 实现 WebServerFactoryCustomizer<ConfigurableServletWebServerFactory>
○ 把配置文件的值和ServletWebServerFactory 进行绑定 - 修改配置文件 server.xxx
- 直接自定义 ConfigurableServletWebServerFactory
xxxxxCustomizer:定制化器,可以改变xxxx的默认规则
import org.springframework.boot.web.server.WebServerFactoryCustomizer;
import org.springframework.boot.web.servlet.server.ConfigurableServletWebServerFactory;
import org.springframework.stereotype.Component;

@Component
public class CustomizationBean implements WebServerFactoryCustomizer<ConfigurableServletWebServerFactory> {

    @Override
    public void customize(ConfigurableServletWebServerFactory server) {
        server.setPort(9000);
    }

}")
docker 使用教程4-(Docker创建Java容器运行SpringBoot项目)
上一篇
本篇介绍如何使用docker创建Java容器运行SpringBoot项目
大部分教程都是使用Dockerfile来创建镜像再去运行,当然这也是一种办法,本篇两种方法都有介绍:
思路1:先拉取java镜像,构建java容器,再把SpringBoot的jar包拷进容器,然后进入容器运行jar包就OK了。
思路2:构建DockerFile创建SpringBoot容器运行。
实现方式一
①、拉取镜像
docker pull java:8
②、运行容器
docker run -p 8888:8001 --name java-test -d java:8 tail -f /dev/null
参数解释:
| -p | 端口映射:(主机端口:容器端口) |
| --name | 容器名称(java-test) |
| -d | 后台运行 |
| java:8 | 镜像名称:版本号 |
| tail -f /dev/null | 有事可做(不然运行了就退出了) |
③、拷贝 jar 包到容器内部
1、先下载SpringBoot项目jar包
jar包下载地址:https://gitee.com/cnetopro/springboot-dcoker
2、通过Xftp或者其他软件把 springboot-0.0.1-SNAPSHOT.jar 传输到主机
3、把 springboot-0.0.1-SNAPSHOT.jar 拷贝到容器内部
docker cp /root/springboot-0.0.1-SNAPSHOT.jar 容器ID:/
④、进入容器运行项目
进入容器
docker exec -it 容器ID bash
运行SpringBoot项目
nohup java -jar springboot-0.0.1-SNAPSHOT.jar /dev/null 2>&1 &
参数解释:
| buhup | 谐音no hope,用于后台运行退出不终止项目。 |
| dev/null | 日志输入地址(不保留日志) |
| 2>&1 & | 标准输出 |
查看运行情况
ps -aux|grep java
⑤万事大吉
在浏览器输入 IP:8888 即可看到:
Hello SpringBoot Docker
实现方式二
使用Dockerfile构建SpringBoot项目运行环境
①、拉取镜像
docker pull java:8
②、下载 SpringBoot 项目 jar 包
1、先下载SpringBoot项目jar包
jar包下载地址:https://gitee.com/cnetopro/springboot-dcoker
2、通过Xftp或者其他软件把 springboot-0.0.1-SNAPSHOT.jar 传输到主机
③、创建Dockerfile
vim Dockerfile
内容:
FROM java:8
copY springboot-0.0.1-SNAPSHOT.jar /
CMD java -jar springboot-0.0.1-SNAPSHOT.jar
解释:
| FROM | 基于 java:8镜像创建 |
| copY | 把当前目录的springboot-0.0.1-SNAPSHOT.jar拷贝到容器内的/目录下 |
| CMD | 执行命令java -jar springboot-0.0.1-SNAPSHOT.jar 运行项目 |
④、构建镜像
docker build -t springboot_test .
解释:
|
build -t |
构建镜像名为 springboot_test |
| . | 表示当前目录的Dockerflie文件 |
⑤、运行镜像
docker run -p 8888:8001 --name java-test -d springboot_test
⑥、万事大吉
在浏览器输入 IP:8888 即可看到:
Hello SpringBoot Docker

docker 部署springboot容器日志处理
将jdk和需要的运行的jar构建成镜像之后,运行成容器之后,可以实时的输出日志,但是当容器挂掉之后,日志也便消失不见。在容器中可以运行bash命令的前提下,容器运行的时候会根据jar中配置的日志目录生成相应的日志文件,当容器停止的时候在容器中的所有的东西也会消失不见,查询原因时就会遇到问题。
方式一:
docker logs containerId/containerName
这种方式存在的问题是只能实时输出层,存储的路径在容器内部,容器挂掉之后日志变会消失不见。这种方式存在的问题是只能实时输出层,存储的路径在容器内部,容器挂掉之后日志变会消失不见。
方式二:
数据卷的方式
docker run -d -v /home/vincent/logs/:/logs/ -p 8081:8080 txxs/springboot前边的是宿主机中日志的目录,后边是容器中日志文件的输出目录,指定暴露的端口号是8081。
这样就可以在外部docker的宿主机上看到日志,但是问题是再次启动镜像的时候日志会怎么办呢,这时候并不会重新新建文件而是直接在原文件的末尾添加,也就是这两个容器的日志文件合并为同一个。改变的办法可以很简单,虽然镜像都是一样的,但是可以动态的生成日志文件的名字,这样在启动镜像的时候因为日志文件的名字不同,也就不存在上边的问题了。具体日志文件的名字可以使用时间或者IP+序号的方式进行拼接。
今天关于使用属性server.port = 0运行spock测试时如何查找Spring Boot容器的端口和springboot从配置中心获取属性文件的讲解已经结束,谢谢您的阅读,如果想了解更多关于17. Spring Boot 配置嵌入式Servlet容器、4、SpringBoot嵌入式Servlet容器、docker 使用教程4-(Docker创建Java容器运行SpringBoot项目)、docker 部署springboot容器日志处理的相关知识,请在本站搜索。
本文标签:


