针对phpLinux下的环境安装包括docker下安装php-fpmnginx和linux系统安装php环境这两个问题,本篇文章进行了详细的解答,同时本文还将给你拓展/usr/local/php-5.
针对php Linux 下的环境安装 包括 docker 下安装 php-fpm nginx和linux系统安装php环境这两个问题,本篇文章进行了详细的解答,同时本文还将给你拓展/usr/local/php-5.2.14/sbin/php-fpm start Starting php_fpm ?fpm-config的错误解决、12.13 Nginx 防盗链 12.14 Nginx 访问控制 12.15 Nginx 解析 php 相关配置 12.16 Nginx 代理、12.21 php-fpm 的 pool 12.22 php-fpm 慢执行日志 12.23 open_basedir 12.24 php-fpm 进程管理、6 月 11 日任务 Nginx 防盗链、Nginx 访问控制、Nginx 解析 php 相关配置、Nginx 代理等相关知识,希望可以帮助到你。
本文目录一览:- php Linux 下的环境安装 包括 docker 下安装 php-fpm nginx(linux系统安装php环境)
- /usr/local/php-5.2.14/sbin/php-fpm start Starting php_fpm ?fpm-config的错误解决
- 12.13 Nginx 防盗链 12.14 Nginx 访问控制 12.15 Nginx 解析 php 相关配置 12.16 Nginx 代理
- 12.21 php-fpm 的 pool 12.22 php-fpm 慢执行日志 12.23 open_basedir 12.24 php-fpm 进程管理
- 6 月 11 日任务 Nginx 防盗链、Nginx 访问控制、Nginx 解析 php 相关配置、Nginx 代理
")
php Linux 下的环境安装 包括 docker 下安装 php-fpm nginx(linux系统安装php环境)
参考 地址:
https://github.com/lmxdawn/PH...
https://segmentfault.com/a/11...
后面持续更新
Linux下php环境安装,这里仅供自己参考
安装Apache 使用yum安装
- yum install httpd -y
安装iptables 防火墙 使用yum安装
- yum install iptables -y 客户端
- yum install iptables-service -y 服务器端
安装php5.6 因为考虑到yum安装版本太低 用源码安装
下载源码编译文件
* wget http://mirrors.sohu.com/php/php-5.6.9.tar.xz (这里用的是搜狐的镜像文件)解压
* tar xf php-5.6.9.tar.xz安装c编译库
* yum install gcc gcc-c++ -y安装php依赖的包
* cd php-5.6.9
* ./configure --prefix=/usr/local/php --with-config-file-path=/usr/local/php/etc --enable-fpm --enable-pcntl --enable-mysqlnd --enable-opcache --enable-sockets --enable-sysvmsg --enable-sysvsem  --enable-sysvshm --enable-shmop --enable-zip --enable-ftp --enable-soap --enable-xml --enable-mbstring --disable-rpath --disable-debug --disable-fileinfo --with-mysql --with-mysqli --with-pdo-mysql --with-pcre-regex --with-iconv --with-zlib --with-mcrypt --with-gd --with-jpeg-dir --with-freetype-dir=/usr/local/freetype --with-openssl --with-mhash --with-xmlrpc --with-curl --with-imap-ssl

如果报错 configure: error: xml2-config not found. Please check your libxml2 installation.
需要安装 libxml2
* yum install libxml2 -y
* yum install libxml2-devel -y
重新执行 php依赖包

再次报错 configure: error: Cannot find OpenSSL''s <evp.h>
需要安装 openssl
* yum install openssl openssl-devel -y
重新执行 php依赖包

再次报错 configure: error: Please reinstall the libcurl distribution -easy.h should be in <curl-dir>/include/curl/
curl的dev包没有安装
* yum install libcurl-devel -y
重新执行 php依赖包

再次报错 configure: error: png.h not found.
* yum install libpng-devel -y
重新执行 php依赖包

再次报错configure: error: mcrypt.h not found. Please reinstall libmcrypt.
* yum install libmcrypt-devel -y
重新执行 php依赖包

基本不报错了 但是还可以在安装一些
* yum install libjpeg-devel freetype-devel -y
重新执行 php依赖包

也可以一次性安装全部需要的扩展 (注意用这个将意味着上面的报错会不存在)
* yum install libxml2 libxml2-devel openssl openssl-devel libcurl-devel libpng-devel libmcrypt-devel libjpeg-devel freetype-devel -y
重新执行 php依赖包
直到出现
Thank you for using PHP.
config.status: creating php5.spec
config.status: creating main/build-defs.h
config.status: creating scripts/phpize
config.status: creating scripts/man1/phpize.1
config.status: creating scripts/php-config
config.status: creating scripts/man1/php-config.1
config.status: creating sapi/cli/php.1
config.status: creating sapi/fpm/php-fpm.conf
config.status: creating sapi/fpm/init.d.php-fpm
config.status: creating sapi/fpm/php-fpm.service
config.status: creating sapi/fpm/php-fpm.8
config.status: creating sapi/fpm/status.html
config.status: creating sapi/cgi/php-cgi.1
config.status: creating ext/phar/phar.1
config.status: creating ext/phar/phar.phar.1
config.status: creating main/php_config.h
config.status: main/php_config.h is unchanged
config.status: executing default commands
总算成功
开始安装
* make
出现这个 Don''t forget to run ''make test''. 没什么问题
* make install
完成安装
下一步 把php的配置文件修改到 安装目录下面 并且修改名称为php.ini
* cp php.ini-production /usr/local/php/etc/php.ini
当我们使用nginx还要把php-fpm.conf复制到/usr/local/php/etc/里头
* cp /root/php-5.6.9/sapi/fpm/php-fpm.conf /usr/local/php/etc/php-fpm.conf
将php-fpm作为server服务 (/root/php-5.6.9/是php的源码编译后的文件夹)
* cp /root/php-5.6.9/sapi/fpm/init.d.php-fpm /etc/init.d/php-fpm
设置权限,并添加服务
* chmod +x /etc/init.d/php-fpm
* chkconfig --add php-fpm
以后可以使用如下命令管理php-fpm了
* service php-fpm start
* service php-fpm stop
* service php-fpm restart
* service php-fpm reload
后面有报错直接 killall php-fpm (killall 杀死进程命令)
为了方便把php设置成为全局变量
方法:
全局的:
cd / 到这个目录编辑/etc/profile文件
* cd /
* cd /etc
* vim profile
加上
PATH=/usr/local/php/bin:$PATH
export PATH
保存退出
执行
* source /etc/profile
局部的:
* cd /
* cd /home/
* cd /lmx/ (这是例子 lmx 是你的用户名)
* ls -a 查看所有文件,包含隐藏的文件
* vim bash_profile (这个是局部的,)
加上
source /etc/profile
保存退出
执行
* source .bash_profile
就OK了
对了还有一个
设置时区:
修改php.ini 文件 中的 ;date.timezone = 为 date.timezone = PRC 中国时区
Nginx 安装
安装依赖
- yum install pcre-devel -y
- yum install zlib-devel -y
下载源码包
- cd /usr/local/src
- wget http://nginx.org/download/ngi...
- tar zxvf nginx-1.10.2.tar.gz
- cd nginx-1.10.2
- ./configure --prefix=/usr/local/nginx
-
make && make install
启动nginx- /usr/local/nginx/sbin/nginx
然后访问这个IP可以看到nginx的欢迎界面
- /usr/local/nginx/sbin/nginx
配置nginx支持php
- cd /usr/local/nginx/conf
- vim nginx.conf
- set nu (显示行号)
大约 64行
因为用thinkPHP5.0 所有用文档上面提供的nginx配置
注意:
fastcgi_param SCRIPT_FILENAME
这里后面的去掉 加上:
    * $document_root$fastcgi_script_name
保存后
查看进程
* ps -A | grep nginx杀死进程
* killall nginx启动nginx
* /usr/local/nginx/sbin/nginx
Nginx 配置虚拟主机
- cd /usr/local/nginx/conf
- vim nginx.conf
添加对应的:
server {
    listen 80;
    server_name xxx.com;
    root   "/var/www/xxx.com/xxx/public";
    location / {
       if (!-e $request_filename) {
          rewrite  ^(.*)$  /index.php?s=/$1  last;
          break;
        }
        index  index.html index.htm index.php l.php;
       autoindex  off;
    }

    #error_page  404              /404.html;

    # redirect server error pages to the static page /50x.html
    #
    error_page   500 502 503 504  /50x.html;
    location = /50x.html {
        root   html;
    }

    # proxy the PHP scripts to Apache listening on 127.0.0.1:80
    #
    #location ~ \.php$ {
    #    proxy_pass   http://127.0.0.1;
    #}

    # pass the PHP scripts to FastCGI server listening on 127.0.0.1:9000
    #
    location ~ \.php(.*)$  {
        fastcgi_pass   127.0.0.1:9000;
        fastcgi_index  index.php;
        fastcgi_split_path_info  ^((?U).+\.php)(/?.+)$;
        fastcgi_param  SCRIPT_FILENAME  $document_root$fastcgi_script_name;
        fastcgi_param  PATH_INFO  $fastcgi_path_info;
        fastcgi_param  PATH_TRANSLATED  $document_root$fastcgi_path_info;
        include        fastcgi_params;
    }

    location ~\.(jpg|jpeg|png|js|css) {
        expires 30d;
    }

}
MySQL 的安装
使用下面的命令检查是否安装有MySQL Server
* rpm -qa | grep mysql
有的话通过下面的命令来卸载掉
* rpm -e mysql   //普通删除模式
* rpm -e --nodeps mysql    // 强力删除模式,如果使用上面命令删除时,提示有依赖的其它文件,则用该命令可以对其进行强力删除
安装编译源码所需的工具和库
* yum -y install gcc gcc-c++ gcc-g77 autoconf automake zlib* fiex* libxml* ncurses-devel libmcrypt* libtool-ltdl-devel* make cmake
添加用户
* groupadd mysql
* useradd -r -g mysql mysql
编译安装
* cd /usr/local/src
* wget http://mirrors.sohu.com/mysql/MySQL-5.6/mysql-5.6.34.tar.gz
* tar -zxvf mysql-5.6.34.tar.gz
* cd mysql-5.6.34
编译参数:
* cmake  -DCMAKE_INSTALL_PREFIX=/usr/local/mysql -DMYSQL_DATADIR=/usr/local/mysql/data -DSYSCONFDIR=/etc -DWITH_MYISAM_STORAGE_ENGINE=1 -DWITH_INNOBASE_STORAGE_ENGINE=1 -DWITH_MEMORY_STORAGE_ENGINE=1 -DWITH_READLINE=1 -DMYSQL_UNIX_ADDR=/tmp/mysqld.sock -DMYSQL_TCP_PORT=3306 -DENABLED_LOCAL_INFILE=1 -DWITH_PARTITION_STORAGE_ENGINE=1 -DEXTRA_CHARSETS=all -DDEFAULT_CHARSET=utf8  -DDEFAULT_COLLATION=utf8_general_ci

          配置的注释:

          -DCMAKE_INSTALL_PREFIX=/usr/local/mysql          \    #安装路径

          -DMYSQL_DATADIR=/usr/local/mysql/data            \    #数据文件存放位置

          -DSYSCONFDIR=/etc                                \    #my.cnf路径

          -DWITH_MYISAM_STORAGE_ENGINE=1                   \    #支持MyIASM引擎

          -DWITH_INNOBASE_STORAGE_ENGINE=1                 \    #支持InnoDB引擎

          -DWITH_MEMORY_STORAGE_ENGINE=1                   \    #支持Memory引擎

          -DWITH_READLINE=1                                \    #快捷键功能(我没用过)

          -DMYSQL_UNIX_ADDR=/tmp/mysqld.sock               \    #连接数据库socket路径

          -DMYSQL_TCP_PORT=3306                            \    #端口

          -DENABLED_LOCAL_INFILE=1                         \    #允许从本地导入数据

          -DWITH_PARTITION_STORAGE_ENGINE=1                \    #安装支持数据库分区

          -DEXTRA_CHARSETS=all                             \    #安装所有的字符集

          -DDEFAULT_CHARSET=utf8                           \    #默认字符

          -DDEFAULT_COLLATION=utf8_general_ci

编译的参数可以参考http://dev.mysql.com/doc/refman/5.6/en/source-configuration-options.html

* make && make install
改变目录所有者
* chown -R mysql:mysql /usr/local/mysql
注:在启动MySQL服务时,会按照一定次序搜索my.cnf,先在/etc目录下找,找不到则会搜索"$basedir/my.cnf",在本例中就是 /usr/local/mysql/my.cnf,这是新版MySQL的配置文件的默认位置!
注意:在CentOS 6.4版操作系统的最小安装完成后,在/etc目录下会存在一个my.cnf,需要将此文件更名为其他的名字,如:/etc/my.cnf.bak,否则,该文件会干扰源码安装的MySQL的正确配置,造成无法启动。
在使用"yum update"更新系统后,需要检查下/etc目录下是否会多出一个my.cnf,如果多出,将它重命名成别的。否则,MySQL将使用这个配置文件启动,可能造成无法正常启动等问题。
进入安装路径
* cd /usr/local/mysql
注册为服务
* cd /usr/local/mysql/support-files
#注册服务
* cp mysql.server /etc/rc.d/init.d/mysql
#使用默认配置文件
* cp my-default.cnf /etc/my.cnf
#让chkconfig管理mysql服务
* chkconfig --add mysql
#开机启动
* chkconfig mysql on
初始化数据库
* cd /usr/local/mysql/scripts
* ./mysql_install_db --user=mysql --basedir=/usr/local/mysql --datadir=/usr/local/mysql/data
启动MySQL服务
* service mysql start
配置用户
MySQL启动成功后,root默认没有密码,我们需要设置root密码。

设置之前,我们需要先设置PATH,要不不能直接调用mysql

修改/etc/profile文件,在文件末尾添加

PATH=/usr/local/mysql/bin:$PATH
export PATH

关闭文件,运行下面的命令,让配置立即生效

* source /etc/profile

现在,我们可以在终端内直接输入mysql进入,mysql的环境了

执行下面的命令修改root密码
mysql -uroot
mysql> SET PASSWORD = PASSWORD(''123456'');

配置远程访问权限
GRANT ALL PRIVILEGES ON *.* TO ''root''@''%'' IDENTIFIED BY ''123456'' WITH GRANT OPTION;
改变编码,防止乱码

SHOW VARIABLES LIKE ''character%''

修改mysql的my.cnf文件

[client]
default-character-set=utf8

[mysqld]
character-set-server=utf8

[mysql]
default-character-set=utf8
下面来介绍 Docker 配置 php-fpm + nginx
简介 : 这个自行百度
Docker 的安装 (这里 介绍CentOS 7 )
参照 菜鸟教程 http://www.runoob.com/docker/...
- uname -r 3.10.0-327.el7.x86_64 查看版本
- yum -y install docker 这里 直接yum 安装,
- service docker start 启动
这一步很关键 (配置 Docker 加速器) 不配置基本下载不了,墙的厉害
进入 https://dashboard.daocloud.io/ 先注册一个账号,没收费, 然后登陆后 进入个人中心,里面有 加速器,点击进入就好,然后就自己看了
这里附上我的
* curl -sSL https://get.daocloud.io/daotools/set_mirror.sh | sh -s http://2327ed6d.m.daocloud.io
每个人的都不一样,
php-fpm 安装
参照菜鸟教程 http://www.runoob.com/docker/...
先切换盘
* cd 切换到 root

* mkdir -p ~/php-fpm/logs ~/php-fpm/conf  创建php-fpm文件夹,这随自己意
* mkdir -p ~/nginx/www ~/nginx/logs ~/nginx/conf 创建 nginx 文件夹
查找Docker Hub上的php镜像
* docker search php
这里我用,标签为5.6-fpm 5.6版本的
* docker pull php:5.6-fpm
创建完成后,我们可以在本地的镜像列表里查找到刚刚创建的镜像
* docker images
运行容器
* docker run -p 9000:9000 --name myphp-fpm -v ~/nginx/www:/www -v ~/php-fpm/conf:/usr/local/etc/php -v ~/php-fpm/logs:/phplogs -d php:5.6-fpm
命令说明:
-p 9000:9000 :将容器的9000端口映射到主机的9000端口

--name myphp-fpm :将容器命名为myphp-fpm

-v ~/nginx/www:/www :将主机中~/nginx/www挂载到容器的/www (这里注意 等会配置nginx 的 fastcgi_param SCRIPT_FILENAME $document_root$fastcgi_script_name; 要用这个 /www 替换 $document_root)

-v ~/php-fpm/conf:/usr/local/etc/php :将主机中~/php-fpm/conf目录挂载到容器的/usr/local/etc/php

-v ~/php-fpm/logs:/phplogs :将主机中~/php-fpm/logs目录挂载到容器的/phplogs
查看 容器是否启动
* docker ps 如果这里没有 证明启动有误,使用 docker ps -a 查看所有 看运行状态 没有 up 多少时间 就证明失败
失败就要先清除
* docker rm -f $(docker ps -a -q) 删除所有容器 ($(docker ps -a -q) 这里可以用 id 或者 容器名称)
成功 可以查看进入容器查看 进入后就跟Linux 操作一样了
* docker exec -it myphp-fpm bash 进入容器 myphp-fpm 这个是容器名
查看所有容器的IP (这个也很重要 因为等会 配置 nginx 的时候会用到 fastcgi_pass 172.17.0.3:9000;) 172.17.0.3 是我这里的IP 9000 是刚刚启动php-fpm时候的端口号
* docker inspect --format=''{{.NetworkSettings.IPAddress}}'' 容器id ($(docker ps -a -q) 代表所有)
接下来安装 nginx
参照 菜鸟教程 http://www.runoob.com/docker/...
查找Docker Hub上的nginx镜像
* docker search nginx
这里我拉取官方的镜像
* docker pull nginx
创建完成后,我们可以在本地的镜像列表里查找到刚刚创建的镜像
* docker images
使用nginx镜像 运行容器 (运行前 先配置好配置变量)
进入 配置文件
    * cd ~/nginx/conf
    * mkdir conf.d  创建配置文件夹 (这里 nginx 一般的配置文件是 /etc/nginx/nginx.conf  但是我们不用 直接配置虚拟机 所有在 conf 下面创建 conf.d)
    * cd conf.d 进入配置文件
    * vi default.conf (这里对应 nginx 容器里面的 /etc/nginx/conf.d 里面的 default.conf 文件)

    default.conf 内容如下:
        server {
            listen       80;
            server_name  www.yuxin.com; #这里是我自己的域名

            location / {
                root   /usr/share/nginx/html; #这个是nginx 默认的静态文件路径 等会运行的时候会挂载到 这个文件夹 如果你挂载到其它文件夹自行调整
                index  index.html index.htm;
                #框架路由设置 这里我是 tp 框架 谁说tp 不好, 之前一直用 YII2 框架 ,谁好谁坏 就不说了,
                if ( !-e $request_filename ) {
                    rewrite ^(.*)$ /index.php?url=$1 last;
                    break;
                }
            }

            error_page   500 502 503 504  /50x.html;
            location = /50x.html {
                root   /usr/share/nginx/html;
            }

            location ~ \.php$ {
                fastcgi_pass   172.17.0.3:9000; #这里的 172.17.0.3 就是 刚刚 myphp-fpm 容器的IP
                fastcgi_index  index.php;
                fastcgi_param  SCRIPT_FILENAME  /www$fastcgi_script_name; #这里的 /www 就是刚刚运行 myphp-fpm 的时候 挂载的 文件
                include        fastcgi_params;
            }
        }
运行容器:
* docker run -p 80:80 --name mynginx -v ~/nginx/www:/usr/share/nginx/html -v ~/nginx/conf/conf.d:/etc/nginx/conf.d -v ~/nginx/logs:/wwwlogs  -d nginx

命令说明:

    -p 80:80:将容器的80端口映射到主机的80端口

    --name mynginx:将容器命名为mynginx

    -v ~/nginx/www:/usr/share/nginx/html:将主机中~/nginx/www挂载到容器的/usr/share/nginx/html

    -v ~/nginx/conf/conf.d:/etc/nginx/conf.d:将主机中~/nginx/conf.d挂载到容器的/etc/nginx/conf.d

    -v ~/nginx/logs:/wwwlogs:将主机中~/nginx/logs挂载到容器的/wwwlogs
这里再次说明一下 这个挂载是这么操作的 /usr/share/nginx/html 是容器 mynginx 的默认静态文件存放路径,我在 配置文件中 配置了 root /usr/share/nginx/html 如果配置的其它目录自行更改
上面 运行 php-fpm 的时候 挂载的 /www 就是把 myphp-fpm 这个容器中的 /www 目录挂载到 当前主机的 ~/nginx/www 下,就是说两个容器的 都挂载到 ~/nginx/www 下, 这里配置错了运行php文件会直接 下载 或者 报错 file not found 意思就是 fastcgi_param SCRIPT_FILENAME /www$fastcgi_script_name; 这里有问题
查看 状态
* docker ps
一切 OK 后
测试 结果
* cd ~/nginx/www

* vi index.html

内容 : <html><body><h1>Hello World</h1></body></html>

* vi phpinfo.php

内容 : <?php phpinfo();

访问 http://你的ip或者域名
    http://你的ip或者域名/phpinfo.php
你会发现 phpinfo 会有警告 date_default_timezone_set 没有设置
这里因为 myphp-fpm 容器的配置文件 挂载到 当前主机的 ~/php-fpm/conf 目录了 直接加上配置文件 即可
- cd ~/php-fpm/conf
- vi php.ini
加入 : date.timezone = PRC # 设置时区 PRC 就是中国
但是注意 还是要重新运行 myphp-fpm 容器
* docker restart myphp-fpm
大功告成,有什么问题欢迎讨论
后面会附上 redis MySQL 的基本安装

/usr/local/php-5.2.14/sbin/php-fpm start Starting php_fpm ?fpm-config的错误解决
1.将fpm打包放到php源代码中
gzip -cd php-5.2.8-fpm-0.5.10.diff.gz | patch -d php-5.2.8 -p1
2.编译安装php 记得带上
?enable-cgi ?enable-fpm 两个参数哦。
遇到以下问题: 问题1,接以下参数编译时,
./configure  ?
prefix=/usr/local/php-5.2.14  ?
with-config-file-path=/usr/local/php-5.2.14/etc ?
enable-fastcgi ?with-mysql ?with-mysqli=/usr/lib/mysql/mysql_config -with-freetype-dir ?
with-jpeg-dir ?with-png-dir ?with-zlib ?with-libxml-dir ?enable-xml ?with-curl ?
enable-force-cgi-redirect ?enable-mbstring ?with-mcrypt make
的时候出现以下错误, /usr/bin/ld: cannot find -lltdl collect2: ld returned 1 exit status make: *** [sapi/cgi/php-cgi] 错误 1
解决方法: 去掉这个参数?with-mcrypt 或者 安装 mcrypt包。 这个包主要用于加密。
立即学习“PHP免费学习笔记(深入)”;
遇到问题: 问题2
/usr/local/php-5.2.14/sbin/php-fpm start
Starting php_fpm ?fpm-config /usr/local/php-5.2.14/etc/php-fpm.conf
Error in argument 1, char 1: no argument for option -
Usage: php-cgi [-q] [-h] [-s] [-v] [-i] [-f
…
解决方案:
重装编译安装php
参数如下
./configure ?prefix=/usr/local/php-5.2.14 ?with-mysql ?with-mysqli=/usr/lib/mysql/mysql_config ?
with-freetype-dir ?with-jpeg-dir ?with-png-dir -with-zlib ?enable-xml ?disable-rpath ?enable-discard-path ?
enable-safe-mode ?enable-bcmath ?enable-shmop ?enable-sysvsem ?enable-inline-optimization ?with-curl ?
with-curlwrappers ?enable-mbregex ?enable-fastcgi ?enable-fpm ?enable-force-cgi-redirect ?enable-mbstring ?
with-gd ?enable-gd-native-ttf ?with-openssl ?with-mhash ?enable-pcntl ?enable-sockets ?with-ldap ?
with-ldap-sasl
以上就是/usr/local/php-5.2.14/sbin/php-fpm start Starting php_fpm ?fpm-config的错误解决的内容。

12.13 Nginx 防盗链 12.14 Nginx 访问控制 12.15 Nginx 解析 php 相关配置 12.16 Nginx 代理
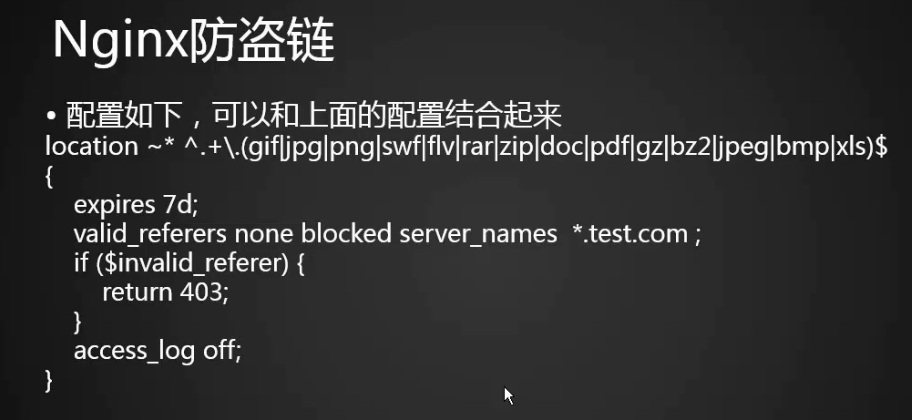
12.13 Nginx 防盗链
因为该配置也使用 location 板块,所以本节可结合日志管理(不记录和过期时间)一起配置:
[root@cham002 ~]# vim /usr/local/nginx/conf/vhost/test.com.conf

location ~* ^.+\.(gif|jpg|png|swf|flv|rar|zip|doc|pdf|gz|bz2|jpeg|bmp|xls)$
{
    expires 7d;
    valid_referers none blocked server_names  *.test.com ;
#定义referer白名单
    if ($invalid_referer) {
        return 403;
#if函数的意思是:如果不是白名单内的域名,返回值:403
    }
    access_log off;
}
说明: “location ~* ^.+” 在此 0“ * ” 的作用是后面匹配的内容不区分大小写。
检测及测试
[root@cham002 ~]# /usr/local/nginx/sbin/nginx -t
nginx: the configuration file /usr/local/nginx/conf/nginx.conf syntax is ok
nginx: configuration file /usr/local/nginx/conf/nginx.conf test is successful
[root@cham002 ~]# /usr/local/nginx/sbin/nginx -s reload
[root@cham002 ~]# ls /data/wwwroot/test.com/
1.gif  2.js  admin  index.html
[root@cham002 ~]# curl -e "http://www.baidu.com/1.txt" -x127.0.0.1:80 -I test.com/1.gif
HTTP/1.1 403 Forbidden
Server: nginx/1.12.1
Date: Wed, 03 Jan 2018 13:54:39 GMT
Content-Type: text/html
Content-Length: 169
Connection: keep-alive

[root@cham002 ~]# curl -e "http://www.test.com/1.txt" -x127.0.0.1:80 -I test.com/1.gif
HTTP/1.1 200 OK
Server: nginx/1.12.1
Date: Wed, 03 Jan 2018 13:55:14 GMT
Content-Type: image/gif
Content-Length: 32
Last-Modified: Wed, 03 Jan 2018 13:34:18 GMT
Connection: keep-alive
ETag: "5a4cdbda-20"
Expires: Wed, 10 Jan 2018 13:55:14 GMT
Cache-Control: max-age=604800
Accept-Ranges: bytes
即,使用非白名单内的 referer 进行访问,被拒绝!!!
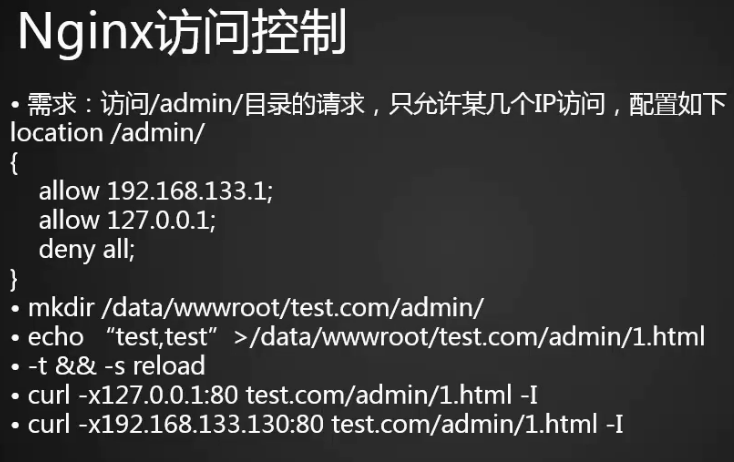
12.14 Nginx 访问控制
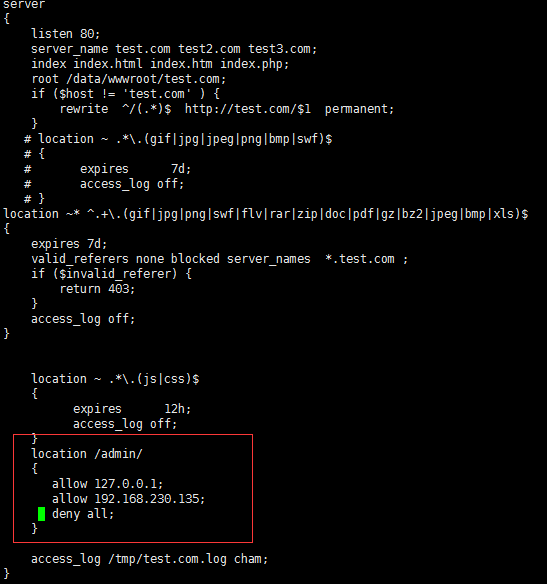
需求:访问 /admin/ 目录的请求,只允许几个指定 IP 通过,配置如下:
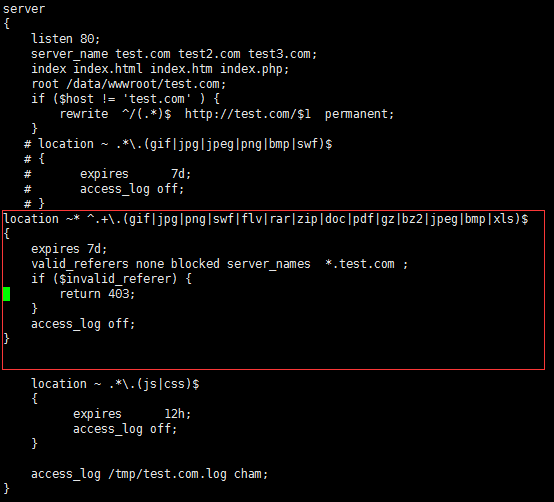
[root@cham002 ~]# vim /usr/local/nginx/conf/vhost/test.com.conf
server
{
    listen 80;
    server_name test.com test2.com test3.com;
    index index.html index.htm index.php;
    root /data/wwwroot/test.com;
    if ($host != ''test.com'' ) {
        rewrite  ^/(.*)$  http://test.com/$1  permanent;
    }
   # location ~ .*\.(gif|jpg|jpeg|png|bmp|swf)$
   # {
   #       expires      7d;
   #       access_log off;
   # }
location ~* ^.+\.(gif|jpg|png|swf|flv|rar|zip|doc|pdf|gz|bz2|jpeg|bmp|xls)$
{
    expires 7d;
    valid_referers none blocked server_names  *.test.com ;
    if ($invalid_referer) {
        return 403;
    }
    access_log off;
}


    location ~ .*\.(js|css)$
    {
          expires      12h;
          access_log off;
    }
    location /admin/
    {
       allow 127.0.0.1;
       allow 192.168.230.135;
       deny all;
#设置IP白名单
    }

    access_log /tmp/test.com.log cham;
}


[root@cham002 ~]# /usr/local/nginx/sbin/nginx -t
nginx: the configuration file /usr/local/nginx/conf/nginx.conf syntax is ok
nginx: configuration file /usr/local/nginx/conf/nginx.conf test is successful

[root@cham002 ~]# /usr/local/nginx/sbin/nginx -s reload
测试 (针对目录的)
[root@cham002 ~]# curl -e "http://www.baidu.com/1.txt" -x127.0.0.1:80 -I test.com/admin/
HTTP/1.1 200 OK
Server: nginx/1.12.1
Date: Thu, 04 Jan 2018 07:59:16 GMT
Content-Type: text/html
Content-Length: 20
Last-Modified: Wed, 03 Jan 2018 08:50:53 GMT
Connection: keep-alive
ETag: "5a4c996d-14"
Accept-Ranges: bytes

[root@cham002 ~]# curl -x192.168.230.150:80 -I test.com/admin/
HTTP/1.1 200 OK
Server: nginx/1.12.1
Date: Thu, 04 Jan 2018 08:01:00 GMT
Content-Type: text/html
Content-Length: 20
Last-Modified: Wed, 03 Jan 2018 08:50:53 GMT
Connection: keep-alive
ETag: "5a4c996d-14"
Accept-Ranges: bytes

[root@cham002 ~]# curl -x192.168.230.135:80 -I test.com/admin/
HTTP/1.1 200 OK
Server: nginx/1.12.1
Date: Thu, 04 Jan 2018 08:01:14 GMT
Content-Type: text/html
Content-Length: 20
Last-Modified: Wed, 03 Jan 2018 08:50:53 GMT
Connection: keep-alive
ETag: "5a4c996d-14"
Accept-Ranges: bytes

[root@cham002 ~]# cat /tmp/test.com.log
127.0.0.1 - [03/Jan/2018:21:35:36 +0800] test.com "/index.html" 200 "-" "curl/7.29.0"
127.0.0.1 - [04/Jan/2018:15:59:16 +0800] test.com "/admin/" 200 "http://www.baidu.com/1.txt" "curl/7.29.0"
192.168.230.135 - [04/Jan/2018:16:01:00 +0800] test.com "/admin/" 200 "-" "curl/7.29.0"
192.168.230.135 - [04/Jan/2018:16:01:14 +0800] test.com "/admin/" 200 "-" "curl/7.29.0"
[root@cham002 ~]# curl -x192.168.230.150:80 -I test.com/admin/
HTTP/1.1 200 OK
Server: nginx/1.12.1
Date: Thu, 04 Jan 2018 08:01:37 GMT
Content-Type: text/html
Content-Length: 20
Last-Modified: Wed, 03 Jan 2018 08:50:53 GMT
Connection: keep-alive
ETag: "5a4c996d-14"
Accept-Ranges: bytes

[root@cham002 ~]# cat /tmp/test.com.log
127.0.0.1 - [03/Jan/2018:21:35:36 +0800] test.com "/index.html" 200 "-" "curl/7.29.0"
127.0.0.1 - [04/Jan/2018:15:59:16 +0800] test.com "/admin/" 200 "http://www.baidu.com/1.txt" "curl/7.29.0"
192.168.230.135 - [04/Jan/2018:16:01:00 +0800] test.com "/admin/" 200 "-" "curl/7.29.0"
192.168.230.135 - [04/Jan/2018:16:01:14 +0800] test.com "/admin/" 200 "-" "curl/7.29.0"
192.168.230.135 - [04/Jan/2018:16:01:37 +0800] test.com "/admin/" 200 "-" "curl/7.29.0"

[root@cham002 ~]# ifconfig
ens33: flags=4163<UP,BROADCAST,RUNNING,MULTICAST>  mtu 1500
        inet 192.168.230.135  netmask 255.255.255.0  broadcast 192.168.230.255
        inet6 fe80::6f15:52d3:ebeb:e193  prefixlen 64  scopeid 0x20<link>
        ether 00:0c:29:b6:9f:e3  txqueuelen 1000  (Ethernet)
        RX packets 96831  bytes 41894507 (39.9 MiB)
        RX errors 0  dropped 0  overruns 0  frame 0
        TX packets 60974  bytes 20136998 (19.2 MiB)
        TX errors 0  dropped 0 overruns 0  carrier 0  collisions 0

ens33:0: flags=4163<UP,BROADCAST,RUNNING,MULTICAST>  mtu 1500
        inet 192.168.230.150  netmask 255.255.255.0  broadcast 192.168.230.255
        ether 00:0c:29:b6:9f:e3  txqueuelen 1000  (Ethernet)

ens37: flags=4163<UP,BROADCAST,RUNNING,MULTICAST>  mtu 1500
        inet 192.168.100.1  netmask 255.255.255.0  broadcast 192.168.100.255
        inet6 fe80::1801:cbbb:ebcc:89a3  prefixlen 64  scopeid 0x20<link>
        ether 00:0c:29:b6:9f:ed  txqueuelen 1000  (Ethernet)
        RX packets 3  bytes 746 (746.0 B)
        RX errors 0  dropped 0  overruns 0  frame 0
        TX packets 81  bytes 6462 (6.3 KiB)
        TX errors 0  dropped 0 overruns 0  carrier 0  collisions 0

lo: flags=73<UP,LOOPBACK,RUNNING>  mtu 65536
        inet 127.0.0.1  netmask 255.0.0.0
        inet6 ::1  prefixlen 128  scopeid 0x10<host>
        loop  txqueuelen 1  (Local Loopback)
        RX packets 1363  bytes 1359483 (1.2 MiB)
        RX errors 0  dropped 0  overruns 0  frame 0
        TX packets 1363  bytes 1359483 (1.2 MiB)
        TX errors 0  dropped 0 overruns 0  carrier 0  collisions 0

[root@cham002 ~]# curl -x192.168.100.1:80 test.com/admin/
<html>
<head><title>403 Forbidden</title></head>
<body bgcolor="white">
<center><h1>403 Forbidden</h1></center>
<hr><center>nginx/1.12.1</center>
</body>
</html>

[root@cham002 ~]# cat /tmp/test.com.log
127.0.0.1 - [03/Jan/2018:21:35:36 +0800] test.com "/index.html" 200 "-" "curl/7.29.0"
127.0.0.1 - [04/Jan/2018:15:59:16 +0800] test.com "/admin/" 200 "http://www.baidu.com/1.txt" "curl/7.29.0"
192.168.230.135 - [04/Jan/2018:16:01:00 +0800] test.com "/admin/" 200 "-" "curl/7.29.0"
192.168.230.135 - [04/Jan/2018:16:01:14 +0800] test.com "/admin/" 200 "-" "curl/7.29.0"
192.168.230.135 - [04/Jan/2018:16:01:37 +0800] test.com "/admin/" 200 "-" "curl/7.29.0"
192.168.100.1 - [04/Jan/2018:16:05:14 +0800] test.com "/admin/" 403 "-" "curl/7.29.0
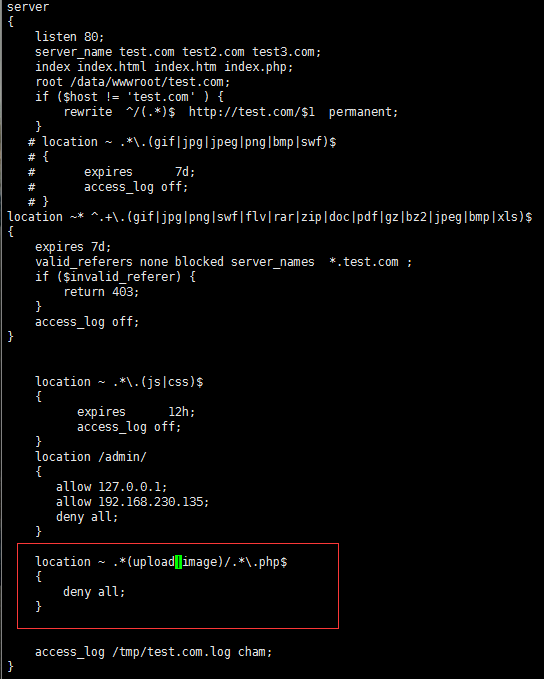
访问控制(针对正则匹配)
[root@cham002 ~]# vim /usr/local/nginx/conf/vhost/test.com.conf
server
{
    listen 80;
    server_name test.com test2.com test3.com;
    index index.html index.htm index.php;
    root /data/wwwroot/test.com;
    if ($host != ''test.com'' ) {
        rewrite  ^/(.*)$  http://test.com/$1  permanent;
    }
   # location ~ .*\.(gif|jpg|jpeg|png|bmp|swf)$
   # {
   #       expires      7d;
   #       access_log off;
   # }
location ~* ^.+\.(gif|jpg|png|swf|flv|rar|zip|doc|pdf|gz|bz2|jpeg|bmp|xls)$
{
    expires 7d;
    valid_referers none blocked server_names  *.test.com ;
    if ($invalid_referer) {
        return 403;
    }
    access_log off;
}


    location ~ .*\.(js|css)$
    {
          expires      12h;
          access_log off;
    }
    location /admin/
    {
       allow 127.0.0.1;
       allow 192.168.230.135;
       deny all;
    }

    location ~ .*(upload|image)/.*\.php$
    {
        deny all;
    }


    access_log /tmp/test.com.log cham;
}

[root@cham002 ~]# /usr/local/nginx/sbin/nginx -t
nginx: the configuration file /usr/local/nginx/conf/nginx.conf syntax is ok
nginx: configuration file /usr/local/nginx/conf/nginx.conf test is successful
[root@cham002 ~]# /usr/local/nginx/sbin/nginx -s reload
[root@cham002 ~]# mkdir /data/wwwroot/test.com/upload
[root@cham002 ~]# echo "11111" > /data/wwwroot/test.com/upload/1.php
测试
[root@cham002 ~]# curl -x127.0.0.1:80 test.com/upload/1.php
<html>
<head><title>403 Forbidden</title></head>
<body bgcolor="white">
<center><h1>403 Forbidden</h1></center>
<hr><center>nginx/1.12.1</center>
</body>
</html>


[root@cham002 ~]# curl -x127.0.0.1:80 test.com/upload/1.txt
11111
看日志
[root@cham002 ~]# cat /tmp/test.com.log
127.0.0.1 - [03/Jan/2018:21:35:36 +0800] test.com "/index.html" 200 "-" "curl/7.29.0"
127.0.0.1 - [04/Jan/2018:15:59:16 +0800] test.com "/admin/" 200 "http://www.baidu.com/1.txt" "curl/7.29.0"
192.168.230.135 - [04/Jan/2018:16:01:00 +0800] test.com "/admin/" 200 "-" "curl/7.29.0"
192.168.230.135 - [04/Jan/2018:16:01:14 +0800] test.com "/admin/" 200 "-" "curl/7.29.0"
192.168.230.135 - [04/Jan/2018:16:01:37 +0800] test.com "/admin/" 200 "-" "curl/7.29.0"
192.168.100.1 - [04/Jan/2018:16:05:14 +0800] test.com "/admin/" 403 "-" "curl/7.29.0"
127.0.0.1 - [04/Jan/2018:16:15:46 +0800] test.com "/upload/1.php" 403 "-" "curl/7.29.0"
127.0.0.1 - [04/Jan/2018:16:16:46 +0800] test.com "/upload/1.txt" 200 "-" "curl/7.29.0"
针对 user_agent 限制

server
{
    listen 80;
    server_name test.com test2.com test3.com;
    index index.html index.htm index.php;
    root /data/wwwroot/test.com;
    if ($host != ''test.com'' ) {
        rewrite  ^/(.*)$  http://test.com/$1  permanent;
    }
   # location ~ .*\.(gif|jpg|jpeg|png|bmp|swf)$
   # {
   #       expires      7d;
   #       access_log off;
   # }
location ~* ^.+\.(gif|jpg|png|swf|flv|rar|zip|doc|pdf|gz|bz2|jpeg|bmp|xls)$
{
    expires 7d;
    valid_referers none blocked server_names  *.test.com ;
    if ($invalid_referer) {
        return 403;
    }
    access_log off;
}


    location ~ .*\.(js|css)$
    {
          expires      12h;
          access_log off;
    }
    location /admin/
    {
       allow 127.0.0.1;
       allow 192.168.230.135;
       deny all;
    }

    location ~ .*(upload|image)/.*\.php$
    {
        deny all;
    }

    if ($http_user_agent ~ ''Spider/3.0|YoudaoBot|Tomato'')
    {
      return 403;
    }


    access_log /tmp/test.com.log cham;
}
[root@cham002 ~]# /usr/local/nginx/sbin/nginx -t
nginx: the configuration file /usr/local/nginx/conf/nginx.conf syntax is ok
nginx: configuration file /usr/local/nginx/conf/nginx.conf test is successful
[root@cham002 ~]# /usr/local/nginx/sbin/nginx -s reload
[root@cham002 ~]# curl -x127.0.0.1:80 test.com/upload/1.txt -I
HTTP/1.1 200 OK
Server: nginx/1.12.1
Date: Thu, 04 Jan 2018 08:22:45 GMT
Content-Type: text/plain
Content-Length: 6
Last-Modified: Thu, 04 Jan 2018 08:16:39 GMT
Connection: keep-alive
ETag: "5a4de2e7-6"
Accept-Ranges: bytes

[root@cham002 ~]# curl -A "Tomatodsfsdf" -x127.0.0.1:80 test.com/upload/1.txt -I
HTTP/1.1 403 Forbidden
Server: nginx/1.12.1
Date: Thu, 04 Jan 2018 08:23:37 GMT
Content-Type: text/html
Content-Length: 169
Connection: keep-alive
说明: deny all 和 return 403 效果一样
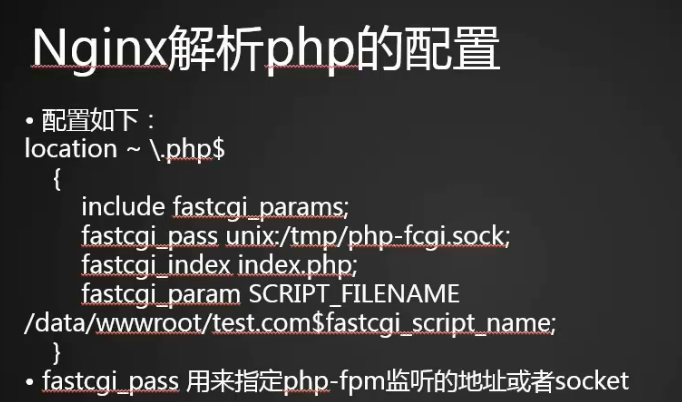
12.15 Nginx 解析 PHP 相关配置
核心配置:
[root@cham002 ~]# vim /usr/local/nginx/conf/vhost/test.com.conf

 location ~ \.php$
    {
        include fastcgi_params;
        #fastcgi_pass unix:/tmp/php-fcgi.sock;
        fastcgi_pass 127.0.0.1:9000;
##fastcgi_pass两种监听格式,但是要保证Nginx和php-fpm中格式一致
        fastcgi_index index.php;
        fastcgi_param SCRIPT_FILENAME /data/wwwroot/test.com$fastcgi_script_name;
    }

[root@cham002 ~]# cat /usr/local/php-fpm/etc/php-fpm.conf
[global]
pid = /usr/local/php-fpm/var/run/php-fpm.pid
error_log = /usr/local/php-fpm/var/log/php-fpm.log
[www]
#listen = /tmp/php-fcgi.sock
listen = 127.0.0.1:9000
listen.mode = 666
user = php-fpm
group = php-fpm
pm = dynamic
pm.max_children = 50
pm.start_servers = 20
pm.min_spare_servers = 5
pm.max_spare_servers = 35
pm.max_requests = 500
rlimit_files = 1024

[root@cham002 ~]# /usr/local/nginx/sbin/nginx -t
nginx: the configuration file /usr/local/nginx/conf/nginx.conf syntax is ok
nginx: configuration file /usr/local/nginx/conf/nginx.conf test is successful
[root@cham002 ~]# /usr/local/nginx/sbin/nginx -s reload
[root@cham002 ~]# /etc/init.d/php-fpm reload
Reload service php-fpm  done

[root@cham002 ~]# curl -x 127.0.0.1:80 test.com/3.php -I
HTTP/1.1 200 OK
Server: nginx/1.12.1
Date: Thu, 04 Jan 2018 10:44:25 GMT
Content-Type: text/html; charset=UTF-8
Connection: keep-alive
X-Powered-By: PHP/5.6.30

注: 在此注意两点,fastcgi_pass 有两种格式,但是无论使用哪种格式都有保证 Nginx 和 php-fpm 中格式一致,否则会报错 502;fastcgi _param SCRIPT _FILENAME 所在行的路径要和 root 路径一致!
12.16 Nginx 代理
Nginx 代理是一种反向代理。反向代理(Reverse Proxy)方式是指以代理服务器来接受 Internet 上的连接请求,然后将请求转发给内部网络上的服务器;并将从服务器上得到的结果返回给 Internet 上请求连接的客户端,此时代理服务器对外就表现为一个服务器。

工作原理
Nginx 代理是在一台代理服务器中自定义一个域名,该域名指向一个 IP,然后将用户的请求通过这台代理服务器访问指定的 IP 所对应的 web 服务器。
graph LR
用户-->代理服务器
代理服务器-->用户
代理服务器-->web服务器
web服务器-->代理服务器
[root@cham002 ~]# cd /usr/local/nginx/conf/vhost
[root@cham002 vhost]# vim proxy.conf
server
{
listen 80;
server_name ask.apelearn.com;
#定义域名(一般和被代理ip的域名保持一致)
location /
{
proxy_pass http://121.201.9.155/;
#指定被代理(被访问)的IP(web服务器IP)
proxy_set_header Host $host;
#$host指的是代理服务器的servername(也是被代理IP的域名)
proxy_set_header X-Real-IP $remote_addr;
proxy_set_header X-Forwarded-For $proxy_add_x_forwarded_for;
}
}说明: 因为该虚拟主机只用作代理服务器,不需要访问本地文件,所以不需要设置根目录。
没有设置代理前
[root@cham002 vhost]# curl -x127.0.0.1:80 ask.apelearn.com/robots.txt
<html>
<head><title>404 Not Found</title></head>
<body bgcolor="white">
<center><h1>404 Not Found</h1></center>
<hr><center>nginx/1.12.1</center>
</body>
</html>
[root@cham002 vhost]#

[root@cham002 vhost]# /usr/local/nginx/sbin/nginx -t
nginx: the configuration file /usr/local/nginx/conf/nginx.conf syntax is ok
nginx: configuration file /usr/local/nginx/conf/nginx.conf test is successful

[root@cham002 vhost]# /usr/local/nginx/sbin/nginx -s reload
设置代理后
[root@cham002 vhost]# curl -x127.0.0.1:80 ask.apelearn.com/robots.txt
#
# robots.txt for MiWen
#

User-agent: *

Disallow: /?/admin/
Disallow: /?/people/
Disallow: /?/question/
Disallow: /account/
Disallow: /app/
Disallow: /cache/
Disallow: /install/
Disallow: /models/
Disallow: /crond/run/
Disallow: /search/
Disallow: /static/
Disallow: /setting/
Disallow: /system/
Disallow: /tmp/
Disallow: /themes/
Disallow: /uploads/
Disallow: /url-*
Disallow: /views/
Disallow: /*/ajax/[root@cham002 vhost]#

12.21 php-fpm 的 pool 12.22 php-fpm 慢执行日志 12.23 open_basedir 12.24 php-fpm 进程管理
12.21 php-fpm 的 pool
每一个站点使用独立的 pool (池子), 好处是当其中一个 php 502 了 (php 资源耗尽了), 也不会影响到其他网站.
vim /usr/local/php-fpm/etc/php-fpm.conf //在[global]部分增加如下, 并删除默认的 www 的pool

include = etc/php-fpm.d/*.conf


/usr/local/php-fpm/sbin/php-fpm -t   //测试php-fpm.conf语法错误

mkdir /usr/local/php-fpm/etc/php-fpm.d/
cd /usr/local/php-fpm/etc/php-fpm.d/

vim www.conf //内容如下

[www]
listen = /tmp/php-fcgi.sock
listen.mode = 666
user = php-fpm
group = php-fpm
pm = dynamic
pm.max_children = 50
pm.start_servers = 20
pm.min_spare_servers = 5
pm.max_spare_servers = 35
pm.max_requests = 500
rlimit_files = 1024

vim test.conf //内容如下
[test]
listen = /tmp/www.sock
listen.mode=666
user = php-fpm
group = php-fpm
pm = dynamic
pm.max_children = 50
pm.start_servers = 20
pm.min_spare_servers = 5
pm.max_spare_servers = 35
pm.max_requests = 500
rlimit_files = 1024
测试:
service php-fpm restart   // 或者 /etc/init.d/php-fpm restart
ps aux | grep php   //可以看到有多个pool
可以把 vim /usr/local/nginx/conf/vhost/test.com.conf 的 sock 给改掉成 test.sock
/usr/local/nginx/sbin/nginx -t && /usr/local/nginx/sbin/nginx -s reload
访问网站 测试是否正确解析 php : http://www.test.com/1.php
12.22 php-fpm 慢执行日志
慢执行日志,我们用来分析 php 网站为什么访问慢
vim /usr/local/php-fpm/etc/php-fpm.d/test.conf //加入如下内容
request_slowlog_timeout = 2    //超过2秒钟,我就要记录日志  一般情况写成2秒, 1秒太短了点
slowlog = /usr/local/php-fpm/var/log/test-slow.log

/usr/local/php-fpm/sbin/php-fpm -t
/etc/init.d/php-fpm reload   //重新加载php 配置文件
看见产生了慢执行日志
 vim /data/wwwroot/test.com/sleep.php//写入如下内容

?php
echo “test slow log”;
sleep(3);
echo “done”;
?>


curl -x127.0.0.1:80 www.test.com/sleep.php   测试报错:


编辑 vim /usr/local/php-fpm/etc/php.ini

打开

/etc/init.d/php-fpm reload

查看到语法错误


修改  vim /data/wwwroot/test.com/sleep.php  // 用英文的双引号和分号

<?php
echo "test slow log";
sleep(3);
echo "done";
?>

 curl -x127.0.0.1:80 www.test.com/sleep.php


 cat /usr/local/php-fpm/var/log/www-slow.log   //查看慢执行日志

会告诉你哪个php文件慢,  而且会告诉你php文件第三行慢
12.23 open_basedir
安全选项 open_basedir, 主要用来定义 限制网站能访问的目录 (限制 php 在指定的目录里活动)
vim /usr/local/php-fpm/etc/php-fpm.d/test.conf //加入如下内容
php_admin_value[open_basedir]=/data/wwwroot/test.com:/tmp

创建测试php脚本,进行测试
etc/init.d/php-fpm restart

curl -x127.0.0.1:80 www.test.com/1.php -I

再次更改test.conf,修改路径,再次测试
故意改错成  php_admin_value[open_basedir]=/data/wwwroot/111test.com:/tmp

配置错误日志
vim /usr/local/php-fpm/etc/php.ini

display_errors=off //是否在页面上显示错误, 如果否, 需定义log_errors
log_errors=on //错误日志是否开启  如果是, 则需定义 log_errors 和  error_log , error_reporting
error_log = /usr/local/php-fpm/var/log/php_errors.log   //定义错误日志的路径
error_reporting=E_ALL & ~E_NOTICE  //错误日志记录的级别, 生产环境用 E_ALL & ~E_NOTICE(阿铭说) , 我看到默认生产环境配置文件 用  E_ALL & ~E_DEPRECATED & ~E_STRICT

创建错误日志文件并设置权限
touch  /usr/local/php-fpm/var/log/php_errors.log
chmod 666   /usr/local/php-fpm/var/log/php_errors.log

/etc/init.d/php-fpm restart

再次测试


查看错误日志

tail -f /usr/local/php-fpm/var/log
12.24 php-fpm 进程管理
/usr/local/php-fpm/etc/php.ini , 注释用;号,用 #号不太对,如;pm = dynamic
动态进程管理,先一开始启动20个进程, 根据需求(访问量)自动生成进程, 服务器闲也会自动销毁,
也可以是static, static只有 pm.max_children有效, start_servers /min_spare_servers /max_spare_servers 都会失效

pm = dynamic  //动态进程管理
pm.max_children = 50 //最大子进程数,ps aux可以查看
pm.start_servers = 20 //启动服务时会启动的进程数
pm.min_spare_servers = 5 //定义在空闲时段,子进程数的最少数量,如果达到这个数值时,php-fpm服务会自动派生新的子进程。
pm.max_spare_servers = 35 //定义在空闲时段,子进程数的最大值,如果高于这个数值就开始清理空闲的子进程。
pm.max_requests = 500  //定义一个子进程最多处理的请求数,也就是说在一个php-fpm的子进程最多可以处理这么多请求,当达到这个数值时,它会自动退出。
rlimit_files = 1024   //设置文件打开描述符的rlimit限制. 默认值: 系统定义值 系统默认可打开句柄是1024,可使用 ulimit -n查看,ulimit -n 2048修改。

6 月 11 日任务 Nginx 防盗链、Nginx 访问控制、Nginx 解析 php 相关配置、Nginx 代理
12.13 Nginx 防盗链
修改配置文件
location ~* ^.+\.(gif|jpg|png|swf|flv|rar|zip|doc|pdf|gz|bz2|jpeg|bmp|xls)$
{
expires 7d;
valid_referers none blocked server_names *.abc.com ;
if ($invalid_referer) {
return 403;
}
access_log off;
}
测试:
curl -e "http://www.abc.com/" -x127.0.0.1:80 -I abc.com/1.jpg
12.14 Nginx 访问控制
修改配置文件
#按目录匹配
location /
{
allow 127.0.0.1;
deny all;
}
#可以匹配正则
location ~ .*(upload|image)/.*\.php$
{
deny all;
}
#根据 user_agent 限制
if ($http_user_agent ~* ''Spider/3.0|YoudaoBot|Tomato'') // 匹配符号后面 +* 忽略大小写
{
return 403;
}
deny all 和 return 403 效果一样
12.15 Nginx 解析 php 相关配置
location ~ \.php$
{
fastcgi_pass 127.0.0.1:9000;
fastcgi_index index.php;
fastcgi_param SCRIPT_FILENAME $document_root$fastcgi_script_name;
include fastcgi_params;
fastcgi_pass 配置对应的参数 是 sock 还是 ip 否则 502 错误
listen.mode = 666 监听 sock 不定义 mode sock 文件权限 440
12.16 Nginx 代理

1. 新建配置文件 proxy.conf
server
{
listen 80;
server_name 111.com; // 本机域名
location /
{
proxy_pass http://106.39.167.118:80/; // 目标服务器
proxy_set_header Host $host;
proxy_set_header X-Real-IP $remote_addr;
proxy_set_header X-Forwarded-For $proxy_add_x_forwarded_for;
}
}
今天关于php Linux 下的环境安装 包括 docker 下安装 php-fpm nginx和linux系统安装php环境的分享就到这里,希望大家有所收获,若想了解更多关于/usr/local/php-5.2.14/sbin/php-fpm start Starting php_fpm ?fpm-config的错误解决、12.13 Nginx 防盗链 12.14 Nginx 访问控制 12.15 Nginx 解析 php 相关配置 12.16 Nginx 代理、12.21 php-fpm 的 pool 12.22 php-fpm 慢执行日志 12.23 open_basedir 12.24 php-fpm 进程管理、6 月 11 日任务 Nginx 防盗链、Nginx 访问控制、Nginx 解析 php 相关配置、Nginx 代理等相关知识,可以在本站进行查询。
本文标签:


