本文将带您了解关于每天学一个Linux命令的新内容,同时我们还将为您解释70:dig的相关知识,另外,我们还将为您提供关于10LinuxDIGCommandExamplesforDNSLookup--
本文将带您了解关于每天学一个 Linux 命令的新内容,同时我们还将为您解释70:dig的相关知识,另外,我们还将为您提供关于10 Linux DIG Command Examples for DNS Lookup--reference、Linux dig 命令、linux dig 命令使用方法、linux shell dig nslookup 指定dns服务器 查询域名解析的实用信息。
本文目录一览:- 每天学一个 Linux 命令(70):dig(linux的dig命令)
- 10 Linux DIG Command Examples for DNS Lookup--reference
- Linux dig 命令
- linux dig 命令使用方法
- linux shell dig nslookup 指定dns服务器 查询域名解析
:dig(linux的dig命令)")
每天学一个 Linux 命令(70):dig(linux的dig命令)
推荐阅读:每天学一个 Linux 命令(69):nslookup
命令简介
dig 命令用于执行网络 DNS 查找。dig 是一个用于查询 DNS 名称服务器的灵活工具。它执行DNS查找并显示从查询的名称服务器返回的答案。
可使用 dig 来解决 DNS 问题,它具有灵活性,易用性和输出清晰度。相比其它工具功能更多、更强大。
语法格式
dig [@server] [-b address] [-c class] [-f filename] [-k filename]
    [-m] [-p port#] [-q name] [-t type] [-x addr] [-y [hmac:]name:ke
选项说明
@<服务器地址>   #指定进行域名解析的域名服务器
-b    #指定使用本机的哪个IP地址向域名服务器发送域名查询请求
-f<文件名称>   #指定dig以批处理的方式运行
-P  #指定域名服务器所使用端口号
-t<类型>  #指定要查询的DNS数据类型
-x  #执行逆向域名查询
-4  #使用IPv4
-6  #使用IPv6
-h  #显示帮助信息
应用举例
实例
[root@CentOS7-1 ~]# dig www.baidu.com
; <<>> DiG 9.11.4-P2-RedHat-9.11.4-26.P2.el7_9.4 <<>> www.baidu.com
;; global options: +cmd
;; Got answer:
;; ->>HEADER<<- opcode: QUERY, status: NOERROR, id: 57747
;; flags: qr rd ra; QUERY: 1, ANSWER: 3, AUTHORITY: 0, ADDITIONAL: 0
;; QUESTION SECTION:
;www.baidu.com.   IN A
;; ANSWER SECTION:
www.baidu.com.  224 IN CNAME www.a.shifen.com.
www.a.shifen.com. 224 IN A 36.152.44.95
www.a.shifen.com. 224 IN A 36.152.44.96
;; Query time: 27 msec
;; SERVER: 223.5.5.5#53(223.5.5.5)
;; WHEN: Sat Mar 13 07:51:28 EST 2021
;; MSG SIZE  rcvd: 90
逆向查询
[root@CentOS7-1 ~]# dig -x wwww.baidu.com
; <<>> DiG 9.11.4-P2-RedHat-9.11.4-26.P2.el7_9.4 <<>> -x wwww.baidu.com
;; global options: +cmd
;; Got answer:
;; ->>HEADER<<- opcode: QUERY, status: NXDOMAIN, id: 7825
;; flags: qr rd ra; QUERY: 1, ANSWER: 0, AUTHORITY: 1, ADDITIONAL: 0
;; QUESTION SECTION:
;com.baidu.wwww.in-addr.arpa. IN PTR
;; AUTHORITY SECTION:
in-addr.arpa.  600 IN SOA b.in-addr-servers.arpa. nstld.iana.org. 2021031279 1800 900 604800 3600
;; Query time: 151 msec
;; SERVER: 223.5.5.5#53(223.5.5.5)
;; WHEN: Sat Mar 13 07:52:54 EST 2021
;; MSG SIZE  rcvd: 113
向指定的DNS服务器查询
[root@CentOS7-1 ~]# dig @8.8.8.8 baidu.com
; <<>> DiG 9.11.4-P2-RedHat-9.11.4-26.P2.el7_9.4 <<>> @8.8.8.8 baidu.com
; (1 server found)
;; global options: +cmd
;; Got answer:
;; ->>HEADER<<- opcode: QUERY, status: NOERROR, id: 20803
;; flags: qr rd ra; QUERY: 1, ANSWER: 2, AUTHORITY: 0, ADDITIONAL: 0
;; QUESTION SECTION:
;baidu.com.   IN A
;; ANSWER SECTION:
baidu.com.  329 IN A 39.156.69.79
baidu.com.  329 IN A 220.181.38.148
;; Query time: 4 msec
;; SERVER: 8.8.8.8#53(8.8.8.8)
;; WHEN: Sat Mar 13 07:55:26 EST 2021
;; MSG SIZE  rcvd: 59
一次查询多少域名,将域名写入文件,然后从文件读取信息。
[root@CentOS7-1 ~]# cat domain_names_file
www.baidu.com
mail.163.com
www.qq.com
www.aliyun.com
www.amazon.com
[root@CentOS7-1 ~]# dig +noall +answer -f domain_names_file
www.baidu.com.  70 IN CNAME www.a.shifen.com.
www.a.shifen.com. 70 IN A 36.152.44.95
www.a.shifen.com. 70 IN A 36.152.44.96
mail.163.com.  117 IN CNAME ntes53.mail.163.com.
ntes53.mail.163.com. 117 IN A 123.126.97.202
www.qq.com.  71 IN CNAME ins-r23tsuuf.ias.tencent-cloud.net.
ins-r23tsuuf.ias.tencent-cloud.net. 71 IN A 183.194.238.19
ins-r23tsuuf.ias.tencent-cloud.net. 71 IN A 183.194.238.117
www.aliyun.com.  44 IN CNAME www-jp-de-intl-adns.aliyun.com.
www-jp-de-intl-adns.aliyun.com. 44 IN CNAME www-jp-de-intl-adns.aliyun.com.gds.alibabadns.com.
www-jp-de-intl-adns.aliyun.com.gds.alibabadns.com. 44 IN CNAME sh.wagbridge.aliyun.aliyun.com.
sh.wagbridge.aliyun.aliyun.com. 44 IN CNAME aliyun-adns.aliyun.com.
aliyun-adns.aliyun.com. 44 IN CNAME aliyun-adns.aliyun.com.gds.alibabadns.com.
aliyun-adns.aliyun.com.gds.alibabadns.com. 44 IN A 106.11.248.144
www.amazon.com.  15 IN CNAME tp.47cf2c8c9-frontier.amazon.com.
tp.47cf2c8c9-frontier.amazon.com. 15 IN CNAME d3ag4hukkh62yn.cloudfront.net.
d3ag4hukkh62yn.cloudfront.net. 15 IN A 13.225.100.223
#+noall(不显示所有内容)和 +answer(仅显示域名服务器的响应内容)
#不使用任何参数,对比一下输出的结果
[root@CentOS7-1 ~]# dig -f domain_names_file
; <<>> DiG 9.11.4-P2-RedHat-9.11.4-26.P2.el7_9.4 <<>> www.baidu.com
;; global options: +cmd
;; Got answer:
;; ->>HEADER<<- opcode: QUERY, status: NOERROR, id: 2834
;; flags: qr rd ra; QUERY: 1, ANSWER: 3, AUTHORITY: 0, ADDITIONAL: 0
;; QUESTION SECTION:
;www.baidu.com.   IN A
;; ANSWER SECTION:
www.baidu.com.  86 IN CNAME www.a.shifen.com.
www.a.shifen.com. 86 IN A 36.152.44.95
www.a.shifen.com. 86 IN A 36.152.44.96
;; Query time: 23 msec
;; SERVER: 223.5.5.5#53(223.5.5.5)
;; WHEN: Sat Mar 13 08:02:46 EST 2021
;; MSG SIZE  rcvd: 90
; <<>> DiG 9.11.4-P2-RedHat-9.11.4-26.P2.el7_9.4 <<>> mail.163.com
;; Got answer:
;; ->>HEADER<<- opcode: QUERY, status: NOERROR, id: 39346
;; flags: qr rd ra; QUERY: 1, ANSWER: 2, AUTHORITY: 0, ADDITIONAL: 0
;; QUESTION SECTION:
;mail.163.com.   IN A
;; ANSWER SECTION:
mail.163.com.  36 IN CNAME ntes53.mail.163.com.
ntes53.mail.163.com. 36 IN A 123.126.97.202
;; Query time: 19 msec
;; SERVER: 223.5.5.5#53(223.5.5.5)
;; WHEN: Sat Mar 13 08:02:46 EST 2021
;; MSG SIZE  rcvd: 67
; <<>> DiG 9.11.4-P2-RedHat-9.11.4-26.P2.el7_9.4 <<>> www.qq.com
;; Got answer:
;; ->>HEADER<<- opcode: QUERY, status: NOERROR, id: 51368
;; flags: qr rd ra; QUERY: 1, ANSWER: 3, AUTHORITY: 0, ADDITIONAL: 0
;; QUESTION SECTION:
;www.qq.com.   IN A
;; ANSWER SECTION:
www.qq.com.  78 IN CNAME ins-r23tsuuf.ias.tencent-cloud.net.
ins-r23tsuuf.ias.tencent-cloud.net. 78 IN A 183.194.238.19
ins-r23tsuuf.ias.tencent-cloud.net. 78 IN A 183.194.238.117
;; Query time: 22 msec
;; SERVER: 223.5.5.5#53(223.5.5.5)
;; WHEN: Sat Mar 13 08:02:46 EST 2021
;; MSG SIZE  rcvd: 108
; <<>> DiG 9.11.4-P2-RedHat-9.11.4-26.P2.el7_9.4 <<>> www.aliyun.com
;; Got answer:
;; ->>HEADER<<- opcode: QUERY, status: NOERROR, id: 5856
;; flags: qr rd ra; QUERY: 1, ANSWER: 6, AUTHORITY: 0, ADDITIONAL: 0
;; QUESTION SECTION:
;www.aliyun.com.   IN A
;; ANSWER SECTION:
www.aliyun.com.  22 IN CNAME www-jp-de-intl-adns.aliyun.com.
www-jp-de-intl-adns.aliyun.com. 22 IN CNAME www-jp-de-intl-adns.aliyun.com.gds.alibabadns.com.
www-jp-de-intl-adns.aliyun.com.gds.alibabadns.com. 22 IN CNAME sh.wagbridge.aliyun.aliyun.com.
sh.wagbridge.aliyun.aliyun.com. 22 IN CNAME aliyun-adns.aliyun.com.
aliyun-adns.aliyun.com. 22 IN CNAME aliyun-adns.aliyun.com.gds.alibabadns.com.
aliyun-adns.aliyun.com.gds.alibabadns.com. 22 IN A 106.11.172.51
;; Query time: 23 msec
;; SERVER: 223.5.5.5#53(223.5.5.5)
;; WHEN: Sat Mar 13 08:02:46 EST 2021
;; MSG SIZE  rcvd: 228
; <<>> DiG 9.11.4-P2-RedHat-9.11.4-26.P2.el7_9.4 <<>> www.amazon.com
;; Got answer:
;; ->>HEADER<<- opcode: QUERY, status: NOERROR, id: 36379
;; flags: qr rd ra; QUERY: 1, ANSWER: 4, AUTHORITY: 0, ADDITIONAL: 0
;; QUESTION SECTION:
;www.amazon.com.   IN A
;; ANSWER SECTION:
www.amazon.com.  26 IN CNAME tp.47cf2c8c9-frontier.amazon.com.
tp.47cf2c8c9-frontier.amazon.com. 26 IN CNAME www.amazon.com.edgekey.net.
www.amazon.com.edgekey.net. 26 IN CNAME e15316.e22.akamaiedge.net.
e15316.e22.akamaiedge.net. 26 IN A 223.119.142.58
;; Query time: 22 msec
;; SERVER: 223.5.5.5#53(223.5.5.5)
;; WHEN: Sat Mar 13 08:02:46 EST 2021
;; MSG SIZE  rcvd: 160

10 Linux DIG Command Examples for DNS Lookup--reference
by
Dig stands for domain information groper.
Using dig command you can query DNS name servers for your DNS lookup related tasks. This article explains 10 examples on how to use dig command.
1. Simple dig Command Usage (Understand dig Output)
When you pass a domain name to the dig command,by default it displays the A record (the ip-address of the site that is queried) as shown below.In this example,it displays the A record of redhat.com in the “ANSWER SECTION” of the dig command output.
$ dig redhat.com; <<>> DiG 9.7.3-RedHat-9.7.3-2.el6 <<>> redhat.com
;; global options: +cmd
;; Got answer:
;; ->>HEADER<<- opcode: QUERY,status: NOERROR,id: 62863
;; flags: qr rd ra; QUERY: 1,ANSWER: 1,AUTHORITY: 4,ADDITIONAL: 3;; QUESTION SECTION:
;redhat.com. IN A;; ANSWER SECTION:
redhat.com. 37 IN A 209.132.183.81;; AUTHORITY SECTION:
redhat.com. 73 IN NS ns4.redhat.com.
redhat.com. 73 IN NS ns3.redhat.com.
redhat.com. 73 IN NS ns2.redhat.com.
redhat.com. 73 IN NS ns1.redhat.com.;; ADDITIONAL SECTION:
ns1.redhat.com. 73 IN A 209.132.186.218
ns2.redhat.com. 73 IN A 209.132.183.2
ns3.redhat.com. 73 IN A 209.132.176.100;; Query time: 13 msec
;; SERVER: 209.144.50.138#53(209.144.50.138)
;; WHEN: Thu Jan 12 10:09:49 2012
;; MSG SIZE rcvd: 164
The dig command output has the following sections:
- Header: This displays the dig command version number,the global options used by the dig command,and few additional header information.
- QUESTION SECTION: This displays the question it asked the DNS. i.e This is your input. Since we said ‘dig redhat.com’,and the default type dig command uses is A record,it indicates in this section that we asked for the A record of the redhat.com website
- ANSWER SECTION: This displays the answer it receives from the DNS. i.e This is your output. This displays the A record of redhat.com
- AUTHORITY SECTION: This displays the DNS name server that has the authority to respond to this query. Basically this displays available name servers of redhat.com
- ADDITIONAL SECTION: This displays the ip address of the name servers listed in the AUTHORITY SECTION.
- Stats section at the bottom displays few dig command statistics including how much time it took to execute this query
2. display Only the ANSWER SECTION of the Dig command Output
For most part,all you need to look at is the “ANSWER SECTION” of the dig command. So,we can turn off all other sections as shown below.
- +nocomments – Turn off the comment lines
- +noauthority – Turn off the authority section
- +noadditional – Turn off the additional section
- +nostats – Turn off the stats section
- +noanswer – Turn off the answer section (Of course,you wouldn’t want to turn off the answer section)
The following dig command displays only the ANSWER SECTION.
$ dig redhat.com +nocomments +noquestion +noauthority +noadditional +nostats; <<>> DiG 9.7.3-RedHat-9.7.3-2.el6 <<>> redhat.com +nocomments +noquestion +noauthority +noadditional +nostats
;; global options: +cmd
redhat.com. 9 IN A 209.132.183.81
Instead of disabling all the sections that we don’t want one by one,we can disable all sections using +noall (this turns off answer section also),and add the +answer which will show only the answer section.
The above command can also be written in a short form as shown below,which displays only the ANSWER SECTION.
$ dig redhat.com +noall +answer; <<>> DiG 9.7.3-RedHat-9.7.3-2.el6 <<>> redhat.com +noall +answer
;; global options: +cmd
redhat.com. 60 IN A 209.132.183.81
3. Query MX Records Using dig -t MX
To query MX records,pass MX as an argument to the dig command as shown below.
$ dig redhat.com MX +noall +answer; <<>> DiG 9.7.3-RedHat-9.7.3-2.el6 <<>> redhat.com MX +noall +answer
;; global options: +cmd
redhat.com. 513 IN MX 5 mx1.redhat.com.
redhat.com. 513 IN MX 10 mx2.redhat.com.
You can also use option -t to pass the query type (for example: MX) as shown below.
$ dig -t MX redhat.com +noall +answer; <<>> DiG 9.7.3-RedHat-9.7.3-2.el6 <<>> -t MX redhat.com +noall +answer
;; global options: +cmd
redhat.com. 489 IN MX 10 mx2.redhat.com.
redhat.com. 489 IN MX 5 mx1.redhat.com.
4. Query NS Records Using dig -t NS
To query the NS record use the type NS as shown below.
$ dig redhat.com NS +noall +answer; <<>> DiG 9.7.3-RedHat-9.7.3-2.el6 <<>> redhat.com NS +noall +answer
;; global options: +cmd
redhat.com. 558 IN NS ns2.redhat.com.
redhat.com. 558 IN NS ns1.redhat.com.
redhat.com. 558 IN NS ns3.redhat.com.
redhat.com. 558 IN NS ns4.redhat.com.
You can also use option -t to pass the query type (for example: NS) as shown below.
$ dig -t NS redhat.com +noall +answer; <<>> DiG 9.7.3-RedHat-9.7.3-2.el6 <<>> -t NS redhat.com +noall +answer
;; global options: +cmd
redhat.com. 543 IN NS ns4.redhat.com.
redhat.com. 543 IN NS ns1.redhat.com.
redhat.com. 543 IN NS ns3.redhat.com.
redhat.com. 543 IN NS ns2.redhat.com.
5. View ALL DNS Records Types Using dig -t ANY
To view all the record types (A,MX,NS,etc.),use ANY as the record type as shown below.
$ dig redhat.com ANY +noall +answer; <<>> DiG 9.7.3-RedHat-9.7.3-2.el6 <<>> redhat.com ANY +noall +answer
;; global options: +cmd
redhat.com. 430 IN MX 5 mx1.redhat.com.
redhat.com. 430 IN MX 10 mx2.redhat.com.
redhat.com. 521 IN NS ns3.redhat.com.
redhat.com. 521 IN NS ns1.redhat.com.
redhat.com. 521 IN NS ns4.redhat.com.
redhat.com. 521 IN NS ns2.redhat.com.
(or) Use -t ANY
$ dig -t ANY redhat.com +noall +answer; <<>> DiG 9.7.3-RedHat-9.7.3-2.el6 <<>> -t ANY redhat.com +noall +answer
;; global options: +cmd
redhat.com. 367 IN MX 10 mx2.redhat.com.
redhat.com. 367 IN MX 5 mx1.redhat.com.
redhat.com. 458 IN NS ns4.redhat.com.
redhat.com. 458 IN NS ns1.redhat.com.
redhat.com. 458 IN NS ns2.redhat.com.
redhat.com. 458 IN NS ns3.redhat.com.
6. View Short Output Using dig +short
To view just the ip-address of a web site (i.e the A record),use the short form option as shown below.
$ dig redhat.com +short
209.132.183.81
You can also specify a record type that you want to view with the +short option.
$ dig redhat.com ns +short
ns2.redhat.com.
ns3.redhat.com.
ns1.redhat.com.
ns4.redhat.com.
7. DNS Reverse Look-up Using dig -x
To perform a DNS reverse look up using the ip-address using dig -x as shown below
For example,if you just have an external ip-address and would like to kNow the website that belongs to it,do the following.
$ dig -x 209.132.183.81 +short
www.redhat.com.
To view the full details of the DNS reverse look-up,remove the +short option.
$ dig -x 209.132.183.81; <<>> DiG 9.7.3-RedHat-9.7.3-2.el6 <<>> -x 209.132.183.81
;; global options: +cmd
;; Got answer:
;; ->>HEADER<<- opcode: QUERY,id: 62435
;; flags: qr rd ra; QUERY: 1,ADDITIONAL: 3;; QUESTION SECTION:
;81.183.132.209.in-addr.arpa. IN PTR;; ANSWER SECTION:
81.183.132.209.in-addr.arpa. 600 IN PTR www.redhat.com.;; AUTHORITY SECTION:
183.132.209.in-addr.arpa. 248 IN NS ns2.redhat.com.
183.132.209.in-addr.arpa. 248 IN NS ns1.redhat.com.
183.132.209.in-addr.arpa. 248 IN NS ns3.redhat.com.
183.132.209.in-addr.arpa. 248 IN NS ns4.redhat.com.;; ADDITIONAL SECTION:
ns1.redhat.com. 363 IN A 209.132.186.218
ns2.redhat.com. 363 IN A 209.132.183.2
ns3.redhat.com. 363 IN A 209.132.176.100;; Query time: 35 msec
;; SERVER: 209.144.50.138#53(209.144.50.138)
;; WHEN: Thu Jan 12 10:15:00 2012
;; MSG SIZE rcvd: 193
8. Use a Specific DNS server Using dig @dnsserver
By default dig uses the DNS servers defined in your /etc/resolv.conf file.
If you like to use a different DNS server to perform the query,specify it in the command line as @dnsserver.
The following example uses ns1.redhat.com as the DNS server to get the answer (instead of using the DNS servers from the /etc/resolv.conf file).
$ dig @ns1.redhat.com redhat.com; <<>> DiG 9.7.3-RedHat-9.7.3-2.el6 <<>> @ns1.redhat.com redhat.com
; (1 server found)
;; global options: +cmd
;; Got answer:
;; ->>HEADER<<- opcode: QUERY,id: 20963
;; flags: qr aa rd; QUERY: 1,ADDITIONAL: 4
;; WARNING: recursion requested but not available;; QUESTION SECTION:
;redhat.com. IN A;; ANSWER SECTION:
redhat.com. 60 IN A 209.132.183.81;; AUTHORITY SECTION:
redhat.com. 600 IN NS ns1.redhat.com.
redhat.com. 600 IN NS ns4.redhat.com.
redhat.com. 600 IN NS ns3.redhat.com.
redhat.com. 600 IN NS ns2.redhat.com.;; ADDITIONAL SECTION:
ns1.redhat.com. 600 IN A 209.132.186.218
ns2.redhat.com. 600 IN A 209.132.183.2
ns3.redhat.com. 600 IN A 209.132.176.100
ns4.redhat.com. 600 IN A 209.132.188.218;; Query time: 160 msec
;; SERVER: 209.132.186.218#53(209.132.186.218)
;; WHEN: Thu Jan 12 10:22:11 2012
;; MSG SIZE rcvd: 180
9. Bulk DNS Query Using dig -f (and command line)
Query multiple websites using a data file:
You can perform a bulk DNS query based on the data from a file.
First,create a sample names.txt file that contains the website that you want to query.
$ vi names.txt
redhat.com
centos.org
Next,execute dig -f as shown below,which will perform DNS query for the websites listed in the names.txt file and display the output.
$ dig -f names.txt +noall +answer
redhat.com.             60      IN      A       209.132.183.81
centos.org.             60      IN      A       72.232.194.162
You can also combine record type with the -f option. The following example displays the MX records of multiple websites that are located in the names.txt file.
$ dig -f names.txt MX +noall +answer
redhat.com.             600     IN      MX      10 mx2.redhat.com.
redhat.com.             600     IN      MX      5 mx1.redhat.com.
centos.org.             3600    IN      MX      10 mail.centos.org.
Query multiple websites from dig command line:
You can also query multiple websites from the dig command line as shown below. The following example queries MX record for redhat.com,and NS record for centos.org from the command line
$ dig redhat.com mx +noall +answer centos.org ns +noall +answer; <<>> DiG 9.7.3-RedHat-9.7.3-2.el6 <<>> redhat.com mx +noall +answer centos.org ns +noall +answer
;; global options: +cmd
redhat.com. 332 IN MX 10 mx2.redhat.com.
redhat.com. 332 IN MX 5 mx1.redhat.com.
centos.org. 3778 IN NS ns3.centos.org.
centos.org. 3778 IN NS ns4.centos.org.
centos.org. 3778 IN NS ns1.centos.org.
10. Use $HOME/.digrc File to Store Default dig Options
If you are always trying to view only the ANSWER section of the dig output,you don’t have to keep typing “+noall +answer” on your every dig command. Instead,add your dig options to the .digrc file as shown below.
$ cat $HOME/.digrc
+noall +answer
Now anytime you execute dig command,it will always use +noall and +answer options by default. Now the dig command line became very simple and easy to read without you have to type those options every time.
$ dig redhat.com redhat.com. 60 IN A 209.132.183.81$ dig redhat.com MX
redhat.com. 52 IN MX 5 mx1.redhat.com.
redhat.com. 52 IN MX 10 mx2.redhat.com.
Linux provides several powerful administrative tools and utilities which will help you to manage your systems effectively. If you don’t kNow what these tools are and how to use them,you Could be spending lot of time trying to perform even the basic administrative tasks. The focus of this course is to help you understand system administration tools,which will help you to become an effective Linux system administrator

Linux dig 命令
常用选项:
-b:当主机具有多个IP地址,指定使用本机的哪个IP地址向域名服务器发送域名查询请求;
-f<文件名称>:指定dig以批处理的方式运行,指定的文件中保存着需要批处理查询的DNS任务信息;
-P:指定域名服务器所使用端口号;
-t<类型>:指定要查询的DNS数据类型;
-x:执行逆向域名查询;
参数:
主机:指定要查询域名主机
查询类型:指定DNS查询的类型
查询类:指定查询DNS的class
查询类型:
A:查看主机的IPv4地址
AAAA:查看主机的IPv6地址
ANY:查看关于主机域的所有信息
CNAME:查找与别名对应的正式名字
HINFO:查找主机的CPU与操作系统类型
MINFO:查找邮箱信息
MX:查找邮件交换信息
NS:查找主机域的域名服务器
PTR:查找与给定IP地址匹配的主机名
RP:查找域负责人记录
SOA:查找域内的SOA地址
UINFO:查找用户信息
linux dig 命令使用方法
ref:https://www.imooc.com/article/26971?block_id=tuijian_wz
dig 命令主要用来从 DNS 域名服务器查询主机地址信息。
查询单个域名的 DNS 信息
dig 命令最典型的用法就是查询单个主机的信息。
$ dig baidu.com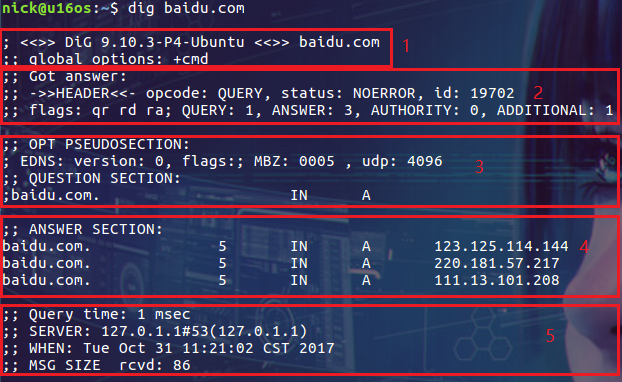
dig 命令默认的输出信息比较丰富,大概可以分为 5 个部分。
第一部分显示 dig 命令的版本和输入的参数。
第二部分显示服务返回的一些技术详情,比较重要的是 status。如果 status 的值为 NOERROR 则说明本次查询成功结束。
第三部分中的 "QUESTION SECTION" 显示我们要查询的域名。
第四部分的 "ANSWER SECTION" 是查询到的结果。
第五部分则是本次查询的一些统计信息,比如用了多长时间,查询了哪个 DNS 服务器,在什么时间进行的查询等等。
默认情况下 dig 命令查询 A 记录,上图中显示的 A 即说明查询的记录类型为 A 记录。在尝试查询其它类型的记录前让我们先来了解一下常见的 DNS 记录类型。
常见 DNS 记录的类型
| 类型 | 目的 |
| A | 地址记录,用来指定域名的 IPv4 地址,如果需要将域名指向一个 IP 地址,就需要添加 A 记录。 |
| AAAA | 用来指定主机名(或域名)对应的 IPv6 地址记录。 |
| CNAME | 如果需要将域名指向另一个域名,再由另一个域名提供 ip 地址,就需要添加 CNAME 记录。 |
| MX | 如果需要设置邮箱,让邮箱能够收到邮件,需要添加 MX 记录。 |
| NS | 域名服务器记录,如果需要把子域名交给其他 DNS 服务器解析,就需要添加 NS 记录。 |
| SOA | SOA 这种记录是所有区域性文件中的强制性记录。它必须是一个文件中的第一个记录。 |
| TXT | 可以写任何东西,长度限制为 255。绝大多数的 TXT记录是用来做 SPF 记录(反垃圾邮件)。 |
查询 CNAME 类型的记录
除了 A 记录,常见的 DNS 记录还有 CNAME,我们可以在查询时指定要查询的 DNS 记录类型:
$ dig abc.filterinto.com CNAME
这样结果中就只有 CNAME 的记录。其实我们可以在查询中指定任何 DNS 记录的类型。
从指定的 DNS 服务器上查询
由于一些原因,希望从指定的 DNS 服务器上进行查询(从默认的 DNS 服务器上获得的结果可能不准确)。指定 DNS 服务器的方式为使用 @ 符号:
$ dig @8.8.8.8 abc.filterinto.com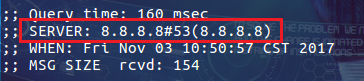
从上图可以看到本次查询的 DNS 服务器为 8.8.8.8。
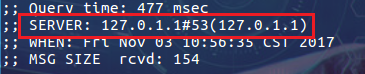
如果不指定 DNS 服务器,dig 会依次使用 /etc/resolv.conf 里的地址作为 DNS 服务器:

$ dig abc.filterinto.com上面查询的 DNS 服务器就变成了:
反向查询
在前面的查询中我们指定了查询服务器为 8.8.8.8,这是谁家的 DNS 服务器?其实我们可以使用 dig 的 -x 选项来反向解析 IP 地址对应的域名:
$ dig -x 8.8.8.8 +short
好吧,应该是谷歌家的,可以放心使用了。
控制显示结果
dig 命令默认返回的结果展示详细的信息,如果要获得精简的结果可以使用 +short 选项:
$ dig +short abc.filterinto.com
这下显示的结果就清爽多了。
其实我们还可以通过更多选项来控制输出的内容,比如只想显示 "ANSWER SECTION" 的内容:
$ dig abc.filterinto.com +nocomments +noquestion +noauthority +noadditional +nostats
这个结果很不错,就是使用的选项太多了(dig 命令有很多这样的选项,详情请参考使用手册)。我们可以换一种优雅一些的方式来实现和上面相同的结果:
$ dig abc.filterinto.com +noall +answer查看 TTL(Time to Live)
TTL 是 DNS 解析中很重要的指标,主要是控制 DNS 记录在 DNS 服务器上的缓存时间:
$ dig abc.filterinto.com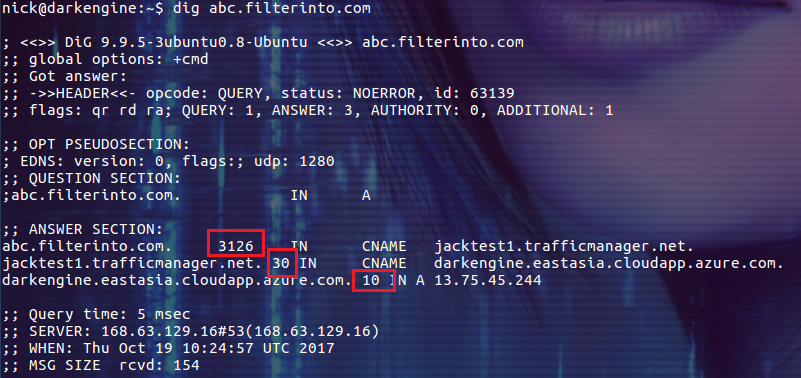
查询结果中的单位是秒。通过下面的命令可以显示精简一些测结果:
$ dig +nocmd +noall +answer +ttlid abc.filterinto.com
跟踪整个查询过程
如果你好奇 dig 命令执行查询时都经历了哪些过程,你可以尝试使用 +trace 选项。它会输出从根域到最终结果的所有信息:
$ dig +trace abc.filterinto.com
上图中显示的并不是一个完整的结果,感兴趣的朋友可以自己尝试。
总结
dig 是一个很给力 DNS 查询工具,本文仅介绍了其常见用法,更多的命令选项及使用方法请查看 man page。

linux shell dig nslookup 指定dns服务器 查询域名解析
一般来说linux下查询域名解析有两种选择,nslookup或者dig,而在使用上我觉得dig更加方便顺手。
如果是在linux下的话,只要装上dnsutils这个包就可以使用dig命令,安装bind-utils就可以使用nslookup命令
nslookup手动指定待测试的DNS服务器地址的用法:
nslookup www.wjoyxtorg 114.114.114.114 手动指定待测试的DNS服务器地址,不使用系统默认的/etc/resolve.conf,例如
dig @114.114.114.114 www.wjoyxt.com 
今天关于每天学一个 Linux 命令和70:dig的分享就到这里,希望大家有所收获,若想了解更多关于10 Linux DIG Command Examples for DNS Lookup--reference、Linux dig 命令、linux dig 命令使用方法、linux shell dig nslookup 指定dns服务器 查询域名解析等相关知识,可以在本站进行查询。
本文标签:


