如果您想了解用:focus-within实现纯CSS下拉框组件和css的下拉框怎么实现的知识,那么本篇文章将是您的不二之选。我们将深入剖析用:focus-within实现纯CSS下拉框组件的各个方面,
如果您想了解用 :focus-within 实现纯 CSS 下拉框组件和css的下拉框怎么实现的知识,那么本篇文章将是您的不二之选。我们将深入剖析用 :focus-within 实现纯 CSS 下拉框组件的各个方面,并为您解答css的下拉框怎么实现的疑在这篇文章中,我们将为您介绍用 :focus-within 实现纯 CSS 下拉框组件的相关知识,同时也会详细的解释css的下拉框怎么实现的运用方法,并给出实际的案例分析,希望能帮助到您!
本文目录一览:- 用 :focus-within 实现纯 CSS 下拉框组件(css的下拉框怎么实现)
- :focus-within 实现离屏导航
- bootstrap下拉框组件
- CSS :focus-within的具体使用方法讲解
- CSS 伪选择器 focus-within 介绍
")
用 :focus-within 实现纯 CSS 下拉框组件(css的下拉框怎么实现)
总结
以上是小编为你收集整理的用 :focus-within 实现纯 CSS 下拉框组件全部内容。
如果觉得小编网站内容还不错,欢迎将小编网站推荐给好友。

:focus-within 实现离屏导航
这个是其他很多文章都有提到过的一个功能,利用 focus-within 便捷的实现离屏导航,可以说将这个属性的功能发挥的淋漓尽致,这里我直接贴一个 codepen 上 Dannie Vinther 对这个效果的实现方案:
<div>
<header tabindex="0">Header</header>
<div id="nav-container">
<div></div>
<divtabindex="0">
<span></span>
<span></span>
<span></span>
</div>
<div id="nav-content" tabindex="0">
<ul>
<li><a href="#0">Home</a></li>
<li><a href="#0">Services</a></li>
<li><a href="#0">Blog</a></li>
<li><a href="#0">About</a></li>
<li><a href="#0">Contact</a></li>
<li><a href="#0">Facebook</a><a href="#0">Instagram</a></li>
</ul>
</div>
</div>
<main>
<div>
<h2>Off-screen navigation using <span>:focus-within</span></h2>
<p>Adding yet another pure CSS technique to the list of off-screen navigation by "hacking" the :focus-within pseudo-class. Have a look at the code to see how it works.</p>
<small><strong>NB!</strong> Use a browser that supports :focus-within</small>
</div>
</main>
</div>
<style>
[@import](https://my.oschina.net/u/3201731) url(''https://fonts.googleapis.com/css?family=Encode+Sans+Condensed:400,600'');
* {
outline: none;
}
strong {
font-weight: 600;
}
.page {
width: 100%;
height: 100vh;
background: #fdfdfd;
font-family: ''Encode Sans Condensed'', sans-serif;
font-weight: 600;
letter-spacing: .03em;
color: #212121;
}
header {
display: flex;
position: fixed;
width: 100%;
height: 70px;
background: #212121;
color: #fff;
justify-content: center;
align-items: center;
-webkit-tap-highlight-color: rgba(0,0,0,0);
}
main {
padding: 70px 20px 0;
display: flex;
flex-direction: column;
height: 100%;
}
main > div {
margin: auto;
max-width: 600px;
}
main h2 span {
color: #BF7497;
}
main p {
line-height: 1.5;
font-weight: 200;
margin: 20px 0;
}
main small {
font-weight: 300;
color: #888;
}
#nav-container {
position: fixed;
height: 100vh;
width: 100%;
pointer-events: none;
}
#nav-container .bg {
position: absolute;
top: 70px;
left: 0;
width: 100%;
height: calc(100% - 70px);
visibility: hidden;
opacity: 0;
transition: .3s;
background: #000;
}
#nav-container:focus-within .bg {
visibility: visible;
opacity: .6;
}
#nav-container * {
visibility: visible;
}
.button {
position: relative;
display: flex;
flex-direction: column;
justify-content: center;
z-index: 1;
-webkit-appearance: none;
border: 0;
background: transparent;
border-radius: 0;
height: 70px;
width: 30px;
cursor: pointer;
pointer-events: auto;
margin-left: 25px;
touch-action: manipulation;
-webkit-tap-highlight-color: rgba(0,0,0,0);
}
.icon-bar {
display: block;
width: 100%;
height: 3px;
background: #aaa;
transition: .3s;
}
.icon-bar + .icon-bar {
margin-top: 5px;
}
#nav-container:focus-within .button {
pointer-events: none;
}
#nav-container:focus-within .icon-bar:nth-of-type(1) {
transform: translate3d(0,8px,0) rotate(45deg);
}
#nav-container:focus-within .icon-bar:nth-of-type(2) {
opacity: 0;
}
#nav-container:focus-within .icon-bar:nth-of-type(3) {
transform: translate3d(0,-8px,0) rotate(-45deg);
}
#nav-content {
margin-top: 70px;
padding: 20px;
width: 90%;
max-width: 300px;
position: absolute;
top: 0;
left: 0;
height: calc(100% - 70px);
background: #ececec;
pointer-events: auto;
-webkit-tap-highlight-color: rgba(0,0,0,0);
transform: translateX(-100%);
transition: transform .3s;
will-change: transform;
contain: paint;
}
#nav-content ul {
height: 100%;
display: flex;
flex-direction: column;
}
#nav-content li a {
padding: 10px 5px;
display: block;
text-transform: uppercase;
transition: color .1s;
}
#nav-content li a:hover {
color: #BF7497;
}
#nav-content li:not(.small) + .small {
margin-top: auto;
}
.small {
display: flex;
align-self: center;
}
.small a {
font-size: 12px;
font-weight: 400;
color: #888;
}
.small a + a {
margin-left: 15px;
}
#nav-container:focus-within #nav-content {
transform: none;
}
* {
box-sizing: border-box;
margin: 0;
padding: 0;
}
html, body {
height: 100%;
}
a,
a:visited,
a:focus,
a:active,
a:link {
text-decoration: none;
outline: 0;
}
a {
color: currentColor;
transition: .2s ease-in-out;
}
h1, h2, h3, h4 {
margin: 0;
}
ul {
padding: 0;
list-style: none;
}
img {
vertical-align: middle;
height: auto;
width: 100%;
}
</style>


bootstrap下拉框组件
这是我的第一个博客,请大家多多包涵,望指教!!!
要使用bootstrap的selectpicker下拉列表必须引入css和js:
<!-- Latest compiled and minified CSS -->
<link rel="stylesheet" href="https://cdnjs.cloudflare.com/ajax/libs/bootstrap-select/1.10.0/css/bootstrap-select.min.css">
<!-- Latest compiled and minified JavaScript -->
<script src="https://cdnjs.cloudflare.com/ajax/libs/bootstrap-select/1.10.0/js/bootstrap-select.min.js"></script>
<!-- (Optional) Latest compiled and minified JavaScript translation files -->
<script src="https://cdnjs.cloudflare.com/ajax/libs/bootstrap-select/1.10.0/js/i18n/defaults-*.min.js"></script>
下面是jsp部分
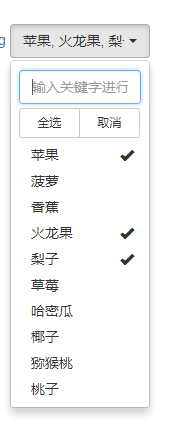
<select id="usertype" name="usertype" class="selectpicker show-tick form-control"  multiple data-live-search="true">
                 <option value="0">苹果</option>
                 <option value="1">菠萝</option>
                 <option value="2">香蕉</option>
                  <option value="3">火龙果</option>
                  <option value="4">梨子</option>
                  <option value="5">草莓</option>
                  <option value="6">哈密瓜</option>
                  <option value="7">椰子</option>
                  <option value="8">猕猴桃</option>
                  <option value="9">桃子</option>
</select>
以下是js部分
$(window).on(''load'', function () {

  $(''#usertype'').selectpicker({
isOpen:true,
noneSelectedText:''请选择'',
noneResultsText:''没有找到该选项'',
selectAll:true,
countSelectedText:function (numSelected,numTotal){
return numSelected==numTotal?"已全选":"{"+numSelected+"}项被选中";
},
selectAllText:''全选'',
deselectAllText:''取消'',
selectedTextFormat:''count > 3'',
width:140,
maxheight:150,
liveSearch:true,
liveSearchPlaceholder:''输入关键字进行搜索'',
actionsBox:true,
minheight:80,
});
});对其取值
$(#usertype).val();赋值
var ss={0,4,3};
var arr=ss.split(",");
$(''#usertype'').selectpicker(''val'', arr);
以下为效果图,其中两个按钮都可以取消掉,输入关键字进行搜索也可以取消掉,同理宽度也一样,这些在js中都有,如果是只需要单选的话将jsp中的multiple去掉就好了

CSS :focus-within的具体使用方法讲解
这篇文章主要介绍了css :focus-within的具体使用的相关资料,具有一定的参考价值,感兴趣的小伙伴们可以参考一下
CSS的世界真是一个神奇的世界。可能众多前端开发者听说过 :focus 并未听说过 :focus-within 。那么 :focus-within 是什么鬼。这篇文章,我们就说说 :focus-within 这个东东。
:focus-within是什么
在CSS中 :focus-within 是一个伪类,现在已经被列入到CSS选择器中(CSS Level 4 selector)。他就像你知道的 :focus 或者 :hover 。 :focus-within 能非常方便处理获取焦点状态。当元素本身或其后代元素获得焦点时, :focus-within 伪类的元素就会有效。
如果文字不好理解,咱们先来看一个简单的示例:
立即学习“前端免费学习笔记(深入)”;
<p>
    <label for="email">
        Your email:
    </label>
    <input type="email" name="email" id="email" placeholder="Enter your email address"/>
</p>上面是一个简单的表单,有一个 input 表单控件。
.form-group *:focus {
    background: yellow;
    color: #000;
}
.form-group {
    padding: 10px;
    border: 3px solid transparent
}

.form-group:focus-within {
    border-color: #000;
}上面的示例中, .form-group 得到焦点的时候, border-color 颜色换成了 #000 。但这不意味着接收键盘的焦点,那是因为
不一定能得到键盘的焦点,没有设置 tabindex 。或者说 p 中的链接或 input 元素接收焦点,那么 .form-group 元素将改变边框颜色。
看到上面的示例,是不是觉得好神奇。在以前要实现类似的效果,我们需要借助JavaScript的脚本。通过 .form-group 的后代元素的鼠标或键盘事件,然后给其父元素(或祖先元素,添加对应的样式)。
:focus-within的使用场景
:focus-within 非常强大,主要是由于伪类在它的任何元素获取到焦点时都将被激活。当元素包含许多子组件的元素上谨慎使用该伪类。
有了 :focus-within 之后,有一些常见的交互行为就变得非常的简单,特别是以前需要JavaScript的键盘事件的交互行为,我们都可以使用 :focus-within 来替代。
接下来,咱们来看一些 :focus-within 的常见示例。
表格行的高亮
一个常见的例子,就是表格行高亮的行为,即鼠标悬浮在表格的行时,颜色变得高亮。这样的交互样式可以帮助有视力阻碍的用户能更好的阅读一个复杂的表格或长表格。因为突出的显示,可以使用这些用户更容易地跟踪他们当前正在阅读的表格行。以前常常实现的方式是通过 :hover 来改变表格行的样式,这种方案对于正常的用户而言是一件易事,但如果你的用户对于一些操作鼠标有阻碍的用户而言,那 :hover 就有点蛋疼了。如果你是追求完美的话,你可能会通过JavaScript的键盘事件给表格行添加样式。
那么有了 :focus-within 之后,我们就可以和JavaScript说拜拜。我们可以这样来设置样式:
上面的示例展示了如何使用 :focus-within 来突出表格的整个行。如果在特定的表格行中有一个可获取焦点的可用元素,这里所指的是通过键盘获取焦点。比如上面这个示例,表格中有 元素,你懂的, a 元素是可以通过键盘获取焦点的。
这个时候你只需要在样式中添加:
下拉菜单
下拉菜单是我们最常的Web组件之一。当我第一次看到 :focus-within 这个伪类时,我想到的第一个使用场景就是下拉菜单。
上面的示例中,JavaScript是用来跟踪用户键盘焦点在一个导航下拉菜单中的。如果JavaScript检测到键盘焦点在一个链接上,那么给 .nav__list_drop 添加一个 .has-focus 类。当 li 有了 .has-focus 类时,他的子元素就会显示出来,也就是下拉菜单会显示出来。
这样的效果,我们可以直接通过 :focus-within 来取代JavaScript脚本的功能。使用 .nav__list__drop:focus-within 替代 .nav__list__drop.has-focus 。当你操作键盘,让下拉菜单项获得焦点时,就会显示下拉菜单。
Off-screen Nav
Off-screen Nav是在移动端上常见的一个效果。那么这个效果我们也可以通过 :focus-within 来实现。详细代码可以看下面这个示例:
浏览器兼容性
:focus-within 虽然很有意思,但很多同学担心它的兼容性。通过Caniuse,我们可以看到浏览器对其支持度情况:
总结
如果你熟悉 :focus 并不奇怪,但是你知道 :focus-within 的话,说明你在不断的关注CSS相关的新特性。当然这个属性再次刷新了CSS的世界真是奇怪。如果你感兴趣的话,不仿自己写写Demo。你会喜欢上这个属性的。
以上就是CSS :focus-within的具体使用方法讲解的详细内容,更多请关注php中文网其它相关文章!

CSS 伪选择器 focus-within 介绍
原文: CSS 伪选择器 focus-within 介绍
CSS 中的 :focus-within 伪选择器可有点 “不寻常”,尽管它的名称看上去很简单,而且相当直观。但它的解释是:选择一个包含具有:focus 的任何子元素的元素。有点绕是不是,但仔细读应该也能理解,下面通过具体的例子你就更能理解了。
form:focus-within {
  background: lightyellow;
}
它是这样工作的:
<form action="#">
  <input type="text">
</form>
当 form 的子元素 input 获得焦点时,form 就会被选中。
我说 “不寻常” 是因为在 CSS 中,根据子元素的存在或状态来选择父元素并不常见,当然也是有用的。
看下面是一个例子:
<form action="#">
  <h2>这是一个表单</h2>
  <div>
    <label class="desc" id="title1" for="Field1">姓名</label>
    <div>
      <input id="Field1" name="Field1" type="text" class="field text fn" value="" size="8" tabindex="1">
    </div>
  </div>
  <div>
    <label class="desc" id="title3" for="Field3">邮箱</label>
    <div>
      <input id="Field3" name="Field3" type="email" spellcheck="false" value="" maxlength="255" tabindex="3">
   </div>
  </div>
  <div>
    <label class="desc" id="title4" for="Field4">内容</label>
    <div>
      <textarea id="Field4" name="Field4" spellcheck="true" rows="3" cols="50" tabindex="4"></textarea>
    </div>
  </div>
  <div>
    <fieldset>
      <legend id="title5" class="desc">请选择</legend>
      <div>
      	<input id="radioDefault_5" name="Field5" type="hidden" value="">
      	<div>
      		<input id="Field5_0" name="Field5" type="radio" value="First Choice" tabindex="5" checked="checked">
      		<label class="choice" for="Field5_0">First Choice</label>
      	</div>
        <div>
        	<input id="Field5_1" name="Field5" type="radio" value="Second Choice" tabindex="6">
        	<label class="choice" for="Field5_1">Second Choice</label>
        </div>
      </div>
    </fieldset>
  </div>
  <div>
    <fieldset>
      <legend id="title6" class="desc">请选择</legend>
      <div>
      <div>
      	<input id="Field6" name="Field6" type="checkbox" value="First Choice" tabindex="8">
      	<label class="choice" for="Field6">First Choice</label>
      </div>
      <div>
      	<input id="Field7" name="Field7" type="checkbox" value="Second Choice" tabindex="9">
      	<label class="choice" for="Field7">Second Choice</label>
      </div>
    </fieldset>
  </div>
  <div>
    <label class="desc" id="title106" for="Field106">请选择</label>
    <div>
    <select id="Field106" name="Field106" class="field select medium" tabindex="11">
      <option value="First Choice">First Choice</option>
      <option value="Second Choice">Second Choice</option>
    </select>
    </div>
  </div>
</form>
form:focus-within {
  background: #f9f98b;
}
form header {
  padding: 2rem;
}
form header div {
  font-size: 90%;
  color: #999;
}
form header h2 {
  margin: 0 0 5px 0;
}
form > div {
  clear: both;
  overflow: hidden;
  padding: 0.5rem 2rem;
}
form > div:last-child {
  padding-bottom: 2rem;
}
form > div:focus-within {
  background: #a1c084;
}
form > div > fieldset > div > div {
  margin: 0 0 5px 0;
}
form > div > label,
legend {
	width: 15%;
  float: left;
  padding-right: 10px;
}
form > div > div,
form > div > fieldset > div {
  width: 85%;
  float: right;
}
form > div > fieldset label {
	font-size: 90%;
}
fieldset {
	border: 0;
  padding: 0;
}

input[type=text],
input[type=email],
input[type=url],
input[type=password],
textarea {
	width: 100%;
  border-top: 1px solid #ccc;
  border-left: 1px solid #ccc;
  border-right: 1px solid #eee;
  border-bottom: 1px solid #eee;
}
input[type=text],
input[type=email],
input[type=url],
input[type=password] {
  width: 50%;
}
input[type=text]:focus,
input[type=email]:focus,
input[type=url]:focus,
input[type=password]:focus,
textarea:focus {
  outline: 0;
  border-color: #4697e4;
}
效果图:
注意上面的示例在整个表单和其内部的 div 上使用了:focus-within。子元素通过任意方式获得焦点都将触发:focus-within。例如,如果一个元素有 tab-index 属性或 contenteditable 属性时,那么它就是一个可聚焦的元素。元素如何成为焦点也不重要,它可以被点击或轻触,或通过其他方式导航,甚至通过 JavaScript 聚焦,比如:
document.querySelector("input").focus();
下面是:focus-within 在各大浏览器上的支持情况:

可见截止目前大部门主流浏览器都已经支持了。
我们今天的关于用 :focus-within 实现纯 CSS 下拉框组件和css的下拉框怎么实现的分享已经告一段落,感谢您的关注,如果您想了解更多关于:focus-within 实现离屏导航、bootstrap下拉框组件、CSS :focus-within的具体使用方法讲解、CSS 伪选择器 focus-within 介绍的相关信息,请在本站查询。
本文标签:


