想了解gin源码分析之路由实现的新动态吗?本文将为您提供详细的信息,我们还将为您解答关于gin路由原理的相关问题,此外,我们还将为您介绍关于@angular/router源码分析之注册路由、Flink
想了解gin 源码分析之路由实现的新动态吗?本文将为您提供详细的信息,我们还将为您解答关于gin路由原理的相关问题,此外,我们还将为您介绍关于@angular/router 源码分析之注册路由、Flink 源码分析之 Client 解析流程分析、illuminate/routing 源码分析之注册路由、JVM 源码分析之 Attach 机制实现完全解读的新知识。
本文目录一览:- gin 源码分析之路由实现(gin路由原理)
- @angular/router 源码分析之注册路由
- Flink 源码分析之 Client 解析流程分析
- illuminate/routing 源码分析之注册路由
- JVM 源码分析之 Attach 机制实现完全解读
")
gin 源码分析之路由实现(gin路由原理)
导读
在go语言的框架中,由于net/http包已经实现了连接建立、拆包、封包等几乎70%的基础工作,留下了ServeHTTP这个接口给有各种不同需要的开发人员自行去扩展。这部分扩展中有很大一部分是对路由注册的封装,gin的路由实现并没有完全重新造轮子,而是一部分重要的代码使用的号称速度最快的httprouter,gin自己增加了易于路由管理的路由组的概念。
什么是路由?
路由直观理解就是根据不同的 URL 找到对应的处理函数,也可以成为一个映射的过程。
目前业界比较推荐的 API 接口的设计方式遵循 RESTful 风格。当然现实不总是这样美好,我也见过某些大公司的接口则不区分 GET/POST/DELETE 这些方法,而是完全靠接口的命名来表示不同的方法。
举个简单的例子,如:"创建一篇博客"
这种非RESTful 的方式,并不是错的,在内部使用可能不会有太多问题,只要大家都遵循相同的设计规范就好了。这种接口设计风格在人员较少时可能并没有明显的副作用,但是当团队成员超过几十人,甚至上百人时,在不同服务做对接时,因为缺少统一的规范的接口设计,沟通成本将会成倍增加。这里非常推荐大家去看看谷歌云对外提供的API,堪称设计的典范,非常值得参考和学习。同时Kubernetes的接口设计也是非常经典的,同样出自谷歌。
当URI相同,不同的请求 Method,最终其他代表的要处理的事情也完全不一样。
这里留一个小练习,让你来设计一个路由组件,需要满足不同URI和方法可以,你会如何设计呢?
gin 路由设计
如何设计不同的 Method ?
通过上面的介绍,已经知道 RESTful 是要区分方法的,不同的方法代表意义也完全不一样,gin 是如何实现这个的呢?
其实很简单,不同的方法就是一棵路由树,所以当 gin 注册路由的时候,会根据不同的 Method 分别注册不同的路由树。
这四个请求最终会构造四棵不同的路由树来表达,具体添加方式如下:
路由注册过程
这段示例代码中,通过r.GET方式注册了一个健康检查路由到GET 路由树中。在实际工程项目中并不会这样直接注册路由,而是再进一步抽象封装将路由的注册放到一个单独的文件中进行管理,这样的好处是可以统一管理服务下的路由。
使用 RouteGroup
RouteGroup 是非常重要和实用的功能,可以帮助开发者按照不同的目的对路由进行分组管理。例如,在一个实际的项目服务中,接口一般会分为鉴权接口和非鉴权接口,即需要登录和权限校验或者不需要,这可以通过 RouteGroup 来实现。另外不同版本的接口,也可以使用RouteGroup来区分。
gin 路由的实现细节
从这个例子开始,我们带着下面三个问题出发:
URL->health 是怎么存储的?
handler-> 处理器又是怎么存储的?
health 和对应处理器实际是关联起来的?
1. 请求方法的底层实现
可以看到handle函数是整个路由处理的核心所在,我们来看看对应的实现代码。
2. gin的路由树设计
在看gin的路由树设计之前,先来看看如果是我们该怎么设计路由树呢?
最简单直接的方式就是全部存储,即每个字符串都存到树的叶子节点中。但是这种设计会有至少两个非常明显的问题:
1、存储空间浪费严重,不同字符串并不是完全不同,其中可能存在大量的相同的子串
2、查询效率并不太高,还需要其他一些辅助的措施来保证一定的顺序才能提高查询效率
还有没有更优的解决方案,通过观察 blogs, blocks, boo 是用相同的前缀的,这样就可以采用公共前缀树的方式来存储就会更好。实际上gin 路由树就是一棵前缀树。
节点操作核心函数如下:
3. URL如何与处理函数关联
从上小节可以看出node 是路由树的核心定义:
children成员记录一颗树的所有叶子结点。存储内容为去掉前缀后的路由信息。
path 则记录了该节点的最长前缀
handlers 存储了当前叶子节点对应的所有处理函数
前文说的路由注册一般发生在服务启动时,在接受请求前会完成所有的服务初始化工作,包括服务路由的注册。当 服务开始接受请求时,路由树已经在内存中构建完毕了,gin框架只需要实现路由的查询就可以了。gin框架开始处理请求的起点是ServeHTTP,因此我们从这里入手。
handleHTTPRequest正是实现了请求URI到处理函数的映射。
可以总结一下查找路由的整体思路:
遍历所有路由树,找到对应的方法的路由树
进行路由的匹配
执行对应处理函数 注意此处涉及gin中间件的执行流程
总结
本次我们梳理总结了gin的路由整体流程,但是路由数的具体实现并没有特别仔细的讲解,这块可以留一个扣,后期有机会我们单独再讲。在go的web框架中路由的性能几乎决定了整个框架的性能,因此这是一个非常值得再深入挖掘的方向,大家感兴趣可以自行探索。
gin 源码分析之路由实现
导读在go语言的框架中,由于net/http包已经实现了连接建立、拆包、封包等几乎70%的基础工作,留下了ServeHTTP这个接口给有各种不同需要的开发人员自行去扩展。这部分...
延伸阅读

@angular/router 源码分析之注册路由
@angular/router 模块主要解决程序路由状态改变和懒加载模块问题。
比如,程序从路由状态 state1: /advisors/1/households/1 转变为路由状态 state2: /advisors/1/accounts/2,需要实例化的组件集合也从 components1: Advisor+Household 转变为 components2: Advisor+Account(准确的说应该是先是 Module 的实例化,然后才是组件的实例化),这个过程是如何实现的?
另外,对于按需加载的模块,又该如何加载该模块,并且将该模块显示在对应位置处?
@angular/router 模块就是用来解决路由状态改变和懒加载模块问题的。本文主要解释程序启动后,@angular/router 是如何注册开发者定义的路由集合的,和实例化 Router 对象的。
程序启动后,即调用 PlatformRef.bootstrapModule(AppModule) 后,会执行导入的 RouterModule.forRoot(routes: Routes) 来合并 RouterModule 提供的服务,且 routes 路由集合是由开发者自定义的,比如:
routes: Routes = [
    {path: ''advisors/:id'', component: AdvisorComponent, children: [
        {path: ''households/:id'', component: HouseholdComponent},
        {path: ''accounts/:id'', component: AccountComponent},
    ]},
];
一起看看 RouterModule 能给我们提供哪些重点对象吧:RouterModule.forRoot(routes)。
第一个对象是来自于 @angular/common 的 Location,用来表示浏览器的 url,并提供了 forward(),back(),go() 等重要方法用来改变 url,同时提供了 HashLocationStrategy 和 PathLocationStrategy 两种策略生成是否带有 ''#'' 的 url,至于为何需要两种不同风格的 url 原因可以看 中文官网描述;
第二个对象是序列化 URL 的对象 UrlSerializer,@angular/router 使用 UrlTree 对象存储一个 URL,比如 ''/advisors/1/accounts/2?type=loan#fragment'',并且 UrlTree 对象又使用 UrlSegmentGroup 对象来表示 URL 的 path 部分,这里 UrlSegmentGroup 表示的就是 ''/advisors/1/accounts/2'' 这部分,UrlSegmentGroup 对象也可以存储 ''/advisors/1/accounts/2/(user/john//bank:abc)?type=loan#fragment'' 这样的多重 URL,该多重 URL 可以表示为两个 URL: ''/advisors/1/accounts/2/user/john?type=loan#fragment'' 和 ''/advisors/1/accounts/2/abc?type=loan#fragment''(该 URL 的出口 outlet 是 bank),虽然是多重 URL,但只需要用一个对象 UrlSegmentGroup 就可以存储,而 UrlSegmentGroup 又使用 Segment 对象来表示当前 group 内的每一个 ''/'' 之间的部分。Url 的格式可见下图:

对于上图中的 URL,@angular/router 会调用 Router.parseUrl(), 实际上还是调用 UrlSerializer.parse() 来把 URL 字符串 ''/section-one;test=one/(nav:navigation;test=two//main:about;test=three)?query=four#frag'' 解析为 UrlTree 对象:

@angular/router 使用 UrlTree 对象来存储 URL 字符串,并使用 UrlSerializer 来解析和序列化 URL。这块知识点还是很重要的。
第三个对象 Router,也是 @angular/router 模块中最重要的对象,使用 setupRouter 方法来初始化 Router,初始化逻辑主要是它的 构造函数,开发者自定义的 routes 集合 也是作为依赖来构造 Router 对象。第一个点就是首先调用 createEmptyUrlTree 方法创建一个 空的 UrlTree;第二个点就是实例化一个路由加载器 loader,当开发者定义了 route.loadChildren 属性时,该 loader 就会使用 loader.load() 方法去异步加载模块,所以该 loader 对象是用来解决懒加载问题的;第三个点是调用 createEmptyState 方法创建一个空 RouterState,RouterState 对象表示当前激活路由的状态(RouterState is a tree of activated routes.),它也是一个树形数据结构,用来存储 当前激活路由 的数据,该树的节点使用 ActivatedRoute 对象表示,比如对于上文中开发者定义的路由列表,当 URL 为 ''/advisors/1/households/1'' 时,这时 RouterState 对象表示的状态树,如下红色显示部分的子树,而每一个包含组件的层级即是 ActivatedRoute:

第四个点是调用 processNavigations() 执行路由状态切换,实际上 @angular/router 的作用就是控制路由状态的切换,所以 整个 @angular/router 的核心代码就是 processNavigations() 方法。该方法订阅了一个 BehaviorSubject 对象,只要该 BehaviorSubject 流对象弹射出一个新值,就会运行 executeScheduledNavigation(),不管是不是刷新 URL,都会运行 runNavigate(),所以精确的说,runNavigate() 这一百行左右代码才是 @angular/router 包最最核心的代码。这一百来行代码具体分为几个步骤:
- 1. Apply redirects(relative/absolute)
- 2. Construct router state by current URL(这段也就是第二篇文章将要探讨的 查找路由 逻辑)
- 3. PreActivation: Run Guard 和 3. PreActivation: Run Resolver
- 4. Activation: Activate Components(这段也就是第三篇文章将要探讨的 运行路由 逻辑)
第四个重要的对象就是模块工厂加载器 NgModuleFactoryLoader,该对象来自于 @angular/core 核心包,主要用来辅助 RouterConfigLoader 对象,懒加载模块时可以异步加载远程模块。
第五个重要的对象就是提供了预加载对象 RouterPreloader,用来预加载所有懒加载模块,从而提高性能。
第六个重要的对象就是 RouterInitializer,提供了初始导航功能。当程序首次初始化和启动时,调用 RouterInitializer.appInitializer() 和 RouterInitializer.bootstrapListener() 来进行初始化导航,最后还是调用 Router.initialNavigation() 来首次导航到 URL 对应的 RouterState。
所以,@angular/router 首次初始化时,提供的最重要对象是 Router,其他一切对象和逻辑都是围绕着 Router 对象展开。@angular/router 是如何根据当前 URL 查找到对应的 route 的呢?见本系列第二篇文章。

Flink 源码分析之 Client 解析流程分析
Flink 源码分析之 Client 解析流程分析
抛出问题
首先来思考一个问题,我们在提交 Flink 任务的时候,在 Flink 客户端执行了下面的命令后,Flink 客户端做了哪些事情?又是怎么执行我们自己写的代码的?下面就来一层一层的揭开 flink-client 的神秘面纱。
flink run -d -m yarn-cluster \
-Dyarn.application.name=FlinkStreamingNewDemoHome \
-Dyarn.application.queue=flink \
-Dmetrics.reporter.promgateway.groupingKey="jobname=FlinkStreamingNewDemoHome" \
-Dmetrics.reporter.promgateway.jobName=FlinkStreamingNewDemoHome \
-c flink.stream.FlinkStreamingNewDemo \
-Denv.java.opts="-Dflink_job_name=FlinkStreamingNewDemoHome" \
/home/jason/bigdata/jar/flink-1.14.0-1.0-SNAPSHOT.jar
要解答这个问题,就先要弄明白,当执行上面命令的时候,实际上底层是在执行哪些代码?我们可以通过查看 flink 脚本找到答案。
# Add HADOOP_CLASSPATH to allow the usage of Hadoop file systems
exec "${JAVA_RUN}" $JVM_ARGS $FLINK_ENV_JAVA_OPTS "${log_setting[@]}" -classpath "`manglePathList "$CC_CLASSPATH:$INTERNAL_HADOOP_CLASSPATHS"`" org.apache.flink.client.cli.CliFrontend "$@"
你会发现脚本的最后一行,实际上是通过 Java 命令执行 org.apache.flink.client.cli.CliFrontend 这个对象的,然后把上面的一大堆 Flink 命令当成参数传入到 main 方法里,我们先在 IDEA 里面找到对应的代码。
CliFrontend

可以看到 CliFrontend 这个类是位于 flink-clients 模块下的,接着来看一下 CliFrontend 类的几个重要成员变量。
直接找到 CliFrontend#main 方法。
CliFrontend#main 源码分析
/** Submits the job based on the arguments. */
public static void main(final String[] args) {
    // 获取 JVM 信息、hadoop 信息等打印日志
    EnvironmentInformation.logEnvironmentInfo(LOG, "Command Line Client", args);

    // 1. find the configuration directory
    // 获取 flink 的配置文件路径 即: flink/conf/flink-conf.yaml
    final String configurationDirectory = getConfigurationDirectoryFromEnv();

    // 2. load the global configuration
    // 解析并加载 flink-conf.yaml 配置文件中的配置到 Configuration(本质上是一个 Map)
    final Configuration configuration =
            GlobalConfiguration.loadConfiguration(configurationDirectory);

    // 3. load the custom command lines
    // 初始化 3 种不同的 CLI 分别是 GenericCLI 对应的是 per-job 模式,flinkYarnSessionCLI 对应的是 yarn-session 模式,以及 DefaultCLI 对应的是 standalone 模式
    final List<CustomCommandLine> customCommandLines =
            loadCustomCommandLines(configuration, configurationDirectory);

    int retCode = 31;
    try {
        // 初始化 CliFrontend 客户端对象
        final CliFrontend cli = new CliFrontend(configuration, customCommandLines);

        SecurityUtils.install(new SecurityConfiguration(cli.configuration));
        // 调用 parseAndRun 执行
        retCode = SecurityUtils.getInstalledContext().runSecured(() -> cli.parseAndRun(args));
    } catch (Throwable t) {
        final Throwable strippedThrowable =
                ExceptionUtils.stripException(t, UndeclaredThrowableException.class);
        LOG.error("Fatal error while running command line interface.", strippedThrowable);
        strippedThrowable.printStackTrace();
    } finally {
        System.exit(retCode);
    }
}
main 方法的代码逻辑非常清晰,大致可以分为下面 5 个步骤:
- 获取 flink 的配置文件路径 即: flink/conf/flink-conf.yaml
- 解析并加载 flink-conf.yaml 配置文件中的配置到 Configuration(本质上是一个 Map)
- 初始化 3 种不同的 CLI 分别是 GenericCLI 对应的是 per-job 模式,flinkYarnSessionCLI 对应的是 yarn-session 模式,以及 DefaultCLI 对应的是 standalone 模式
- 初始化 CliFrontend 客户端对象
- 调用 parseAndRun 解析并执行程序
下面就来看一下每个步骤具体做了哪些事情。
flink-conf.yaml 获取配置文件源码
public static String getConfigurationDirectoryFromEnv() {
    String location = System.getenv(ConfigConstants.ENV_FLINK_CONF_DIR);

    if (location != null) {
        if (new File(location).exists()) {
            return location;
        } else {
            throw new RuntimeException(
                    "The configuration directory ''"
                            + location
                            + "'', specified in the ''"
                            + ConfigConstants.ENV_FLINK_CONF_DIR
                            + "'' environment variable, does not exist.");
        }
    } else if (new File(CONFIG_DIRECTORY_FALLBACK_1).exists()) {
        location = CONFIG_DIRECTORY_FALLBACK_1;
    } else if (new File(CONFIG_DIRECTORY_FALLBACK_2).exists()) {
        location = CONFIG_DIRECTORY_FALLBACK_2;
    } else {
        throw new RuntimeException(
                "The configuration directory was not specified. "
                        + "Please specify the directory containing the configuration file through the ''"
                        + ConfigConstants.ENV_FLINK_CONF_DIR
                        + "'' environment variable.");
    }
    return location;
}
代码比较简单,直接获取系统环境变量的值,然后返回 flink-conf.yaml 配置文件的路径。
flink-conf.yaml 解析配置文件源码
private static Configuration loadYAMLResource(File file) {
    final Configuration config = new Configuration();

    try (BufferedReader reader =
            new BufferedReader(new InputStreamReader(new FileInputStream(file)))) {

        String line;
        int lineNo = 0;
        while ((line = reader.readLine()) != null) {
            lineNo++;
            // 1. check for comments
            String[] comments = line.split("#", 2);
            String conf = comments[0].trim();

            // 2. get key and value
            if (conf.length() > 0) {
                String[] kv = conf.split(": ", 2);

                // skip line with no valid key-value pair
                if (kv.length == 1) {
                    LOG.warn(
                            "Error while trying to split key and value in configuration file "
                                    + file
                                    + ":"
                                    + lineNo
                                    + ": \""
                                    + line
                                    + "\"");
                    continue;
                }
                                // 获取配置的 key: value
                  // 比如,jobmanager.rpc.address: storm1
                  // key: jobmanager.rpc.address
                  // value: storm1
                String key = kv[0].trim();
                String value = kv[1].trim();

                // sanity check
                if (key.length() == 0 || value.length() == 0) {
                    LOG.warn(
                            "Error after splitting key and value in configuration file "
                                    + file
                                    + ":"
                                    + lineNo
                                    + ": \""
                                    + line
                                    + "\"");
                    continue;
                }

                LOG.info(
                        "Loading configuration property: {}, {}",
                        key,
                        isSensitive(key) ? HIDDEN_CONTENT : value);
                  // 加入到 config,相当于是一个 map
                config.setString(key, value);
            }
        }
    } catch (IOException e) {
        throw new RuntimeException("Error parsing YAML configuration.", e);
    }

    return config;
}
loadConfiguration 方法最终会调用 loadYAMLResource 方法进行解析 flink-conf.yaml 配置文件,通过一行行的读取配置,然后把配置的 key,value 加入到 Configuration 中,Configuration 的本质就是一个 map,用来保存 flink 的配置信息。
CustomCommandLine 初始化源码
public static List<CustomCommandLine> loadCustomCommandLines(
        Configuration configuration, String configurationDirectory) {
    List<CustomCommandLine> customCommandLines = new ArrayList<>();
    customCommandLines.add(new GenericCLI(configuration, configurationDirectory));

    // Command line interface of the YARN session, with a special initialization here
    // to prefix all options with y/yarn.
    final String flinkYarnSessionCLI = "org.apache.flink.yarn.cli.FlinkYarnSessionCli";
    try {
        customCommandLines.add(
                loadCustomCommandLine(
                        flinkYarnSessionCLI,
                        configuration,
                        configurationDirectory,
                        "y",
                        "yarn"));
    } catch (NoClassDefFoundError | Exception e) {
        final String errorYarnSessionCLI = "org.apache.flink.yarn.cli.FallbackYarnSessionCli";
        try {
            LOG.info("Loading FallbackYarnSessionCli");
            customCommandLines.add(loadCustomCommandLine(errorYarnSessionCLI, configuration));
        } catch (Exception exception) {
            LOG.warn("Could not load CLI class {}.", flinkYarnSessionCLI, e);
        }
    }

    // Tips: DefaultCLI must be added at last, because getActiveCustomCommandLine(..) will get
    // the
    //       active CustomCommandLine in order and DefaultCLI isActive always return true.
    customCommandLines.add(new DefaultCLI());

    return customCommandLines;
}
loadCustomCommandLines 主要是用来初始化 CustomCommandLine 的,返回一个 CustomCommandLine 的集合。
这里主要有三种不同的 CustomCommandLine 实现类,分别是 GenericCLI,FlinkYarnSessionCli,DefaultCLI。

三种不同的实现对应三种不同的模式,GenericCLI 对应的是 per-job 模式,flinkYarnSessionCLI 对应的是 yarn-session 模式,以及 DefaultCLI 对应的是 standalone 模式。
CliFrontend 初始化源码
// 初始化 CliFrontend 客户端对象
final CliFrontend cli = new CliFrontend(configuration, customCommandLines);

public CliFrontend(
            Configuration configuration,
            ClusterClientServiceLoader clusterClientServiceLoader,
            List<CustomCommandLine> customCommandLines) {
        this.configuration = checkNotNull(configuration);
        this.customCommandLines = checkNotNull(customCommandLines);
        this.clusterClientServiceLoader = checkNotNull(clusterClientServiceLoader);

        FileSystem.initialize(
                configuration, PluginUtils.createPluginManagerFromRootFolder(configuration));

        this.customCommandLineOptions = new Options();

        for (CustomCommandLine customCommandLine : customCommandLines) {
            customCommandLine.addGeneralOptions(customCommandLineOptions);
            customCommandLine.addRunOptions(customCommandLineOptions);
        }

        this.clientTimeout = configuration.get(ClientOptions.CLIENT_TIMEOUT);
        this.defaultParallelism = configuration.getInteger(CoreOptions.DEFAULT_PARALLELISM);
    }
通过上面第二步和第三步获取到的 configuration 和 customCommandLines 信息初始化 CliFrontend 对象。
parseAndRun 解析并运行程序源码解析
public int parseAndRun(String[] args) {

    // check for action
    if (args.length < 1) {
        CliFrontendParser.printHelp(customCommandLines);
        System.out.println("Please specify an action.");
        return 1;
    }

    // get action
    // 其实这里就是 run
    String action = args[0];

    // remove action from parameters
    final String[] params = Arrays.copyOfRange(args, 1, args.length);

    try {
        // do action
        switch (action) {
            case ACTION_RUN:
                // 所以会走到这里
                run(params);
                return 0;
            case ACTION_RUN_APPLICATION:
                runApplication(params);
                return 0;
            case ACTION_LIST:
                list(params);
                return 0;
            case ACTION_INFO:
                info(params);
                return 0;
            case ACTION_CANCEL:
                cancel(params);
                return 0;
            case ACTION_STOP:
                stop(params);
                return 0;
            case ACTION_SAVEPOINT:
                savepoint(params);
                return 0;
            case "-h":
            case "--help":
                CliFrontendParser.printHelp(customCommandLines);
                return 0;
            case "-v":
            case "--version":
                String version = EnvironmentInformation.getVersion();
                String commitID = EnvironmentInformation.getRevisionInformation().commitId;
                System.out.print("Version: " + version);
                System.out.println(
                        commitID.equals(EnvironmentInformation.UNKNOWN)
                                ? ""
                                : ", Commit ID: " + commitID);
                return 0;
            default:
                System.out.printf("\"%s\" is not a valid action.\n", action);
                System.out.println();
                System.out.println(
                        "Valid actions are \"run\", \"run-application\", \"list\", \"info\", \"savepoint\", \"stop\", or \"cancel\".");
                System.out.println();
                System.out.println(
                        "Specify the version option (-v or --version) to print Flink version.");
                System.out.println();
                System.out.println(
                        "Specify the help option (-h or --help) to get help on the command.");
                return 1;
        }
    } catch (CliArgsException ce) {
        return handleArgException(ce);
    } catch (ProgramParametrizationException ppe) {
        return handleParametrizationException(ppe);
    } catch (ProgramMissingJobException pmje) {
        return handleMissingJobException();
    } catch (Exception e) {
        return handleError(e);
    }
}
前面 4 个步骤都是在做一些准备工作,最后一步才是真正开始执行程序,因为我们执行的是 flink run 命令,所以会走到 run(params) 方法里面。
run(params) 源码
protected void run(String[] args) throws Exception {
    LOG.info("Running ''run'' command.");
    // 获取所有的 flink 命令
    final Options commandOptions = CliFrontendParser.getRunCommandOptions();
    // 获取输入参数里面的 flink 命令
    final CommandLine commandLine = getCommandLine(commandOptions, args, true);

    // evaluate help flag
    // 如果是 help 打印帮忙命令信息
    if (commandLine.hasOption(HELP_OPTION.getOpt())) {
        CliFrontendParser.printHelpForRun(customCommandLines);
        return;
    }
    // 获取处于 active 状态的 CLI
    final CustomCommandLine activeCommandLine =
            validateAndGetActiveCommandLine(checkNotNull(commandLine));
    // 构建 ProgramOptions 对象
    final ProgramOptions programOptions = ProgramOptions.create(commandLine);
    // 获取用户提交的 jar 包和依赖包
    final List<URL> jobJars = getJobJarAndDependencies(programOptions);

    final Configuration effectiveConfiguration =
            getEffectiveConfiguration(activeCommandLine, commandLine, programOptions, jobJars);

    LOG.debug("Effective executor configuration: {}", effectiveConfiguration);

    try (PackagedProgram program = getPackagedProgram(programOptions, effectiveConfiguration)) {
        // 真正的执行程序
        executeProgram(effectiveConfiguration, program);
    }
}
首先会获取 flink 所有的 options,然后在获取我们输入的 flink 命令。如果有 h 的话就会打印 help 信息。接下来会获取处于 active 状态的 CustomCommandLine,这里获取到的应该是 GenericCLI 。然后获取用户提交的 jar 包和依赖包,最后调用 executeProgram 开始真正的执行程序。
public static void executeProgram(
        PipelineExecutorServiceLoader executorServiceLoader,
        Configuration configuration,
        PackagedProgram program,
        boolean enforceSingleJobExecution,
        boolean suppressSysout)
        throws ProgramInvocationException {
    checkNotNull(executorServiceLoader);
    // 获取用户代码的类加载器,默认情况下是 ChildFirstClassLoader 这个可以在配置文件里面配置
    final ClassLoader userCodeClassLoader = program.getUserCodeClassLoader();
    // 获取当前线程的类加载器
    final ClassLoader contextClassLoader = Thread.currentThread().getContextClassLoader();
    try {
        // 把当前线程的类加载器设置为 ChildFirstClassLoader
        Thread.currentThread().setContextClassLoader(userCodeClassLoader);

        LOG.info(
                "Starting program (detached: {})",
                !configuration.getBoolean(DeploymentOptions.ATTACHED));
        // 初始化上下文的配置信息 ContextEnvironment
        ContextEnvironment.setAsContext(
                executorServiceLoader,
                configuration,
                userCodeClassLoader,
                enforceSingleJobExecution,
                suppressSysout);
        // 初始化 StreamContextEnvironment
        StreamContextEnvironment.setAsContext(
                executorServiceLoader,
                configuration,
                userCodeClassLoader,
                enforceSingleJobExecution,
                suppressSysout);

        try {
            // 通过反射去执行用户编写的代码
            program.invokeInteractiveModeForExecution();
        } finally {
            ContextEnvironment.unsetAsContext();
            StreamContextEnvironment.unsetAsContext();
        }
    } finally {
          // 最后在把类加载器切换回去
        Thread.currentThread().setContextClassLoader(contextClassLoader);
    }
}
先是会获取用户代码的类加载器,默认情况下是 ChildFirstClassLoader 这个可以在 flink-conf.yaml 配置文件里面配置
#Flink的类加载策略
classloader.resolve-order: child-first/parent-first
这里有一个非常有意思的地方是,获取当前线程的类加载器 contextClassLoader ,然后把当前线程的类加载器设置为 ChildFirstClassLoader 或者 ParentFirstClassLoader 紧接着初始化 ContextEnvironment 和 StreamContextEnvironment 的上下文配置信息,最终通过反射的方式调用 invokeInteractiveModeForExecution 方法,也就是在执行用户的代码,注意最后在 finally 里面又把线程的类加载器切换到了之前的 contextClassLoader,相当于做了一个线程类加载器的切换,也就是通过这种方式,实现了用户代码和 flink 框架代码不发生冲突。
callMainMethod 源码
private static void callMainMethod(Class<?> entryClass, String[] args)
        throws ProgramInvocationException {
    Method mainMethod;
    if (!Modifier.isPublic(entryClass.getModifiers())) {
        throw new ProgramInvocationException(
                "The class " + entryClass.getName() + " must be public.");
    }

    try {
        // 获取到用户编写代码类的 main 方法
        mainMethod = entryClass.getMethod("main", String[].class);
    } catch (NoSuchMethodException e) {
        throw new ProgramInvocationException(
                "The class " + entryClass.getName() + " has no main(String[]) method.");
    } catch (Throwable t) {
        throw new ProgramInvocationException(
                "Could not look up the main(String[]) method from the class "
                        + entryClass.getName()
                        + ": "
                        + t.getMessage(),
                t);
    }

    if (!Modifier.isStatic(mainMethod.getModifiers())) {
        throw new ProgramInvocationException(
                "The class " + entryClass.getName() + " declares a non-static main method.");
    }
    if (!Modifier.isPublic(mainMethod.getModifiers())) {
        throw new ProgramInvocationException(
                "The class " + entryClass.getName() + " declares a non-public main method.");
    }

    try {
        // 调用 invoke 方法的时候就会走到用户代码的 main 方法里面
        mainMethod.invoke(null, (Object) args);
    } catch (IllegalArgumentException e) {
        throw new ProgramInvocationException(
                "Could not invoke the main method, arguments are not matching.", e);
    } catch (IllegalAccessException e) {
        throw new ProgramInvocationException(
                "Access to the main method was denied: " + e.getMessage(), e);
    } catch (InvocationTargetException e) {
        Throwable exceptionInMethod = e.getTargetException();
        if (exceptionInMethod instanceof Error) {
            throw (Error) exceptionInMethod;
        } else if (exceptionInMethod instanceof ProgramParametrizationException) {
            throw (ProgramParametrizationException) exceptionInMethod;
        } else if (exceptionInMethod instanceof ProgramInvocationException) {
            throw (ProgramInvocationException) exceptionInMethod;
        } else {
            throw new ProgramInvocationException(
                    "The main method caused an error: " + exceptionInMethod.getMessage(),
                    exceptionInMethod);
        }
    } catch (Throwable t) {
        throw new ProgramInvocationException(
                "An error occurred while invoking the program''s main method: " + t.getMessage(),
                t);
    }
}
最终调用的是 callMainMethod 方法。首先会判断该类是否是 public 的,如果是的话,会获取到 main 方法,然后再次判断 mainMethod 是否是 public static 修饰的,都满足条件的话,最后调用 invoke 方法,这个时候就会来到用户自己的代码,比如上面提交的代码是 flink.stream.FlinkStreamingNewDemo 那么就会执行 FlinkStreamingNewDemo 类的 main 方法。经过上面一系列的解析配置,初始化最终终于走到我们的代码里面了。
本文由mdnice多平台发布

illuminate/routing 源码分析之注册路由
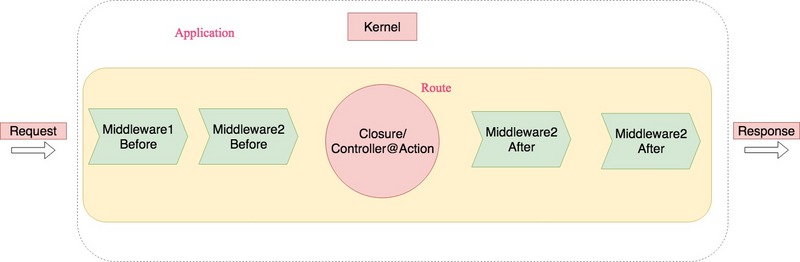
<p> 我们知道,在 Laravel 世界里,外界传进来一个 Request 时,会被 Kernel 处理并返回给外界一个 Response。Kernel 在处理 Request 时,会调用 <strong>illuminate/routing</strong> 包提供的路由功能,来根据当前的 Request,转发到对应的执行逻辑(执行逻辑的形式可以为 Closure 或 Controller@Action)。同时,在进入执行逻辑之前和之后,还会依次进入 Middlewares 的前置和后置处理。所以,一个 Request 由 Kernel 处理为一个 Response 的一个生命周期图如下:<br></p>
<p> 根据上面的流程,理解路由系统的内部工作原理是非常重要的!当然,它也是非常复杂的。<strong > 想要深入理解一个工具的使用,学习它的内部设计原理才是画龙点睛 </strong>。在理解 <strong>illuminate/routing</strong> 如何工作之前,先设想如何去设计一个路由系统呢?一起想个三分钟吧。</p> <ul> <li> <strong > 注册路由 </strong> :想想一个 Request 进入程序时,携带的请求信息类似为 <strong>GET <a href="https://localhost/api/v2/people/1/accounts?type=bank" rel="nofollow noreferrer">https://localhost/api/v2/peop...</a></strong>,所以我们需要定义一个 Route 对象来表示这个信息,同时还得定义 RouteCollection(Route 的集合)来添加、获取和匹配出一个 Route。程序启动时,开发者定义的所有路由(Route)列表都会被注册到 RouteCollection 内。</li> <li> <strong > 查找路由 </strong> :有了整个程序的路由列表,这样当一个 Request 进来时,再根据当前 Request 的信息匹配出一个合适的 Route,所以可以设计一个类似 RouterManager 对象,作用类似开发经理 Manager 的总体统筹,来调用 <strong>$router->findRoute (\$request): Route</strong> 匹配出合适的 Route。</li> <li> <strong > 运行路由 </strong> :既然匹配出了对应 Route,那可以调用 <strong>RouterManager->runRoute (&dollar;route): Response</strong> 得到对应的 Response 返回给外界。</li> </ul> <p > 所以,如果自己去设计一个路由系统,就可以按照上面三步去做,思路也很好理解。实际上,Laravel 的路由模块 <strong>illuminate/routing</strong> 也是按照这三个步骤来设计的。本文将会源码分析下 Laravel 是如何把开发者在 routes/*.php 中写的路由列表注册到 RouteCollection 对象内的。</p> <p > 我们知道,Laravel 在启动时第一步会去实例化 <strong>\Illuminate\Foundation\Application</strong> 对象,这个容器对象会去调用 <strong><a href="https://github.com/laravel/framework/blob/5.6/src/Illuminate/Routing/RoutingServiceProvider.php#L21-L29" rel="nofollow noreferrer">\Illuminate\Routing\RoutingServiceProvider::register ()</a></strong> 往容器对象的 <strong><a href="https://github.com/laravel/framework/blob/5.6/src/Illuminate/Container/Container.php#L34" rel="nofollow noreferrer">$bindings 数组属性 </a></strong> 以 <strong>key-value</strong> 形式注册进来,注册的对象主要包括 Router(就是上文的 RouterManager 角色,把它比作为开发小组的开发经理角色)等。</p> <p > 然后会去调用 <strong>\App\Providers\RouteServiceProvider::boot ()</strong> 方法默认加载 <strong>routes/api.php 和 routes/web.php</strong> 文件中注册的路由列表,并且以 Facade 模式去注册路由列表:</p>
Route::prefix($prefix)->middleware($middleware)->group(''xxx/web.php'');
<p> 实际上就是调用 <strong>\Illuminate\Routing\RouteRegistrar</strong> 类里的 <strong>attribute (key, value)</strong> 方法以 <strong>key-value</strong> 形式注册到 <strong><a href="https://github.com/laravel/framework/blob/5.6/src/Illuminate/Routing/RouteRegistrar.php#L39" rel="nofollow noreferrer">attributes</a></strong> 数组属性里。最主要的 <strong>group (string)</strong> 方法调用的是 <strong><a href="https://github.com/laravel/framework/blob/5.6/src/Illuminate/Routing/Router.php#L349-L358" rel="nofollow noreferrer">Router::group ()</a></strong> 方法,然后调用 <strong><a href="https://github.com/laravel/framework/blob/5.6/src/Illuminate/Routing/Router.php#L393-L400" rel="nofollow noreferrer">loadRoutes (routes)</a></strong> 去执行在 <strong>routes/api.php 和 routes/web.php</strong> 文件中定义的路由。对于每一种方法(如 GET、POST 等等方法)的路由,<strong>Router</strong> 对象内都有对应的方法来添加 <strong>Route</strong> 注册到 <strong>RouteCollection</strong> 中,比如常见的 <strong><a href="https://github.com/laravel/framework/blob/5.6/src/Illuminate/Routing/Router.php#L139-L142" rel="nofollow noreferrer">get (uri, action)</a></strong> 方法,就是调用的 <strong>RouteCollection::add (route)</strong> 方法把 <strong>Route</strong> 注册到 <strong>RouteCollection</strong> 中。而 <strong>route</strong> 的创建,调用的是 <strong><a href="https://github.com/laravel/framework/blob/5.6/src/Illuminate/Routing/Router.php#L441-L463" rel="nofollow noreferrer">Router::createRoute (methods, uri, action)</a></strong>,其中由于 <strong>$action</strong> 可能是 <strong>Closure</strong> 或者 <strong>Controller@Action</strong>,如果是 <strong>Controller@Action</strong> 形式,则需要把字符串切割为数组形式,再传入 <strong>Route</strong> 类的构造函数里。</p> <p > 总结下注册路由所需要用到的对象:使用 <strong>Route</strong> 来表示路由信息,使用 <strong>RouteCollection</strong> 来表示路由集合列表,并且提供了添加删除方法来把 <strong>Route</strong> 注册到 <strong>RouteCollection</strong> 内,而 <strong>Router</strong> 才是纵览全局的角色,注册路由是通过该对象发起的,它会调用 <strong>RouteCollection</strong> 去注册路由,路由的元数据信息如路由名称等是用 <strong>RouteRegistrar</strong> 对象表示。从上文可知道,所有对象中,<strong>Router</strong> 才是画龙点睛的对象。</p> <p > 通过以上的分析,就能对 <strong>illuminate/routing</strong> 路由系统的基本设计越来越清晰。一个 Request 进来后,Application 首先开始启动并按照以上逻辑开始注册路由列表,然后就是根据当前 Request 信息查找对应的 Route 对象。</p> <p > 那如何根据当前 Request 信息查找出对应的 Route 的呢?见本系列第二篇文章。</p>
原文地址:https://segmentfault.com/a/1190000015862083

JVM 源码分析之 Attach 机制实现完全解读
本文来自:HeapDump 性能社区
PerfMa (笨马网络) 官网
Attach 是什么
在讲这个之前,我们先来点大家都知道的东西,当我们感觉线程一直卡在某个地方,想知道卡在哪里,首先想到的是进行线程 dump,而常用的命令是 jstack ,我们就可以看到如下线程栈了

大家是否注意过上面圈起来的两个线程,”Attach Listener” 和 “Signal Dispatcher”,这两个线程是我们这次要讲的 Attach 机制的关键,先偷偷告诉各位,其实 Attach Listener 这个线程在 jvm 起来的时候可能并没有的,后面会细说。
那 Attach 机制是什么?说简单点就是 jvm 提供一种 jvm 进程间通信的能力,能让一个进程传命令给另外一个进程,并让它执行内部的一些操作,比如说我们为了让另外一个 jvm 进程把线程 dump 出来,那么我们跑了一个 jstack 的进程,然后传了个 pid 的参数,告诉它要哪个进程进行线程 dump,既然是两个进程,那肯定涉及到进程间通信,以及传输协议的定义,比如要执行什么操作,传了什么参数等
Attach 能做些什么
总结起来说,比如内存 dump,线程 dump,类信息统计 (比如加载的类及大小以及实例个数等),动态加载 agent (使用过 btrace 的应该不陌生),动态设置 vm flag (但是并不是所有的 flag 都可以设置的,因为有些 flag 是在 jvm 启动过程中使用的,是一次性的),打印 vm flag,获取系统属性等,这些对应的源码 (AttachListener.cpp) 如下
static AttachOperationFunctionInfo funcs[] = {
  { "agentProperties",  get_agent_properties },
  { "datadump",         data_dump },
  { "dumpheap",         dump_heap },
  { "load",             JvmtiExport::load_agent_library },
  { "properties",       get_system_properties },
  { "threaddump",       thread_dump },
  { "inspectheap",      heap_inspection },
  { "setflag",          set_flag },
  { "printflag",        print_flag },
  { "jcmd",             jcmd },
  { NULL,               NULL }
};
后面是命令对应的处理函数。
Attach 在 jvm 里如何实现的
Attach Listener 线程的创建
前面也提到了,jvm 在启动过程中可能并没有启动 Attach Listener 这个线程,可以通过 jvm 参数来启动,代码 (Threads::create_vm)如下:
  if (!DisableAttachMechanism) {
    if (StartAttachListener || AttachListener::init_at_startup()) {
      AttachListener::init();
    }
  }
bool AttachListener::init_at_startup() {
  if (ReduceSignalUsage) {
    return true;
  } else {
    return false;
  }
}
其中 DisableAttachMechanism,StartAttachListener ,ReduceSignalUsage 均默认是 false (globals.hpp)
product(bool, DisableAttachMechanism, false,
         "Disable mechanism that allows tools to Attach to this VM”)
product(bool, StartAttachListener, false,
          "Always start Attach Listener at VM startup")
product(bool, ReduceSignalUsage, false,
          "Reduce the use of OS signals in Java and/or the VM”)
因此 AttachListener::init () 并不会被执行,而 Attach Listener 线程正是在此方法里创建的

既然在启动的时候不会创建这个线程,那么我们在上面看到的那个线程是怎么创建的呢,这个就要关注另外一个线程 “Signal Dispatcher” 了,顾名思义是处理信号的,这个线程是在 jvm 启动的时候就会创建的,具体代码就不说了。
下面以 jstack 的实现来说明触发 Attach 这一机制进行的过程,jstack 命令的实现其实是一个叫做 JStack.java 的类,查看 jstack 代码后会走到下面的方法里
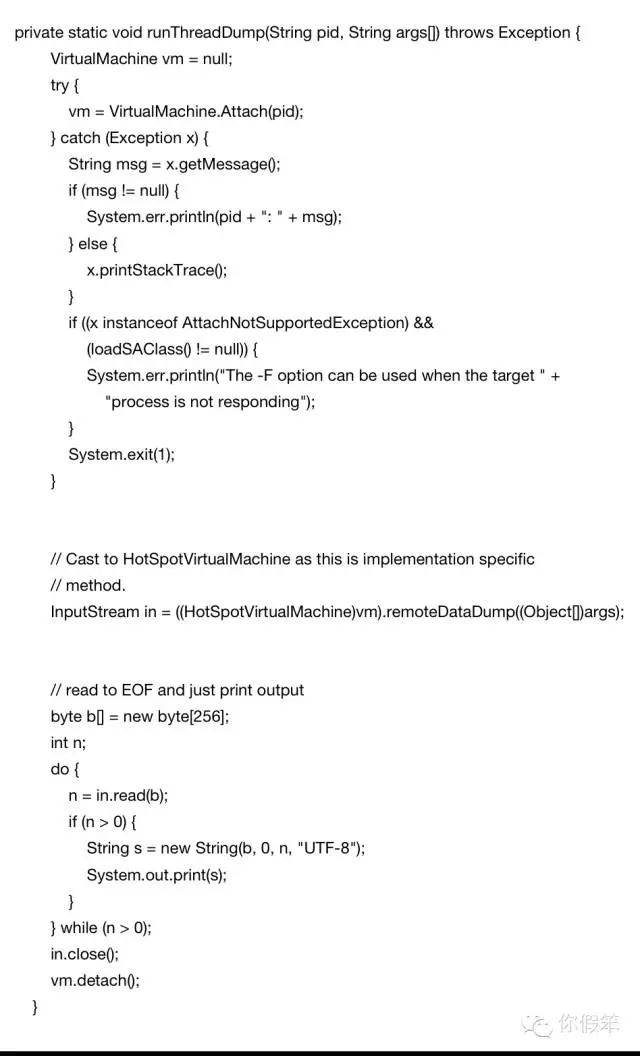
请注意 VirtualMachine.Attach (pid); 这行代码,触发 Attach pid 的关键,如果是在 linux 下会走到下面的构造函数
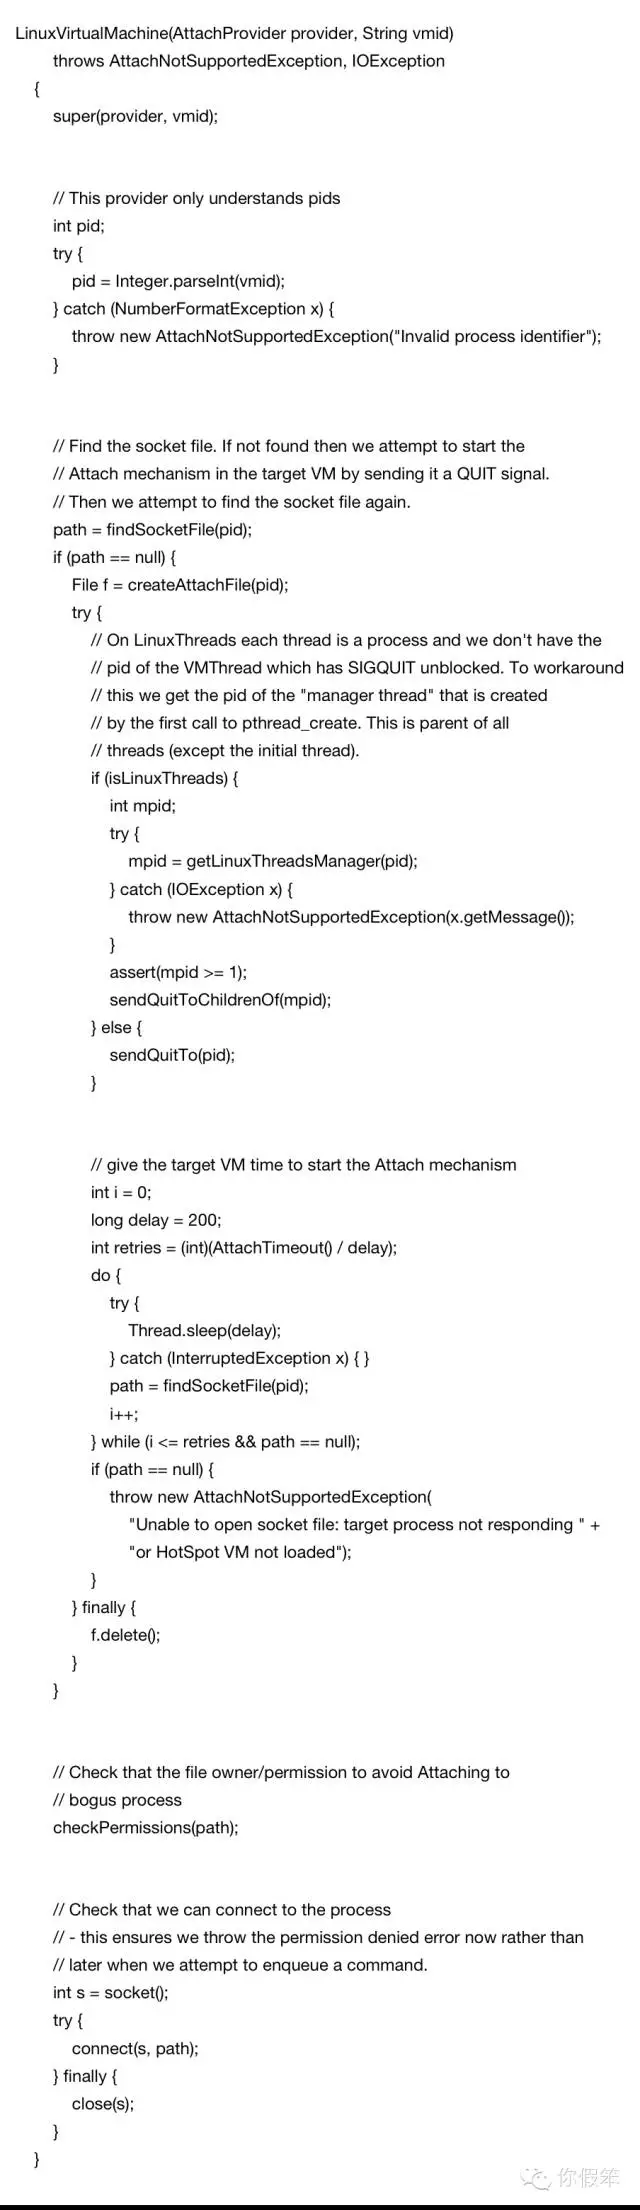
这里要解释下代码了,首先看到调用了 createAttachFile 方法在目标进程的 cwd 目录下创建了一个文件 /proc//cwd/.Attach_pid,这个在后面的信号处理过程中会取出来做判断 (为了安全),另外我们知道在 linux 下线程是用进程实现的,在 jvm 启动过程中会创建很多线程,比如我们上面的信号线程,也就是会看到很多的 pid (应该是 LWP),那么如何找到这个信号处理线程呢,从上面实现来看是找到我们传进去的 pid 的父进程,然后给它的所有子进程都发送一个 SIGQUIT 信号,而 jvm 里除了信号线程,其他线程都设置了对此信号的屏蔽,因此收不到该信号,于是该信号就传给了 “Signal Dispatcher”,在传完之后作轮询等待看目标进程是否创建了某个文件,AttachTimeout 默认超时时间是 5000ms,可通过设置系统变量 sun.tools.Attach.AttachTimeout 来指定,下面是 Signal Dispatcher 线程的 entry 实现
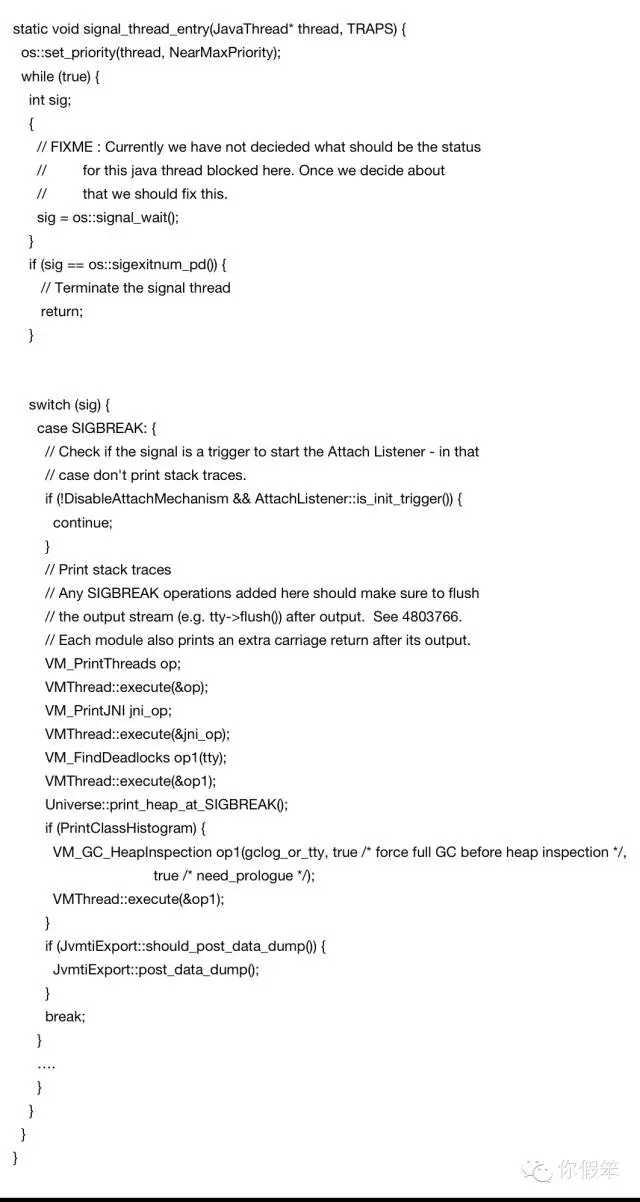
当信号是 SIGBREAK (在 jvm 里做了 #define,其实就是 SIGQUIT) 的时候,就会触发 AttachListener::is_init_trigger () 的执行
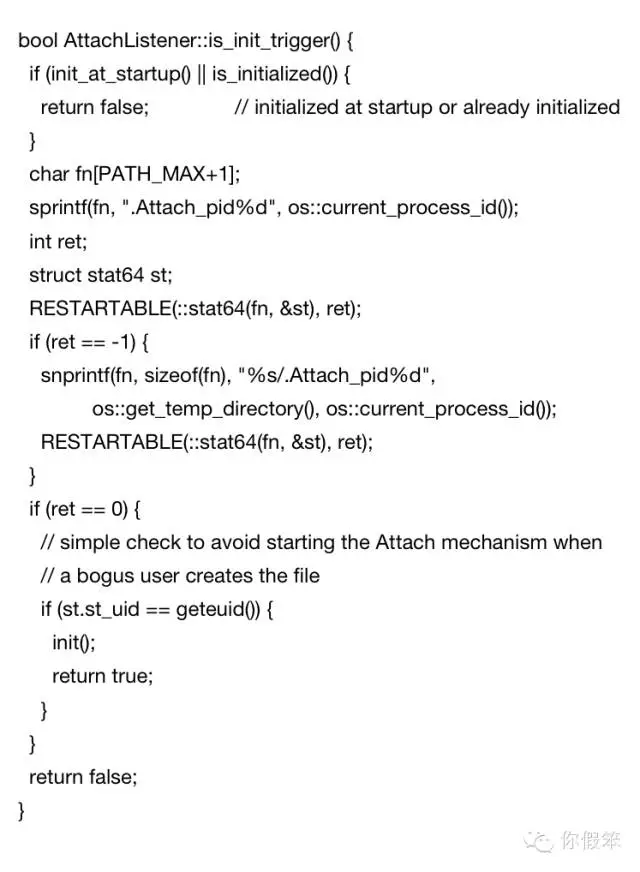
一开始会判断当前进程目录下是否有个.Attach_pid 文件(前面提到了),如果没有就会在 /tmp 下创建一个 /tmp/.Attach_pid,当那个文件的 uid 和自己的 uid 是一致的情况下(为了安全)再调用 init 方法
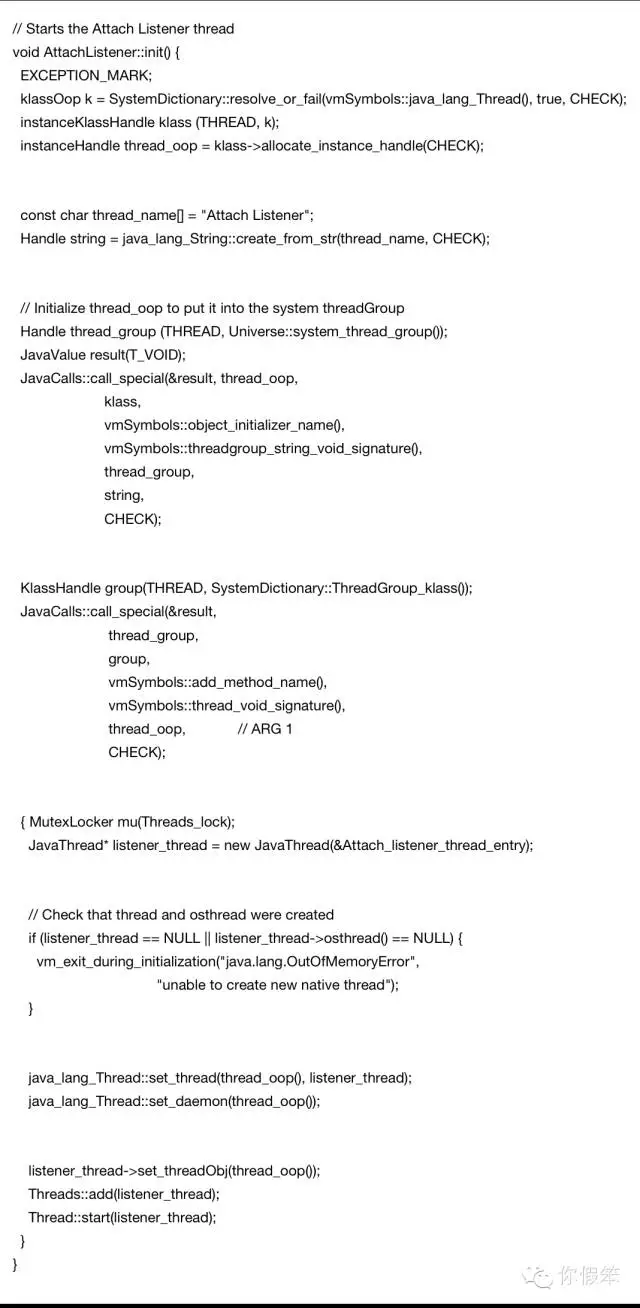
此时水落石出了,看到创建了一个线程,并且取名为 Attach Listener。再看看其子类 LinuxAttachListener 的 init 方法
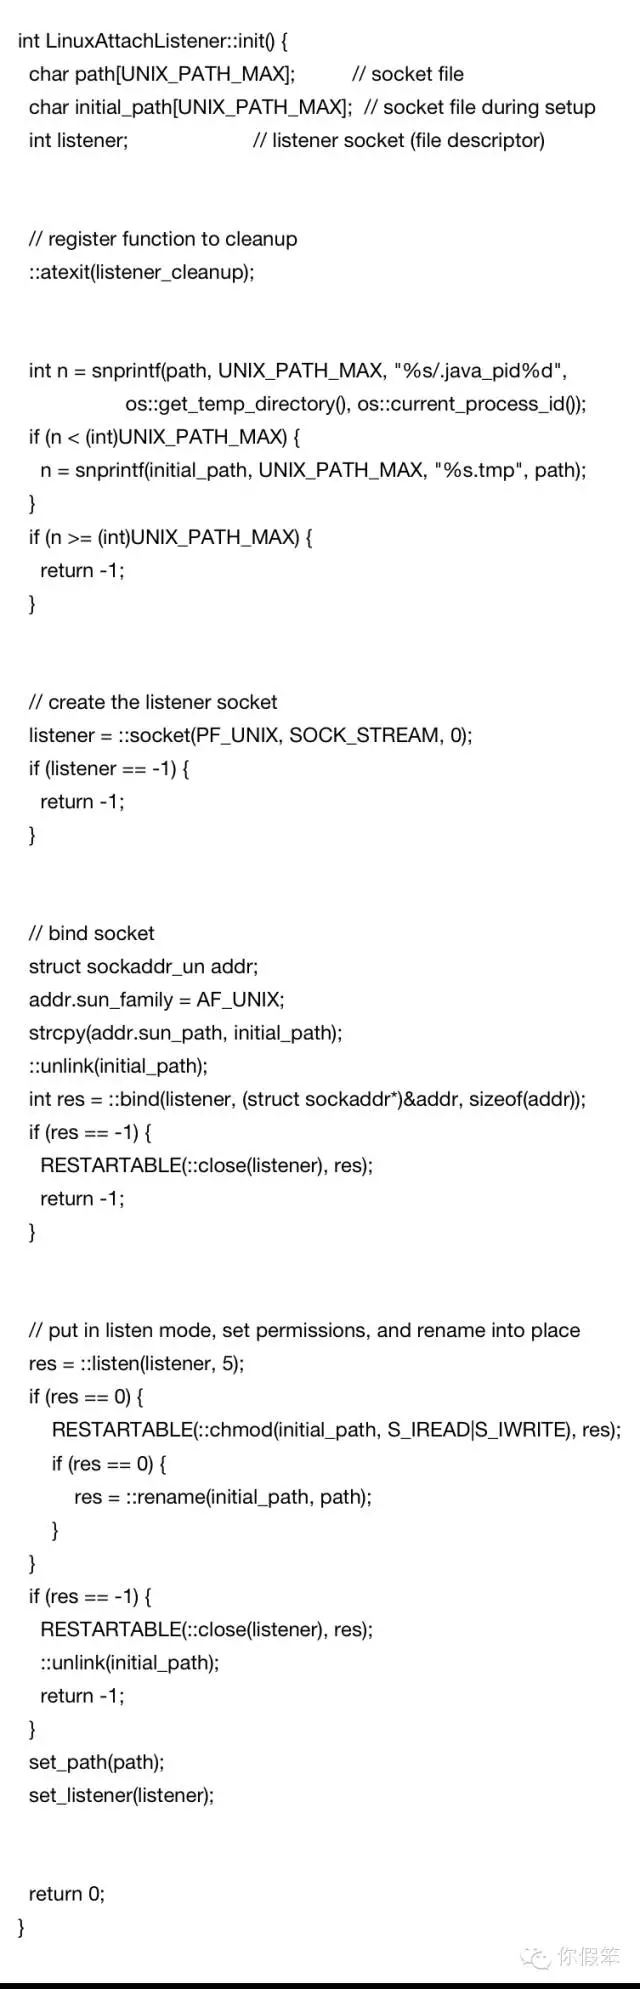
看到其创建了一个监听套接字,并创建了一个文件 /tmp/.java_pid,这个文件就是客户端之前一直在轮询等待的文件,随着这个文件的生成,意味着 Attach 的过程圆满结束了。
Attach listener 接收请求
看看它的 entry 实现 Attach_listener_thread_entry
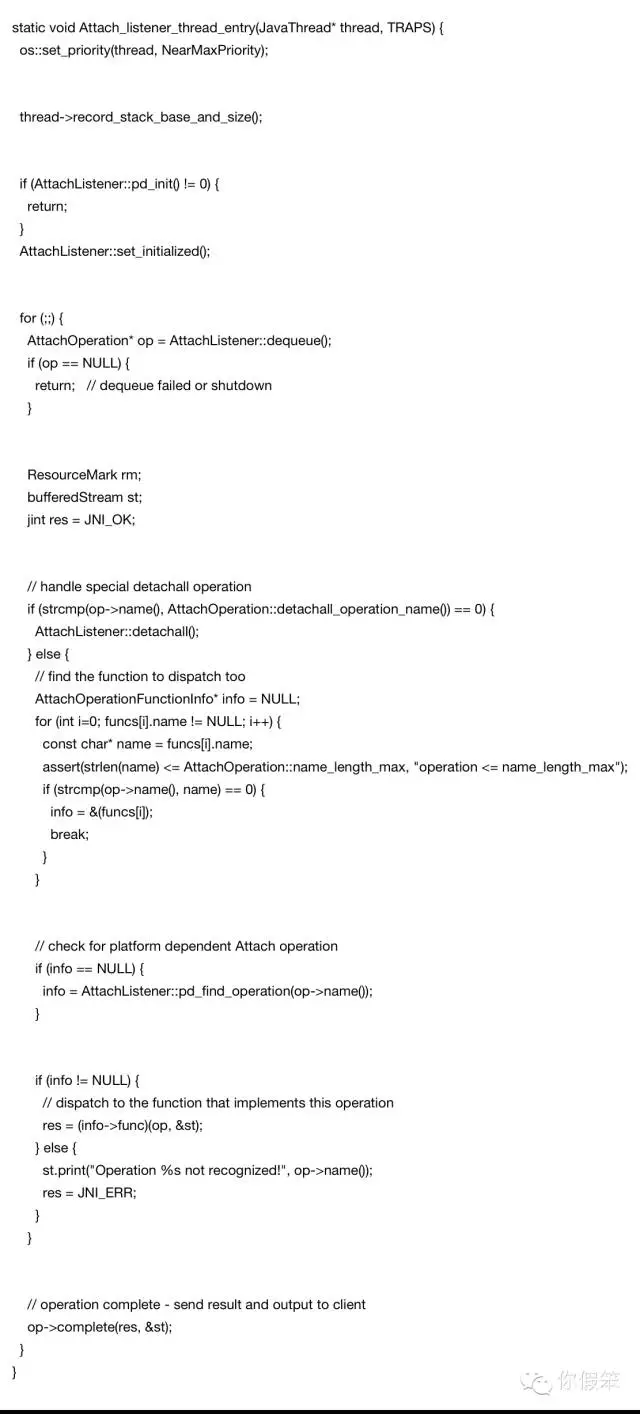
从代码来看就是从队列里不断取 AttachOperation,然后找到请求命令对应的方法进行执行,比如我们一开始说的 jstack 命令,找到 {“threaddump”, thread_dump } 的映射关系,然后执行 thread_dump 方法
再来看看其要调用的 AttachListener::dequeue (),
AttachOperation* AttachListener::dequeue() {
  JavaThread* thread = JavaThread::current();
  ThreadBlockInVM tbivm(thread);

  thread->set_suspend_equivalent();
  // cleared by handle_special_suspend_equivalent_condition() or
  // java_suspend_self() via check_and_wait_while_suspended()

  AttachOperation* op = LinuxAttachListener::dequeue();

  // were we externally suspended while we were waiting?
  thread->check_and_wait_while_suspended();

  return op;
}
最终调用的是 LinuxAttachListener::dequeue (),
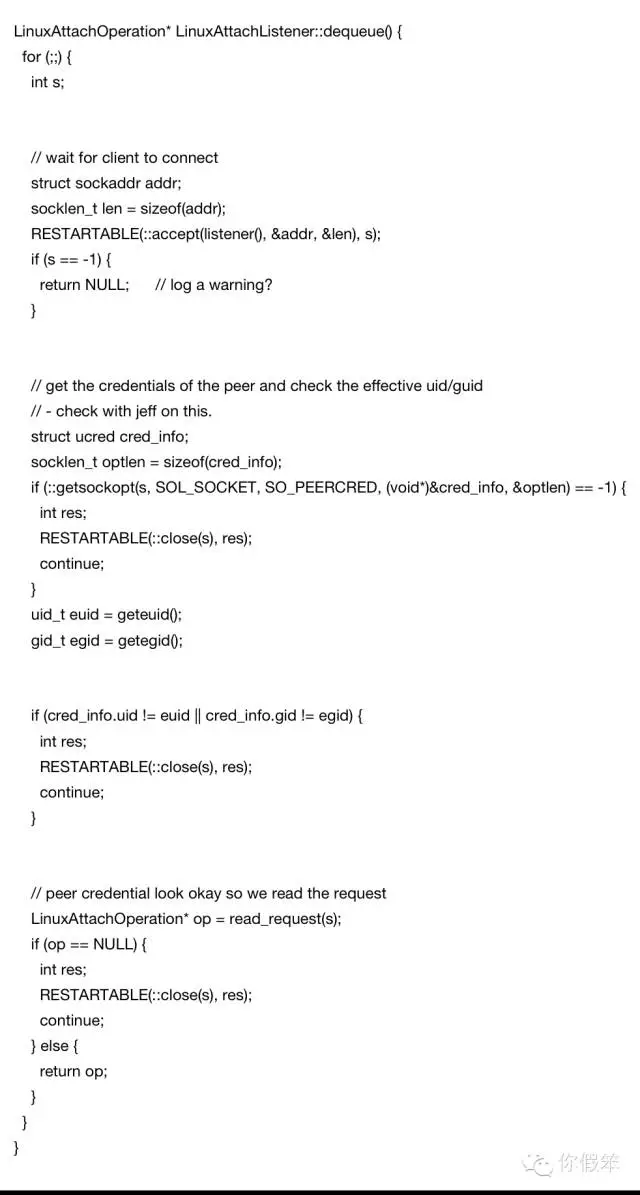
我们看到如果没有请求的话,会一直 accept 在那里,当来了请求,然后就会创建一个套接字,并读取数据,构建出 LinuxAttachOperation 返回并执行。
整个过程就这样了,从 Attach 线程创建到接收请求,处理请求。
一起来学习吧: 记一次微服务耗时毛刺排查
关于gin 源码分析之路由实现和gin路由原理的介绍已经告一段落,感谢您的耐心阅读,如果想了解更多关于@angular/router 源码分析之注册路由、Flink 源码分析之 Client 解析流程分析、illuminate/routing 源码分析之注册路由、JVM 源码分析之 Attach 机制实现完全解读的相关信息,请在本站寻找。
本文标签:


